Untuk setiap perubahan yang Anda buat dan komit, Anda harus menyediakan pesan log untuk perubahan itu. Dengan cara itu nantinya Anda bisa menemukan perubahan apa yang telah dibuat dan mengapa, dan Anda mempunyai log detil atas proses pengembangan Anda.
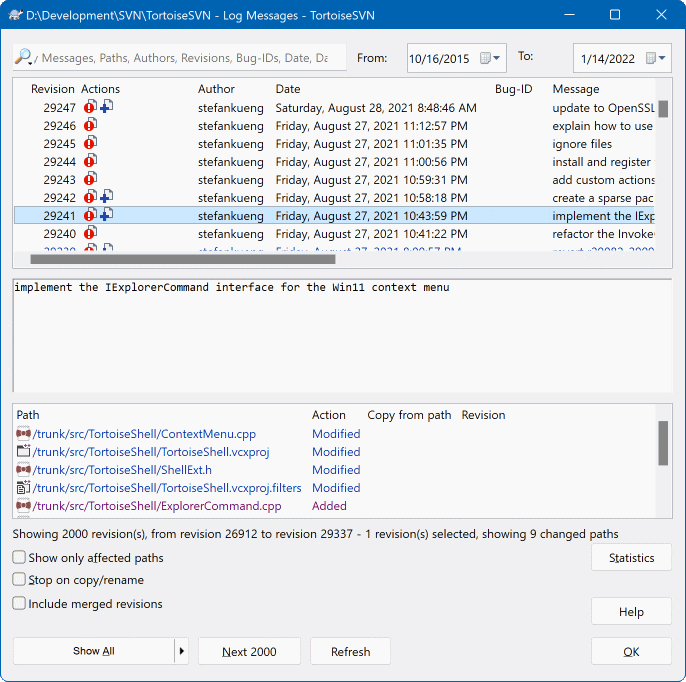
Dialog Log Revisi mengambil semua pesan log itu dan menampilkannya untuk Anda. Tampilan menjadi 3 pane.
Pane atas menampilkan daftar revisi dimana perubahan terhadap file/folder sudah dikomit. Ringkasan ini menyertakan tanggal dan jam, orang yang mengkomit revisi dan awal dari pesan log.
Baris yang ditampilkan dalam warna biru menunjukan bahwa sesuatu telah dicopy ke baris pengembangan ini (mungkin dari cabang).
Pane tengah menampilkan pesan log lengkap untuk revisi yang dipilih.
Pane bawah menampilkan daftar semua file dan folder yang sudah diubah sebagai bagian dari revisi yang dipilih.
Tapi ia lebih dari itu - ia menyediakan perintah menu konteks yang bisa Anda gunakan untuk mendapatkan bahkan lebih banyak informasi tentang histori proyek.
Ada beberapa tempat dari dimana Anda bisa menampilkan dialog Log:
Dari submenu konteks TortoiseSVN
Dari halaman properti
Dari dialog progres setelah pemutahiran selesai. Maka dialog Log hanya menampilkan revisi itu yang diubah sejak pemutahiran Anda yang terakhir
From the repository browser
Apabila repositori tidak tersedia anda akan melihat dialog Apakah anda ingin offline?, seperti pada bagian bernama “Offline Mode”.
The top pane has an Actions column containing icons that summarize what has been done in that revision. There are four different icons, each shown in its own column.

If a revision modified a file or directory, the modified icon is shown in the first column.

If a revision added a file or directory, the added icon is shown in the second column.

If a revision deleted a file or directory, the deleted icon is shown in the third column.

If a revision replaced a file or directory, the replaced icon is shown in the fourth column.

If a revision moved or renamed a file or directory, the moved icon is shown in the fourth column.

If a revision replaced a file or directory by moving/renaming it, the move replaced icon is shown in the fourth column.

If a revision merged a file or directory, the merged icon is shown in the fourth column.

If a revision reverse merged a file or directory, the reverse merged icon is shown in the fourth column.
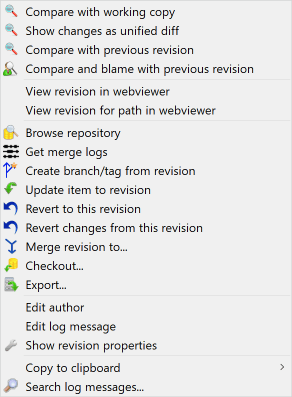
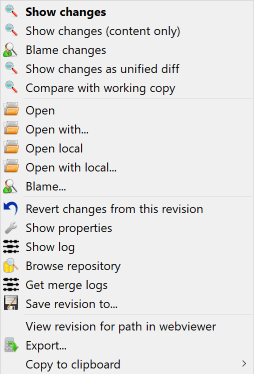
The top pane of the Log dialog has a context menu that allows you to access much more information. Some of these menu entries appear only when the log is shown for a file, and some only when the log is shown for a folder.
- Compare with working copy
Membandingkan revisi yang dipilih dengan copy pekerjaan Anda. Piranti-Diff standar adalah TortoiseMerge yang disertakan dengan TortoiseSVN. Jika dialog log adalah untuk folder, ini akan memperlihatkan kepada Anda daftar dari file yang diubah, dan membolehkan Anda untuk meninjau ulang perubahan yang dibuat ke setiap file secara individu.
- Compare and blame with working BASE
Blame the selected revision, and the file in your working BASE and compare the blame reports using a visual diff tool. Read bagian bernama “Blame Perbedaan” for more detail. (files only)
- Show changes as unified diff
Melihat perubahan yang dibuat dalam revisi yang dipilih sebagai fileUnified-Diff (GNU patch format). Ini memperlihatkan hanya perbedaan dengan beberapa baris dari konteks. Ini lebih sulit untuk dibaca daripada perbandingan file visual, tapi akan menampilkan semua perubahan file sekaligus dalam format yang kompak.
If you hold down the Shift key when clicking on the menu item, a dialog shows up first where you can set options for the unified diff. These options include the ability to ignore changes in line endings and whitespaces.
- Bandingkan dengan revisi sebelumnya
Compare the selected revision with the previous revision. This works in a similar manner to comparing with your working copy. For folders this option will first show the changed files dialog allowing you to select files to compare.
- Bandingkan dan salahkan dengan revisi sebelumnya
Show the changed files dialog allowing you to select files. Blame the selected revision, and the previous revision, and compare the results using a visual diff tool. (folders only)
- Save revision to...
Save the selected revision to a file so you have an older version of that file. (files only)
- Open / Open with...
Open the selected file, either with the default viewer for that file type, or with a program you choose. (files only)
- Salahkan...
Blame the file up to the selected revision. (files only)
- Browse repository
Open the repository browser to examine the selected file or folder in the repository as it was at the selected revision.
- Create branch/tag from revision
Create a branch or tag from a selected revision. This is useful e.g. if you forgot to create a tag and already committed some changes which weren't supposed to get into that release.
- Update item to revision
Update your working copy to the selected revision. Useful if you want to have your working copy reflect a time in the past, or if there have been further commits to the repository and you want to update your working copy one step at a time. It is best to update a whole directory in your working copy, not just one file, otherwise your working copy could be inconsistent.
If you want to undo an earlier change permanently, use Revert to this revision instead.
- Revert to this revision
Revert to an earlier revision. If you have made several changes, and then decide that you really want to go back to how things were in revision N, this is the command you need. The changes are undone in your working copy so this operation does not affect the repository until you commit the changes. Note that this will undo all changes made after the selected revision, replacing the file/folder with the earlier version.
If your working copy is in an unmodified state, after you perform this action your working copy will show as modified. If you already have local changes, this command will merge the undo changes into your working copy.
What is happening internally is that Subversion performs a reverse merge of all the changes made after the selected revision, undoing the effect of those previous commits.
If after performing this action you decide that you want to undo the undo and get your working copy back to its previous unmodified state, you should use → from within Windows Explorer, which will discard the local modifications made by this reverse merge action.
If you simply want to see what a file or folder looked like at an earlier revision, use Update to revision or Save revision as... instead.
- Revert changes from this revision
Undo changes from which were made in the selected revision. The changes are undone in your working copy so this operation does not affect the repository at all! Note that this will undo the changes made in that revision only; it does not replace your working copy with the entire file at the earlier revision. This is very useful for undoing an earlier change when other unrelated changes have been made since.
If your working copy is in an unmodified state, after you perform this action your working copy will show as modified. If you already have local changes, this command will merge the undo changes into your working copy.
What is happening internally is that Subversion performs a reverse merge of that one revision, undoing its effect from a previous commit.
You can undo the undo as described above in Revert to this revision.
- Gabung revisi ke...
Merge the selected revision(s) into a different working copy. A folder selection dialog allows you to choose the working copy to merge into, but after that there is no confirmation dialog, nor any opportunity to try a test merge. It is a good idea to merge into an unmodified working copy so that you can revert the changes if it doesn't work out! This is a useful feature if you want to merge selected revisions from one branch to another.
- Checkout...
Melakukan suatu checkout baru dari folder terpilih pada revisi terpilih. Hal ini akan menampilkan suatu dialog di mana Anda dapat mengkonfirmasi URL dan revisi tersebut dan memilih sebuah lokasi untuk checkout itu.
- Export...
Mengekspor file/folder terpilih pada revisi terpilih. Hal ini akan menampilkan suatu dialog dimana Anda dapat mengkonfirmasi URL dan revisi tersebut dan memilih sebuah lokasi untuk ekspor itu.
- Edit author / log message
Mengedit pesan log atau pembuat yang terlampir ke komit sebelumnya. Baca bagian bernama “Mengubah Pesan Log dan Pembuat” untuk mengetahui bagaimana ini bekerja.
- Tampilkan properti-properti revisi
View and edit any revision property, not just log message and author. Refer to bagian bernama “Mengubah Pesan Log dan Pembuat”.
- Copy ke clipboard
Menyalin rincian log dari revisi-revisi terpilih ke clipboard. Tindakan ini akan menyalin nomor revisi, pengarang, tanggal, pesan log dan daftar hal-hal yang berubah untuk setiap revisi.
- Search log messages...
Mencari pesan log untuk teks yang Anda masukan. Ini mencari pesan log yang Anda masukan dan juga ringkasan tindakan yang dibuat oleh Subversion (ditampilkan dalam pane bawah). Pencarian tidak sensitif huruf.
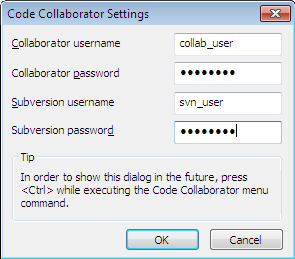
- Create code collaborator review...
This menu is shown only if the SmartBear code collaborator tool is installed. When invoked for the first time, a dialog is shown prompting the user to enter user credentials for both code collaborator and SVN. Once the settings are stored, the settings dialog is no longer shown when the menu is invoked, unless the user holds Ctrl while executing the menu item. The configuration and the chosen revision(s) are used to invoke the code collaborator graphical user interface client, which creates a new review with the selected revisions.
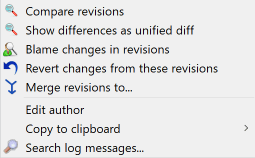
Jika Anda memilih dua revisi sekaligus (menggunakan Ctrl-modifier biasa), menu konteks berubah dan memberikan opsi lebih sedikit:
- Compare revisions
Membandingkan dua revisi yang dipilih menggunkan piranti pembeda visual. Piranti-Diff standar adalah TortoiseMerge yang disertakan dengan TortoiseSVN.
Jika Anda memilih opsi ini untuk folder, dialog selanjutnya muncul mendaftarkan file yang diubah dan menawarkan opsi diff berikutnya. Baca tentang dialog Membandingkan Revisi dalam bagian bernama “Membandingkan Folder”.
- Blame revisions
Blame the two revisions and compare the blame reports using a visual difference tool. Read bagian bernama “Blame Perbedaan” for more detail.
- Show differences as unified diff
Melihat perbedaan antara dua revisi yang dipilih sebagai file Unified-Diff. Pekerjaan ini untuk file dan folder.
- Copy ke clipboard
Cari pesan log seperti dijelaskan di atas.
- Search log messages...
Cari pesan log seperti dijelaskan di atas.
If you select two or more revisions (using the usual Ctrl or Shift modifiers), the context menu will include an entry to Revert all changes which were made in the selected revisions. This is the easiest way to rollback a group of revisions in one go.
You can also choose to merge the selected revisions to another working copy, as described above.
If all selected revisions have the same author, you can edit the author of all those revisions in one go.
The bottom pane of the Log dialog also has a context menu that allows you to
- Show changes
Show changes made in the selected revision for the selected file.
- Blame changes
Blame the selected revision and the previous revision for the selected file, and compare the blame reports using a visual diff tool. Read bagian bernama “Blame Perbedaan” for more detail.
- Show as unified diff
Show file changes in unified diff format. This context menu is only available for files shown as modified.
- Open / Open with...
Membuka file yang dipilih, baik dengan peninjau standar untuk tipe file itu, ataupun dengan program yang Anda sukai.
- Salahkan...
Opens the Blame dialog, allowing you to blame up to the selected revision.
- Revert changes from this revision
Memulihkan perubahan yang dibuat untuk file terpilih dalam revisi itu.
- Show properties
Melihat properti Subversion untuk item yang dipilih.
- Show log
Menampilkan log revisi untuk file tunggal yang dipilih.
- Dapatkan log penggabungan
Show the revision log for the selected single file, including merged changes. Find out more in bagian bernama “Merge Tracking Features”.
- Save revision to...
Menyimpan revisi yang dipilih ke file agar Anda mempunyai versi lama dari file itu.
- Export...
Export the selected items in this revision to a folder, preserving the file hierarchy.
When multiple files are selected in the bottom pane of the Log dialog, the context menu changes to the following:
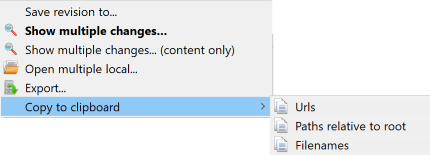
- Save revision to...
Menyimpan revisi yang dipilih ke file agar Anda mempunyai versi lama dari file itu.
- Show multiple changes...
Show changes made in the selected revision for the selected files. Note that the show changes functionality is invoked multiple times, which may bring up multiple copies of your selected diff tool, or just add a new comparison tab in your diff tool. If you have selected more than 15 files, you will be prompted to confirm the action.
- Open multiple local...
This will open local working copy files that correspond to your selected files using the application that is registered for the extension. [The behavior is the one you would get double-clicking the working-copy file(s) in Windows explorer]. Depending on how your file extension is associated to an application and the capabilities of the application, this may be a slow operation. In the worst case, new instances of the application may be launched by Windows for each file that was selected.
If you hold Ctrl while invoking this command, the working copy files are always loaded into Visual Studio. This only works when the following conditions are met: Visual Studio must be running in the same user context while having the same process integrity level [running as admin or not] as TortoiseProc.exe. It may be desirable to have the solution containing the changed files loaded, although this is not strictly necessary. Only files that exist on disk with extensions [.cpp, .h, .cs, .rc, .resx, .xaml, .js, .html, .htm, .asp, .aspx, .php, .css and .xml] will be loaded. A maximum of 100 files can be loaded into Visual Studio at one time, and the files are always loaded as new tabs into the currently open instance of Visual Studio. The benefit of reviewing code changes in Visual Studio lies in the fact that you can then use the built-in code navigation, reference finding, static code analysis and other tools built into Visual Studio.
- Export...
Export the selected files/folder at the selected revision. This brings up a dialog for you to confirm the URL and revision, and select a location for the export.
Tip
You may notice that sometimes we refer to changes and other times to differences. What's the difference?
Subversion uses revision numbers to mean 2 different things. A revision generally represents the state of the repository at a point in time, but it can also be used to represent the changeset which created that revision, e.g. “Done in r1234” means that the changes committed in r1234 implement feature X. To make it clearer which sense is being used, we use two different terms.
If you select two revisions N and M, the context menu will offer to show the difference between those two revisions. In Subversion terms this is diff -r M:N.
If you select a single revision N, the context menu will offer to show the changes made in that revision. In Subversion terms this is diff -r N-1:N or diff -c N.
The bottom pane shows the files changed in all selected revisions, so the context menu always offers to show changes.
Dialog Log tidak selalu menampilkan semua perubahan yang dibuat untuk sejumlah alasan:
For a large repository there may be hundreds or even thousands of changes and fetching them all could take a long time. Normally you are only interested in the more recent changes. By default, the number of log messages fetched is limited to 100, but you can change this value in → (bagian bernama “Seting Dialog TortoiseSVN 1”),
Ketika kotak Hentikan copy/ganti nama dicentang, Tampilkan Log akan berhenti pada titik file atau folder yang dipilih dari mana saja di dalam repositori. Ini bisa berguna saat pencarian di cabang (atau tag) karena ia berhenti di akar dari cabang itu, dan memberikan indikasi cepat dari perubahan hanya dalam cabang itu.
Biasanya Anda ingin membiarkan opsi ini tidak dicentang. TortoiseSVN mengingat kondisi dari kotak centang, maka ia akan menghormati preferensi Anda.
Ketika dialog Tampilkan Log diminta dari dalam dialog Merge, secara bawaan kotak itu selalu dicentang. Ini dikarenakan penggabungan adalah paling sering mencari perubahan pada cabang, dan kembali diluar akar dari cabang tidak masuk akal dalam kejadian itu.
Catatan bahwa Subversion saat ini mengimplementasi penggantian nama sebagai pasangan copy/hapus, maka mengganti nama file atau folder juga akan menyebabkan tampilan log berhenti jika opsi ini dicentang.
Jika Anda ingin melihat log pesan lebih, klik untuk mengambil 100 pesan log berikutnya. Anda bisa mengulang ini sebanyak yang Anda butuhkan.
Disebelah tombol ini ada tombol multi-fungsi yang mengingat opsi terakhir yang Anda gunakan. Klik pada panah untuk melihat opsi lain yang ditawarkan.
Gunakan jika Anda ingin meninjau jangkauan revisi tertentu. Dialog akan meminta Anda untuk memasukan awal dan akhir revisi.
Gunakan jika Anda ingin melihat semua pesan log dari HEAD kembali ke revisi 1.
To refresh the latest revision in case there were other commits while the log dialog was open, hit the F5 key.
To refresh the log cache, hit the Ctrl-F5 keys.
Because the log dialog shows you the log from HEAD, not from the current working copy revision, it often happens that there are log messages shown for content which has not yet been updated in your working copy. To help make this clearer, the commit message which corresponds to the revision you have in your working copy is shown in bold.
When you show the log for a folder the revision highlighted is the highest revision found anywhere within that folder, which requires a crawl of the working copy. The crawl takes place within a separate thread so as not to delay showing the log, but as a result highlighting for folders may not appear immediately.
Subversion 1.5 and later keeps a record of merges using properties. This allows us to get a more detailed history of merged changes. For example, if you develop a new feature on a branch and then merge that branch back to trunk, the feature development will show up on the trunk log as a single commit for the merge, even though there may have been 1000 commits during branch development.
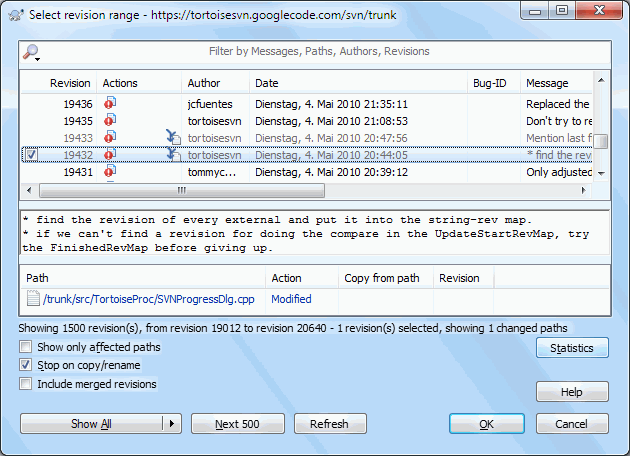
If you want to see the detail of which revisions were merged as part of that commit, use the Include merged revisions checkbox. This will fetch the log messages again, but will also interleave the log messages from revisions which were merged. Merged revisions are shown in grey because they represent changes made on a different part of the tree.
Of course, merging is never simple! During feature development on the branch there will probably be occasional merges back from trunk to keep the branch in sync with the main line code. So the merge history of the branch will also include another layer of merge history. These different layers are shown in the log dialog using indentation levels.
Revision properties are completely different from the Subversion properties of each item. Revprops are descriptive items which are associated with one specific revision number in the repository, such as log message, commit date and committer name (author).
Ada kalanya Anda mungkin ingin mengubah pesan log yang pernah Anda masukan, mungkin karena ada kesalahan ejaan didalamnya atau Anda ingin meningkatkan pesan atau mengubahnya untuk alasan lain. Atau Anda ingin mengubah pembuat dari komit karena Anda lupa untuk menyiapkan otentikasi atau ...
Subversion lets you change revision properties any time you want. But since such changes can't be undone (those changes are not versioned) this feature is disabled by default. To make this work, you must set up a pre-revprop-change hook. Please refer to the chapter on Hook Scripts in the Subversion Book for details about how to do that. Read bagian bernama “Server side hook scripts” to find some further notes on implementing hooks on a Windows machine.
Once you've set up your server with the required hooks, you can change the author and log message (or any other revprop) of any revision, using the context menu from the top pane of the Log dialog. You can also edit a log message using the context menu for the middle pane.
Awas
Karena properti revisi Subversion tidak diversi, membuat perubahan ke properti demikian (sebagai contoh, properti pesan komit svn:log) akan menimpa nilai sebelumnya dari properti itu selamanya.
Penting
Since TortoiseSVN keeps a cache of all the log information, edits made for author and log messages will only show up on your local installation. Other users using TortoiseSVN will still see the cached (old) authors and log messages until they refresh the log cache. Refer to bagian bernama “Refreshing the View”
Jika Anda ingin membatasi pesan log untuk ditampilkan hanya yang menarik bagi Anda daripada menggulung melalui daftar ratusan, Anda bisa menggunakan kontrol filter di atas dari Dialog Log. Kontrol awal dan akhir tanggal membolehkan Anda untuk membatasi output ke jangkauan tanggal yang diketahui. Kotak pencarian membolehkan Anda untuk menampilkan hanya pesan yang berisi frase tertentu.
Click on the search icon to select which information you want to search in, and to choose regex mode. Normally you will only need a simple sub-string search, but if you need to more flexible search terms, you can use regular expressions. If you hover the mouse over the box, a tooltip will give hints on how to use the regex functions, or the sub-string functions. The filter works by checking whether your filter string matches the log entries, and then only those entries which match the filter string are shown.
Simple sub-string search works in a manner similar to a search engine. Strings to search for are separated by spaces, and all strings must match. You can use a leading - to specify that a particular sub-string is not found (invert matching for that term), and you can use ! at the start of the expression to invert matching for the entire expression. You can use a leading + to specify that a sub-string should be included, even if previously excluded with a -. Note that the order of inclusion/exclusion is significant here. You can use quote marks to surround a string which must contain spaces, and if you want to search for a literal quotation mark you can use two quotation marks together as a self-escaping sequence. Note that the backslash character is not used as an escape character and has no special significance in simple sub-string searches. Examples will make this easier:
Alice Bob -Eve
searches for strings containing both Alice and Bob but not Eve
Alice -Bob +Eve
searches for strings containing both Alice but not Bob, or strings which contain Eve.
-Case +SpecialCase
searches for strings which do not contain Case, but still include strings which contain SpecialCase.
!Alice Bob
searches for strings which do not contain both Alice and Bob
!-Alice -Bob
do you remember De Morgan's theorem? NOT(NOT Alice AND NOT Bob) reduces to (Alice OR Bob).
"Alice and Bob"
searches for the literal expression “Alice and Bob”
""
searches for a double-quote anywhere in the text
"Alice says ""hi"" to Bob"
searches for the literal expression “Alice says "hi" to Bob”.
Describing the use of regular expression searches is beyond the scope of this manual, but you can find online documentation and a tutorial at http://www.regular-expressions.info/.
Catatan bahwa filter ini bertindak pada pesan yang sudah diterima. Mereka tidak mengontrol pengambilan pesan dari repositori.
You can also filter the path names in the bottom pane using the Show only affected paths checkbox. Affected paths are those which contain the path used to display the log. If you fetch the log for a folder, that means anything in that folder or below it. For a file it means just that one file. Normally the path list shows any other paths which are affected by the same commit, but in grey. If the box is checked, those paths are hidden.
Sometimes your working practices will require log messages to follow a particular format, which means that the text describing the changes is not visible in the abbreviated summary shown in the top pane. The property tsvn:logsummary can be used to extract a portion of the log message to be shown in the top pane. Read bagian bernama “TortoiseSVN Project Properties” to find out how to use this property.
No Log Formatting from Repository Browser
Because the formatting depends upon accessing Subversion properties, you will only see the results when using a checked out working copy. Fetching properties remotely is a slow operation, so you will not see this feature in action from the repo browser.
Tombol memunculkan kotak yang menampilkan beberapa informasi menarik tentang revisi yang ditampikan dalam dialog Log. Ini menampilkan berapa banyak pembuat sudah bekerja, berapa banyak komit yang telah dibuat, kemajuan dengan minggu, dan masih banyak lagi. Sekarang Anda bisa melihat sekaligus siap yang sudah bekerja paling keras dan siapa yang malas ;-)
Halaman ini memberikan Anda semua angka yang bisa Anda pikirkan dalam periode dan jumlah revisi tertentu yang ditemukan, dan beberapa nilai min/max/rata-rata.

Grafik ini memperlihatkan kepada Anda pembuat yang aktif pada proyek sebagai histogram sederhana, histogram bertumpuk atau pie chart.
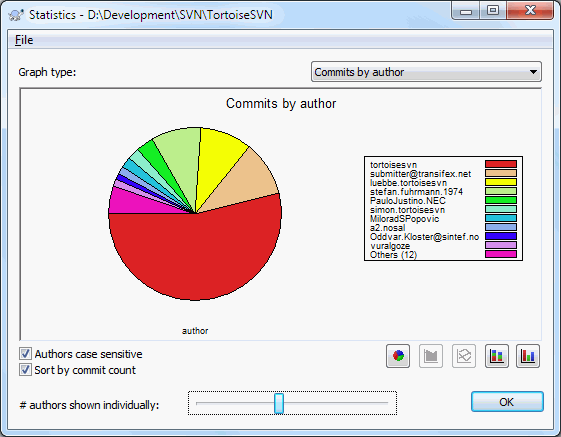
Where there are a few major authors and many minor contributors, the number of tiny segments can make the graph more difficult to read. The slider at the bottom allows you to set a threshold (as a percentage of total commits) below which any activity is grouped into an Others category.
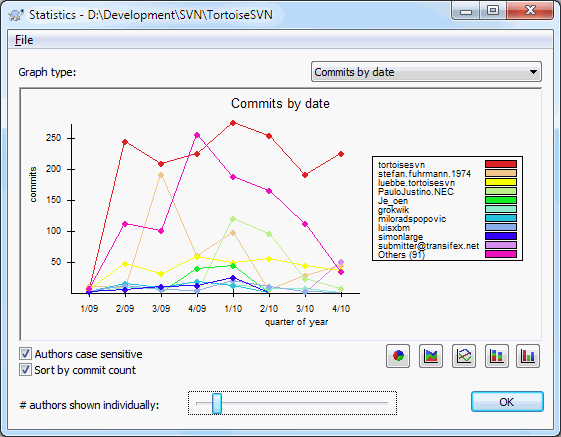
Halaman ini memberikan gambaran grafis dari aktivitas proyek dalam batasan jumlah komit dan pembuat. Ini memberikan ide kapan proyek dikerjakan, dan siapa yang mengerjakannya pada waktu kapan.
Ketika ada beberapa pembuat, Anda akan mendapatkan banyak baris pada grafik. Ada dua tampilan tersedia disini: normal, dimana setiap aktivitas pembuat relatif ke baris base, dan ditumpuk, dimana aktivitas pembuat relatif ke baris dibawahnya. Opsi terakhir menghindari baris saling silang, yang bisa membuat grafik mudah untuk dibaca, tapi kurang mudah bagi satu output pembuat.
By default the analysis is case-sensitive, so users PeterEgan and PeteRegan are treated as different authors. However, in many cases user names are not case-sensitive, and are sometimes entered inconsistently, so you may want DavidMorgan and davidmorgan to be treated as the same person. Use the Authors case insensitive checkbox to control how this is handled.
Catatan bahwa statistik mencakup periode yang sama dengan dialog Log. Jika itu hanya menampilkan satu revisi maka statistik tidak akan memberitahu lebih banyak.
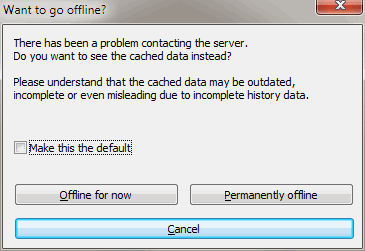
If the server is not reachable, and you have log caching enabled you can use the log dialog and revision graph in offline mode. This uses data from the cache, which allows you to continue working although the information may not be up-to-date or even complete.
Here you have three options:
- Offline for now
Complete the current operation in offline mode, but retry the repository next time log data is requested.
- Permanently offline
Remain in offline mode until a repository check is specifically requested. See bagian bernama “Refreshing the View”.
- Batal
If you don't want to continue the operation with possibly stale data, just cancel.
The Make this the default checkbox prevents this dialog from re-appearing and always picks the option you choose next. You can still change (or remove) the default after doing this from → .
If you want to check the server again for newer log messages, you can simply refresh the view using F5. If you are using the log cache (enabled by default), this will check the repository for newer messages and fetch only the new ones. If the log cache was in offline mode, this will also attempt to go back online.
If you are using the log cache and you think the message content or author may have changed, you can use Shift-F5 or Ctrl-F5 to re-fetch the displayed messages from the server and update the log cache. Note that this only affects messages currently shown and does not invalidate the entire cache for that repository.