Table of Contents
List of Figures
- 1.1. File Conflict
- 2.1. File Conflict
- 3.1. One Pane View
- 3.2. Two Pane View
- 3.3. Three Pane View
- 3.4. Patch File List
- 3.5. The Open Dialog
- 3.6. The Settings Main Page
- 3.7. The Settings Color Page
List of Tables
Table of Contents
When working on a project, either an open-source project where several people review your code, or a commercial project where you sell a component with your source code, there will be people and customers who find bugs or want to improve your project. To do that they send you patches which you have to review and decide if you want to apply them.
TortoiseMerge helps you with both those tasks:
Reviewing patches
Applying the patches
TortoiseMerge also helps you to sort out conflicted files which can occur if you're working with a source control system and others are working on the same files as you.
TortoiseMerge is free. You don't have to pay for it, you can use it any way you want. It is developed under the GP license (GPL).
TortoiseMerge is an Open Source project. That means you have full
read access to the source code of this program. You can browse it
on this link
https://sourceforge.net/p/tortoisesvn/code/HEAD/tree
.
The most recent version (where we're currently working) is located under
/trunk/,
and the released versions are located under
/tags/.
- Stefan Küng
for the hard work on TortoiseMerge
- Lübbe Onken
for the beautiful icons, logo, bug hunting and taking care of the documentation
- The Tigris Style project
for some of the styles which are reused in this documentation
- Our Contributors
for the patches, bug reports and new ideas, and for helping others by answering questions on our mailing list.
- Our Donators
for many hours of joy with the music they sent us

Table of Contents
TortoiseMerge is a free/open-source application. It lets you see differences in text files, merge those changes and even review and apply unified diff files, often called patches.
While working on text files, e.g. source files in your favourite programming language, or html/xml files for your documentation or website, you will often have a situation where you need to compare different versions of those files. Sometimes you get a different version from someone else, sometimes you just want to see the changes you've made.
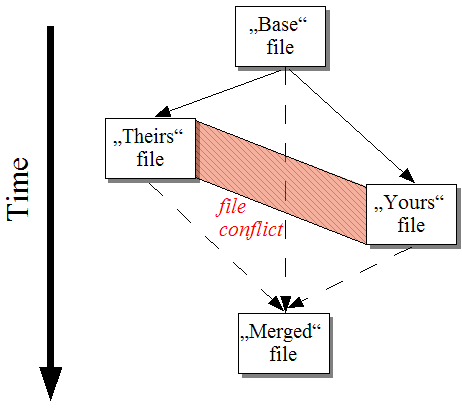
If you're working with a version control system (e.g. Subversion) then you sometimes get conflicts when you update your working copy. This happens if someone else changed the same parts of the file you're currently working on as you did. Then you have to resolve those conflicts manually. This is where TortoiseMerge can help you.
The following diagram shows you the relationships between the files involved in a conflict:
While working on TortoiseSVN we found that whenever users sent in patches to enhance the project or just to fix bugs, we had a lot of work just applying those patches. And many times those patches were outdated and couldn't be applied with the command line patch tool https://unxutils.sourceforge.net/ because we were working on those files and had sometimes changed those files already.
This was also the main reason why TortoiseSVN did not originally have a → implemented: we preferred users to send us the whole files because with those it was easier to apply patches.
So we spent a lot of time, searching the Internet for a GUI tool which could apply patch files, but all we found was that such a tool didn't exist. So to cut a long story short: We decided that if no-one else could provide such a tool we would have to write our own. That's when TortoiseMerge was born.
Since TortoiseSVN already uses the Subversion library, which has a nice diffing engine built in, it was just natural to use this library instead of the GNU diff.
Subversion 1.7 introduced the svn patch command which allows to apply a patch file to a working copy. TortoiseMerge uses now the same functions as the Subversion command to avoid different behaviors between the two.
Table of Contents
TortoiseMerge has several different uses:
Viewing the difference between two files and merging changes into one of them, or removing unwanted changes.
Editing conflicts between local changes and changes in the Subversion repository following an update.
Applying patch files and reviewing them.
In this mode you are comparing two files. The file in the left pane is considered to be the original file (sometimes referred to as Theirs, and the file in the right pane is the modified file (sometimes referred to as Mine.
You can make simple line-based changes to the file in the right pane which include:
Reverting changed lines back to the text shown in the left pane.
Using a combination of both blocks, either Theirs before Mine or Mine before Theirs.
You can also edit the file in the right pane just as you would in a text editor. Such lines are marked using a pencil icon. Please note that if you want to make any of the line/block-based changes described above, it is better to do those first since once you start editing the file yourself it becomes impossible for TortoiseMerge to keep track of the relationship to the original files.
This is sometimes referred to as a three-way merge, and is shown in three panes. However there are actually four files involved. The file which is not shown is the common base file, the last common ancestor of the two files which are now in conflict. The relationships between the three files are explained in the diagram below:
The base file represents the oldest version of a file, from where You and They start making changes. Mine represents the base file with all the changes you made, and Theirs is the file with all the changes someone else made to the file. The left pane shows the changes in Theirs relative to the base file and the right pane shows the changes in Mine relative to the base file. The bottom pane is the output file which is where you are trying to resolve the conflicts.
In conflict resolution view, you can choose to use blocks from Mine or Theirs or both. But in this case, the changes are shown in the bottom pane.
A patch file is a Subversion unified diff file, which contains the information required to apply changes to a set of files. The patch may have been supplied by another developer so that you can see changes he has made and possibly commit them to the repository. Or it may have been generated internally by TortoiseSVN when comparing two folders. This happens when you compare a repository revision with your working copy folder, or if you compare two different repository revisions, or if you compare two different repository paths.
In either case TortoiseMerge will show a small window listing the files included in the patch. By double clicking on one of these files you fetch the relevant file and apply the changes. The left pane shows the original file content and the right pane shows it after the patch is applied.
You can edit the file in the right pane exactly as you would in compare/edit mode.
Table of Contents
TortoiseMerge has three main viewing modes: one-pane, two-pane and three-pane view. One/two-pane view is used to view changes and three-pane view is used to resolve conflicts.

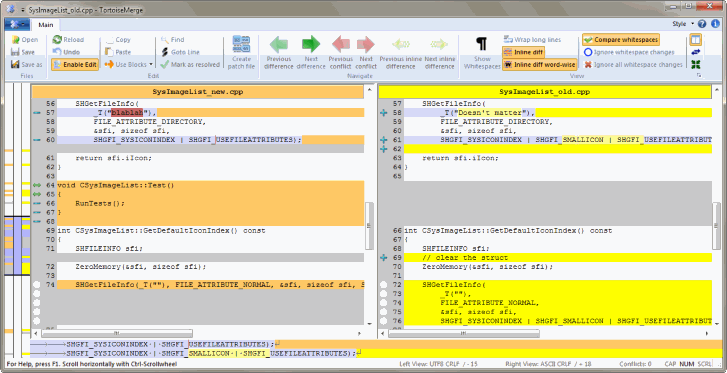
The two pane view has some features which are not available in the one pane view:
Changes inside the modified lines are shown in different colors. Added string parts are shown with a lighter color, but you can of course configure the colors used here. Removed parts are indicated with a dark brown vertical line in the string. Check out the screenshot above to see how this works.
Code reorganization usually means a lot of changes in whitespaces (space, tab, newlines) but no actual code change. For example, you split up a very long line into several lines, or you sometimes compact several lines together into one.
Such changes are marked with a white circle symbol on the left side of the views. If you see such a white circle, you know immediately that no real code change is there and you don't have to check the changed block further.
Hand editing of the file in the right pane is possible in two-pane view. Such changes are marked with a pencil symbol. Hand editing of the file in the left pane is also possible, only when is pressed when the left pane is active.
If you want to compare/merge three files, TortoiseMerge will show you the differences in a three pane view. This view is also used if you need to resolve conflicted files.
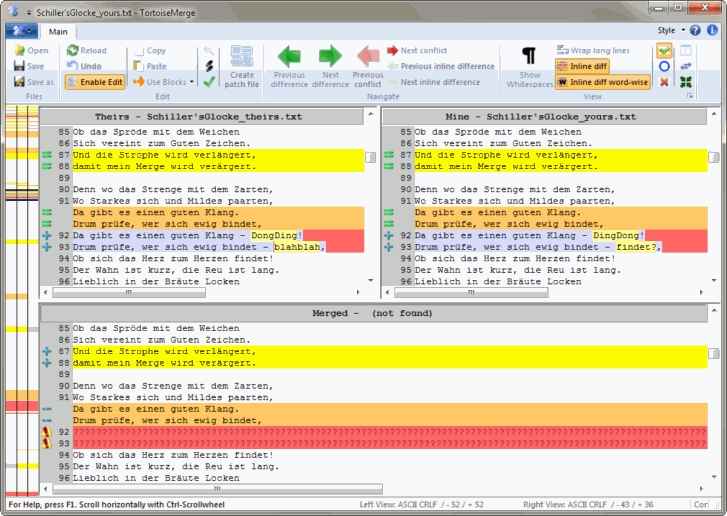
The left pane shows you the differences between Their file and the Base file, while the right pane shows you the differences between Mine file and the Base file. The bottom pane shows you the result of merging Base, Mine and Theirs with possible conflicts.
If you hover the mouse over the pane title, a tooltip will show the filenames used for the diff in each pane.
Hand editing of the file in the left pane or right pane is also possible, only when is pressed when that pane is active.
After TortoiseMerge parses the patch file it will show you a small window with all the files which have changes according to the patch file.
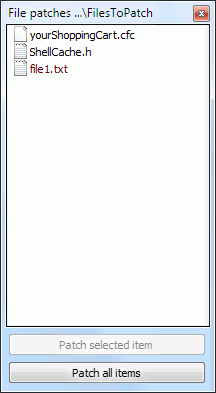
If the filename is shown in black, then the patch can be applied
without any problems. That means the file is not outdated
according to the patch.
However, if the filename is shown in red, then the patch can't
get applied directly because you already changed that file.
The patch file window has a context menu which allows you to preview the effect of the patch on the current file (apply without saving), to apply and save the changes for the selected file, or to apply and save changes to all files in the list. The double click action is to preview.
Depending on your setting, you either see a toolbar or a ribbon with many buttons. The buttons all show a tooltip explaining their function when you hover the mouse pointer over them.
On the left side of the window is a locator bar. This provides a quick visual reference as to where the changes lie within the file. The bar has three columns. The left column refers to the left pane, the right column to the right pane, and the centre column to the bottom pane (if present). In one-pane view only the left column is used. The locator bar can also be used as a scroll bar to scroll all the windows simultaneously.
If you double click on a word then every occurrence of that word will be highlighted throughout the document, both in the main panes and the locator bar. Double click on the word again to remove the highlighting.
If you click in the left margin, or if you triple click within a line, that whole line will be selected.
Below the bottom window is the status bar. This shows the number of
lines added and deleted in Theirs and
Mine, and the number of unresolved
conflicts remaining.
The status bar also contains combo box controls which indicate how the files are handled and treated:
- Encoding
The encoding specifies how the characters in the views are loaded/saved and shown. The most common encoding in English is ASCII (which means the local encoding of the OS language), but you can change this to be UTF8, UTF16LE, UTF16BE, UTF32LE and UTF32BE, both with or without a byte order mark (BOM).
- Line Endings
The most common line endings on Windows is CRLF, but you can change the line endings to whatever you like. Note that if you change the line endings, then all line endings in the whole file will change, even if when loaded the line endings were not all the same.
- Tabs
The option at the top of the combo box menu indicates whether tabs or spaces are inserted when you press the tab key. The smart tab char option if enabled uses an algorithm to determine whether one or the other is best used.
The tab size specifies how many space chars are inserted when editing and pressing the tab char, or how many chars the next word is indented when a tab char is encountered.
Changed lines are marked with an icon to indicate what type of change has occurred.

A line has been added.

A line has been removed.

A change has been undone by reverting to the original content of the line.

This line contains only whitespace changes. Where several consecutive lines are marked, the paragraph may have been re-wrapped, causing words to shuffle onto adjacent lines.

A line has been edited by hand, using TortoiseMerge as a text editor.

This line is in conflict.

This line is conflicted, but the effect is hidden by whitespace or line-ending settings.

This line is detected as being moved from / to another location.
TortoiseMerge not only shows you the differences between files but also lets you resolve conflicts or apply changes.
If you're in two pane view, then you can only edit the file in the
right pane (Mine). To apply changes made in the
left file (Theirs),
right click on the changed lines and select
→ .
Then the changes from the left file are added to the right file.
Sometimes you actually want both text blocks, and the context menu also offers you → and → .
You can also edit the output file just as you would in a text editor. Such lines are marked using a pencil icon. Please note that if you want to make any of the line/block-based changes described above, it is better to do those first since once you start editing the file yourself it becomes impossible for TortoiseMerge to keep track of the relationship to the original files.
If you're in three pane view (sometimes called
merge view) you can only edit the file in the
bottom view (Merged). As in two pane view,
you can right click on conflicted
lines and either select
→
or
→ .
In addition, if you want both blocks, you can
select
→
or
→ .
According to the command you've selected, the changes are used
in the resulting Merged file.
Sometimes a file will be marked as conflicted in Subversion, yet when you view it using TortoiseMerge there are no conflicts shown. This may be due to the whitespace handling you have chosen. If you choose to ignore line-endings or whitespace changes, those lines will be marked using the Conflict-Ignored icon. To resolve the conflict you still need to pick which version you want to use.
Important
Note that if you use TortoiseMerge on the same files again, any changes to your working copy, whether in TortoiseMerge, or by hand-editing, will be discarded and the file will appear as it did when conflict-editing first started.
When you start TortoiseMerge without any command line switches then you have to open the files manually, using → .
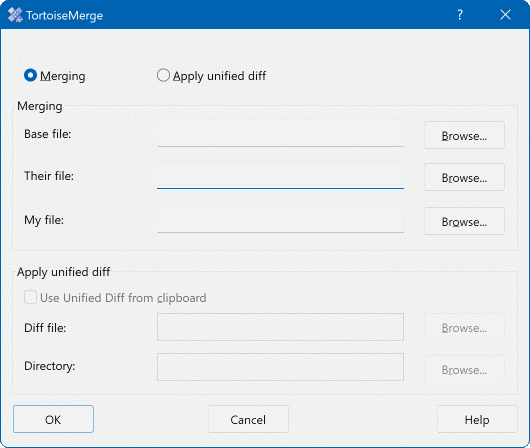
The first thing you have to do is to decide whether you just want to compare/merge files, or whether you want to apply a patch file. Depending on what you choose, the corresponding edit boxes and browse buttons are activated.
If you want to compare / merge files you have to set at least two
of the three possible paths for Base,
Mine and Theirs.
If you select only two files, then TortoiseMerge will show
you the differences between those two files, either in a two
pane view or in a one pane view.
If you want to merge three files, TortoiseMerge will show you the differences in a three pane view. This view is generally used if you need to resolve conflicted files. The output file is not named in this case and you will have to use the → . to save the results.
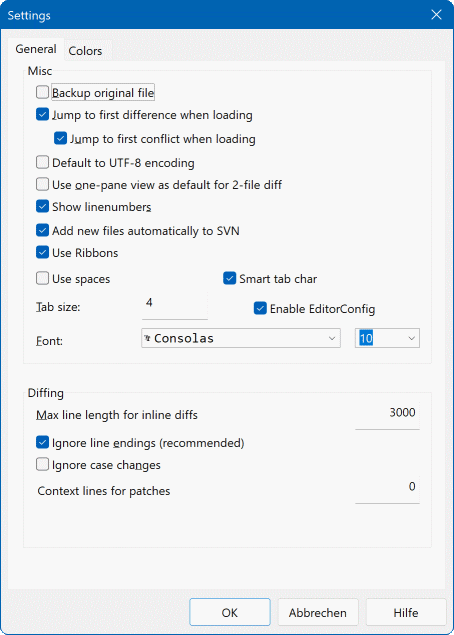
Most of the options here are self-explanatory, but a few points need clarifying.
Backup original file
renames the original file in the WC to filename.bak
before saving the modified version.
Default to UTF-8 encoding when set, ANSI files are loaded as UTF-8 encoded and saved as such when edited.
Max line length for inline diffs TortoiseMerge can get slow when showing inline diffs for very long lines. Because of that only lines that are shorter than 3000 chars are shown with inline diffs. You can change this value here.
Ignore line endings hides changes which are due solely to difference in line-end style.
Ignore case changes hides changes which are due solely to case changes within the text. This can be useful with apps such as Visual Basic, which changes case in variables without warning.
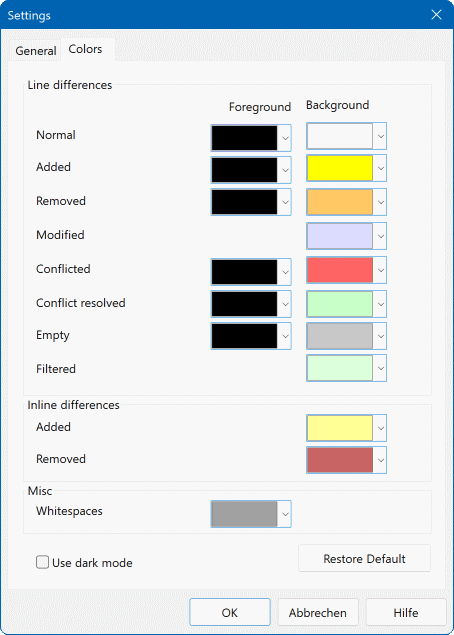
This dialog allows you to select the background color coding used to highlight the different line changes.
- Normal
- All lines which are unchanged, or where changes are hidden.
- Added
- Lines which have been added.
- Removed
- Lines which have been deleted.
- Modified
- Lines which have relatively small changes, and are shown using inline diff. This colour is used for the unchanged portion of the line content. Changed portions will be shown using the inline added and deleted colours described below. If Colour code in-line changes is not enabled, this colour will not be used and changed lines will always be shown as replacements.
- Conflicted
- Where the same line has been changed in both files.
- Conflict resolved
- Where the same line has been changed in both files, and you have now selected which version should be used.
- Empty
- Where lines have been added in the opposite pane, and no such line existed in this pane.
- Inline added text
- When inline diffs are shown, added text is shown in this colour.
- Inline removed text
- When inline diffs are shown, deleted text is shown in this colour.
- Misc whitespaces
- Characters used to indicate Whitespace are shown in a different colour from normal text.
- Use dark mode
- Enables a dark mode for the UI. This requires at least Windows 10 1809.
Table of Contents
List of keyboard shortcuts and commands.
- Ctrl-Q, Ctrl-W, Escape
Quit the program
- Ctrl-C
Copy the selected text to the clipboard
- Ctrl-X, Shift-Del
Cut the selected text to the clipboard
- Ctrl-V, Shift-Insert
Paste the selected text from the clipboard
- Ctrl-Z, Alt-Backspace
Undo the last edits
- Ctrl-F
Open the Find dialog for text searches and replaces
- Ctrl-O
Open files to diff/merge
- Ctrl-S
Save the changes
- Ctrl-Shift-S
Save as...
- F7, Ctrl-Down
Go to next difference
- Shift-F7, Ctrl-Up
Go to previous difference
- Ctrl-R
Reload the files and revert all changes made
- Ctrl-T
Toggles between showing whitespaces or not
- Ctrl-L
Toggles between collapsing unchanged sections or not
- Ctrl-P
Toggles between line wrapping
- Ctrl-G
Go to line
- Ctrl-A
Select all text
- Ctrl-mousewheel
Scroll the display left/right
- Ctrl-Tab
Switch between left/right/bottom view
- Ctrl-M
Toggles between marking the selected change
- Ctrl-D
Toggle between one-pane diff and two-pane diff
- Ctrl-M
Toggles between marking the selected change
- Ctrl-U
Switches views
- F12
Use left block
Table of Contents
TortoiseMerge can be started with command line parameters to avoid having to go through the Open dialog to select the files yourself. This is useful also if you want to use TortoiseMerge from another application.
Most switches require additional information like a path or some other string. In those cases, append an ':' to the switch and put the string/path after it. Example:
/base:"c:\folder\my base file.txt"
Table B.1. List of available command line options
| Command | Description |
|---|---|
| /? | Shows a dialog box with the most important command line switches. |
| /help |
The same as ?.
|
| /base | Specifies the base file used in three way diffs. This is the common ancestor of the files being diffed, although it is not shown in a separate window. For two way diffs, this is the left file. |
| /basename | The name of the base file. This is shown in the view title instead of the file path. For three way diffs it is shown in a tooltip for the view title. |
| /basereflectedname | The name to use for editorconfig templates. |
| /theirs | Specifies the theirs file used in three way diffs, displayed in the left pane. |
| /theirsname | The name of the theirs file. This is shown in the view title instead of the file path. |
| /theirsreflectedname | The name to use for editorconfig templates. |
| /mine | Specifies the mine file used in three way diffs, displayed in the right pane. For two way diffs, this is the right file. |
| /minename | The name of the mine file. This is shown in the view title instead of the file path. |
| /minereflectedname | The name to use for editorconfig templates. |
| /merged |
Specifies the resulting merged file used in diffs. This is the file path where the result of the merge/conflict resolving is saved. If this is not set for a three-way diff, then TortoiseMerge will ask the user where to save the result. If this is not set for a two-way diff, then TortoiseMerge will automatically use the path of the file shown in the right view as the save path. |
| /mergedname | The name of the merged file. This is shown in the view title instead of the file path. |
| /mergedreflectedname | The name to use for editorconfig templates. |
| /patchpath | The path where a patch should be applied to. If you don't set this path, then TortoiseMerge will try to find the path itself to match the paths in the patch file, but that can take very long. |
| /saverequired | If specified, forces TortoiseMerge to ask to save the file before exiting, even if the user does not modify the files. |
| /saverequiredonconflicts | If specified, forces TortoiseMerge to ask to save the file before exiting if there are conflicts found, even if the user does not modify the files. |
| /patchoriginal | The name of the original file to patch. Used for the view title. |
| /patchpatched | The name of the resulting patched file. Used for the view title. |
| /diff | The path to the patch/diff file to apply to a directory. |
| /oneway | Forces TortoiseMerge to start with the one-way view instead of the view the user specified in the settings. |
| /reversedpatch | Switches the left and right view of the specified two files to diff. |
| /createunifieddiff |
Creates a unified diff file (patch file) of two files
specified with
/origfile:"path_to_original_file" and
/modifiedfile:"path_to_modified_file".
The target path is set with
/outfile:"path_to_resulting_patchfile".
If /outfile is not set, a file save dialog
is shown so the user can choose the location to save the
patch file.
Note: If /createunifieddiff is set,
all other parameters are ignored.
|
| /line | Specifies a line number to jump to after loading the files. |
| /readonly | Prevents the file from being edited. That means the editing capabilities of TortoiseMerge are disabled. |
| /nosvnresolve | Prevents TortoiseMerge from asking whether to mark a file as resolved in SVN after saving it. |
You can also supply simple filenames on the command line for compatibility with other diff programs. In this simplified form the command line is
TortoiseMerge BaseFilePath MyFilePath [ TheirFilePath ]
If two files are given they will be compared with each other. If three files are given, the first is taken as the BASE file, and the other two are compared with it in a three-way diff.
- Add
A Subversion command that is used to add a file or directory to your working copy. The new items are added to the repository when you commit.
- BASE revision
The current base revision of a file or folder in your working copy. This is the revision the file or folder was in, when the last checkout, update or commit was run. The BASE revision is normally not equal to the HEAD revision.
- Blame
This command is for text files only, and it annotates every line to show the repository revision in which it was last changed, and the author who made that change. Our GUI implementation is called TortoiseBlame and it also shows the commit date/time and the log message when you hover the mouse of the revision number.
- Branch
A term frequently used in revision control systems to describe what happens when development forks at a particular point and follows 2 separate paths. You can create a branch off the main development line so as to develop a new feature without rendering the main line unstable. Or you can branch a stable release to which you make only bug fixes, while new developments take place on the unstable trunk. In Subversion a branch is implemented as a “cheap copy”.
- Checkout
A Subversion command which creates a local working copy in an empty directory by downloading versioned files from the repository.
- Cleanup
To quote from the Subversion book: “ Recursively clean up the working copy, removing locks and resuming unfinished operations. If you ever get a working copy locked error, run this command to remove stale locks and get your working copy into a usable state again. ” Note that in this context lock refers to local filesystem locking, not repository locking.
- Commit
This Subversion command is used to pass the changes in your local working copy back into the repository, creating a new repository revision.
- Conflict
When changes from the repository are merged with local changes, sometimes those changes occur on the same lines. In this case Subversion cannot automatically decide which version to use and the file is said to be in conflict. You have to edit the file manually and resolve the conflict before you can commit any further changes.
- Copy
In a Subversion repository you can create a copy of a single file or an entire tree. These are implemented as “cheap copies” which act a bit like a link to the original in that they take up almost no space. Making a copy preserves the history of the item in the copy, so you can trace changes made before the copy was made.
- Delete
When you delete a versioned item (and commit the change) the item no longer exists in the repository after the committed revision. But of course it still exists in earlier repository revisions, so you can still access it. If necessary, you can copy a deleted item and “resurrect” it complete with history.
- Diff
Shorthand for “Show Differences”. Very useful when you want to see exactly what changes have been made.
- Export
This command produces a copy of a versioned folder, just like a working copy, but without the local
.svnfolders.- FSFS
A proprietary Subversion filesystem backend for repositories. Can be used on network shares. Default for 1.2 and newer repositories.
- GPO
Group policy object.
- HEAD revision
The latest revision of a file or folder in the repository.
- Import
Subversion command to import an entire folder hierarchy into the repository in a single revision.
- Lock
When you take out a lock on a versioned item, you mark it in the repository as non-committable, except from the working copy where the lock was taken out.
- Log
Show the revision history of a file or folder. Also known as “History”.
- History
Show the revision history of a file or folder. Also known as “Log”.
- Merge
The process by which changes from the repository are added to your working copy without disrupting any changes you have already made locally. Sometimes these changes cannot be reconciled automatically and the working copy is said to be in conflict.
Merging happens automatically when you update your working copy. You can also merge specific changes from another branch using TortoiseSVN's Merge command.
- Patch
If a working copy has changes to text files only, it is possible to use Subversion's Diff command to generate a single file summary of those changes in Unified Diff format. A file of this type is often referred to as a “Patch”, and it can be emailed to someone else (or to a mailing list) and applied to another working copy. Someone without commit access can make changes and submit a patch file for an authorized committer to apply. Or if you are unsure about a change you can submit a patch for others to review.
- Property
In addition to versioning your directories and files, Subversion allows you to add versioned metadata - referred to as “properties” to each of your versioned directories and files. Each property has a name and a value, rather like a registry key. Subversion has some special properties which it uses internally, such as
svn:eol-style. TortoiseSVN has some too, such astsvn:logminsize. You can add your own properties with any name and value you choose.- Relocate
If your repository moves, perhaps because you have moved it to a different directory on your server, or the server domain name has changed, you need to “relocate” your working copy so that its repository URLs point to the new location.
Note: you should only use this command if your working copy is referring to the same location in the same repository, but the repository itself has moved. In any other circumstance you probably need the “Switch” command instead.
- Repository
A repository is a central place where data is stored and maintained. A repository can be a place where multiple databases or files are located for distribution over a network, or a repository can be a location that is directly accessible to the user without having to travel across a network.
- Resolve
When files in a working copy are left in a conflicted state following a merge, those conflicts must be sorted out by a human using an editor (or perhaps TortoiseMerge). This process is referred to as “Resolving Conflicts”. When this is complete you can mark the conflicted files as being resolved, which allows them to be committed.
- Revert
Subversion keeps a local “pristine” copy of each file as it was when you last updated your working copy. If you have made changes and decide you want to undo them, you can use the “revert” command to go back to the pristine copy.
- Revision
Every time you commit a set of changes, you create one new “revision” in the repository. Each revision represents the state of the repository tree at a certain point in its history. If you want to go back in time you can examine the repository as it was at revision N.
In another sense, a revision can refer to the set of changes that were made when that revision was created.
- Revision Property (revprop)
Just as files can have properties, so can each revision in the repository. Some special revprops are added automatically when the revision is created, namely:
svn:date svn:author svn:logwhich represent the commit date/time, the committer and the log message respectively. These properties can be edited, but they are not versioned, so any change is permanent and cannot be undone.- SVN
A frequently-used abbreviation for Subversion.
The name of the Subversion custom protocol used by the “svnserve” repository server.
- Switch
Just as “Update-to-revision” changes the time window of a working copy to look at a different point in history, so “Switch” changes the space window of a working copy so that it points to a different part of the repository. It is particularly useful when working on trunk and branches where only a few files differ. You can switch your working copy between the two and only the changed files will be transferred.
- Update
This Subversion command pulls down the latest changes from the repository into your working copy, merging any changes made by others with local changes in the working copy.
- Working Copy
This is your local “sandbox”, the area where you work on the versioned files, and it normally resides on your local hard disk. You create a working copy by doing a “Checkout” from a repository, and you feed your changes back into the repository using “Commit”.