This section shows you how to try out some of the most commonly used features on a small test repository. Naturally it doesn't explain everything - this is just the Quick Start Guide after all. Once you are up and running you should take the time to read the rest of this user guide, which takes you through things in much more detail. It also explains more about setting up a proper Subversion server.
For a real project you will have a repository set up somewhere safe and a Subversion server to control it. For the purposes of this tutorial we are going to use Subversion's local repository feature which allows direct access to a repository created on your hard drive without needing a server at all.
First create a new empty directory on your PC. It can go anywhere, but
in this tutorial we are going to call it C:\svn_repos.
Now right click on the new folder and from the context menu choose
→ .
The repository is then created inside the folder, ready for you to use.
We will also create the default internal folder structure by clicking
the button.
Important
The local repository feature is very useful for test and evaluation but unless you are working as a sole developer on one PC you should always use a proper Subversion server. It is tempting in a small company to avoid the work of setting up a server and just access your repository on a network share. Don't ever do that. You will lose data. Read the section called “Accessing a Repository on a Network Share” to find out why this is a bad idea, and how to set up a server.
Now we have a repository, but it is completely empty at the moment.
Let's assume I have a set of files in C:\Projects\Widget1
that I would like to add. Navigate to the Widget1 folder
in Explorer and right click on it. Now select
→ which brings up a dialog
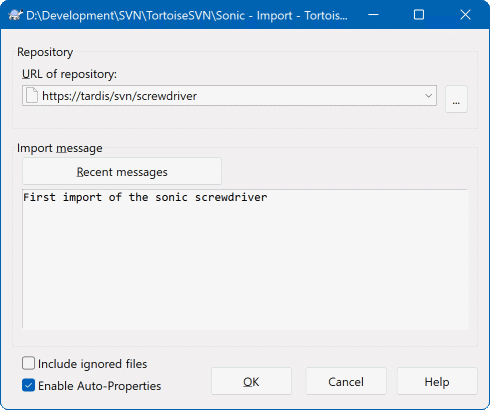
A Subversion repository is referred to by URL, which allows us to specify
a repository anywhere on the Internet. In this case we need to point to our
own local repository which has a URL of file:///c:/svn_repos/trunk,
and to which we add our own project name Widget1.
Note that there are 3 slashes after file: and that
forward slashes are used throughout.
The other important feature of this dialog is the Import Message box which allows you to enter a message describing what you are doing. When you come to look through your project history, these commit messages are a valuable guide to what changes have been made and why. In this case we can say something simple like “Import the Widget1 project”. Click on and the folder is added to your repository.
Now that we have a project in our repository, we need to create a working
copy to use for day-to-day work. Note that the act of importing a folder
does not automatically turn that folder into a working copy. The Subversion
term for creating a fresh working copy is Checkout.
We are going to checkout the Widget1 folder of our repository into a
development folder on the PC called C:\Projects\Widget1-Dev.
Create that folder, then right click on it and select
→ .
Then enter the URL to checkout, in this case file:///c:/svn_repos/trunk/Widget1
and click on . Our development folder is then populated
with files from the repository.
Important
In the default setting, the checkout menu item is not
located in the TortoiseSVN submenu but is shown at the top
explorer menu. TortoiseSVN commands that are not in the submenu
have SVN prepended:
You will notice that the appearance of this folder is different from our original folder. Every file has a green check mark in the bottom left corner. These are TortoiseSVN's status icons which are only present in a working copy. The green state indicates that the file is unchanged from the version in the repository.
Time to get to work. In the Widget1-Dev folder we start editing
files - let's say we make changes to Widget1.c and
ReadMe.txt. Notice that the icon overlays on these files
have now changed to red, indicating that changes have been made locally.
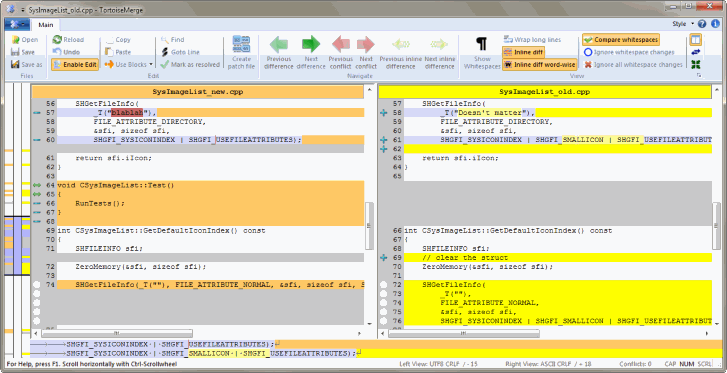
But what are the changes? Right click on one of the changed files and select → . TortoiseSVN's file compare tool starts, showing you exactly which lines have changed.
OK, so we are happy with the changes, let's update the repository. This
action is referred to as a Commit of the changes.
Right click on the Widget1-Dev folder and select
→ .
The commit dialog lists the changed files, each with a checkbox.
You might want to choose only a subset of those files, but in this
case we are going to commit the changes to both files.
Enter up a message to describe what the change is all about and
click on . The progress dialog shows the
files being uploaded to the repository and you're done.
As the project develops you will need to add new files - let's say you add
some new features in Extras.c and add a reference in
the existing Makefile. Right click on the folder and
→ .
The Add dialog now shows you all unversioned files and you can select
which ones you want to add. Another way of adding files would be to
right click on the file itself and select
→ .
Now when you go to commit the folder, the new file shows up as Added and the existing file as Modified. Note that you can double click on the modified file to check exactly what changes were made.
One of the most useful features of TortoiseSVN is the Log dialog. This shows you a list of all the commits you made to a file or folder, and shows those detailed commit messages that you entered (you did enter a commit message as suggested? If not, now you see why this is important).
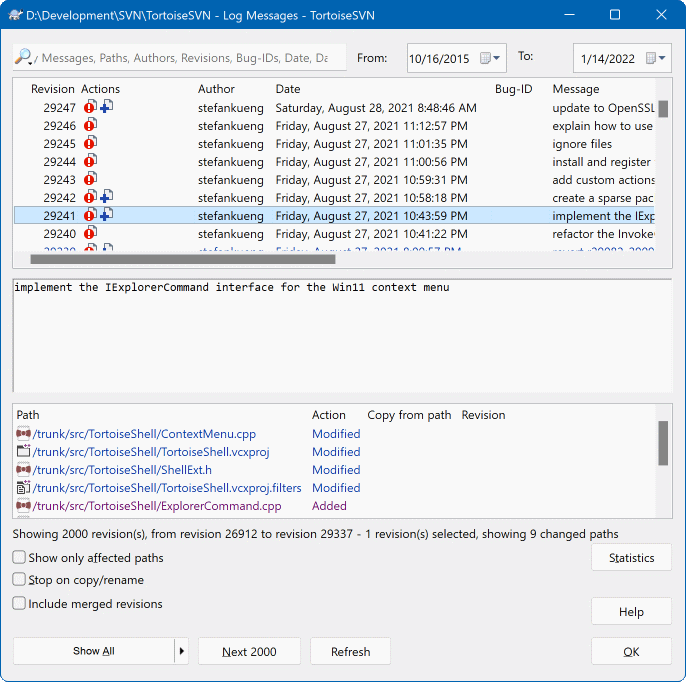
OK, so I cheated a little here and used a screenshot from the
TortoiseSVN repository.
The top pane shows a list of revisions committed along with the start of the commit message. If you select one of these revisions, the middle pane will show the full log message for that revision and the bottom pane will show a list of changed files and folders.
Each of these panes has a context menu which provides you with lots more ways of using the information. In the bottom pane you can double click on a file to see exactly what changes were made in that revision. Read the section called “Revision Log Dialog” to get the full story.
One feature of all revision control systems is that they let you undo changes that you made previously. As you would expect, TortoiseSVN makes this easy to access.
If you want to get rid of changes that you have not yet committed and reset your file to the way it was before you started editing, → is your friend. This discards your changes (to the Recycle bin, just in case) and reverts to the committed version you started with. If you want to get rid of just some of the changes, you can use TortoiseMerge to view the differences and selectively revert changed lines.
If you want to undo the effects of a particular revision, start with the Log dialog and find the offending revision. Select → and those changes will be undone.