Table of Contents
- Preface
- 1. Getting Started
- 2. Basic Version-Control Concepts
- 3. The Repository
- 4. Daily Use Guide
- General Features
- Importing Data Into A Repository
- Checking Out A Working Copy
- Committing Your Changes To The Repository
- Update Your Working Copy With Changes From Others
- Resolving Conflicts
- Getting Status Information
- Change Lists
- Shelving
- Revision Log Dialog
- Viewing Differences
- Adding New Files And Directories
- Copying/Moving/Renaming Files and Folders
- Ignoring Files And Directories
- Deleting, Moving and Renaming
- Undo Changes
- Cleanup
- Project Settings
- External Items
- Branching / Tagging
- Merging
- Locking
- Creating and Applying Patches
- Who Changed Which Line?
- The Repository Browser
- Revision Graphs
- Exporting a Subversion Working Copy
- Relocating a working copy
- Integration with Bug Tracking Systems / Issue Trackers
- Integration with Web-based Repository Viewers
- TortoiseSVN's Settings
- Final Step
- 5. Project Monitor
- 6. The SubWCRev Program
- 7. IBugtraqProvider interface
- A. Frequently Asked Questions (FAQ)
- B. How Do I...
- Move/copy a lot of files at once
- Force users to enter a log message
- Update selected files from the repository
- Roll back (Undo) revisions in the repository
- Compare two revisions of a file or folder
- Include a common sub-project
- Create a shortcut to a repository
- Ignore files which are already versioned
- Unversion a working copy
- Remove a working copy
- C. Useful Tips For Administrators
- D. Automating TortoiseSVN
- E. Command Line Interface Cross Reference
- F. Implementation Details
- G. Language Packs and Spell Checkers
- Glossary
- Index
List of Figures
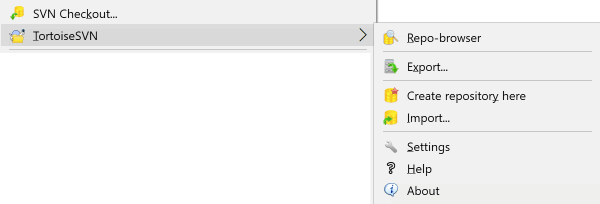
- 1.1. The TortoiseSVN menu for unversioned folders
- 1.2. The Import dialog
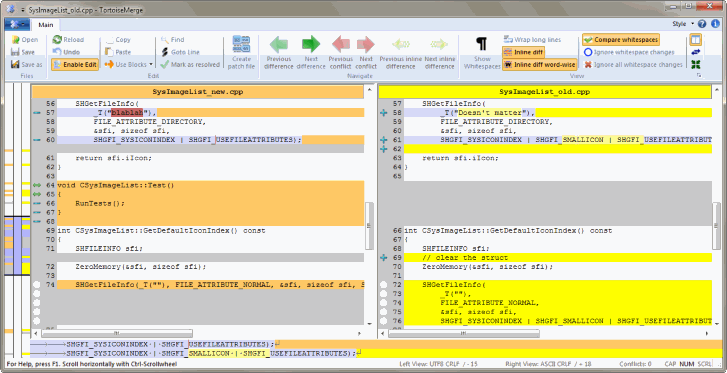
- 1.3. File Difference Viewer
- 1.4. The Log Dialog
- 2.1. A Typical Client/Server System
- 2.2. The Problem to Avoid
- 2.3. The Lock-Modify-Unlock Solution
- 2.4. The Copy-Modify-Merge Solution
- 2.5. ...Copy-Modify-Merge Continued
- 2.6. The Repository's Filesystem
- 2.7. The Repository
- 3.1. The TortoiseSVN menu for unversioned folders
- 4.1. Explorer showing icon overlays
- 4.2. Context menu for a directory under version control
- 4.3. Explorer file menu for a shortcut in a versioned folder
- 4.4. Right drag menu for a directory under version control
- 4.5. Authentication Dialog
- 4.6. The Import dialog
- 4.7. The Checkout dialog
- 4.8. The Commit dialog
- 4.9. The Commit Dialog Spellchecker
- 4.10. The Progress dialog showing a commit in progress
- 4.11. Progress dialog showing finished update
- 4.12. Explorer showing icon overlays
- 4.13. Explorer property page, Subversion tab
- 4.14. Check for Modifications
- 4.15. Commit dialog with Changelists
- 4.16. Shelve dialog
- 4.17. Unshelve dialog
- 4.18. The Revision Log Dialog
- 4.19. The Revision Log Dialog Top Pane with Context Menu
- 4.20. The Code Collaborator Settings Dialog
- 4.21. Top Pane Context Menu for 2 Selected Revisions
- 4.22. The Log Dialog Bottom Pane with Context Menu
- 4.23. The Log Dialog Bottom Pane with Context Menu When Multiple Files Selected.
- 4.24. The Log Dialog Showing Merge Tracking Revisions
- 4.25. Commits-by-Author Histogram
- 4.26. Commits-by-Author Pie Chart
- 4.27. Commits-by-date Graph
- 4.28. Go Offline Dialog
- 4.29. The Compare Revisions Dialog
- 4.30. The image difference viewer
- 4.31. Explorer context menu for unversioned files
- 4.32. Right drag menu for a directory under version control
- 4.33. Explorer context menu for unversioned files
- 4.34. Explorer context menu for versioned files
- 4.35. Revert dialog
- 4.36. The Cleanup dialog
- 4.37. Subversion property page
- 4.38. Adding properties
- 4.39. Property dialog for hook scripts
- 4.40. Property dialog boolean user types
- 4.41. Property dialog state user types
- 4.42. Property dialog single-line user types
- 4.43. Property dialog multi-line user types
- 4.44. svn:externals property page
- 4.45. svn:keywords property page
- 4.46. svn:eol-style property page
- 4.47. tsvn:bugtraq property page
- 4.48. Size of log messages property page
- 4.49. Language property page
- 4.50. svn:mime-type property page
- 4.51. svn:needs-lock property page
- 4.52. svn:executable property page
- 4.53. Property dialog merge log message templates
- 4.54. The Branch/Tag Dialog
- 4.55. The Switch Dialog
- 4.56. The Merge Wizard - Select Revision Range
- 4.57. The Merge Wizard - Tree Merge
- 4.58. The Merge Conflict Dialog
- 4.59. The Merge Tree Conflict Dialog
- 4.60. The Merge-All Dialog
- 4.61. The Locking Dialog
- 4.62. The Check for Modifications Dialog
- 4.63. The Create Patch dialog
- 4.64. The Annotate / Blame Dialog
- 4.65. TortoiseBlame
- 4.66. The Repository Browser
- 4.67. A Revision Graph
- 4.68. The Export-from-URL Dialog
- 4.69. The Relocate Dialog
- 4.70. The Bugtraq Properties Dialog
- 4.71. Example issue tracker query dialog
- 4.72. The Settings Dialog, General Page
- 4.73. The Settings Dialog, Context Menu Page
- 4.74. The Settings Dialog, Dialogs 1 Page
- 4.75. The Settings Dialog, Dialogs 2 Page
- 4.76. The Settings Dialog, Dialogs 3 Page
- 4.77. The Settings Dialog, Colours Page
- 4.78. The Settings Dialog, Revision Graph Page
- 4.79. The Settings Dialog, Revision Graph Colors Page
- 4.80. The Settings Dialog, Icon Overlays Page
- 4.81. The Settings Dialog, Icon Set Page
- 4.82. The Settings Dialog, Icon Handlers Page
- 4.83. The Settings Dialog, Network Page
- 4.84. The Settings Dialog, Diff Viewer Page
- 4.85. The Settings Dialog, Diff/Merge Advanced Dialog
- 4.86. The Settings Dialog, Saved Data Page
- 4.87. The Settings Dialog, Log Cache Page
- 4.88. The Settings Dialog, Log Cache Statistics
- 4.89. The Settings Dialog, Hook Scripts Page
- 4.90. The Settings Dialog, Configure Hook Scripts
- 4.91. The Settings Dialog, Issue Tracker Integration Page
- 4.92. The Settings Dialog, TortoiseBlame Page
- 4.93. The Settings Dialog, TortoiseUDiff Page
- 4.94. The Settings Dialog, Sync Page
- 4.95. Taskbar with default grouping
- 4.96. Taskbar with repository grouping
- 4.97. Taskbar with repository grouping
- 4.98. Taskbar grouping with repository color overlays
- 5.1. The edit project dialog of the project monitor
- 5.2. The main dialog of the project monitor
- B.1. The TortoiseSVN right drag context menu for moving files
- C.1. The commit dialog, showing the upgrade notification
List of Tables
- 2.1. Repository Access URLs
- 4.1. Pinned Revision
- 6.1. List of available command line switches
- 6.2. List of SubWCRev error codes
- 6.3. List of available keywords
- 6.4. COM/automation methods supported
- C.1. Menu entries and their values
- D.1. List of available commands and options
- D.2. List of available options
- D.3. List of available options
Table of Contents
Version control is the art of managing changes to information. It has long been a critical tool for programmers, who typically spend their time making small changes to software and then undoing or checking some of those changes the next day. Imagine a team of such developers working concurrently - and perhaps even simultaneously on the very same files! - and you can see why a good system is needed to manage the potential chaos.
TortoiseSVN is a free open-source Windows client for the Apache™ Subversion® version control system. That is, TortoiseSVN manages files and directories over time. Files are stored in a central repository. The repository is much like an ordinary file server, except that it remembers every change ever made to your files and directories. This allows you to recover older versions of your files and examine the history of how and when your data changed, and who changed it. This is why many people think of Subversion and version control systems in general as a sort of “time machine”.
Some version control systems are also software configuration management (SCM) systems. These systems are specifically tailored to manage trees of source code, and have many features that are specific to software development - such as natively understanding programming languages, or supplying tools for building software. Subversion, however, is not one of these systems; it is a general system that can be used to manage any collection of files, including source code.
What makes TortoiseSVN such a good Subversion client? Here's a short list of features.
- Shell integration
TortoiseSVN integrates seamlessly into the Windows shell (i.e. the explorer). This means you can keep working with the tools you're already familiar with. And you do not have to change into a different application each time you need the functions of version control.
And you are not limited to using the Windows Explorer; TortoiseSVN's context menus work in many other file managers, and also in the File/Open dialog which is common to most standard Windows applications. You should, however, bear in mind that TortoiseSVN is intentionally developed as an extension for the Windows Explorer. Thus it is possible that in other applications the integration is not as complete and e.g. the icon overlays may not be shown.
- Icon overlays
The status of every versioned file and folder is indicated by small overlay icons. That way you can see right away what the status of your working copy is.
- Graphical User Interface
When you list the changes to a file or folder, you can click on a revision to see the comments for that commit. You can also see a list of changed files - just double click on a file to see exactly what changed.
The commit dialog lists all the items that will be included in a commit, and each item has a checkbox so you can choose which items you want to include. Unversioned files can also be listed, in case you forgot to add that new file.
- Easy access to Subversion commands
All Subversion commands are available from the explorer context menu. TortoiseSVN adds its own submenu there.
Since TortoiseSVN is a Subversion client, we would also like to show you some of the features of Subversion itself:
- Directory versioning
CVS only tracks the history of individual files, but Subversion implements a “virtual” versioned filesystem that tracks changes to whole directory trees over time. Files and directories are versioned. As a result, there are real client-side move and copy commands that operate on files and directories.
- Atomic commits
A commit either goes into the repository completely, or not at all. This allows developers to construct and commit changes as logical chunks.
- Versioned metadata
Each file and directory has an invisible set of “properties” attached. You can invent and store any arbitrary key/value pairs you wish. Properties are versioned over time, just like file contents.
- Choice of network layers
Subversion has an abstracted notion of repository access, making it easy for people to implement new network mechanisms. Subversion's “advanced” network server is a module for the Apache web server, which speaks a variant of HTTP called WebDAV/DeltaV. This gives Subversion a big advantage in stability and interoperability, and provides various key features for free: authentication, authorization, wire compression, and repository browsing, for example. A smaller, standalone Subversion server process is also available. This server speaks a custom protocol which can be easily tunneled over ssh.
- Consistent data handling
Subversion expresses file differences using a binary differencing algorithm, which works identically on both text (human-readable) and binary (human-unreadable) files. Both types of files are stored equally compressed in the repository, and differences are transmitted in both directions across the network.
- Efficient branching and tagging
The cost of branching and tagging need not be proportional to the project size. Subversion creates branches and tags by simply copying the project, using a mechanism similar to a hard-link. Thus these operations take only a very small, constant amount of time, and very little space in the repository.
TortoiseSVN is an Open Source project developed under the GNU General Public License (GPL). It is free to download and free to use, either personally or commercially, on any number of PCs.
Although most people just download the installer, you also have full
read access to the source code of this program.
You can browse it on this link
https://sourceforge.net/p/tortoisesvn/code/HEAD/tree
.
The current development line is located under
/trunk/,
and the released versions are located under
/tags/.
Both TortoiseSVN and Subversion are developed by a community of people who are working on those projects. They come from different countries all over the world, working together to create great software.
In 2002, Tim Kemp found that Subversion was a very good version
control system, but it lacked a good GUI client. The idea for a
Subversion client as a Windows shell integration was inspired by
the similar client for CVS named TortoiseCVS.
Tim studied the source code of TortoiseCVS and used it as a base for
TortoiseSVN. He then started the project, registered the domain
tortoisesvn.org and put the source code online.
Around that time, Stefan Küng was looking for a good and free version control system and found Subversion and the source for TortoiseSVN. Since TortoiseSVN was still not ready for use, he joined the project and started programming. He soon rewrote most of the existing code and started adding commands and features, up to a point where nothing of the original code remained.
As Subversion became more stable it attracted more and more users who also started using TortoiseSVN as their Subversion client. The user base grew quickly (and is still growing every day). That's when Lübbe Onken offered to help out with some nice icons and a logo for TortoiseSVN. He now takes care of the website and manages the many translations.
With time, other version control systems all got their own Tortoise client which caused a problem with the icon overlays in Explorer: the number of such overlays is limited and even one Tortoise client can easily exceed that limit. That's when Stefan Küng implemented the TortoiseOverlays component which allows all Tortoise clients to use the same icon overlays. Now all open source Tortoise clients and even some non-Tortoise clients use that shared component.
- Tim Kemp
for starting the TortoiseSVN project
- Stefan Küng
for the hard work to get TortoiseSVN to what it is now, and his leadership of the project
- Lübbe Onken
for the beautiful icons, logo, bug hunting, translating and managing the translations
- Simon Large
for maintaining the documentation
- Stefan Fuhrmann
for the log cache and revision graph
- The Subversion Book
for the great introduction to Subversion and its chapter 2 which we copied here
- The Tigris Style project
for some of the styles which are reused in this documentation
- Our Contributors
for the patches, bug reports and new ideas, and for helping others by answering questions on our mailing list
- Our Donators
for many hours of joy with the music they sent us
This book is written for computer-literate folk who want to use Subversion to manage their data, but prefer to use a GUI client rather than a command line client. TortoiseSVN is a windows shell extension and it is assumed that the user is familiar with the windows explorer and how to use it.
This Preface explains what TortoiseSVN is, a little about the TortoiseSVN project and the community of people who work on it, and the licensing conditions for using it and distributing it.
The Chapter 1, Getting Started explains how to install TortoiseSVN on your PC, and how to start using it straight away.
In Chapter 2, Basic Version-Control Concepts we give a short introduction to the Subversion revision control system which underlies TortoiseSVN. This is borrowed from the documentation for the Subversion project and explains the different approaches to version control, and how Subversion works.
The chapter on Chapter 3, The Repository explains how to set up a local repository, which is useful for testing Subversion and TortoiseSVN using a single PC. It also explains a bit about repository administration which is also relevant to repositories located on a server.
The Chapter 4, Daily Use Guide is the most important section as it explains all the main features of TortoiseSVN and how to use them. It takes the form of a tutorial, starting with checking out a working copy, modifying it, committing your changes, etc. It then progresses to more advanced topics.
The Chapter 5, Project Monitor explains how you can monitor your Subversion projects so you don't miss important commits from your other team members.
Chapter 6, The SubWCRev Program is a separate program included with TortoiseSVN which can extract the information from your working copy and write it into a file. This is useful for including build information in your projects.
The Appendix B, How Do I... section answers some common questions about performing tasks which are not explicitly covered elsewhere.
The section on Appendix D, Automating TortoiseSVN shows how the TortoiseSVN GUI dialogs can be called from the command line. This is useful for scripting where you still need user interaction.
The Appendix E, Command Line Interface Cross Reference give a correlation
between TortoiseSVN commands and their equivalents in the Subversion
command line client svn.exe.
To make reading the docs easier, the names of all the screens and Menus from TortoiseSVN are marked up in a different font. The Log Dialog for instance.
A menu choice is indicated with an arrow. → means: select Show Log from the TortoiseSVN context menu.
Where a local context menu appears within one of the TortoiseSVN dialogs, it is shown like this: →
User Interface Buttons are indicated like this: Press to continue.
User Actions are indicated using a bold font. Alt+A: press the Alt-Key on your keyboard and while holding it down press the A-Key as well. Right drag: press the right mouse button and while holding it down drag the items to the new location.
System output and keyboard input is indicated with a
different font as well.
Important
Important notes are marked with an icon.
Tip
Tips that make your life easier.
Caution
Places where you have to be careful what you are doing.
Warning
Where extreme care has to be taken. Data corruption or other nasty things may occur if these warnings are ignored.
 |
Table of Contents
This section is aimed at people who would like to find out what TortoiseSVN is all about and give it a test drive. It explains how to install TortoiseSVN and set up a local repository, and it walks you through the most commonly used operations.
TortoiseSVN runs on Windows Vista or higher and is available in both 32-bit and 64-bit flavours. The installer for 64-bit Windows also includes the 32-bit extension parts. Which means you don't need to install the 32-bit version separately to get the TortoiseSVN context menu and overlays in 32-bit applications.
Support for Windows 98, Windows ME and Windows NT4 was dropped in version 1.2.0, and Windows 2000 and XP up to SP2 support was dropped in 1.7.0. Support for Windows XP with SP3 was dropped in 1.9.0. You can still download and install older versions if you need them.
TortoiseSVN comes with an easy to use installer. Double click on the installer file and follow the instructions. The installer will take care of the rest. Don't forget to reboot after installation.
Important
You need Administrator privileges to install TortoiseSVN. The installer will ask you for Administrator credentials if necessary.
Language packs are available which translate the TortoiseSVN user interface into many different languages. Please check Appendix G, Language Packs and Spell Checkers for more information on how to install these.
If you encounter any problems during or after installing TortoiseSVN please refer to our online FAQ at https://tortoisesvn.net/faq.html .
Before we get stuck into working with some real files, it is important to get an overview of how Subversion works and the terms that are used.
- The Repository
Subversion uses a central database which contains all your version-controlled files with their complete history. This database is referred to as the repository. The repository normally lives on a file server running the Subversion server program, which supplies content to Subversion clients (like TortoiseSVN) on request. If you only back up one thing, back up your repository as it is the definitive master copy of all your data.
- Working Copy
This is where you do the real work. Every developer has his own working copy, sometimes known as a sandbox, on his local PC. You can pull down the latest version from the repository, work on it locally without affecting anyone else, then when you are happy with the changes you made commit them back to the repository.
A Subversion working copy does not contain the history of the project, but it does keep a copy of the files as they exist in the repository before you started making changes. This means that it is easy to check exactly what changes you have made.
You also need to know where to find TortoiseSVN because there is not much to see from the Start Menu. This is because TortoiseSVN is a Shell extension, so first of all, start Windows Explorer. Right click on a folder in Explorer and you should see some new entries in the context menu like this:
This section shows you how to try out some of the most commonly used features on a small test repository. Naturally it doesn't explain everything - this is just the Quick Start Guide after all. Once you are up and running you should take the time to read the rest of this user guide, which takes you through things in much more detail. It also explains more about setting up a proper Subversion server.
For a real project you will have a repository set up somewhere safe and a Subversion server to control it. For the purposes of this tutorial we are going to use Subversion's local repository feature which allows direct access to a repository created on your hard drive without needing a server at all.
First create a new empty directory on your PC. It can go anywhere, but
in this tutorial we are going to call it C:\svn_repos.
Now right click on the new folder and from the context menu choose
→ .
The repository is then created inside the folder, ready for you to use.
We will also create the default internal folder structure by clicking
the button.
Important
The local repository feature is very useful for test and evaluation but unless you are working as a sole developer on one PC you should always use a proper Subversion server. It is tempting in a small company to avoid the work of setting up a server and just access your repository on a network share. Don't ever do that. You will lose data. Read the section called “Accessing a Repository on a Network Share” to find out why this is a bad idea, and how to set up a server.
Now we have a repository, but it is completely empty at the moment.
Let's assume I have a set of files in C:\Projects\Widget1
that I would like to add. Navigate to the Widget1 folder
in Explorer and right click on it. Now select
→ which brings up a dialog
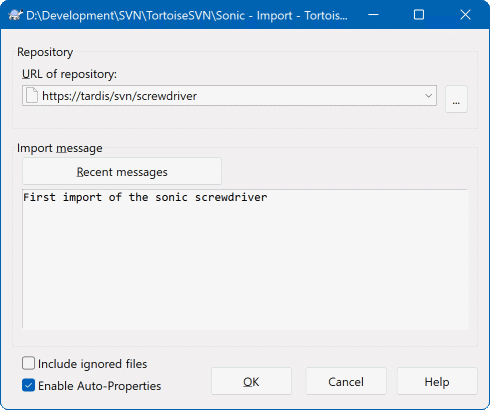
A Subversion repository is referred to by URL, which allows us to specify
a repository anywhere on the Internet. In this case we need to point to our
own local repository which has a URL of file:///c:/svn_repos/trunk,
and to which we add our own project name Widget1.
Note that there are 3 slashes after file: and that
forward slashes are used throughout.
The other important feature of this dialog is the Import Message box which allows you to enter a message describing what you are doing. When you come to look through your project history, these commit messages are a valuable guide to what changes have been made and why. In this case we can say something simple like “Import the Widget1 project”. Click on and the folder is added to your repository.
Now that we have a project in our repository, we need to create a working
copy to use for day-to-day work. Note that the act of importing a folder
does not automatically turn that folder into a working copy. The Subversion
term for creating a fresh working copy is Checkout.
We are going to checkout the Widget1 folder of our repository into a
development folder on the PC called C:\Projects\Widget1-Dev.
Create that folder, then right click on it and select
→ .
Then enter the URL to checkout, in this case file:///c:/svn_repos/trunk/Widget1
and click on . Our development folder is then populated
with files from the repository.
Important
In the default setting, the checkout menu item is not
located in the TortoiseSVN submenu but is shown at the top
explorer menu. TortoiseSVN commands that are not in the submenu
have SVN prepended:
You will notice that the appearance of this folder is different from our original folder. Every file has a green check mark in the bottom left corner. These are TortoiseSVN's status icons which are only present in a working copy. The green state indicates that the file is unchanged from the version in the repository.
Time to get to work. In the Widget1-Dev folder we start editing
files - let's say we make changes to Widget1.c and
ReadMe.txt. Notice that the icon overlays on these files
have now changed to red, indicating that changes have been made locally.
But what are the changes? Right click on one of the changed files and select → . TortoiseSVN's file compare tool starts, showing you exactly which lines have changed.
OK, so we are happy with the changes, let's update the repository. This
action is referred to as a Commit of the changes.
Right click on the Widget1-Dev folder and select
→ .
The commit dialog lists the changed files, each with a checkbox.
You might want to choose only a subset of those files, but in this
case we are going to commit the changes to both files.
Enter up a message to describe what the change is all about and
click on . The progress dialog shows the
files being uploaded to the repository and you're done.
As the project develops you will need to add new files - let's say you add
some new features in Extras.c and add a reference in
the existing Makefile. Right click on the folder and
→ .
The Add dialog now shows you all unversioned files and you can select
which ones you want to add. Another way of adding files would be to
right click on the file itself and select
→ .
Now when you go to commit the folder, the new file shows up as Added and the existing file as Modified. Note that you can double click on the modified file to check exactly what changes were made.
One of the most useful features of TortoiseSVN is the Log dialog. This shows you a list of all the commits you made to a file or folder, and shows those detailed commit messages that you entered (you did enter a commit message as suggested? If not, now you see why this is important).
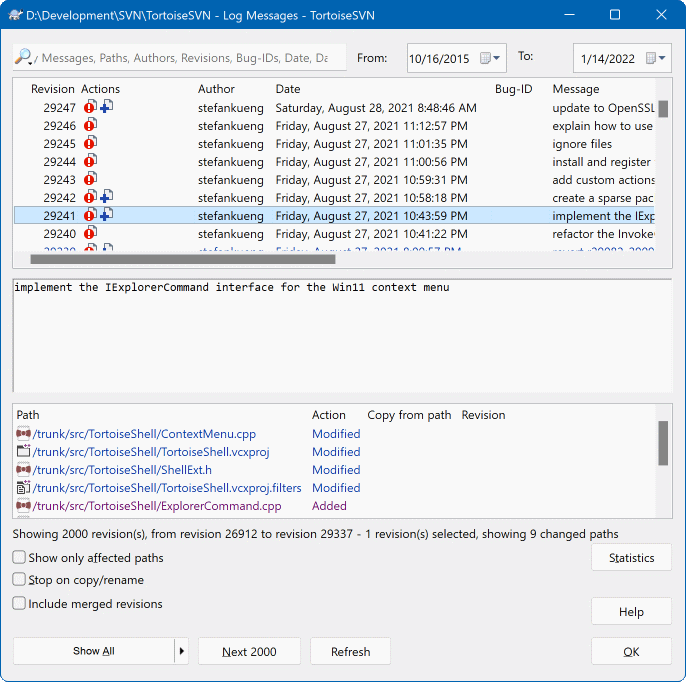
OK, so I cheated a little here and used a screenshot from the
TortoiseSVN repository.
The top pane shows a list of revisions committed along with the start of the commit message. If you select one of these revisions, the middle pane will show the full log message for that revision and the bottom pane will show a list of changed files and folders.
Each of these panes has a context menu which provides you with lots more ways of using the information. In the bottom pane you can double click on a file to see exactly what changes were made in that revision. Read the section called “Revision Log Dialog” to get the full story.
One feature of all revision control systems is that they let you undo changes that you made previously. As you would expect, TortoiseSVN makes this easy to access.
If you want to get rid of changes that you have not yet committed and reset your file to the way it was before you started editing, → is your friend. This discards your changes (to the Recycle bin, just in case) and reverts to the committed version you started with. If you want to get rid of just some of the changes, you can use TortoiseMerge to view the differences and selectively revert changed lines.
If you want to undo the effects of a particular revision, start with the Log dialog and find the offending revision. Select → and those changes will be undone.
This guide has given you a very quick tour of some of TortoiseSVN's most important and useful features, but of course there is far more that we haven't covered. We strongly recommend that you take the time to read the rest of this manual, especially Chapter 4, Daily Use Guide which gives you a lot more detail on day-to-day operations.
We have taken a lot of trouble to make sure that it is both informative and easy to read, but we recognise that there is a lot of it! Take your time and don't be afraid to try things out on a test repository as you go along. The best way to learn is by using it.
Table of Contents
This chapter is a slightly modified version of the same chapter in the Subversion book. An online version of the Subversion book is available here: https://svnbook.red-bean.com/ .
This chapter is a short, casual introduction to Subversion. If you're new to version control, this chapter is definitely for you. We begin with a discussion of general version control concepts, work our way into the specific ideas behind Subversion, and show some simple examples of Subversion in use.
Even though the examples in this chapter show people sharing collections of program source code, keep in mind that Subversion can manage any sort of file collection - it's not limited to helping computer programmers.
Subversion is a centralized system for sharing information. At its core is a repository, which is a central store of data. The repository stores information in the form of a filesystem tree - a typical hierarchy of files and directories. Any number of clients connect to the repository, and then read or write to these files. By writing data, a client makes the information available to others; by reading data, the client receives information from others.
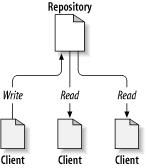
So why is this interesting? So far, this sounds like the definition of a typical file server. And indeed, the repository is a kind of file server, but it's not your usual breed. What makes the Subversion repository special is that it remembers every change ever written to it: every change to every file, and even changes to the directory tree itself, such as the addition, deletion, and rearrangement of files and directories.
When a client reads data from the repository, it normally sees only the latest version of the filesystem tree. But the client also has the ability to view previous states of the filesystem. For example, a client can ask historical questions like, “ what did this directory contain last Wednesday? ”, or “ who was the last person to change this file, and what changes did they make? ” These are the sorts of questions that are at the heart of any version control system: systems that are designed to record and track changes to data over time.
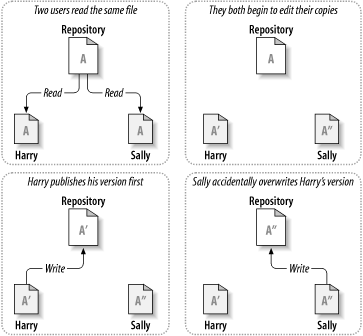
All version control systems have to solve the same fundamental problem: how will the system allow users to share information, but prevent them from accidentally stepping on each other's feet? It's all too easy for users to accidentally overwrite each other's changes in the repository.
Consider this scenario: suppose we have two co-workers, Harry and Sally. They each decide to edit the same repository file at the same time. If Harry saves his changes to the repository first, then it's possible that (a few moments later) Sally could accidentally overwrite them with her own new version of the file. While Harry's version of the file won't be lost forever (because the system remembers every change), any changes Harry made won't be present in Sally's newer version of the file, because she never saw Harry's changes to begin with. Harry's work is still effectively lost - or at least missing from the latest version of the file - and probably by accident. This is definitely a situation we want to avoid!
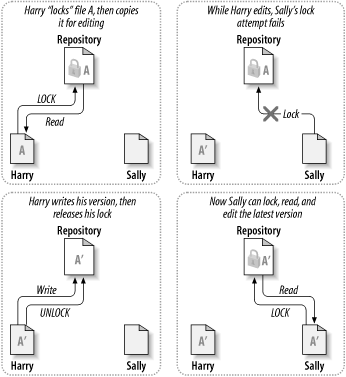
Many version control systems use a lock-modify-unlock model to address this problem, which is a very simple solution. In such a system, the repository allows only one person to change a file at a time. First Harry must lock the file before he can begin making changes to it. Locking a file is a lot like borrowing a book from the library; if Harry has locked a file, then Sally cannot make any changes to it. If she tries to lock the file, the repository will deny the request. All she can do is read the file, and wait for Harry to finish his changes and release his lock. After Harry unlocks the file, his turn is over, and now Sally can take her turn by locking and editing.
The problem with the lock-modify-unlock model is that it's a bit restrictive, and often becomes a roadblock for users:
Locking may cause administrative problems. Sometimes Harry will lock a file and then forget about it. Meanwhile, because Sally is still waiting to edit the file, her hands are tied. And then Harry goes on vacation. Now Sally has to get an administrator to release Harry's lock. The situation ends up causing a lot of unnecessary delay and wasted time.
Locking may cause unnecessary serialization. What if Harry is editing the beginning of a text file, and Sally simply wants to edit the end of the same file? These changes don't overlap at all. They could easily edit the file simultaneously, and no great harm would come, assuming the changes were properly merged together. There's no need for them to take turns in this situation.
Locking may create a false sense of security. Pretend that Harry locks and edits file A, while Sally simultaneously locks and edits file B. But suppose that A and B depend on one another, and the changes made to each are semantically incompatible. Suddenly A and B don't work together anymore. The locking system was powerless to prevent the problem - yet it somehow provided a sense of false security. It's easy for Harry and Sally to imagine that by locking files, each is beginning a safe, insulated task, and thus inhibits them from discussing their incompatible changes early on.
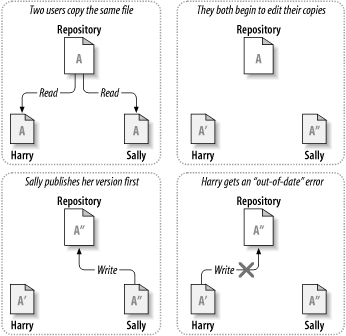
Subversion, CVS, and other version control systems use a copy-modify-merge model as an alternative to locking. In this model, each user's client reads the repository and creates a personal working copy of the file or project. Users then work in parallel, modifying their private copies. Finally, the private copies are merged together into a new, final version. The version control system often assists with the merging, but ultimately a human being is responsible for making it happen correctly.
Here's an example. Say that Harry and Sally each create
working copies of the same project, copied from the
repository. They work concurrently, and make changes to the
same file A within their copies. Sally saves her changes to
the repository first. When Harry attempts to save his changes
later, the repository informs him that his file A is
out-of-date. In other words, that file
A in the repository has somehow changed since he last copied
it. So Harry asks his client to merge
any new changes from the repository into his working copy of
file A. Chances are that Sally's changes don't overlap with
his own; so once he has both sets of changes integrated, he
saves his working copy back to the repository.
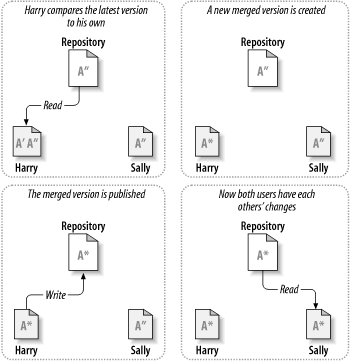
But what if Sally's changes do overlap with Harry's changes? What then? This situation is called a conflict, and it's usually not much of a problem. When Harry asks his client to merge the latest repository changes into his working copy, his copy of file A is somehow flagged as being in a state of conflict: he'll be able to see both sets of conflicting changes, and manually choose between them. Note that software can't automatically resolve conflicts; only humans are capable of understanding and making the necessary intelligent choices. Once Harry has manually resolved the overlapping changes (perhaps by discussing the conflict with Sally!), he can safely save the merged file back to the repository.
The copy-modify-merge model may sound a bit chaotic, but in practice, it runs extremely smoothly. Users can work in parallel, never waiting for one another. When they work on the same files, it turns out that most of their concurrent changes don't overlap at all; conflicts are infrequent. And the amount of time it takes to resolve conflicts is far less than the time lost by a locking system.
In the end, it all comes down to one critical factor: user communication. When users communicate poorly, both syntactic and semantic conflicts increase. No system can force users to communicate perfectly, and no system can detect semantic conflicts. So there's no point in being lulled into a false promise that a locking system will somehow prevent conflicts; in practice, locking seems to inhibit productivity more than anything else.
There is one common situation where the lock-modify-unlock model comes out better, and that is where you have unmergeable files. For example if your repository contains some graphic images, and two people change the image at the same time, there is no way for those changes to be merged together. Either Harry or Sally will lose their changes.
Subversion uses the copy-modify-merge solution by default, and in many cases this is all you will ever need. However, as of Version 1.2, Subversion also supports file locking, so if you have unmergeable files, or if you are simply forced into a locking policy by management, Subversion will still provide the features you need.
You've already read about working copies; now we'll demonstrate how the Subversion client creates and uses them.
A Subversion working copy is an ordinary directory tree on your local system, containing a collection of files. You can edit these files however you wish, and if they're source code files, you can compile your program from them in the usual way. Your working copy is your own private work area: Subversion will never incorporate other people's changes, nor make your own changes available to others, until you explicitly tell it to do so.
After you've made some changes to the files in your working copy and verified that they work properly, Subversion provides you with commands to publish your changes to the other people working with you on your project (by writing to the repository). If other people publish their own changes, Subversion provides you with commands to merge those changes into your working directory (by reading from the repository).
A working copy also contains some extra files, created and
maintained by Subversion, to help it carry out these commands.
In particular, your working copy contains a
subdirectory named .svn, also known as
the working copy
administrative
directory
. The files in this administrative
directory help Subversion recognize which files contain
unpublished changes, and which files are out-of-date with
respect to others' work. Prior to 1.7 Subversion maintained
.svn administrative subdirectories in every
versioned directory of your working copy.
Subversion 1.7 takes a completely different approach and each
working copy now has only one administrative subdirectory which
is an immediate child of the root of that working copy.
A typical Subversion repository often holds the files (or source code) for several projects; usually, each project is a subdirectory in the repository's filesystem tree. In this arrangement, a user's working copy will usually correspond to a particular subtree of the repository.
For example, suppose you have a repository that contains two software projects.
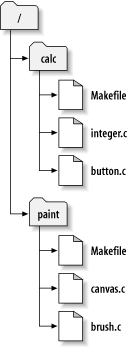
In other words, the repository's root directory has two
subdirectories: paint and
calc.
To get a working copy, you must check out some subtree of the repository. (The term check out may sound like it has something to do with locking or reserving resources, but it doesn't; it simply creates a private copy of the project for you.)
Suppose you make changes to button.c.
Since the .svn directory remembers the
file's modification date and original contents, Subversion can
tell that you've changed the file. However, Subversion does
not make your changes public until you explicitly tell it to.
The act of publishing your changes is more commonly known as
committing (or
checking
in
) changes to the repository.
To publish your changes to others, you can use Subversion's commit command.
Now your changes to button.c have
been committed to the repository; if another user checks out a
working copy of /calc, they will see
your changes in the latest version of the file.
Suppose you have a collaborator, Sally, who checked out a
working copy of /calc at the same time
you did. When you commit your change to
button.c, Sally's working copy is left
unchanged; Subversion only modifies working copies at the
user's request.
To bring her project up to date, Sally can ask Subversion to update her working copy, by using the Subversion update command. This will incorporate your changes into her working copy, as well as any others that have been committed since she checked it out.
Note that Sally didn't need to
specify which files to update; Subversion uses the information
in the .svn directory, and further
information in the repository, to decide which files need to
be brought up to date.
Subversion repositories can be accessed through many different methods - on local disk, or through various network protocols. A repository location, however, is always a URL. The URL schema indicates the access method:
Table 2.1. Repository Access URLs
| Schema | Access Method |
|---|---|
file://
| Direct repository access on local or network drive. |
http://
| Access via WebDAV protocol to Subversion-aware Apache server. |
https://
|
Same as http://, but with SSL encryption.
|
svn://
|
Unauthenticated TCP/IP access via custom protocol
to a svnserve server.
|
svn+ssh://
|
authenticated, encrypted TCP/IP access via custom protocol
to a svnserve server.
|
For the most part, Subversion's URLs use the standard
syntax, allowing for server names and port numbers to be
specified as part of the URL.
The file:// access method is normally used
for local access, although it can be used with UNC paths to
a networked host. The URL therefore takes the form
file://hostname/path/to/repos. For the
local machine, the hostname portion of the URL is required
to be either absent or localhost. For
this reason, local paths normally appear with three slashes,
file:///path/to/repos.
Also, users of the file:// scheme on
Windows platforms will need to use an unofficially
“standard” syntax for accessing repositories
that are on the same machine, but on a different drive than
the client's current working drive. Either of the two
following URL path syntaxes will work where
X is the drive on which the repository
resides:
file:///X:/path/to/repos
...
file:///X|/path/to/repos
...
Note that a URL uses ordinary slashes even though the native (non-URL) form of a path on Windows uses backslashes.
You can access a FSFS repository via a network share, but this is not recommended for various reasons:
You are giving direct write access to all users, so they could accidentally delete or corrupt the repository file system.
Not all network file sharing protocols support the locking that Subversion requires. One day you will find your repository has been subtly corrupted.
You have to set the access permissions in just the right way. SAMBA is particularly difficult in this respect.
If one person installs a newer version of the client which upgrades the repository format, then everyone else will be unable to access the repository until they also upgrade to the new client version.
A svn commit operation can publish changes to any number of files and directories as a single atomic transaction. In your working copy, you can change files' contents, create, delete, rename and copy files and directories, and then commit the complete set of changes as a unit.
In the repository, each commit is treated as an atomic transaction: either all the commits changes take place, or none of them take place. Subversion retains this atomicity in the face of program crashes, system crashes, network problems, and other users' actions.
Each time the repository accepts a commit, this creates a new state of the filesystem tree, called a revision. Each revision is assigned a unique natural number, one greater than the number of the previous revision. The initial revision of a freshly created repository is numbered zero, and consists of nothing but an empty root directory.
A nice way to visualize the repository is as a series of trees. Imagine an array of revision numbers, starting at 0, stretching from left to right. Each revision number has a filesystem tree hanging below it, and each tree is a “snapshot” of the way the repository looked after each commit.
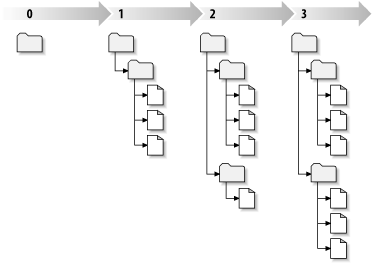
It's important to note that working copies do not always correspond to any single revision in the repository; they may contain files from several different revisions. For example, suppose you check out a working copy from a repository whose most recent revision is 4:
calc/Makefile:4
integer.c:4
button.c:4
At the moment, this working directory corresponds exactly
to revision 4 in the repository. However, suppose you make a
change to button.c, and commit that
change. Assuming no other commits have taken place, your
commit will create revision 5 of the repository, and your
working copy will now look like this:
calc/Makefile:4
integer.c:4
button.c:5
Suppose that, at this point, Sally commits a change to
integer.c, creating revision 6. If you
use svn update to bring your working copy
up to date, then it will look like this:
calc/Makefile:6
integer.c:6
button.c:6
Sally's changes to integer.c will
appear in your working copy, and your change will still be
present in button.c. In this example,
the text of Makefile is identical in
revisions 4, 5, and 6, but Subversion will mark your working
copy of Makefile with revision 6 to
indicate that it is still current. So, after you do a clean
update at the top of your working copy, it will generally
correspond to exactly one revision in the repository.
For each file in a working directory, Subversion records
two essential pieces of information in the
.svn/ administrative area:
what revision your working file is based on (this is called the file's working revision ), and
a timestamp recording when the local copy was last updated by the repository.
Given this information, by talking to the repository, Subversion can tell which of the following four states a working file is in:
- Unchanged, and current
The file is unchanged in the working directory, and no changes to that file have been committed to the repository since its working revision. A commit of the file will do nothing, and an update of the file will do nothing.
- Locally changed, and current
The file has been changed in the working directory, and no changes to that file have been committed to the repository since its base revision. There are local changes that have not been committed to the repository, thus a commit of the file will succeed in publishing your changes, and an update of the file will do nothing.
- Unchanged, and out-of-date
The file has not been changed in the working directory, but it has been changed in the repository. The file should eventually be updated, to make it current with the public revision. A commit of the file will do nothing, and an update of the file will fold the latest changes into your working copy.
- Locally changed, and out-of-date
The file has been changed both in the working directory, and in the repository. A commit of the file will fail with an out-of-date error. The file should be updated first; an update command will attempt to merge the public changes with the local changes. If Subversion can't complete the merge in a plausible way automatically, it leaves it to the user to resolve the conflict.
We've covered a number of fundamental Subversion concepts in this chapter:
We've introduced the notions of the central repository, the client working copy, and the array of repository revision trees.
We've seen some simple examples of how two collaborators can use Subversion to publish and receive changes from one another, using the 'copy-modify-merge' model.
We've talked a bit about the way Subversion tracks and manages information in a working copy.
Table of Contents
No matter which protocol you use to access your repositories, you always need to create at least one repository. This can either be done with the Subversion command line client or with TortoiseSVN.
If you haven't created a Subversion repository yet, it's time to do that now.
Create an empty folder with the name SVN (e.g.
D:\SVN\), which is used as root for all your repositories.Create another folder
MyNewRepositoryinsideD:\SVN\.Open the command prompt (or DOS-Box), change into
D:\SVN\and typesvnadmin create --fs-type fsfs MyNewRepository
Now you've got a new repository located at
D:\SVN\MyNewRepository.
Open the windows explorer
Create a new folder and name it e.g.
SVNRepositoryRight click on the newly created folder and select → .
A repository is then created inside the new folder. Don't edit those files yourself!!!. If you get any errors make sure that the folder is empty and not write protected.
You will also be asked whether you want to create a directory structure within the repository. Find out about layout options in the section called “Repository Layout”.
TortoiseSVN will set a custom folder icon when it creates a repository so you can identify local repositories more easily. If you create a repository using the official command line client this folder icon is not assigned.
Tip
We also recommend that you don't use file://
access at all, apart from local testing purposes. Using a server is
more secure and more reliable for all but single-developer use.
To access your local repository you need the path to that folder.
Just remember that Subversion expects all repository paths in the form
file:///C:/SVNRepository/.
Note the use of forward slashes throughout.
To access a repository located on a network share you can either
use drive mapping, or you can use the UNC path. For UNC paths,
the form is
file://ServerName/path/to/repos/.
Note that there are only 2 leading slashes here.
Prior to SVN 1.2, UNC paths had to be given in the more obscure form
file:///\ServerName/path/to/repos.
This form is still supported, but not recommended.
Although in theory it is possible to put a FSFS repository on a network
share and have multiple users access it using file://
protocol, this is most definitely not
recommended. In fact we would strongly
discourage it, and do not support such use for various reasons:
Firstly you are giving every user direct write access to the repository, so any user could accidentally delete the entire repository or make it unusable in some other way.
Secondly not all network file sharing protocols support the locking that Subversion requires, so you may find your repository gets corrupted. It may not happen straight away, but one day two users will try to access the repository at the same time.
Thirdly the file permissions have to be set just so. You may just about get away with it on a native Windows share, but SAMBA is particularly difficult.
If one person installs a newer version of the client which upgrades the repository format, then everyone else will be unable to access the repository until they also upgrade to the new client version.
file:// access is intended for local, single-user
access only, particularly testing and debugging. When you want to share
the repository you really need to set up a proper server,
and it is not nearly as difficult as you might think.
Read the section called “Accessing the Repository” for guidelines on choosing and
setting up a server.
Before you import your data into the repository you should first think about how you want to organize your data. If you use one of the recommended layouts you will later have it much easier.
There are some standard, recommended ways to organize a
repository. Most people create a trunk
directory to hold the “main line” of development, a
branches directory to contain branch
copies, and a tags directory to contain
tag copies. If a repository holds only one project, then
often people create these top-level directories:
/trunk
/branches
/tags
Because this layout is so commonly used, when you create a new repository using TortoiseSVN, it will also offer to create the directory structure for you.
If a repository contains multiple projects, people often index their layout by branch:
/trunk/paint
/trunk/calc
/branches/paint
/branches/calc
/tags/paint
/tags/calc
...or by project:
/paint/trunk
/paint/branches
/paint/tags
/calc/trunk
/calc/branches
/calc/tags
Indexing by project makes sense if the projects are not closely related and each one is checked out individually. For related projects where you may want to check out all projects in one go, or where the projects are all tied together in a single distribution package, it is often better to index by branch. This way you have only one trunk to checkout, and the relationships between the sub-projects is more easily visible.
If you adopt a top level /trunk /tags /branches
approach, there is nothing to say that you have to copy the entire trunk
for every branch and tag, and in some ways this structure offers the
most flexibility.
For unrelated projects you may prefer to use separate repositories. When you commit changes, it is the revision number of the whole repository which changes, not the revision number of the project. Having 2 unrelated projects share a repository can mean large gaps in the revision numbers. The Subversion and TortoiseSVN projects appear at the same host address, but are completely separate repositories allowing independent development, and no confusion over build numbers.
Of course, you're free to ignore these common layouts. You can create any sort of variation, whatever works best for you or your team. Remember that whatever you choose, it's not a permanent commitment. You can reorganize your repository at any time. Because branches and tags are ordinary directories, TortoiseSVN can move or rename them however you wish.
Switching from one layout to another is just a matter of issuing a series of server-side moves; If you don't like the way things are organized in the repository, just juggle the directories around.
So if you haven't already created a basic folder structure inside
your repository you should do that now. There are two ways to
achieve this. If you simply want to create a
/trunk /tags /branches structure, you can use
the repository browser to create the three folders (in three separate
commits). If you want to create a deeper hierarchy then it is simpler
to create a folder structure on disk first and import it in a single
commit, like this:
create a new empty folder on your hard drive
create your desired top-level folder structure inside that folder - don't put any files in it yet!
import this structure into the repository via a right click on the folder that contains this folder structure and selecting → In the import dialog enter the URL to your repository and click OK. This will import your temp folder into the repository root to create the basic repository layout.
Note that the name of the folder you are importing does not appear in the repository, only its contents. For example, create the following folder structure:
C:\Temp\New\trunk
C:\Temp\New\branches
C:\Temp\New\tags
Import C:\Temp\New into the repository root,
which will then look like this:
/trunk
/branches
/tags
Whichever type of repository you use, it is vitally important that you maintain regular backups, and that you verify the backup. If the server fails, you may be able to access a recent version of your files, but without the repository all your history is lost forever.
The simplest (but not recommended) way is just to copy the repository folder onto the backup medium. However, you have to be absolutely sure that no process is accessing the data. In this context, access means any access at all. If your repository is accessed at all during the copy, (web browser left open, WebSVN, etc.) the backup will be worthless.
The recommended method is to run
svnadmin hotcopy path/to/repository path/to/backup
to create a copy of your repository in a safe manner. Then backup the copy.
The svnadmin tool is installed automatically
when you install the Subversion command line client. The easiest
way to get this is to check the option to include the command
line tools when installing TortoiseSVN, but if you prefer you can
download the latest version of command line tools directly from the
Subversion
website.
A hook script is a program triggered by some repository event, such as the creation of a new revision or the modification of an unversioned property. Each hook is handed enough information to tell what that event is, what target(s) it's operating on, and the username of the person who triggered the event. Depending on the hook's output or return status, the hook program may continue the action, stop it, or suspend it in some way. Please refer to the chapter on Hook Scripts in the Subversion Book for full details about the hooks which are implemented.
These hook scripts are executed by the server that hosts the repository. TortoiseSVN also allows you to configure client side hook scripts that are executed locally upon certain events. See the section called “Client Side Hook Scripts” for more information.
Sample hook scripts can be found in the hooks
directory of the repository. These sample scripts are suitable
for Unix/Linux servers but need to be modified if your server is
Windows based. The hook can be a batch file or an executable.
The sample below shows a batch file which might be used to
implement a pre-revprop-change hook.
rem Only allow log messages to be changed.
if "%4" == "svn:log" exit 0
echo Property '%4' cannot be changed >&2
exit 1
Note that anything sent to stdout is discarded. If you want
a message to appear in the Commit Reject dialog you must
send it to stderr. In a batch file this is achieved using
>&2.
Overriding Hooks
If a hook script rejects your commit then its decision is final. But you can build an override mechanism into the script itself using the Magic Word technique. If the script wants to reject the operation it first scans the log message for a special pass phrase, either a fixed phrase or perhaps the filename with a prefix. If it finds the magic word then it allows the commit to proceed. If the phrase is not found then it can block the commit with a message like “You didn't say the magic word”. :-)
If you want to make your Subversion repository available to others you may want to include a link to it from your website. One way to make this more accessible is to include a checkout link for other TortoiseSVN users.
When you install TortoiseSVN, it registers a new
tsvn: protocol. When a TortoiseSVN user clicks on
such a link, the checkout dialog will open automatically with
the repository URL already filled in.
To include such a link in your own html page, you need to add code which looks something like this:
<a href="tsvn:http://project.domain.org/svn/trunk">
</a>
Of course it would look even better if you included a suitable picture. You can use the TortoiseSVN logo or you can provide your own image.
<a href="tsvn:http://project.domain.org/svn/trunk">
<img src=TortoiseCheckout.png></a>
You can also make the link point to a specific revision, for example
<a href="tsvn:http://project.domain.org/svn/trunk?100">
</a>
To use TortoiseSVN (or any other Subversion client), you need a place where your
repositories are located. You can either store your repositories locally and access
them using the file:// protocol or you can place them on a
server and access them with the http:// or
svn:// protocols.
The two server protocols can also be encrypted.
You use https:// or svn+ssh://,
or you can use svn:// with SASL.
If you are using a public hosting service such as SourceForge or your server has already been setup by someone else then there is nothing else you need to do. Move along to Chapter 4, Daily Use Guide.
If you don't have a server and you work alone, or if you are just evaluating Subversion and TortoiseSVN in isolation, then local repositories are probably your best choice. Just create a repository on your own PC as described earlier in Chapter 3, The Repository. You can skip the rest of this chapter and go directly to Chapter 4, Daily Use Guide to find out how to start using it.
If you were thinking about setting up a multi-user repository on a network share, think again. Read the section called “Accessing a Repository on a Network Share” to find out why we think this is a bad idea. Setting up a server is not as hard as it sounds, and will give you better reliability and probably speed too.
More detailed information on the Subversion server options, and how to choose the best architecture for your situation, can be found in the Subversion book under Server Configuration .
In the early days of Subversion, setting up a server required a good understanding of server configuration and in previous versions of this manual we included detailed descriptions of how to set up a server. Since then things have become easier as there are now several pre-packaged server installers available which guide you through the setup and configuration process. These links are for some of the installers we know about:
You can always find the latest links on the Subversion website.
You can find further How To guides on the TortoiseSVN website.
Table of Contents
- General Features
- Importing Data Into A Repository
- Checking Out A Working Copy
- Committing Your Changes To The Repository
- Update Your Working Copy With Changes From Others
- Resolving Conflicts
- Getting Status Information
- Change Lists
- Shelving
- Revision Log Dialog
- Viewing Differences
- Adding New Files And Directories
- Copying/Moving/Renaming Files and Folders
- Ignoring Files And Directories
- Deleting, Moving and Renaming
- Undo Changes
- Cleanup
- Project Settings
- External Items
- Branching / Tagging
- Merging
- Locking
- Creating and Applying Patches
- Who Changed Which Line?
- The Repository Browser
- Revision Graphs
- Exporting a Subversion Working Copy
- Relocating a working copy
- Integration with Bug Tracking Systems / Issue Trackers
- Integration with Web-based Repository Viewers
- TortoiseSVN's Settings
- Final Step
This document describes day to day usage of the TortoiseSVN client. It is not an introduction to version control systems, and not an introduction to Subversion (SVN). It is more like a place you may turn to when you know approximately what you want to do, but don't quite remember how to do it.
If you need an introduction to version control with Subversion, then we recommend you read the fantastic book: Version Control with Subversion .
This document is also a work in progress, just as TortoiseSVN and Subversion are. If you find any mistakes, please report them to the mailing list so we can update the documentation. Some of the screenshots in the Daily Use Guide (DUG) might not reflect the current state of the software. Please forgive us. We're working on TortoiseSVN in our free time.
In order to get the most out of the Daily Use Guide:
You should have installed TortoiseSVN already.
You should be familiar with version control systems.
You should know the basics of Subversion.
You should have set up a server and/or have access to a Subversion repository.
This section describes some of the features of TortoiseSVN which apply to just about everything in the manual. Note that many of these features will only show up within a Subversion working copy.
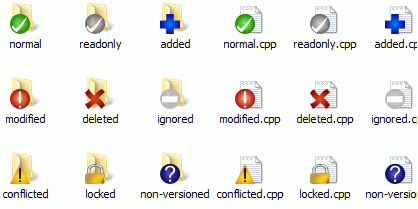
One of the most visible features of TortoiseSVN is the icon
overlays which appear on files in your working copy. These
show you at a glance which of your files have been modified.
Refer to the section called “Icon Overlays” to find out
what the different overlays represent.
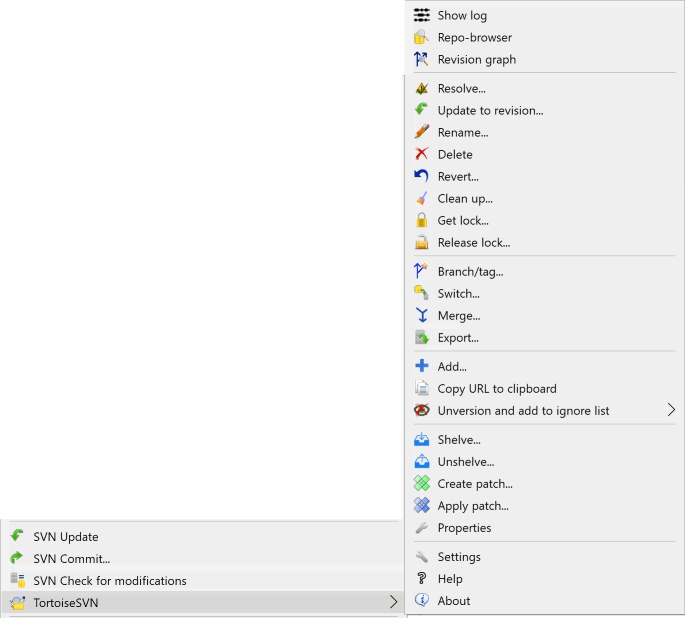
All TortoiseSVN commands are invoked from the context menu of the windows
explorer. Most are directly visible, when you right click
on a file or folder. The commands that are available depend on whether the
file or folder or its parent folder is under version control or not.
You can also see the TortoiseSVN menu as part of the Explorer file menu.
Tip
Some commands which are very rarely used are only available in the extended context menu. To bring up the extended context menu, hold down the Shift key when you right click.
In some cases you may see several TortoiseSVN entries. This is not a bug!
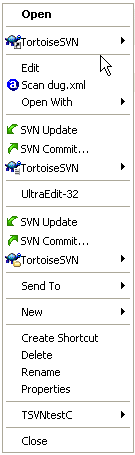
This example is for an unversioned shortcut within a versioned folder, and
in the Explorer file menu there are three entries
for TortoiseSVN. One is for the folder, one for the shortcut itself,
and the third for the object the shortcut is pointing to.
To help you distinguish between them, the icons have an indicator in the
lower right corner to show whether the menu entry is for a file,
a folder, a shortcut or for multiple selected items.
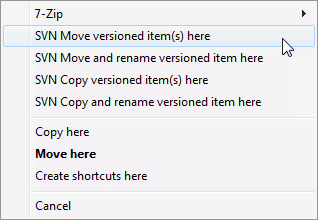
Other commands are available as drag handlers, when you right drag
files or folders to a new location inside working copies or when you
right drag a non-versioned file or folder into a directory
which is under version control.
Some common operations have well-known Windows shortcuts, but do not appear on buttons or in menus. If you can't work out how to do something obvious, like refreshing a view, check here.
- F1
Help, of course.
- F5
Refresh the current view. This is perhaps the single most useful one-key command. For example ... In Explorer this will refresh the icon overlays on your working copy. In the commit dialog it will re-scan the working copy to see what may need to be committed. In the Revision Log dialog it will contact the repository again to check for more recent changes.
- Ctrl-A
Select all. This can be used if you get an error message and want to copy and paste into an email. Use Ctrl-A to select the error message and then ...
- Ctrl-C
Copy the selected text. In case no text is selected but e.g. a list entry or a message box, then the content of that list entry or the message box is copied to the clipboard.
If the repository that you are trying to access is password protected, an authentication Dialog will show up.

Enter your username and password. The checkbox will make TortoiseSVN
store the credentials in Subversion's default directory:
%APPDATA%\Subversion\auth in three subdirectories:
svn.simplecontains credentials for basic authentication (username/password). Note that passwords are stored using the WinCrypt API, not in plain text form.svn.ssl.servercontains SSL server certificates.svn.usernamecontains credentials for username-only authentication (no password needed).
If you want to clear the authentication cache, you can do so from the Saved Data page of TortoiseSVN's settings dialog. The button will clear the cached authentication data for all repositories. The button however will show a dialog where you can chose which cached authentication data should be deleted. Refer to the section called “Saved Data Settings”.
Some people like to have the authentication data deleted when they
log off Windows, or on shutdown. The way to do that is to use a shutdown
script to delete the %APPDATA%\Subversion\auth
directory, e.g.
@echo off
rmdir /s /q "%APPDATA%\Subversion\auth"
You can install such a script on Windows like this:
Run
gpedit.msc(Local Policies)User Configuration -> Windows Settings -> Scripts -> Logon or Logoff -> Properties -> Add
For more information on how to set up your server for authentication and access control, refer to the section called “Accessing the Repository”.
Many of TortoiseSVN's dialogs have a lot of information to display, but it is often useful to maximize only the height, or only the width, rather than maximizing to fill the screen. As a convenience, there are shortcuts for this on the Maximize button. Use the middle mouse button to maximize vertically, and right mouse to maximize horizontally.
If you are importing into an existing repository which already contains some projects, then the repository structure will already have been decided. If you are importing data into a new repository, then it is worth taking the time to think about how it will be organised. Read the section called “Repository Layout” for further advice.
This section describes the Subversion import command, which was designed for importing a directory hierarchy into the repository in one shot. Although it does the job, it has several shortcomings:
There is no way to select files and folders to include, aside from using the global ignore settings.
The folder imported does not become a working copy. You have to do a checkout to copy the files back from the server.
It is easy to import to the wrong folder level in the repository.
For these reasons we recommend that you do not use the import command
at all but rather follow the two-step method described in
the section called “Import in Place”, unless you are performing
the simple step of creating an initial
/trunk /tags /branches structure in your repository.
Since you are here, this is how the basic import works ...
Before you import your project into a repository you should:
Remove all files which are not needed to build the project (temporary files, files which are generated by a compiler e.g. *.obj, compiled binaries, ...)
Organize the files in folders and sub-folders. Although it is possible to rename/move files later it is highly recommended to get your project's structure straight before importing!
Now select the top-level folder of your project directory structure in the windows explorer and right click to open the context menu. Select the command → which brings up a dialog box:
In this dialog you have to enter the URL of the repository location where you want to import your project. It is very important to realise that the local folder you are importing does not itself appear in the repository, only its content. For example if you have a structure:
C:\Projects\Widget\source
C:\Projects\Widget\doc
C:\Projects\Widget\images
and you import C:\Projects\Widget into
http://mydomain.com/svn/trunk
then you may be surprised to find that your subdirectories go
straight into trunk rather than being in a
Widget subdirectory. You need to specify the
subdirectory as part of the URL,
http://mydomain.com/svn/trunk/Widget-X.
Note that the import command will automatically create subdirectories
within the repository if they do not exist.
The import message is used as a log message.
By default, files and folders which match the global-ignore patterns are not imported. To override this behaviour you can use the Include ignored files checkbox. Refer to the section called “General Settings” for more information on setting a global ignore pattern.
As soon as you press TortoiseSVN imports the complete directory tree including all files into the repository. The project is now stored in the repository under version control. Please note that the folder you imported is NOT under version control! To get a version-controlled working copy you need to do a Checkout of the version you just imported. Or read on to find out how to import a folder in place.
Assuming you already have a repository, and you want to add a new folder structure to it, just follow these steps:
Use the repository browser to create a new project folder directly in the repository. If you are using one of the standard layouts you will probably want to create this as a sub-folder of trunk rather than in the repository root. The repository browser shows the repository structure just like Windows explorer, so you can see how things are organised.
Checkout the new folder over the top of the folder you want to import. You will get a warning that the local folder is not empty. Ignore the warning. Now you have a versioned top level folder with unversioned content.
Use → on this versioned folder to add some or all of the content. You can add and remove files, set
svn:ignoreproperties on folders and make any other changes you need to.Commit the top level folder, and you have a new versioned tree, and a local working copy, created from your existing folder.
Sometimes you need to have a file under version control which contains user specific data. That means you have a file which every developer/user needs to modify to suit his/her local setup. But versioning such a file is difficult because every user would commit his/her changes every time to the repository.
In such cases we suggest to use template files. You create a file which contains all the data your developers will need, add that file to version control and let the developers check this file out. Then, each developer has to make a copy of that file and rename that copy. After that, modifying the copy is not a problem anymore.
As an example, you can have a look at TortoiseSVN's build script. It
calls a file named default.build.user which
doesn't exist in the repository. Only the file
default.build.user.tmpl.
default.build.user.tmpl is the template file which
every developer has to create a copy from and rename that file
to default.build.user. Inside that file, we added
comments so that the users will see which lines they have to edit
and change according to their local setup to get it working.
So as not to disturb the users, we also added the file
default.build.user to the ignore list of its
parent folder, i.e. we've set the Subversion property
svn:ignore to include that filename.
That way it won't show up as unversioned on every commit.
To obtain a working copy you need to do a checkout from a repository.
Select a directory in windows explorer where you want to place your working copy. Right click to pop up the context menu and select the command → , which brings up the following dialog box:
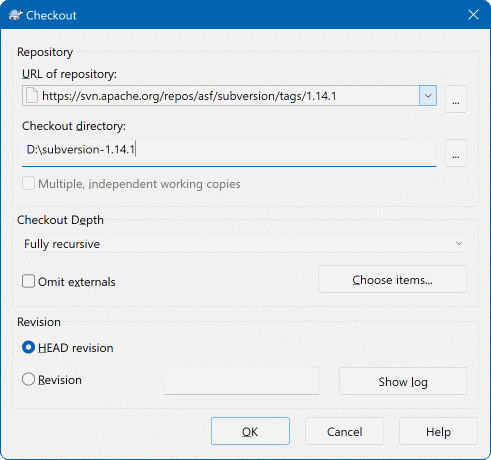
If you enter a folder name that does not yet exist, then a
directory with that name is created.
Important
In the default setting, the checkout menu item is not
located in the TortoiseSVN submenu but is shown at the top
explorer menu. TortoiseSVN commands that are not in the submenu
have SVN prepended:
If the project contains references to external projects which you do not want checked out at the same time, use the Omit externals checkbox.
Important
If Omit externals is checked, or if you wish to increase the depth value, you will have to perform updates to your working copy using → instead of → . The standard update will include all externals and keep the existing depth.
It is recommended that you check out only the trunk part of the
directory tree, or lower. If you specify the parent path of the
directory tree in the URL then you might end up with a full
hard disk since you will get a copy of the entire repository tree
including every branch and tag of your project!
Exporting
Sometimes you may want to create a local copy without any of those
.svn directories, e.g. to create a zipped
tarball of your source.
Read the section called “Exporting a Subversion Working Copy” to find out how to do that.
You can choose the depth you want to checkout, which allows you to specify the depth of recursion into child folders. If you want just a few sections of a large tree, You can checkout the top level folder only, then update selected folders recursively.
- Fully recursive
Checkout the entire tree, including all child folders and sub-folders.
- Immediate children, including folders
Checkout the specified directory, including all files and child folders, but do not populate the child folders.
- Only file children
Checkout the specified directory, including all files but do not checkout any child folders.
- Only this item
Checkout the directory only. Do not populate it with files or child folders.
- Working copy
Retain the depth specified in the working copy. This option is not used in the checkout dialog, but it is the default in all other dialogs which have a depth setting.
- Exclude
Used to reduce working copy depth after a folder has already been populated. This option is only available in the Update to revision dialog.
To easily select only the items you want for the checkout and force
the resulting working copy to keep only those items, click the
button. This opens a new dialog
where you can check all items you want in your working copy and uncheck
all the items you don't want. The resulting working copy is then known
as a sparse checkout. An update of such a working
copy will not fetch the missing files and folders but only update
what you already have in your working copy.
If you check out a sparse working copy (i.e., by choosing something other
than fully recursive for the checkout depth), you can
easily add or remove sub-folders later using one of the following methods.
Right click on the checked out folder, then use → and select . This opens the same dialog that was available in the original checkout and allows you to select or deselect items to include in the checkout. This method is very flexible but can be slow as every item in the folder is updated individually.
Right click on the checked out folder, then use → to bring up the repository browser. Find the sub-folder you would like to add to your working copy, then use → .
In the check for modifications dialog, first shift click on the button
. The dialog will show all
the files and folders which are in the repository but which you
have not checked out as remotely added.
Right click on the folder(s) you would like to add
to your working copy, then use
→ .
This feature is very useful when you only want to checkout parts of a
large tree, but you want the convenience of updating a single working
copy. Suppose you have a large tree which has sub-folders
Project01 to Project99,
and you only want to checkout
Project03,
Project25 and
Project76/SubProj.
Use these steps:
Checkout the parent folder with depth “Only this item” You now have an empty top level folder.
Select the new folder and use → to display the repository content.
Right click on
Project03and → . Keep the default settings and click on . You now have that folder fully populated.Repeat the same process for
Project25.Navigate to
Project76/SubProjand do the same. This time note that theProject76folder has no content except forSubProj, which itself is fully populated. Subversion has created the intermediate folders for you without populating them.
Changing working copy depth
Once you have checked out a working copy to a particular depth you can change that depth later to get more or less content using → . In that dialog, be sure to check the Make depth sticky checkbox.
Using an older server
Pre-1.5 servers do not understand the working copy depth request, so they cannot always deal with requests efficiently. The command will still work, but an older server may send all the data, leaving the client to filter out what is not required, which may mean a lot of network traffic. If possible you should upgrade your server to at least 1.5.
The checkbox Store pristine copies in working copy
is checked by default. With this option enabled, Subversion caches each file's
BASE revision (the pristine) inside the
working copy. This is so that operations such as diffing and reverting work offline,
and a commit can just send the modified versions parts of a file to the repo server
rather than the whole file. This design optimizes the speed and availability of
these operations on the assumption that network connectivity to the repository
may be the bottleneck while local storage is cheap.
For version pre 1.15 this was the only way Subversion worked.
Since Subversion 1.15, you can avoid having a copy of each file stored
in the working copy. Subversion will then download the pristine copy
only when needed ("on demand").
This can be useful if you have really large files to work with or if you
have a lot of binary files which rarely change.
To avoid storing the pristine copies for all files, uncheck the checkbox Store pristine copies in working copy.
Important
If Store pristine copies in working copy is unchecked, the resulting working copy will be unusable by pre 1.15 Subversion clients.
Sending the changes you made to your working copy is known as committing the changes. But before you commit you have to make sure that your working copy is up to date. You can either use → directly. Or you can use → first, to see which files have changed locally or on the server.
If your working copy is up to date and there are no conflicts, you are ready to commit your changes. Select any file and/or folders you want to commit, then → .
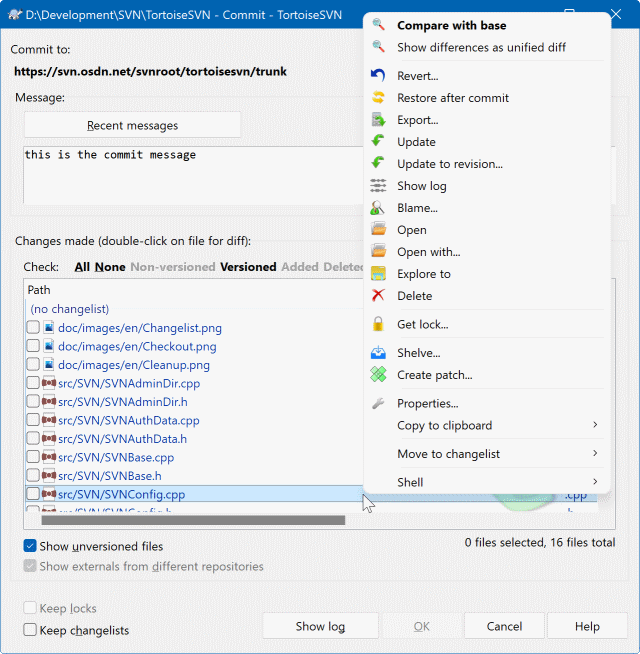
The commit dialog will show you every changed file, including added, deleted and unversioned files. If you don't want a changed file to be committed, just uncheck that file. If you want to include an unversioned file, just check that file to add it to the commit.
To quickly check or uncheck types of files like all versioned files or all modified files, click the link items just above the list of shown items.
For information on the coloring and overlays of the items according to their status, please see the section called “Local and Remote Status”.
Items which have been switched to a different repository path are
also indicated using an (s) marker. You may have
switched something while working on a branch and forgotten to switch
back to trunk. This is your warning sign!
Commit files or folders?
When you commit files, the commit dialog shows only the files you have selected. When you commit a folder the commit dialog will select the changed files automatically. If you forget about a new file you created, committing the folder will find it anyway. Committing a folder does not mean that every file gets marked as changed; It just makes your life easier by doing more work for you.
Many unversioned files in the commit dialog
If you think that the commit dialog shows you too many unversioned (e.g. compiler generated or editor backup) files, there are several ways to handle this. You can:
add the file (or a wildcard extension) to the list of files to exclude on the settings page. This will affect every working copy you have.
add the file to the
svn:ignorelist using → This will only affect the directory on which you set thesvn:ignoreproperty. Using the SVN Property Dialog, you can alter thesvn:ignoreproperty for a directory.add the file to the
svn:global-ignoreslist using → This will affect the directory on which you set thesvn:global-ignoresproperty and all subfolders as well.
Read the section called “Ignoring Files And Directories” for more information.
Double clicking on any modified file in the commit dialog will launch the external diff tool to show your changes. The context menu will give you more options, as shown in the screenshot. You can also drag files from here into another application such as a text editor or an IDE.
You can select or deselect items by clicking on the checkbox to the left of the item. For directories you can use Shift-select to make the action recursive.
The columns displayed in the bottom pane are customizable. If you right click on any column header you will see a context menu allowing you to select which columns are displayed. You can also change column width by using the drag handle which appears when you move the mouse over a column boundary. These customizations are preserved, so you will see the same headings next time.
By default when you commit changes, any locks that you hold on files
are released automatically after the commit succeeds. If you want
to keep those locks, make sure the Keep locks
checkbox is checked. The default state of this checkbox is taken
from the no_unlock option in the Subversion
configuration file. Read the section called “General Settings”
for information on how to edit the Subversion configuration file.
Warning when committing to a tag
Usually, commits are done to the trunk or a branch, but not to tags. After all, a tag is considered fixed and should not change.
If a commit is attempted to a tag URL, TortoiseSVN shows a confirmation dialog first to ensure whether this is really what is intended. Because most of the time such a commit is done by accident.
However, this check only works if the repository layout is one of the
recommended ones, meaning it uses the names trunk,
branches and tags to mark
the three main areas. In case the setup is different, the detection
of what is a tag/branch/trunk (also known as
classification patterns), can be configured in the
settings dialog:
the section called “Revision Graph Settings”
Drag and Drop
You can drag files into the commit dialog from elsewhere, so long as the working copies are checked out from the same repository. For example, you may have a huge working copy with several explorer windows open to look at distant folders of the hierarchy. If you want to avoid committing from the top level folder (with a lengthy folder crawl to check for changes) you can open the commit dialog for one folder and drag in items from the other windows to include within the same atomic commit.
You can drag unversioned files which reside within a working copy into the commit dialog, and they will be SVN added automatically.
Dragging files from the list at the bottom of the commit dialog to the log message edit box will insert the paths as plain text into that edit box. This is useful if you want to write commit log messages that include the paths that are affected by the commit.
Repairing External Renames
Sometimes files get renamed outside of Subversion, and they show up in the file list as a missing file and an unversioned file. To avoid losing the history you need to notify Subversion about the connection. Simply select both the old name (missing) and the new name (unversioned) and use → to pair the two files as a rename.
Repairing External Copies
If you made a copy of a file but forgot to use the Subversion command to do so, you can repair that copy so the new file doesn't lose its history. Simply select both the old name (normal or modified) and the new name (unversioned) and use → to pair the two files as a copy.
The commit dialog supports Subversion's changelist feature to help with grouping related files together. Find out about this feature in the section called “Change Lists”.
Sometimes you want to only commit parts of the changes you made to a file. Such a situation usually happens when you're working on something but then an urgent fix needs to be committed, and that fix happens to be in the same file you're working on.
right click on the file and use → . This will create a copy of the file as it is. Then you can edit the file, e.g. in a text editor and undo all the changes you don't want to commit. After saving those changes you can commit the file.
Using TortoiseMerge
If you use TortoiseMerge to edit the file, you can either edit the changes as you're used to, or mark all the changes that you want to include. right click on a modified block and use → to include that change. Finally right click and use → which will change the right view to only include the changes you've marked before and undo the changes you have not marked.
After the commit is done, the copy of the file is restored automatically, and you have the file with all your modifications that were not committed back.
Sometimes you have versioned files that change frequently but that you really don't want to commit. Sometimes this indicates a flaw in your build process - why are those files versioned? should you be using template files? But occasionally it is inevitable. A classic reason is that your IDE changes a timestamp in the project file every time you build. The project file has to be versioned as it includes all the build settings, but it doesn't need to be committed just because the timestamp changed.
To help out in awkward cases like this, we have reserved a changelist
called ignore-on-commit. Any file added to this
changelist will automatically be unchecked in the commit dialog.
You can still commit changes, but you have to select it manually
in the commit dialog.
Be sure to enter a log message which describes the changes you are committing. This will help you to see what happened and when, as you browse through the project log messages at a later date. The message can be as long or as brief as you like; many projects have guidelines for what should be included, the language to use, and sometimes even a strict format.
You can apply simple formatting to your log messages using a convention
similar to that used within emails.
To apply styling to text, use
*text* for bold,
_text_ for underlining, and
^text^ for italics.
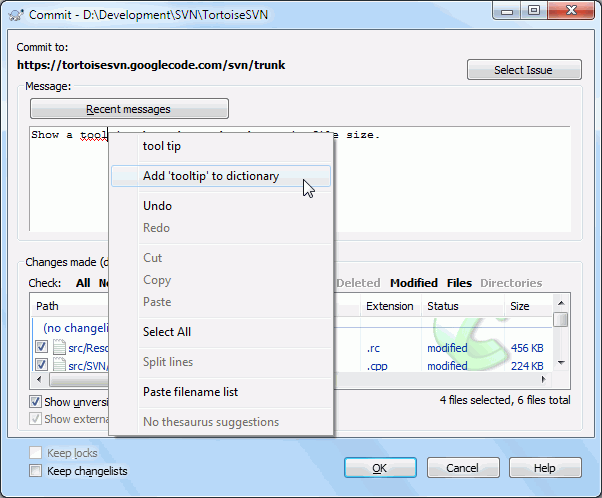
TortoiseSVN includes a spellchecker to help you get your log messages
right. This will highlight any mis-spelled words. Use the context menu
to access the suggested corrections. Of course, it doesn't know
every technical term that you do, so correctly
spelt words will sometimes show up as errors. But don't worry. You can
just add them to your personal dictionary using the context menu.
The log message window also includes a filename and function auto-completion
facility. This uses regular expressions to extract class and function names
from the (text) files you are committing, as well as the filenames themselves.
If a word you are typing matches anything in the list (after you have typed at
least 3 characters, or pressed Ctrl+Space),
a drop-down appears allowing you to select the full name.
The regular expressions supplied with TortoiseSVN are held in the TortoiseSVN
installation bin folder. You can also define your own
regexes and store them in %APPDATA%\TortoiseSVN\autolist.txt.
Of course your private autolist will not be overwritten when you update your
installation of TortoiseSVN. If you are unfamiliar with regular expressions,
take a look at the introduction at
https://en.wikipedia.org/wiki/Regular_expression
,
and the online documentation and tutorial at
https://www.regular-expressions.info/
.
Getting the regex just right can be tricky, so to help you sort out a
suitable expression there is a test dialog which allows you to enter
an expression and then type in filenames to test it against.
Start it from the command prompt using the command
TortoiseProc.exe /command:autotexttest.
The log message window also includes a commit message snippet facility.
These snippets are shown in the autocomplete dropdown once you type
a snippet shortcut, and selecting the snippet in the autocomplete dropdown
then inserts the full text of the snippet.
The snippets supplied with TortoiseSVN are held in the TortoiseSVN
installation bin folder. You can also define your own
snippets and store them in %APPDATA%\TortoiseSVN\snippet.txt.
# is the comment character. Newlines can be inserted
by escaping them like this: \n and \r.
To insert a backslash, escape it like this: \\.
You can re-use previously entered log messages. Just click on to view a list of the last few messages you entered for this working copy. The number of stored messages can be customized in the TortoiseSVN settings dialog.
You can clear all stored commit messages from the Saved data page of TortoiseSVN's settings, or you can clear individual messages from within the Recent messages dialog using the Delete key.
If you want to include the checked paths in your log message, you can use the command → in the edit control.
Another way to insert the paths into the log message is to simply drag the files from the file list onto the edit control.
Special Folder Properties
There are several special folder properties which can be used to help give more control over the formatting of commit log messages and the language used by the spellchecker module. Read the section called “Project Settings” for further information.
Integration with Bug Tracking Tools
If you have activated the bug tracking system, you can set one or more Issues in the Bug-ID / Issue-Nr: text box. Multiple issues should be comma separated. Alternatively, if you are using regex-based bug tracking support, just add your issue references as part of the log message. Learn more in the section called “Integration with Bug Tracking Systems / Issue Trackers”.
After pressing , a dialog appears displaying the progress of the commit.
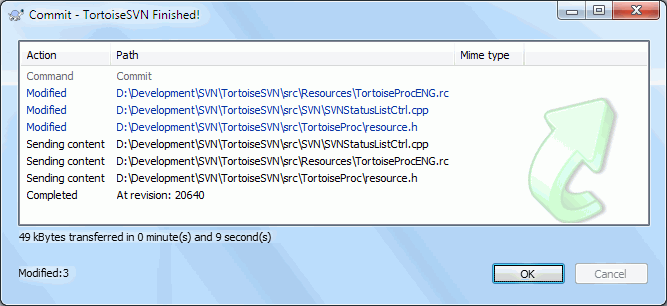
The progress dialog uses colour coding to highlight different commit actions
- Blue
Committing a modification.
- Purple
Committing a new addition.
- Dark red
Committing a deletion or a replacement.
- Black
All other items.
This is the default colour scheme, but you can customise those colours using the settings dialog. Read the section called “TortoiseSVN Colour Settings” for more information.
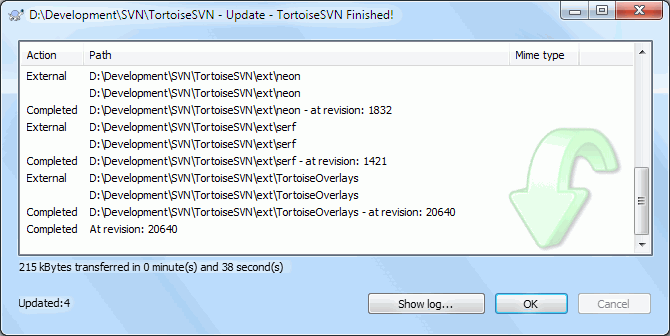
Periodically, you should ensure that changes done by others get
incorporated in your local working copy. The process of
getting changes from the server to your local copy is
known as updating. Updating may be done on
single files, a set of selected files, or recursively on
entire directory hierarchies. To update, select the files
and/or directories you want, right click and select
→
in the explorer context menu. A window will pop up displaying the
progress of the update as it runs.
Changes done by others will be merged into your files,
keeping any changes you may have done to the same files.
The repository is not affected by an update.
The progress dialog uses colour coding to highlight different update actions
- Purple
New item added to your WC.
- Dark red
Redundant item deleted from your WC, or missing item replaced in your WC.
- Green
Changes from repository successfully merged with your local changes.
- Bright red
Changes from repository merged with local changes, resulting in conflicts which you need to resolve.
- Black
Unchanged item in your WC updated with newer version from the repository.
This is the default colour scheme, but you can customise those colours using the settings dialog. Read the section called “TortoiseSVN Colour Settings” for more information.
If you get any conflicts during an update (this can happen if others changed the same lines in the same file as you did and those changes don't match) then the dialog shows those conflicts in red. You can double click on these lines to start the external merge tool to resolve the conflicts.
When the update is complete, the progress dialog shows a summary of the number of items updated, added, removed, conflicted, etc. below the file list. This summary information can be copied to the clipboard using Ctrl+C.
The standard Update command has no options and just updates your working copy to the HEAD revision of the repository, which is the most common use case. If you want more control over the update process, you should use → instead. This allows you to update your working copy to a specific revision, not only to the most recent one. Suppose your working copy is at revision 100, but you want it to reflect the state which it had in revision 50 - then simply update to revision 50.
In the same dialog you can also choose the depth
at which to update the current folder. The terms used are described
in the section called “Checkout Depth”. The default depth is
Working copy, which preserves the existing depth setting.
You can also set the depth sticky which means
subsequent updates will use that new depth, i.e. that depth is then
used as the default depth.
To make it easier to include or exclude specific items from the checkout click the button. This opens a new dialog where you can check all items you want in your working copy and uncheck all the items you don't want.
You can also choose whether to ignore any external projects in the update
(i.e. projects referenced using svn:externals).
Caution
If you update a file or folder to a specific revision, you should not make changes to those files. You will get “out of date” error messages when you try to commit them! If you want to undo changes to a file and start afresh from an earlier revision, you can rollback to a previous revision from the revision log dialog. Take a look at the section called “Roll back (Undo) revisions in the repository” for further instructions, and alternative methods.
can occasionally be useful to see what your project looked like at some earlier point in its history. But in general, updating individual files to an earlier revision is not a good idea as it leaves your working copy in an inconsistent state. If the file you are updating has changed name, you may even find that the file just disappears from your working copy because no file of that name existed in the earlier revision. You should also note that the item will show a normal green overlay, so it is indistinguishable from files which are up-to-date.
If you simply want a local copy of an old version of a file it is better to use the → command from the log dialog for that file.
Multiple Files/Folders
If you select multiple files and folders in the explorer and then select , all of those files/folders are updated one by one. TortoiseSVN makes sure that all files/folders which are from the same repository are updated to the exact same revision! Even if between those updates another commit occurred.
Once in a while, you will get a conflict when you update/merge your files from the repository or when you switch your working copy to a different URL. There are two kinds of conflicts:
- file conflicts
A file conflict occurs if two (or more) developers have changed the same few lines of a file.
- tree conflicts
A tree conflict occurs when a developer moved/renamed/deleted a file or folder, which another developer either also has moved/renamed/deleted or just modified.
A file conflict occurs when two or more developers have changed the same few lines of a file. As Subversion knows nothing of your project, it leaves resolving the conflicts to the developers. The conflicting area in a text file is marked like this:
<<<<<<< filename
your changes
=======
code merged from repository
>>>>>>> revision
Also, for every conflicted file Subversion places three additional files in your directory:
- filename.ext.mine
This is your file as it existed in your working copy before you updated your working copy - that is, without conflict markers. This file has your latest changes in it and nothing else.
- filename.ext.rOLDREV
This is the file that was the BASE revision before you updated your working copy. That is, it the file that you checked out before you made your latest edits.
- filename.ext.rNEWREV
This is the file that your Subversion client just received from the server when you updated your working copy. This file corresponds to the HEAD revision of the repository.
You can either launch an external merge tool / conflict
editor with
→
or you can use any text editor to resolve the conflict manually.
You should decide what the code should look like, do the necessary
changes and save the file.
Using a merge tool such as TortoiseMerge or one of the other
popular tools is generally the easier option as they generally
present the files involved in a 3-pane view and you don't
have to worry about the conflict markers. If you do use a text
editor then you should search for lines starting with the string
<<<<<<<.
Afterwards execute the command
→
and commit your modifications to the repository.
Please note that the Resolve command does not really
resolve the conflict. It just removes the
filename.ext.mine and
filename.ext.r* files,
to allow you to commit your changes.
If you have conflicts with binary files, Subversion does
not attempt to merge the files itself. The local file remains
unchanged (exactly as you last changed it) and you have
filename.ext.r* files.
If you want to discard your changes and keep the repository
version, just use the Revert command. If you want to keep
your version and overwrite the repository version, use the
Resolved command, then commit your version.
You can use the Resolved command for multiple files if you right click on the parent folder and select → This will bring up a dialog listing all conflicted files in that folder, and you can select which ones to mark as resolved.
A property conflict occurs when two or more developers have changed the same property. As with file content, resolving the conflict can only be done by the developers.
If one of the changes must override the other then choose the option to Resolve using local property or Resolve using remote property. If the changes must be merged then select Manually edit property, sort out what the property value should be and mark as resolved.
A tree conflict occurs when a developer moved/renamed/deleted a file or folder, which another developer either also has moved/renamed/deleted or just modified. There are many different situations that can result in a tree conflict, and all of them require different steps to resolve the conflict.
When a file is deleted locally in Subversion, the file is also deleted from the local file system, so even if it is part of a tree conflict it cannot show a conflicted overlay and you cannot right click on it to resolve the conflict. Use the Check for Modifications dialog instead to access the Edit conflicts option.
TortoiseSVN can help find the right place to merge changes, but there may be additional work required to sort out the conflicts. Remember that after an update the working BASE will always contain the revision of each item as it was in the repository at the time of update. If you revert a change after updating it goes back to the repository state, not to the way it was when you started making your own local changes.
Developer A modifies
Foo.cand commits it to the repository.Developer B has simultaneously moved
Foo.ctoBar.cin his working copy, or simply deletedFoo.cor its parent folder.
An update of developer B's working copy results in a tree conflict:
Foo.chas been deleted from working copy, but is marked with a tree conflict.If the conflict results from a rename rather than a delete then
Bar.cis marked as added, but does not contain developer A's modifications.
Developer B now has to choose whether to keep Developer A's changes.
In the case of a file rename, he can merge the changes to
Foo.c into the renamed file Bar.c.
For simple file or directory deletions he can choose to keep the
item with Developer A's changes and discard the deletion.
Or, by marking the conflict as resolved without doing anything he
effectively discards Developer A's changes.
The conflict edit dialog offers to merge changes if it can find
the original file of the renamed Bar.c.
If there are multiple files that are possible move sources,
then a button for each of these files is shown which allow
you to chose the correct file.
Developer A moves
Foo.ctoBar.cand commits it to the repository.Developer B modifies
Foo.cin his working copy.
Or in the case of a folder move ...
Developer A moves parent folder
FooFoldertoBarFolderand commits it to the repository.Developer B modifies
Foo.cin his working copy.
An update of developer B's working copy results in a tree conflict. For a simple file conflict:
Bar.cis added to the working copy as a normal file.Foo.cis marked as added (with history) and has a tree conflict.
For a folder conflict:
BarFolderis added to the working copy as a normal folder.FooFolderis marked as added (with history) and has a tree conflict.Foo.cis marked as modified.
Developer B now has to decide whether to go with developer A's reorganisation and merge her changes into the corresponding file in the new structure, or simply revert A's changes and keep the local file.
To merge her local changes with the reshuffle, Developer B must
first find out to what filename the conflicted file
Foo.c was renamed/moved in the repository.
This can be done by using the log dialog. Then use the button
which shows the correct source file to resolve the conflict.
If Developer B decides that A's changes were wrong then she must choose the Mark as resolved button in the conflict editor dialog. This marks the conflicted file/folder as resolved, but Developer A's changes need to be removed by hand. Again the log dialog helps to track down what was moved.
Developer A moves
Foo.ctoBar.cand commits it to the repository.Developer B moves
Foo.ctoBix.c.
An update of developer B's working copy results in a tree conflict:
Bix.cis marked as added with history.Bar.cis added to the working copy with status 'normal'.Foo.cis marked as deleted and has a tree conflict.
To resolve this conflict, Developer B has to find out
to what filename the conflicted file Foo.c
was renamed/moved in the repository. This can be done by
using the log dialog.
Then developer B has to decide which new filename of
Foo.c to keep - the one done by developer A
or the rename done by himself.
After developer B has manually resolved the conflict, the tree conflict has to be marked as resolved with the button in the conflict editor dialog.
Developer A working on trunk modifies
Foo.cand commits it to the repositoryDeveloper B working on a branch moves
Foo.ctoBar.cand commits it to the repository
A merge of developer A's trunk changes to developer B's branch working copy results in a tree conflict:
Bar.cis already in the working copy with status 'normal'.Foo.cis marked as missing with a tree conflict.
To resolve this conflict, Developer B has to mark the file as
resolved in the conflict editor dialog, which will remove it
from the conflict list.
She then has to decide whether to copy the missing file
Foo.c from the repository to the working
copy, whether to merge Developer A's changes to
Foo.c into the renamed
Bar.c or whether to ignore the changes
by marking the conflict as resolved and doing nothing else.
Note that if you copy the missing file from the repository and then mark as resolved, your copy will be removed again. You have to resolve the conflict first.
Developer A working on trunk moves
Foo.ctoBar.cand commits it to the repository.Developer B working on a branch modifies
Foo.cand commits it to the repository.
Developer A working on trunk moves parent folder
FooFoldertoBarFolderand commits it to the repository.Developer B working on a branch modifies
Foo.cin her working copy.
A merge of developer A's trunk changes to developer B's branch working copy results in a tree conflict:
Bar.cis marked as added.Foo.cis marked as modified with a tree conflict.
Developer B now has to decide whether to go with developer A's reorganisation and merge her changes into the corresponding file in the new structure, or simply revert A's changes and keep the local file.
To merge her local changes with the reshuffle, Developer B must
first find out to what filename the conflicted file
Foo.c was renamed/moved in the repository.
This can be done by using the log dialog for the merge source.
The conflict editor only shows the log for the working copy
as it does not know which path was used in the merge,
so you will have to find that yourself.
The changes must then be
merged by hand as there is currently no way to automate or even
simplify this process. Once the changes have been ported across,
the conflicted path is redundant and can be deleted.
If Developer B decides that A's changes were wrong then she must choose the Mark as resolved button in the conflict editor dialog. This marks the conflicted file/folder as resolved, but Developer A's changes need to be removed by hand. Again the log dialog for the merge source helps to track down what was moved.
Developer A working on trunk moves
Foo.ctoBar.cand commits it to the repository.Developer B working on a branch moves
Foo.ctoBix.cand commits it to the repository.
A merge of developer A's trunk changes to developer B's branch working copy results in a tree conflict:
Bix.cis marked with normal (unmodified) status.Bar.cis marked as added with history.Foo.cis marked as missing and has a tree conflict.
To resolve this conflict, Developer B has to find out
to what filename the conflicted file Foo.c
was renamed/moved in the repository.
This can be done by using the log dialog for the merge source.
Then developer B has to decide which new filename of
Foo.c to keep - the one done by developer A
or the rename done by himself.
After developer B has manually resolved the conflict, the tree conflict has to be marked as resolved with the button in the conflict editor dialog.
There are other cases which are labelled as tree conflicts simply because the conflict involves a folder rather than a file. For example if you add a folder with the same name to both trunk and branch and then try to merge you will get a tree conflict. If you want to keep the folder from the merge target, just mark the conflict as resolved. If you want to use the one in the merge source then you need to SVN delete the one in the target first and run the merge again. If you need anything more complicated then you have to resolve manually.
While you are working on your working copy you often need to know which files you have changed/added/removed or renamed, or even which files got changed and committed by others.
Now that you have checked out a working copy from a Subversion repository you can see your files in the windows explorer with changed icons. This is one of the reasons why TortoiseSVN is so popular. TortoiseSVN adds a so called overlay icon to each file icon which overlaps the original file icon. Depending on the Subversion status of the file the overlay icon is different.

A fresh checked out working copy has a green checkmark as overlay. That means the Subversion status is normal.

As soon as you start editing a file, the status changes to modified and the icon overlay then changes to a red exclamation mark. That way you can easily see which files were changed since you last updated your working copy and need to be committed.

If during an update a conflict occurs then the icon changes to a yellow exclamation mark.

If you have set the svn:needs-lock property on a file,
Subversion makes that file read-only until you get a lock on that file.
Such files have this overlay to indicate that you have to get a lock
first before you can edit that file.

If you hold a lock on a file, and the Subversion status is normal, this icon overlay reminds you that you should release the lock if you are not using it to allow others to commit their changes to the file.

This icon shows you that some files or folders inside the current folder have been scheduled to be deleted from version control or a file under version control is missing in a folder.

The plus sign tells you that a file or folder has been scheduled to be added to version control.

The bar sign tells you that a file or folder is ignored for version control purposes. This overlay is optional.

This icon shows files and folders which are not under version control, but have not been ignored. This overlay is optional.
In fact, you may find that not all of these icons are used on your system. This is because the number of overlays allowed by Windows is very limited and if you are also using an old version of TortoiseCVS, then there are not enough overlay slots available. TortoiseSVN tries to be a “Good Citizen (TM)” and limits its use of overlays to give other apps a chance too.
Now that there are more Tortoise clients around (TortoiseCVS, TortoiseHg, ...) the icon limit becomes a real problem. To work around this, the TortoiseSVN project introduced a common shared icon set, loaded as a DLL, which can be used by all Tortoise clients. Check with your client provider to see if this has been integrated yet :-)
For a description of how icon overlays correspond to Subversion status and other technical details, read the section called “Icon Overlays”.
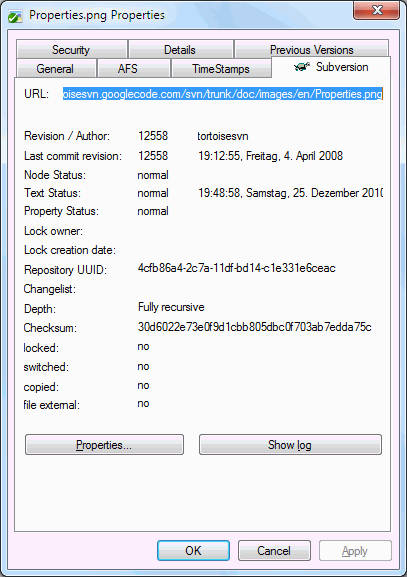
Sometimes you want to have more detailed information
about a file/directory than just the icon overlay.
You can get all the information Subversion provides in the
explorer properties dialog. Just select the file or
directory and select
→
in the context menu (note: this is the normal properties menu entry
the explorer provides, not the one in the TortoiseSVN submenu!).
In the properties dialog box TortoiseSVN has added a new
property page for files/folders under Subversion control,
where you can see all relevant information about the
selected file/directory.
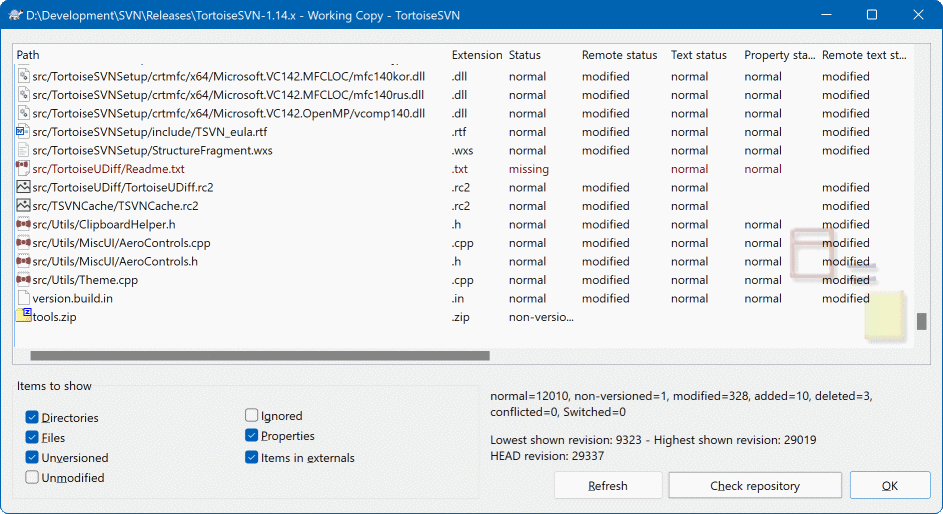
It's often very useful to know which files you have
changed and also which files got changed and
committed by others. That's where the command
→
comes in handy.
This dialog will show you every file that has changed in any
way in your working copy, as well as any unversioned files
you may have.
If you click on the then you can also look for changes in the repository. That way you can check before an update if there's a possible conflict. You can also update selected files from the repository without updating the whole folder. By default, the button only fetches the remote status with the checkout depth of the working copy. If you want to see all files and folders in the repository, even those you have not checked out, then you have to hold down the Shift key when you click on the button.
The dialog uses colour coding to highlight the status.
- Blue
Locally modified items.
if unchanged files are inside a directory that's been moved, the status will show a
+sign in the status column, and it will be colored in blue as well.- Purple
Added items. Items which have been added with history have a
+sign in the Text status column, and a tooltip shows where the item was copied from.- Dark red
Deleted or missing items.
- Green
Items modified locally and in the repository. The changes will be merged on update. These may produce conflicts on update.
- Bright red
Items modified locally and deleted in repository, or modified in repository and deleted locally. These will produce conflicts on update.
- Black
Unchanged and unversioned items.
This is the default colour scheme, but you can customise those colours using the settings dialog. Read the section called “TortoiseSVN Colour Settings” for more information.
Overlay icons are used to indicate other states as well. The screenshot below shows all the possible overlays that are shown if necessary.
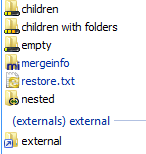
Overlays are shown for the following states:
Checkout depth
empty, meaning only the item itself.Checkout depth
files, meaning only the item itself and all file children without child folders.Checkout depth
immediates, meaning only the item itself and all file and folder children, but without children of the child folders.Nested items, i.e., working copies inside the working copy.
External items, i.e., all items that are added via an
svn:externalsproperty.Items that are restored after a commit. See the section called “Commit only parts of files” for details.
Items that have property modifications, but only to the
svn:mergeinfoproperty. If any other property is modified, the overlay is not used.
Items which have been switched to a different repository path are
also indicated using an (s) marker. You may have
switched something while working on a branch and forgotten to switch
back to trunk. This is your warning sign!
The context menu allows you to switch them back to the normal path again.
From the context menu of the dialog you can show a diff of the changes. Check the local changes you made using → . Check the changes in the repository made by others using → .
You can also revert changes in individual files. If you have deleted a file accidentally, it will show up as Missing and you can use Revert to recover it.
Unversioned and ignored files can be sent to the recycle bin from here using → . If you want to delete files permanently (bypassing the recycle bin) hold the Shift key while clicking on Delete.
If you want to examine a file in detail, you can drag it from here into another application such as a text editor or IDE, or you can save a copy simply by dragging it into a folder in explorer.
The columns are customizable. If you right click on any column header you will see a context menu allowing you to select which columns are displayed. You can also change column width by using the drag handle which appears when you move the mouse over a column boundary. These customizations are preserved, so you will see the same headings next time.
If you are working on several unrelated tasks at once, you can also group files together into changelists. Read the section called “Change Lists” for more information.
At the bottom of the dialog you can see a summary of the range of repository revisions in use in your working copy. These are the commit revisions, not the update revisions; they represent the range of revisions where these files were last committed, not the revisions to which they have been updated. Note that the revision range shown applies only to the items displayed, not to the entire working copy. If you want to see that information for the whole working copy you must check the Show unmodified files checkbox.
Tip
If you want a flat view of your working copy, i.e. showing all files and folders at every level of the folder hierarchy, then the Check for Modifications dialog is the easiest way to achieve that. Just check the Show unmodified files checkbox to show all files in your working copy.
Repairing External Renames
Sometimes files get renamed outside of Subversion, and they show up in the file list as a missing file and an unversioned file. To avoid losing the history you need to notify Subversion about the connection. Simply select both the old name (missing) and the new name (unversioned) and use → to pair the two files as a rename.
Repairing External Copies
If you made a copy of a file but forgot to use the Subversion command to do so, you can repair that copy so the new file doesn't lose its history. Simply select both the old name (normal or modified) and the new name (unversioned) and use → to pair the two files as a copy.
Often you want to look inside your files, to have a look at what
you've changed. You can accomplish this by selecting a file which
has changed, and selecting from
TortoiseSVN's context menu. This starts the external
diff-viewer, which will then compare the current file with the
pristine copy (BASE revision), which was stored
after the last checkout or update.
Tip
Even when not inside a working copy or when you have multiple versions of the file lying around, you can still display diffs:
Select the two files you want to compare in explorer (e.g. using Ctrl and the mouse) and choose from TortoiseSVN's context menu. The file clicked last (the one with the focus, i.e. the dotted rectangle) will be regarded as the later one.
In an ideal world, you only ever work on one thing at a time, and your working copy contains only one set of logical changes. OK, back to reality. It often happens that you have to work on several unrelated tasks at once, and when you look in the commit dialog, all the changes are mixed in together. The changelist feature helps you group files together, making it easier to see what you are doing. Of course this can only work if the changes do not overlap. If two different tasks affect the same file, there is no way to separate the changes.
You can see changelists in several places, but the most important ones are the commit dialog and the check-for-modifications dialog. Let's start in the check-for-modifications dialog after you have worked on several features and many files. When you first open the dialog, all the changed files are listed together. Suppose you now want to organise things and group those files according to feature.
Select one or more files and use → to add an item to a changelist. Initially there will be no changelists, so the first time you do this you will create a new changelist. Give it name which describes what you are using it for, and click . The dialog will now change to show groups of items.
Once you have created a changelist you can drag and drop items into it, either from another changelist, or from Windows Explorer. Dragging from Explorer can be useful as it allows you to add items to a changelist before the file is modified. You could do that from the check-for-modifications dialog, but only by displaying all unmodified files.
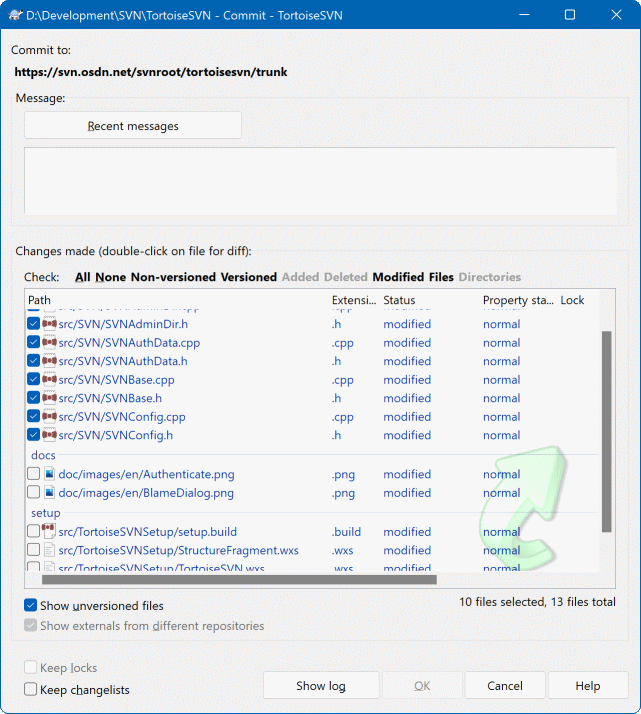
In the commit dialog you can see those same files, grouped by changelist.
Apart from giving an immediate visual indication of groupings, you can
also use the group headings to select which files to commit.
TortoiseSVN reserves one changelist name for its own use, namely
ignore-on-commit. This is used to mark versioned
files which you almost never want to commit even though they have local
changes. This feature is described in the section called “Excluding Items from the Commit List”.
When you commit files belonging to a changelist then normally you would expect that the changelist membership is no longer needed. So by default, files are removed from changelists automatically on commit. If you wish to retain the file in its changelist, use the Keep changelists checkbox at the bottom of the commit dialog.
Tip
Changelists are purely a local client feature. Creating and removing changelists will not affect the repository, nor anyone else's working copy. They are simply a convenient way for you to organise your files.
Warning
Note that if you use changelists, externals will no longer show up in their own groups anymore. Once there are changelists, files and folders are grouped by changelist, not by external anymore.
More often than wanted, it's necessary to stop what you were working on and work on something else. For example a serious problem needs immediate dealing with and you have to stop working on the new feature. If possible, you should commit the changes you have done so far and then start working on the urgent issue, but often those changes would break the build or are just not ready for committing yet.
So if you can't commit your local changes yet, you have to put them aside while you're working on the urgent issue. The shelving feature helps you do exactly that: you can store your local changes on a shelve, get your working copy in a clean state again and work on the issue. After you're finished with the urgent issue and you've committed those changes, you can unshelve your shelved work and continue working on your previous task again.
Two new commands are implemented for this. One for shelving and one for unshelving.
To shelve your local changes, select your working copy and use → The following dialog allows you to select the files you want to shelve and give a name under which you want to store them.
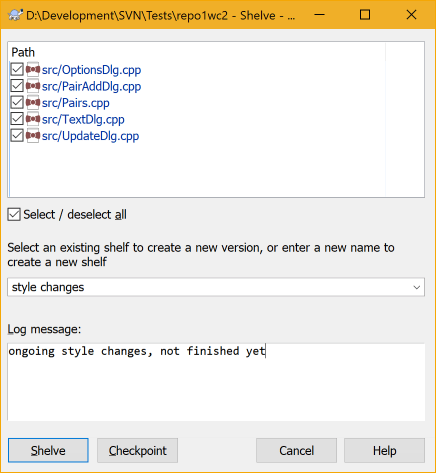
If you select an existing shelf, then a new version is created for that shelf.
If you provide a new name, a new shelf is created for the selected files.
If you click the button, the shelf is created and your working copy files are reset to a clean state. If you click the button, the shelf is created but your local modifications are kept.
To unshelve your changes, use → to get the unshelve dialog. This dialog shows you a list of all shelved items. Select the shelved item you want and the version to apply back to your working copy and click .
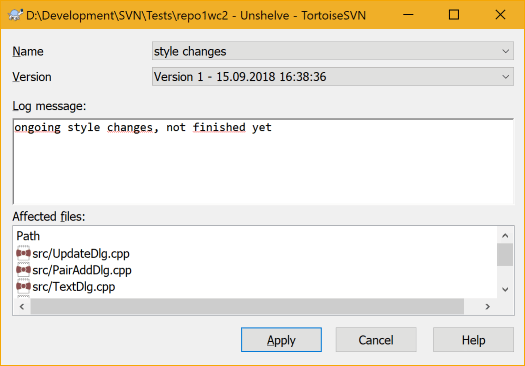
Tip
Shelves are purely a local client feature. Creating and removing Shelves will not affect the repository, nor anyone else's working copy.
Experimental
The shelving feature is still marked as experimental.
That means that while shelving works as advertised, it is still in a stage where it's heavily improved and worked on. That also means that there's no guarantee that the shelves you create are upwards compatible and future versions might not be able to use them. And of course the UI might change as well in future versions to accommodate new features and behaviors.
For every change you make and commit, you should provide a log message for that change. That way you can later find out what changes you made and why, and you have a detailed log for your development process.
The Revision Log Dialog retrieves all those log messages and shows them to you. The display is divided into 3 panes.
The top pane shows a list of revisions where changes to the file/folder have been committed. This summary includes the date and time, the person who committed the revision and the start of the log message.
Lines shown in blue indicate that something has been copied to this development line (perhaps from a branch).
The middle pane shows the full log message for the selected revision.
The bottom pane shows a list of all files and folders that were changed as part of the selected revision.
But it does much more than that - it provides context menu commands which you can use to get even more information about the project history.
There are several places from where you can show the Log dialog:
From the TortoiseSVN context submenu
From the property page
From the Progress dialog after an update has finished. Then the Log dialog only shows those revisions which were changed since your last update
From the repository browser
If the repository is unavailable you will see the Want to go offline? dialog, described in the section called “Offline Mode”.
The top pane has an Actions column containing icons that summarize what has been done in that revision. There are four different icons, each shown in its own column.

If a revision modified a file or directory, the modified icon is shown in the first column.

If a revision added a file or directory, the added icon is shown in the second column.

If a revision deleted a file or directory, the deleted icon is shown in the third column.

If a revision replaced a file or directory, the replaced icon is shown in the fourth column.

If a revision moved or renamed a file or directory, the moved icon is shown in the fourth column.

If a revision replaced a file or directory by moving/renaming it, the move replaced icon is shown in the fourth column.

If a revision merged a file or directory, the merged icon is shown in the fourth column.

If a revision reverse merged a file or directory, the reverse merged icon is shown in the fourth column.
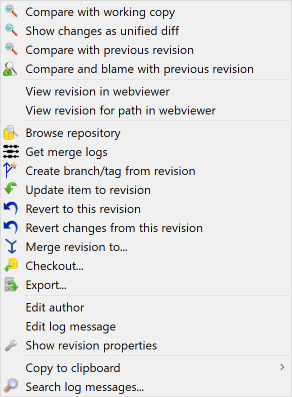
The top pane of the Log dialog has a context menu that allows you to
access much more information. Some of these menu entries appear only
when the log is shown for a file, and some only when the log is shown
for a folder.
- Compare with working copy
Compare the selected revision with your working copy. The default Diff-Tool is TortoiseMerge which is supplied with TortoiseSVN. If the log dialog is for a folder, this will show you a list of changed files, and allow you to review the changes made to each file individually.
- Compare and blame with working BASE
Blame the selected revision, and the file in your working BASE and compare the blame reports using a visual diff tool. Read the section called “Blame Differences” for more detail. (files only)
- Show changes as unified diff
View the changes made in the selected revision as a Unified-Diff file (GNU patch format). This shows only the differences with a few lines of context. It is harder to read than a visual file compare, but will show all file changes together in a compact format.
If you hold down the Shift key when clicking on the menu item, a dialog shows up first where you can set options for the unified diff. These options include the ability to ignore changes in line endings and whitespaces.
- Compare with previous revision
Compare the selected revision with the previous revision. This works in a similar manner to comparing with your working copy. For folders this option will first show the changed files dialog allowing you to select files to compare.
- Compare and blame with previous revision
Show the changed files dialog allowing you to select files. Blame the selected revision, and the previous revision, and compare the results using a visual diff tool. (folders only)
- Save revision to...
Save the selected revision to a file so you have an older version of that file. (files only)
- Open / Open with...
Open the selected file, either with the default viewer for that file type, or with a program you choose. (files only)
- Blame...
Blame the file up to the selected revision. (files only)
- Browse repository
Open the repository browser to examine the selected file or folder in the repository as it was at the selected revision.
- Create branch/tag from revision
Create a branch or tag from a selected revision. This is useful e.g. if you forgot to create a tag and already committed some changes which weren't supposed to get into that release.
- Update item to revision
Update your working copy to the selected revision. Useful if you want to have your working copy reflect a time in the past, or if there have been further commits to the repository and you want to update your working copy one step at a time. It is best to update a whole directory in your working copy, not just one file, otherwise your working copy could be inconsistent.
If you want to undo an earlier change permanently, use Revert to this revision instead.
- Revert to this revision
Revert to an earlier revision. If you have made several changes, and then decide that you really want to go back to how things were in revision N, this is the command you need. The changes are undone in your working copy so this operation does not affect the repository until you commit the changes. Note that this will undo all changes made after the selected revision, replacing the file/folder with the earlier version.
If your working copy is in an unmodified state, after you perform this action your working copy will show as modified. If you already have local changes, this command will merge the undo changes into your working copy.
What is happening internally is that Subversion performs a reverse merge of all the changes made after the selected revision, undoing the effect of those previous commits.
If after performing this action you decide that you want to undo the undo and get your working copy back to its previous unmodified state, you should use → from within Windows Explorer, which will discard the local modifications made by this reverse merge action.
If you simply want to see what a file or folder looked like at an earlier revision, use Update to revision or Save revision as... instead.
- Revert changes from this revision
Undo changes from which were made in the selected revision. The changes are undone in your working copy so this operation does not affect the repository at all! Note that this will undo the changes made in that revision only; it does not replace your working copy with the entire file at the earlier revision. This is very useful for undoing an earlier change when other unrelated changes have been made since.
If your working copy is in an unmodified state, after you perform this action your working copy will show as modified. If you already have local changes, this command will merge the undo changes into your working copy.
What is happening internally is that Subversion performs a reverse merge of that one revision, undoing its effect from a previous commit.
You can undo the undo as described above in Revert to this revision.
- Merge revision to...
Merge the selected revision(s) into a different working copy. A folder selection dialog allows you to choose the working copy to merge into, but after that there is no confirmation dialog, nor any opportunity to try a test merge. It is a good idea to merge into an unmodified working copy so that you can revert the changes if it doesn't work out! This is a useful feature if you want to merge selected revisions from one branch to another.
- Checkout...
Make a fresh checkout of the selected folder at the selected revision. This brings up a dialog for you to confirm the URL and revision, and select a location for the checkout.
- Export...
Export the selected file/folder at the selected revision. This brings up a dialog for you to confirm the URL and revision, and select a location for the export.
- Edit author / log message
Edit the log message or author attached to a previous commit. Read the section called “Changing the Log Message and Author” to find out how this works.
- Show revision properties
View and edit any revision property, not just log message and author. Refer to the section called “Changing the Log Message and Author”.
- Copy to clipboard
Copy the log details of the selected revisions to the clipboard. This will copy the revision number, author, date, log message and the list of changed items for each revision.
- Search log messages...
Search log messages for the text you enter. This searches the log messages that you entered and also the action summaries created by Subversion (shown in the bottom pane). The search is not case sensitive.
- Create code collaborator review...
This menu is shown only if the SmartBear code collaborator tool is installed. When invoked for the first time, a dialog is shown prompting the user to enter user credentials for both code collaborator and SVN. Once the settings are stored, the settings dialog is no longer shown when the menu is invoked, unless the user holds Ctrl while executing the menu item. The configuration and the chosen revision(s) are used to invoke the code collaborator graphical user interface client, which creates a new review with the selected revisions.
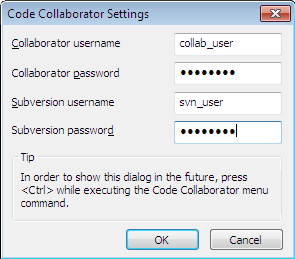

If you select two revisions at once (using the usual
Ctrl-modifier), the context menu changes and
gives you fewer options:
- Compare revisions
Compare the two selected revisions using a visual difference tool. The default Diff-Tool is TortoiseMerge which is supplied with TortoiseSVN.
If you select this option for a folder, a further dialog pops up listing the changed files and offering you further diff options. Read more about the Compare Revisions dialog in the section called “Comparing Folders”.
- Blame revisions
Blame the two revisions and compare the blame reports using a visual difference tool. Read the section called “Blame Differences” for more detail.
- Show differences as unified diff
View the differences between the two selected revisions as a Unified-Diff file. This works for files and folders.
- Copy to clipboard
Copy log messages to clipboard as described above.
- Search log messages...
Search log messages as described above.
If you select two or more revisions (using the usual Ctrl or Shift modifiers), the context menu will include an entry to Revert all changes which were made in the selected revisions. This is the easiest way to rollback a group of revisions in one go.
You can also choose to merge the selected revisions to another working copy, as described above.
If all selected revisions have the same author, you can edit the author of all those revisions in one go.
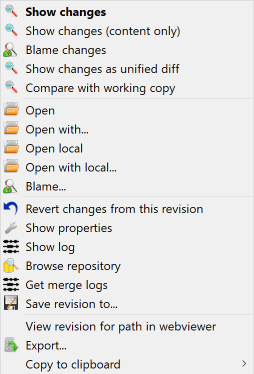
The bottom pane of the Log dialog also has a context menu that allows you to
- Show changes
Show changes made in the selected revision for the selected file.
- Blame changes
Blame the selected revision and the previous revision for the selected file, and compare the blame reports using a visual diff tool. Read the section called “Blame Differences” for more detail.
- Show as unified diff
Show file changes in unified diff format. This context menu is only available for files shown as modified.
- Open / Open with...
Open the selected file, either with the default viewer for that file type, or with a program you choose.
- Blame...
Opens the Blame dialog, allowing you to blame up to the selected revision.
- Revert changes from this revision
Revert the changes made to the selected file in that revision.
- Show properties
View the Subversion properties for the selected item.
- Show log
Show the revision log for the selected single file.
- Get merge logs
Show the revision log for the selected single file, including merged changes. Find out more in the section called “Merge Tracking Features”.
- Save revision to...
Save the selected revision to a file so you have an older version of that file.
- Export...
Export the selected items in this revision to a folder, preserving the file hierarchy.
When multiple files are selected in the bottom pane of the Log dialog, the context menu changes to the following:
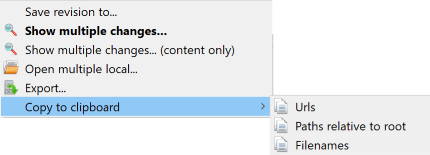
- Save revision to...
Save the selected revision to a file so you have an older version of that file.
- Show multiple changes...
Show changes made in the selected revision for the selected files. Note that the show changes functionality is invoked multiple times, which may bring up multiple copies of your selected diff tool, or just add a new comparison tab in your diff tool. If you have selected more than 15 files, you will be prompted to confirm the action.
- Open multiple local...
This will open local working copy files that correspond to your selected files using the application that is registered for the extension. [The behavior is the one you would get double-clicking the working-copy file(s) in Windows explorer]. Depending on how your file extension is associated to an application and the capabilities of the application, this may be a slow operation. In the worst case, new instances of the application may be launched by Windows for each file that was selected.
If you hold Ctrl while invoking this command, the working copy files are always loaded into Visual Studio. This only works when the following conditions are met: Visual Studio must be running in the same user context while having the same process integrity level [running as admin or not] as TortoiseProc.exe. It may be desirable to have the solution containing the changed files loaded, although this is not strictly necessary. Only files that exist on disk with extensions [.cpp, .h, .cs, .rc, .resx, .xaml, .js, .html, .htm, .asp, .aspx, .php, .css and .xml] will be loaded. A maximum of 100 files can be loaded into Visual Studio at one time, and the files are always loaded as new tabs into the currently open instance of Visual Studio. The benefit of reviewing code changes in Visual Studio lies in the fact that you can then use the built-in code navigation, reference finding, static code analysis and other tools built into Visual Studio.
- Export...
Export the selected files/folder at the selected revision. This brings up a dialog for you to confirm the URL and revision, and select a location for the export.
Tip
You may notice that sometimes we refer to changes and other times to differences. What's the difference?
Subversion uses revision numbers to mean 2 different things. A revision generally represents the state of the repository at a point in time, but it can also be used to represent the changeset which created that revision, e.g. “Done in r1234” means that the changes committed in r1234 implement feature X. To make it clearer which sense is being used, we use two different terms.
If you select two revisions N and M, the context menu will offer
to show the difference between those two
revisions. In Subversion terms this is
diff -r M:N.
If you select a single revision N, the context menu will offer
to show the changes made in that revision.
In Subversion terms this is diff -r N-1:N
or diff -c N.
The bottom pane shows the files changed in all selected revisions, so the context menu always offers to show changes.
The Log dialog does not always show all changes ever made for a number of reasons:
For a large repository there may be hundreds or even thousands of changes and fetching them all could take a long time. Normally you are only interested in the more recent changes. By default, the number of log messages fetched is limited to 100, but you can change this value in → (the section called “TortoiseSVN Dialog Settings 1”),
When the Stop on copy/rename box is checked, Show Log will stop at the point that the selected file or folder was copied from somewhere else within the repository. This can be useful when looking at branches (or tags) as it stops at the root of that branch, and gives a quick indication of changes made in that branch only.
Normally you will want to leave this option unchecked. TortoiseSVN remembers the state of the checkbox, so it will respect your preference.
When the Show Log dialog is invoked from within the Merge dialog, the box is always checked by default. This is because merging is most often looking at changes on branches, and going back beyond the root of the branch does not make sense in that instance.
Note that Subversion currently implements renaming as a copy/delete pair, so renaming a file or folder will also cause the log display to stop if this option is checked.
If you want to see more log messages, click the to retrieve the next 100 log messages. You can repeat this as many times as needed.
Next to this button there is a multi-function button which remembers the last option you used it for. Click on the arrow to see the other options offered.
Use if you want to view a specific range of revisions. A dialog will then prompt you to enter the start and end revision.
Use if you want to see all log messages from HEAD right back to revision 1.
To refresh the latest revision in case there were other commits while the log dialog was open, hit the F5 key.
To refresh the log cache, hit the Ctrl-F5 keys.
Because the log dialog shows you the log from HEAD, not from the current working copy revision, it often happens that there are log messages shown for content which has not yet been updated in your working copy. To help make this clearer, the commit message which corresponds to the revision you have in your working copy is shown in bold.
When you show the log for a folder the revision highlighted is the highest revision found anywhere within that folder, which requires a crawl of the working copy. The crawl takes place within a separate thread so as not to delay showing the log, but as a result highlighting for folders may not appear immediately.
Subversion 1.5 and later keeps a record of merges using properties. This allows us to get a more detailed history of merged changes. For example, if you develop a new feature on a branch and then merge that branch back to trunk, the feature development will show up on the trunk log as a single commit for the merge, even though there may have been 1000 commits during branch development.
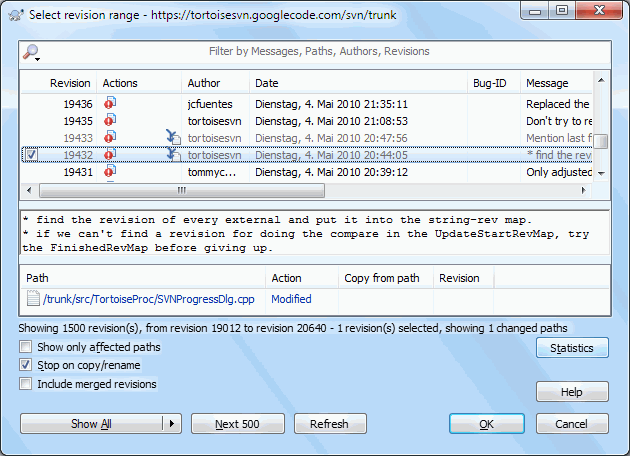
If you want to see the detail of which revisions were merged as part of that commit, use the Include merged revisions checkbox. This will fetch the log messages again, but will also interleave the log messages from revisions which were merged. Merged revisions are shown in grey because they represent changes made on a different part of the tree.
Of course, merging is never simple! During feature development on the branch there will probably be occasional merges back from trunk to keep the branch in sync with the main line code. So the merge history of the branch will also include another layer of merge history. These different layers are shown in the log dialog using indentation levels.
Revision properties are completely different from the Subversion properties of each item. Revprops are descriptive items which are associated with one specific revision number in the repository, such as log message, commit date and committer name (author).
Sometimes you might want to change a log message you once entered, maybe because there's a spelling error in it or you want to improve the message or change it for other reasons. Or you want to change the author of the commit because you forgot to set up authentication or...
Subversion lets you change revision properties any time you want. But since such changes can't be undone (those changes are not versioned) this feature is disabled by default. To make this work, you must set up a pre-revprop-change hook. Please refer to the chapter on Hook Scripts in the Subversion Book for details about how to do that. Read the section called “Server side hook scripts” to find some further notes on implementing hooks on a Windows machine.
Once you've set up your server with the required hooks, you can change the author and log message (or any other revprop) of any revision, using the context menu from the top pane of the Log dialog. You can also edit a log message using the context menu for the middle pane.
Warning
Because Subversion's revision properties are not versioned, making
modifications to such a property (for example, the
svn:log commit
message property) will overwrite the previous value of that
property forever.
Important
Since TortoiseSVN keeps a cache of all the log information, edits made for author and log messages will only show up on your local installation. Other users using TortoiseSVN will still see the cached (old) authors and log messages until they refresh the log cache. Refer to the section called “Refreshing the View”
If you want to restrict the log messages to show only those you are interested in rather than scrolling through a list of hundreds, you can use the filter controls at the top of the Log Dialog. The start and end date controls allow you to restrict the output to a known date range. The search box allows you to show only messages which contain a particular phrase.
Click on the search icon to select which information you want to search in, and to choose regex mode. Normally you will only need a simple sub-string search, but if you need to more flexible search terms, you can use regular expressions. If you hover the mouse over the box, a tooltip will give hints on how to use the regex functions, or the sub-string functions. The filter works by checking whether your filter string matches the log entries, and then only those entries which match the filter string are shown.
Simple sub-string search works in a manner similar to a search engine.
Strings to search for are separated by spaces, and all strings must
match. You can use a leading - to specify that a
particular sub-string is not found (invert matching for that term),
and you can use ! at the start of the expression
to invert matching for the entire expression.
You can use a leading + to specify that a sub-string
should be included, even if previously excluded with a -.
Note that the order of inclusion/exclusion is significant here.
You can use quote marks to surround a string which must contain spaces,
and if you want to search for a literal quotation mark you can use two
quotation marks together as a self-escaping sequence.
Note that the backslash character is not used as
an escape character and has no special significance in simple sub-string
searches. Examples will make this easier:
Alice Bob -Eve
searches for strings containing both Alice and Bob but not Eve
Alice -Bob +Eve
searches for strings containing both Alice but not Bob, or strings which contain Eve.
-Case +SpecialCase
searches for strings which do not contain Case, but still include strings which contain SpecialCase.
!Alice Bob
searches for strings which do not contain both Alice and Bob
!-Alice -Bob
do you remember De Morgan's theorem? NOT(NOT Alice AND NOT Bob) reduces to (Alice OR Bob).
"Alice and Bob"
searches for the literal expression “Alice and Bob”
""
searches for a double-quote anywhere in the text
"Alice says ""hi"" to Bob"
searches for the literal expression “Alice says "hi" to Bob”.
Describing the use of regular expression searches is beyond the scope of this manual, but you can find online documentation and a tutorial at https://www.regular-expressions.info/ .
Note that these filters act on the messages already retrieved. They do not control downloading of messages from the repository.
You can also filter the path names in the bottom pane using the Show only affected paths checkbox. Affected paths are those which contain the path used to display the log. If you fetch the log for a folder, that means anything in that folder or below it. For a file it means just that one file. Normally the path list shows any other paths which are affected by the same commit, but in grey. If the box is checked, those paths are hidden.
Sometimes your working practices will require log messages to follow
a particular format, which means that the text describing the changes
is not visible in the abbreviated summary shown in the top pane.
The property tsvn:logsummary can be used to
extract a portion of the log message to be shown in the top pane.
Read the section called “TortoiseSVN Project Properties” to find
out how to use this property.
No Log Formatting from Repository Browser
Because the formatting depends upon accessing Subversion properties, you will only see the results when using a checked out working copy. Fetching properties remotely is a slow operation, so you will not see this feature in action from the repo browser.
The button brings up a box showing some interesting information about the revisions shown in the Log dialog. This shows how many authors have been at work, how many commits they have made, progress by week, and much more. Now you can see at a glance who has been working hardest and who is slacking ;-)
This page gives you all the numbers you can think of, in particular the period and number of revisions covered, and some min/max/average values.
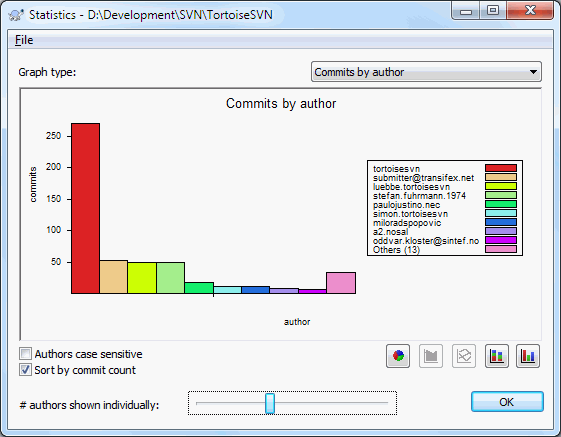
This graph shows you which authors have been active on the
project as a simple histogram, stacked histogram or
pie chart.
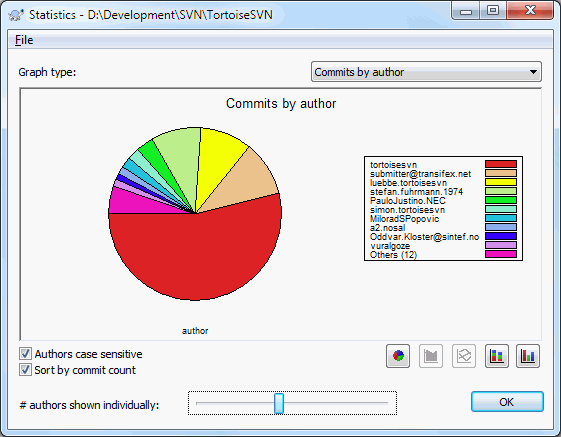
Where there are a few major authors and many minor contributors, the number of tiny segments can make the graph more difficult to read. The slider at the bottom allows you to set a threshold (as a percentage of total commits) below which any activity is grouped into an Others category.
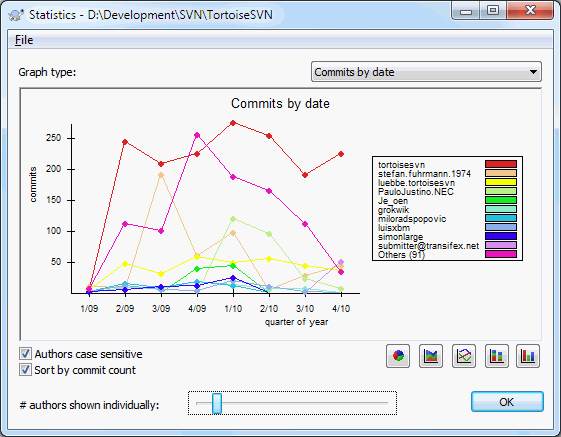
This page gives you a graphical representation of project
activity in terms of number of commits and
author. This gives some idea of when a project is being worked
on, and who was working at which time.
When there are several authors, you will get many lines on the graph. There are two views available here: normal, where each author's activity is relative to the base line, and stacked, where each author's activity is relative to the line underneath. The latter option avoids the lines crossing over, which can make the graph easier to read, but less easy to see one author's output.
By default the analysis is case-sensitive, so users
PeterEgan and PeteRegan
are treated as different authors. However, in many cases user names
are not case-sensitive, and are sometimes entered inconsistently,
so you may want DavidMorgan and
davidmorgan to be treated as the same person.
Use the Authors case insensitive checkbox
to control how this is handled.
Note that the statistics cover the same period as the Log dialog. If that is only displaying one revision then the statistics will not tell you very much.
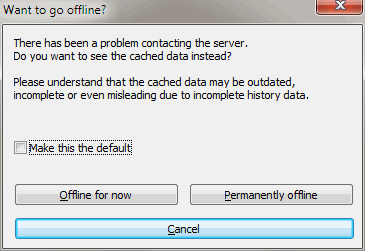
If the server is not reachable, and you have log caching enabled
you can use the log dialog and revision graph in offline mode.
This uses data from the cache, which allows you to continue working
although the information may not be up-to-date or even complete.
Here you have three options:
- Offline for now
Complete the current operation in offline mode, but retry the repository next time log data is requested.
- Permanently offline
Remain in offline mode until a repository check is specifically requested. See the section called “Refreshing the View”.
- Cancel
If you don't want to continue the operation with possibly stale data, just cancel.
The Make this the default checkbox prevents this dialog from re-appearing and always picks the option you choose next. You can still change (or remove) the default after doing this from → .
If you want to check the server again for newer log messages, you can simply refresh the view using F5. If you are using the log cache (enabled by default), this will check the repository for newer messages and fetch only the new ones. If the log cache was in offline mode, this will also attempt to go back online.
If you are using the log cache and you think the message content or author may have changed, you can use Shift-F5 or Ctrl-F5 to re-fetch the displayed messages from the server and update the log cache. Note that this only affects messages currently shown and does not invalidate the entire cache for that repository.
One of the commonest requirements in project development is to see what has changed. You might want to look at the differences between two revisions of the same file, or the differences between two separate files. TortoiseSVN provides a built-in tool named TortoiseMerge for viewing differences of text files. For viewing differences of image files, TortoiseSVN also has a tool named TortoiseIDiff. Of course, you can use your own favourite diff program if you like.
- Local changes
If you want to see what changes you have made in your working copy, just use the explorer context menu and select → .
- Difference to another branch/tag
If you want to see what has changed on trunk (if you are working on a branch) or on a specific branch (if you are working on trunk), you can use the explorer context menu. Just hold down the Shift key while you right click on the file. Then select → . In the following dialog, specify the URL in the repository with which you want to compare your local file to.
You can also use the repository browser and select two trees to diff, perhaps two tags, or a branch/tag and trunk. The context menu there allows you to compare them using . Read more in the section called “Comparing Folders”.
- Difference from a previous revision
If you want to see the difference between a particular revision and your working copy, use the Revision Log dialog, select the revision of interest, then select from the context menu.
If you want to see the difference between the last committed revision and your working copy, assuming that the working copy hasn't been modified, just right click on the file. Then select → . This will perform a diff between the revision before the last-commit-date (as recorded in your working copy) and the working BASE. This shows you the last change made to that file to bring it to the state you now see in your working copy. It will not show changes newer than your working copy.
- Difference between two previous revisions
If you want to see the difference between two revisions which are already committed, use the Revision Log dialog and select the two revisions you want to compare (using the usual Ctrl-modifier). Then select from the context menu.
If you did this from the revision log for a folder, a Compare Revisions dialog appears, showing a list of changed files in that folder. Read more in the section called “Comparing Folders”.
- All changes made in a commit
If you want to see the changes made to all files in a particular revision in one view, you can use Unified-Diff output (GNU patch format). This shows only the differences with a few lines of context. It is harder to read than a visual file compare, but will show all the changes together. From the Revision Log dialog select the revision of interest, then select from the context menu.
- Difference between files
If you want to see the differences between two different files, you can do that directly in explorer by selecting both files (using the usual Ctrl-modifier). Then from the explorer context menu select → .
If the files to compare are not located in the same folder, use the command → to mark the first file for diffing, then browse to the second file and use → . To remove the marked file, use the command → again, but hold down the Ctrl-modifier while clicking on it.
- Difference between WC file/folder and a URL
If you want to see the differences between a file in your working copy, and a file in any Subversion repository, you can do that directly in explorer by selecting the file then holding down the Shift key whilst right clicking to obtain the context menu. Select → . You can do the same thing for a working copy folder. TortoiseMerge shows these differences in the same way as it shows a patch file - a list of changed files which you can view one at a time.
- Difference with blame information
If you want to see not only the differences but also the author, revision and date that changes were made, you can combine the diff and blame reports from within the revision log dialog. Read the section called “Blame Differences” for more detail.
- Difference between folders
The built-in tools supplied with TortoiseSVN do not support viewing differences between directory hierarchies. But if you have an external tool which does support that feature, you can use that instead. In the section called “External Diff/Merge Tools” we tell you about some tools which we have used.
If you have configured a third party diff tool, you can use Shift when selecting the Diff command to use the alternate tool. Read the section called “External Program Settings” to find out about configuring other diff tools.
Sometimes in the life of a project you might change the line endings
from CRLF to LF, or you may
change the indentation of a section. Unfortunately this will mark
a large number of lines as changed, even though there is no change
to the meaning of the code. The options here will help to manage
these changes when it comes to comparing and applying differences.
You will see these settings in the Merge and
Blame dialogs, as well as in the settings for
TortoiseMerge.
Ignore line endings excludes changes which are due solely to difference in line-end style.
Compare whitespaces includes all changes in indentation and inline whitespace as added/removed lines.
Ignore whitespace changes excludes changes which are due solely to a change in the amount or type of whitespace, e.g. changing the indentation or changing tabs to spaces. Adding whitespace where there was none before, or removing a whitespace completely is still shown as a change.
Ignore all whitespaces excludes all whitespace-only changes.
Naturally, any line with changed content is always included in the diff.
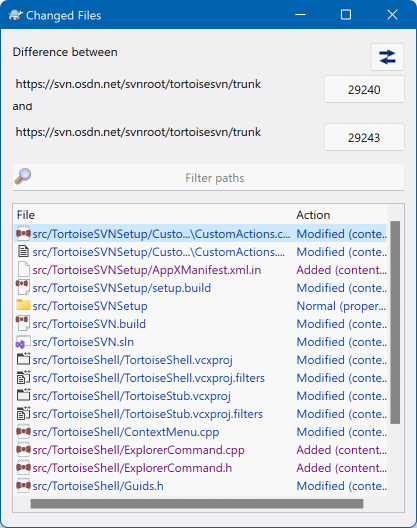
When you select two trees within the repository browser, or when
you select two revisions of a folder in the log dialog, you can
→ .
This dialog shows a list of all files which have changed and allows you to compare or blame them individually using context menu.
You can export a change tree, which is useful if you need to send someone else your project tree structure, but containing only the files which have changed. This operation works on the selected files only, so you need to select the files of interest - usually that means all of them - and then → . You will be prompted for a location to save the change tree.
You can also export the list of changed files to a text file using → .
If you want to export the list of files and the actions (modified, added, deleted) as well, you can do that using → .
The button at the top allows you to change the direction of comparison. You can show the changes need to get from A to B, or if you prefer, from B to A.
The buttons with the revision numbers on can be used to change to a different revision range. When you change the range, the list of items which differ between the two revisions will be updated automatically.
If the list of filenames is very long, you can use the search box
to reduce the list to filenames containing specific text. Note that
a simple text search is used, so if you want to restrict the list
to C source files you should enter .c rather than
*.c.
There are many tools available for diffing text files, including our own TortoiseMerge, but we often find ourselves wanting to see how an image file has changed too. That's why we created TortoiseIDiff.
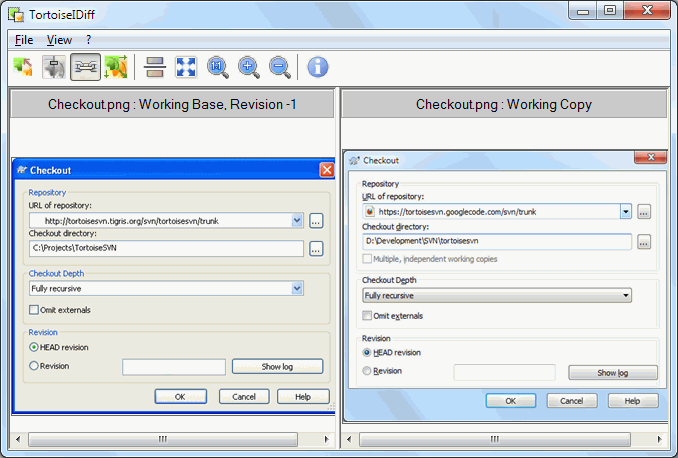
→
for any of the common image file formats will start TortoiseIDiff
to show image differences. By default the images are displayed side-by-side
but you can use the View menu or toolbar to switch to a top-bottom
view instead, or if you prefer, you can overlay the images and pretend
you are using a lightbox.
Naturally you can also zoom in and out and pan around the image. You can also pan the image simply by left-dragging it. If you select the Link images together option, then the pan controls (scrollbars, mousewheel) on both images are linked.
An image info box shows details about the image file, such as the size in pixels, resolution and colour depth. If this box gets in the way, use → to hide it. You can get the same information in a tooltip if you hover the mouse over the image title bar.
When the images are overlaid, the relative intensity of the images (alpha blend) is controlled by a slider control at the left side. You can click anywhere in the slider to set the blend directly, or you can drag the slider to change the blend interactively. Ctrl+Shift-Wheel to change the blend.
The button above the slider toggles between 0% and 100% blends, and if you double click the button, the blend toggles automatically every second until you click the button again. This can be useful when looking for multiple small changes.
Sometimes you want to see a difference rather than a blend. You might have the image files for two revisions of a printed circuit board and want to see which tracks have changed. If you disable alpha blend mode, the difference will be shown as an XOR of the pixel colour values. Unchanged areas will be plain white and changes will be coloured.
When you want to diff non-text documents you normally have to use the software used to create the document as it understands the file format. For the commonly used Microsoft Office and Open Office suites there is indeed some support for viewing differences and TortoiseSVN includes scripts to invoke these with the right settings when you diff files with the well-known file extensions. You can check which file extensions are supported and add your own by going to → and clicking in the External Programs section.
Problems with Office 2010
If you installed the Click-to-Run version of Office 2010 and you try to diff documents you may get an error message from Windows Script Host something like this: “ActiveX component can't create object: word.Application”. It seems you have to use the MSI-based version of Office to get the diff functionality.
If the tools we provide don't do what you need, try one of the many open-source or commercial programs available. Everyone has their own favourites, and this list is by no means complete, but here are a few that you might consider:
- WinMerge
WinMerge is a great open-source diff tool which can also handle directories.
- Perforce Merge
Perforce is a commercial RCS, but you can download the diff/merge tool for free. Get more information from Perforce .
- KDiff3
KDiff3 is a free diff tool which can also handle directories. You can download it from here .
- SourceGear DiffMerge
SourceGear Vault is a commercial RCS, but you can download the diff/merge tool for free. Get more information from SourceGear .
- ExamDiff
ExamDiff Standard is freeware. It can handle files but not directories. ExamDiff Pro is shareware and adds a number of goodies including directory diff and editing capability. In both flavours, version 3.2 and above can handle unicode. You can download them from PrestoSoft .
- Beyond Compare
Similar to ExamDiff Pro, this is an excellent shareware diff tool which can handle directory diffs and unicode. Download it from Scooter Software .
- Araxis Merge
Araxis Merge is a useful commercial tool for diff and merging both files and folders. It does three-way comparison in merges and has synchronization links to use if you've changed the order of functions. Download it from Araxis .
Read the section called “External Program Settings” for information on how to set up TortoiseSVN to use these tools.
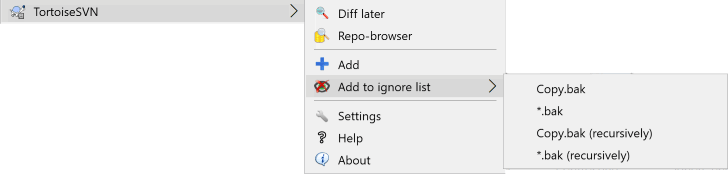
If you created new files and/or directories during
your development process then you need to add them
to source control too. Select the file(s) and/or directory
and use
→ .
After you added the files/directories to source control
the file appears with a added icon overlay which means you
first have to commit your working copy to make those
files/directories available to other developers.
Adding a file/directory does not affect
the repository!
Many Adds
You can also use the Add command on already versioned folders. In that case, the add dialog will show you all unversioned files inside that versioned folder. This helps if you have many new files and need to add them all at once.
To add files from outside your working copy you can use the drag-and-drop handler:
select the files you want to add
right drag them to the new location inside the working copy
release the right mouse button
select → . The files will then be copied to the working copy and added to version control.
You can also add files within a working copy simply by left-dragging and dropping them onto the commit dialog.
If you add a file or folder by mistake, you can undo the addition before you commit using → .
It often happens that you already have the files you need in another project in your repository, and you simply want to copy them across. You could simply copy the files and add them, but that would not give you any history. And if you subsequently fix a bug in the original files, you can only merge the fix automatically if the new copy is related to the original in Subversion.
The easiest way to copy files and folders from within a working copy is to use the right drag menu. When you right drag a file or folder from one working copy to another, or even within the same folder, a context menu appears when you release the mouse.
Now you can copy existing versioned content to a new location, possibly
renaming it at the same time.
You can also copy or move versioned files within a working copy, or between two working copies, using the familiar cut-and-paste method. Use the standard Windows Copy or Cut to copy one or more versioned items to the clipboard. If the clipboard contains such versioned items, you can then use → (note: not the standard Windows Paste) to copy or move those items to the new working copy location.
You can copy files and folders from your working copy to another location in the repository using → . Refer to the section called “Creating a Branch or Tag” to find out more.
You can locate an older version of a file or folder in the log dialog and copy it to a new location in the repository directly from the log dialog using → . Refer to the section called “Getting Additional Information” to find out more.
You can also use the repository browser to locate content you want, and copy it into your working copy directly from the repository, or copy between two locations within the repository. Refer to the section called “The Repository Browser” to find out more.
Cannot copy between repositories
Whilst you can copy or move files and folders within a repository, you cannot copy or move from one repository to another while preserving history using TortoiseSVN. Not even if the repositories live on the same server. All you can do is copy the content in its current state and add it as new content to the second repository.
If you are uncertain whether two URLs on the same server refer to the same or different repositories, use the repo browser to open one URL and find out where the repository root is. If you can see both locations in one repo browser window then they are in the same repository.
In most projects you will have files and folders that should not be subject
to version control. These might include files created by the compiler,
*.obj, *.lst, maybe an output folder used to store
the executable. Whenever you commit changes, TortoiseSVN shows your unversioned
files, which fills up the file list in the commit dialog. Of course you
can turn off this display, but then you might forget to add a new source
file.
The best way to avoid these problems is to add the derived files to the project's ignore list. That way they will never show up in the commit dialog, but genuine unversioned source files will still be flagged up.
If you right click on a single unversioned file,
and select the command
→
from the context menu, a submenu appears allowing you to select just that
file, or all files with the same extension. Both submenus
also have a (recursively) equivalent.
If you select multiple files, there is no submenu and you can only add
those specific files/folders.
If you choose the (recursively) version of
the ignore context menu, the item will be ignored not just
for the selected folder but all subfolders as well. However
this requires SVN clients version 1.8 or higher.
If you want to remove one or more items from the ignore list,
right click on those items and select
→
You can also access a folder's svn:ignore
property directly. That allows you to specify more general
patterns using filename globbing, described in the section below.
Read the section called “Project Settings” for more information
on setting properties directly. Please be aware that each ignore pattern
has to be placed on a separate line. Separating them by spaces does not work.
The Global Ignore List
Another way to ignore files is to add them to the
global ignore list. The big difference here
is that the global ignore list is a client property.
It applies to all Subversion projects, but on
the client PC only. In general it is better to use the
svn:ignore property where possible, because it
can be applied to specific project areas, and it works for
everyone who checks out the project. Read
the section called “General Settings” for more information.
Ignoring Versioned Items
Versioned files and folders can never be ignored - that's a feature of Subversion. If you versioned a file by mistake, read the section called “Ignore files which are already versioned” for instructions on how to “unversion” it.
Subversion's ignore patterns make use of filename globbing, a technique originally used in Unix to specify files using meta-characters as wildcards. The following characters have special meaning:
- *
Matches any string of characters, including the empty string (no characters).
- ?
Matches any single character.
- [...]
Matches any one of the characters enclosed in the square brackets. Within the brackets, a pair of characters separated by “-” matches any character lexically between the two. For example
[AGm-p]matches any one ofA,G,m,n,oorp.
Pattern matching is case sensitive, which can cause problems
on Windows. You can force case insensitivity the hard way
by pairing characters, e.g. to ignore *.tmp
regardless of case, you could use a pattern like
*.[Tt][Mm][Pp].
If you want an official definition for globbing, you can find it in the IEEE specifications for the shell command language Pattern Matching Notation .
No Paths in Global Ignore List
You should not include path information in your pattern.
The pattern matching is intended to be used against plain
file names and folder names.
If you want to ignore all CVS folders,
just add CVS to the ignore list. There is
no need to specify CVS */CVS as you did in
earlier versions.
If you want to ignore all tmp folders
when they exist within a prog folder but
not within a doc folder you should use the
svn:ignore property instead. There is no
reliable way to achieve this using global ignore patterns.
Subversion allows renaming and moving of files and folders. So there are menu entries for delete and rename in the TortoiseSVN submenu.
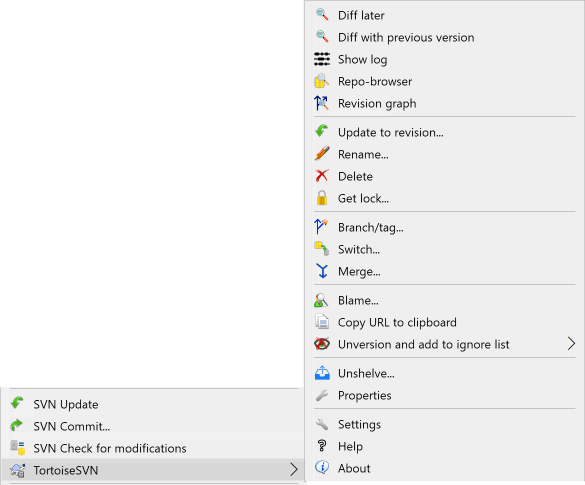
Use → to remove files or folders from Subversion.
When you → a file or folder, it is removed from your working copy immediately as well as being marked for deletion in the repository on next commit. The item's parent folder shows a “modified” icon overlay. Up until you commit the change, you can get the file back using → on the parent folder.
If you want to delete an item from the repository, but keep it locally as an unversioned file/folder, use → . You have to hold the Shift key while right clicking on the item in the explorer list pane (right pane) in order to see this in the extended context menu.
If an item is deleted via the explorer instead of using the TortoiseSVN context menu, the commit dialog shows those items as missing and lets you remove them from version control too before the commit. However, if you update your working copy, Subversion will spot the missing item and replace it with the latest version from the repository. If you need to delete a version-controlled file, always use → so that Subversion doesn't have to guess what you really want to do.
Getting a deleted file or folder back
If you have deleted a file or a folder and already committed that delete operation to the repository, then a normal → can't bring it back anymore. But the file or folder is not lost at all. If you know the revision the file or folder got deleted (if you don't, use the log dialog to find out) open the repository browser and switch to that revision. Then select the file or folder you deleted, right click and select → as the target for that copy operation select the path to your working copy.
If you want to do a simple in-place rename of a file or folder, use → Enter the new name for the item and you're done.
If you want to move files around inside your working copy, perhaps to a different sub-folder, use the right mouse drag-and-drop handler:
select the files or directories you want to move
right drag them to the new location inside the working copy
release the right mouse button
in the popup menu select →
Commit the parent folder
Since renames and moves are done as a delete followed by an add you must commit the parent folder of the renamed/moved file so that the deleted part of the rename/move will show up in the commit dialog. If you don't commit the removed part of the rename/move, it will stay behind in the repository and when your co-workers update, the old file will not be removed. i.e. they will have both the old and the new copies.
You must commit a folder rename before changing any of the files inside the folder, otherwise your working copy can get really messed up.
Another way of moving or copying files is to use the Windows copy/cut commands. Select the files you want to copy, right click and choose → from the explorer context menu. Then browse to the target folder, right click and choose → . For moving files, choose → instead of → .
You can also use the repository browser to move items around. Read the section called “The Repository Browser” to find out more.
Do Not SVN Move Externals
You should not use the TortoiseSVN
Move or Rename
commands on a folder which has been created using
svn:externals.
This action would cause the external item to be deleted from
its parent repository, probably upsetting many other people.
If you need to move an externals folder you should use an
ordinary shell move, then adjust the
svn:externals properties of the source
and destination parent folders.
If the repository already contains two files with the same name
but differing only in case (e.g. TEST.TXT
and test.txt), you
will not be able to update or checkout the parent directory
on a Windows client. Whilst Subversion supports case-sensitive
filenames, Windows does not.
This sometimes happens when two people commit, from separate working copies, files which happen to have the same name, but with a case difference. It can also happen when files are committed from a system with a case-sensitive file system, like Linux.
In that case, you have to decide which one of them you want to keep and delete (or rename) the other one from the repository.
Preventing two files with the same name
There is a server hook script available at: https://svn.apache.org/repos/asf/subversion/trunk/contrib/hook-scripts/ that will prevent checkins which result in case conflicts.
Sometimes your friendly IDE will rename files for you as part of a refactoring exercise, and of course it doesn't tell Subversion. If you try to commit your changes, Subversion will see the old filename as missing and the new one as an unversioned file. You could just check the new filename to get it added in, but you would then lose the history tracing, as Subversion does not know the files are related.
A better way is to notify Subversion that this change is actually a rename, and you can do this within the Commit and Check for Modifications dialogs. Simply select both the old name (missing) and the new name (unversioned) and use → to pair the two files as a rename.
Usually you set your ignore list such that all generated files are ignored in Subversion. But what if you want to clear all those ignored items to produce a clean build? Usually you would set that in your makefile, but if you are debugging the makefile, or changing the build system it is useful to have a way of clearing the decks.
TortoiseSVN provides just such an option using → . You have to hold the Shift while right clicking on a folder in the explorer list pane (right pane) in order to see this in the extended context menu. This will produce a dialog which lists all unversioned files anywhere in your working copy. You can then select or deselect items to be removed.
When such items are deleted, the recycle bin is used, so if you make a mistake here and delete a file that should have been versioned, you can still recover it.
If you want to undo all changes you made in a file since the last update you need to select the file, right click to pop up the context menu and then select the command → A dialog will pop up showing you the files that you've changed and can revert. Select those you want to revert and click on .
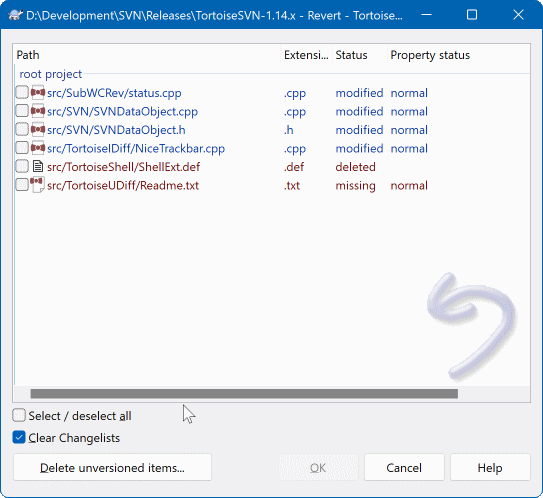
If you also want to clear all the changelists that are set, check the box at the bottom of the dialog.
If you want to undo a deletion or a rename, you need to use Revert on the parent folder as the deleted item does not exist for you to right click on.
If you want to undo the addition of an item, this appears in the context menu as → . This is really a revert as well, but the name has been changed to make it more obvious.
The columns in this dialog can be customized in the same way as the columns in the Check for modifications dialog. Read the section called “Local and Remote Status” for further details.
Since revert is sometimes used to clean up a working copy, there is an extra button which allows you to delete unversioned items as well. When you click this button another dialog comes up listing all the unversioned items, which you can then select for deletion.
Undoing Changes which have been Committed
will only undo your local changes. It does not undo any changes which have already been committed. If you want to undo all the changes which were committed in a particular revision, read the section called “Revision Log Dialog” for further information.
Revert is Slow
When you revert changes you may find that the operation takes a lot longer than you expect. This is because the modified version of the file is sent to the recycle bin, so you can retrieve your changes if you reverted by mistake. However, if your recycle bin is full, Windows takes a long time to find a place to put the file. The solution is simple: either empty the recycle bin or deactivate the Use recycle bin when reverting box in TortoiseSVN's settings.
If a Subversion command cannot complete successfully, perhaps due to server problems, your working copy can be left in an inconsistent state. In that case you need to use → on the folder. It is a good idea to do this at the top level of the working copy.
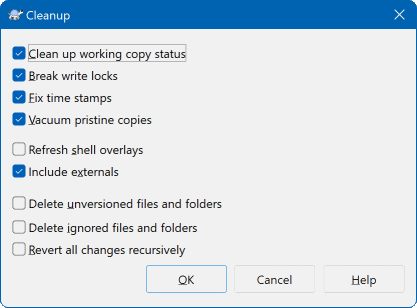
In the cleanup dialog, there are also other useful options
to get the working copy into a clean state.
- Clean up working copy status
As stated above, this option tries to get an inconsistent working copy into a workable and usable state. This doesn't affect any data you have but only the internal states of the working copy database. This is the actual
Cleanupcommand you know from older TortoiseSVN clients or other SVN clients.- Break write locks
If checked, all write locks are removed from the working copy database. For most situations, this is required for the cleanup to work!
Only uncheck this option if the working copy is used by other users/clients at the time. But if the cleanup then fails, you have to check this option for the cleanup to succeed.
- Fix time stamps
Adjusts the recorded time stamps of all files, speeding up future status checks. This can speed up all dialogs that show working copy file lists, for example the Commit dialog.
- Vacuum pristine copies
Removes unused pristine copies and compresses all remaining pristine copies of working copy files.
- Refresh shell overlays
Sometimes the shell overlays, especially on the tree view on the left side of the explorer don't show the current status, or the status cache failed to recognize changes. In this situation, you can use this command to force a refresh.
- Include externals
If this is checked, then all actions are done for all files and folders included with the
svn:externalsproperty as well.- Delete unversioned files and folders, Delete ignored files and folders
This is a fast and easy way to remove all generated files in your working copy. All files and folders that are not versioned are moved to the trash bin.
Note: you can also do the same from the → dialog. There you also get a list of all the unversioned files and folders to select for removal.
- Revert all changes recursively
This command reverts all your local modifications which are not committed yet.
Note: it's better to use the → command instead, because there you can first see and select the files which you want to revert.
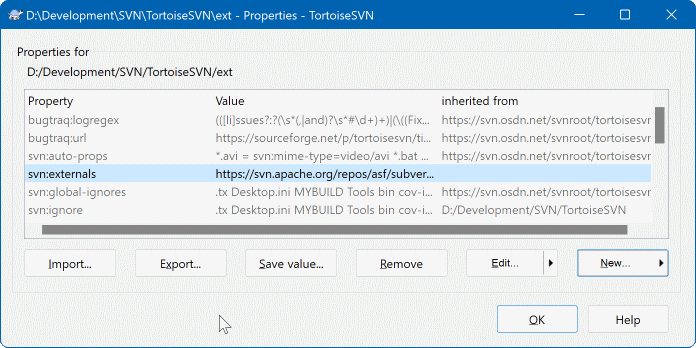
You can read and set the Subversion properties
from the Windows properties dialog, but also from
→
and within TortoiseSVN's status lists, from
→ .
You can add your own properties, or some properties with a
special meaning in Subversion. These begin with svn:.
svn:externals is such a property; see how to handle
externals in the section called “External Items”.
Subversion supports CVS-like keyword expansion which can be used to embed filename and revision information within the file itself. Keywords currently supported are:
- $Date$
Date of last known commit. This is based on information obtained when you update your working copy. It does not check the repository to find more recent changes.
- $Revision$
Revision of last known commit.
- $Author$
Author who made the last known commit.
- $HeadURL$
The full URL of this file in the repository.
- $Id$
A compressed combination of the previous four keywords.
To find out how to use these keywords, look at the svn:keywords section in the Subversion book, which gives a full description of these keywords and how to enable and use them.
For more information about properties in Subversion see the Special Properties .
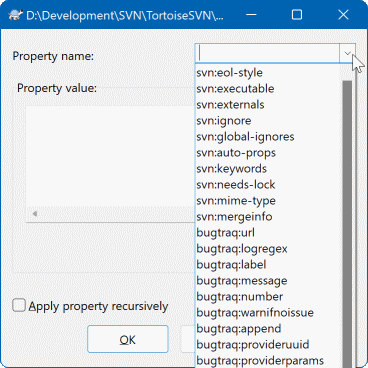
To add a new property, first click on New....
Select the required property name from the menu, and then
fill in the required information in the specific property
dialog. These specific property dialogs are described in more
detail in the section called “Property Editors”.
To add a property that doesn't have its own dialog, choose from the New... menu. Then either select an existing property in the combo box or enter a custom property name.
If you want to apply a property to many items at once, select the files/folders in explorer, then select → .
If you want to apply the property to every file and folder in the hierarchy below the current folder, check the Recursive checkbox.
If you wish to edit an existing property, select that property from the list of existing properties, then click on .
If you wish to remove an existing property, select that property from the list of existing properties, then click on .
The svn:externals property can be used to
pull in other projects from the same repository or a completely
different repository. For more information, read
the section called “External Items”.
Edit properties at HEAD revision
Because properties are versioned, you cannot edit the properties of previous revisions. If you look at properties from the log dialog, or from a non-HEAD revision in the repository browser, you will see a list of properties and values, but no edit controls.
Often you will find yourself applying the same set of properties many
times, for example bugtraq:logregex. To simplify
the process of copying properties from one project to another, you
can use the Export/Import feature.
From the file or folder where the properties are already set, use → , select the properties you wish to export and click on . You will be prompted for a filename where the property names and values will be saved.
From the folder(s) where you wish to apply these properties, use → and click on . You will be prompted for a filename to import from, so navigate to the place you saved the export file previously and select it. The properties will be added to the folders non-recursively.
If you want to add properties to a tree recursively, follow the steps above, then in the property dialog select each property in turn, click on , check the Apply property recursively box and click on .
The Import file format is binary and proprietary to TortoiseSVN. Its only purpose is to transfer properties using Import and Export, so there is no need to edit these files.
TortoiseSVN can handle binary property values using files. To read a binary property value, to a file. To set a binary value, use a hex editor or other appropriate tool to create a file with the content you require, then from that file.
Although binary properties are not often used, they can be useful in some applications. For example if you are storing huge graphics files, or if the application used to load the file is huge, you might want to store a thumbnail as a property so you can obtain a preview quickly.
You can configure Subversion and TortoiseSVN to set properties automatically on files and folders when they are added to the repository. There are two ways of doing this.
You can edit the Subversion configuration file to enable
this feature on your client. The General
page of TortoiseSVN's settings dialog has an edit button to
take you there directly.
The config file is a simple text file which controls some of
Subversion's workings. You need to change two things:
firstly in the section headed
miscellany uncomment the line
enable-auto-props = yes.
Secondly you need to edit the section below to define which
properties you want added to which file types.
This method is a standard Subversion feature and works with
any Subversion client. However it has to be defined on each
client individually - there is no way to propagate these settings
from the repository.
An alternative method is to set the tsvn:autoprops
property on folders, as described in the next section. This method
only works for TortoiseSVN clients, but it does get propagated
to all working copies on update.
As of Subversion 1.8, you can also set the property
svn:auto-props on the root folder. The property value
is automatically inherited by all child items.
Whichever method you choose, you should note that auto-props are only applied to files at the time they are added to the working copy. Auto-props will never change the properties of files which are already versioned.
If you want to be absolutely sure that new files have the correct properties applied, you should set up a repository pre-commit hook to reject commits where the required properties are not set.
Commit properties
Subversion properties are versioned. After you change or add a property you have to commit your changes.
Conflicts on properties
If there's a conflict on committing the changes, because another
user has changed the same property, Subversion generates a
.prej file. Delete this file after you
have resolved the conflict.
TortoiseSVN has a few special properties of its own, and these begin
with tsvn:.
tsvn:logminsizesets the minimum length of a log message for a commit. If you enter a shorter message than specified here, the commit is disabled. This feature is very useful for reminding you to supply a proper descriptive message for every commit. If this property is not set, or the value is zero, empty log messages are allowed.tsvn:lockmsgminsizesets the minimum length of a lock message. If you enter a shorter message than specified here, the lock is disabled. This feature is very useful for reminding you to supply a proper descriptive message for every lock you get. If this property is not set, or the value is zero, empty lock messages are allowed.tsvn:logwidthmarkeris used with projects which require log messages to be formatted with some maximum width (typically 80 characters) before a line break. Setting this property to a non-zero will do 2 things in the log message entry dialog: it places a marker to indicate the maximum width, and it disables word wrap in the display, so that you can see whether the text you entered is too long. Note: this feature will only work correctly if you have a fixed-width font selected for log messages.tsvn:logtemplateis used with projects which have rules about log message formatting. The property holds a multi-line text string which will be inserted in the commit message box when you start a commit. You can then edit it to include the required information. Note: if you are also usingtsvn:logminsize, be sure to set the length longer than the template or you will lose the protection mechanism.There are also action specific templates which you can use instead of
tsvn:logtemplate. The action specific templates are used if set, buttsvn:logtemplatewill be used if no action specific template is set.The action specific templates are:
tsvn:logtemplatecommitis used for all commits from a working copy.tsvn:logtemplatebranchis used when you create a branch/tag, or when you copy files or folders directly in the repository browser.tsvn:logtemplateimportis used for imports.tsvn:logtemplatedeleteis used when deleting items directly in the repository browser.tsvn:logtemplatemoveis used when renaming or moving items in the repository browser.tsvn:logtemplatemkdiris used when creating directories in the repository browser.tsvn:logtemplatepropsetis used when modifying properties in the repository browser.tsvn:logtemplatelockis used when getting a lock.
Subversion allows you to set “autoprops” which will be applied to newly added or imported files, based on the file extension. This depends on every client having set appropriate autoprops in their Subversion configuration file.
tsvn:autopropscan be set on folders and these will be merged with the user's local autoprops when importing or adding files. The format is the same as for Subversion autoprops, e.g.*.sh = svn:eol-style=native;svn:executablesets two properties on files with the.shextension.If there is a conflict between the local autoprops and
tsvn:autoprops, the project settings take precedence because they are specific to that project.As of Subversion 1.8, you should use the property
svn:auto-propsinstead oftsvn:autopropssince this has the very same functionality but works with all svn clients and is not specific to TortoiseSVN.In the Commit dialog you have the option to paste in the list of changed files, including the status of each file (added, modified, etc).
tsvn:logfilelistenglishdefines whether the file status is inserted in English or in the localized language. If the property is not set, the default istrue.TortoiseSVN can use a spell checker. On Windows 10, the spell checker of the OS is used. On earlier Windows versions, it can use spell checker modules which are also used by OpenOffice and Mozilla. If you have those installed this property will determine which spell checker to use, i.e. in which language the log messages for your project should be written.
tsvn:projectlanguagesets the language module the spell checking engine should use when you enter a log message. You can find the values for your language on this page: MSDN: Language Identifiers .You can enter this value in decimal, or in hexadecimal if prefixed with
0x. For example English (US) can be entered as0x0409or1033.The property
tsvn:logsummaryis used to extract a portion of the log message which is then shown in the log dialog as the log message summary.The value of the
tsvn:logsummaryproperty must be set to a one line regex string which contains one regex group. Whatever matches that group is used as the summary.An example:
\[SUMMARY\]:\s+(.*)Will catch everything after “[SUMMARY]” in the log message and use that as the summary.The property
tsvn:logrevregexdefines a regular expression which matches references to revisions in a log message. This is used in the log dialog to turn such references into links which when clicked will either scroll to that revision (if the revision is already shown in the log dialog, or if it's available from the log cache) or open a new log dialog showing that revision.The regular expression must match the whole reference, not just the revision number. The revision number is extracted from the matched reference string automatically.
If this property is not set, a default regular expression is used to link revision references.
There are several properties available to configure client-side hook scripts. Each property is for one specific hook script type.
The available properties/hook-scripts are
- tsvn:startcommithook
- tsvn:precommithook
- tsvn:postcommithook
- tsvn:startupdatehook
- tsvn:preupdatehook
- tsvn:postupdatehook
- tsvn:prelockhook
- tsvn:postlockhook
The parameters are the same as if you would configure the hook scripts in the settings dialog. See the section called “Client Side Hook Scripts” for the details.
Since not every user has his or her working copy checked out at the same location with the same name, you can configure a script/tool to execute that resides in your working copy by specifying the URL in the repository instead, using
%REPOROOT%as the part of the URL to the repository root. For example, if your hook script is in your working copy undercontrib/hook-scripts/client-side/checkyear.js, you would specify the path to the script as%REPOROOT%/trunk/contrib/hook-scripts/client-side/checkyear.js. This way even if you move your repository to another server you do not have to adjust the hook script properties.Instead of
%REPOROOT%you can also specify%REPOROOT+%. The+is used to insert any number of folder paths necessary to find the script. This is useful if you want to specify your script so that if you create a branch the script is still found even though the url of the working copy is now different. Using the example above, you would specify the path to the script as%REPOROOT+%/contrib/hook-scripts/client-side/checkyear.js.The following screenshot shows how the script to check for current copyright years in source file headers is configured for TortoiseSVN.
When you want to add a new property, you can either pick one from the list in the combo box, or you can enter any property name you like. If your project uses some custom properties, and you want those properties to appear in the list in the combo box (to avoid typos when you enter a property name), you can create a list of your custom properties using
tsvn:userfilepropertiesandtsvn:userdirproperties. Apply these properties to a folder. When you go to edit the properties of any child item, your custom properties will appear in the list of pre-defined property names.You can also specify whether a custom dialog is used to add/edit your property. TortoiseSVN offers four different dialog, depending on the type of your property.
- bool
If your property can only have two states, e.g., true and false, then you can configure your property as a
booltype.
Specify your property like this:propertyname=bool;labeltext(YESVALUE;NOVALUE;Checkboxtext)the
labeltextis the text shown in the dialog above the checkbox where you can explain the purpose and use of the property. The other parameters should be self explanatory.- state
If your property represents one of many possible states, e.g.,
yes, no, maybe, then you can configure your property as astate
property like this:propertyname=state;labeltext(DEFVAL;VAL1;TEXT1;VAL2;TEXT2;VAL3;TEXT3;...)The parameters are the same as for the
boolproperty, withDEFVALbeing the default value to be used if the property isn't set yet or has a value that's not configured.For up to three different values, the dialog shows up to three radio buttons. If there are more values configured, it uses a combo box from where the user can select the required state.
- singleline
For properties that consist of one line of text, use the
singlelineproperty type:
propertyname=singleline;labeltext(regex)the
regexspecifies a regular expression which is used to validate (match) the text the user entered. If the text does not match the regex, then the user is shown an error and the property isn't set.- multiline
For properties that consist of multiple lines of text, use the
multilineproperty type:
propertyname=multiline;labeltext(regex)the
regexspecifies a regular expression which is used to validate (match) the text the user entered. Don't forget to include the newline (\n) character in the regex!
The screenshots above were made with the following
tsvn:userdirproperties:my:boolprop=bool;This is a bool type property. Either check or uncheck it.(true;false;my bool prop) my:stateprop1=state;This is a state property. Select one of the two states.(true;true;true value;false;false value) my:stateprop2=state;This is a state property. Select one of the three states.(maybe;true;answer is correct;false;answer is wrong;maybe;not answered) my:stateprop3=state;Specify the day to set this property.(1;1;Monday;2;Tuesday;3;Wednesday;4;Thursday;5;Friday;6;Saturday;7;Sunday) my:singlelineprop=singleline;enter a small comment(.*) my:multilineprop=multiline;copy and paste a full chapter here(.*)
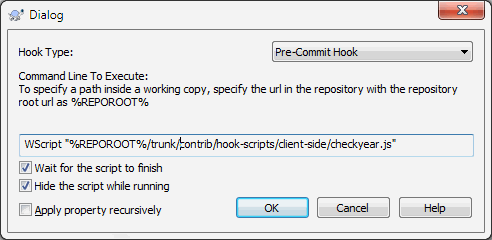
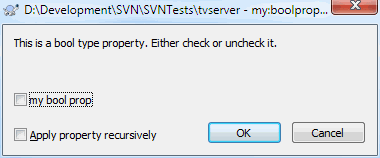
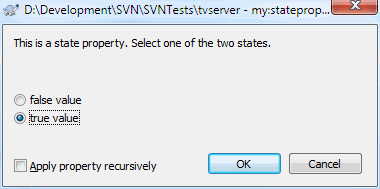
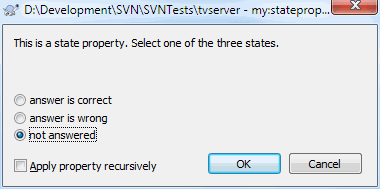
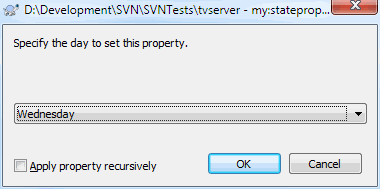
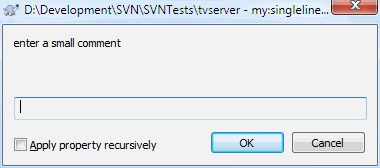
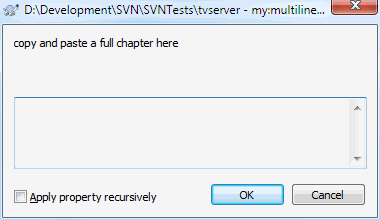
TortoiseSVN can integrate with some bug tracking tools. This uses
project properties that start with bugtraq:.
Read the section called “Integration with Bug Tracking Systems / Issue Trackers” for further information.
It can also integrate with some web-based repository browsers,
using project properties that start with webviewer:.
Read the section called “Integration with Web-based Repository Viewers” for further information.
Set the project properties on folders
These special project properties must be set on
folders for the system to work.
When you use a TortoiseSVN command which uses these properties, the
properties are read from the folder you clicked on.
If the properties are not found there, TortoiseSVN will search upwards
through the folder tree to find them until it comes to an unversioned
folder, or the tree root (e.g. C:\) is found.
If you can be sure that each user checks out only from e.g
trunk/ and not some sub-folder, then it is
sufficient to set the properties on trunk/.
If you can't be sure, you should set the properties recursively on
each sub-folder.
If you set the same property but you use different values at different
depths in your project hierarchy then you will get different results
depending on where you click in the folder structure.
For project properties only,
i.e. tsvn:, bugtraq:
and webviewer:
you can use the Recursive checkbox to set
the property to all sub-folders in the hierarchy, without also
setting it on all files.
When you add new sub-folders to a working copy using TortoiseSVN, any project properties present in the parent folder will automatically be added to the new child folder too.
Limitations Using the Repository Browser
Fetching properties remotely is a slow operation, so some of the features described above will not work in the repository browser as they do in a working copy.
When you add a property using the repo browser, only the standard
svn:properties are offered in the pre-defined list. Any other property name must be entered manually.Properties cannot be set or deleted recursively using the repo browser.
Project properties will not be propagated automatically when a child folder is added using the repo browser.
tsvn:autopropswill not set properties on files which are added using the repo browser.
Caution
Although TortoiseSVN's project properties are extremely useful, they only work with TortoiseSVN, and some will only work in newer versions of TortoiseSVN. If people working on your project use a variety of Subversion clients, or possibly have old versions of TortoiseSVN, you may want to use repository hooks to enforce project policies. project properties can only help to implement a policy, they cannot enforce it.
Some properties have to use specific values, or be formatted in a specific way in order to be used for automation. To help get the formatting correct, TortoiseSVN presents edit dialogs for some particular properties which show the possible values or break the property into its individual components.
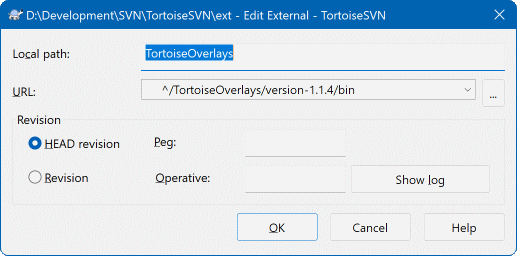
The svn:externals property can be used to
pull in other projects from the same repository or a completely
different repository as described in
the section called “External Items”.
You need to define the name of the sub-folder that the external folder is checked out as, and the Subversion URL of the external item. You can check out an external at its HEAD revision, so when the external item changes in the repository, your working copy will receive those changes on update. However, if you want the external to reference a particular stable point then you can specify the specific revision to use. IN this case you may also want to specify the same revision as a peg revision. If the external item is renamed at some point in the future then Subversion will not be able to update this item in your working copy. By specifying a peg revision you tell Subversion to look for an item that had that name at the peg revision rather than at HEAD.
The button fetches the HEAD revision of every external URL and shows that HEAD revision in the rightmost column. After the HEAD revision is known, a simple right click on an external gives you the command to peg the selected externals to their explicit HEAD revision. In case the HEAD revision is not known yet, the right click command will fetch the HEAD revision first.
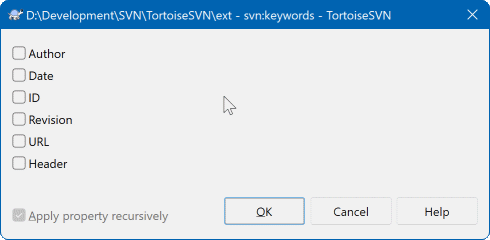
Select the keywords that you would like to be expanded in your file.
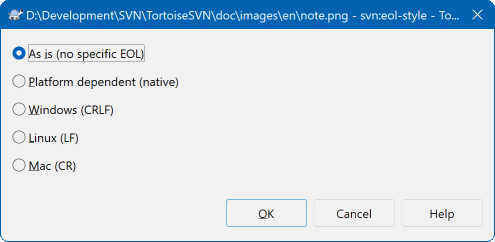
Select the end-of-line style that you wish to use and TortoiseSVN will
use the correct property value.
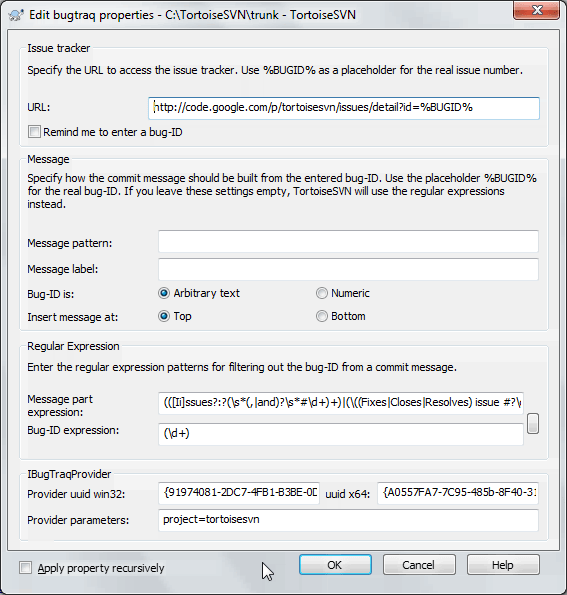
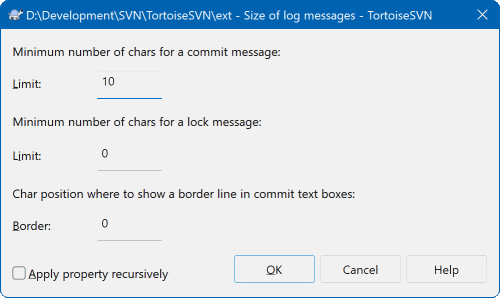
These 3 properties control the formatting of log messages.
The first 2 disable the in the
commit or lock dialogs until the message meets the minimum length.
The border position shows a marker at the given column width as
a guide for projects which have width limits on their log messages.
Setting a value to zero will delete the property.
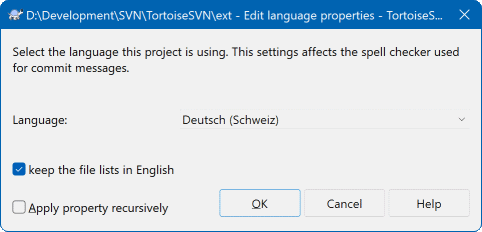
Choose the language to use for spell-checking log messages in the
commit dialog. The file lists checkbox comes into effect when you
right click in the log message pane and select
Paste file list. By default the Subversion
status will be shown in your local language. When this box is checked
the status is always given in English, for projects which require
English-only log messages.
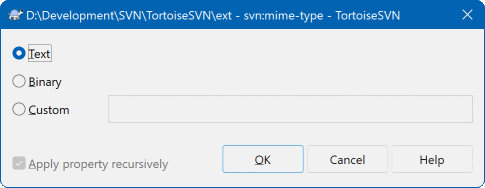
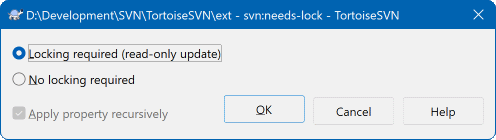
This property simply controls whether a file will be checked out as
read-only if there is no lock held for it in the working copy.
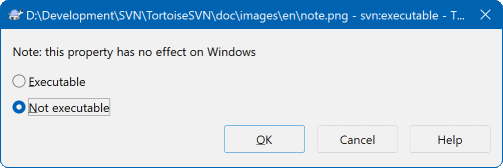
This property controls whether a file will be given executable status
when checked out on a Unix/Linux system. It has no effect on a Windows
checkout.
Whenever revisions are merged into a working copy, TortoiseSVN generates a log message from all the merged revisions. Those are then available from the button in the commit dialog.
You can customize that generated message with the following properties:
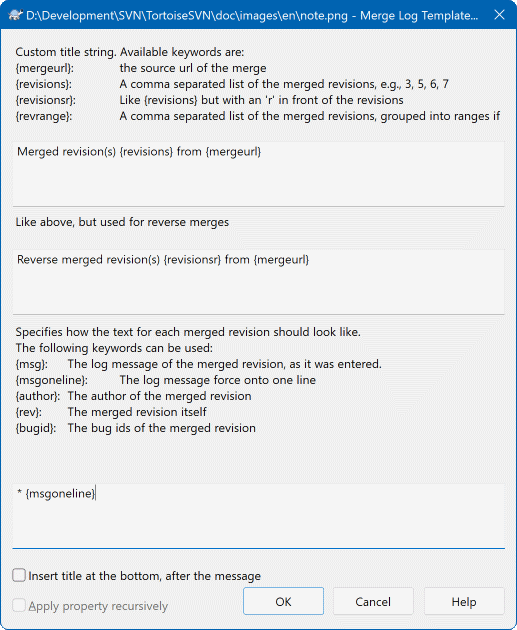
- tsvn:mergelogtemplatetitle, tsvn:mergelogtemplatereversetitle
This property specifies the first part of the generated log message. The following keywords can be used:
- {revisions}
A comma separated list of the merged revisions, e.g.,
3, 5, 6, 7- {revisionsr}
Like
{revisions}, but with each revision preceded with anr, e.g.,r3, r5, r6, r7- {revrange}
A comma separated list of the merged revisions, grouped into ranges if possible, e.g.,
3, 5-7- {mergeurl}
The source URL of the merge, i.e., where the revisions are merged from.
The default value for this string is
Merged revision(s) {revrange} from {mergeurl}:with a newline at the end.- tsvn:mergelogtemplatemsg
This property specifies how the text for each merged revision should look like. The following keywords can be used:
- {msg}
The log message of the merged revision, as it was entered.
- {msgoneline}
Like
{msg}, but all newlines are replaced with a space, so that the whole log message appears on one single line.- {author}
The author of the merged revision.
- {rev}
The merged revision itself.
- {bugids}
The bug IDs of the merged revision, if there are any.
- tsvn:mergelogtemplatemsgtitlebottom
This property specifies the position of the title string specified with the
tsvn:mergelogtemplatetitleortsvn:mergelogtemplatereversetitle. If the property is set toyesortrue, then the title string is appended at the bottom instead of the top.
Important
This only works if the merged revisions are already in the log cache. If you have disabled the log cache or not shown the log first before the merge, the generated message won't contain any information about the merged revisions.
Sometimes it is useful to construct a working copy that is made out
of a number of different checkouts. For example, you may want different
files or subdirectories to come from different locations in a repository,
or perhaps from different repositories altogether.
If you want every user to have the same layout, you can define the
svn:externals properties to pull in the specified
resource at the locations where they are needed.
Let's say you check out a working copy of
/project1 to
D:\dev\project1.
Select the folder D:\dev\project1,
right click and choose
→
from the context menu.
The Properties Dialog comes up. Then go to the Subversion tab.
There, you can set properties. Click .
In the properties dialog, either double click on the
svn:externals if it already exists, or click
on the button and select
externals from the menu.
To add a new external, click the
and then fill in the required information in the shown dialog.
Caution
URLs must be properly escaped or they will not work, e.g. you must
replace each space with %20.
If you want the local path to include spaces or other special characters,
you can enclose it in double quotes, or you can use the \
(backslash) character as a Unix shell style escape character preceding any
special character. Of course this also means that you must use
/ (forward slash) as a path delimiter.
Note that this behaviour is new in Subversion 1.6 and will not work with
older clients.
Use explicit revision numbers
You should strongly consider using explicit revision numbers in all of your externals definitions, as described above. Doing so means that you get to decide when to pull down a different snapshot of external information, and exactly which snapshot to pull. Besides the common sense aspect of not being surprised by changes to third-party repositories that you might not have any control over, using explicit revision numbers also means that as you backdate your working copy to a previous revision, your externals definitions will also revert to the way they looked in that previous revision, which in turn means that the external working copies will be updated to match the way they looked back when your repository was at that previous revision. For software projects, this could be the difference between a successful and a failed build of an older snapshot of your complex code base.
The edit dialog for svn:externals
properties allows you to select the externals and automatically
set them explicitly to the HEAD revision.
If the external project is in the same repository, any changes you make there will be included in the commit list when you commit your main project.
If the external project is in a different repository, any changes you make to the external project will be shown or indicated when you commit the main project, but you have to commit those external changes separately.
If you use absolute URLs in svn:externals
definitions and you have to relocate your working copy (i.e.,
if the URL of your repository changes), then your externals
won't change and might not work anymore.
To avoid such problems, Subversion clients version 1.5 and
higher support relative external URLs. Four different methods
of specifying a relative URL are supported.
In the following examples, assume we have two repositories: one at
http://example.com/svn/repos-1
and another at
http://example.com/svn/repos-2.
We have a checkout of
http://example.com/svn/repos-1/project/trunk
into C:\Working and the svn:externals
property is set on trunk.
- Relative to parent directory
These URLs always begin with the string
../for example:../../widgets/foo common/foo-widgetThis will extract
http://example.com/svn/repos-1/widgets/foointoC:\Working\common\foo-widget.Note that the URL is relative to the URL of the directory with the
svn:externalsproperty, not to the directory where the external is written to disk.- Relative to repository root
These URLs always begin with the string
^/for example:^/widgets/foo common/foo-widgetThis will extract
http://example.com/svn/repos-1/widgets/foointoC:\Working\common\foo-widget.You can easily refer to other repositories with the same
SVNParentPath(a common directory holding several repositories). For example:^/../repos-2/hammers/claw common/claw-hammerThis will extract
http://example.com/svn/repos-2/hammers/clawintoC:\Working\common\claw-hammer.- Relative to scheme
URLs beginning with the string
//copy only the scheme part of the URL. This is useful when the same hostname must the accessed with different schemes depending upon network location; e.g. clients in the intranet usehttp://while external clients usesvn+ssh://. For example://example.com/svn/repos-1/widgets/foo common/foo-widgetThis will extract
http://example.com/svn/repos-1/widgets/fooorsvn+ssh://example.com/svn/repos-1/widgets/foodepending on which method was used to checkoutC:\Working.- Relative to the server's hostname
URLs beginning with the string
/copy the scheme and the hostname part of the URL, for example:/svn/repos-1/widgets/foo common/foo-widgetThis will extract
http://example.com/svn/repos-1/widgets/foointoC:\Working\common\foo-widget. But if you checkout your working copy from another server atsvn+ssh://another.mirror.net/svn/repos-1/project1/trunkthen the external reference will extractsvn+ssh://another.mirror.net/svn/repos-1/widgets/foo.
You can also specify a peg and operative revision for the URL if required. To learn more about peg and operative revisions, please read the corresponding chapter in the Subversion book.
Important
If you specify the target folder for the external as a subfolder
like in the examples above, make sure that all
folders in between are versioned as well. So for the examples above,
the folder common should be versioned!
While the external will work in most situations properly if folders in between are not versioned, there are some operations that won't work as you expect. And the status overlay icons in explorer will also not show the correct status.
If you need more information how TortoiseSVN handles Properties read the section called “Project Settings”.
To find out about different methods of accessing common sub-projects read the section called “Include a common sub-project”.
As of Subversion 1.6 you can add single file externals to your working copy using the same syntax as for folders. However, there are some restrictions.
The path to the file external must be a direct child of the folder where you set the
svn:externalsproperty.The URL for a file external must be in the same repository as the URL that the file external will be inserted into; inter-repository file externals are not supported.
A file external behaves just like any other versioned file in many respects,
but they cannot be moved or deleted using the normal commands; the
svn:externals property must be modified instead.
If you already have a working copy of the files or folders you want to include as externals in another working copy, you can simply add those via drag and drop from the windows explorer.
Simply right drag the file or folder from one
working copy to where you want those to be included as externals.
A context menu appears when you release the mouse button:
if you click on that context menu entry, the svn:externals
property is automatically added. All you have to do after that
is commit the property changes and update to get those externals
properly included in your working copy.
One of the features of version control systems is the ability to isolate changes onto a separate line of development. This line is known as a branch. Branches are often used to try out new features without disturbing the main line of development with compiler errors and bugs. As soon as the new feature is stable enough then the development branch is merged back into the main branch (trunk).
Another feature of version control systems is the ability to mark particular revisions (e.g. a release version), so you can at any time recreate a certain build or environment. This process is known as tagging.
Subversion does not have special commands for branching or tagging, but uses so-called “cheap copies” instead. Cheap copies are similar to hard links in Unix, which means that instead of making a complete copy in the repository, an internal link is created, pointing to a specific tree/revision. As a result branches and tags are very quick to create, and take up almost no extra space in the repository.
If you have imported your project with the recommended directory structure, creating a branch or tag version is very simple:
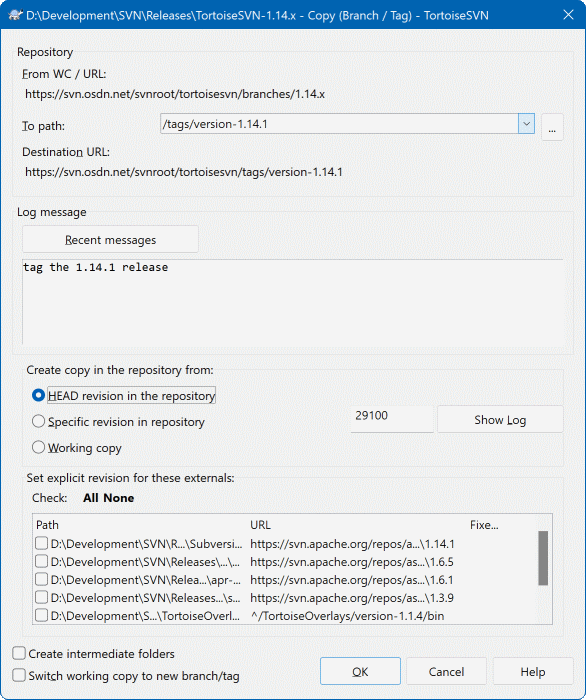
Select the folder in your working copy which you want to copy
to a branch or tag, then select the command
→ .
The default destination URL for the new branch will be the source URL on which your working copy is based. You will need to edit that URL to the new path for your branch/tag. So instead of
https://svn.example.com/repos/ProjectName/trunk
you might now use something like
https://svn.example.com/repos/ProjectName/tags/Release_1.10
If you can't remember the naming convention you used last time, click the button on the right to open the repository browser so you can view the existing repository structure.
intermediate folders
When you specify the target URL, all the folders
up to the last one must already exist or you will
get an error message. In the above example, the URL
https://svn.example.com/repos/ProjectName/tags/
must exist to create the Release_1.10
tag.
However if you want to create a branch/tag to an URL
that has intermediate folders that don't exist yet
you can check the option Create intermediate folders
at the bottom of the dialog. If that option is activated,
all intermediate folders are automatically created.
Note that this option is disabled by default to avoid
typos. For example, if you typed the target URL as
https://svn.example.com/repos/ProjectName/Tags/Release_1.10
instead of
https://svn.example.com/repos/ProjectName/tags/Release_1.10,
you would get an error with the option disabled, but
with the option enabled a folder Tags
would be automatically created, and you would end up with
a folder Tags and a folder tags.
Now you have to select the source of the copy. Here you have three options:
- HEAD revision in the repository
The new branch is copied directly in the repository from the HEAD revision. No data needs to be transferred from your working copy, and the branch is created very quickly.
- Specific revision in the repository
The new branch is copied directly in the repository but you can choose an older revision. This is useful if you forgot to make a tag when you released your project last week. If you can't remember the revision number, click the button on the right to show the revision log, and select the revision number from there. Again no data is transferred from your working copy, and the branch is created very quickly.
- Working copy
The new branch is an identical copy of your local working copy. If you have updated some files to an older revision in your WC, or if you have made local changes, that is exactly what goes into the copy. Naturally this sort of complex tag may involve transferring data from your WC back to the repository if it does not exist there already.
If you want your working copy to be switched to the newly created branch automatically, use the Switch working copy to new branch/tag checkbox. But if you do that, first make sure that your working copy does not contain modifications. If it does, those changes will be merged into the branch WC when you switch.
If your working copy has other projects included with
svn:externals properties, those externals will
be listed at the bottom of the branch/tag dialog. For each external,
the target path and the source URL is shown.
If you want to make sure that the new tag always is in a consistent state, check all the externals to have their revisions pinned. If you don't check the externals and those externals point to a HEAD revision which might change in the future, checking out the new tag will check out that HEAD revision of the external and your tag might not compile anymore. So it's always a good idea to set the externals to an explicit revision when creating a tag.
The externals are automatically pinned to either the current HEAD revision or the working copy BASE revision, depending on the source of the branch/tag:
Table 4.1. Pinned Revision
| Copy Source | Pinned Revision |
|---|---|
| HEAD revision in the repository | external's repos HEAD revision |
| Specific revision in repository | external's repos HEAD revision |
| Working copy | external's WC BASE revision |
externals within externals
If a project that is included as an external has itself included externals, then those will not be tagged! Only externals that are direct children can be tagged.
Press to commit the new copy to the repository. Don't forget to supply a log message. Note that the copy is created inside the repository.
Note that unless you opted to switch your working copy to the newly created branch, creating a Branch or Tag does not affect your working copy. Even if you create the branch from your WC, those changes are committed to the new branch, not to the trunk, so your WC may still be marked as modified with respect to the trunk.
You can also create a branch or tag without having a working copy. To do that, open the repository browser. You can there drag folders to a new location. You have to hold down the Ctrl key while you drag to create a copy, otherwise the folder gets moved, not copied.
You can also drag a folder with the right mouse button. Once you release the mouse button you can choose from the context menu whether you want the folder to be moved or copied. Of course to create a branch or tag you must copy the folder, not move it.
Yet another way is from the log dialog. You can show the log dialog for e.g. trunk, select a revision (either the HEAD revision at the very top or an earlier revision), right click and choose .
...that is (not really) the question. While a checkout downloads everything from the desired branch in the repository to your working directory, → only transfers the changed data to your working copy. Good for the network load, good for your patience. :-)
To be able to work with your freshly generated branch or tag you have several ways to handle it. You can:
→ to make a fresh checkout in an empty folder. You can check out to any location on your local disk and you can create as many working copies from your repository as you like.
Switch your current working copy to the newly created copy in the repository. Again select the top level folder of your project and use → from the context menu.
In the next dialog enter the URL of the branch you just created. Select the Head Revision radio button and click on . Your working copy is switched to the new branch/tag.
Switch works just like Update in that it never discards your local changes. Any changes you have made to your working copy which have not yet been committed will be merged when you do the Switch. If you do not want this to happen then you must either commit the changes before switching, or revert your working copy to an already-committed revision (typically HEAD).
If you want to work on trunk and branch, but don't want the expense of a fresh checkout, you can use Windows Explorer to make a copy of your trunk checkout in another folder, then → that copy to your new branch.
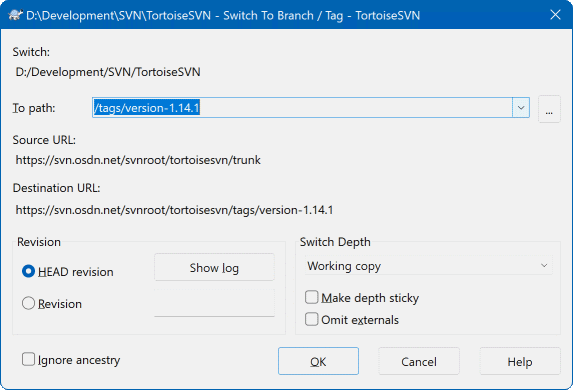
Although Subversion itself makes no distinction between tags and branches, the way they are typically used differs a bit.
Tags are typically used to create a static snapshot of the project at a particular stage. As such they are not normally used for development - that's what branches are for, which is the reason we recommended the
/trunk /branches /tagsrepository structure in the first place. Working on a tag revision is not a good idea, but because your local files are not write protected there is nothing to stop you doing this by mistake. However, if you try to commit to a path in the repository which contains/tags/, TortoiseSVN will warn you.It may be that you need to make further changes to a release which you have already tagged. The correct way to handle this is to create a new branch from the tag first and commit the branch. Do your Changes on this branch and then create a new tag from this new branch, e.g.
Version_1.0.1.If you modify a working copy created from a branch and commit, then all changes go to the new branch and not the trunk. Only the modifications are stored. The rest remains a cheap copy.
Where branches are used to maintain separate lines of development, at some stage you will want to merge the changes made on one branch back into the trunk, or vice versa.
It is important to understand how branching and merging works in Subversion before you start using it, as it can become quite complex. It is highly recommended that you read the chapter Branching and Merging in the Subversion book, which gives a full description and many examples of how it is used.
The next point to note is that merging always takes place within a working copy. If you want to merge changes into a branch, you have to have a working copy for that branch checked out, and invoke the merge wizard from that working copy using → .
In general it is a good idea to perform a merge into an unmodified working copy. If you have made other changes in your WC, commit those first. If the merge does not go as you expect, you may want to revert the changes, and the Revert command will discard all changes including any you made before the merge.
There are three common use cases for merging which are handled in slightly different ways, as described below. The first page of the merge wizard asks you to select the method you need.
- Merge a range of revisions
This method covers the case when you have made one or more revisions to a branch (or to the trunk) and you want to port those changes across to a different branch.
What you are asking Subversion to do is this: “ Calculate the changes necessary to get [FROM] revision 1 of branch A [TO] revision 7 of branch A, and apply those changes to my working copy (of trunk or branch B). ”
If you leave the revision range empty, Subversion uses the merge-tracking features to calculate the correct revision range to use. This is known as a reintegrate or automatic merge.
- Merge two different trees
This is a more general case of the reintegrate method. What you are asking Subversion to do is: “ Calculate the changes necessary to get [FROM] the head revision of the trunk [TO] the head revision of the branch, and apply those changes to my working copy (of the trunk). ” The net result is that trunk now looks exactly like the branch.
If your server/repository does not support merge-tracking then this is the only way to merge a branch back to trunk. Another use case occurs when you are using vendor branches and you need to merge the changes following a new vendor drop into your trunk code. For more information read the chapter on vendor branches in the Subversion Book.
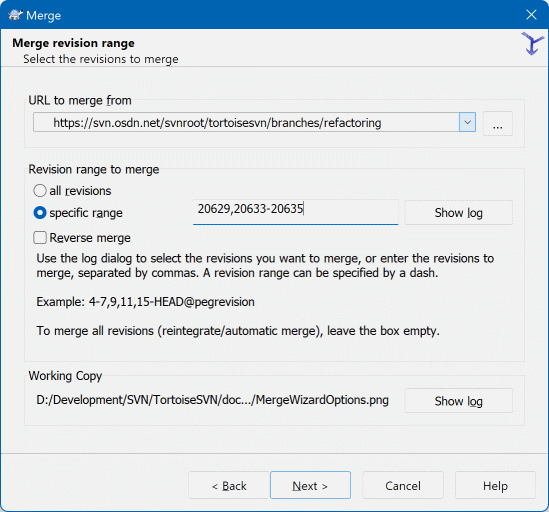
In the From: field enter the full
folder URL of the branch or tag containing the changes
you want to port into your working copy.
You may also click
to browse the repository and find the desired branch.
If you have merged from this branch before, then just
use the drop down list which shows a history of
previously used URLs.
If you are merging from a renamed or deleted branch then you will have to go back to a revision where that branch still existed. In this case you will also need to specify that revision as a peg revision in the range of revisions being merged (see below), otherwise the merge will fail when it can't find that path at HEAD.
In the Revision range to merge field enter the list of revisions you want to merge. This can be a single revision, a list of specific revisions separated by commas, or a range of revisions separated by a dash, or any combination of these.
If you need to specify a peg revision for the merge, add the
peg revision at the end of the revisions, e.g. 5-7,10@3.
In the above example, the revisions 5,6,7 and 10 would be merged,
with 3 being the peg revision.
Important
There is an important difference in the way a revision range is specified with TortoiseSVN compared to the command line client. The easiest way to visualise it is to think of a fence with posts and fence panels.
With the command line client you specify the changes to merge using two “fence post” revisions which specify the before and after points.
With TortoiseSVN you specify the changeset to merge using “fence panels”. The reason for this becomes clear when you use the log dialog to specify revisions to merge, where each revision appears as a changeset.
If you are merging revisions in chunks, the method shown in the Subversion book will have you merge 100-200 this time and 200-300 next time. With TortoiseSVN you would merge 100-200 this time and 201-300 next time.
This difference has generated a lot of heat on the mailing lists. We acknowledge that there is a difference from the command line client, but we believe that for the majority of GUI users it is easier to understand the method we have implemented.
The easiest way to select the range of revisions you need is to click on , as this will list recent changes with their log comments. If you want to merge the changes from a single revision, just select that revision. If you want to merge changes from several revisions, then select that range (using the usual Shift-modifier). Click on and the list of revision numbers to merge will be filled in for you.
If you want to merge changes back out of your working copy, to revert a change which has already been committed, select the revisions to revert and make sure the Reverse merge box is checked.
If you have already merged some changes from this branch, hopefully you will have made a note of the last revision merged in the log message when you committed the change. In that case, you can use for the Working Copy to trace that log message. Remembering that we are thinking of revisions as changesets, you should Use the revision after the end point of the last merge as the start point for this merge. For example, if you have merged revisions 37 to 39 last time, then the start point for this merge should be revision 40.
If you are using the merge tracking features of Subversion, you do not need to remember which revisions have already been merged - Subversion will record that for you. If you leave the revision range blank, all revisions which have not yet been merged will be included. Read the section called “Merge Tracking” to find out more.
When merge tracking is used, the log dialog will show previously merged revisions, and revisions pre-dating the common ancestor point, i.e. before the branch was copied, as greyed out. The Hide non-mergeable revisions checkbox allows you to filter out these revisions completely so you see only the revisions which can be merged.
If other people may be committing changes then be careful about using the HEAD revision. It may not refer to the revision you think it does if someone else made a commit after your last update.
If you leave the range of revisions empty or have the radio button all revisions checked, then Subversion merges all not-yet merged revisions. This is known as a reintegrate or automatic merge.
There are some conditions which apply to a reintegrate merge. Firstly, the server must support merge tracking. The working copy must be of depth infinite (no sparse checkouts), and it must not have any local modifications, switched items or items that have been updated to revisions other than HEAD. All changes to trunk made during branch development must have been merged across to the branch (or marked as having been merged). The range of revisions to merge will be calculated automatically.
Click and go to the section called “Merge Options”.
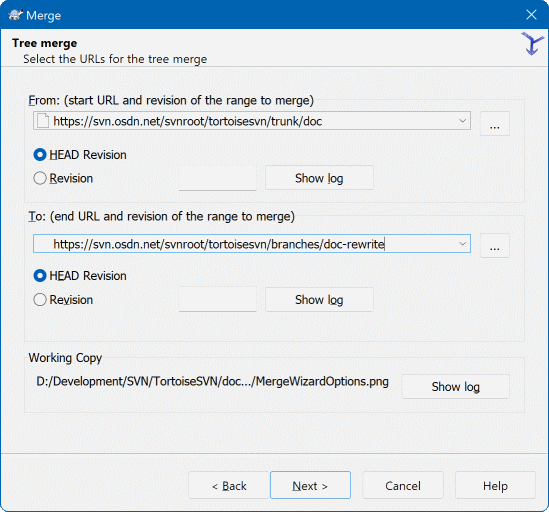
If you are using this method to merge a feature branch back to trunk,
you need to start the merge wizard from within a working copy of trunk.
In the From: field enter the full folder URL of the trunk. This may sound wrong, but remember that the trunk is the start point to which you want to add the branch changes. You may also click to browse the repository.
In the To: field enter the full folder URL of the feature branch.
In both the From Revision field and the To Revision field, enter the last revision number at which the two trees were synchronized. If you are sure no-one else is making commits you can use the HEAD revision in both cases. If there is a chance that someone else may have made a commit since that synchronization, use the specific revision number to avoid losing more recent commits.
You can also use to select the revision.
This page of the wizard lets you specify advanced options, before starting the merge process. Most of the time you can just use the default settings.
You can specify the depth to use for the merge, i.e. how far down into your working copy the merge should go. The depth terms used are described in the section called “Checkout Depth”. The default depth is Working copy, which uses the existing depth setting, and is almost always what you want.
Most of the time you want merge to take account of the file's history, so that changes relative to a common ancestor are merged. Sometimes you may need to merge files which are perhaps related, but not in your repository. For example you may have imported versions 1 and 2 of a third party library into two separate directories. Although they are logically related, Subversion has no knowledge of this because it only sees the tarballs you imported. If you attempt to merge the difference between these two trees you would see a complete removal followed by a complete add. To make Subversion use only path-based differences rather than history-based differences, check the Ignore ancestry box. Read more about this topic in the Subversion book, Noticing or Ignoring Ancestry .
You can specify the way that line ending and whitespace changes are handled. These options are described in the section called “Line-end and Whitespace Options”. The default behaviour is to treat all whitespace and line-end differences as real changes to be merged.
The checkbox marked Force the merge is used to avoid a tree conflict where an incoming delete affects a file that is either modified locally or not versioned at all. If the file is deleted then there is no way to recover it, which is why that option is not checked by default.
The checkbox marked Allow mixed revisions (not recommended)
is used to allow merging into mixed-revision working copies (corresponding
to the command line option --allow-mixed-revisions).
The default since Subversion 1.7 is to disallow merging into mixed-revision
working copies. The reasons are described in the Subversion book towards
the end of the section
Keeping a Branch in Sync
. If you understand the possible problems of merging into a mixed-revision
working copy you may select this checkbox to perform the merge anyway.
If you are using merge tracking and you want to mark a revision as having been merged, without actually doing the merge here, check the Only record the merge checkbox. There are two possible reasons you might want to do this. It may be that the merge is too complicated for the merge algorithms, so you code the changes by hand, then mark the change as merged so that the merge tracking algorithm is aware of it. Or you might want to prevent a particular revision from being merged. Marking it as already merged will prevent the merge occurring with merge-tracking-aware clients.
Now everything is set up, all you have to do is click on the button. If you want to preview the results simulates the merge operation, but does not modify the working copy at all. It shows you a list of the files that will be changed by a real merge, and notes files where conflicts may occur. Because merge tracking makes the merge process a lot more complicated, there is no guaranteed way to find out in advance whether the merge will complete without conflicts, so files marked as conflicted in a test merge may in fact merge without any problem.
The merge progress dialog shows each stage of the merge, with the revision ranges involved. This may indicate one more revision than you were expecting. For example if you asked to merge revision 123 the progress dialog will report “ Merging revisions 122 through 123 ”. To understand this you need to remember that Merge is closely related to Diff. The merge process works by generating a list of differences between two points in the repository, and applying those differences to your working copy. The progress dialog is simply showing the start and end points for the diff.
The merge is now complete. It's a good idea to have a look at the merge and see if it's as expected. Merging is usually quite complicated. Conflicts often arise if the branch has drifted far from the trunk.
Tip
Whenever revisions are merged into a working copy, TortoiseSVN generates a log message from all the merged revisions. Those are then available from the button in the commit dialog.
To customize that generated message, set the corresponding project properties on your working copy. See the section called “Merge log message templates”
For Subversion clients and servers prior to 1.5, no merge information is stored and merged revisions have to be tracked manually. When you have tested the changes and come to commit this revision, your commit log message should always include the revision numbers which have been ported in the merge. If you want to apply another merge at a later time you will need to know what you have already merged, as you do not want to port a change more than once. For more information about this, refer to Best Practices for Merging in the Subversion book.
If your server and all clients are running Subversion 1.5 or higher, the merge tracking facility will record the revisions merged and avoid a revision being merged more than once. This makes your life much simpler as you can simply merge the entire revision range each time and know that only new revisions will actually be merged.
Branch management is important. If you want to keep this branch up to date with the trunk, you should be sure to merge often so that the branch and trunk do not drift too far apart. Of course, you should still avoid repeated merging of changes, as explained above.
Tip
If you have just merged a feature branch back into the trunk, the trunk now contains all the new feature code, and the branch is obsolete. You can now delete it from the repository if required.
Important
Subversion can't merge a file with a folder and vice versa - only folders to folders and files to files. If you click on a file and open up the merge dialog, then you have to give a path to a file in that dialog. If you select a folder and bring up the dialog, then you must specify a folder URL for the merge.
Subversion 1.5 introduced facilities for merge tracking. When you merge changes from one tree into another, the revision numbers merged are stored and this information can be used for several different purposes.
You can avoid the danger of merging the same revision twice (repeated merge problem). Once a revision is marked as having been merged, future merges which include that revision in the range will skip over it.
When you merge a branch back into trunk, the log dialog can show you the branch commits as part of the trunk log, giving better traceability of changes.
When you show the log dialog from within the merge dialog, revisions already merged are shown in grey.
When showing blame information for a file, you can choose to show the original author of merged revisions, rather than the person who did the merge.
You can mark revisions as do not merge by including them in the list of merged revisions without actually doing the merge.
Merge tracking information is stored in the svn:mergeinfo
property by the client when it performs a merge. When the merge is committed
the server stores that information in a database, and when you request merge,
log or blame information, the server can respond appropriately. For the system
to work properly you must ensure that the server, the repository and all clients
are upgraded.
Earlier clients will not store the svn:mergeinfo property
and earlier servers will not provide the information requested by new clients.
Find out more about merge tracking from Subversion's Merge tracking documentation .
Important
The text in the conflict resolver dialogs are provided by the SVN library and might therefore not (yet) be translated as the TortoiseSVN dialogs are. Sorry for that.
Merging does not always go smoothly. Sometimes there is a conflict. TortoiseSVN helps you through this process by showing the merge conflict dialog.
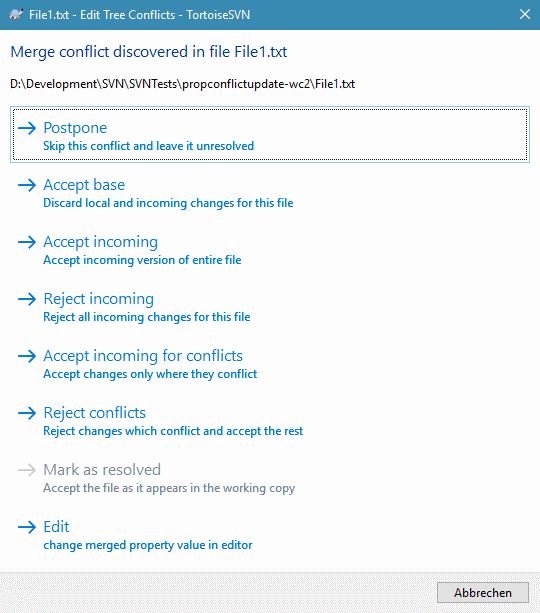
It is likely that some of the changes will have merged smoothly, while other local changes conflict with changes already committed to the repository. All changes which can be merged are merged. The Merge Conflict dialog gives you different ways of handling the lines which are in conflict.
For normal conflicts that happen due to changes in the file content or its properties, the dialog shows buttons which allow you to chose which of the conflicting parts to keep or reject.
- Postpone
Don't deal with the conflict now. Let the merge continue and resolve the conflicts after the merge is done.
- Accept base
This leaves the file as it was, without neither the changes coming from the merge nor the changes you've made in your working copy.
- Accept incoming
This discards all your local changes and uses the file as it arrives from the merge source.
- Reject incoming
This discards all the changes from the merge source and leaves the file with your local edits.
- Accept incoming for conflicts
This discards your local changes where they conflict with the changes from the merge source. But it leaves all your local changes which don't conflict.
- Reject conflicts
This discards changes from the merge source which conflict with your local changes. But it keeps all changes that don't conflict with your local changes.
- Mark as resolved
Marks the conflicts as resolved. This button is disabled until you use the button to edit the conflict manually and save those changes back to the file. Once the changes are saved, the button becomes enabled.
- Edit
Starts the merge editor so you can resolve the conflicts manually. Don't forget to save the file so the button becomes enabled.
If there's a tree conflict, please first see the section called “Tree Conflicts” about the various types of tree conflicts and how and why they can happen.
To resolve tree conflicts after a merge, a dialog is shown with various options on how to resolve the conflict:
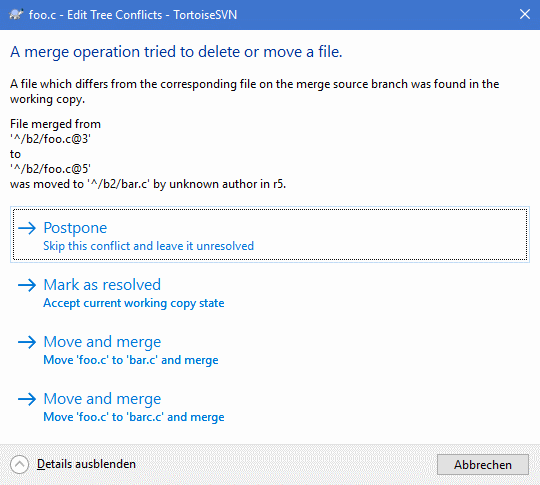
Since there are various possible tree conflict situations, the dialog will show
buttons to resolve those depending on the specific conflict.
The button texts and labels explain what the option to resolve the conflict
does. If you're not sure, either cancel the dialog or use the
button to resolve the conflict later.
When you develop a new feature on a separate branch it is a good
idea to work out a policy for re-integration when the feature is
complete. If other work is going on in trunk
at the same time you may find that the differences become significant
over time, and merging back becomes a nightmare.
If the feature is relatively simple and development will not take long then you can adopt a simple approach, which is to keep the branch entirely separate until the feature is complete, then merge the branch changes back into trunk. In the merge wizard this would be a simple Merge a range of revisions, with the revision range being the revision span of the branch.
If the feature is going to take longer and you need to account
for changes in trunk, then you need to keep
the branch synchronised. This simply means that periodically
you merge trunk changes into the branch, so that the branch
contains all the trunk changes plus the
new feature. The synchronisation process uses
Merge a range of revisions. When the feature
is complete then you can merge it back to trunk
using either Reintegrate a branch or
Merge two different trees.
Another (fast) way to merge all changes from trunk to the feature branch is to use the → from the extended context menu (hold down the Shift key while you right click on the file).
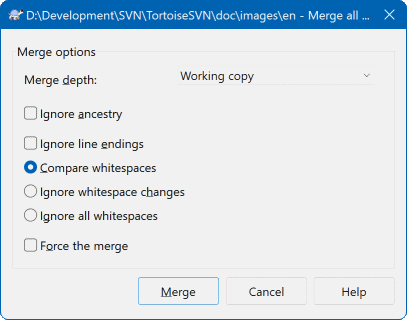
This dialog is very easy. All you have to do is set the options for
the merge, as described in the section called “Merge Options”.
The rest is done by TortoiseSVN automatically using merge tracking.
Subversion generally works best without locking, using the “Copy-Modify-Merge” methods described earlier in the section called “The Copy-Modify-Merge Solution”. However there are a few instances when you may need to implement some form of locking policy.
You are using “unmergeable” files, for example, graphics files. If two people change the same file, merging is not possible, so one of you will lose their changes.
Your company has always used a locking revision control system in the past and there has been a management decision that “locking is best”.
Firstly you need to ensure that your Subversion server is upgraded to at
least version 1.2. Earlier versions do not support locking at all. If you
are using file:// access, then of course only your
client needs to be updated.
The Three Meanings of “Lock”
In this section, and almost everywhere in this book, the words “lock” and “locking” describe a mechanism for mutual exclusion between users to avoid clashing commits. Unfortunately, there are two other sorts of “lock” with which Subversion, and therefore this book, sometimes needs to be concerned.
The second is working copy locks,
used internally by Subversion to prevent clashes between
multiple Subversion clients operating on the same working
copy. Usually you get these locks whenever a command
like update/commit/... is interrupted due to an error.
These locks can be removed by running the cleanup
command on the working copy, as described in the section called “Cleanup”.
And third, files and folders can get locked if they're in use by another process, for example if you have a word document opened in Word, that file is locked and can not be accessed by TortoiseSVN.
You can generally forget about these other kinds of locks until something goes wrong that requires you to care about them. In this book, “lock” means the first sort unless the contrary is either clear from context or explicitly stated.
By default, nothing is locked and anyone who has commit access can commit changes to any file at any time. Others will update their working copies periodically and changes in the repository will be merged with local changes.
If you Get a Lock on a file, then only you can commit that file. Commits by all other users will be blocked until you release the lock. A locked file cannot be modified in any way in the repository, so it cannot be deleted or renamed either, except by the lock owner.
Important
A lock is not assigned to a specific user, but to a specific user and a working copy. Having a lock in one working copy also prevents the same user from committing the locked file from another working copy.
As an example, imagine that user Jon has a working copy on his office PC. There he starts working on an image, and therefore acquires a lock on that file. When he leaves his office he's not finished yet with that file, so he doesn't release that lock. Back at home Jon also has a working copy and decides to work a little more on the project. But he can't modify or commit that same image file, because the lock for that file resides in his working copy in the office.
However, other users will not necessarily know that you have taken
out a lock. Unless they check the lock status regularly, the first
they will know about it is when their commit fails, which in most
cases is not very useful. To make it easier to manage locks, there
is a new Subversion property
svn:needs-lock.
When this property is set (to any value) on a file, whenever the
file is checked out or updated, the local copy is made read-only
unless that working copy holds a lock for
the file. This acts as a warning that you should not edit that
file unless you have first acquired a lock.
Files which are versioned and read-only are marked with a
special overlay in TortoiseSVN to indicate that you need to
acquire a lock before editing.
Locks are recorded by working copy location as well as by owner. If you have several working copies (at home, at work) then you can only hold a lock in one of those working copies.
If one of your co-workers acquires a lock and then goes on holiday without releasing it, what do you do? Subversion provides a means to force locks. Releasing a lock held by someone else is referred to as Breaking the lock, and forcibly acquiring a lock which someone else already holds is referred to as Stealing the lock. Naturally these are not things you should do lightly if you want to remain friends with your co-workers.
Locks are recorded in the repository, and a lock token is created in your local working copy. If there is a discrepancy, for example if someone else has broken the lock, the local lock token becomes invalid. The repository is always the definitive reference.
Select the file(s) in your working copy for which you want to acquire a lock, then select the command → .
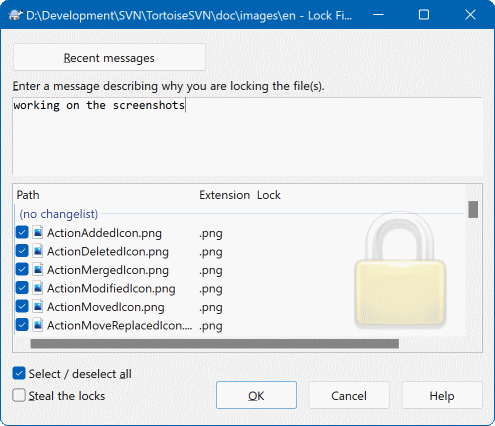
A dialog appears, allowing you to enter a comment, so others
can see why you have locked the file. The comment is optional
and currently only used with Svnserve
based repositories.
If (and only if) you need to steal the
lock from someone else, check the
Steal lock box, then click on
.
You can set the project property tsvn:logtemplatelock
to provide a message template for users to fill in as the lock message.
Refer to the section called “Project Settings” for instructions on how to set properties.
If you select a folder and then use → the lock dialog will open with every file in every sub-folder selected for locking. If you really want to lock an entire hierarchy, that is the way to do it, but you could become very unpopular with your co-workers if you lock them out of the whole project. Use with care ...
To make sure you don't forget to release a lock you don't need any more, locked files are shown in the commit dialog and selected by default. If you continue with the commit, locks you hold on the selected files are removed, even if the files haven't been modified. If you don't want to release a lock on certain files, you can uncheck them (if they're not modified). If you want to keep a lock on a file you've modified, you have to enable the Keep locks checkbox before you commit your changes.
To release a lock manually, select the file(s) in your working copy for which you want to release the lock, then select the command → There is nothing further to enter so TortoiseSVN will contact the repository and release the locks. You can also use this command on a folder to release all locks recursively.
To see what locks you and others hold, you can use
→ .
Locally held lock tokens show up immediately. To check for
locks held by others (and to see if any of your locks are
broken or stolen) you need to click on
.
From the context menu here, you can also get and release locks, as well as breaking and stealing locks held by others.
Avoid Breaking and Stealing Locks
If you break or steal someone else's lock without telling them, you could potentially cause loss of work. If you are working with unmergeable file types and you steal someone else's lock, once you release the lock they are free to check in their changes and overwrite yours. Subversion doesn't lose data, but you have lost the team-working protection that locking gave you.
As mentioned above, the most effective way to use locking is to set
the svn:needs-lock property on files. Refer to
the section called “Project Settings”
for instructions on how to set properties.
Files with this property set will always be checked out and updated
with the read-only flag set unless your working copy holds a lock.
As a reminder, TortoiseSVN uses a special overlay to indicate this.
If you operate a policy where every file has to be locked then you may find it easier to use Subversion's auto-props feature to set the property automatically every time you add new files. Read the section called “Automatic property setting” for further information.
When you create a new repository with Subversion 1.2 or higher,
four hook templates are created in the repository
hooks directory. These are called before
and after getting a lock, and before and after releasing a lock.
It is a good idea to install a post-lock
and post-unlock hook script on the server which
sends out an email indicating the file which has been locked.
With such a script in place, all your users can be notified if
someone locks/unlocks a file. You can find an example hook script
hooks/post-lock.tmpl in your repository folder.
You might also use hooks to disallow breaking or stealing of locks, or perhaps limit it to a named administrator. Or maybe you want to email the owner when one of their locks is broken or stolen.
Read the section called “Server side hook scripts” to find out more.
For open source projects (like this one) everyone has read access to the repository, and anyone can make a contribution to the project. So how are those contributions controlled? If just anyone could commit changes, the project would be permanently unstable and probably permanently broken. In this situation the change is managed by submitting a patch file to the development team, who do have write access. They can review the patch first, and then either submit it to the repository or reject it back to the author.
Patch files are simply Unified-Diff files showing the differences between your working copy and the base revision.
First you need to make and test your changes. Then instead of using → on the parent folder, you select →
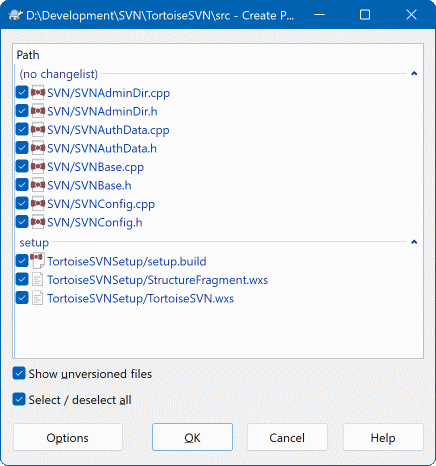
you can now select the files you want included in the patch, just as you would with a full commit. This will produce a single file containing a summary of all the changes you have made to the selected files since the last update from the repository.
The columns in this dialog can be customized in the same way as the columns in the Check for modifications dialog. Read the section called “Local and Remote Status” for further details.
By clicking on the Options button you can specify how the patch is created. For example you can specify that changes in line endings or whitespaces are not included in the final patch file.
You can produce separate patches containing changes to different sets of files. Of course, if you create a patch file, make some more changes to the same files and then create another patch, the second patch file will include both sets of changes.
Just save the file using a filename of your choice.
Patch files can have any extension you like, but by convention they
should use the .patch or
.diff extension.
You are now ready to submit your patch file.
Tip
Do not save the patch file with a.txt extension
if you intend to send it via email to someone else. Plain text files
are often mangled with by the email software and it often happens
that whitespaces and newline chars are automatically converted and compressed.
If that happens, the patch won't apply smoothly. So use .patch or
.diff as the extension when you save the patch file.
You can also save the patch to the clipboard instead of to a file. You might want to do this so that you can paste it into an email for review by others. Or if you have two working copies on one machine and you want to transfer changes from one to the other, a patch on the clipboard is a convenient way of doing this.
If you prefer, you can create a patch file from within the Commit or Check for Modifications dialogs. Just select the files and use the context menu item to create a patch from those files. If you want to see the Options dialog you have to hold shift when you right click.
Patch files are applied to your working copy. This should be done
from the same folder level as was used to create the patch.
If you are not sure what this is, just look at the first line of
the patch file. For example, if the first file being worked on was
doc/source/english/chapter1.xml
and the first line in the patch file is
Index: english/chapter1.xml
then you need to apply the patch to the
doc/source/ folder.
However, provided you are in the correct working copy, if you
pick the wrong folder level, TortoiseSVN will notice and suggest the
correct level.
In order to apply a patch file to your working copy, you need to have at least read access to the repository. The reason for this is that the merge program must reference the changes back to the revision against which they were made by the remote developer.
From the context menu for that folder, click on
→
This will bring up a file open dialog allowing you to select the
patch file to apply. By default only .patch
or .diff
files are shown, but you can opt for “All files”.
If you previously saved a patch to the clipboard, you can use
in the file
open dialog. Note that this option only appears if you
saved the patch to the clipboard using
→ .
Copying a patch to the clipboard from another app will not
make the button appear.
Alternatively, if the patch file has a .patch
or .diff extension, you can right click on it
directly and select
→ .
In this case you will be prompted to enter a working copy location.
These two methods just offer different ways of doing the same thing. With the first method you select the WC and browse to the patch file. With the second you select the patch file and browse to the WC.
Once you have selected the patch file and working copy location, TortoiseMerge runs to merge the changes from the patch file with your working copy. A small window lists the files which have been changed. Double click on each one in turn, review the changes and save the merged files.
The remote developer's patch has now been applied to your working copy, so you need to commit to allow everyone else to access the changes from the repository.
Sometimes you need to know not only what lines have changed, but also who exactly changed specific lines in a file. That's when the → command, sometimes also referred to as annotate command comes in handy.
This command lists, for every line in a file, the author and the revision the line was changed.
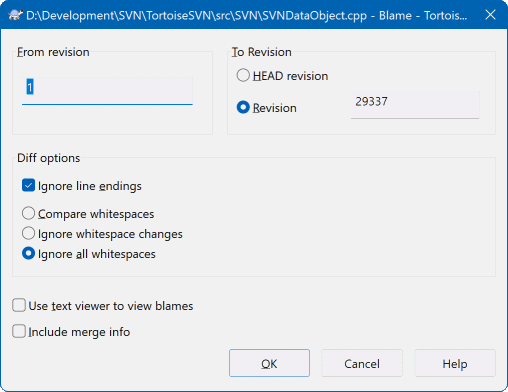
If you're not interested in changes from earlier revisions you can
set the revision from which the blame should start. Set this to 1,
if you want the blame for every revision.
By default the blame file is viewed using TortoiseBlame, which highlights the different revisions to make it easier to read. If you wish to print or edit the blame file, select Use Text viewer to view blames.
You can specify the way that line ending and whitespace changes are handled. These options are described in the section called “Line-end and Whitespace Options”. The default behaviour is to treat all whitespace and line-end differences as real changes, but if you want to ignore an indentation change and find the original author, you can choose an appropriate option here.
You can include merge information as well if you wish, although this option can take considerably longer to retrieve from the server. When lines are merged from another source, the blame information shows the revision the change was made in the original source as well as the revision when it was merged into this file.
Once you press TortoiseSVN starts retrieving the data to create the blame file. Once the blame process has finished the result is written into a temporary file and you can view the results.
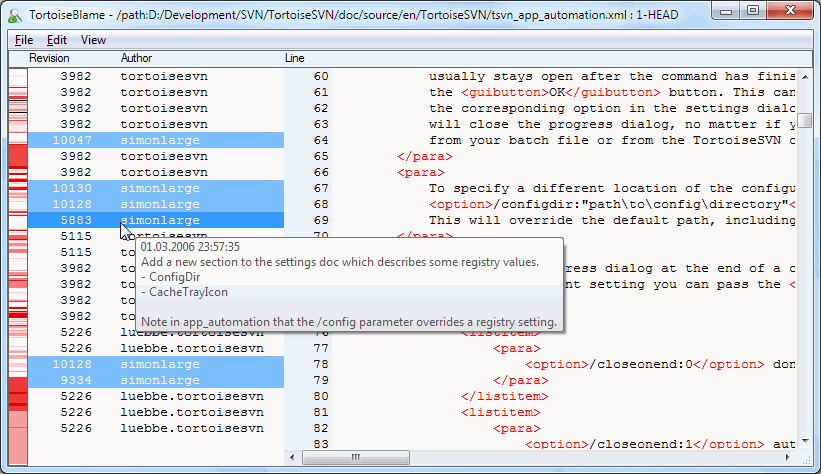
TortoiseBlame, which is included with TortoiseSVN, makes the blame file
easier to read. When you hover the mouse over a line in the blame info
column, all lines with the same revision are shown with a darker
background. Lines from other revisions which were changed by the same author
are shown with a light background.
The colouring may not work as clearly if you have your display set to
256 colour mode.
If you left click on a line, all lines with the same revision are highlighted, and lines from other revisions by the same author are highlighted in a lighter colour. This highlighting is sticky, allowing you to move the mouse without losing the highlights. Click on that revision again to turn off highlighting.
The revision comments (log message) are shown in a hint box whenever the mouse hovers over the blame info column. If you want to copy the log message for that revision, use the context menu which appears when you right click on the blame info column.
You can search within the Blame report using → . This allows you to search for revision numbers, authors and the content of the file itself. Log messages are not included in the search - you should use the Log Dialog to search those.
You can also jump to a specific line number using → .
When the mouse is over the blame info columns, a context menu is available which helps with comparing revisions and examining history, using the revision number of the line under the mouse as a reference. → generates a blame report for the same file, but using the previous revision as the upper limit. This gives you the blame report for the state of the file just before the line you are looking at was last changed. → starts your diff viewer, showing you what changed in the referenced revision. → displays the revision log dialog starting with the referenced revision.
If you need a better visual indicator of where the oldest and newest changes are, select → . This will use a colour gradient to show newer lines in red and older lines in blue. The default colouring is quite light, but you can change it using the TortoiseBlame settings.
If you are using Merge Tracking and you requested merge info when starting the blame, merged lines are shown slightly differently. Where a line has changed as a result of merging from another path, TortoiseBlame will show the revision and author of the last change in the original file rather than the revision where the merge took place. These lines are indicated by showing the revision and author in italics. The revision where the merge took place is shown separately in the tooltip when you hover the mouse over the blame info columns. If you do not want merged lines shown in this way, uncheck the Include merge info checkbox when starting the blame.
If you want to see the paths involved in the merge, select → . This shows the path where the line was last changed, excluding changes resulting from a merge.
The revision shown in the blame information represents the last revision where the content of that line changed. If the file was created by copying another file, then until you change a line, its blame revision will show the last change in the original source file, not the revision where the copy was made. This also applies to the paths shown with merge info. The path shows the repository location where the last change was made to that line.
The settings for TortoiseBlame can be accessed using → on the TortoiseBlame tab. Refer to the section called “TortoiseBlame Settings”.
One of the limitations of the Blame report is that it only shows the file as it was in a particular revision, and the last person to change each line. Sometimes you want to know what change was made, as well as who made it. If you right click on a line in TortoiseBlame you have a context menu item to show the changes made in that revision. But if you want to see the changes and the blame information simultaneously then you need a combination of the diff and blame reports.
The revision log dialog includes several options which allow you to do this.
- Blame Revisions
In the top pane, select 2 revisions, then select → . This will fetch the blame data for the 2 revisions, then use the diff viewer to compare the two blame files.
- Blame Changes
Select one revision in the top pane, then pick one file in the bottom pane and select → . This will fetch the blame data for the selected revision and the previous revision, then use the diff viewer to compare the two blame files.
- Compare and Blame with Working BASE
Show the log for a single file, and in the top pane, select a single revision, then select → . This will fetch the blame data for the selected revision, and for the file in the working BASE, then use the diff viewer to compare the two blame files.
Sometimes you need to work directly on the repository, without having a working copy. That's what the Repository Browser is for. Just as the explorer and the icon overlays allow you to view your working copy, so the Repository Browser allows you to view the structure and status of the repository.
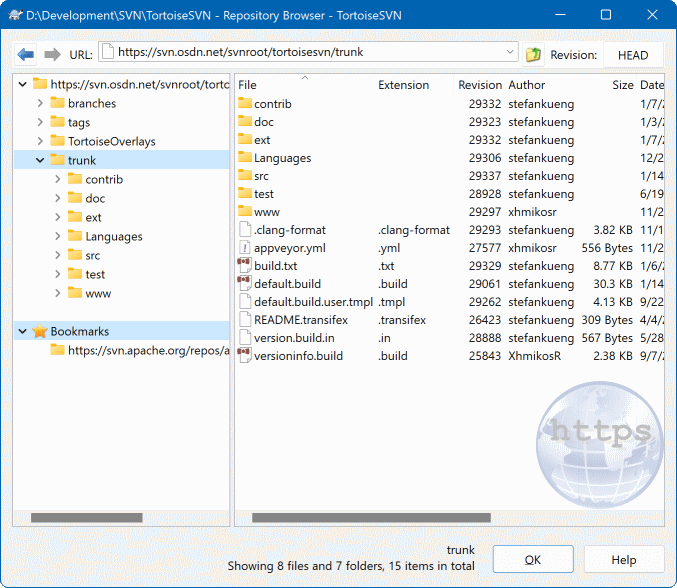
With the Repository Browser you can execute commands like copy, move,
rename, ... directly on the repository.
The repository browser looks very similar to the Windows explorer, except that it is showing the content of the repository at a particular revision rather than files on your computer. In the left pane you can see a directory tree, and in the right pane are the contents of the selected directory. At the top of the Repository Browser Window you can enter the URL of the repository and the revision you want to browse.
Folders included with the svn:externals property are
also shown in the repository browser. Those folders are shown with a
small arrow on them to indicate that they are not part of the repository
structure, just links.
Just like Windows explorer, you can click on the column headings in the right pane if you want to set the sort order. And as in explorer there are context menus available in both panes.
The context menu for a file allows you to:
Open the selected file, either with the default viewer for that file type, or with a program you choose.
Edit the selected file. This will checkout a temporary working copy and start the default editor for that file type. When you close the editor program, if changes were saved then a commit dialog appears, allowing you to enter a comment and commit the change.
Show the revision log for that file, or show a graph of all revisions so you can see where the file came from.
Blame the file, to see who changed which line and when.
Checkout a single file. This creates a “sparse” working copy which contains just this one file.
Delete or rename the file.
Save an unversioned copy of the file to your hard drive.
Copy the URL shown in the address bar to the clipboard.
Make a copy of the file, either to a different part of the repository, or to a working copy rooted in the same repository.
View/Edit the file's properties.
Create a shortcut so that you can quickly start repo browser again, opened directly at this location.
The context menu for a folder allows you to:
Show the revision log for that folder, or show a graph of all revisions so you can see where the folder came from.
Export the folder to a local unversioned copy on your hard drive.
Checkout the folder to produce a local working copy on your hard drive.
Create a new folder in the repository.
Add unversioned files or folders directly to the repository. This is effectively the Subversion Import operation.
Delete or rename the folder.
Make a copy of the folder, either to a different part of the repository, or to a working copy rooted in the same repository. This can also be used to create a branch/tag without the need to have a working copy checked out.
View/Edit the folder's properties.
Mark the folder for comparison. A marked folder is shown in bold.
Compare the folder with a previously marked folder, either as a unified diff, or as a list of changed files which can then be visually diffed using the default diff tool. This can be particularly useful for comparing two tags, or trunk and branch to see what changed.
If you select two folders in the right pane, you can view the differences either as a unified-diff, or as a list of files which can be visually diffed using the default diff tool.
If you select multiple folders in the right pane, you can checkout all of them at once into a common parent folder.
If you select 2 tags which are copied from the same root
(typically /trunk/), you can use
→
to view the list of revisions between the two tag points.
External items (referenced using svn:externals are also
shown in the repository browser, and you can even drill down into the folder
contents. External items are marked with a red arrow over the item.
You can use F5 to refresh the view as usual. This will refresh everything which is currently displayed. If you want to pre-fetch or refresh the information for nodes which have not been opened yet, use Ctrl-F5. After that, expanding any node will happen instantly without a network delay while the information is fetched.
You can also use the repository browser for drag-and-drop operations. If you drag a folder from explorer into the repo-browser, it will be imported into the repository. Note that if you drag multiple items, they will be imported in separate commits.
If you want to move an item within the repository, just left drag it to the new location. If you want to create a copy rather than moving the item, Ctrl-left drag instead. When copying, the cursor has a “plus” symbol on it, just as it does in Explorer.
If you want to copy/move a file or folder to another location and also give it a new name at the same time, you can right drag or Ctrl-right drag the item instead of using left drag. In that case, a rename dialog is shown where you can enter a new name for the file or folder.
Whenever you make changes in the repository using one of these methods, you will be presented with a log message entry dialog. If you dragged something by mistake, this is also your chance to cancel the action.
Sometimes when you try to open a path you will get an error message in place of the item details. This might happen if you specified an invalid URL, or if you don't have access permission, or if there is some other server problem. If you need to copy this message to include it in an email, just right click on it and use → , or simply use Ctrl+C.
Bookmarked urls/repositories are shown below the current repository folders in the left tree view. You can add entries there by right clicking on any file or folder and select → . Clicking on a bookmark will browse to that repository and file/folder.
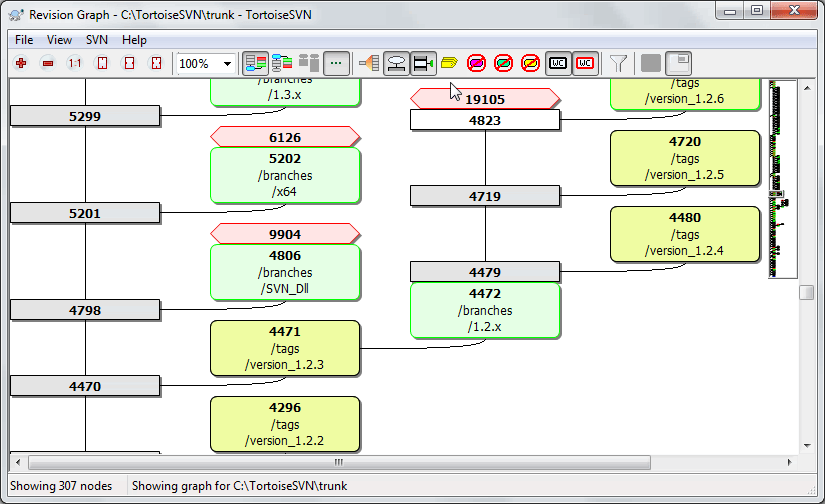
Sometimes you need to know where branches and tags were taken from
the trunk, and the ideal way to view this sort of information is
as a graph or tree structure. That's when you need to use
→
This command analyses the revision history and attempts to create a tree showing the points at which copies were taken, and when branches/tags were deleted.
Important
In order to generate the graph, TortoiseSVN must fetch all log messages from the repository root. Needless to say this can take several minutes even with a repository of a few thousand revisions, depending on server speed, network bandwidth, etc. If you try this with something like the Apache project which currently has over 500,000 revisions you could be waiting for some time.
The good news is that if you are using log caching, you only have to suffer this delay once. After that, log data is held locally. Log caching is enabled in TortoiseSVN's settings.
Each revision graph node represents a revision in the repository where something changed in the tree you are looking at. Different types of node can be distinguished by shape and colour. The shapes are fixed, but colours can be set using →
- Added or copied items
Items which have been added, or created by copying another file/folder are shown using a rounded rectangle. The default colour is green. Tags and trunks are treated as a special case and use a different shade, depending on the → .
- Deleted items
Deleted items e.g. a branch which is no longer required, are shown using an octagon (rectangle with corners cut off). The default colour is red.
- Renamed items
Renamed items are also shown using an octagon, but the default colour is blue.
- Branch tip revision
The graph is normally restricted to showing branch points, but it is often useful to be able to see the respective HEAD revision for each branch too. If you select Show HEAD revisions, each HEAD revision nodes will be shown as an ellipse. Note that HEAD here refers to the last revision committed on that path, not to the HEAD revision of the repository.
- Working copy revision
If you invoked the revision graph from a working copy, you can opt to show the BASE revision on the graph using Show WC revision, which marks the BASE node with a bold outline.
- Modified working copy
If you invoked the revision graph from a working copy, you can opt to show an additional node representing your modified working copy using Show WC modifications. This is an elliptical node with a bold outline in red by default.
- Normal item
All other items are shown using a plain rectangle.
Note that by default the graph only shows the points at which items were added, copied or deleted. Showing every revision of a project will generate a very large graph for non-trivial cases. If you really want to see all revisions where changes were made, there is an option to do this in the View menu and on the toolbar.
The default view (grouping off) places the nodes such that their vertical position is in strict revision order, so you have a visual cue for the order in which things were done. Where two nodes are in the same column the order is very obvious. When two nodes are in adjacent columns the offset is much smaller because there is no need to prevent the nodes from overlapping, and as a result the order is a little less obvious. Such optimisations are necessary to keep complex graphs to a reasonable size. Please note that this ordering uses the edge of the node on the older side as a reference, i.e. the bottom edge of the node when the graph is shown with oldest node at the bottom. The reference edge is significant because the node shapes are not all the same height.
Because a revision graph is often quite complex, there are a number of features which can be used to tailor the view the way you want it. These are available in the View menu and from the toolbar.
- Group branches
The default behavior (grouping off) has all rows sorted strictly by revision. As a result, long-living branches with sparse commits occupy a whole column for only a few changes and the graph becomes very broad.
This mode groups changes by branch, so that there is no global revision ordering: Consecutive revisions on a branch will be shown in (often) consecutive lines. Sub-branches, however, are arranged in such a way that later branches will be shown in the same column above earlier branches to keep the graph slim. As a result, a given row may contain changes from different revisions.
- Oldest on top
Normally the graph shows the oldest revision at the bottom, and the tree grows upwards. Use this option to grow down from the top instead.
- Align trees on top
When a graph is broken into several smaller trees, the trees may appear either in natural revision order, or aligned at the bottom of the window, depending on whether you are using the Group Branches option. Use this option to grow all trees down from the top instead.
- Reduce cross lines
This option is normally enabled and avoids showing the graph with a lot of confused crossing lines. However this may also make the layout columns appear in less logical places, for example in a diagonal line rather than a column, and the graph may require a larger area to draw. If this is a problem you can disable the option from the View menu.
- Differential path names
Long path names can take a lot of space and make the node boxes very large. Use this option to show only the changed part of a path, replacing the common part with dots. E.g. if you create a branch
/branches/1.2.x/doc/htmlfrom/trunk/doc/htmlthe branch could be shown in compact form as/branches/1.2.x/..because the last two levels,docandhtml, did not change.- Show all revisions
This does just what you expect and shows every revision where something (in the tree that you are graphing) has changed. For long histories this can produce a truly huge graph.
- Show HEAD revisions
This ensures that the latest revision on every branch is always shown on the graph.
- Exact copy sources
When a branch/tag is made, the default behaviour is to show the branch as taken from the last node where a change was made. Strictly speaking this is inaccurate since the branches are often made from the current HEAD rather than a specific revision. So it is possible to show the more correct (but less useful) revision that was used to create the copy. Note that this revision may be younger than the HEAD revision of the source branch.
- Fold tags
When a project has many tags, showing every tag as a separate node on the graph takes a lot of space and obscures the more interesting development branch structure. At the same time you may need to be able to access the tag content easily so that you can compare revisions. This option hides the nodes for tags and shows them instead in the tooltip for the node that they were copied from. A tag icon on the right side of the source node indicates that tags were made. This greatly simplifies the view.
Note that if a tag is itself used as the source for a copy, perhaps a new branch based on a tag, then that tag will be shown as a separate node rather than folded.
- Hide deleted paths
Hides paths which are no longer present at the HEAD revision of the repository, e.g. deleted branches.
If you have selected the Fold tags option then a deleted branch from which tags were taken will still be shown, otherwise the tags would disappear too. The last revision that was tagged will be shown in the colour used for deleted nodes instead of showing a separate deletion revision.
If you select the Hide tags option then these branches will disappear again as they are not needed to show the tags.
- Hide unused branches
Hides branches where no changes were committed to the respective file or sub-folder. This does not necessarily indicate that the branch was not used, just that no changes were made to this part of it.
- Show WC revision
Marks the revision on the graph which corresponds to the update revision of the item you fetched the graph for. If you have just updated, this will be HEAD, but if others have committed changes since your last update your WC may be a few revisions lower down. The node is marked by giving it a bold outline.
- Show WC modifications
If your WC contains local changes, this option draws it as a separate elliptical node, linked back to the node that your WC was last updated to. The default outline colour is red. You may need to refresh the graph using F5 to capture recent changes.
- Filter
Sometimes the revision graph contains more revisions than you want to see. This option opens a dialog which allows you to restrict the range of revisions displayed, and to hide particular paths by name.
If you hide a particular path and that node has child nodes, the children will be shown as a separate tree. If you want to hide all children as well, use the Remove the whole subtree(s) checkbox.
- Tree stripes
Where the graph contains several trees, it is sometimes useful to use alternating colours on the background to help distinguish between trees.
- Show overview
Shows a small picture of the entire graph, with the current view window as a rectangle which you can drag. This allows you to navigate the graph more easily. Note that for very large graphs the overview may become useless due to the extreme zoom factor and will therefore not be shown in such cases.
To make it easier to navigate a large graph, use the overview window. This shows the entire graph in a small window, with the currently displayed portion highlighted. You can drag the highlighted area to change the displayed region.
The revision date, author and comments are shown in a hint box whenever the mouse hovers over a revision box.
If you select two revisions (Use Ctrl-left click), you can use the context menu to show the differences between these revisions. You can choose to show differences as at the branch creation points, but usually you will want to show the differences at the branch end points, i.e. at the HEAD revision.
You can view the differences as a Unified-Diff file, which shows all differences in a single file with minimal context. If you opt to → you will be presented with a list of changed files. Double click on a file name to fetch both revisions of the file and compare them using the visual difference tool.
If you right click on a revision you can use → to view the history.
You can also merge changes in the selected revision(s) into a different working copy. A folder selection dialog allows you to choose the working copy to merge into, but after that there is no confirmation dialog, nor any opportunity to try a test merge. It is a good idea to merge into an unmodified working copy so that you can revert the changes if it doesn't work out! This is a useful feature if you want to merge selected revisions from one branch to another.
Learn to Read the Revision Graph
First-time users may be surprised by the fact that the revision graph shows something that does not match the user's mental model. If a revision changes multiple copies or branches of a file or folder, for instance, then there will be multiple nodes for that single revision. It is a good practice to start with the leftmost options in the toolbar and customize the graph step-by-step until it comes close to your mental model.
All filter options try lose as little information as possible. That may cause some nodes to change their color, for instance. Whenever the result is unexpected, undo the last filter operation and try to understand what is special about that particular revision or branch. In most cases, the initially expected outcome of the filter operation would either be inaccurate or misleading.
If you want to check the server again for newer information, you can simply refresh the view using F5. If you are using the log cache (enabled by default), this will check the repository for newer commits and fetch only the new ones. If the log cache was in offline mode, this will also attempt to go back online.
If you are using the log cache and you think the message content or author may have changed, you should use the log dialog to refresh the messages you need. Since the revision graph works from the repository root, we would have to invalidate the entire log cache, and refilling it could take a very long time.
A large tree can be difficult to navigate and sometimes you will want to hide parts of it, or break it down into a forest of smaller trees. If you hover the mouse over the point where a node link enters or leaves the node you will see one or more popup buttons which allow you to do this.

Click on the minus button to collapse the attached sub-tree.

Click on the plus button to expand a collapsed tree. When a tree has been collapsed, this button remains visible to indicate the hidden sub-tree.

Click on the cross button to split the attached sub-tree and show it as a separate tree on the graph.

Click on the circle button to reattach a split tree. When a tree has been split away, this button remains visible to indicate that there is a separate sub-tree.
Click on the graph background for the main context menu, which offers options to Expand all and Join all. If no branch has been collapsed or split, the context menu will not be shown.
Sometimes you may want a clean copy of your working tree without the
.svn directory, e.g. to create a zipped
tarball of your source, or to export to a web server. Instead of
making a copy and then deleting the .svn
directory manually, TortoiseSVN offers the command
→ .
Exporting from a URL and exporting from a working copy are treated
slightly differently.
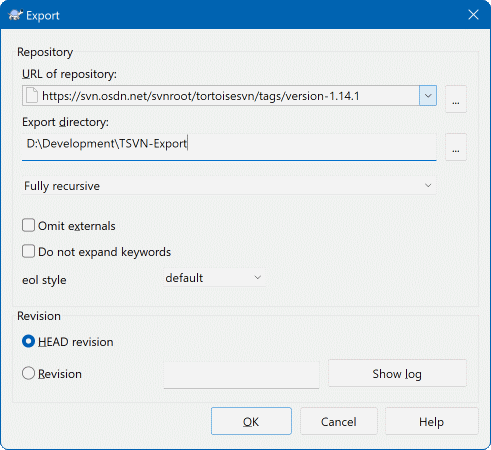
If you execute this command on an unversioned folder, TortoiseSVN will
assume that the selected folder is the target, and open a dialog for
you to enter the URL and revision to export from.
This dialog has options to export only the top level folder, to omit
external references, and to override the line end style for files which
have the svn:eol-style property set.
Of course you can export directly from the repository too. Use the Repository Browser to navigate to the relevant subtree in your repository, then use → . You will get the Export from URL dialog described above.
If you execute this command on your working copy you'll be asked for
a place to save the clean working copy without the
.svn folder.
By default, only the versioned files are exported, but you can use the
Export unversioned files too checkbox to include any other
unversioned files which exist in your WC and not in the repository.
External references using svn:externals can be
omitted if required.
Another way to export from a working copy is to right drag the working copy folder to another location and choose → or → or → . The second option includes the unversioned files as well. The third option exports only modified items, but maintains the folder structure.
When exporting from a working copy,
if the target folder already contains a folder of the same
name as the one you are exporting, you will be given the option
to overwrite the existing content, or to create a new folder with
an automatically generated name, e.g. Target (1).
Exporting single files
The export dialog does not allow exporting single files, even though Subversion can.
To export single files with TortoiseSVN, you have to use the repository browser (the section called “The Repository Browser”). Simply drag the file(s) you want to export from the repository browser to where you want them in the explorer, or use the context menu in the repository browser to export the files.
Exporting a Change Tree
If you want to export a copy of your project tree structure but containing only the files which have changed in a particular revision, or between any two revisions, use the compare revisions feature described in the section called “Comparing Folders”.
If you want to export your working copy tree structure but containing only the files which are locally modified, refer to SVN Export changed items here above.
Sometimes you have a working copy which you want to convert back
to a normal folder without the .svn directory.
All you need to do is delete the .svn directory
from the working copy root.
Alternatively you can export the folder to itself. In Windows Explorer right drag the working copy root folder from the file pane onto itself in the folder pane. TortoiseSVN detects this special case and asks if you want to make the working copy unversioned. If you answer yes the control directory will be removed and you will have a plain, unversioned directory tree.
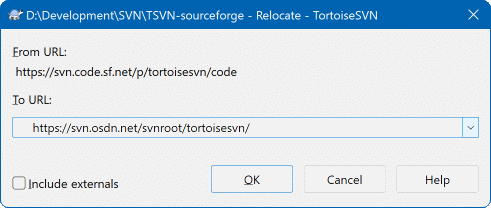
If your repository has for some reason changed it's
location (IP/URL). Maybe you're even stuck and can't
commit and you don't want to checkout your working
copy again from the new location and to move all your
changed data back into the new working copy,
→
is the command you are looking for. It basically
does very little: it rewrites all URLs that are associated with each
file and folder with the new URL.
Note
This operation only works on working copy roots. So the context menu entry is only shown for working copy roots.
You may be surprised to find that TortoiseSVN contacts the repository as part of this operation. All it is doing is performing some simple checks to make sure that the new URL really does refer to the same repository as the existing working copy.
Warning
This is a very infrequently used operation. The relocate command is only used if the URL of the repository root has changed. Possible reasons are:
The IP address of the server has changed.
The protocol has changed (e.g. http:// to https://).
The repository root path in the server setup has changed.
Put another way, you need to relocate when your working copy is referring to the same location in the same repository, but the repository itself has moved.
It does not apply if:
You want to move to a different Subversion repository. In that case you should perform a clean checkout from the new repository location.
You want to switch to a different branch or directory within the same repository. To do that you should use → . Read the section called “To Checkout or to Switch...” for more information.
If you use relocate in either of the cases above, it will corrupt your working copy and you will get many unexplainable error messages while updating, committing, etc. Once that has happened, the only fix is a fresh checkout.
It is very common in Software Development for changes to be related to a specific bug or issue ID. Users of bug tracking systems (issue trackers) would like to associate the changes they make in Subversion with a specific ID in their issue tracker. Most issue trackers therefore provide a pre-commit hook script which parses the log message to find the bug ID with which the commit is associated. This is somewhat error prone since it relies on the user to write the log message properly so that the pre-commit hook script can parse it correctly.
TortoiseSVN can help the user in two ways:
When the user enters a log message, a well defined line including the issue number associated with the commit can be added automatically. This reduces the risk that the user enters the issue number in a way the bug tracking tools can't parse correctly.
Or TortoiseSVN can highlight the part of the entered log message which is recognized by the issue tracker. That way the user knows that the log message can be parsed correctly.
When the user browses the log messages, TortoiseSVN creates a link out of each bug ID in the log message which fires up the browser to the issue mentioned.
You can integrate a bug tracking tool of your choice in
TortoiseSVN. To do this, you have to define
some properties, which start with bugtraq:.
They must be set on Folders: (the section called “Project Settings”)
When you edit any of the bugtraq properties a special property
editor is used to make it easier to set appropriate values.
There are two ways to integrate TortoiseSVN with issue trackers. One is based on simple strings, the other is based on regular expressions. The properties used by both approaches are:
- bugtraq:url
Set this property to the URL of your bug tracking tool. It must be properly URI encoded and it has to contain
%BUGID%.%BUGID%is replaced with the Issue number you entered. This allows TortoiseSVN to display a link in the log dialog, so when you are looking at the revision log you can jump directly to your bug tracking tool. You do not have to provide this property, but then TortoiseSVN shows only the issue number and not the link to it.You can also use relative URLs instead of absolute ones. This is useful when your issue tracker is on the same domain/server as your source repository. In case the domain name ever changes, you don't have to adjust the
bugtraq:urlproperty. There are two ways to specify a relative URL:If it begins with the string
^/it is assumed to be relative to the repository root. For example,^/../?do=details&id=%BUGID%will resolve tohttps://example.com/?do=details&id=%BUGID%if your repository is located onhttps://example.com/svn/trunk/.A URL beginning with the string
/is assumed to be relative to the server's hostname. For example/?do=details&id=%BUGID%will resolve tohttps://example.com/?do=details&id=%BUGID%if your repository is located anywhere onhttps://example.com.- bugtraq:warnifnoissue
Set this to
true, if you want TortoiseSVN to warn you because of an empty issue-number text field. Valid values aretrue/false. If not defined,falseis assumed.
In the simple approach, TortoiseSVN shows the user a separate input field where a bug ID can be entered. Then a separate line is appended/prepended to the log message the user entered.
- bugtraq:message
This property activates the bug tracking system in Input field mode. If this property is set, then TortoiseSVN will prompt you to enter an issue number when you commit your changes. It's used to add a line at the end of the log message. It must contain
%BUGID%, which is replaced with the issue number on commit. This ensures that your commit log contains a reference to the issue number which is always in a consistent format and can be parsed by your bug tracking tool to associate the issue number with a particular commit. As an example you might useIssue : %BUGID%, but this depends on your Tool.- bugtraq:label
This text is shown by TortoiseSVN on the commit dialog to label the edit box where you enter the issue number. If it's not set,
Bug-ID / Issue-Nr:will be displayed. Keep in mind though that the window will not be resized to fit this label, so keep the size of the label below 20-25 characters.- bugtraq:number
If set to
trueonly numbers are allowed in the issue-number text field. An exception is the comma, so you can comma separate several numbers. Valid values aretrue/false. If not defined,trueis assumed.- bugtraq:append
This property defines if the bug-ID is appended (true) to the end of the log message or inserted (false) at the start of the log message. Valid values are
true/false. If not defined,trueis assumed, so that existing projects don't break.
In the approach with regular expressions, TortoiseSVN doesn't show a separate input field but marks the part of the log message the user enters which is recognized by the issue tracker. This is done while the user writes the log message. This also means that the bug ID can be anywhere inside a log message! This method is much more flexible, and is the one used by the TortoiseSVN project itself.
- bugtraq:logregex
This property activates the bug tracking system in Regex mode. It contains either a single regular expressions, or two regular expressions separated by a newline.
If two expressions are set, then the first expression is used as a pre-filter to find expressions which contain bug IDs. The second expression then extracts the bare bug IDs from the result of the first regex. This allows you to use a list of bug IDs and natural language expressions if you wish. e.g. you might fix several bugs and include a string something like this: “This change resolves issues #23, #24 and #25”.
If you want to catch bug IDs as used in the expression above inside a log message, you could use the following regex strings, which are the ones used by the TortoiseSVN project:
[Ii]ssues?:?(\s*(,|and)?\s*#\d+)+and(\d+).The first expression picks out “issues #23, #24 and #25” from the surrounding log message. The second regex extracts plain decimal numbers from the output of the first regex, so it will return “23”, “24” and “25” to use as bug IDs.
Breaking the first regex down a little, it must start with the word “issue”, possibly capitalised. This is optionally followed by an “s” (more than one issue) and optionally a colon. This is followed by one or more groups each having zero or more leading whitespace, an optional comma or “and” and more optional space. Finally there is a mandatory “#” and a mandatory decimal number.
If only one expression is set, then the bare bug IDs must be matched in the groups of the regex string. Example:
[Ii]ssue(?:s)? #?(\d+)This method is required by a few issue trackers, e.g. trac, but it is harder to construct the regex. We recommend that you only use this method if your issue tracker documentation tells you to.If you are unfamiliar with regular expressions, take a look at the introduction at https://en.wikipedia.org/wiki/Regular_expression , and the online documentation and tutorial at https://www.regular-expressions.info/ .
It's not always easy to get the regex right so to help out there is a test dialog built into the bugtraq properties dialog. Click on the button to the right of the edit boxes to bring it up. Here you can enter some test text, and change each regex to see the results. If the regex is invalid the edit box background changes to red.
If both the bugtraq:message and bugtraq:logregex
properties are set, logregex takes precedence.
Tip
Even if you don't have an issue tracker with a pre-commit hook parsing your log messages, you still can use this to turn the issues mentioned in your log messages into links!
And even if you don't need the links, the issue numbers show up as a separate column in the log dialog, making it easier to find the changes which relate to a particular issue.
Some tsvn: properties require a
true/false value. TortoiseSVN also understands
yes as a synonym for true and
no as a synonym for false.
Set the Properties on Folders
These properties must be set on folders for the system to work.
When you commit a file or folder the properties are read from that folder.
If the properties are not found there, TortoiseSVN will search upwards
through the folder tree to find them until it comes to an unversioned
folder, or the tree root (e.g. C:\) is found.
If you can be sure that each user checks out only from e.g
trunk/ and not some sub-folder, then it's enough if
you set the properties on trunk/.
If you can't be sure, you should set the properties recursively
on each sub-folder.
A property setting deeper in the project hierarchy overrides settings on
higher levels (closer to trunk/).
As of version 1.8, TortoiseSVN and Subversion use so called
inherited properties, which means a property that
is set on a folder is automatically also implicitly set on all
subfolders. So there's no need to set the properties on all
folders anymore but only on the root folder.
For project properties only,
i.e. tsvn:, bugtraq:
and webviewer:
you can use the Recursive checkbox to set
the property to all sub-folders in the hierarchy, without also
setting it on all files.
When you add new sub-folders to a working copy using TortoiseSVN, any project properties present in the parent folder will automatically be added to the new child folder too.
No Issue Tracker Information from Repository Browser
Because the issue tracker integration depends upon accessing Subversion properties, you will only see the results when using a checked out working copy. Fetching properties remotely is a slow operation, so you will not see this feature in action from the repo browser unless you started the repo browser from your working copy. If you started the repo browser by entering the URL of the repository you won't see this feature.
For the same reason, project properties will not be propagated automatically when a child folder is added using the repo browser.
This issue tracker integration is not restricted to TortoiseSVN; it can be used with any Subversion client. For more information, read the full Issue Tracker Integration Specification in the TortoiseSVN source repository. (the section called “License” explains how to access the repository.)
The previous section deals with adding issue information to the log messages. But what if you need to get information from the issue tracker? The commit dialog has a COM interface which allows integration an external program that can talk to your tracker. Typically you might want to query the tracker to get a list of open issues assigned to you, so that you can pick the issues that are being addressed in this commit.
Any such interface is of course highly specific to your issue tracker system,
so we cannot provide this part, and describing how to create such a
program is beyond the scope of this manual. The interface definition
and sample plugins in C# and C++/ATL can be obtained from the contrib
folder in the
TortoiseSVN repository
.
(the section called “License” explains how to access the repository.)
A summary of the API is also given in Chapter 7, IBugtraqProvider interface.
Another (working) example plugin in C# is
Gurtle
which implements the required COM interface to interact with the
Google Code
issue tracker. Google Code itself is turned down as of 2016, but the
plugin is still available as an example implementation.
For illustration purposes, let's suppose that your system administrator has provided you with an issue tracker plugin which you have installed, and that you have set up some of your working copies to use the plugin in TortoiseSVN's settings dialog. When you open the commit dialog from a working copy to which the plugin has been assigned, you will see a new button at the top of the dialog.
In this example you can select one or more open issues. The plugin
can then generate specially formatted text which it adds to your log
message.
There are several web-based repository viewers available for use with Subversion such as ViewVC and WebSVN . TortoiseSVN provides a means to link with these viewers.
You can integrate a repo viewer of your choice in TortoiseSVN. To do this, you have to define some properties which define the linkage. They must be set on Folders: (the section called “Project Settings”)
- webviewer:revision
Set this property to the URL of your repo viewer to view all changes in a specific revision. It must be properly URI encoded and it has to contain
%REVISION%.%REVISION%is replaced with the revision number in question. This allows TortoiseSVN to display a context menu entry in the log dialog → .- webviewer:pathrevision
Set this property to the URL of your repo viewer to view changes to a specific file in a specific revision. It must be properly URI encoded and it has to contain
%REVISION%and%PATH%.%PATH%is replaced with the path relative to the repository root. This allows TortoiseSVN to display a context menu entry in the log dialog → For example, if you right click in the log dialog bottom pane on a file entry/trunk/src/filethen the%PATH%in the URL will be replaced with/trunk/src/file.
You can also use relative URLs instead of absolute ones. This is useful
in case your web viewer is on the same domain/server as your source
repository. In case the domain name ever changes, you don't have to adjust
the webviewer:revision and webviewer:pathrevision
property. The format is the same as for the bugtraq:url property.
See the section called “Integration with Bug Tracking Systems / Issue Trackers”.
Set the Properties on Folders
These properties must be set on folders for the system to work.
When you commit a file or folder the properties are read from that folder.
If the properties are not found there, TortoiseSVN will search upwards
through the folder tree to find them until it comes to an unversioned
folder, or the tree root (e.g. C:\) is found.
If you can be sure that each user checks out only from e.g
trunk/ and not some sub-folder, then it's enough if
you set the properties on trunk/.
If you can't be sure, you should set the properties recursively
on each sub-folder.
A property setting deeper in the project hierarchy overrides settings on
higher levels (closer to trunk/).
For project properties only,
i.e. tsvn:, bugtraq:
and webviewer:
you can use the Recursive checkbox to set
the property to all sub-folders in the hierarchy, without also
setting it on all files.
When you add new sub-folders to a working copy using TortoiseSVN, any project properties present in the parent folder will automatically be added to the new child folder too.
Limitations Using the Repository Browser
Because the repo viewer integration depends upon accessing Subversion properties, you will only see the results when using a checked out working copy. Fetching properties remotely is a slow operation, so you will not see this feature in action from the repo browser unless you started the repo browser from your working copy. If you started the repo browser by entering the URL of the repository you won't see this feature.
For the same reason, project properties will not be propagated automatically when a child folder is added using the repo browser.
To find out what the different settings are for, just leave your mouse pointer a second on the editbox/checkbox... and a helpful tooltip will popup.
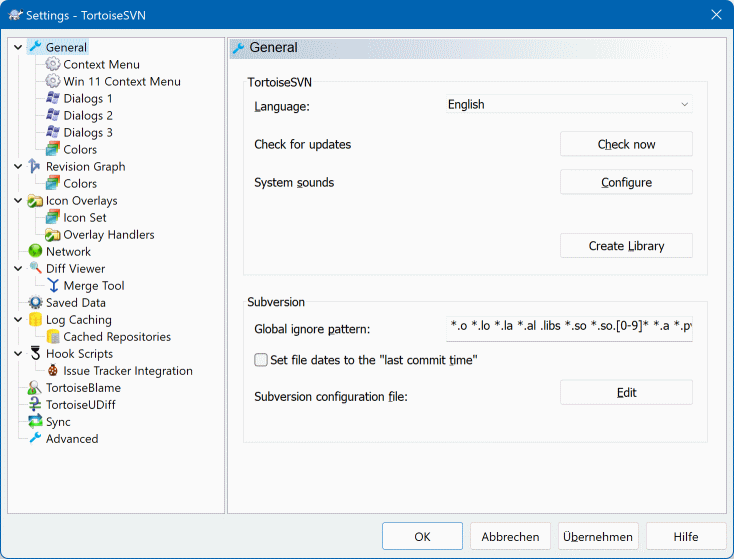
This dialog allows you to specify your preferred language,
and the Subversion-specific settings.
- Language
Selects your user interface language. Of course, you have to install the corresponding language pack first to get another UI language than the default English one.
- Check for updates
TortoiseSVN will contact its download site periodically to see if there is a newer version of the program available. If there is it will show a notification link in the commit dialog. Use if you want an answer right away. The new version will not be downloaded; you simply receive an information dialog telling you that the new version is available.
- System sounds
TortoiseSVN has three custom sounds which are installed by default.
Error
Notice
Warning
You can select different sounds (or turn these sounds off completely) using the Windows Control Panel. is a shortcut to the Control Panel.
- Use Aero Dialogs
On Windows Vista and later systems this controls whether dialogs use the Aero styling.
- Create Library
On Windows 7 you can create a Library in which to group working copies which are scattered in various places on your system.
- Global ignore pattern
Global ignore patterns are used to prevent unversioned files from showing up e.g. in the commit dialog. Files matching the patterns are also ignored by an import. Ignore files or directories by typing in the names or extensions. Patterns are separated by spaces e.g.
bin obj *.bak *.~?? *.jar *.[Tt]mp. These patterns should not include any path separators. Note also that there is no way to differentiate between files and directories. Read the section called “Pattern Matching in Ignore Lists” for more information on the pattern-matching syntax.Note that the ignore patterns you specify here will also affect other Subversion clients running on your PC, including the command line client.
Caution
If you use the Subversion configuration file to set a
global-ignorespattern, it will override the settings you make here. The Subversion configuration file is accessed using the as described below.This ignore pattern will affect all your projects. It is not versioned, so it will not affect other users. By contrast you can also use the versioned
svn:ignoreorsvn:global-ignoresproperty to exclude files or directories from version control. Read the section called “Ignoring Files And Directories” for more information.- Set file dates to the “last commit time”
This option tells TortoiseSVN to set the file dates to the last commit time when doing a checkout or an update. Otherwise TortoiseSVN will use the current date. If you are developing software it is generally best to use the current date because build systems normally look at the date stamps to decide which files need compiling. If you use “last commit time” and revert to an older file revision, your project may not compile as you expect it to.
- Subversion configuration file
Use to edit the Subversion configuration file directly. Some settings cannot be modified directly by TortoiseSVN, and need to be set here instead. For more information about the Subversion
configfile see the Runtime Configuration Area . The section on Automatic Property Setting is of particular interest, and that is configured here. Note that Subversion can read configuration information from several places, and you need to know which one takes priority. Refer to Configuration and the Windows Registry to find out more.- Apply local modifications to svn:externals when updating
This option tells TortoiseSVN to always apply local modifications to the
svn:externalsproperty when updating the working copy.
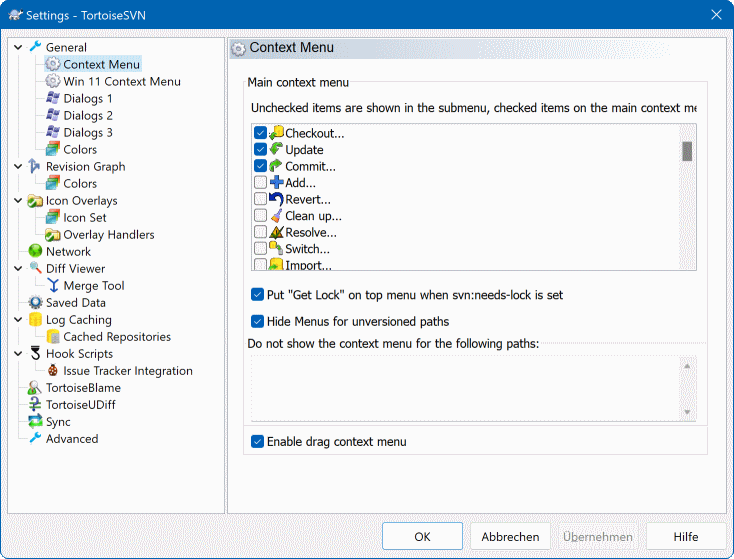
This page allows you to specify which of the TortoiseSVN context menu
entries will show up in the main context menu, and which will appear
in the TortoiseSVN submenu. By default most items are unchecked and
appear in the submenu.
There is a special case for Get Lock. You can of
course promote it to the top level using the list above, but as most
files don't need locking this just adds clutter. However, a file with
the svn:needs-lock property needs this action every
time it is edited, so in that case it is very useful to have at the top
level. Checking the box here means that when a file is selected which has
the svn:needs-lock property set,
Get Lock will always appear at the top level.
Most of the time, you won't need the TortoiseSVN context menu, apart
for folders that are under version control by Subversion. For non-
versioned folders, you only really need the context menu when you
want to do a checkout. If you check the option
        Hide menus
        for unversioned paths
, TortoiseSVN will not add its entries
to the context menu for unversioned folders. But the entries are
added for all items and paths in a versioned folder. And you can
get the entries back for unversioned folders by holding the
Shift key down while showing the context menu.
If there are some paths on your computer where you just don't want
TortoiseSVN's context menu to appear at all, you can list them in
the box at the bottom.
A trailing * is treated as a wildcard character matching
any characters. Additionally, a path ending with \ will
match a folder and all its files and subfolders.
Please note: * cannot be used as a
wildcard character within a path.
There's a different settings page for the Windows 11 context menu. That page also has a button to register the TortoiseSVN entries in the context menu. You only have to do this if TortoiseSVN was installed as a different user.
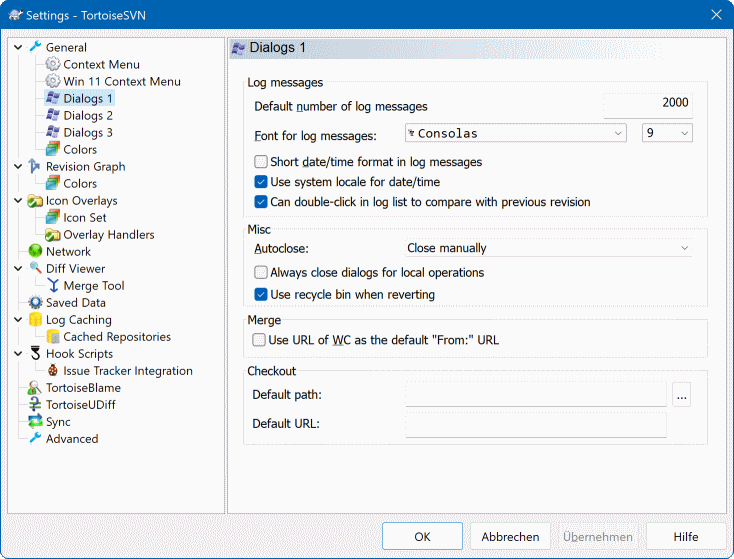
This dialog allows you to configure some of TortoiseSVN's
dialogs the way you like them.
- Default number of log messages
Limits the number of log messages that TortoiseSVN fetches when you first select → Useful for slow server connections. You can always use or to get more messages.
- Font for log messages
Selects the font face and size used to display the log message itself in the middle pane of the Revision Log dialog, and when composing log messages in the Commit dialog.
- Short date / time format in log messages
If the standard long messages use up too much space on your screen use the short format.
- Can double click in log list to compare with previous revision
If you frequently find yourself comparing revisions in the top pane of the log dialog, you can use this option to allow that action on double click. It is not enabled by default because fetching the diff is often a long process, and many people prefer to avoid the wait after an accidental double click, which is why this option is not enabled by default.
- Auto-close
TortoiseSVN can automatically close all progress dialogs when the action is finished without error. This setting allows you to select the conditions for closing the dialogs. The default (recommended) setting is Close manually which allows you to review all messages and check what has happened. However, you may decide that you want to ignore some types of message and have the dialog close automatically if there are no critical changes.
Auto-close if no merges, adds or deletes means that the progress dialog will close if there were simple updates, but if changes from the repository were merged with yours, or if any files were added or deleted, the dialog will remain open. It will also stay open if there were any conflicts or errors during the operation.
Auto-close if no conflicts relaxes the criteria further and will close the dialog even if there were merges, adds or deletes. However, if there were any conflicts or errors, the dialog remains open.
Auto-close if no errors always closes the dialog even if there were conflicts. The only condition that keeps the dialog open is an error condition, which occurs when Subversion is unable to complete the task. For example, an update fails because the server is inaccessible, or a commit fails because the working copy is out-of-date.
- Always close dialogs for local operations
Local operations like adding files or reverting changes do not need to contact the repository and complete quickly, so the progress dialog is often of little interest. Select this option if you want the progress dialog to close automatically after these operations, unless there are errors.
- Use recycle bin when reverting
When you revert local modifications, your changes are discarded. TortoiseSVN gives you an extra safety net by sending the modified file to the recycle bin before bringing back the pristine copy. If you prefer to skip the recycle bin, uncheck this option.
- Use URL of WC as the default “From:” URL
In the merge dialog, the default behaviour is for the From: URL to be remembered between merges. However, some people like to perform merges from many different points in their hierarchy, and find it easier to start out with the URL of the current working copy. This can then be edited to refer to a parallel path on another branch.
- Default checkout path
You can specify the default path for checkouts. If you keep all your checkouts in one place, it is useful to have the drive and folder pre-filled so you only have to add the new folder name to the end.
- Default checkout URL
You can also specify the default URL for checkouts. If you often checkout sub-projects of some very large project, it can be useful to have the URL pre-filled so you only have to add the sub-project name to the end.
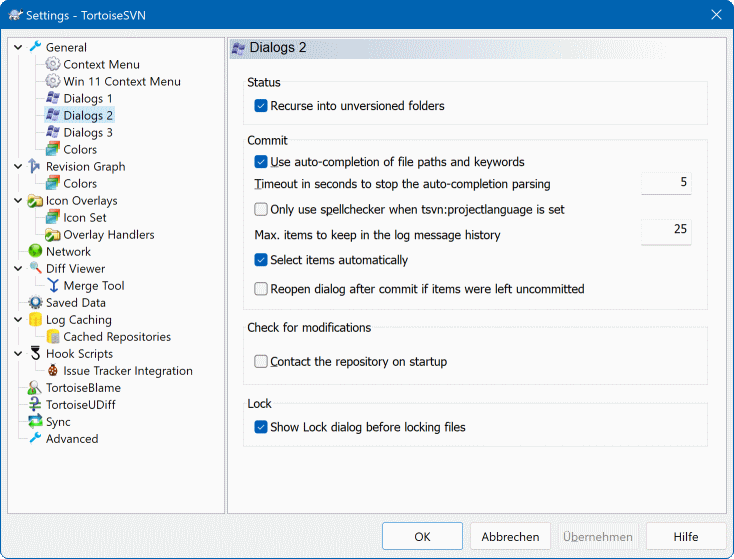
- Recurse into unversioned folders
If this box is checked (default state), then whenever the status of an unversioned folder is shown in the Add, Commit or Check for Modifications dialog, every child file and folder is also shown. If you uncheck this box, only the unversioned parent is shown. Unchecking reduces clutter in these dialogs. In that case if you select an unversioned folder for Add, it is added recursively.
In the Check for Modifications dialog you can opt to see ignored items. If this box is checked then whenever an ignored folder is found, all child items will be shown as well.
- Use auto-completion of file paths and keywords
The commit dialog includes a facility to parse the list of filenames being committed. When you type the first 3 letters of an item in the list, the auto-completion box pops up, and you can press Enter to complete the filename. Check the box to enable this feature.
- Timeout in seconds to stop the auto-completion parsing
The auto-completion parser can be quite slow if there are a lot of large files to check. This timeout stops the commit dialog being held up for too long. If you are missing important auto-completion information, you can extend the timeout.
-
Only use spellchecker when
tsvn:projectlanguageis set If you don't wish to use the spellchecker for all commits, check this box. The spellchecker will still be enabled where the project properties require it.
- Max. items to keep in the log message history
When you type in a log message in the commit dialog, TortoiseSVN stores it for possible re-use later. By default it will keep the last 25 log messages for each repository, but you can customize that number here. If you have many different repositories, you may wish to reduce this to avoid filling your registry.
Note that this setting applies only to messages that you type in on this computer. It has nothing to do with the log cache.
- Select items automatically
The normal behaviour in the commit dialog is for all modified (versioned) items to be selected for commit automatically. If you prefer to start with nothing selected and pick the items for commit manually, uncheck this box.
- Reopen dialog after commit if items were left uncommitted
This reopens the commit dialog automatically at the same directory after a successful commit. The dialog is reopened only if there still are items left to commit.
- Contact the repository on startup
The Check for Modifications dialog checks the working copy by default, and only contacts the repository when you click . If you always want to check the repository, you can use this setting to make that action happen automatically.
- Show Lock dialog before locking files
When you select one or more files and then use → to take out a lock on those files, on some projects it is customary to write a lock message explaining why you have locked the files. If you do not use lock messages, you can uncheck this box to skip that dialog and lock the files immediately.
If you use the lock command on a folder, you are always presented with the lock dialog as that also gives you the option to select files for locking.
If your project is using the
tsvn:lockmsgminsizeproperty, you will see the lock dialog regardless of this setting because the project requires lock messages.
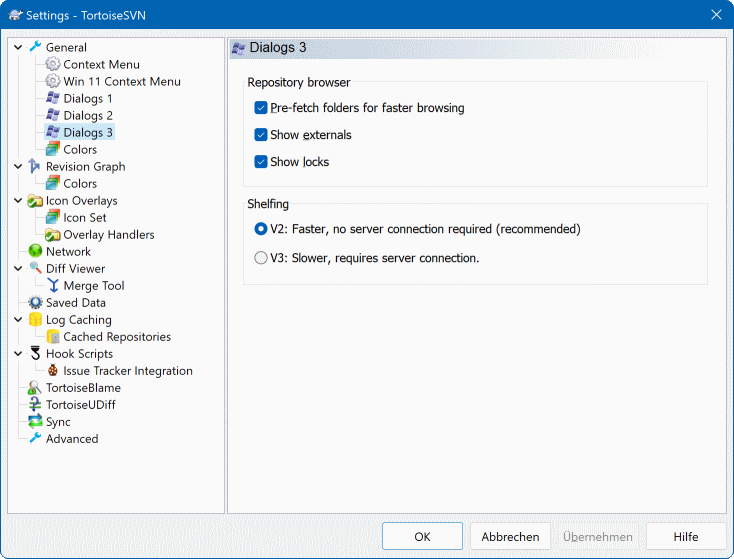
Settings for the repository browser:
- Pre-fetch folders for faster browsing
If this box is checked (default state), then the repository browser fetches information about shown folders in the background. That way as soon as you browse into one of those folders, the information is already available.
Some servers however can't handle the multiple requests this causes or when not configured correctly treat so many requests as something bad and start blocking them. In this case you can disable the pre-fetching here.
- Show externals
If this box is checked (default state), then the repository browser shows files and folders that are included with the
svn:externalsproperty as normal files and folders, but with an overlay icon to mark them as from an external source.As with the pre-fetch feature explained above, this too can put too much stress on weak servers. In this case you can disable this feature here.
There are two versions of shelfing implemented in SVN. Here you can select which version you want to use. Note that changing this setting might require an OS restart to take effect.
- V2
this version is much faster than
V3and is the recommended version to use.However, the speed comes at a prize:
V2does not handle directory changes, and can't handle copies and moves of files.- V3
this is the latest version of the shelfing feature. It can handle changes to directories as well as file moves/copies.
However,
V3is much slower thanV2and can be unusably slow for big repositories or if you have a slow connection to the repository.
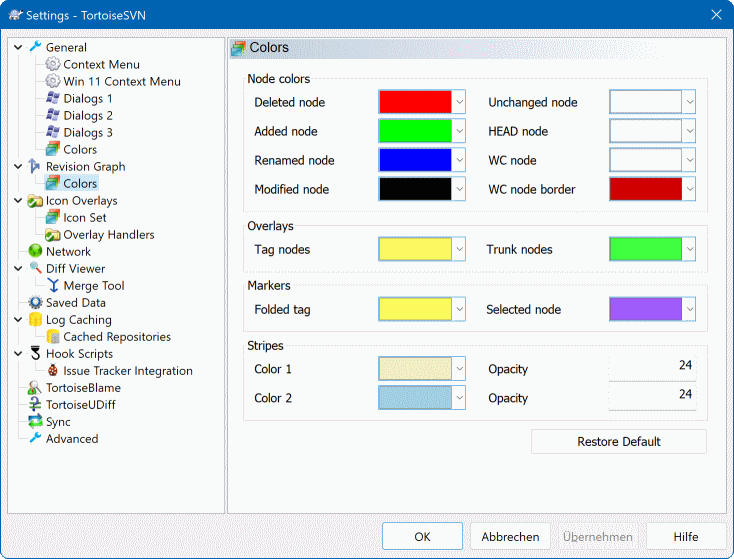
This dialog allows you to configure the text colours
used in TortoiseSVN's dialogs the way you like them.
- Possible or real conflict / obstructed
A conflict has occurred during update, or may occur during merge. Update is obstructed by an existing unversioned file/folder of the same name as a versioned one.
This colour is also used for error messages in the progress dialogs.
- Added files
Items added to the repository.
- Missing / deleted / replaced
Items deleted from the repository, missing from the working copy, or deleted from the working copy and replaced with another file of the same name.
- Merged
Changes from the repository successfully merged into the WC without creating any conflicts.
- Modified / copied
Add with history, or paths copied in the repository. Also used in the log dialog for entries which include copied items.
- Deleted node
An item which has been deleted from the repository.
- Added node
An item which has been added to the repository, by an add, copy or move operation.
- Renamed node
An item which has been renamed within the repository.
- Replaced node
The original item has been deleted and a new item with the same name replaces it.
- Filter match
When using filtering in the log dialog, search terms are highlighted in the results using this colour.
other settings:
- Dark theme
The dialogs in TortoiseSVN can be shown in a dark mode on Windows 10 1809 and later. This feature also requires that dark mode for applications is enabled in the Windows 10 settings.
Important
Note that not all controls in all dialogs are shown in a dark theme.
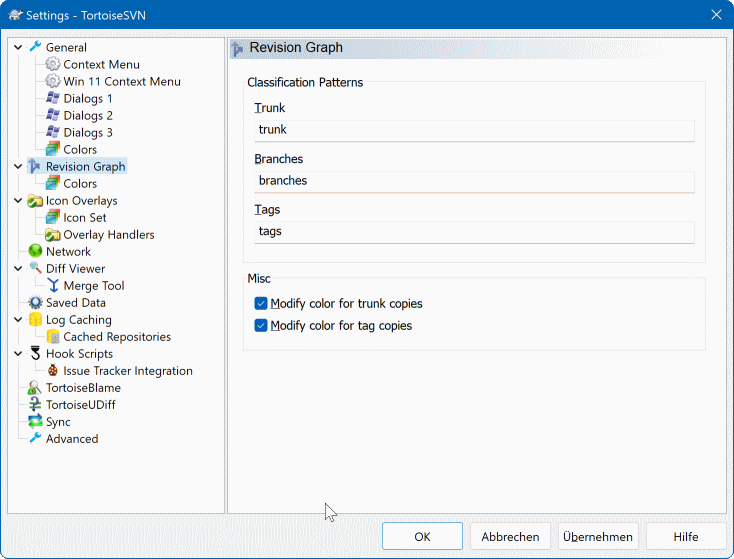
- Classification Patterns
The revision graph attempts to show a clearer picture of your repository structure by distinguishing between trunk, branches and tags. As there is no such classification built into Subversion, this information is extracted from the path names. The default settings assume that you use the conventional English names as suggested in the Subversion documentation, but of course your usage may vary.
Specify the patterns used to recognise these paths in the three boxes provided. The patterns will be matched case-insensitively, but you must specify them in lower case. Wild cards
*and?will work as usual, and you can use;to separate multiple patterns. Do not include any extra white space as it will be included in the matching specification.Commit tag detection
Please note that these patterns are also used to detect commits to a tag, not just for the revision graph.
- Modify Colors
Colors are used in the revision graph to indicate the node type, i.e. whether a node is added, deleted, renamed. In order to help pick out node classifications, you can allow the revision graph to blend colors to give an indication of both node type and classification. If the box is checked, blending is used. If the box is unchecked, color is used to indicate node type only. Use the color selection dialog to allocate the specific colors used.
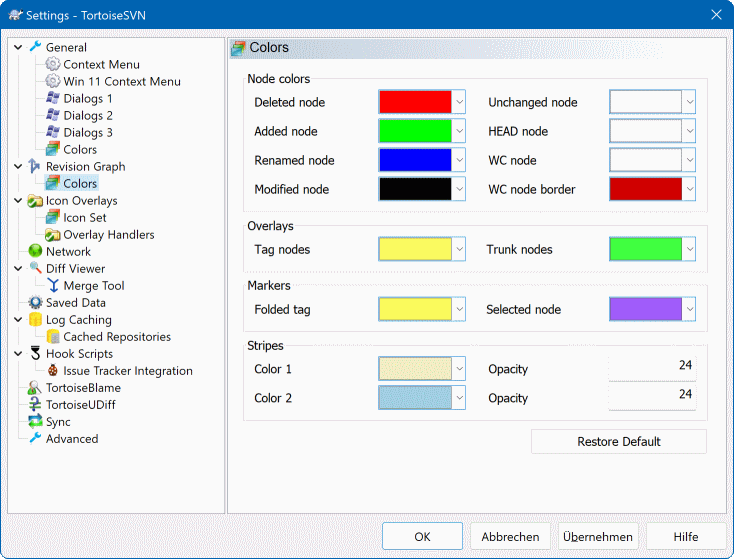
This page allows you to configure the colors used. Note that the
color specified here is the solid color. Most nodes are colored
using a blend of the node type color, the background color and
optionally the classification color.
- Deleted Node
Items which have been deleted and not copied anywhere else in the same revision.
- Added Node
Items newly added, or copied (add with history).
- Renamed Node
Items deleted from one location and added in another in the same revision.
- Modified Node
Simple modifications without any add or delete.
- Unchanged Node
May be used to show the revision used as the source of a copy, even when no change (to the item being graphed) took place in that revision.
- HEAD node
Current HEAD revision in the repository.
- WC Node
If you opt to show an extra node for your modified working copy, attached to its last-commit revision on the graph, use this color.
- WC Node Border
If you opt to show whether the working copy is modified, use this color border on the WC node when modifications are found.
- Tag Nodes
Nodes classified as tags may be blended with this color.
- Trunk Nodes
Nodes classified as trunk may be blended with this color.
- Folded Tag Markers
If you use tag folding to save space, tags are marked on the copy source using a block in this color.
- Selected Node Markers
When you left click on a node to select it, the marker used to indicate selection is a block in this color.
- Stripes
These colors are used when the graph is split into sub-trees and the background is colored in alternating stripes to help pick out the separate trees.

This page allows you to choose the items for which TortoiseSVN will
display icon overlays.
Since it takes quite a while to fetch the status of a working copy, TortoiseSVN uses a cache to store the status so the explorer doesn't get hogged too much when showing the overlays. You can choose which type of cache TortoiseSVN should use according to your system and working copy size here:
- Default
Caches all status information in a separate process (
TSVNCache.exe). That process watches all drives for changes and fetches the status again if files inside a working copy get modified. The process runs with the least possible priority so other programs don't get hogged because of it. That also means that the status information is not real time but it can take a few seconds for the overlays to change.Advantage: the overlays show the status recursively, i.e. if a file deep inside a working copy is modified, all folders up to the working copy root will also show the modified overlay. And since the process can send notifications to the shell, the overlays on the left tree view usually change too.
Disadvantage: the process runs constantly, even if you're not working on your projects. It also uses around 10-50 MB of RAM depending on number and size of your working copies.
- Shell
Caching is done directly inside the shell extension dll, but only for the currently visible folder. Each time you navigate to another folder, the status information is fetched again.
Advantage: needs only very little memory (around 1 MB of RAM) and can show the status in real time.
Disadvantage: Since only one folder is cached, the overlays don't show the status recursively. For big working copies, it can take more time to show a folder in explorer than with the default cache. Also the mime-type column is not available.
- None
With this setting, the TortoiseSVN does not fetch the status at all in Explorer. Because of that, files don't get an overlay and folders only get a 'normal' overlay if they're versioned. No other overlays are shown, and no extra columns are available either.
Advantage: uses absolutely no additional memory and does not slow down the Explorer at all while browsing.
Disadvantage: Status information of files and folders is not shown in Explorer. To see if your working copies are modified, you have to use the “Check for modifications” dialog.
By default, overlay icons and context menus will appear in all open/save dialogs as well as in Windows Explorer. If you want them to appear only in Windows Explorer, check the Show overlays and context menu only in explorer box.
You can force the status cache to None for elevated
processes by checking the
Disable status cache for elevated processes box.
This is useful if you want to prevent another TSVNCache.exe
process getting created with elevated privileges.
You can also choose to mark folders as modified if they contain unversioned items. This could be useful for reminding you that you have created new files which are not yet versioned. This option is only available when you use the default status cache option (see below).
If you have files in the ignore-on-commit changelist, you can chose to
make those files not propagate their status to the parent folder. That way if
only files in that changelist are modified, the parent folder still shows
the unmodified overlay icon.
The next group allows you to select which classes of storage should show overlays. By default, only hard drives are selected. You can even disable all icon overlays, but where's the fun in that?
Network drives can be very slow, so by default icons are not shown for working copies located on network shares.
USB Flash drives appear to be a special case in that the drive type is identified by the device itself. Some appear as fixed drives, and some as removable drives.
The Exclude Paths are used to tell TortoiseSVN those paths for which it should not show icon overlays and status columns. This is useful if you have some very big working copies containing only libraries which you won't change at all and therefore don't need the overlays, or if you only want TortoiseSVN to look in specific folders.
Any path you specify here is assumed to apply recursively, so none of the
child folders will show overlays either. If you want to exclude
only the named folder, append ?
after the path.
The same applies to the Include Paths. Except that for those paths the overlays are shown even if the overlays are disabled for that specific drive type, or by an exclude path specified above.
Users sometimes ask how these three settings interact. For any given path check the include and exclude lists, seeking upwards through the directory structure until a match is found. When the first match is found, obey that include or exclude rule. If there is a conflict, a single directory spec takes precedence over a recursive spec, then inclusion takes precedence over exclusion.
An example will help here:
Exclude:
C:
C:\develop\?
C:\develop\tsvn\obj
C:\develop\tsvn\bin

Include:
C:\develop
These settings disable icon overlays for the C: drive, except for
c:\develop. All projects below that directory will
show overlays, except the c:\develop folder itself,
which is specifically ignored. The high-churn binary folders are also
excluded.
TSVNCache.exe also uses these paths to restrict its scanning. If you want it to look only in particular folders, disable all drive types and include only the folders you specifically want to be scanned.
Exclude SUBST Drives
It is often convenient to use a SUBST drive
to access your working copies, e.g. using the command
subst T: C:\TortoiseSVN\trunk\doc
However this can cause the overlays not to update, as
TSVNCache will only receive one notification when
a file changes, and that is normally for the original path. This means
that your overlays on the subst path may never
be updated.
An easy way to work around this is to exclude the original path
from showing overlays, so that the overlays show up on the
subst path instead.
Sometimes you will exclude areas that contain working copies, which saves TSVNCache from scanning and monitoring for changes, but you still want a visual indication that a folder contains a working copy. The Show excluded root folders as 'normal' checkbox allows you to do this. With this option, working copy root folders in any excluded area (drive type not checked, or specifically excluded) will show up as normal and up-to-date, with a green check mark. This reminds you that you are looking at a working copy, even though the folder overlays may not be correct. Files do not get an overlay at all. Note that the context menus still work, even though the overlays are not shown.
As a special exception to this, drives A:
and B: are never considered for the
Show excluded folders as 'normal' option.
This is because Windows is forced to look on the drive, which can
result in a delay of several seconds when starting Explorer, even
if your PC does have a floppy drive.
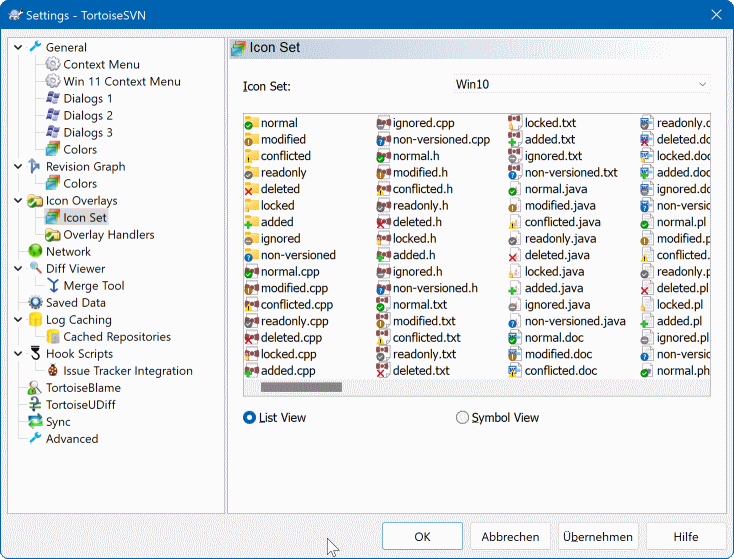
You can change the overlay icon set to the one you like best.
Note that if you change overlay set, you may have to restart
your computer for the changes to take effect.
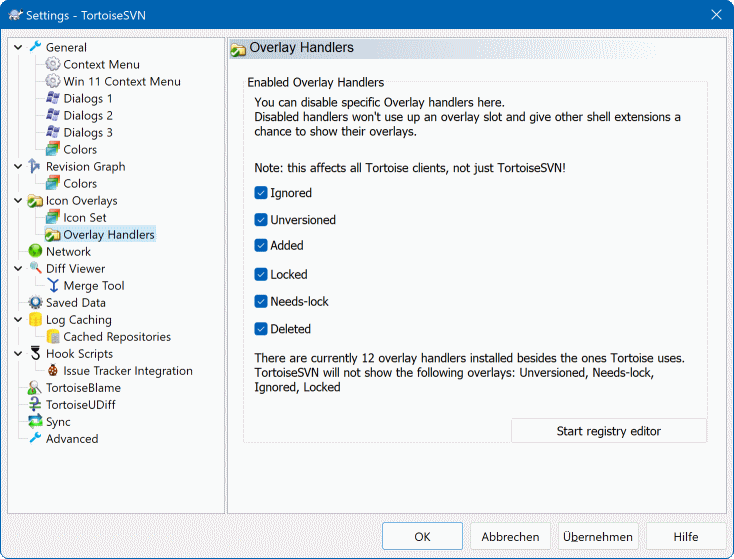
Because the number of overlays available is severely restricted,
you can choose to disable some handlers to ensure that the ones
you want will be loaded. Because TortoiseSVN uses the common
TortoiseOverlays component which is shared with other Tortoise
clients (e.g. TortoiseCVS, TortoiseHg) this setting will affect
those clients too.
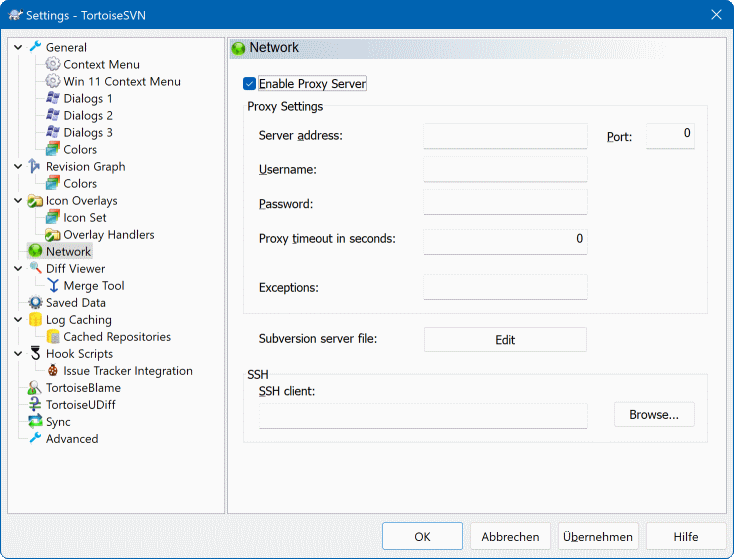
Here you can configure your proxy server, if you need one to get
through your company's firewall.
If you need to set up per-repository proxy settings, you will
need to use the Subversion servers file to
configure this. Use to get there
directly. Consult the
Runtime Configuration Area
for details on how to use this file.
You can also specify which program TortoiseSVN should use to establish a secure connection to a svn+ssh repository. We recommend that you use TortoisePlink.exe. This is a version of the popular Plink program, and is included with TortoiseSVN, but it is compiled as a Windowless app, so you don't get a DOS box popping up every time you authenticate.
You must specify the full path to the executable. For TortoisePlink.exe this is the standard TortoiseSVN bin directory. Use the button to help locate it. Note that if the path contains spaces, you must enclose it in quotes, e.g.
"C:\Program Files\TortoiseSVN\bin\TortoisePlink.exe"
One side-effect of not having a window is that there is nowhere for any error messages to go, so if authentication fails you will simply get a message saying something like “Unable to write to standard output”. For this reason we recommend that you first set up using standard Plink. When everything is working, you can use TortoisePlink with exactly the same parameters.
TortoisePlink does not have any documentation of its own because it is just a minor variant of Plink. Find out about command line parameters from the PuTTY website .
To avoid being prompted for a password repeatedly, you might also consider using a password caching tool such as Pageant. This is also available for download from the PuTTY website.
Finally, setting up SSH on server and clients is a non-trivial process which is beyond the scope of this help file. However, you can find a guide in the TortoiseSVN FAQ listed under Subversion/TortoiseSVN SSH How-To .
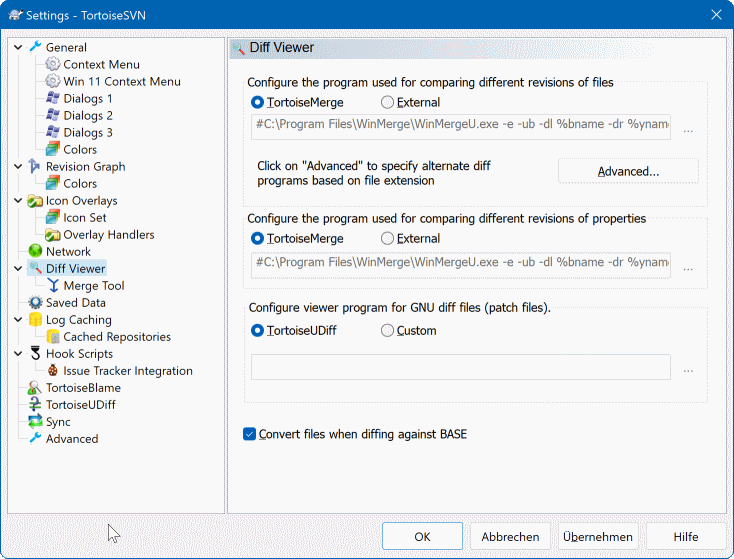
Here you can define your own diff/merge programs that TortoiseSVN
should use. The default setting is to use TortoiseMerge
which is installed alongside TortoiseSVN.
Read the section called “External Diff/Merge Tools” for a list of some of the external diff/merge programs that people are using with TortoiseSVN.
An external diff program may be used for comparing different
revisions of files. The external program will need to
obtain the filenames from the command line, along with
any other command line options. TortoiseSVN uses
substitution parameters prefixed with %.
When it encounters one of these it will substitute the
appropriate value. The order of the parameters will depend
on the Diff program you use.
- %base
The original file without your changes
- %bname
The window title for the base file
- %nqbname
The window title for the base file, without quotes
- %mine
Your own file, with your changes
- %yname
The window title for your file
- %nqyname
The window title for your file, without quotes
- %burl
The URL of the original file, if available
- %nqburl
The URL of the original file, if available, without quotes
- %yurl
The URL of the second file, if available
- %nqyurl
The URL of the second file, if available, without quotes
- %brev
The revision of the original file, if available
- %nqbrev
The revision of the original file, if available, without quotes
- %yrev
The revision of the second file, if available
- %nqyrev
The revision of the second file, if available, without quotes
- %peg
The peg revision, if available
- %nqpeg
The peg revision, if available, without quotes
- %fname
The name of the file. This is an empty string if two different files are diffed instead of two states of the same file.
- %nqfname
The name of the file, without quotes
The window titles are not pure filenames.
TortoiseSVN treats that as a name to display and creates
the names accordingly. So e.g. if you're doing a
diff from a file in revision 123 with a file
in your working copy, the names will be
filename : revision 123
and
filename : working copy.
For example, with ExamDiff Pro:
C:\Path-To\ExamDiff.exe %base %mine --left_display_name:%bname
                                    --right_display_name:%yname
or with KDiff3:
C:\Path-To\kdiff3.exe %base %mine --L1 %bname --L2 %yname
or with WinMerge:
C:\Path-To\WinMerge.exe -e -ub -dl %bname -dr %yname %base %mine
or with Araxis:
C:\Path-To\compare.exe /max /wait /title1:%bname /title2:%yname
                       %base %mine
or with UltraCompare:
C:\Path-To\uc.exe %base %mine -title1 %bname -title2 %yname
or with DiffMerge:
C:\Path-To\DiffMerge.exe -nosplash -t1=%bname -t2=%yname %base %mine
If you use the svn:keywords property to
expand keywords, and in particular the revision
of a file, then there may be a difference between files which
is purely due to the current value of the keyword. Also if you use
svn:eol-style = native the BASE file will have
pure LF line endings whereas your file will
have CR-LF line endings. TortoiseSVN will normally hide
these differences automatically by first parsing the BASE file to
expand keywords and line endings before doing the diff operation.
However, this can take a long time with large files. If
Convert files when diffing against BASE
is unchecked then TortoiseSVN will skip pre-processing the files.
You can also specify a different diff tool to use on Subversion properties. Since these tend to be short simple text strings, you may want to use a simpler more compact viewer.
If you have configured an alternate diff tool, you can access TortoiseMerge and the third party tool from the context menus. → uses the primary diff tool, and Shift+ → uses the secondary diff tool.
At the bottom of the dialog you can configure a viewer program for unified-diff files (patch files). No parameters are required. The Default setting is to use TortoiseUDiff which is installed alongside TortoiseSVN, and colour-codes the added and removed lines.
Since Unified Diff is just a text format, you can use your favourite text editor if you prefer.
An external merge program used to resolve conflicted files. Parameter substitution is used in the same way as with the Diff Program.
- %base
the original file without your or the others changes
- %bname
The window title for the base file
- %nqbname
The window title for the base file, without quotes
- %mine
your own file, with your changes
- %yname
The window title for your file
- %nqyname
The window title for your file, without quotes
- %theirs
the file as it is in the repository
- %tname
The window title for the file in the repository
- %nqtname
The window title for the file in the repository, without quotes
- %merged
the conflicted file, the result of the merge operation
- %mname
The window title for the merged file
- %nqmname
The window title for the merged file, without quotes
- %fname
The name of the conflicted file
- %nqfname
The name of the conflicted file, without quotes
For example, with Perforce Merge:
C:\Path-To\P4Merge.exe %base %theirs %mine %merged
or with KDiff3:
C:\Path-To\kdiff3.exe %base %mine %theirs -o %merged
                      --L1 %bname --L2 %yname --L3 %tname
or with Araxis:
C:\Path-To\compare.exe /max /wait /3 /title1:%tname /title2:%bname
                       /title3:%yname %theirs %base %mine %merged /a2
or with WinMerge (2.8 or later):
C:\Path-To\WinMerge.exe %merged
or with DiffMerge:
C:\Path-To\DiffMerge.exe -caption=%mname -result=%merged -merge
      -nosplash -t1=%yname -t2=%bname -t3=%tname %mine %base %theirs
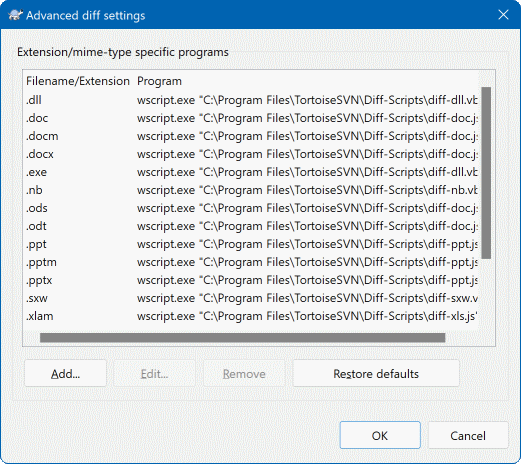
In the advanced settings, you can define a different diff and merge
program for every file extension. For instance you could associate
Photoshop as the “Diff” Program for .jpg files :-)
You can also associate the svn:mime-type property
with a diff or merge program.
To associate using a file extension, you need to specify the extension.
Use .bmp to describe Windows bitmap files.
To associate using the svn:mime-type property, specify
the mime type, including a slash, for example
text/xml.

For your convenience, TortoiseSVN saves many of the settings
you use, and remembers where you have been lately. If you
want to clear out that cache of data, you can do it here.
- URL history
Whenever you checkout a working copy, merge changes or use the repository browser, TortoiseSVN keeps a record of recently used URLs and offers them in a combo box. Sometimes that list gets cluttered with outdated URLs so it is useful to flush it out periodically.
If you want to remove a single item from one of the combo boxes you can do that in-place. Just click on the arrow to drop the combo box down, move the mouse over the item you want to remove and type Shift+Del.
- Log messages (Input dialog)
TortoiseSVN stores recent commit log messages that you enter. These are stored per repository, so if you access many repositories this list can grow quite large.
- Log messages (Show log dialog)
TortoiseSVN caches log messages fetched by the Show Log dialog to save time when you next show the log. If someone else edits a log message and you already have that message cached, you will not see the change until you clear the cache. Log message caching is enabled on the Log Cache tab.
- Dialog sizes and positions
Many dialogs remember the size and screen position that you last used.
- Authentication data
When you authenticate with a Subversion server, the username and password are cached locally so you don't have to keep entering them. You may want to clear this for security reasons, or because you want to access the repository under a different username ... does John know you are using his PC?
If you want to clear authentication data for one particular server only, use the instead of the button.
- Action log
TortoiseSVN keeps a log of everything written to its progress dialogs. This can be useful when, for example, you want to check what happened in a recent update command.
The log file is limited in length and when it grows too big the oldest content is discarded. By default 4000 lines are kept, but you can customize that number.
From here you can view the log file content, and also clear it.
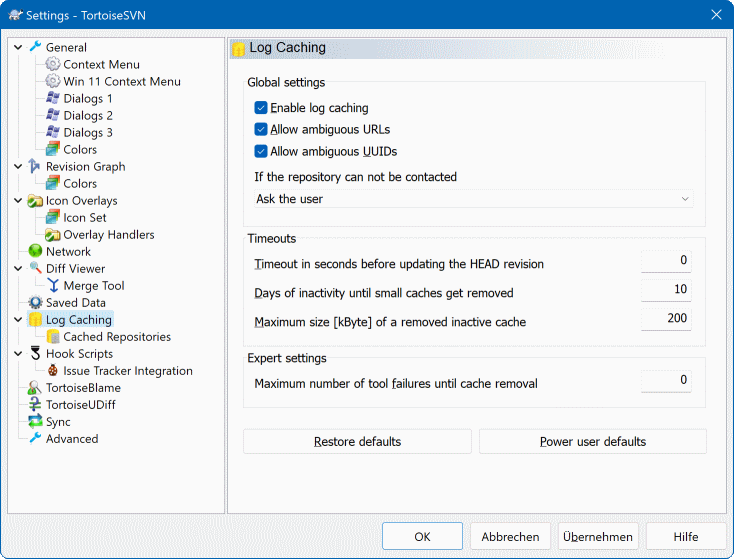
This dialog allows you to configure the log caching feature of
TortoiseSVN, which retains a local copy of log messages and changed
paths to avoid time-consuming downloads from the server. Using the
log cache can dramatically speed up the log dialog and the revision graph.
Another useful feature is that the log messages can still be
accessed when offline.
- Enable log caching
Enables log caching whenever log data is requested. If checked, data will be retrieved from the cache when available, and any messages not in the cache will be retrieved from the server and added to the cache.
If caching is disabled, data will always be retrieved directly from the server and not stored locally.
- Allow ambiguous URLs
Occasionally you may have to connect to a server which uses the same URL for all repositories. Older versions of
svnbridgewould do this. If you need to access such repositories you will have to check this option. If you don't, unchecked it to improve performance.- Allow ambiguous UUIDs
Some hosting services give all their repositories the same UUID. You may even have done this yourself by copying a repository folder to create a new one. For all sorts of reasons this is a bad idea - a UUID should be unique. However, the log cache will still work in this situation if you check this box. If you don't need it, unchecked it to improve performance.
- If the repository cannot be contacted
If you are working offline, or if the repository server is down, the log cache can still be used to supply log messages already held in the cache. Of course the cache may not be up-to-date, so there are options to allow you to select whether this feature should be used.
When log data is being taken from the cache without contacting the server, the dialog using those message will show the offline state in its title bar.
- Timeout before updating the HEAD revision
When you invoke the log dialog you will normally want to contact the server to check for any newer log messages. If the timeout set here is non-zero then the server will only be contacted when the timeout has elapsed since the last time contact. This can reduce server round-trips if you open the log dialog frequently and the server is slow, but the data shown may not be completely up-to-date. If you want to use this feature we suggest using a value of 300 (5 minutes) as a compromise.
- Days of inactivity until small caches get removed
If you browse around a lot of repositories you will accumulate a lot of log caches. If you're not actively using them, the cache will not grow very big, so TortoiseSVN purges them after a set time by default. Use this item to control cache purging.
- Maximum size of removed inactive caches
Larger caches are more expensive to reacquire, so TortoiseSVN only purges small caches. Fine tune the threshold with this value.
- Maximum number of tool failures before cache removal
Occasionally something goes wrong with the caching and causes a crash. If this happens the cache is normally deleted automatically to prevent a recurrence of the problem. If you use the less stable nightly build you may opt to keep the cache anyway.
On this page you can see a list of the repositories that are cached locally, and the space used for the cache. If you select one of the repositories you can then use the buttons underneath.
Click on the to completely refresh the cache and fill in any holes. For a large repository this could be very time consuming, but useful if you are about to go offline and want the best available cache.
Click on the button to export the entire cache as a set of CSV files. This could be useful if you want to process the log data using an external program, although it is mainly useful to the developers.
Click on to remove all cached data for the selected repositories. This does not disable caching for the repository so the next time you request log data, a new cache will be created.
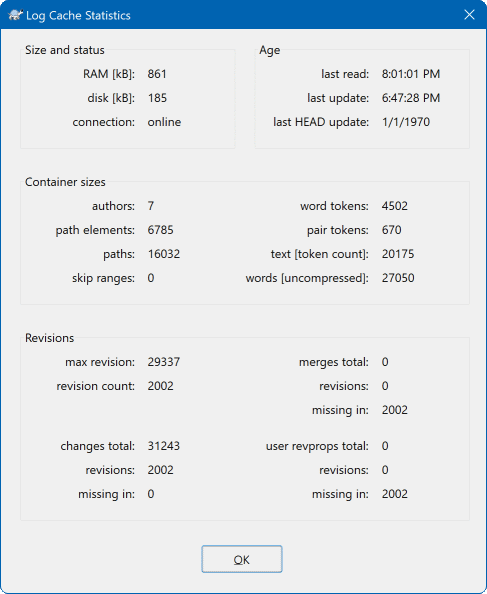
Click on the button to see
detailed statistics for a particular cache. Many of the fields
shown here are mainly of interest to the developers of TortoiseSVN,
so they are not all described in detail.
- RAM
The amount of memory required to service this cache.
- Disk
The amount of disk space used for the cache. Data is compressed, so disk usage is generally fairly modest.
- Connection
Shows whether the repository was available last time the cache was used.
- Last update
The last time the cache content was changed.
- Last head update
The last time we requested the HEAD revision from the server.
- Authors
The number of different authors with messages recorded in the cache.
- Paths
The number of paths listed, as you would see using
svn log -v.- Skip ranges
The number of revision ranges which we have not fetched, simply because they haven't been requested. This is a measure of the number of holes in the cache.
- Max revision
The highest revision number stored in the cache.
- Revision count
The number of revisions stored in the cache. This is another measure of cache completeness.
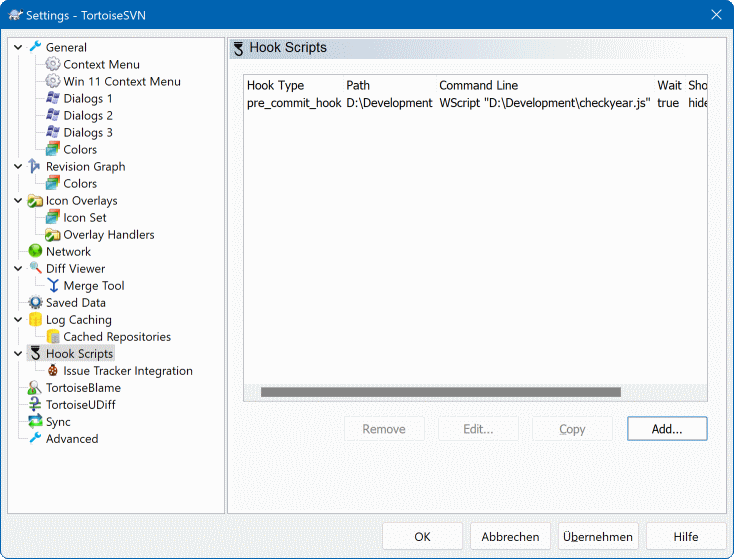
This dialog allows you to set up hook scripts which will be
executed automatically when certain Subversion actions are performed.
As opposed to the hook scripts explained in the section called “Server side hook scripts”,
these scripts are executed locally on the client.
One application for such hooks might be to call a program like
SubWCRev.exe to update version numbers after a commit,
and perhaps to trigger a rebuild.
Note that you can also specify such hook scripts using special properties on your working copy. See the section the section called “TortoiseSVN Project Properties” for details.

To add a new hook script, simply click
and fill in the details.
There are currently these types of hook script available
- Start-commit
Called before the commit dialog is shown. You might want to use this if the hook modifies a versioned file and affects the list of files that need to be committed and/or commit message. However you should note that because the hook is called at an early stage, the full list of objects selected for commit is not available.
- Manual Pre-commit
If this is specified, the commit dialog shows a button which when clicked runs the specified hook script. The hook script receives a list of all checked files and folders and the commit message if there was one entered.
- Check-commit
Called after the user clicks in the commit dialog, and before the commit dialog closes. This hook gets a list of all the checked files. If the hook returns an error, the commit dialog stays open.
If the returned error message contains paths on newline separated lines, those paths will get selected in the commit dialog after the error message is shown.
- Pre-commit
Called after the user clicks in the commit dialog, and before the actual commit begins. This hook has a list of exactly what will be committed.
- Post-commit
Called after the commit finishes successfully.
- Start-update
Called before the update-to-revision dialog is shown.
- Pre-update
Called before the actual Subversion update or switch begins.
- Post-update
Called after the update, switch or checkout finishes (whether successful or not).
- Pre-connect
Called before an attempt to contact the repository. Called at most once in five minutes.
- Pre-lock
Called before an attempt to lock a file.
- Post-lock
Called after a file has been locked.
A hook is defined for a particular working copy path. You only need to specify the top level path; if you perform an operation in a sub-folder, TortoiseSVN will automatically search upwards for a matching path.
Next you must specify the command line to execute, starting with the path to the hook script or executable. This could be a batch file, an executable file or any other file which has a valid windows file association, e.g. a perl script. Note that the script must not be specified using a UNC path as Windows shell execute will not allow such scripts to run due to security restrictions.
The command line includes several parameters which get filled in by TortoiseSVN. The parameters passed depend upon which hook is called. Each hook has its own parameters which are passed in the following order:
- Start-commit
PATHMESSAGEFILECWD- Manual Pre-commit
PATHMESSAGEFILECWD- Check-commit
PATHMESSAGEFILECWD- Pre-commit
PATHDEPTHMESSAGEFILECWD- Post-commit
PATHDEPTHMESSAGEFILEREVISIONERRORCWD- Start-update
PATHCWD- Pre-update
PATHDEPTHREVISIONCWD- Post-update
PATHDEPTHREVISIONERRORCWDRESULTPATH- Pre-connect
no parameters are passed to this script. You can pass a custom parameter by appending it to the script path.
- Pre-lock
PATHLOCKFORCEMESSAGEFILECWD- Post-lock
PATHLOCKFORCEMESSAGEFILEERRORCWD
The meaning of each of these parameters is described here:
- PATH
A path to a temporary file which contains all the paths for which the operation was started in UTF-8 encoding. Each path is on a separate line in the temp file.
Note that for operations done remotely, e.g. in the repository browser, those paths are not local paths but the urls of the affected items.
- DEPTH
The depth with which the commit/update is done.
Possible values are:
- -2
svn_depth_unknown- -1
svn_depth_exclude- 0
svn_depth_empty- 1
svn_depth_files- 2
svn_depth_immediates- 3
svn_depth_infinity
- MESSAGEFILE
Path to a file containing the log message for the commit. The file contains the text in UTF-8 encoding. After successful execution of the start-commit hook, the log message is read back, giving the hook a chance to modify it.
- REVISION
The repository revision to which the update should be done or after a commit completes.
- LOCK
Either
truewhen locking, orfalsewhen unlocking.- FORCE
Either
trueorfalse, depending on whether the operation was forced or not.- ERROR
Path to a file containing the error message. If there was no error, the file will be empty.
- CWD
The current working directory with which the script is run. This is set to the common root directory of all affected paths.
- RESULTPATH
A path to a temporary file which contains all the paths in UTF-8 encoding which were somehow touched by the operation. Each path is on a separate line in the temp file.
Note that although we have given these parameters names for convenience, you do not have to refer to those names in the hook settings. All parameters listed for a particular hook are always passed, whether you want them or not ;-)
If you want the Subversion operation to hold off until the hook has completed, check Wait for the script to finish.
Normally you will want to hide ugly DOS boxes when the script runs, so Hide the script while running is checked by default. Also you need to check this if your hook script might return an error that should stop the operation.
Theforce flag can be set if the user must not proceed
with the operation without running the script, i.e. the script must always
run. If the force flag is not checked, then the user
is shown a button to retry
the operation without running the hook script.
Sample client hook scripts can be found in the contrib folder in the
TortoiseSVN repository
.
(the section called “License” explains how to access the repository.)
When debugging hook scripts you may want to echo progress lines to the DOS console, or insert a pause to stop the console window disappearing when the script completes. Because I/O is redirected this will not normally work. However you can redirect input and output explicitly to CON to overcome this. e.g.
echo Checking Status > con
pause < con > con
A small tool is included in the TortoiseSVN installation folder named
ConnectVPN.exe. You can use this tool configured as a
pre-connect hook to connect automatically to your VPN before TortoiseSVN
tries to connect to a repository.
Just pass the name of the VPN connection as the first parameter to the tool.
TortoiseSVN can use a COM plugin to query issue trackers when in the commit dialog. The use of such plugins is described in the section called “Getting Information from the Issue Tracker”. If your system administrator has provided you with a plugin, which you have already installed and registered, this is the place to specify how it integrates with your working copy.
Click on to use the plugin with
a particular working copy. Here you can specify the working copy
path, choose which plugin to use from a drop down list of all
registered issue tracker plugins, and any parameters to pass.
The parameters will be specific to the plugin, but might include
your user name on the issue tracker so that the plugin can
query for issues which are assigned to you.
If you want all users to use the same COM plugin for your project, you
can specify the plugin also with the properties bugtraq:provideruuid,
bugtraq:provideruuid64 and bugtraq:providerparams.
- bugtraq:provideruuid
This property specifies the COM UUID of the IBugtraqProvider, for example
{0044f6c0-b999-11e1-afa6-0800200c9a66}. (This example is the UUID of the YurtleTrack provider , which is a provider for the JetBrains YouTrack 6.0 issue tracker.)- bugtraq:provideruuid64
This is the same as
bugtraq:provideruuid, but for the 64-bit version of the IBugtraqProvider.- bugtraq:providerparams
This property specifies the parameters passed to the IBugtraqProvider.
Please check the documentation of your IBugtraqProvider plugin to find out what to specify in these two properties.
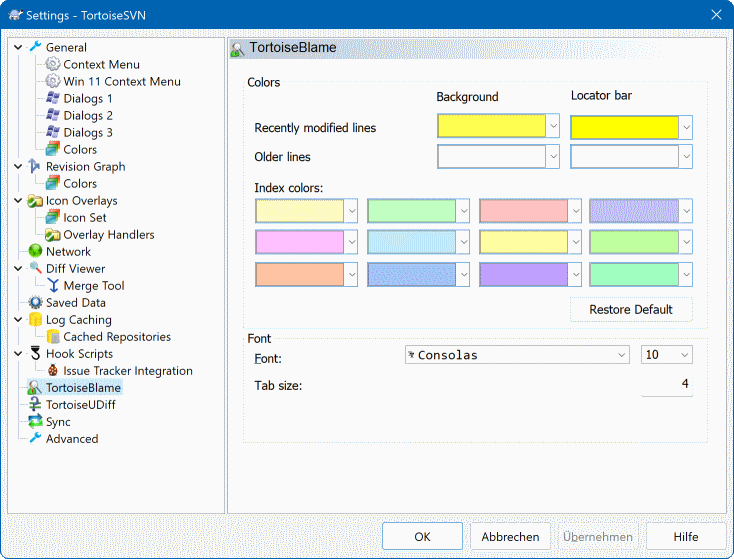
The settings used by TortoiseBlame are controlled from the
main context menu, not directly with TortoiseBlame itself.
- Colors
TortoiseBlame can use the background colour to indicate the age of lines in a file. You set the endpoints by specifying the colours for the newest and oldest revisions, and TortoiseBlame uses a linear interpolation between these colours according to the repository revision indicated for each line.
You can specify different colours to use for the locator bar. The default is to use strong contrast on the locator bar while keeping the main window background light so that you can still read the text.
- Font
You can select the font used to display the text, and the point size to use. This applies both to the file content, and to the author and revision information shown in the left pane.
- Tabs
Defines how many spaces to use for expansion when a tab character is found in the file content.
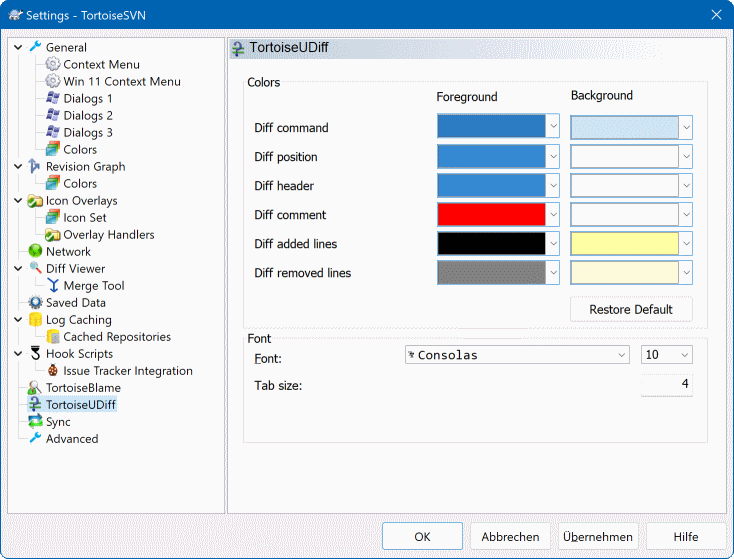
The settings used by TortoiseUDiff are controlled from the
main context menu, not directly with TortoiseUDiff itself.
- Colors
The default colors used by TortoiseUDiff are usually ok, but you can configure them here.
- Font
You can select the font used to display the text, and the point size to use.
- Tabs
Defines how many spaces to use for expansion when a tab character is found in the file diff.
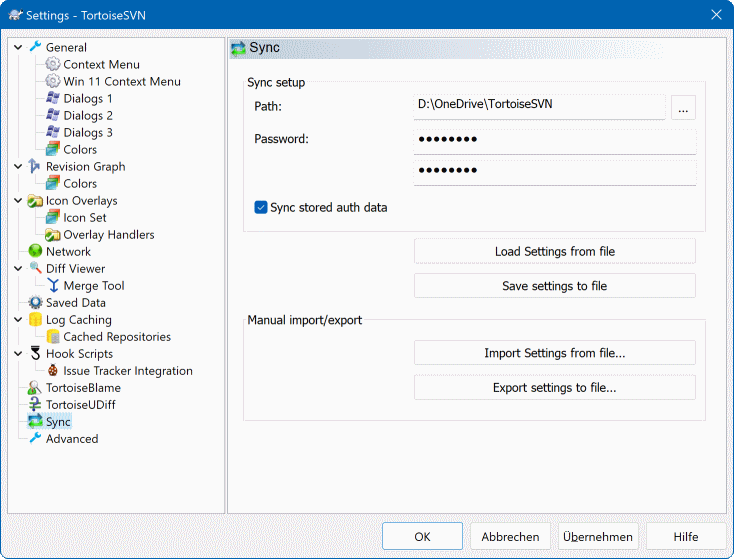
You can sync all TortoiseSVN settings to and from an encrypted file.
The file is encrypted with the password you enter so you don't have to
worry if you store that file on a cloud folder like OneDrive, GDrive,
DropBox, ...
When a path and password is specified, TortoiseSVN will sync all settings automatically and keep them in sync.
You can also export/import an encrypted files with all the settings manually. When you do that, you're asked for the path of the file and the password to encrypt/decrypt the settings file.
When exporting the settings manually, you can also optionally include all local settings which are not included in a normal export or in a sync. Local settings are settings which include local paths which usually vary between computers. These local settings include the configured diff and merge tools and hook scripts.
A few infrequently used settings are available only in the advanced page of the settings dialog. These settings modify the registry directly and you have to know what each of these settings is used for and what it does. Do not modify these settings unless you are sure you need to change them.
- AllowAuthSave
Sometimes multiple users use the same account on the same computer. In such situations it's not really wanted to save the authentication data. Setting this value to
falsedisables thesave authenticationbutton in the authentication dialog.- AllowUnversionedObstruction
If an update adds a new file from the repository which already exists in the local working copy as an unversioned file, the default action is to keep the local file, showing it as a (possibly) modified version of the new file from the repository. If you would prefer TortoiseSVN to create a conflict in such situations, set this value to
false.- AlwaysExtendedMenu
As with the explorer, TortoiseSVN shows additional commands if the Shift key is pressed while the context menu is opened. To force TortoiseSVN to always show those extended commands, set this value to
true.- AutoCompleteMinChars
The minimum amount of chars from which the editor shows an auto-completion popup. The default value is
3.- AutocompleteRemovesExtensions
The auto-completion list shown in the commit message editor displays the names of files listed for commit. To also include these names with extensions removed, set this value to
true.- BlockPeggedExternals
File externals that are pegged to a specific revision are blocked by default from being selected for a commit. This is because a subsequent update would revert those changes again unless the pegged revision of the external is adjusted.
Set this value to
falsein case you still want to commit changes to such external files.- BlockStatus
If you don't want the explorer to update the status overlays while another TortoiseSVN command is running (e.g. Update, Commit, ...) then set this value to
true.- CacheTrayIcon
To add a cache tray icon for the TSVNCache program, set this value to
true. This is really only useful for developers as it allows you to terminate the program gracefully.- ColumnsEveryWhere
The extra columns the TortoiseSVN adds to the details view in Windows Explorer are normally only active in a working copy. If you want those to be accessible everywhere, not just in working copies, set this value to
true. Note that the extra columns are only available in XP. Vista and later doesn't support that feature any more. However some third-party explorer replacements do support those even on Windows versions later than XP.- ConfigDir
You can specify a different location for the Subversion configuration file here. This will affect all TortoiseSVN operations.
- CtrlEnter
In most dialogs in TortoiseSVN, you can use Ctrl+Enter to dismiss the dialog as if you clicked on the OK button. If you don't want this, set this value to
false.- Debug
Set this to
trueif you want a dialog to pop up for every command showing the command line used to start TortoiseProc.exe.- DebugOutputString
Set this to
trueif you want TortoiseSVN to print out debug messages during execution. The messages can be captured with special debugging tools only.- DialogTitles
The default format (value of 0) of dialog titles is
url/path - name of dialog - TortoiseSVN. If you set this value to 1, the format changes toname of dialog - url/path - TortoiseSVN.- DiffBlamesWithTortoiseMerge
TortoiseSVN allows you to assign an external diff viewer. Most such viewers, however, are not suited for change blaming (the section called “Blame Differences”), so you might wish to fall back to TortoiseMerge in this case. To do so, set this value to
true.- DlgStickySize
This value specifies the number of pixels a dialog has to be near a border before the dialog sticks to it. The default value is 3. To disable this value set the value to zero.
- FixCaseRenames
Some apps change the case of filenames without notice but those changes aren't really necessary nor wanted. For example a change from
file.txttoFILE.TXTwouldn't bother normal Windows applications, but Subversion is case sensitive in these situations. So TortoiseSVN automatically fixes such case changes.If you don't want TortoiseSVN to automatically fix such case changes for you, you can set this value to
false.- FullRowSelect
The status list control which is used in various dialogs (e.g., commit, check-for-modifications, add, revert, ...) uses full row selection (i.e., if you select an entry, the full row is selected, not just the first column). This is fine, but the selected row then also covers the background image on the bottom right, which can look ugly. To disable full row select, set this value to
false.- GroupTaskbarIconsPerRepo
This option determines how the Win7 taskbar icons of the various TortoiseSVN dialogs and windows are grouped together. This option has no effect on Vista!
The default value is 0. With this setting, the icons are grouped together by application type. All dialogs from TortoiseSVN are grouped together, all windows from TortoiseMerge are grouped together, ...
If set to 1, then instead of all dialogs in one single group per application, they're grouped together by repository. For example, if you have a log dialog and a commit dialog open for repository
A, and a check-for-modifications dialog and a log dialog for repositoryB, then there are two application icon groups shown in the Win7 taskbar, one group for each repository. But TortoiseMerge windows are not grouped together with TortoiseSVN dialogs.
If set to 2, then the grouping works as with the setting set to 1, except that TortoiseSVN, TortoiseMerge, TortoiseBlame, TortoiseIDiff and TortoiseUDiff windows are all grouped together. For example, if you have the commit dialog open and then double click on a modified file, the opened TortoiseMerge diff window will be put in the same icon group on the taskbar as the commit dialog icon.
If set to 3, then the grouping works as with the setting set to 1, but the grouping isn't done according to the repository but according to the working copy. This is useful if you have all your projects in the same repository but different working copies for each project.
If set to 4, then the grouping works as with the setting set to 2, but the grouping isn't done according to the repository but according to the working copy.
- GroupTaskbarIconsPerRepoOverlay
This has no effect if the option
GroupTaskbarIconsPerRepois set to 0 (see above).If this option is set to
true, then every icon on the Win7 taskbar shows a small colored rectangle overlay, indicating the repository the dialogs/windows are used for.
- HideExternalInfo
If this is set to
false, then everysvn:externalsis shown during an update separately.If it is set to
true(the default), then update information for externals is only shown if the externals are affected by the update, i.e. changed in some way. Otherwise nothing is shown as with normal files and folders.- HookCancelError
If this is set to
true, then cancelling the dialog to approve a hook script to run will show an error dialog indicating the user cancelled.- IncludeExternals
By default, TortoiseSVN always runs an update with externals included. This avoids problems with inconsistent working copies. If you have however a lot of externals set, an update can take quite a while. Set this value to
falseto run the default update with externals excluded. To update with externals included, either run theUpdate to revision...dialog or set this value totrueagain.- LogFindCopyFrom
When the log dialog is started from the merge wizard, already merged revisions are shown in gray, but revisions beyond the point where the branch was created are also shown. These revisions are shown in black because those can't be merged.
If this option is set to
truethen TortoiseSVN tries to find the revision where the branch was created from and hide all the revisions that are beyond that revision. Since this can take quite a while, this option is disabled by default.- LogMultiRevFormat
A format string for the log messages when multiple revisions are selected in the log dialog.
You can use the following placeholders in your format string:
- %1!ld!
- gets replaced with the revision number text
- %2!s!
- gets replaced with the short log message of the revision
- LogStatusCheck
The log dialog shows the revision the working copy path is at in bold. But this requires that the log dialog fetches the status of that path. Since for very big working copies this can take a while, you can set this value to
falseto deactivate this feature.- MaxHistoryComboItems
Comboboxes for URLs and paths show a history of previously used URLs/paths if possible. This settings controls how many previous items are saved and shown. The default is 25 items.
- MergeLogSeparator
When you merge revisions from another branch, and merge tracking information is available, the log messages from the revisions you merge will be collected to make up a commit log message. A pre-defined string is used to separate the individual log messages of the merged revisions. If you prefer, you can set this to a value containing a separator string of your choice.
- MergeAllowMixedRevisionsDefault
By setting to
trueyou can set the default value of the Allow mixed revisions (not recommended) checkbox in the Merge option dialog. Please be aware of the limitations and potentional problems of merges into mixed-revision working copies before configuring this setting.- NumDiffWarning
If you want to show the diff at once for more items than specified with this settings, a warning dialog is shown first. The default is 10.
- OldVersionCheck
TortoiseSVN checks whether there's a new version available about once a week. If an updated version is found, the commit dialog shows a link control with that info. If you prefer the old behavior back where a dialog pops up notifying you about the update, set this value to
true.- RepoBrowserTrySVNParentPath
The repository browser tries to fetch the web page that's generated by an SVN server configured with the SVNParentPath directive to get a list of all repositories. To disable that behavior, set this value to
false.- ScintillaBidirectional
This option enables the bidirectional mode for the commit message edit box. If enabled, right-to-left language text editing is done properly. Since this feature is expensive, it is disabled by default. You can enable this by setting this value to
true.- ScintillaDirect2D
This option enables the use of Direct2D accelerated drawing in the Scintilla control which is used as the edit box in e.g. the commit dialog, and also for the unified diff viewer. With some graphic cards however this sometimes doesn't work properly so that the cursor to enter text isn't always visible. If that happens, you can turn this feature off by setting this value to
false.- OutOfDateRetry
This parameter specifies how TortoiseSVN behaves if a commit fails due to an out-of-date error:
- 0
The user is asked whether to update the working copy or not, and the commit dialog is not reopened after the update.
- 1
This is the default. The user is asked whether to update the working copy or not, and the commit dialog is reopened after the update so the user can proceed with the commit right away.
- 2
Similar to
1, but instead of updating only the paths selected for a commit, the update is done on the working copy root. This helps to avoid inconsistent working copies.- 3
The user is not asked to update the working copy. The commit simply fails with the out-of-date error message.
- PlaySound
If set to
true, TortoiseSVN will play a system sound when an error or warning occurs, or another situation which is important and requires your attention. Set this tofalseif you want to keep TortoiseSVN quiet. Note that the project monitor has its own setting for playing sounds, which you can configure in its settings dialog.- ShellMenuAccelerators
TortoiseSVN uses accelerators for its explorer context menu entries. Since this can lead to doubled accelerators (e.g. the
SVN Commithas the Alt-C accelerator, but so does theCopyentry of explorer). If you don't want or need the accelerators of the TortoiseSVN entries, set this value tofalse.- ShowContextMenuIcons
This can be useful if you use something other than the windows explorer or if you get problems with the context menu displaying incorrectly. Set this value to
falseif you don't want TortoiseSVN to show icons for the shell context menu items. Set this value totrueto show the icons again.- ShowAppContextMenuIcons
If you don't want TortoiseSVN to show icons for the context menus in its own dialogs, set this value to
false.- ShowNotifications
Set this value to
falseif you don't want the project monitor to show notification popups when new commits are detected.- StyleCommitMessages
The commit and log dialog use styling (e.g. bold, italic) in commit messages (see the section called “Commit Log Messages” for details). If you don't want to do this, set the value to
false.- UpdateCheckURL
This value contains the URL from which TortoiseSVN tries to download a text file to find out if there are updates available. This might be useful for company admins who don't want their users to update TortoiseSVN until they approve it.
- UseCustomWordBreak
The standard edit controls do not stop on forward slashes like they're found in paths and urls. TortoiseSVN uses a custom word break procedure for the edit controls. If you don't want that and use the default instead, set this value to 0. If you only want the default for edit controls in combo boxes, set this value to 1.
- VersionCheck
TortoiseSVN checks whether there's a new version available about once a week. If you don't want TortoiseSVN to do this check, set this value to
false.
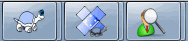
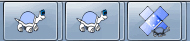
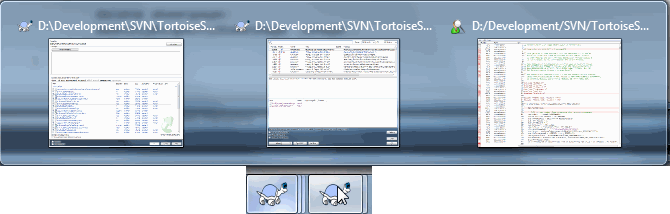
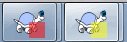
Table of Contents
The project monitor is a helpful tool that monitors repositories and notifies you in case there are new commits.
The projects can be monitored via a working copy path or directly via their repository URLs.
The project monitor scans each project in a configurable interval, and every time new commits are detected a notification popup is shown. Also the icon that is added to the system tray changes to indicate that there are new commits.
Snarl
If Snarl is installed and active, then the project monitor automatically uses Snarl to show the notifications about newly detected commits.
If you first start the project monitor, the tree view on the left side is empty. To add projects, click on the button at the top of the dialog named .
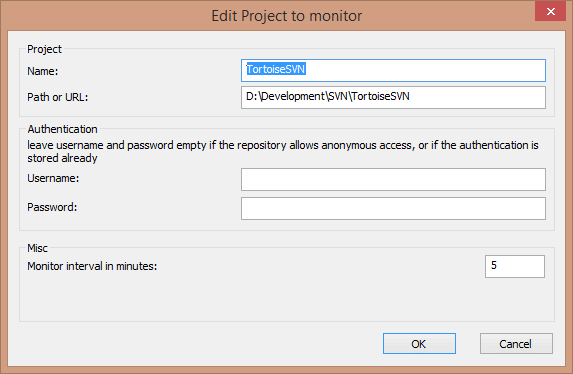
To add a project for monitoring, fill in the required information.
The name of the project is not optional and must be filled in, all
other information is optional.
If the box for Path or Url is left empty, then
a folder is added. This is useful to group monitored projects.
If you want to monitor all repositories served via the
SVNParentPath
directive, enter the root Url for your repositories and check the box
Url points to SVNParentPath list.
The fields Username and Password
should only be filled in if the repository does not provide anonymous
read access, and only if the authentication is not stored by Subversion
itself. If you're accessing the monitored repository with TortoiseSVN
or other svn clients and you've stored the authentication already,
you should leave this empty: you won't have to edit those projects
manually if the password changes.
The Monitor interval in minutes specifies the minutes
to wait in between checks. The smallest interval is one minute.
check interval
If there are a lot of users monitoring the same repository and the
bandwidth on the server is limited, a repository admin can set the
minimum for check intervals using an svnrobots.txt file.
A detailed explanation on how this works can be found on the project monitor
website:
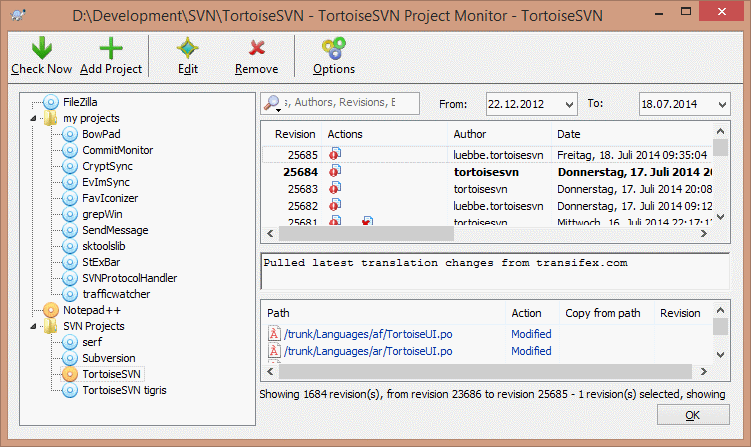
The project monitor shows all monitored projects on the left in a tree
view. The projects can be moved around, for example one project can be moved
below another project, making it a child/subproject.
A click on a project shows all the log messages of that project on the right.
Projects that have updates are shown in bold, with the number of new commits in brackets at the right. A click on a project marks it automatically as read.
The toolbar at the top of the dialog allows to configure and operate the project monitor.
- Check Now
While each monitored project is checked according to the interval that's set up, clicking this button will force a check of all projects immediately. Note that if there are updates, the notification won't show up until all projects have been checked.
- Add Project
Opens a new dialog to set up a new project for monitoring.
- Edit
Opens the configuration dialog for the selected project.
- Remove
Removes the selected project after a confirmation dialog is shown.
- Mark all as read
Marks all revisions in all projects as read. Note that if you select a project with unread revisions, those revisions are automatically marked as read when you select another project.
If you hold down the Shift key when clicking the button, all error states are also cleared if there are any.
- Update all
Runs an Update on all monitored working copies. Projects that are monitored via an url are not updated, only those that are set up with a working copy path.
- Options
Shows a dialog to configure the behavior of the project monitor.
SubWCRev is Windows console program which can be used to read the status of a Subversion working copy and optionally perform keyword substitution in a template file. This is often used as part of the build process as a means of incorporating working copy information into the object you are building. Typically it might be used to include the revision number in an “About” box.
SubWCRev reads the Subversion status of all files in a working copy, excluding externals by default. It records the highest commit revision number found, and the commit timestamp of that revision, it also records whether there are local modifications in the working copy, or mixed update revisions. The revision number, update revision range and modification status are displayed on stdout.
SubWCRev.exe is called from the command line or a script, and is controlled using the command line parameters.
SubWCRev WorkingCopyPath [SrcVersionFile DstVersionFile] [-nmdfe]
WorkingCopyPath is the path to the working
copy being checked. You can only use SubWCRev on working copies,
not directly on the repository. The path may be absolute or
relative to the current working directory.
If you want SubWCRev to perform keyword substitution, so that
fields like repository revision and URL are saved to a text
file, you need to supply a template file
SrcVersionFile
and an output file
DstVersionFile
which contains the substituted version of the template.
You can specify ignore patterns for SubWCRev to prevent specific files
and paths from being considered. The patterns are read from a file
named .subwcrevignore. The file is read from
the specified path, and also from the working copy root.
If the file does not exist, no files or paths are ignored.
The .subwcrevignore file can contain multiple
patterns, separated by newlines. The patterns are matched against
the paths relative to the repository root and paths relative to
the path of the .subwcrevignore file. For example, to ignore all
files in the doc folder of the TortoiseSVN working copy,
the .subwcrevignore would contain the following
lines:
/trunk/doc
/trunk/doc/*
Or, assuming the .subwcrevignore file is in the working copy root which
is checked out from trunk, using the patterns
doc
doc/*
is the same as the example above.
To ignore all images, the ignore patterns could be set like this:
*.png
*.jpg
*.ico
*.bmp
Important
The ignore patterns are case-sensitive, just like Subversion is.
Tip
To create a file with a starting dot in the Windows explorer,
enter .subwcrevignore.. Note the trailing dot.
There are a number of optional switches which affect the way
SubWCRev works. If you use more than one, they must be specified
as a single group, e.g.
-nm, not
-n -m.
Table 6.1. List of available command line switches
| Switch | Description |
|---|---|
| -n |
If this switch is given, SubWCRev will exit with
ERRORLEVEL 7 if the working copy
contains local modifications. This may be used to
prevent building with uncommitted changes present.
|
| -N |
If this switch is given, SubWCRev will exit with
ERRORLEVEL 11 if the working copy
contains unversioned items that are not ignored.
|
| -m |
If this switch is given, SubWCRev will exit with
ERRORLEVEL 8 if the working copy
contains mixed revisions. This may be used to prevent
building with a partially updated working copy.
|
| -d |
If this switch is given, SubWCRev will exit with
ERRORLEVEL 9 if the destination file
already exists.
|
| -f | If this switch is given, SubWCRev will include the last-changed revision of folders. The default behaviour is to use only files when getting the revision numbers. |
| -e |
If this switch is given, SubWCRev will examine
directories which are included with
svn:externals,
but only if they are from the same repository.
The default behaviour is to ignore externals.
|
| -E |
If this switch is given, same as -e,
but it ignores the externals with explicit revisions,
when the revision range inside of them is only
the given explicit revision in the properties.
So it doesn't lead to mixed revisions.
|
| -x | If this switch is given, SubWCRev will output the revision numbers in HEX. |
| -X | If this switch is given, SubWCRev will output the revision numbers in HEX, with '0X' prepended. |
| -F |
If this switch is given, SubWCRev will ignore any
.subwcrevignore files and
include all files.
|
| -q | If this switch is given, SubWCRev will perform the keyword substitution without showing working copy status on stdout. |
If there is no error, SubWCRev returns zero. But in case an error occurs, the error message is written to stderr and shown in the console. And the returned error codes are:
Table 6.2. List of SubWCRev error codes
| Error Code | Description |
|---|---|
| 1 | Syntax error. One or more command line parameters are invalid. |
| 2 | The file or folder specified on the command line was not found. |
| 3 | The input file could not be opened, or the target file could not be created. |
| 4 | Could not allocate memory. This could happen if e.g. the source file is too big. |
| 5 | The source file can not be scanned properly. |
| 6 | SVN error: Subversion returned with an error when SubWCRev tried to find the information from the working copy. |
| 7 |
The working copy has local modifications.
This requires the -n switch.
|
| 8 |
The working copy has mixed revisions.
This requires the -m switch.
|
| 9 |
The output file already exists.
This requires the -d switch.
|
| 10 | The specified path is not a working copy or part or one. |
| 11 |
The working copy has unversioned files or folders in it.
This requires the -N switch.
|
If a source and destination files are supplied, SubWCRev copies source to destination, performing keyword substitution as follows:
Table 6.3. List of available keywords
| Keyword | Description |
|---|---|
| $WCREV$ | Replaced with the highest commit revision in the working copy. |
| $WCREV&$ |
Replaced with the highest commit revision
in the working copy, ANDed with the value
after the & char. For example:
$WCREV&0xFFFF$
|
| $WCREV-$, $WCREV+$ |
Replaced with the highest commit revision
in the working copy, with the value
after the + or - char added or subtracted.
For example:
$WCREV-1000$
|
| $WCDATE$, $WCDATEUTC$ |
Replaced with the commit date/time of the
highest commit revision. By default,
international format is used:
yyyy-mm-dd hh:mm:ss.
Alternatively, you can specify a custom format which
will be used with strftime(),
for example:
$WCDATE=%a %b %d %I:%M:%S %p$.
For a list of available formatting characters, look at the
online reference
.
|
| $WCNOW$, $WCNOWUTC$ |
Replaced with the current system date/time.
This can be used to indicate the build time.
Time formatting can be used as described for
$WCDATE$.
|
| $WCRANGE$ | Replaced with the update revision range in the working copy. If the working copy is in a consistent state, this will be a single revision. If the working copy contains mixed revisions, either due to being out of date, or due to a deliberate update-to-revision, then the range will be shown in the form 100:200. |
| $WCMIXED$ |
$WCMIXED?TText:FText$ is
replaced with TText if there are mixed update
revisions, or FText if not.
|
| $WCMODS$ |
$WCMODS?TText:FText$ is
replaced with TText if there are local
modifications, or FText if not.
|
| $WCUNVER$ |
$WCUNVER?TText:FText$ is
replaced with TText if there are unversioned
items in the working copy, or FText if not.
|
| $WCEXTALLFIXED$ |
$WCEXTALLFIXED?TText:FText$ is
replaced with TText if all externals are fixed
to an explicit revision, or FText if not.
|
| $WCISTAGGED$ |
$WCISTAGGED?TText:FText$ is
replaced with TText if the repository
URL contains the tags classification pattern, or
FText if not.
|
| $WCURL$ | Replaced with the repository URL of the working copy path passed to SubWCRev. |
| $REPOROOT$ | Replaced with the URL of the repository root. |
| $WCINSVN$ |
$WCINSVN?TText:FText$ is
replaced with TText if the entry is versioned,
or FText if not.
|
| $WCNEEDSLOCK$ |
$WCNEEDSLOCK?TText:FText$ is
replaced with TText if the entry has
the svn:needs-lock property set,
or FText if not.
|
| $WCISLOCKED$ |
$WCISLOCKED?TText:FText$ is
replaced with TText if the entry is locked,
or FText if not.
|
| $WCLOCKDATE$, $WCLOCKDATEUTC$ |
Replaced with the lock date.
Time formatting can be used as described for
$WCDATE$.
|
| $WCLOCKOWNER$ | Replaced with the name of the lock owner. |
| $WCLOCKCOMMENT$ | Replaced with the comment of the lock. |
| $WCUNVER$ |
$WCUNVER?TText:FText$ is
replaced with TText if there are
unversioned files or folders in the working copy,
or FText if not.
|
SubWCRev does not directly support nesting of expressions, so for example you cannot use an expression like:
#define SVN_REVISION "$WCMIXED?$WCRANGE$:$WCREV$$"
But you can usually work around it by other means, for example:
#define SVN_RANGE       $WCRANGE$
#define SVN_REV         $WCREV$
#define SVN_REVISION    "$WCMIXED?SVN_RANGE:SVN_REV$"
Tip
Some of these keywords apply to single files rather than to
an entire working copy, so it only makes sense to use these
when SubWCRev is called to scan a single file. This applies to
$WCINSVN$,
$WCNEEDSLOCK$,
$WCISLOCKED$,
$WCLOCKDATE$,
$WCLOCKOWNER$ and
$WCLOCKCOMMENT$.
The example below shows how keywords in a template file are substituted in the output file.
// Test file for SubWCRev

char *Revision      = "$WCREV$";
char *Revision16    = "$WCREV&0xFF$";
char *Revisionp100  = "$WCREV+100$";
char *Revisionm100  = "$WCREV-100$";
char *Modified      = "$WCMODS?Modified:Not modified$";
char *Unversioned   = "$WCUNVER?Unversioned items found:no unversioned items$";
char *Date          = "$WCDATE$";
char *CustDate      = "$WCDATE=%a, %d %B %Y$";
char *DateUTC       = "$WCDATEUTC$";
char *CustDateUTC   = "$WCDATEUTC=%a, %d %B %Y$";
char *TimeNow       = "$WCNOW$";
char *TimeNowUTC    = "$WCNOWUTC$";
char *RevRange      = "$WCRANGE$";
char *Mixed         = "$WCMIXED?Mixed revision WC:Not mixed$";
char *ExtAllFixed   = "$WCEXTALLFIXED?All externals fixed:Not all externals fixed$";
char *IsTagged      = "$WCISTAGGED?Tagged:Not tagged$";
char *URL           = "$WCURL$";
char *isInSVN       = "$WCINSVN?versioned:not versioned$";
char *needslck      = "$WCNEEDSLOCK?TRUE:FALSE$";
char *islocked      = "$WCISLOCKED?locked:not locked$";
char *lockdateutc   = "$WCLOCKDATEUTC$";
char *lockdate      = "$WCLOCKDATE$";
char *lockcustutc   = "$WCLOCKDATEUTC=%a, %d %B %Y$";
char *lockcust      = "$WCLOCKDATE=%a, %d %B %Y$";
char *lockown       = "$WCLOCKOWNER$";
char *lockcmt       = "$WCLOCKCOMMENT$";

#if $WCMODS?1:0$
#error Source is modified
#endif

// End of file
After running SubWCRev.exe path\to\workingcopy testfile.tmpl testfile.txt,
the output file testfile.txt would looks like this:
// Test file for SubWCRev

char *Revision      = "22837";
char *Revision16    = "53";
char *Revisionp100  = "22937";
char *Revisionm100  = "22737";
char *Modified      = "Modified";
char *Unversioned   = "no unversioned items";
char *Date          = "2012/04/26 18:47:57";
char *CustDate      = "Thu, 26 April 2012";
char *DateUTC       = "2012/04/26 16:47:57";
char *CustDateUTC   = "Thu, 26 April 2012";
char *TimeNow       = "2012/04/26 20:51:17";
char *TimeNowUTC    = "2012/04/26 18:51:17";
char *RevRange      = "22836:22837";
char *Mixed         = "Mixed revision WC";
char *ExtAllFixed   = "All externals fixed";
char *IsTagged      = "Not tagged";
char *URL           = "https://svn.code.sf.net/p/tortoisesvn/code/trunk";
char *isInSVN       = "versioned";
char *needslck      = "FALSE";
char *islocked      = "not locked";
char *lockdateutc   = "1970/01/01 00:00:00";
char *lockdate      = "1970/01/01 01:00:00";
char *lockcustutc   = "Thu, 01 January 1970";
char *lockcust      = "Thu, 01 January 1970";
char *lockown       = "";
char *lockcmt       = "";

#if 1
#error Source is modified
#endif

// End of file
Tip
A file like this will be included in the build so you would expect it to be versioned. Be sure to version the template file, not the generated file, otherwise each time you regenerate the version file you need to commit the change, which in turn means the version file needs to be updated.
If you need to access Subversion revision information from other
programs, you can use the COM interface of SubWCRev. The object to
create is SubWCRev.object, and the following
methods are supported:
Table 6.4. COM/automation methods supported
| Method | Description |
|---|---|
| .GetWCInfo |
This method traverses the working copy gathering the
revision information. Naturally you must call this before
you can access the information using the remaining methods.
The first parameter is the path.
The second parameter should be true if you want to include
folder revisions. Equivalent to the -f
command line switch.
The third parameter should be true if you want to include
svn:externals. Equivalent to the -e
command line switch.
|
| .GetWCInfo2 |
The same as GetWCInfo() but with a fourth parameter
that sets the equivalent to the -E
command line switch.
|
| .Revision |
The highest commit revision in the working copy.
Equivalent to $WCREV$.
|
| .Date |
The commit date/time of the highest commit revision.
Equivalent to $WCDATE$.
|
| .Author | The author of the highest commit revision, that is, the last person to commit changes to the working copy. |
| .MinRev |
The minimum update revision, as shown in $WCRANGE$
|
| .MaxRev |
The maximum update revision, as shown in $WCRANGE$
|
| .HasModifications | True if there are local modifications |
| .HasUnversioned | True if there are unversioned items |
| .Url |
Replaced with the repository URL of the working
copy path used in GetWCInfo.
Equivalent to $WCURL$.
|
| .RepoRoot |
Replaced with the URL of the repository root.
Equivalent to $REPOROOT$.
|
| .IsSvnItem | True if the item is versioned. |
| .NeedsLocking |
True if the item has the svn:needs-lock
property set.
|
| .IsLocked | True if the item is locked. |
| .LockCreationDate | String representing the date when the lock was created, or an empty string if the item is not locked. |
| .LockOwner | String representing the lock owner, or an empty string if the item is not locked. |
| .LockComment | The message entered when the lock was created. |
The following example shows how the interface might be used.
// testCOM.js - javascript file
// test script for the SubWCRev COM/Automation-object

filesystem = new ActiveXObject("Scripting.FileSystemObject");

revObject1 = new ActiveXObject("SubWCRev.object");
revObject2 = new ActiveXObject("SubWCRev.object");
revObject3 = new ActiveXObject("SubWCRev.object");
revObject4 = new ActiveXObject("SubWCRev.object");

revObject1.GetWCInfo(
    filesystem.GetAbsolutePathName("."), 1, 1);
revObject2.GetWCInfo(
    filesystem.GetAbsolutePathName(".."), 1, 1);
revObject3.GetWCInfo(
    filesystem.GetAbsolutePathName("SubWCRev.cpp"), 1, 1);
revObject4.GetWCInfo2(
    filesystem.GetAbsolutePathName("..\\.."), 1, 1, 1);

wcInfoString1 = "Revision = " + revObject1.Revision +
                "\nMin Revision = " + revObject1.MinRev +
                "\nMax Revision = " + revObject1.MaxRev +
                "\nDate = " + revObject1.Date +
                "\nURL = " + revObject1.Url + "\nAuthor = " +
                revObject1.Author + "\nHasMods = " +
                revObject1.HasModifications + "\nIsSvnItem = " +
                revObject1.IsSvnItem + "\nNeedsLocking = " +
                revObject1.NeedsLocking + "\nIsLocked = " +
                revObject1.IsLocked + "\nLockCreationDate = " +
                revObject1.LockCreationDate + "\nLockOwner = " +
                revObject1.LockOwner + "\nLockComment = " +
                revObject1.LockComment;
wcInfoString2 = "Revision = " + revObject2.Revision +
                "\nMin Revision = " + revObject2.MinRev +
                "\nMax Revision = " + revObject2.MaxRev +
                "\nDate = " + revObject2.Date +
                "\nURL = " + revObject2.Url + "\nAuthor = " +
                revObject2.Author + "\nHasMods = " +
                revObject2.HasModifications + "\nIsSvnItem = " +
                revObject2.IsSvnItem + "\nNeedsLocking = " +
                revObject2.NeedsLocking + "\nIsLocked = " +
                revObject2.IsLocked + "\nLockCreationDate = " +
                revObject2.LockCreationDate + "\nLockOwner = " +
                revObject2.LockOwner + "\nLockComment = " +
                revObject2.LockComment;
wcInfoString3 = "Revision = " + revObject3.Revision +
                "\nMin Revision = " + revObject3.MinRev +
                "\nMax Revision = " + revObject3.MaxRev +
                "\nDate = " + revObject3.Date +
                "\nURL = " + revObject3.Url + "\nAuthor = " +
                revObject3.Author + "\nHasMods = " +
                revObject3.HasModifications + "\nIsSvnItem = " +
                revObject3.IsSvnItem + "\nNeedsLocking = " +
                revObject3.NeedsLocking + "\nIsLocked = " +
                revObject3.IsLocked + "\nLockCreationDate = " +
                revObject3.LockCreationDate + "\nLockOwner = " +
                revObject3.LockOwner + "\nLockComment = " +
                revObject3.LockComment;
wcInfoString4 = "Revision = " + revObject4.Revision +
                "\nMin Revision = " + revObject4.MinRev +
                "\nMax Revision = " + revObject4.MaxRev +
                "\nDate = " + revObject4.Date +
                "\nURL = " + revObject4.Url + "\nAuthor = " +
                revObject4.Author + "\nHasMods = " +
                revObject4.HasModifications + "\nIsSvnItem = " +
                revObject4.IsSvnItem + "\nNeedsLocking = " +
                revObject4.NeedsLocking + "\nIsLocked = " +
                revObject4.IsLocked + "\nLockCreationDate = " +
                revObject4.LockCreationDate + "\nLockOwner = " +
                revObject4.LockOwner + "\nLockComment = " +
                revObject4.LockComment;

WScript.Echo(wcInfoString1);
WScript.Echo(wcInfoString2);
WScript.Echo(wcInfoString3);
WScript.Echo(wcInfoString4);
The following listing is an example on how to use the SubWCRev COM object from C#:
using LibSubWCRev;
SubWCRev sub = new SubWCRev();
sub.GetWCInfo("C:\\PathToMyFile\\MyFile.cc", true, true);
if (sub.IsSvnItem == true)
{
    MessageBox.Show("versioned");
}
else
{
    MessageBox.Show("not versioned");
}
To get a tighter integration with issue trackers than by simply
using the bugtraq: properties, TortoiseSVN can make use of COM
plugins. With such plugins it is possible to fetch information
directly from the issue tracker, interact with the user and provide
information back to TortoiseSVN about open issues, verify log
messages entered by the user and even run actions after a successful
commit to e.g, close an issue.
We can't provide information and tutorials on how you have
to implement a COM object in your preferred programming language, but
we have example plugins in C++/ATL and C# in our repository in
the contrib/issue-tracker-plugins folder.
In that folder you can also find the required include files you
need to build your plugin.
(the section called “License” explains how to access the repository.)
Important
You should provide both a 32-bit and 64-bit version of your plugin. Because the x64-Version of TortoiseSVN can not use a 32-bit plugin and vice-versa.
If you release an issue tracker plugin for TortoiseSVN, please do not name it Tortoise<Something>. We'd like to reserve the Tortoise prefix for a version control client integrated into the windows shell. For example: TortoiseCVS, TortoiseSVN, TortoiseHg, TortoiseGit and TortoiseBzr are all version control clients.
Please name your plugin for a Tortoise client Turtle<Something>, where <Something> refers to the issue tracker that you are connecting to. Alternatively choose a name that sounds like Turtle but has a different first letter. Nice examples are:
Gurtle - An issue tracker plugin for Google code
TurtleMine - An issue tracker plugin for Redmine
VurtleOne - An issue tracker plugin for VersionOne
TortoiseSVN 1.5 and later can use plugins which implement the IBugtraqProvider interface. The interface provides a few methods which plugins can use to interact with the issue tracker.
HRESULT ValidateParameters (
  // Parent window for any UI that needs to be
  // displayed during validation.
  [in] HWND hParentWnd,

  // The parameter string that needs to be validated.
  [in] BSTR parameters,

  // Is the string valid?
  [out, retval] VARIANT_BOOL *valid
);
This method is called from the settings dialog where the user can
add and configure the plugin. The parameters string
can be used by a plugin to get additional required information, e.g., the URL
to the issue tracker, login information, etc.
The plugin should verify the parameters string and
show an error dialog if the string is not valid. The hParentWnd
parameter should be used for any dialog the plugin shows as the parent window.
The plugin must return TRUE if the validation of the parameters
string is successful. If the plugin returns FALSE, the settings dialog won't
allow the user to add the plugin to a working copy path.
HRESULT GetLinkText (
  // Parent window for any (error) UI that needs to be displayed.
  [in] HWND hParentWnd,

  // The parameter string, just in case you need to talk to your
  // web service (e.g.) to find out what the correct text is.
  [in] BSTR parameters,

  // What text do you want to display?
  // Use the current thread locale.
  [out, retval] BSTR *linkText
);
The plugin can provide a string here which is used in the TortoiseSVN
commit dialog for the button which invokes the plugin, e.g., "Choose issue"
or "Select ticket". Make sure the string is not too long, otherwise it
might not fit into the button.
If the method returns an error (e.g., E_NOTIMPL), a default
text is used for the button.
HRESULT GetCommitMessage (
  // Parent window for your provider's UI.
  [in] HWND hParentWnd,

  // Parameters for your provider.
  [in] BSTR parameters,
  [in] BSTR commonRoot,
  [in] SAFEARRAY(BSTR) pathList,

  // The text already present in the commit message.
  // Your provider should include this text in the new message,
  // where appropriate.
  [in] BSTR originalMessage,

  // The new text for the commit message.
  // This replaces the original message.
  [out, retval] BSTR *newMessage
);
This is the main method of the plugin. This method is called from the TortoiseSVN commit dialog when the user clicks on the plugin button.
The parameters string is the string the
user has to enter in the settings dialog when he configures
the plugin. Usually a plugin would use this to find the URL
of the issue tracker and/or login information or more.
The commonRoot string contains the parent path
of all items selected to bring up the commit dialog. Note that this
is not the root path of all items which the user has selected in
the commit dialog.
For the branch/tag dialog, this is the path which is to be copied.
The pathList parameter contains an array of paths
(as strings) which the user has selected for the commit.
The originalMessage parameter contains the text
entered in the log message box in the commit dialog. If the user
has not yet entered any text, this string will be empty.
The newMessage return string is copied into
the log message edit box in the commit dialog, replacing whatever
is already there. If a plugin does not modify the originalMessage
string, it must return the same string again here, otherwise
any text the user has entered will be lost.
In TortoiseSVN 1.6 a new interface was added which provides more functionality for plugins. This IBugtraqProvider2 interface inherits from IBugtraqProvider.
HRESULT GetCommitMessage2 (
  // Parent window for your provider's UI.
  [in] HWND hParentWnd,

  // Parameters for your provider.
  [in] BSTR parameters,
  // The common URL of the commit
  [in] BSTR commonURL,
  [in] BSTR commonRoot,
  [in] SAFEARRAY(BSTR) pathList,

  // The text already present in the commit message.
  // Your provider should include this text in the new message,
  // where appropriate.
  [in] BSTR originalMessage,

  // You can assign custom revision properties to a commit
  // by setting the next two params.
  // note: Both safearrays must be of the same length.
  //       For every property name there must be a property value!

  // The content of the bugID field (if shown)
  [in] BSTR bugID,

  // Modified content of the bugID field
  [out] BSTR * bugIDOut,

  // The list of revision property names.
  [out] SAFEARRAY(BSTR) * revPropNames,

  // The list of revision property values.
  [out] SAFEARRAY(BSTR) * revPropValues,

  // The new text for the commit message.
  // This replaces the original message
  [out, retval] BSTR * newMessage
);
This method is called from the TortoiseSVN commit dialog
when the user clicks on the plugin button. This method is called
instead of GetCommitMessage(). Please refer
to the documentation for GetCommitMessage
for the parameters that are also used there.
The parameter commonURL is the parent URL
of all items selected to bring up the commit dialog. This is basically
the URL of the commonRoot path.
The parameter bugID contains the content of
the bug-ID field (if it is shown, configured with the property
bugtraq:message).
The return parameter bugIDOut is used to fill
the bug-ID field when the method returns.
The revPropNames and revPropValues
return parameters can contain name/value pairs for revision properties
that the commit should set. A plugin must make sure that both arrays
have the same size on return! Each property name in revPropNames
must also have a corresponding value in revPropValues.
If no revision properties are to be set, the plugin must return empty arrays.
HRESULT CheckCommit (
  [in] HWND hParentWnd,
  [in] BSTR parameters,
  [in] BSTR commonURL,
  [in] BSTR commonRoot,
  [in] SAFEARRAY(BSTR) pathList,
  [in] BSTR commitMessage,
  [out, retval] BSTR * errorMessage
);
This method is called right before the commit dialog is closed
and the commit begins. A plugin can use this method to validate
the selected files/folders for the commit and/or the commit
message entered by the user. The parameters are the same as
for GetCommitMessage2(), with the difference that
commonURL is now the common URL of all
checked items, and commonRoot
the root path of all checked items.
For the branch/tag dialog, the commonURL is the source
URL of the copy, and commonRoot is set to the
target URL of the copy.
The return parameter errorMessage must
either contain an error message which TortoiseSVN shows to the
user or be empty for the commit to start.
If an error message is returned, TortoiseSVN shows the error
string in a dialog and keeps the commit dialog open so the
user can correct whatever is wrong. A plugin should therefore
return an error string which informs the user what
is wrong and how to correct it.
HRESULT  OnCommitFinished (
  // Parent window for any (error) UI that needs to be displayed.
  [in] HWND hParentWnd,

  // The common root of all paths that got committed.
  [in] BSTR commonRoot,

  // All the paths that got committed.
  [in] SAFEARRAY(BSTR) pathList,


  // The text already present in the commit message.
  [in] BSTR logMessage,

  // The revision of the commit.
  [in] ULONG revision,


  // An error to show to the user if this function
  // returns something else than S_OK
  [out, retval] BSTR * error
);
This method is called after a successful commit. A plugin
can use this method to e.g., close the selected issue or add
information about the commit to the issue.
The parameters are the same as for GetCommitMessage2.
HRESULT HasOptions(
  // Whether the provider provides options
  [out, retval] VARIANT_BOOL *ret
);
This method is called from the settings dialog where the user
can configure the plugins. If a plugin provides its own
configuration dialog with ShowOptionsDialog, it must
return TRUE here, otherwise it must return FALSE.
HRESULT ShowOptionsDialog(
  // Parent window for the options dialog
  [in] HWND hParentWnd,

  // Parameters for your provider.
  [in] BSTR parameters,

  // The parameters string
  [out, retval] BSTR * newparameters
);
This method is called from the settings dialog when the user
clicks on the "Options" button that is shown if HasOptions
returns TRUE.
A plugin can show an options dialog to make it easier for the user
to configure the plugin.
The parameters string contains the plugin
parameters string that is already set/entered.
The newparameters return parameter must contain
the parameters string which the plugin constructed from the info
it gathered in its options dialog. That paramameters
string is passed to all other IBugtraqProvider and IBugtraqProvider2
methods.
Because TortoiseSVN is being developed all the time it is sometimes hard to keep the documentation completely up to date. We maintain an online FAQ which contains a selection of the questions we are asked the most on the TortoiseSVN mailing lists https://groups.google.com/forum/#!forum/tortoisesvn and https://groups.google.com/forum/#!forum/tortoisesvn-dev
If you have a question which is not answered anywhere else, the best place to ask it is on one of the mailing lists:
https://groups.google.com/forum/#!forum/tortoisesvn is the one to use if you have questions about using TortoiseSVN.
If you want to help out with the development of TortoiseSVN, then you should take part in discussions on https://groups.google.com/forum/#!forum/tortoisesvn-dev
Table of Contents
- Move/copy a lot of files at once
- Force users to enter a log message
- Update selected files from the repository
- Roll back (Undo) revisions in the repository
- Compare two revisions of a file or folder
- Include a common sub-project
- Create a shortcut to a repository
- Ignore files which are already versioned
- Unversion a working copy
- Remove a working copy
This appendix contains solutions to problems/questions you might have when using TortoiseSVN.
Moving/Copying single files can be done by using → . But if you want to move/copy a lot of files, this way is just too slow and too much work.
The recommended way is by right dragging the files to the new location. Simply right click on the files you want to move/copy without releasing the mouse button. Then drag the files to the new location and release the mouse button. A context menu will appear where you can either choose → . or → .

There are two ways to prevent users from committing with an empty log message. One is specific to TortoiseSVN, the other works for all Subversion clients, but requires access to the server directly.
If you have direct access to the repository server, you can install a pre-commit hook script which rejects all commits with an empty or too short log message.
In the repository folder on the server, there's a sub-folder
hooks
which contains some example hook scripts you can use. The file
pre-commit.tmpl
contains a sample script which will reject commits if no log message
is supplied, or the message is too short.
The file also contains comments on how to install/use this script.
Just follow the instructions in that file.
This method is the recommended way if your users also use other Subversion clients than TortoiseSVN. The drawback is that the commit is rejected by the server and therefore users will get an error message. The client can't know before the commit that it will be rejected. If you want to make TortoiseSVN have the button disabled until the log message is long enough then please use the method described below.
TortoiseSVN uses properties to control some of its features. One of those
properties is the tsvn:logminsize property.
If you set that property on a folder, then TortoiseSVN will disable the button in all commit dialogs until the user has entered a log message with at least the length specified in the property.
For detailed information on those project properties, please refer to the section called “Project Settings”.
Normally you update your working copy using → . But if you only want to pick up some new files that a colleague has added without merging in any changes to other files at the same time, you need a different approach.
Use → . and click on to see what has changed in the repository. Select the files you want to update locally, then use the context menu to update just those files.
By far the easiest way to revert the changes from one or more revisions, is to use the revision log dialog.
Select the file or folder in which you need to revert the changes. If you want to revert all changes, this should be the top level folder.
Select → to display a list of revisions. You may need to use or to show the revision(s) you are interested in.
Select the revision you wish to revert. If you want to undo a range of revisions, select the first one and hold the Shift key while selecting the last one. If you want to pick out individual revisions and ranges, use the Ctrl key while selecting revisions. Right click on the selected revision(s), then select → .
Or if you want to make an earlier revision the new HEAD revision, right click on the selected revision, then select → . This will discard all changes after the selected revision.
You have reverted the changes within your working copy. Check the results, then commit the changes.
If you want to enter revision numbers as a list, you can use the Merge dialog. The previous method uses merging behind the scenes; this method uses it explicitly.
In your working copy select → .
In the Merge Type dialog select Merge a range of revisions.
In the From: field enter the full repository URL of your working copy folder. This should come up as the default URL.
In the Revision range to merge field enter the list of revisions to roll back (or use the log dialog to select them as described above).
Make sure the Reverse merge checkbox is checked.
In the Merge options dialog accept the defaults.
Click to complete the merge.
You have reverted the changes within your working copy. Check that the results are as expected, then commit the changes.
Since TortoiseSVN never loses data, your “rolled back” revisions still exist as intermediate revisions in the repository. Only the HEAD revision was changed to a previous state. If you want to make revisions disappear completely from your repository, erasing all trace that they ever existed, you have to use more extreme measures. Unless there is a really good reason to do this, it is not recommended. One possible reason would be that someone committed a confidential document to a public repository.
The only way to remove data from the repository is to use the
Subversion command line tool svnadmin.
You can find a description of how this works in the
Repository Maintenance
.
If you want to compare two revisions in an item's history, for example revisions 100 and 200 of the same file, just use → to list the revision history for that file. Pick the two revisions you want to compare then use → .
If you want to compare the same item in two different trees, for example the trunk and a branch, you can use the repository browser to open up both trees, select the file in both places, then use → .
If you want to compare two trees to see what has changed, for example the trunk and a tagged release, you can use → Select the two nodes to compare, then use → . This will show a list of changed files, and you can then select individual files to view the changes in detail. You can also export a tree structure containing all the changed files, or simply a list of all changed files. Read the section called “Comparing Folders” for more information. Alternatively use → to see a summary of all differences, with minimal context.
Sometimes you will want to include another project within your working copy, perhaps some library code. There are at least 4 ways of dealing with this.
Set the svn:externals property for a folder
in your project. This property consists of one or more lines;
each line has the name of a sub-folder which you want to use
as the checkout folder for common code, and the repository URL
that you want to be checked out there. For full details
refer to the section called “External Items”.
Commit the new folder. Now when you update, Subversion will pull a copy of that project from its repository into your working copy. The sub-folders will be created automatically if required. Each time you update your main working copy, you will also receive the latest version of all external projects.
If the external project is in the same repository, any changes you make there will be included in the commit list when you commit your main project.
If the external project is in a different repository, any changes you make to the external project will be shown or indicated when you commit the main project, but you have to commit those external changes separately.
Of the three methods described, this is the only one which needs no setup on the client side. Once externals are specified in the folder properties, all clients will get populated folders when they update.
Create a new folder within your project to contain the common code, but do not add it to Subversion.
Select → for the new folder and checkout a copy of the common code into it. You now have a separate working copy nested within your main working copy.
The two working copies are independent. When you commit changes to the parent, changes to the nested WC are ignored. Likewise when you update the parent, the nested WC is not updated.
If you use the same common core code in several projects, and you do not want to keep multiple working copies of it for every project that uses it, you can just check it out to a separate location which is related to all the other projects which use it. For example:
C:\Projects\Proj1
C:\Projects\Proj2
C:\Projects\Proj3
C:\Projects\Common
and refer to the common code using a relative path, e.g.
..\..\Common\DSPcore.
If your projects are scattered in unrelated locations you
can use a variant of this, which is to put the common
code in one location and use drive letter substitution to
map that location to something you can hard code in your
projects, e.g. Checkout the common code to
D:\Documents\Framework or
C:\Documents and Settings\{login}\My Documents\framework
then use
SUBST X: "D:\Documents\framework"
to create the drive mapping used in your source code. Your code can then use absolute locations.
#include "X:\superio\superio.h"
This method will only work in an all-PC environment, and you will need to document the required drive mappings so your team know where these mysterious files are. This method is strictly for use in closed development environments, and not recommended for general use.
The maybe easiest way is to simply add the project in a subfolder to your own project working copy. However this has the disadvantage that you have to update and upgrade this external project manually.
To help with the upgrade, TortoiseSVN provides a command in the explorer right-drag context menu. Simply right-drag the folder where you unzipped the new version of the external library to the folder in your working copy, and then select → . This will then copy the new files over to the target folder while automatically adding new files and removing files that aren't in the new version anymore.
If you frequently need to open the repository browser at a particular location, you can create a desktop shortcut using the automation interface to TortoiseProc. Just create a new shortcut and set the target to:
TortoiseProc.exe /command:repobrowser /path:"url/to/repository"
Of course you need to include the real repository URL.
If you accidentally added some files which should have been ignored, how do you get them out of version control without losing them? Maybe you have your own IDE configuration file which is not part of the project, but which took you a long time to set up just the way you like it.
If you have not yet committed the add, then all you have to do is use → to undo the add. You should then add the file(s) to the ignore list so they don't get added again later by mistake.
If the files are already in the repository, they have to be deleted from the repository and added to the ignore list. Fortunately TortoiseSVN has a convenient shortcut for doing this. → will first mark the file/folder for deletion from the repository, keeping the local copy. It also adds this item to the ignore list so that it will not be added back into Subversion again by mistake. Once this is done you just need to commit the parent folder.
If you have a working copy which you want to convert back to
a plain folder tree without the .svn
directory, you can simply export it to itself. Read
the section called “Removing a working copy from version control” to find out how.
If you have a working copy which you no longer need, how do you get rid of it cleanly? Easy - just delete it in Windows Explorer! Working copies are private local entities, and they are self-contained. Deleting a working copy in Windows Explorer does not affect the data in the repository at all.
Table of Contents
This appendix contains solutions to problems/questions you might have when you are responsible for deploying TortoiseSVN to multiple client computers.
The TortoiseSVN installer comes as an MSI file, which means you should have no problems adding that MSI file to the group policies of your domain controller.
A good walk-through on how to do that can be found in this article from Microsoft: https://learn.microsoft.com/en-us/troubleshoot/windows-server/group-policy/use-group-policy-to-install-software .
TortoiseSVN must be installed under Computer Configuration and not under User Configuration. This is because TortoiseSVN needs the CRT and MFC DLLs, which can only be deployed per computer and not per user. If you really must install TortoiseSVN on a per user basis, then you must first install the MFC and CRT package version 12 from Microsoft on each computer you want to install TortoiseSVN as per user.
You can customize the MSI file if you wish so that all your users end up
with the same settings. TSVN settings are stored in the registry under
HKEY_CURRENT_USER\Software\TortoiseSVN and general
Subversion settings (which affect all Subversion clients) are stored in
config files under %APPDATA%\Subversion.
If you need help with MSI customization, try one of the MSI transform forums
or search the web for “MSI transform”.
TortoiseSVN checks if there's a new version available every few days. If there is a newer version available, a notification is shown in the commit dialog.
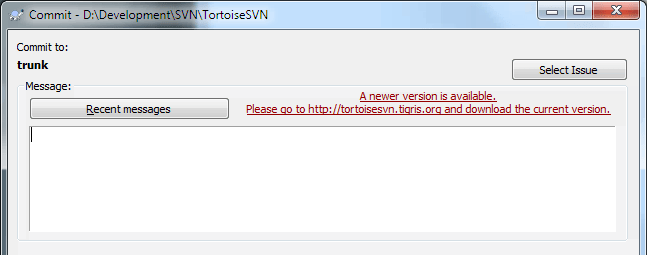
If you're responsible for a lot of users in your domain, you might want your users to use only versions you have approved and not have them install always the latest version. You probably don't want that upgrade notification to show up so your users don't go and upgrade immediately.
Versions 1.4.0 and later of TortoiseSVN allow you to redirect that upgrade
check to your intranet server. You can set the registry key
HKCU\Software\TortoiseSVN\UpdateCheckURL (string value)
to an URL pointing to a text file in your intranet. That text file must have
the following format:
1.9.1.6000
A new version of TortoiseSVN is available for you to download!
http://192.168.2.1/downloads/TortoiseSVN-1.9.1.6000-svn-1.9.1.msi
The first line in that file is the version string. You must make sure that it matches the exact version string of the TortoiseSVN installation package. The second line is a custom text, shown in the commit dialog. You can write there whatever you want. Just note that the space in the commit dialog is limited. Too long messages will get truncated! The third line is the URL to the new installation package. This URL is opened when the user clicks on the custom message label in the commit dialog. You can also just point the user to a web page instead of the MSI file directly. The URL is opened with the default web browser, so if you specify a web page, that page is opened and shown to the user. If you specify the MSI package, the browser will ask the user to save the MSI file locally.
As of version 1.4.0 and later, the TortoiseSVN installer doesn't provide
the user with the option to set the SVN_ASP_DOT_NET_HACK
environment variable
anymore, since that caused many problems and confusion for users who
always install everything no matter whether they know
what it is for.
But the feature is still available in TortoiseSVN and other svn clients.
To enable it you have to set the Windows environment variable named
ASPDOTNETHACK to 1. Actually, the value
of that environment variable doesn't matter: if the variable exists
the feature is active.
Important
Please note that this hack is only necessary if you're still using VS.NET2002. All later versions of Visual Studio do not require this hack to be activated! So unless you're using that ancient tool, DO NOT USE THIS!
As of version 1.5.0 and later, TortoiseSVN allows you to disable (actually, hide) context menu entries. Since this is a feature which should not be used lightly but only if there is a compelling reason, there is no GUI for this and it has to be done directly in the registry. This can be used to disable certain commands for users who should not use them. But please note that only the context menu entries in the explorer are hidden, and the commands are still available through other means, e.g. the command line or even other dialogs in TortoiseSVN itself!
The registry keys which hold the information on which context menus to show are
HKEY_CURRENT_USER\Software\TortoiseSVN\ContextMenuEntriesMaskLow
and HKEY_CURRENT_USER\Software\TortoiseSVN\ContextMenuEntriesMaskHigh.
Each of these registry entries is a DWORD value, with each
bit corresponding to a specific menu entry. A set bit means the corresponding
menu entry is deactivated.
Table C.1. Menu entries and their values
| Value | Menu entry |
|---|---|
| 0x0000000000000001 | Checkout |
| 0x0000000000000002 | Update |
| 0x0000000000000004 | Commit |
| 0x0000000000000008 | Add |
| 0x0000000000000010 | Revert |
| 0x0000000000000020 | Cleanup |
| 0x0000000000000040 | Resolve |
| 0x0000000000000080 | Switch |
| 0x0000000000000100 | Import |
| 0x0000000000000200 | Export |
| 0x0000000000000400 | Create Repository here |
| 0x0000000000000800 | Branch/Tag |
| 0x0000000000001000 | Merge |
| 0x0000000000002000 | Delete |
| 0x0000000000004000 | Rename |
| 0x0000000000008000 | Update to revision |
| 0x0000000000010000 | Diff |
| 0x0000000000020000 | Show Log |
| 0x0000000000040000 | Edit Conflicts |
| 0x0000000000080000 | Relocate |
| 0x0000000000100000 | Check for modifications |
| 0x0000000000200000 | Ignore |
| 0x0000000000400000 | Repository Browser |
| 0x0000000000800000 | Blame |
| 0x0000000001000000 | Create Patch |
| 0x0000000002000000 | Apply Patch |
| 0x0000000004000000 | Revision graph |
| 0x0000000008000000 | Lock |
| 0x0000000010000000 | Remove Lock |
| 0x0000000020000000 | Properties |
| 0x0000000040000000 | Diff with URL |
| 0x0000000080000000 | Delete unversioned items |
| 0x0000000100000000 | Merge All |
| 0x0000000200000000 | Diff with previous version |
| 0x0000000400000000 | Paste |
| 0x0000000800000000 | Upgrade working copy |
| 0x0000001000000000 | Diff later |
| 0x0000002000000000 | Diff with 'filename' |
| 0x0000004000000000 | Unified diff |
| 0x2000000000000000 | Settings |
| 0x4000000000000000 | Help |
| 0x8000000000000000 | About |
Example: to disable the “Relocate” the “Delete unversioned items” and the “Settings” menu entries, add the values assigned to the entries like this:
0x0000000000080000
+ 0x0000000080000000
+ 0x2000000000000000
= 0x2000000080080000
The lower DWORD value (0x80080000)
must then be stored in
HKEY_CURRENT_USER\Software\TortoiseSVN\ContextMenuEntriesMaskLow,
the higher DWORD value (0x20000000) in
HKEY_CURRENT_USER\Software\TortoiseSVN\ContextMenuEntriesMaskHigh.
To enable the menu entries again, simply delete the two registry keys.
Table of Contents
Since all commands for TortoiseSVN are controlled through command line parameters, you can automate it with batch scripts or start specific commands and dialogs from other programs (e.g. your favourite text editor).
Important
Remember that TortoiseSVN is a GUI client, and this automation guide shows you how to make the TortoiseSVN dialogs appear to collect user input. If you want to write a script which requires no input, you should use the official Subversion command line client instead.
The TortoiseSVN GUI program is called TortoiseProc.exe.
All commands are specified with the parameter /command:abcd
where abcd is the required command name. Most of these
commands need at least one path argument, which is given with
/path:"some\path". In the following table the command
refers to the /command:abcd parameter and the path
refers to the /path:"some\path" parameter.
There's a special command that does not require the parameter /command:abcd
but, if nothing is specified on the command line, starts the project monitor instead.
If /tray is specified, the project monitor starts hidden and only
adds its icon to the system tray.
Since some of the commands can take a list of target paths (e.g. committing
several specific files) the /path parameter can take
several paths, separated by a * character.
You can also specify a file which contains a list of paths, separated by
newlines. The file must be in UTF-16 format, without a
BOM
.
If you pass such a file, use /pathfile instead of
/path. To have TortoiseProc delete that file after
the command is finished, you can pass the parameter /deletepathfile.
If you don't pass /deletepathfile, you have to delete the file
yourself or the file gets left behind.
The progress dialog which is used for commits, updates and many more commands usually stays open after the command has finished until the user presses the button. This can be changed by checking the corresponding option in the settings dialog. But using that setting will close the progress dialog, no matter if you start the command from your batch file or from the TortoiseSVN context menu.
To specify a different location of the configuration file, use the parameter
/configdir:"path\to\config\directory".
This will override the default path, including any registry setting.
To close the progress dialog at the end of a command automatically without
using the permanent setting you can pass the /closeonend
parameter.
/closeonend:0don't close the dialog automatically/closeonend:1auto close if no errors/closeonend:2auto close if no errors and conflicts/closeonend:3auto close if no errors, conflicts and merges
To close the progress dialog for local operations if there were no
errors or conflicts, pass the /closeforlocal parameter.
The table below lists all the commands which can be accessed
using the TortoiseProc.exe command line. As described above,
these should be used in the form /command:abcd.
In the table, the /command prefix is omitted
to save space.
Table D.1. List of available commands and options
| Command | Description |
|---|---|
| :about | Shows the about dialog. This is also shown if no command is given. |
| :log |
Opens the log dialog. The
An svn date revision can be in one of the following formats:
|
| :checkout |
Opens the checkout dialog. The
If you specify |
| :import |
Opens the import dialog. The /path
specifies the directory with the data to import.
You can also specify the /logmsg switch
to pass a predefined log message to the import dialog.
Or, if you don't want to pass the log message on the
command line, use /logmsgfile:path,
where path
points to a file containing the log message.
|
| :update |
Updates the working copy in /path to
HEAD. If the option /rev is given
then a dialog is shown to ask the user to which
revision the update should go. To avoid the dialog
specify a revision number /rev:1234.
Other options are /nonrecursive,
/ignoreexternals and
/includeexternals.
The /stickydepth indicates that
the specified depth should be sticky, creating
a sparse checkout.
The /skipprechecks can be set
to skip all checks that are done before an update. If this
is specified, then the Show log button
is disabled, and the context menu
to show diffs is also disabled after the update.
|
| :commit |
Opens the commit dialog. The /path specifies the
target directory or the list of files to commit.
You can also specify the /logmsg switch
to pass a predefined log message to the commit dialog.
Or, if you don't want to pass the log message on the
command line, use /logmsgfile:path,
where path
points to a file containing the log message.
To pre-fill the bug ID box (in case you've set up
integration with bug trackers properly), you can use
the /bugid:"the bug id here" to
do that.
|
| :add |
Adds the files in /path to
version control.
|
| :revert |
Reverts local modifications of a working copy.
The /path tells which items
to revert.
|
| :cleanup |
Cleans up interrupted or aborted operations and
unlocks the working copy in /path.
You also have to pass the /cleanup to
actually do the cleanup.
Use /noui to prevent the result
dialog from popping up (either telling about
the cleanup being finished or showing an error message).
/noprogressui also disables the
progress dialog. /nodlg disables
showing the cleanup dialog where the user can
choose what exactly should be done in the cleanup.
The available actions can be specified with the
options /cleanup for status cleanup, /breaklocks
to break all locks, /revert to revert uncommitted changes, /delunversioned,
/delignored, /refreshshell,
/externals, /fixtimestamps
and /vacuum.
|
| :resolve |
Marks a conflicted file specified in
/path as resolved. If
/noquestion is given, then resolving
is done without asking the user first if it really
should be done.
|
| :repocreate |
Creates a repository in /path
|
| :switch |
Opens the switch dialog. The /path specifies the
target directory and /url the
URL to switch to.
|
| :export |
Exports the working copy in /path
to another directory. If the /path
points to an unversioned directory, a dialog will ask
for an URL to export to the directory in /path.
If you specify the key /blockpathadjustments,
the automatic export path adjustments are blocked.
|
| :dropexport |
Exports the working copy in /path
to the directory specified in /droptarget.
This exporting does not use the export dialog but
executes directly. The option /overwrite
specifies that existing files are overwritten without
user confirmation, and the option /autorename
specifies that if files already exist, the exported
files get automatically renamed to avoid overwriting
them. The option /extended can specify either
localchanges to only export files that
got changed locally, or unversioned
to also export all unversioned items as well.
|
| :dropvendor |
Copies the folder in /path recursively
to the directory specified in /droptarget.
New files are added automatically, and missing files get
removed in the target working copy, basically ensuring
that source and destination are exactly the same.
Specify /noui to skip the confirmation dialog,
and /noprogressui to also disable showing the
progress dialog.
|
| :merge |
Opens the merge dialog. The /path specifies the
target directory.
For merging a revision range, the following options are available:
/fromurl:URL,
/revrange:string.
For merging two repository trees, the following options are available:
/fromurl:URL,
/tourl:URL,
/fromrev:xxx and
/torev:xxx.
|
| :mergeall |
Opens the merge all dialog. The /path specifies the
target directory.
|
| :copy |
Brings up the branch/tag dialog.
The /path
is the working copy to branch/tag from.
And the /url is the
target URL. If the urls starts with a ^ it is assumed
to be relative to the repository root.
To already check the option
Switch working copy to new branch/tag you can pass
the /switchaftercopy switch. To check the option
Create intermediate folders pass the /makeparents switch.
You can also specify the /logmsg switch
to pass a predefined log message to the branch/tag dialog.
Or, if you don't want to pass the log message on the
command line, use /logmsgfile:path,
where path
points to a file containing the log message.
|
| :settings | Opens the settings dialog. |
| :remove |
Removes the file(s) in /path from
version control.
|
| :rename |
Renames the file in /path. The new
name for the file is asked with a dialog.
To avoid the question about renaming similar files
in one step, pass /noquestion.
|
| :diff |
Starts the external diff program specified in the
TortoiseSVN settings. The /path
specifies the first file.
If the option /path2
is set, then the diff program is started with those
two files. If /path2 is omitted,
then the diff is done between the file in
/path and its BASE. If the specified
file also has property modifications, the external
diff tool is also started for each modified property.
To prevent that, pass the option /ignoreprops.
To explicitly set the revision numbers use
/startrev:xxx and
/endrev:xxx, and for the optional
peg revision use /pegrev:xxx.
If /blame is set and /path2
is not set, then the diff is done by first blaming
the files with the given revisions.
The parameter /line:xxx specifies the
line to jump to when the diff is shown.
|
| :shelve |
Shelves the specified paths in a new shelf.
The option /shelfname:name specifies the name
of the shelf. An optional log message can be specified
with /logmsg:message.
If option /checkpoint is passed, the
modifications of the files are kept.
|
| :unshelve |
Applies the shelf with the name /shelfname:name
to the working copy path. By default the last version of the shelf
is applied, but you can specify a version with /version:X.
|
| :showcompare |
Depending on the URLs and revisions to compare, this
either shows a unified diff (if the option
The options
If the specified url also has property modifications, the external
diff tool is also started for each modified property.
To prevent that, pass the option
If a unified diff is requested, an optional |
| :conflicteditor |
Starts the conflict editor specified in the TortoiseSVN
settings with the correct files for the conflicted
file in /path.
|
| :relocate |
Opens the relocate dialog. The /path
specifies the working copy path to relocate.
|
| :help | Opens the help file. |
| :repostatus |
Opens the check-for-modifications dialog. The /path
specifies the working copy directory. If /remote is
specified, the dialog contacts the repository immediately on startup,
as if the user clicked on the Check repository button.
|
| :repobrowser |
Starts the repository browser dialog, pointing to
the URL of the working copy given in
An additional option
If
If |
| :ignore |
Adds all targets in /path to the
ignore list, i.e. adds the svn:ignore
property to those files.
|
| :blame |
Opens the blame dialog for the file specified
in
If the options
If the option
The options |
| :cat |
Saves a file from an URL or working copy path given
in /path to the location given in
/savepath:path. The revision is
given in /revision:xxx. This can
be used to get a file with a specific revision.
|
| :createpatch |
Creates a patch file for the path given in
/path. To skip the file Save-As dialog
you can pass /savepath:path to specify
the path where to save the patch file to directly.
To prevent the unified diff viewer from being started showing
the patch file, pass /noview.
If a unified diff is requested, an optional prettyprint
option can be specified which will show the merge-info properties in
a more user readable format.
|
| :revisiongraph |
Shows the revision graph for the path given in
To create an image file of the revision graph for a specific path, but
without showing the graph window, pass
Since the revision graph has many options that
affect how it is shown, you can also set the options
to use when creating the output image file.
Pass these options with |
| :lock |
Locks a file or all files in a directory given in
/path.
The 'lock' dialog is shown so the
user can enter a comment for the lock.
|
| :unlock |
Unlocks a file or all files in a directory given in
/path.
|
| :rebuildiconcache |
Rebuilds the windows icon cache. Only use this in
case the windows icons are corrupted. A side effect
of this (which can't be avoided) is that the icons
on the desktop get rearranged.
To suppress the message box, pass /noquestion.
|
| :properties |
Shows the properties dialog for the path given in
For dealing with versioned properties this command requires a working copy.
Revision properties can be viewed/changed if
To open the properties dialog directly for a specific
property, pass the property name as |
| :sync |
Exports/imports settings, either depending on whether the current settings or the exported settings are newer, or as specified.
If a path is passed with
The parameter
If neither
If
If
The parameter |
Examples (which should be entered on one line):
TortoiseProc.exe /command:commit
                 /path:"c:\svn_wc\file1.txt*c:\svn_wc\file2.txt"
                 /logmsg:"test log message" /closeonend:0

TortoiseProc.exe /command:update /path:"c:\svn_wc\" /closeonend:0

TortoiseProc.exe /command:log /path:"c:\svn_wc\file1.txt"
                 /startrev:50 /endrev:60 /closeonend:0
Using special URLs, it is also possible to call TortoiseProc from a web page.
TortoiseSVN registers a new protocol tsvncmd: which
can be used to create hyperlinks that execute TortoiseSVN commands.
The commands and parameters are the same as when automating TortoiseSVN
from the command line.
The format of the tsvncmd: URL is like this:
tsvncmd:command:cmd?parameter:paramvalue?parameter:paramvalue
with cmd being one of the allowed commands,
parameter being the name of a parameter like
path or revision, and
paramvalue being the value to use for that parameter.
The list of parameters allowed depends on the command used.
The following commands are allowed with tsvncmd: URLs:
:update:commit:diff:repobrowser:checkout:export:blame:repostatus:revisiongraph:showcompare:log:properties
A simple example URL might look like this:
<a href="tsvncmd:command:update?path:c:\svn_wc?rev:1234">Update</a>
or in a more complex case:
<a href="tsvncmd:command:showcompare?
url1:https://svn.code.sf.net/p/stefanstools/code/trunk/StExBar/src/setup/Setup.wxs?
url2:https://svn.code.sf.net/p/stefanstools/code/trunk/StExBar/src/setup/Setup.wxs?
revision1:188?revision2:189">compare</a>
The image diff tool has a few command line options which you
can use to control how the tool is started.
The program is called TortoiseIDiff.exe.
The table below lists all the options which can be passed to the image diff tool on the command line.
Table D.2. List of available options
| Option | Description |
|---|---|
| :left | Path to the file shown on the left. |
| :lefttitle | A title string. This string is used in the image view title instead of the full path to the image file. |
| :right | Path to the file shown on the right. |
| :righttitle | A title string. This string is used in the image view title instead of the full path to the image file. |
| :overlay | If specified, the image diff tool switches to the overlay mode (alpha blend). |
| :fit | If specified, the image diff tool fits both images together. |
| :showinfo | Shows the image info box. |
Example (which should be entered on one line):
TortoiseIDiff.exe /left:"c:\images\img1.jpg" /lefttitle:"image 1"
                  /right:"c:\images\img2.jpg" /righttitle:"image 2"
                  /fit /overlay
The unified diff viewer has only two command line options:
Table D.3. List of available options
| Option | Description |
|---|---|
| :patchfile | Path to the unified diff file. |
| :p | Activates pipe mode. The unified diff is read from the console input. |
Examples (which should be entered on one line):
TortoiseUDiff.exe /patchfile:"c:\diff.patch"
If you create the diff from another command, you can use TortoiseUDiff to show that diff directly:
svn diff | TortoiseUDiff.exe /u
this also works if you omit the /p parameter:
svn diff | TortoiseUDiff.exe
Table of Contents
Sometimes this manual refers you to the main Subversion documentation, which describes Subversion in terms of the Command Line Interface (CLI). To help you understand what TortoiseSVN is doing behind the scenes, we have compiled a list showing the equivalent CLI commands for each of TortoiseSVN's GUI operations.
Note
Even though there are CLI equivalents to what TortoiseSVN does, remember that TortoiseSVN does not call the CLI but uses the Subversion library directly.
If you think you have found a bug in TortoiseSVN, we may ask you to try to reproduce it using the CLI, so that we can distinguish TortoiseSVN issues from Subversion issues. This reference tells you which command to try.
In the descriptions which follow, the URL for a repository
location is shown simply as
URL, and an example might be
https://svn.code.sf.net/p/tortoisesvn/code/trunk/.
The working copy path is shown simply as
PATH, and an example might be
C:\TortoiseSVN\trunk.
Important
Because TortoiseSVN is a Windows Shell Extension, it is not able to use the notion of a current working directory. All working copy paths must be given using the absolute path, not a relative path.
Certain items are optional, and these are often controlled by checkboxes or radio buttons in TortoiseSVN. These options are shown in [square brackets] in the command line definitions.
svn checkout [-depth ARG] [--ignore-externals] [-r rev] URL PATH
The depth combo box items relate to the -depth
argument.
If Omit externals is checked,
use the --ignore-externals switch.
If you are checking out a specific revision, specify that
after the URL using -r switch.
svn info URL_of_WC
svn update [-r rev] PATH
Updating multiple items is currently not an atomic operation in Subversion. So TortoiseSVN first finds the HEAD revision of the repository, and then updates all items to that particular revision number to avoid creating a mixed revision working copy.
If only one item is selected for updating or the selected items are not all from the same repository, TortoiseSVN just updates to HEAD.
No command line options are used here. Update to revision also implements the update command, but offers more options.
svn info URL_of_WC
svn update [-r rev] [-depth ARG] [--ignore-externals] PATH
The depth combo box items relate to the -depth
argument.
If Omit externals is checked,
use the --ignore-externals switch.
In TortoiseSVN, the commit dialog uses several Subversion commands. The first stage is a status check which determines the items in your working copy which can potentially be committed. You can review the list, diff files against BASE and select the items you want to be included in the commit.
svn status -v PATH
If Show unversioned files is checked,
TortoiseSVN will also show all unversioned files and folders in
the working copy hierarchy, taking account of the ignore rules.
This particular feature has no direct equivalent in Subversion,
as the svn status command does not descend into
unversioned folders.
If you check any unversioned files and folders, those items will first be added to your working copy.
svn add PATH...
When you click on OK, the Subversion commit takes place. If you have
left all the file selection checkboxes in their default state,
TortoiseSVN uses a single recursive commit of the working copy.
If you deselect some files, then a non-recursive commit
(-N) must be used, and every path must be
specified individually on the commit command line.
svn commit -m "LogMessage" [-depth ARG] [--no-unlock] PATH...
LogMessage here represents the contents of the
log message edit box. This can be empty.
If Keep locks is checked,
use the --no-unlock switch.
svn diff PATH
If you use Diff from the main context menu, you are diffing a modified file against its BASE revision. The output from the CLI command above also does this and produces output in unified-diff format. However, this is not what TortoiseSVN is using. TortoiseSVN uses TortoiseMerge (or a diff program of your choosing) to display differences visually between full-text files, so there is no direct CLI equivalent.
You can also diff any 2 files using TortoiseSVN, whether or not they are version controlled. TortoiseSVN just feeds the two files into the chosen diff program and lets it work out where the differences lie.
svn log -v -r 0:N --limit 100 [--stop-on-copy] PATH
or
svn log -v -r M:N [--stop-on-copy] PATH
By default, TortoiseSVN tries to fetch 100 log messages using the --limit method. If the settings instruct it to use old APIs, then the second form is used to fetch the log messages for 100 repository revisions.
If Stop on copy/rename is checked,
use the --stop-on-copy switch.
svn status -v PATH
or
svn status -u -v PATH
The initial status check looks only at your working copy.
If you click on
then the repository is also checked to see which files
would be changed by an update, which requires the
-u switch.
If Show unversioned files is checked,
TortoiseSVN will also show all unversioned files and folders in
the working copy hierarchy, taking account of the ignore rules.
This particular feature has no direct equivalent in Subversion,
as the svn status command does not descend into
unversioned folders.
The revision graph is a feature of TortoiseSVN only. There's no equivalent in the command line client.
What TortoiseSVN does is an
svn info URL_of_WC
svn log -v URL
where URL is the repository root and then analyzes the data returned.
svn info URL_of_WC
svn list [-r rev] -v URL
You can use svn info to determine the repository
root, which is the top level shown in the repository browser. You
cannot navigate Up above this level.
Also, this command returns all the locking information shown in
the repository browser.
The svn list call will list the contents of a
directory, given a URL and revision.
This command has no CLI equivalent. It invokes TortoiseMerge or an external 3-way diff/merge tool to look at the files involved in the conflict and sort out which lines to use.
svn status -v PATH
The first stage is a status check which determines the items in your working copy which can potentially be reverted. You can review the list, diff files against BASE and select the items you want to be included in the revert.
When you click on OK, the Subversion revert takes place. If you have
left all the file selection checkboxes in their default state,
TortoiseSVN uses a single recursive (-R)
revert of the working copy. If you deselect some files, then
every path must be specified individually on the revert command line.
svn revert [-R] PATH...
svn status -v PATH
The first stage is a status check which determines the files in your working copy which can potentially be locked. You can select the items you want to be locked.
svn lock -m "LockMessage" [--force] PATH...
LockMessage here represents the contents of the
lock message edit box. This can be empty.
If Steal the locks is checked,
use the --force switch.
svn copy -m "LogMessage" URL URL
or
svn copy -m "LogMessage" URL@rev URL@rev
or
svn copy -m "LogMessage" PATH URL
The Branch/Tag dialog performs a copy to the repository. There are 3 radio button options:
- HEAD revision in the repository
- Specific revision in repository
- Working copy
which correspond to the 3 command line variants above.
LogMessage here represents the contents of the
log message edit box. This can be empty.
svn merge [--dry-run] --force From_URL@revN To_URL@revM PATH
The performs the same merge
with the --dry-run switch.
svn diff From_URL@revN To_URL@revM
The shows the diff operation which will be used to do the merge.
svn export [-r rev] [--ignore-externals] URL Export_PATH
This form is used when accessed from an unversioned folder, and the folder is used as the destination.
Exporting a working copy to a different location is done without using the Subversion library, so there's no matching command line equivalent.
What TortoiseSVN does is to copy all files to the new location while showing you the progress of the operation. Unversioned files/folders can optionally be exported too.
In both cases,
if Omit externals is checked,
use the --ignore-externals switch.
svn add PATH...
If you selected a folder, TortoiseSVN first scans it recursively for items which can be added.
svn import -m LogMessage PATH URL
LogMessage here represents the contents of the
log message edit box. This can be empty.
svn blame -r N:M -v PATH
svn log -r N:M PATH
If you use TortoiseBlame to view the blame info, the file log is also required to show log messages in a tooltip. If you view blame as a text file, this information is not required.
svn propget svn:ignore PATH > tempfile
{edit new ignore item into tempfile}
svn propset svn:ignore -F tempfile PATH
Because the svn:ignore property is often
a multi-line value, it is shown here as being changed via
a text file rather than directly on the command line.
svn diff PATH > patch-file
TortoiseSVN creates a patch file in unified diff format by comparing the working copy with its BASE version.
Table of Contents
This appendix contains a more detailed discussion of the implementation of some of TortoiseSVN's features.
Every file and folder has a Subversion status value as reported by the Subversion library. In the command line client, these are represented by single letter codes, but in TortoiseSVN they are shown graphically using the icon overlays. Because the number of overlays is very limited, each overlay may represent one of several status values.
The Conflicted overlay is used to
represent the conflicted state, where
an update or switch results in conflicts between local
changes and changes downloaded from the repository. It is
also used to indicate the obstructed state,
which can occur when an operation is unable to complete.
The Modified overlay represents the
modified state, where you have made
local modifications, the merged state,
where changes from the repository have been merged with
local changes, and the replaced state,
where a file has been deleted and replaced by another
different file with the same name.
The Deleted overlay represents the
deleted state, where an item is scheduled for
deletion, or the missing state, where an
item is not present. Naturally an item which is missing cannot have
an overlay itself, but the parent folder can be marked if one of its
child items is missing.
The Added overlay is simply used to
represent the added status when an item
has been added to version control.
The In Subversion overlay is used to
represent an item which is in the normal
state, or a versioned item whose state is not yet known.
Because TortoiseSVN uses a background caching process to
gather status, it may take a few seconds before the overlay
updates.
The Needs Lock overlay is used to
indicate when a file has the svn:needs-lock
property set.
The Locked overlay is used when the local working copy holds a lock for that file.
The Ignored overlay is used to
represent an item which is in the ignored
state, either due to a global ignore pattern, or the
svn:ignore property of the parent folder.
This overlay is optional.
The Unversioned overlay is used to
represent an item which is in the unversioned
state. This is an item in a versioned folder, but which is not
under version control itself.
This overlay is optional.
If an item has Subversion status none (the item
is not within a working copy) then no overlay is shown.
If you have chosen to disable the Ignored
and Unversioned overlays then no overlay
will be shown for those files either.
An item can only have one Subversion status value. For example
a file could be locally modified and it could be marked for
deletion at the same time. Subversion returns a single status
value - in this case deleted.
Those priorities are defined within Subversion itself.
When TortoiseSVN displays the status recursively (the default setting), each folder displays an overlay reflecting its own status and the status of all its children. In order to display a single summary overlay, we use the priority order shown above to determine which overlay to use, with the Conflicted overlay taking highest priority.
In fact, you may find that not all of these icons are used on your system. This is because the number of overlays allowed by Windows is limited to 15. Windows uses 4 of those, and the remaining 11 can be used by other applications. If there are not enough overlay slots available, TortoiseSVN tries to be a Good Citizen (TM) and limits its use of overlays to give other apps a chance.
Since there are Tortoise clients available for other version control systems, we've created a shared component which is responsible for showing the overlay icons. The technical details are not important here, all you need to know is that this shared component allows all Tortoise clients to use the same overlays and therefore the limit of 11 available slots isn't used up by installing more than one Tortoise client. Of course there's one small drawback: all Tortoise clients use the same overlay icons, so you can't figure out by the overlay icons what version control system a working copy is using.
Normal, Modified and Conflicted are always loaded and visible.
Deleted is loaded if possible, but falls back to Modified if there are not enough slots.
Read-Only is loaded if possible, but falls back to Normal if there are not enough slots.
Locked is loaded if possible, but falls back to Normal if there are not enough slots.
Added is loaded if possible, but falls back to Modified if there are not enough slots.
Table of Contents
The standard installer has support only for English, but you can download separate language packs and spell check dictionaries separately after installation.
The TortoiseSVN user interface has been translated into many different languages, so you may be able to download a language pack to suit your needs. You can find the language packs on our translation status page . And if there is no language pack available, why not join the team and submit your own translation ;-)
Each language pack is packaged as a .msi installer.
Just run the install program and follow the instructions.
After the installation finishes, the translation will be available.
The documentation has also been translated into several different languages. You can download translated manuals from the support page on our website.
TortoiseSVN uses the Windows spell checker if it's available (Windows 8 or later).
Which means that if you want the spell checker to work in a different language
than the default OS language, you have to install the spell checker module
in the Windows settings (Settings > Time & Language > Region & Language).
TortoiseSVN will use that spell checker if properly configured with the tsvn:projectlanguage
project property.
In case the Windows spell checker is not available, TortoiseSVN can also use spell checker dictionaries from OpenOffice and Mozilla .
The installer automatically adds the US and UK English dictionaries. If you want other languages, the easiest option is simply to install one of TortoiseSVN's language packs. This will install the appropriate dictionary files as well as the TortoiseSVN local user interface. After the installation finishes, the dictionary will be available too.
Or you can install the dictionaries yourself. If you have OpenOffice or Mozilla installed, you can copy those dictionaries, which are located in the installation folders for those applications. Otherwise, you need to download the required dictionary files from https://cgit.freedesktop.org/libreoffice/dictionaries/tree/ .
Once you have got the dictionary files, you probably need to rename them so that the filenames only have the locale chars in it. Example:
en_US.affen_US.dic
Then just copy them into the %APPDATA%\TortoiseSVN\dic folder.
If that folder isn't there, you have to create it first.
TortoiseSVN will also search the Languages sub-folder of
the TortoiseSVN installation folder (normally this will be C:\Program Files\TortoiseSVN\Languages);
this is the place where the language packs put their files.
However, the %APPDATA%-folder doesn't require administrator privileges and, thus, has higher priority.
The next time you start TortoiseSVN, the spell checker will be available.
If you install multiple dictionaries, TortoiseSVN uses these rules to select which one to use.
Check the
tsvn:projectlanguagesetting. Refer to the section called “Project Settings” for information about setting project properties.If no project language is set, or that language is not installed, try the language corresponding to the Windows locale.
If the exact Windows locale doesn't work, try the “Base” language, e.g.
de_CH(Swiss-German) falls back tode_DE(German).If none of the above works, then the default language is English, which is included with the standard installation.
- Add
A Subversion command that is used to add a file or directory to your working copy. The new items are added to the repository when you commit.
- BASE revision
The current base revision of a file or folder in your working copy. This is the revision the file or folder was in, when the last checkout, update or commit was run. The BASE revision is normally not equal to the HEAD revision.
- Blame
This command is for text files only, and it annotates every line to show the repository revision in which it was last changed, and the author who made that change. Our GUI implementation is called TortoiseBlame and it also shows the commit date/time and the log message when you hover the mouse of the revision number.
- Branch
A term frequently used in revision control systems to describe what happens when development forks at a particular point and follows 2 separate paths. You can create a branch off the main development line so as to develop a new feature without rendering the main line unstable. Or you can branch a stable release to which you make only bug fixes, while new developments take place on the unstable trunk. In Subversion a branch is implemented as a “cheap copy”.
- Checkout
A Subversion command which creates a local working copy in an empty directory by downloading versioned files from the repository.
- Cleanup
To quote from the Subversion book: “ Recursively clean up the working copy, removing locks and resuming unfinished operations. If you ever get a working copy locked error, run this command to remove stale locks and get your working copy into a usable state again. ” Note that in this context lock refers to local filesystem locking, not repository locking.
- Commit
This Subversion command is used to pass the changes in your local working copy back into the repository, creating a new repository revision.
- Conflict
When changes from the repository are merged with local changes, sometimes those changes occur on the same lines. In this case Subversion cannot automatically decide which version to use and the file is said to be in conflict. You have to edit the file manually and resolve the conflict before you can commit any further changes.
- Copy
In a Subversion repository you can create a copy of a single file or an entire tree. These are implemented as “cheap copies” which act a bit like a link to the original in that they take up almost no space. Making a copy preserves the history of the item in the copy, so you can trace changes made before the copy was made.
- Delete
When you delete a versioned item (and commit the change) the item no longer exists in the repository after the committed revision. But of course it still exists in earlier repository revisions, so you can still access it. If necessary, you can copy a deleted item and “resurrect” it complete with history.
- Diff
Shorthand for “Show Differences”. Very useful when you want to see exactly what changes have been made.
- Export
This command produces a copy of a versioned folder, just like a working copy, but without the local
.svnfolders.- FSFS
A proprietary Subversion filesystem backend for repositories. Can be used on network shares. Default for 1.2 and newer repositories.
- GPO
Group policy object.
- HEAD revision
The latest revision of a file or folder in the repository.
- Import
Subversion command to import an entire folder hierarchy into the repository in a single revision.
- Lock
When you take out a lock on a versioned item, you mark it in the repository as non-committable, except from the working copy where the lock was taken out.
- Log
Show the revision history of a file or folder. Also known as “History”.
- History
Show the revision history of a file or folder. Also known as “Log”.
- Merge
The process by which changes from the repository are added to your working copy without disrupting any changes you have already made locally. Sometimes these changes cannot be reconciled automatically and the working copy is said to be in conflict.
Merging happens automatically when you update your working copy. You can also merge specific changes from another branch using TortoiseSVN's Merge command.
- Patch
If a working copy has changes to text files only, it is possible to use Subversion's Diff command to generate a single file summary of those changes in Unified Diff format. A file of this type is often referred to as a “Patch”, and it can be emailed to someone else (or to a mailing list) and applied to another working copy. Someone without commit access can make changes and submit a patch file for an authorized committer to apply. Or if you are unsure about a change you can submit a patch for others to review.
- Property
In addition to versioning your directories and files, Subversion allows you to add versioned metadata - referred to as “properties” to each of your versioned directories and files. Each property has a name and a value, rather like a registry key. Subversion has some special properties which it uses internally, such as
svn:eol-style. TortoiseSVN has some too, such astsvn:logminsize. You can add your own properties with any name and value you choose.- Relocate
If your repository moves, perhaps because you have moved it to a different directory on your server, or the server domain name has changed, you need to “relocate” your working copy so that its repository URLs point to the new location.
Note: you should only use this command if your working copy is referring to the same location in the same repository, but the repository itself has moved. In any other circumstance you probably need the “Switch” command instead.
- Repository
A repository is a central place where data is stored and maintained. A repository can be a place where multiple databases or files are located for distribution over a network, or a repository can be a location that is directly accessible to the user without having to travel across a network.
- Resolve
When files in a working copy are left in a conflicted state following a merge, those conflicts must be sorted out by a human using an editor (or perhaps TortoiseMerge). This process is referred to as “Resolving Conflicts”. When this is complete you can mark the conflicted files as being resolved, which allows them to be committed.
- Revert
Subversion keeps a local “pristine” copy of each file as it was when you last updated your working copy. If you have made changes and decide you want to undo them, you can use the “revert” command to go back to the pristine copy.
- Revision
Every time you commit a set of changes, you create one new “revision” in the repository. Each revision represents the state of the repository tree at a certain point in its history. If you want to go back in time you can examine the repository as it was at revision N.
In another sense, a revision can refer to the set of changes that were made when that revision was created.
- Revision Property (revprop)
Just as files can have properties, so can each revision in the repository. Some special revprops are added automatically when the revision is created, namely:
svn:date svn:author svn:logwhich represent the commit date/time, the committer and the log message respectively. These properties can be edited, but they are not versioned, so any change is permanent and cannot be undone.- SVN
A frequently-used abbreviation for Subversion.
The name of the Subversion custom protocol used by the “svnserve” repository server.
- Switch
Just as “Update-to-revision” changes the time window of a working copy to look at a different point in history, so “Switch” changes the space window of a working copy so that it points to a different part of the repository. It is particularly useful when working on trunk and branches where only a few files differ. You can switch your working copy between the two and only the changed files will be transferred.
- Update
This Subversion command pulls down the latest changes from the repository into your working copy, merging any changes made by others with local changes in the working copy.
- Working Copy
This is your local “sandbox”, the area where you work on the versioned files, and it normally resides on your local hard disk. You create a working copy by doing a “Checkout” from a repository, and you feed your changes back into the repository using “Commit”.
Symbols
A
- Access, Local Access to the Repository
- add, Adding New Files And Directories
- add files to repository, Importing Data Into A Repository
- annotate, Who Changed Which Line?
- ASP projects, Setting the SVN_ASP_DOT_NET_HACK environment variable
- authentication, Authentication
- authentication cache, Authentication
- auto-props, Automatic property setting
- automation, TortoiseSVN Commands, Tsvncmd URL handler, TortoiseIDiff Commands, TortoiseUDiff Commands
B
- backup, Repository Backup
- blame, Who Changed Which Line?
- branch, Copying/Moving/Renaming Files and Folders, Branching / Tagging
- bug tracker, Integration with Bug Tracking Systems / Issue Trackers
- bug tracking, Integration with Bug Tracking Systems / Issue Trackers
- bugtracker, Integration with Bug Tracking Systems / Issue Trackers
C
- changelist, Change Lists
- changes, Compare two revisions of a file or folder
- check in, Committing Your Changes To The Repository
- check new version, Redirect the upgrade check
- checkout, Checking Out A Working Copy
- checkout link, Checkout Links
- clean, Undo Changes
- cleanup, Cleanup
- CLI,
- client hooks, Client Side Hook Scripts
- COM, ,
- COM SubWCRev interface, COM interface
- command line, TortoiseSVN Commands, TortoiseIDiff Commands, TortoiseUDiff Commands
- command line client,
- commit, Committing Your Changes To The Repository
- commit message, Force users to enter a log message
- commit messages, Revision Log Dialog
- commit monitor,
- common projects, Include a common sub-project
- compare, Viewing Differences
- compare files, Compare two revisions of a file or folder
- compare folders, Compare two revisions of a file or folder
- compare revisions, Comparing Folders
- conflict, The Copy-Modify-Merge Solution, Resolving Conflicts
- context menu, Context Menus
- context menu entries, Disable context menu entries
- copy, Branching / Tagging, The Repository Browser
- copy files, Copying/Moving/Renaming Files and Folders
- Create, Creating a Repository with the Command Line Client
- TortoiseSVN, Creating The Repository With TortoiseSVN
- create repository, Repository Creation
- create working copy, Checking Out A Working Copy
D
- delete, Deleting files and folders
- deploy, Deploy TortoiseSVN via group policies
- detach from repository, Ignore files which are already versioned
- dictionary, Spellchecker
- diff, Viewing Differences, Creating and Applying Patches
- diff tools, External Diff/Merge Tools
- diffing, Viewing Diffs
- disable functions, Disable context menu entries
- domain controller, Deploy TortoiseSVN via group policies
- drag handler, Drag and Drop
- drag-n-drop, Drag and Drop
E
- edit log/author, Changing the Log Message and Author
- empty message, Force users to enter a log message
- exclude pattern, General Settings
- expand keywords, svn:keywords
- explorer, TortoiseSVN's Features
- export, Exporting a Subversion Working Copy
- export changes, Comparing Folders
- external repositories, External Items
- externals, External Items, Include a common sub-project
F
- FAQ,
- fetch changes, Update Your Working Copy With Changes From Others
- filter, Filtering Log Messages
G
- global ignore, General Settings
- globbing, Pattern Matching in Ignore Lists
- GPO, Deploy TortoiseSVN via group policies
- graph, Revision Graphs
- group policies, Deploy TortoiseSVN via group policies, Disable context menu entries
H
- history, Revision Log Dialog
- hook scripts, Server side hook scripts, Client Side Hook Scripts
- hooks, Server side hook scripts
I
- IBugtraqProvider,
- icons, Icon Overlays
- ignore, Ignoring Files And Directories
- image diff, Diffing Images Using TortoiseIDiff
- import, Importing Data Into A Repository
- import in place, Import in Place
- install, Installation
- issue tracker, Integration with Bug Tracking Systems / Issue Trackers,
K
- keywords, svn:keywords
L
- language packs, Language Packs
- link, Checkout Links
- locking, Locking
- log, Revision Log Dialog
- log cache, Log Caching
- log message, Force users to enter a log message
- log messages, Revision Log Dialog
M
- mark release, Branching / Tagging
- maximize, Maximizing Windows
- merge, Merging
- revision range, Merging a Range of Revisions
- two trees, Merging Two Different Trees
- merge conflicts, Handling Conflicts after Merge
- merge tools, External Diff/Merge Tools
- merge tracking, Merge Tracking
- merge tracking log, Merge Tracking Features
- Microsoft Word, Diffing Office Documents
- modifications, Local and Remote Status
- monitoring projects,
- move, Moving files and folders
- move files, Copying/Moving/Renaming Files and Folders
- moved server, Relocating a working copy
- moving, Move/copy a lot of files at once
- msi, Deploy TortoiseSVN via group policies
N
- Network share, Accessing a Repository on a Network Share
O
- overlay priority, Icon Overlays
- overlays, Icon Overlays, Icon Overlays
P
- partial checkout, Checking Out A Working Copy
- patch, Creating and Applying Patches
- pattern matching, Pattern Matching in Ignore Lists
- plugin,
- praise, Who Changed Which Line?
- pristines on demand, Checking Out A Working Copy
- project monitor,
- project properties, TortoiseSVN Project Properties
- proxy server, Network Settings
R
- readonly, Locking
- registry, Advanced Settings
- relocate, Relocating a working copy
- remote commits,
- remove, Deleting files and folders
- remove versioning, Ignore files which are already versioned
- rename, Moving files and folders, The Repository Browser, Move/copy a lot of files at once
- rename files, Copying/Moving/Renaming Files and Folders
- reorganize, Move/copy a lot of files at once
- repo viewer, Integration with Web-based Repository Viewers
- repo-browser, The Repository Browser
- repository, The Repository, Importing Data Into A Repository
- repository URL changed, Relocating a working copy
- resolve, Resolving Conflicts
- revert, Undo Changes, Roll back (Undo) revisions in the repository
- revision, Revisions, Revision Graphs
- revision graph, Revision Graphs
- revision properties, Changing the Log Message and Author
- revprops, Changing the Log Message and Author
- right click, Context Menus
- right drag, Drag and Drop
- rollback, Roll back (Undo) revisions in the repository
S
- send changes, Committing Your Changes To The Repository
- server moved, Relocating a working copy
- server side hook scripts, Server side hook scripts
- server viewer, The Repository Browser
- server-side actions, The Repository Browser
- settings, TortoiseSVN's Settings
- shelve, Shelving
- shortcut, Create a shortcut to a repository
- sounds, General Settings
- sparse checkout, Checking Out A Working Copy
- special files, Special Files
- spellchecker, Spellchecker
- statistics, Statistical Information
- status, Getting Status Information, Local and Remote Status
- SUBST drives, Icon Overlay Settings
- Subversion book,
- Subversion properties, Subversion Properties
- SubWCRev,
- SVN_ASP_DOT_NET_HACK, Setting the SVN_ASP_DOT_NET_HACK environment variable
- switch, To Checkout or to Switch...
T
- tag, Copying/Moving/Renaming Files and Folders, Branching / Tagging
- temporary files, Import
- TortoiseIDiff, Diffing Images Using TortoiseIDiff
- TortoiseSVN link, Checkout Links
- TortoiseSVN properties, TortoiseSVN Project Properties
- translations, Language Packs
- tree conflict, Resolving Conflicts
U
- UNC paths, Local Access to the Repository
- undo, Undo Changes
- undo change, Roll back (Undo) revisions in the repository
- undo commit, Roll back (Undo) revisions in the repository
- unified diff, Creating and Applying Patches
- unshelve, Shelving
- unversion, Removing a working copy from version control, Ignore files which are already versioned
- unversioned 'working copy', Exporting a Subversion Working Copy
- unversioned files/folders, Ignoring Files And Directories
- update, Update Your Working Copy With Changes From Others, Update selected files from the repository
- upgrade check, Redirect the upgrade check
- URL changed, Relocating a working copy
- URL handler, Tsvncmd URL handler
V
- vendor projects, Include a common sub-project
- version, Redirect the upgrade check
- version control,
- version extraction,
- version new files, Adding New Files And Directories
- version number in files,
- view changes, Getting Status Information
- ViewVC, Integration with Web-based Repository Viewers
- VS2003, Setting the SVN_ASP_DOT_NET_HACK environment variable
W
- web view, Integration with Web-based Repository Viewers
- website, Checkout Links
- WebSVN, Integration with Web-based Repository Viewers
- windows properties, Detailed Status
- Windows shell, TortoiseSVN's Features
- working copy, Working Copies
- working copy status, Getting Status Information