对于每次进行修改和提交,你应该有针对性地留下日志信息。这样,你就可以在以后方便地看到你都做了什么,为什么这么做。当然这么做还是你拥有了开发过程的详细日志。
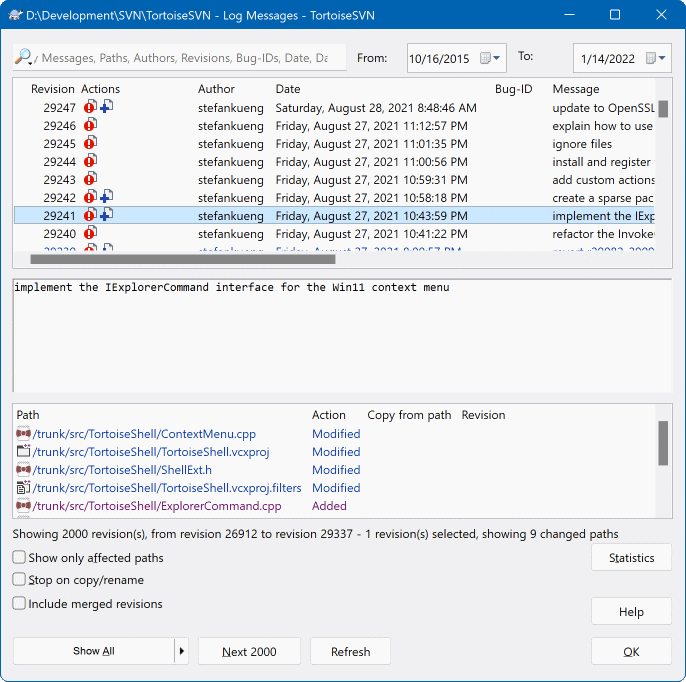
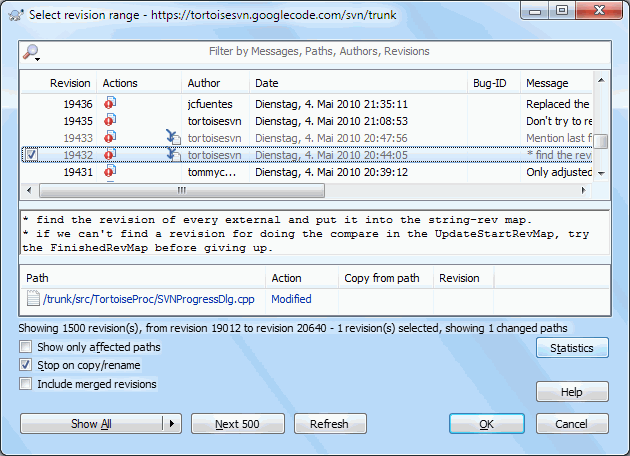
版本日志对话框可以获取所有的日志信息,并将其显示出来。对话框的视图分成3个面板。
最上方的面板显示了版本的列表。这其中包含了日期和时间,以及提交的用户和日志信息开头的部分内容。
以蓝色显示的行表示某些内容被复制到该开发版本中(可能是从一个分支中复制而来)。
中间的面板显示了被选中的版本的完整的日志信息。
最下面的面板显示了被选中版本中都对哪里文件和文件夹进行了修改。
当然,对话框的作用不止于此——它提供了右键菜单,通过它可以获取更多的项目历史信息。
有几种途径可以调出日志对话框:
从右键菜单的TortoiseSVN子菜单中调用
从属性页中调用
在更新结束后,从进度对话框中调用。在这里,日志对话框只显示你上一次更新以来的版本变化。
来自版本库浏览器
如果版本库不可用,你将会看到 要离线? 对话框,在 “离线方式”一节 中有详细描述。
顶部面板有个动作列,包含了此版本的动作概要图标。有四个不同的图标,每个都在自己的列显示。

如果某个版本修改了文件或目录,已修改 图表就会在首列显示。

如果某个版本增加了文件或目录,已增加 图表就会在第二列显示。

如果某个版本删除了文件或目录,已删除 图表就会在第三列显示。

如果某个版本替换了文件或目录,已替换 图标就会在第四列显示。

如果一个修订版本移动了,或者重命名了一个文件或目录,移动图标在第四栏显示。

如果修订版本通过移动/重命名替换了文件或者目录,移动替换图标显示在第四栏。

如果某个版本合并了文件或目录,合并 图标就会在第四列显示。

如果某个版本取消合并了文件或目录,取消合并 图标就会在第四列显示。
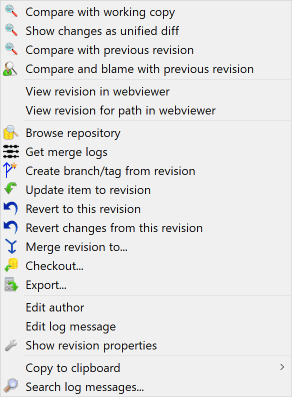
日志对话框的顶部面板有一个右键菜单,通过此菜单你可以获得更多信息。这些菜单条目中的有些内容只会在显示文件日志时出现,有些内容只有显示文件夹日志时出现。
- 与工作副本比较
将你的工作版本与选中的版本进行比较。默认的比较工具是与 TortoiseSNV 一同发布的 TortoiseMerge,如果日志对话框是针对文件夹的,那么就会出现一个被修改的文件的列表,你可以单独地查看每个文件所做的修改。
- 与工作基础版本比较并追溯
追溯文件的选中版本与你工作的 BASE 版本,使用可视化差异工具显示差异。详情请参阅 “追溯不同点”一节 。(仅适用于文件)
- 以标准差异文件显示改变
将选中的版本作为单一差异文件(GNU补丁格式)查看。相对于可视化的文件比较器,它更难阅读,但它将所有的变化显示在一个格式更为紧凑的文件中。
如果你在单击菜单项目时,按住Shift键,对话框回显示出来,你可以为统一的diff设置选项。这些选项包括忽视每行结尾的更改和空格。
- 与前一版本比较
比较选中的版本和以前版本。它与比较工作副本类似。对于文件夹,这个选项首先会显示已修改的文件对话框让你选择要比较的文件。
- 与前一版本比较并追溯
显示修改的文件对话框让你选择文件。追溯选中的版本和前一版本,并使用可视化比较工具显示差异。(仅适用于文件夹)
- 保存版本至...
将选中的版本保存成文件,你可以得到一份该文件的旧版本。(仅适用于文件)
- 打开 / 打开方式...
用默认查看器或你指定的程序打开选中文件的选中版本。(仅适用于文件)
- 追溯...
追溯文件直到选中的版本。(仅适用于文件)
- 浏览版本库
打开版本库浏览器,基于选中的版本,在版本库中检查选中的文件或目录。
- 从版本创建分支/标记
从选中的版本建立一个分支/标记。这个选项很有用。比如: 如果你忘记建立标记,并且提交了某些你不想使其进入发行版的修改。
- 更新项目至版本
将你的工作副本更新到选中的版本。如果你想要你的工作副本折返到过去的某个时间,或者在版本库中有一系列提交而你想每次只更新工作副本一小步,那这个功能就很好用。你最好是更新工作副本的整个目录而不是单一某个文件,因为如果只更新某个文件,否则你的工作副本就可能不一致。
如果你想要永久撤销先前的更改,使用 复原到此版本。
- 复原到此版本
恢复到某个以前的版本。如果你做了多处修改,然后决定要返回到版本 N,你就可以使用这个命令。恢复的修改位于你的工作副本,在你提交之前,并不会影响版本库。注意,这将会丢弃从那个版本以来的所有修改,使用选中的版本来替换文件/文件夹。
如果你的工作副本处于未修改的状态,在执行此操作后,工作副本将会显示为已修改。如果你已经进行了本地修改,这个命令将会把撤销的改变合并至你的工作副本中。
内部的动作是 Subversion 对选中版本之后的修改内容执行了反向合并,撤销这些先前提交产生的影响。
如果在执行这个动作后你察觉到你需要撤销这次撤销并且让工作副本返回到先前没有修改的状态,你应该在 Windows 资源管理器中使用 → , 这个命令将会丢弃本次撤销动作带来的修改。
如果你只是想看看某个文件或者文件夹在先前的版本是什么样子,使用 更新至版本 或 保存版本为... 功能替代此操作。
- 复原此版本作出的修改
还原选中版本所做的修改。还原的内容只在你的工作副本中,所以此操作完全不会影响版本库!要注意的是,这个操作仅仅还原该版本中的修改。不是将整个文件替换成选中的那个版本。它对于已经做过其它无关修改的还原早期修改非常有用。
如果你的工作副本处于未修改的状态,在执行此操作后,工作副本将会显示为已修改。如果你已经进行了本地修改,这个命令将会把撤销的改变合并至你的工作副本中。
内部的动作是 Subversion 对这个版本的修改内容执行了反向合并,撤销先前提交产生的影响。
你可以使用上文复原到此版本中描述的撤销这次撤销。
- 合并版本到...
合并选中的版本到不同的工作副本。可以通过文件夹选择对话框来确定合并到哪一个工作副本中,但是此操作没有冲突对话框,也没有尝试测试合并的机会。合并到未修改的工作副本是一个好主意,这样当合并不成功时你可以还原工作副本。当你想要将某个分支上选中的版本合并至其他分支时,这个功能很有用。
- 检出...
检出你选择的目录的选中版本,创建一个全新副本。它弹出对话框,让你确认URL和版本,并且选择保存的位置。
- 导出...
导出选择的文件/目录的选中版本。它弹出对话框,让你确认URL和版本,选择导出位置。
- 编辑作者 / 日志信息
编辑之前提交时的日志信息或是作者。请阅读“修改日志消息和作者”一节,了解其工作原理。
- 显示版本属性
查看和编辑任何版本属性,不仅仅是日志信息和作者。参看 “修改日志消息和作者”一节。
- 复制到剪贴板
将选中版本的详细日志信息复制到剪贴板。它会复制版本号,作者,日期,日志信息,以及每个版本的改变项目列表。
- 查找日志信息...
在日志信息中搜索你输入的的文字。这个操作搜索日志信息,也搜索由Subversion建立的提交行为总结(最底部的面板中的内容)。搜索大小写无关。
- 创建代码合作者审查..
This menu is shown only if the SmartBear code collaborator tool is installed. When invoked for the first time, a dialog is shown prompting the user to enter user credentials for both code collaborator and SVN. Once the settings are stored, the settings dialog is no longer shown when the menu is invoked, unless the user holds Ctrl while executing the menu item. The configuration and the chosen revision(s) are used to invoke the code collaborator graphical user interface client, which creates a new review with the selected revisions.
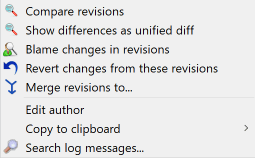
如果你使用Ctrl组合键一次选中了两个版本,右键菜单有所改变:
如果你用 Ctrl 或 Shift 组合键选择了两个或多个版本,右键菜单将有一个选项,可以让你还原这些选中的版本中的修改。这是一次性还原一组版本中修改的最简方法。
你也可以合并选中的版本到别的工作副本,就像上面描述的那样。
如果所有选中的版本作者是相同的,你可以同时修改这些版本的作者。
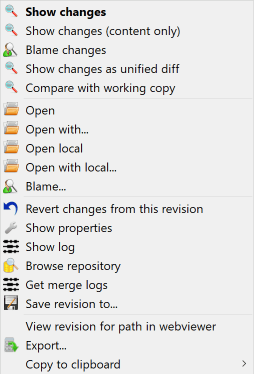
日志对话框的底部面板有一个右键菜单,通过此菜单
- 显示改变
显示选中的文件在选中的版本所做的更改。
- 追溯改变
追溯选中文件的选中版本与前一个版本,使用可视化差异工具显示差异。详情请参阅“追溯不同点”一节 。
- 以标准差异格式显示改变
以标准差异格式显示改变。这个菜单条目只对显示为
已修改的文件有效。- 打开 / 打开方式...
用默认查看器或你指定的程序打开选中文件的选中版本。
- 追溯...
打开追溯对话框,你可以追溯到选中的版本。
- 复原此版本作出的修改
还原选中文件的选中版本所作的变更。
- 显示属性
查看选中项的Subversion属性。
- 显示日志
显示选中的单个文件的版本日志。
- 取得合并日志
显示被选中的单个文件的版本日志,包括合并修改。在 “合并跟踪特性”一节 中查看更多信息。
- 保存版本至...
将选中的版本保存成文件,你可以得到一份该文件的旧版本。
- 导出...
导出这个版本中选中的项目到文件夹,保留文件的目录结构。
在多个文件被选中时,日志对话框的底部面板,右键菜单会显示如下更改:

- 保存版本至...
将选中的版本保存成文件,你可以得到一份该文件的旧版本。
- 显示多个更改
显示选中文件的选中版本的修改。注意,显示修改功能被多次引用,这可能导致你选择的diff工具的多个副本,或者在你的diff工具中增加一个新的比较选项卡。如果你选择了多于15个文件,你将需要确认这个动作。
- 打开多个本地项目...
This will open local working copy files that correspond to your selected files using the application that is registered for the extension. [The behavior is the one you would get double-clicking the working-copy file(s) in Windows explorer]. Depending on how your file extension is associated to an application and the capabilities of the application, this may be a slow operation. In the worst case, new instances of the application may be launched by Windows for each file that was selected.
If you hold Ctrl while invoking this command, the working copy files are always loaded into Visual Studio. This only works when the following conditions are met: Visual Studio must be running in the same user context while having the same process integrity level [running as admin or not] as TortoiseProc.exe. It may be desirable to have the solution containing the changed files loaded, although this is not strictly necessary. Only files that exist on disk with extensions [.cpp, .h, .cs, .rc, .resx, .xaml, .js, .html, .htm, .asp, .aspx, .php, .css and .xml] will be loaded. A maximum of 100 files can be loaded into Visual Studio at one time, and the files are always loaded as new tabs into the currently open instance of Visual Studio. The benefit of reviewing code changes in Visual Studio lies in the fact that you can then use the built-in code navigation, reference finding, static code analysis and other tools built into Visual Studio.
- 导出...
导出选择的文件/目录的选中版本。这会弹出对话框,让你确认URL和版本,并选择导出位置。
提示
你可能会注意到,我们有时候说改变,有时候说差异。它们的区别在哪儿?
Subversion 使用版本号代表 2 种不同的东西。版本通常表示版本库在某一个时间点的状态,但它也可以表示创建该版本时的更改集合,例如 “在 r1234 完成” 表示在 r1234 提交的更改实现了 X 功能。为了避免混淆,我们使用两个不同的术语。
如果你选择了两个版本 N 和 M,上下文菜单会显示这两个版本的差异。用 Subversion 术语说,就是diff -r M:N。
如果你选择了一个版本 N,上下文菜单会显示这个版本的改变。用 Subversion 术语说,就是diff -r N-1:N 或 diff -c N。
底部面板显示在所有选中版本中被修改的文件,所以右键菜单通常会提供显示改变。
日志对话框并不总是显示所有曾经的修改,日志不显示的可能原因如下:
对于一个大的库,可能存在几百上千个改动,全部得到它们可能要花上很久的时间。通常你只关心最近的修改。默认情况下,日志消息限制只获取100条,但你可以在 → 中修改这个值 (“TSVN对话框设置一”一节),
当复制/重命名时停止复选框被选中时, 如果选中的文件或文件夹是从版本库中的其他地方复制而来的,显示日志将停止在该点。这对于查看分支(或标记)时很有用,因为它会停在分支的根节点上,可以快速查看该分支的修改。
一般情况下你可以不要勾选它。 TortoiseSVN会记住它的状态,以改进性能。
如果你在从合并对话框中调用的显示日志对话框,那么这个复选框默认将总是选中的。这是由于合并通常都是查看分支中的修改, 获取分支的根之前的日志在这种情况下通常没有什么意义。
注意,Subversion当前是用复制/删除来实现重命名的,所以重命名一个文件或文件夹也会造成日志显示停止(如果选择了复制/重命名时停止)在该点。
如果你要查看更多的日志信息,点击,以获取下100个日志信息。如果有需要你可以多次重复这个操作。
这个按钮旁边的是一个多功能按钮,它可以记住上一次你要它进行的操作。点击它上面的箭头,可以看到更多的选项。
如果你要查询指定范围的版本,使用。这会出现一个对话框,要求输入开始和结束的版本。
如果你要查询从最新版本直到版本1的所有的日志消息,使用。
当日志对话框显示后有其他人进行了提交的情况下,可以单击 F5 键来刷新最新的版本。
单击 Ctrl-F5 键来刷新日志缓存。
因为日志对话框从最新版本开始显示日志,而不是从当前工作副本的版本开始。还未被更新至工作副本中的版本的日志消息也经常会显示出来。为了使其更清楚,符合当前工作副本版本的提交信息使用粗体显示。
当你显示文件夹的日志时,高亮的版本是此文件夹中的最高版本,这就需要遍历工作副本。遍历操作在单独的进程中进行,因此不会使显示日志有延迟,但是这样的结果就是高亮也许不会立刻显示出来。
Subversion 1.5 及以后的版本使用属性保留合并记录。关于已合并的修改,我们可以获得更详细的历史。例如,你在分支中开发了一个新特性并且将此分支合并到主干,此特性开发将会以一次合并提交的形式显示在主干的日志中,即使在分支开发中可能有 1000 次提交。
如果你想查看此次提交中有哪些版本被合并的详细信息,选中 包含合并版本。这样将会再次获取日志信息,同时也会插入被合并的版本的日志信息。被合并的版本使用灰色显示,因为它们代表在版本库中不同部分的修改。
当然,合并绝非简单!在分支上进行特性开发过程中,也许不时的会将主干的内容合并至分支使分支保持同步。所以分支的合并历史将会包含其它层次的合并历史。这些不同层次的信息在日志对话框中使用不同的缩进级别显示。
版本属性完全不同于其它的 Subversion 属性。版本属性是关联于版本库中的特定版本号的描述项目,例如日志消息,提交日期和提交者名称(作者)。
有时你可能想要修改你曾经输入的日志消息,也许是因为有拼写错误或是你想改进消息内容,或是其他别的原因。偶尔你还想修改提交者,可能是你忘了设置认证等原因。
Subversion lets you change revision properties any time you want. But since such changes can't be undone (those changes are not versioned) this feature is disabled by default. To make this work, you must set up a pre-revprop-change hook. Please refer to the chapter on Hook Scripts in the Subversion Book for details about how to do that. Read “服务器端钩子脚本”一节 to find some further notes on implementing hooks on a Windows machine.
一旦你按需要为服务器设置了钩子,你就可以使用日志对话框顶部面板的右键菜单来修改任意版本的作者和日志信息(或其它版本属性)了。你也可以使用中间面板的右键菜单编辑日志信息。
警告
由于 Subversion 的版本属性不受版本控制,对于这种属性(如 svn:log提交信息属性)作出的修改将永久覆盖该属性之前的值。
重要
TortoiseSVN保留所有日志信息的缓存。只有在本地安装时用户编辑和日志信息才会显示。其他使用TortoiseSVN 的用户会看到缓存(老)用户和日志信息,除非他们更新了日志缓存。参考“刷新视图”一节
如果你只想要显示上千条日志中你所感兴趣的日志,你可以使用日志对话框顶部的过滤器控件。开始和结束日期控件允许你查看指定日期范围内的输出。查找框帮你查出含有指定内容的信息。
单击查找图标可以选择在哪些信息中查找,并选择 正则表达式 模式。正常情况下你可能只需要进行简单的子字符串查找,但如果你需要更有弹性的查找条件,就可以使用正则表达式。如果将鼠标在文本框上停留一会,就会出现一个工具提示条显示一些如何使用正则表达式功能和子字符串功能的使用帮助。过滤器检查字符串是否与日志内容匹配,并且只有 匹配 过滤字符串的条目才会显示。
Simple sub-string search works in a manner similar to a search engine. Strings to search for are separated by spaces, and all strings must match. You can use a leading - to specify that a particular sub-string is not found (invert matching for that term), and you can use ! at the start of the expression to invert matching for the entire expression. You can use a leading + to specify that a sub-string should be included, even if previously excluded with a -. Note that the order of inclusion/exclusion is significant here. You can use quote marks to surround a string which must contain spaces, and if you want to search for a literal quotation mark you can use two quotation marks together as a self-escaping sequence. Note that the backslash character is not used as an escape character and has no special significance in simple sub-string searches. Examples will make this easier:
Alice Bob -Eve
searches for strings containing both Alice and Bob but not Eve
Alice -Bob +Eve
searches for strings containing both Alice but not Bob, or strings which contain Eve.
-Case +SpecialCase
searches for strings which do not contain Case, but still include strings which contain SpecialCase.
!Alice Bob
searches for strings which do not contain both Alice and Bob
!-Alice -Bob
do you remember De Morgan's theorem? NOT(NOT Alice AND NOT Bob) reduces to (Alice OR Bob).
"Alice and Bob"
searches for the literal expression “Alice and Bob”
""
searches for a double-quote anywhere in the text
"Alice says ""hi"" to Bob"
searches for the literal expression “Alice says "hi" to Bob”.
如何使用正则表达式进行查找超出了本手册的范围,你可以查看在线文档和教程 http://www.regular-expressions.info/。
要注意的是,这些过滤器只对已经获取的信息有效。它们并不从版本库中下载信息。
在底部的面板选中 仅显示影响的路径 复选框可以过滤路径名称。影响的路径就是那些用来显示日志的路径。如果是获取文件夹的日志,就是指文件夹中的或者以下的任何内容。对于文件,就是指该文件。正常情况下,路径列表会显示受本次提交影响的其它路径,但是是灰色的。如果选中该复选框,这些路径就会被隐藏。
有时,工作规范要求日志消息符合一个特定的格式,这就意味着描述修改的文本不能在顶部面板中以简短的摘要形式显示。属性 tsvn:logsummary 可以用于提取日志消息的一部分显示在顶部面板中。参阅 “TortoiseSVN 项目属性”一节 了解如何使用这个属性。
在版本库浏览器中没有日志格式化
Because the formatting depends upon accessing Subversion properties, you will only see the results when using a checked out working copy. Fetching properties remotely is a slow operation, so you will not see this feature in action from the repo browser.
按扭,可以显示一些你感兴趣的关于日志对话框中版本的信息。可以显示已经有几个作者做了工作,他们各提交了几次,按周的统计,等等。现在,你可以发现一个大概情况: 谁最勤快,谁偷懒。;-)
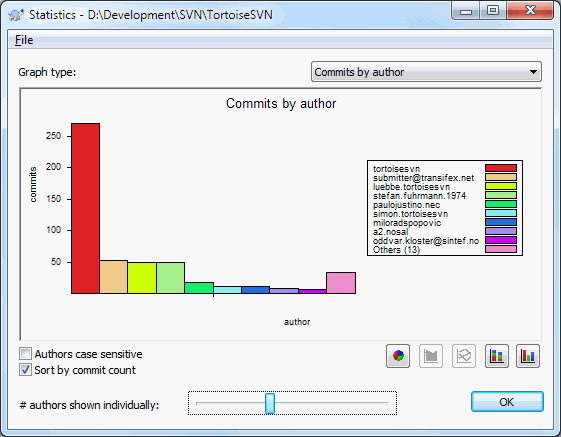
此图用简单柱状图、叠加柱状图或饼图显示了哪些作者已经在项目中活跃了。
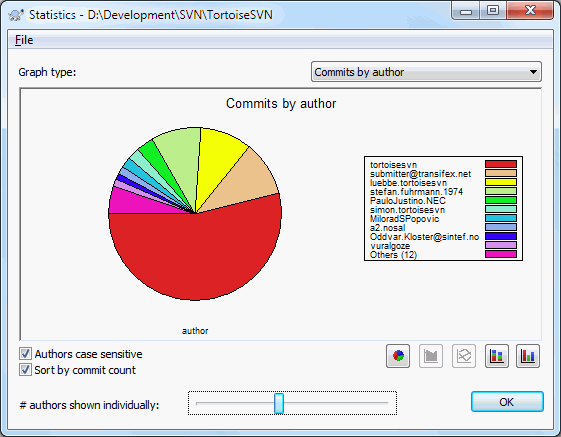
其中有几个主要作者和许多辅助的贡献者。由于太小的部分会导致图形难于阅读,所以在底部有个滑动条,可以设置一个范围(占所有提交的百分比),在这个范围下的所有行为都整合成其他类。
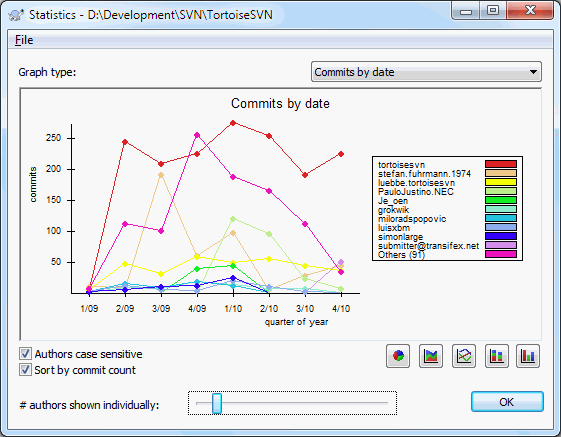
本页图示了以提交次数和作者作为条件的项目行为统计。这里可以看出项目什么时候有人在工作,以及什么人在什么时候进行了工作。
如果有多个作者,你就会在图中看到多行。有两种视图可用正常,在这里,每个作者的行为都相对于基线;叠加,在这里每个作者的行为是相对于他的下面那条线。后一种视图避免了线的交叉,对于图来说更明了,但对查看一个作者的输出比较不直观。
默认统计是区别大小写的,也就是说用户 PeterEgan 与 PeteRegan 被认为是两个不同的作者。但在多数时候用户名并不区别大小写,有时会存在不一致,所以你可能希望 DavidMorgan 和 davidmorgan 能被当成是同一个作者。使用作者区分大小写复选框来控制。
注意,统计只包括了日志对话框中的那段时期。如果日志对话框中只显示一个版本,那么统计就没有什么意义了。
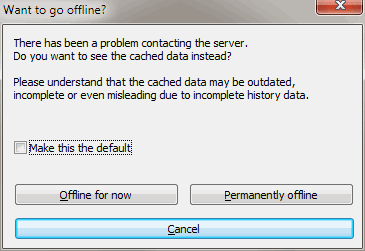
如果服务器不可用,并且你已经启用了日志缓存,那么你可以在离线方式下使用日志对话框和版本图。它使用缓存中的数据,使得你可以继续工作,尽管信息可能不是最新的甚至不完整。
这里你有三个选择:
- 立即离线
使用离线方式完成当前操作,但当下次需要日志数据时重新尝试链接版本库。
- 永久离线
保持离线方式,直到特别要求进行版本库检查。参见 “刷新视图”一节。
- 取消
如果你不想使用失效的数据来继续操作,就取消吧。
选中设为默认值复选框使用你本次的选项作为以后的选择,避免再次显示此对话框。你可以通过 → 修改(或删除)此默认值。