Klien Subversi untuk Windows
Version 1.14
Zaenal Mutaquin
Terjemahan olehThomas Edwin Santosa
Terjemahan olehEvan Allrich
Terjemahan olehEdwin Elisia
Terjemahan oleh2022/09/06 19:53:28 (r29447)
Daftar Isi
- Pendahuluan
- 1. Memulai
- 2. Konsep Dasar Kendali-Versi
- 3. Repositori
- 4. Bimbingan Penggunaan Harian
- General Features
- Mengimpor Data Ke dalam Suatu Repositori
- Melakukan Checkout Copy Pekerjaan
- Mengirimkan Perubahan Anda Ke Repositori
- Memutahirkan Copy Pekerjaan Anda Dengan Perubahan Dari Yang Lain
- Menyelesaikan Konflik
- Mendapatkan Informasi Status
- Daftar Perubahan
- Shelving
- Dialog Log Revisi
- Melihat Perbedaan
- Menambah File Dan Direktori Baru
- Copying/Moving/Renaming Files and Folders
- Mengabaikan File Dan Direktori
- Deleting, Moving and Renaming
- Memulihkan Perubahan
- Membersihkan
- Seting Proyek
- External Items
- Pencabangan / Pembuatan Tag
- Penggabungan
- Penguncian
- Membuat dan Menerapkan Patch
- Siapa Yang Mengubah Baris Mana?
- Browser Repositori
- Grafik Revisi
- Mengekspor suatu Copy Pekerjaan Subversion
- Merelokasi copy pekerjaan
- Integration with Bug Tracking Systems / Issue Trackers
- Integrasi dengan Pelihat Repositori Berbasis Web
- Seting TortoiseSVN
- Langkah terakhir
- 5. Project Monitor
- 6. Program SubWCRev
- 7. IBugtraqProvider interface
- A. Pertanyaan Sering Diajukan (FAQ)
- B. Bagaimana Saya...
- Memindahkan/copy banyak file sekaligus
- Memaksa pengguna untuk memasukan log pesan
- Mutahirkan file dari repositori
- Roll back (Undo) revisions in the repository
- Compare two revisions of a file or folder
- Sertakan sub-proyek umum
- Membuat jalan pintas ke repositori
- Abaikan file yang sudah diversi
- Unversion a working copy
- Remove a working copy
- C. Saran-Saran yang Berguna untuk Administrator
- D. Mengotomasi TortoiseSVN
- E. Referensi Silang Interface Baris Perintah
- Konvensi dan Aturan Dasar
- Perintah TortoiseSVN
- Checkout
- Mutahirkan
- Mutahirkan ke Revisi
- Komit
- Diff
- Tampilkan Log
- Periksa Modifikasi
- Grafik Revisi
- Repo Browser
- Edit Konflik
- Diselesaikan
- Ganti nama
- Hapus
- Pulihkan
- Membersihkan
- Dapatkan Kunci
- Lepaskan Kunci
- Cabang/Tag
- Saklar
- Gabung
- Ekspor
- Relokasi
- Buat Repositori Disini
- Tambah
- Impor
- Blame
- Tambah ke Daftar Abaikan
- Buat Patch
- Terapkan Patch
- F. Implementation Details
- G. Language Packs and Spell Checkers
- Daftar Kata
- Indeks
Daftar Gambar
- 1.1. Menu TortoiseSVN untuk folder tidak berversi
- 1.2. Dialog Impor
- 1.3. File Difference Viewer
- 1.4. The Log Dialog
- 2.1. Sistem Klien/Server Umum
- 2.2. Masalah yang Dihindari
- 2.3. Solusi Kunci-Ubah-Buka Kunci
- 2.4. Solusi Copy-Ubah-Gabung
- 2.5. ...Copy-Ubah-Gabung Lanjutan
- 2.6. Sistem File Repositori
- 2.7. Repositori
- 3.1. Menu TortoiseSVN untuk folder tidak berversi
- 4.1. Explorer menampilkan lapisan ikon
- 4.2. Menu konteks untuk direktori dibawah kontrol versi
- 4.3. Menu file Explorer untuk jalan pintas dalam folder berversi
- 4.4. Menu drag kanan untuk direktori dibawah kontrol versi
- 4.5. Dialog Otentikasi
- 4.6. Dialog Impor
- 4.7. Dialog Checkout
- 4.8. Dialog Komit
- 4.9. Pemeriksa Ejaan Dialog Komit
- 4.10. Dialog Progres menampilkan komit dalam proses
- 4.11. Dialog Progres menampilkan pemutahiran yang sudah selesai
- 4.12. Explorer menampilkan lapisan ikon
- 4.13. Halaman properti Explorer, tab Subversion
- 4.14. Periksa Modifikasi
- 4.15. Dialog Komit dengan Daftar Perubahan
- 4.16. Shelve dialog
- 4.17. Unshelve dialog
- 4.18. Dialog Log Revisi
- 4.19. Pane Atas Dialog Log Revisi dengan Menu Konteks
- 4.20. The Code Collaborator Settings Dialog
- 4.21. Menu Konteks Pane Atas untuk 2 Revisi yang Dipilih
- 4.22. Pane Bawah Dialog Log dengan Menu Konteks
- 4.23. The Log Dialog Bottom Pane with Context Menu When Multiple Files Selected.
- 4.24. The Log Dialog Showing Merge Tracking Revisions
- 4.25. Histogram Komit-per-Pembuat
- 4.26. Pie Chart Komit-per-Pembuat
- 4.27. Grafik Komit-Menurut-Tanggal
- 4.28. Go Offline Dialog
- 4.29. Dialog Pembandingan Revisi-Revisi
- 4.30. Peninjau perbedaan gambar
- 4.31. Menu konteks Explorer untuk file tidak berversi
- 4.32. Menu drag kanan untuk direktori dibawah kontrol versi
- 4.33. Menu konteks Explorer untuk file tidak berversi
- 4.34. Menu konteks Explorer untuk file berversi
- 4.35. Dialog Pulihkan
- 4.36. The Cleanup dialog
- 4.37. Halaman properti Subversion
- 4.38. Menambah properti
- 4.39. Property dialog for hook scripts
- 4.40. Property dialog boolean user types
- 4.41. Property dialog state user types
- 4.42. Property dialog single-line user types
- 4.43. Property dialog multi-line user types
- 4.44. svn:externals property page
- 4.45. svn:keywords property page
- 4.46. svn:eol-style property page
- 4.47. tsvn:bugtraq property page
- 4.48. Size of log messages property page
- 4.49. Language property page
- 4.50. svn:mime-type property page
- 4.51. svn:needs-lock property page
- 4.52. svn:executable property page
- 4.53. Property dialog merge log message templates
- 4.54. Dialog Cabang/Tag
- 4.55. Dialog Tukar
- 4.56. The Merge Wizard - Select Revision Range
- 4.57. The Merge Wizard - Tree Merge
- 4.58. The Merge Conflict Dialog
- 4.59. The Merge Tree Conflict Dialog
- 4.60. The Merge-All Dialog
- 4.61. Dialog Penguncian
- 4.62. Dialog Pemeriksaan Modifikasi
- 4.63. Dialog Buat Patch
- 4.64. Dialog Anotasi / Blame
- 4.65. TortoiseBlame
- 4.66. Browser Repositori
- 4.67. Grafik Revisi
- 4.68. Dialog Ekspor-dari-URL
- 4.69. Dialog Relokasi
- 4.70. The Bugtraq Properties Dialog
- 4.71. Example issue tracker query dialog
- 4.72. Dialog Seting, Halaman Umum
- 4.73. The Settings Dialog, Context Menu Page
- 4.74. Dialog Setting, Dialog 1 Halaman
- 4.75. Dialog Seting, Halaman Dialog 2
- 4.76. The Settings Dialog, Dialogs 3 Page
- 4.77. Dialog Seting, Halaman Warna
- 4.78. The Settings Dialog, Revision Graph Page
- 4.79. The Settings Dialog, Revision Graph Colors Page
- 4.80. The Settings Dialog, Icon Overlays Page
- 4.81. HDialog Seting, Halaman Set Ikon
- 4.82. The Settings Dialog, Icon Handlers Page
- 4.83. Dialog Seting, Halaman Jaringan
- 4.84. Dialog Seting, Halaman Peninjau Diff
- 4.85. Dialog Seting, Dialog Lanjutan Diff/Merge
- 4.86. Dialog Seting, Halaman Data Tersimpan
- 4.87. The Settings Dialog, Log Cache Page
- 4.88. The Settings Dialog, Log Cache Statistics
- 4.89. Dialog Seting, Halaman Naskah Hook
- 4.90. Dialog Seting, Konfigurasi Naskah Hook
- 4.91. The Settings Dialog, Issue Tracker Integration Page
- 4.92. The Settings Dialog, TortoiseBlame Page
- 4.93. The Settings Dialog, TortoiseUDiff Page
- 4.94. The Settings Dialog, Sync Page
- 4.95. Taskbar with default grouping
- 4.96. Taskbar with repository grouping
- 4.97. Taskbar with repository grouping
- 4.98. Taskbar grouping with repository color overlays
- 5.1. The edit project dialog of the project monitor
- 5.2. The main dialog of the project monitor
- B.1. The TortoiseSVN right drag context menu for moving files
- C.1. The commit dialog, showing the upgrade notification
Daftar Tabel
- 2.1. URL Akses Repositori
- 4.1. Pinned Revision
- 6.1. Daftar saklar baris perintah yang tersedia
- 6.2. List of SubWCRev error codes
- 6.3. List of available keywords
- 6.4. COM/automation methods supported
- C.1. Menu entries and their values
- D.1. Daftar perintah dan opsi yang tersedia
- D.2. Daftar opsi yang tersedia
- D.3. Daftar opsi yang tersedia
Daftar Isi
Kontrol versi adalah seni dalam pengaturan perubahan informasi. Merupakan piranti kritis bagi para programmer sejak lama, yang pada umumnya meluangkan waktu membuat beberapa perubahan kecil pada perangkat lunak lalu membatalkan atau memeriksa beberapa dari perubahan itu di hari-hari berikutnya. Bayangkan satu tim dari para pengembang itu bekerja secara bersamaan - dan mungkin bahkan secara simultan pada file yang sama! - Anda dapat melihat mengapa sistem yang baik diperlukan untuk meminimasi potensi kekacauan.
TortoiseSVN is a free open-source Windows client for the Apache™ Subversion® version control system. That is, TortoiseSVN manages files and directories over time. Files are stored in a central repository. The repository is much like an ordinary file server, except that it remembers every change ever made to your files and directories. This allows you to recover older versions of your files and examine the history of how and when your data changed, and who changed it. This is why many people think of Subversion and version control systems in general as a sort of “time machine”.
Beberapa sistem kontrol versi juga merupakan sistem manajemen konfigurasi perangkat lunak (SCM). Sistem ini terutama dibuat untuk mengatur susunan dari kode sumber, dan mempunyai banyak fitur yang khusus ke pengembangan perangkat lunak - seperti pengertian alami bahasa pemrograman, atau piranti penyediaan untuk pembangunan software. Subversion, bagaimanapun, bukan salah satu dari sistem ini; ia adalah sistem umum yang bisa digunakan untuk mengatur setiap koleksi file, termasuk kode sumber.
Apa yang membuat TortoiseSVN menjadi klien Subversion yang baik? Ini adalah daftar singkat dari fitur.
- Integrasi Shell
TortoiseSVN terintegrasi sepenuhnya dengan shell Windows (contohnya. explorer). Ini berarti bahwa anda dapat tetap bekerja menggunakan piranti yang biasa anda gunakan. Anda tidak perlu beralih ke aplikasi lain untuk menggunakan fungsi kontrol versi tersebut.
Bahkan anda tidak dibatasi hanya dengan Windows Explorer. TortoiseSVN dapat bekerja dengan banyak aplikasi pengaturan file lain, termasuk dengan dialog Arsip/Buka yang umum pada aplikasi standar Windows. Bagaimanapun juga, anda harus ingat bahwa TortoiseSVN sengaja dikembangkan sebagai tambahan dalam Windows Explorer. Karena itu ada kemungkinan dalam aplikasi pengaturan file yang lain integrasi tersebut tidak berjalan seperti dalam Windows Explorer. Misalnya ikon tidak muncul.
- Lapisan ikon
Status dari setiap file dan folder berversi ditunjukan oleh lapisan ikon kecil. Dengan cara itu Anda bisa melihat dengan cepat bagaimana status dari copy pekerjaan Anda.
- Tampilan Grafis Pengguna
Ketika Anda sedang melihat daftar perubahan terhadap file atau folder, Anda dapat mengklik pada revisi untuk melihat komentar untuk komit tersebut. Anda juga dapat melihat daftar file yang diubah - cukup klik ganda pada file untuk melihat secara tepat apa yang berubah.
Dialog komit menunjukkan daftar semua item yang akan dimasukkan dalam komit, dan masing-masing item memiliki kotak centang sehingga Anda dapat memilih item yang ingin Anda sertakan. File tidak berversi juga ditunjukkan dlm daftar ini, kalau saja Anda lupa untuk menambahkan file baru tersebut.
- Akses mudah ke perintah Subversion
Semua perintah Subversion tersedia dari menu konteks explorer. TortoiseSVN menambahkannya sendiri submenu disana.
Karena TortoiseSVN adalah klien Subversion, kami juga ingin memperlihatkan kepada Anda beberapa fitur Subversion sendiri:
- Pembuatan versi direktori
CVS hanya melacak histori dari file individual, tapi Subversion mengimplementasikan sistem file berversi “virtual” yang melacak perubahan ke seluruh susunan direktori terus menerus. File dan direktori diversikan. Walhasil, ada perintah sisi-klien nyata memindahkan dan mengcopy yang beroperasi pada file dan direktori.
- Komit atomis
Komit pergi ke repositori sepenuhnya, atau tidak sama sekali. Ini membolehkan para pengembang untu mengkonstruksi dan mengkomit perubahan sebagai potongan logikal.
- Metadata berversi
Setiap file dan direktori mempunyai set “properti” tidak terlihat yang dilampirkan. Anda bisa menciptakan dan menyimpan setiap pasangan kunci/nilai semau yang Anda inginkan. Properti diversi terus menerus, seperti halnya isi file.
- Pilihan lapisan jaringan
Subversion mempunyai pengertian abstrak dari akses repositori, membuatnya mudah bagi orang untuk mengimplementasikan mekanisme jaringan baru. Server jaringan “tingkat lanjut” Subversion adalah modul untuk server web Apache, yang berbicara varian HTTP yang disebut WebDAV/DeltaV. Ini memberikan keuntungan besar untuk Subversion dalam stabilitas dan interoperabilitas, dan menyediakan berbagai fitur kunci bebas: otentikasi, otorisasi, kompresi sambungan, dan melihat repositori, sebagai contoh. Proses server Subversion sendiri yang lebih kecil juga tersedia. Server ini menggunakan protokol bebas yang bisa dilintasi dengan mudah melalui ssh.
- Penanganan data konsisten
Subversion memperlihatkan perbedaan file menggunakan algoritma pembedaan biner, yang bekerja secara identik pada file teks (bisa dibaca-manusia) dan biner (tidak bisa dibaca-manusia). Kedua tipe file disimpan secara sama dipadatkan dalam repositori, dan perbedaan dikirimkan dalam kedua arah melintasi jaringan.
- Pembuatan cabang dan tag secara efisien
Biaya pencabangan dan tag tidak perlu proporsional pada besarnya proyek. Subversion membuat cabang dan tag dengan cukup mengcopy proyek, menggunakan mekanisme mirip dengan link-kasar. Selanjutnya operasi ini hanya memerlukan waktu hanya sebentar, dan ruang sangat kecil dalam repositori.
TortoiseSVN adalah sebuah proyek open source yang dikembangkan di bawah GNU General Public License (GPL). Sehingga TortoiseSVN ini bebas untuk di download dan digunakan, baik secara pribadi atau komersial, di komputer manapun juga.
Although most people just download the installer, you also have full read access to the source code of this program. You can browse it on this link https://osdn.net/projects/tortoisesvn/scm/svn/. The current development line is located under /trunk/, and the released versions are located under /tags/.
TortoiseSVN dan Subversion dikembangkan oleh komunitas orang-orang yang bekerja pada proyek itu. Mereka berasal dari berbagai negara di seluruh dunia dan bekerjasama untuk menciptakan program yang hebat.
Pada tahun 2002. Tim Kemp menemukan bahwa Subversion adalah sistem kendali versi, tapi masih buruk dalam hal GUI klien. Ide dari Subversion klien sebagai integrasi dari shell Windows yang terinspirasi dari klien yang sama pada CVS bernama TortoiseCVS. Tim mempelajari kode sumber yang ada pada TortoiseCVS dan menggunakannya sebagai dasar dari TortoiseSVN. Beliau kemudian memulai proyeknya, mendaftarkan domain tortoisesvn.org dan meletakkan kode sumber itu secara online.
Pada saat itu, Stefan Küng sedang mencari sistem kontrol versi yang baik serta bebas dan Subversion pun ditemukan berikut sumber untuk TortoiseSVN. Karena TortoiseSVN masih belum siap untuk digunakan, ia bergabung dengan proyek ini dan mulai pemrograman. Dia segera menulis ulang sebagian besar kode yang sudah ada dan mulai menambahkan perintah dan fitur, sampai ke titik di mana tidak ada dari kode asli yang tersisa.
Setelah Subversion lebih stabil dan menarik lebih banyak lagi pengguna yang juga mulai menggunakan TortoiseSVN sebagai klien Subversion mereka. Basis pengguna tumbuh dengan cepat (dan tetap berkembang tiap harinya). Saat itulah Lübbe Onken menawarkan untuk membantu dengan beberapa ikon yang bagus dan sebuah logo untuk TortoiseSVN. Sekarang beliau meemelihara dan mengatur banyak sekali terjemahan.
With time, other version control systems all got their own Tortoise client which caused a problem with the icon overlays in Explorer: the number of such overlays is limited and even one Tortoise client can easily exceed that limit. That's when Stefan Küng implemented the TortoiseOverlays component which allows all Tortoise clients to use the same icon overlays. Now all open source Tortoise clients and even some non-Tortoise clients use that shared component.
- Tim Kemp
atas dimulainya proyek TortoiseSVN
- Stefan Küng
untuk kerja kerasnya dalam TortoiseSVN hingga menjadi seperti yang sekarang ini, dan kepemimpinannnya dalam proyek
- Lübbe Onken
ikon-ikon, logo, pencarian bug, penterjemahan dan mengelola terjemahan
- Simon Large
untuk memelihara dokumentasi
- Stefan Fuhrmann
untuk log cache dan revisi grafik
- Buku Subversion
untuk pengenalan yang baik pada Subversion dan bab 2 yang kami salin ke sini
- Proyek Gaya Tigris
untuk beberapa gaya yang digunakan kembali dalam dokumentasi ini
- Kontributor Kami
untuk patch, laporan bug dan ide-ide baru, dan untuk pertolongannya pada yang lain dengan menjawab pertanyaan-pertanyaan pada milis kami
- Donatur Kami
untuk banyak jam kesenangan dengan musik yang mereka kirimkan kepada kami
Buku ini ditulis sebagai literatur komputer bagi para sahabat yang ingin menggunakan Subversion untuk mengelola data mereka, tapi lebih nyaman dengan menggunakan klien GUI daripada menggunakan klien baris perintah. TortoiseSVN adalah ekstensi ehell windows dan diasumsikan bahwa para penggunanya sudah lebih mengenal windows explorer dan tahu bagaimana menggunakannya.
Pendahuluan ini menjelaskan apa sebenarnya TortoiseSVN itu, sedikit mengenai proyek TortoiseSVN dan orang-orang dalam komunitas yang menggunakannya, dan lisensi untuk menggunakannya dan mendistribusikannya
Pada Bab 1, Memulai menjelaskan bagaimana cara memasang TortoiseSVN pada PC anda, dan bagaimana cara memulai untuk menggunakannya secara langsung.
Dalam Bab 2, Konsep Dasar Kendali-Versi kami memberikan pengenalan ringkas pada sistem kontrol versi Subversion yang mendasari TortoiseSVN. Ini dipinjam dari dokumentasi untuk proyek Subversion dan menjelaskan pendekatan-pendekatan berbeda terhadap kontrol versi, dan bagaimana Subversion bekerja.
The chapter on Bab 3, Repositori explains how to set up a local repository, which is useful for testing Subversion and TortoiseSVN using a single PC. It also explains a bit about repository administration which is also relevant to repositories located on a server.
Bab 4, Bimbingan Penggunaan Harian adalah bagian paling penting karena menjelaskan semua fitur utama TortoiseSVN dan bagaimana menggunakannya. Bagian itu berbentuk tutorial, bermula dengan check out salinan bekerja, mengubahnya, mengkomit perubahan Anda, dll. Bagian itu kemudian berlanjut ke topik lebih lanjut.
The Bab 5, Project Monitor explains how you can monitor your Subversion projects so you don't miss important commits from your other team members.
Bab 6, Program SubWCRev adalah program terpisah yang disertakan dengan TortoiseSVN yang bisa mengurai informasi dari salinan bekerja Anda dan menulisnya ke dalam file. Ini berguna untuk memasukkan informasi pembangunan dalam proyek-proyek Anda.
Bagian Lampiran B, Bagaimana Saya... menjawab beberapa pertanyaan umum tentang melakukan tugas yang tidak dicakup secara eksplisit di tempat lain.
Pada bagian Lampiran D, Mengotomasi TortoiseSVN memperlihatkan bagaimana dialog GUI TortoiseSVN bisa dipanggil dari baris perintah. Hal ini berguna untuk penulisan dimana anda masih memerlukan interaksi pengguna.
The Lampiran E, Referensi Silang Interface Baris Perintah give a correlation between TortoiseSVN commands and their equivalents in the Subversion command line client svn.exe.
Untuk memudahkan pembacaan dokumen, nama dari semua layar dan Menu dari TortoiseSVN ditandai dalam font yang bebeda. Contohnya Dialog Log.
Pilihan menu ditunjukan dengan panah. → berarti: pilih Tampilkan Log dari menu konteks TortoiseSVN.
Di mana menu konteks lokal muncul dalam salah satu dialog TortoiseSVN, ditampilkan seperti ini: →
Tombol Interface Pengguna ditunjukan seperti ini: Tekan untuk melanjutkan.
Aksi Pengguna ditandai menggunakan font tebal. ALT+A: tekan Tombol-ALT pada keyboard Anda dan sementara menekannya tekan juga Tombol-A. Seret-kanan: tekan tombol kanan mouse dan sementara menekannya seret item ke lokasi baru.
Keluaran sistem dan masukan keyboard ditunjukkan dengan huruf berbeda juga.
Penting
Catatan penting ditandai dengan ikon.
Tip
Petunjuk yang memudahkan hidup Anda.
Perhatian
Tempat di mana Anda harus berhati-hati dengan apa yang Anda kerjakan.
Awas
Dimana penanganan ekstrem seharusnya diambil. Data yang korup atau hal buruk yang lainnya mungkin terjadi bila peringatan ini diabaikan.
 |
Daftar Isi
Bagian ini ditujukan kepara orang-orang yang ingin mencari tahu apa sebenarnya TortoiseSVN dan ingin mencobanya. Bagian ini menjelaskan bagaimana cara menginstal TortoiseSVN dan mengatur repositori lokal, juga menuntun anda melalui operasi yang paling umum digunakan.
TortoiseSVN runs on Windows Vista or higher and is available in both 32-bit and 64-bit flavours. The installer for 64-bit Windows also includes the 32-bit extension parts. Which means you don't need to install the 32-bit version separately to get the TortoiseSVN context menu and overlays in 32-bit applications.
Support for Windows 98, Windows ME and Windows NT4 was dropped in version 1.2.0, and Windows 2000 and XP up to SP2 support was dropped in 1.7.0. Support for Windows XP with SP3 was dropped in 1.9.0. You can still download and install older versions if you need them.
TortoiseSVN hadir dengan instalatur yang mudah digunakan. Klik ganda pada file instalatur dan ikuti petunjuknya. Instalatur akan mengurus sisanya. Jangan lupa untuk reboot setelah instalasi.
Penting
You need Administrator privileges to install TortoiseSVN. The installer will ask you for Administrator credentials if necessary.
Paket bahasa tersedia sesuai terjemahan antarmuka pengguna TortoiseSVN ke dalam berbagai bahasa. Silahkan periksa Lampiran G, Language Packs and Spell Checkers untuk informasi lebih lanjut tentang cara memasang ini.
If you encounter any problems during or after installing TortoiseSVN please refer to our online FAQ at https://tortoisesvn.net/faq.html.
Before we get stuck into working with some real files, it is important to get an overview of how Subversion works and the terms that are used.
- Repositori
Subversion menggunakan database pusat yang berisi semua file yang dikendalikan oleh versi dengan sejarah lengkap mereka. Database ini disebut sebagai repositori. Repositori biasanya hidup pada file server yang menjalankan program server Subversion, yang memasok konten untuk klien Subversion (seperti TortoiseSVN) berdasarkan permintaan. Jika Anda hanya membuat satu cadangan, buatlah cadangan repositori Anda seakan-akan itu adalah cadangan utama definitif atas semua data Anda.
- Working Copy (Copy Pekerjaan)
Ini adalah dimana Anda melakukan pekerjaan nyata. Setiap pengembang memiliki salinan bekerja sendiri, kadang-kadang dikenal sebagai sandbox, pada PC lokal nya. Anda dapat mengunduh versi terbaru dari repositori, bekerja di dalamnya secara lokal tanpa mempengaruhi orang lain, maka ketika Anda puas dengan perubahan yang Anda buat masukkan mereka kembali ke repositori.
A Subversion working copy does not contain the history of the project, but it does keep a copy of the files as they exist in the repository before you started making changes. This means that it is easy to check exactly what changes you have made.
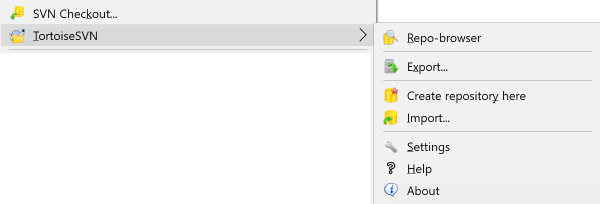
You also need to know where to find TortoiseSVN because there is not much to see from the Start Menu. This is because TortoiseSVN is a Shell extension, so first of all, start Windows Explorer. Right click on a folder in Explorer and you should see some new entries in the context menu like this:
This section shows you how to try out some of the most commonly used features on a small test repository. Naturally it doesn't explain everything - this is just the Quick Start Guide after all. Once you are up and running you should take the time to read the rest of this user guide, which takes you through things in much more detail. It also explains more about setting up a proper Subversion server.
For a real project you will have a repository set up somewhere safe and a Subversion server to control it. For the purposes of this tutorial we are going to use Subversion's local repository feature which allows direct access to a repository created on your hard drive without needing a server at all.
First create a new empty directory on your PC. It can go anywhere, but in this tutorial we are going to call it C:\svn_repos. Now right click on the new folder and from the context menu choose → . The repository is then created inside the folder, ready for you to use. We will also create the default internal folder structure by clicking the button.
Penting
The local repository feature is very useful for test and evaluation but unless you are working as a sole developer on one PC you should always use a proper Subversion server. It is tempting in a small company to avoid the work of setting up a server and just access your repository on a network share. Don't ever do that. You will lose data. Read bagian bernama “Accessing a Repository on a Network Share” to find out why this is a bad idea, and how to set up a server.
Now we have a repository, but it is completely empty at the moment. Let's assume I have a set of files in C:\Projects\Widget1 that I would like to add. Navigate to the Widget1 folder in Explorer and right click on it. Now select → which brings up a dialog
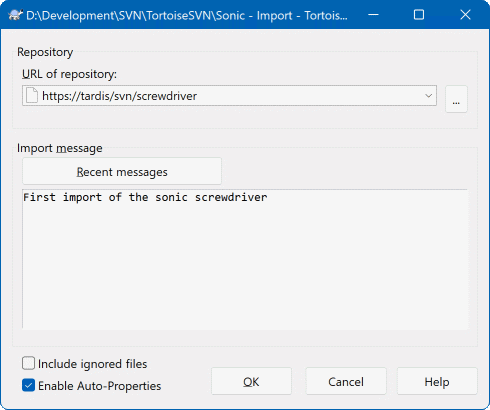
A Subversion repository is referred to by URL, which allows us to specify a repository anywhere on the Internet. In this case we need to point to our own local repository which has a URL of file:///c:/svn_repos/trunk, and to which we add our own project name Widget1. Note that there are 3 slashes after file: and that forward slashes are used throughout.
The other important feature of this dialog is the Import Message box which allows you to enter a message describing what you are doing. When you come to look through your project history, these commit messages are a valuable guide to what changes have been made and why. In this case we can say something simple like “Import the Widget1 project”. Click on and the folder is added to your repository.
Now that we have a project in our repository, we need to create a working copy to use for day-to-day work. Note that the act of importing a folder does not automatically turn that folder into a working copy. The Subversion term for creating a fresh working copy is Checkout. We are going to checkout the Widget1 folder of our repository into a development folder on the PC called C:\Projects\Widget1-Dev. Create that folder, then right click on it and select → . Then enter the URL to checkout, in this case file:///c:/svn_repos/trunk/Widget1 and click on . Our development folder is then populated with files from the repository.
Penting
In the default setting, the checkout menu item is not located in the TortoiseSVN submenu but is shown at the top explorer menu. TortoiseSVN commands that are not in the submenu have SVN prepended:
You will notice that the appearance of this folder is different from our original folder. Every file has a green check mark in the bottom left corner. These are TortoiseSVN's status icons which are only present in a working copy. The green state indicates that the file is unchanged from the version in the repository.
Time to get to work. In the Widget1-Dev folder we start editing files - let's say we make changes to Widget1.c and ReadMe.txt. Notice that the icon overlays on these files have now changed to red, indicating that changes have been made locally.
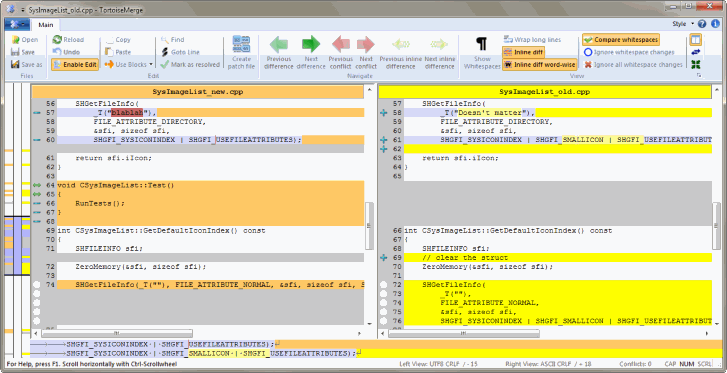
But what are the changes? Right click on one of the changed files and select → . TortoiseSVN's file compare tool starts, showing you exactly which lines have changed.
OK, so we are happy with the changes, let's update the repository. This action is referred to as a Commit of the changes. Right click on the Widget1-Dev folder and select → . The commit dialog lists the changed files, each with a checkbox. You might want to choose only a subset of those files, but in this case we are going to commit the changes to both files. Enter up a message to describe what the change is all about and click on . The progress dialog shows the files being uploaded to the repository and you're done.
As the project develops you will need to add new files - let's say you add some new features in Extras.c and add a reference in the existing Makefile. Right click on the folder and → . The Add dialog now shows you all unversioned files and you can select which ones you want to add. Another way of adding files would be to right click on the file itself and select → .
Now when you go to commit the folder, the new file shows up as Added and the existing file as Modified. Note that you can double click on the modified file to check exactly what changes were made.
One of the most useful features of TortoiseSVN is the Log dialog. This shows you a list of all the commits you made to a file or folder, and shows those detailed commit messages that you entered (you did enter a commit message as suggested? If not, now you see why this is important).
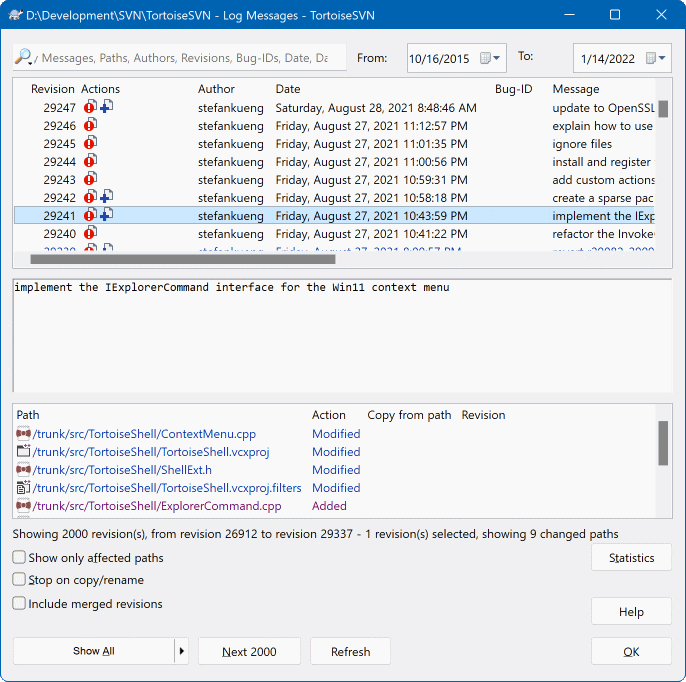
OK, so I cheated a little here and used a screenshot from the TortoiseSVN repository.
The top pane shows a list of revisions committed along with the start of the commit message. If you select one of these revisions, the middle pane will show the full log message for that revision and the bottom pane will show a list of changed files and folders.
Each of these panes has a context menu which provides you with lots more ways of using the information. In the bottom pane you can double click on a file to see exactly what changes were made in that revision. Read bagian bernama “Dialog Log Revisi” to get the full story.
One feature of all revision control systems is that they let you undo changes that you made previously. As you would expect, TortoiseSVN makes this easy to access.
If you want to get rid of changes that you have not yet committed and reset your file to the way it was before you started editing, → is your friend. This discards your changes (to the Recycle bin, just in case) and reverts to the committed version you started with. If you want to get rid of just some of the changes, you can use TortoiseMerge to view the differences and selectively revert changed lines.
If you want to undo the effects of a particular revision, start with the Log dialog and find the offending revision. Select → and those changes will be undone.
This guide has given you a very quick tour of some of TortoiseSVN's most important and useful features, but of course there is far more that we haven't covered. We strongly recommend that you take the time to read the rest of this manual, especially Bab 4, Bimbingan Penggunaan Harian which gives you a lot more detail on day-to-day operations.
We have taken a lot of trouble to make sure that it is both informative and easy to read, but we recognise that there is a lot of it! Take your time and don't be afraid to try things out on a test repository as you go along. The best way to learn is by using it.
Daftar Isi
Bab ini adalah versi bab yang sama dalam buku Subversion dengan sedikit modifikasi. Versi daring dari buku Subversion tersedia di sini: http://svnbook.red-bean.com/.
Bab ini adalah pengenalan pendek dan kasual terhadap Subversion. Jika Anda baru mengenal kontrol versi, bab ini benar-benar untuk Anda. Kami mulai dengan diskusi konsep kontrol versi umum, bekerja dengan cara kami ke dalam ide spesifik di belakang Subversion, dan memperlihatkan contoh sederhana dari penggunaan Subversion.
Meskipun contoh dalam bab ini memperlihatkan orang berbagi koleksi kode sumber program, harap diingat bahwa Subversion bisa mengatur apapun dari koleksi file - tidak terbatas menolong pemrogram komputer.
Subversion adalah sistem terpusat untuk membagi informasi. Pada intinya ada repositori, yang merupakan pusat penyimpanan data. Repositori menyimpan informasi dalam bentuk susunan sistem file - hirarki umum dari file dan direktori. Beberapa klien tersambung ke repositori, dan kemudian membaca atau menulis ke file ini. Dengan penulisan data, klien membuat informasi tersedia bagi yang lain; dengan membaca data, klien menerima informasi dari yang lain.
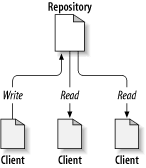
Lalu mengapa ini menarik? Sampai sekarang, ini seperti definisi dari file server secara umum. Dan benar, repositori adalah sejenis file server, tapi bukan seperti yang Anda bayangkan. Apa yang membuat repositori Subversion istimewa adalah bahwa ia mengingat setiap perubahan yang pernah dituliskan: setiap perubahan ke setiap file, dan bahkan perubahan ke susunan direktori itu sendiri, seperti penambahan, penghapusan, dan pengaturan ulang dari file serta direktori.
When a client reads data from the repository, it normally sees only the latest version of the filesystem tree. But the client also has the ability to view previous states of the filesystem. For example, a client can ask historical questions like, “ what did this directory contain last Wednesday? ”, or “ who was the last person to change this file, and what changes did they make? ” These are the sorts of questions that are at the heart of any version control system: systems that are designed to record and track changes to data over time.
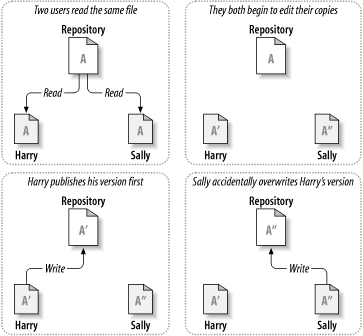
Semua sistem kontrol versi harus masalah fundamental yang sama: bagaimana sistem akan membolehkan pengguna untuk berbagi informasi, tapi menjaganya dari saling injak secara tidak sengaja? Semua ini terlalu mudah bagi pengguna untuk menulis ulang perubahan dalam repositori secara tidak sengaja.
Pertimbangkan skenario ini: anggap kami mempunyai dua teman kerja, Harry dan Sally. Mereka masing-masing memutuskan untuk mengedit file pada repositori yang sama pada saat yang sama. Jika Harry menyimpan ke repositori lebih dulu, lalu mungkin saja (beberapa waktu kemudian) Sally bisa menimpanya dengan file tulisan versi barunya sendiri secara tidak sengaja. Sementara versi file Harry tidak akan hilang selamanya (karena sistem mengingat setiap perubahan), setiap perubahan yang dibuat Harry tidak akan ada dalam versi file terbaru Sally, karena ia tidak pernah melihat perubahan Harry untuk dimulainya. Pekerjaan Harry masih secara efektif hilang - atau setidaknya hilang dari versi file terbaru dan mungkin karena kecelakaan. Ini betul-betul situasi yang ingin kami hindari!
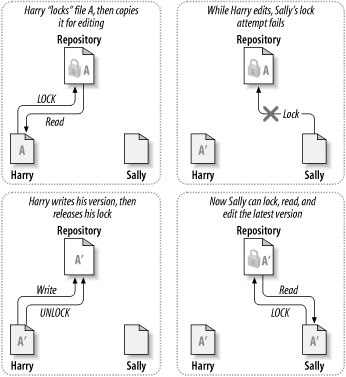
Many version control systems use a lock-modify-unlock model to address this problem, which is a very simple solution. In such a system, the repository allows only one person to change a file at a time. First Harry must lock the file before he can begin making changes to it. Locking a file is a lot like borrowing a book from the library; if Harry has locked a file, then Sally cannot make any changes to it. If she tries to lock the file, the repository will deny the request. All she can do is read the file, and wait for Harry to finish his changes and release his lock. After Harry unlocks the file, his turn is over, and now Sally can take her turn by locking and editing.
Masalah dengan model kunci-ubah-buka kunci adalah bahwa itu sedikit membatasi, dan sering menjadi halangan bagi pengguna:
Mengunci bisa menyebabkan masalah administratif. Kadang-kadang Harry akan mengunci file dan melupakannya. Sementara itu, karena Sally masih menunggu untuk mengedit file, tangannya terikat. Dan kemudian Harry pergi berlibur. Sekarang Sally harus mendapatkan administrator untuk melepaskan kunci Harry. Situasi berakhir menyebabkan penangguhan yang tidak perlu dan buang-buang waktu.
Mengunci bisa menyebabkan serialisasi yang tidak perlu. Bagaimana jika Harry sedang mengedit awal file teks, dan Sally ingin mengedit akhir dari file yang sama? Ini bukan waktu yang bersamaan sama sekali. Mereka bisa dengan mudah mengedit file secara simultan, dan tidak ada kerusakan besar akan terjadi, dengan asumsi perubahan digabung dengan benar. Tidak perlu mereka mengambil giliran dalam situasi ini.
Mengunci bisa membuat rasa aman yang salah. Anggap bahwa Harry mengunci dan mengedit file A, sementara Sally mengunci dan mengedit file B secara simultan. Tapi anggap bahwa A dan B tergantung pada satu yang lain, dan perubahan yang dibuat ke masing-masing secara semantik tidak sama. Tiba-tiba A dan B tidak bekerja sama lagi. Sistem penguncian tidak berdaya untuk mencegah masalah tersebut - lagipula karena suatu alasan, solusi ini memberikan rasa aman yang salah. Adalah mudah bagi Harry dan Sally untuk membayangkan bahwa dengan mengunci file, masing-masing memulai tugas yang aman dan terinsulasi, dan lalu mencegah mereka mendiskusikan perbedaan-perbedaan yang tidak kompatibel secara dini.
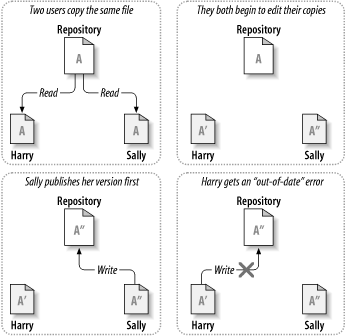
Subversion, CVS, and other version control systems use a copy-modify-merge model as an alternative to locking. In this model, each user's client reads the repository and creates a personal working copy of the file or project. Users then work in parallel, modifying their private copies. Finally, the private copies are merged together into a new, final version. The version control system often assists with the merging, but ultimately a human being is responsible for making it happen correctly.
Here's an example. Say that Harry and Sally each create working copies of the same project, copied from the repository. They work concurrently, and make changes to the same file A within their copies. Sally saves her changes to the repository first. When Harry attempts to save his changes later, the repository informs him that his file A is out-of-date. In other words, that file A in the repository has somehow changed since he last copied it. So Harry asks his client to merge any new changes from the repository into his working copy of file A. Chances are that Sally's changes don't overlap with his own; so once he has both sets of changes integrated, he saves his working copy back to the repository.
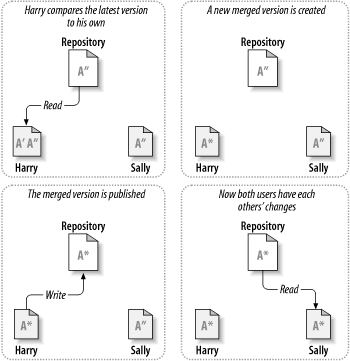
Tapi bagaimana jika perubahan-perubahan Sally benar-benar bertumpukan dengan perubahan-perubahan Harry? Lalu apa? Situasi ini disebut konflik, dan biasanya tidak begitu bermasalah. Ketika Harry meminta kliennya untuk menggabung perubahan repositori terbaru ke dalam copy pekerjaannya, copy file A miliknya ditandai sebagai dalam keadaan konflik: dia akan bisa melihat kedua set dari perubahan-perubahan yang konflik, dan memilih diantaranya secara manual. Perlu dicatat bahwa perangkat lunak tidak bisa menyelesaikan konflik secara otomatis; hanya manusia yang mampu mengerti dan membuat pilihan-pilihan pintar yang diperlukan. Sekali Harry sudah menyelesaikan perubahan yang saling tindih secara manual (mungkin dengan mendiskusikannya bersama Sally!), dia bisa menyimpan file gabungan dengan aman kembali ke repositori.
Model copy-ubah-gabung mungkin terdengar sedikit kacau, tapi dalam prakteknya, ia berjalan dengan sangat baik. Para pengguna bisa bekerja secara paralel, tidak pernah menunggu yang lain. Saat mereka bekerja pada file yang sama, tampak bahwa kebanyakan perubahan-perubahan konkuren mereka tidak tumpang tindih sama sekali; konflik jarang terjadi. Dan jumlah waktu untuk menyelesaikan konflik jauh lebih sedikit daripada jumlah waktu yang hilang oleh suatu sistem penguncian.
Akhirnya, itu semua berujung pada satu faktor kritis: komunikasi pengguna. Ketika para pengguna berkomunikasi dengan buruk, konflik-konflik baik sintatik maupun semantik meningkat. Tidak ada sistem yang memaksa pengguna untuk berkomunikasi dengan sempurna, dan tidak ada sistem yang dapat mendeteksi konflik semantik. Jadi tidak ada gunanya untuk mencegah konflik; dalam praktek, penguncian nampak untuk menghambat produktivitas lebih dari pada yang lain.
There is one common situation where the lock-modify-unlock model comes out better, and that is where you have unmergeable files. For example if your repository contains some graphic images, and two people change the image at the same time, there is no way for those changes to be merged together. Either Harry or Sally will lose their changes.
Subversion menggunakan solusi copy-ubah-gabung secara bawaan, dan dalam banyak kasus ini adalah semua yang akan Anda perlukan. Akan tetapi, sejak Versi 1.2, Subversion juga mendukung penguncian file. Jadi jika Anda mempunyai file yang tidak bisa digabung, atau jika Anda dipaksa menggunakan kebijakan penguncian oleh manajemen, Subversion akan masih menyediakan fitur yang Anda butuhkan.
Anda sudah membaca tentang copy pekerjaan; sekarang kami akan mendemonstrasikan bagaimana klien Subversion membuat dan menggunakannya.
Copy pekerjaan Subversion adalah susunan direktori biasa pada sistem lokal Anda, dan berisi koleksi file. Anda bisa mengedit file-file ini sesuka Anda, dan jika ada file kode sumber, Anda bisa mengompilasi program Anda darinya seperti biasa. Copy pekerjaan Anda adalah area kerja pribadi Anda sendiri: Subversion tidak akan pernah menyatukan perubahan orang lain, maupun membuat perubahan Anda sendiri tersedia bagi yang lain, sampai Anda memberitahukan secara eksplisit untuk melakukannya.
After you've made some changes to the files in your working copy and verified that they work properly, Subversion provides you with commands to publish your changes to the other people working with you on your project (by writing to the repository). If other people publish their own changes, Subversion provides you with commands to merge those changes into your working directory (by reading from the repository).
A working copy also contains some extra files, created and maintained by Subversion, to help it carry out these commands. In particular, your working copy contains a subdirectory named .svn, also known as the working copy administrative directory . The files in this administrative directory help Subversion recognize which files contain unpublished changes, and which files are out-of-date with respect to others' work. Prior to 1.7 Subversion maintained .svn administrative subdirectories in every versioned directory of your working copy. Subversion 1.7 takes a completely different approach and each working copy now has only one administrative subdirectory which is an immediate child of the root of that working copy.
Suatu repositori Subversion umum sering menampung file (atau kode sumber) untuk beberapa proyek; biasanya, setiap proyek adalah subdirektori dalam susunan sistem file repositori. Dalam pengaturan ini, copy pekerjaan pengguna akan terhubung ke subpohon tertentu dari repositori.
Sebagai contoh, anggap Anda mempunyai repositori yang berisi dua proyek software.
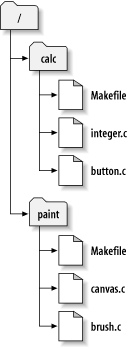
Dengan kata lain, akar direktori repositori mempunyai dua subdirektori: gambar dan hitung.
To get a working copy, you must check out some subtree of the repository. (The term check out may sound like it has something to do with locking or reserving resources, but it doesn't; it simply creates a private copy of the project for you.)
Suppose you make changes to button.c. Since the .svn directory remembers the file's modification date and original contents, Subversion can tell that you've changed the file. However, Subversion does not make your changes public until you explicitly tell it to. The act of publishing your changes is more commonly known as committing (or checking in ) changes to the repository.
Untuk menerbitkan perubahan Anda bagi yang lain, Anda bisa menggunakan perintah Subversion komit.
Sekarang perubahan Anda ke button.c sudah dikomit ke repositori; jika pengguna lain melakukan check out copy pekerjaan dari /hitung, mereka akan melihat perubahan Anda dalam file versi terbaru.
Anggap Anda mempunyai kolaborator, Sally, yang melakukan check out copy pekerjaan /hitung pada saat yang sama seperti yang Anda lakukan. Ketika Anda mengkomit perubahan Anda ke button.c, copy pekerjaan Sally dibiarkan tidak berubah; Subversion hanya mengubah copy pekerjaan atas permintaan pengguna.
Agar proyeknya mutahir, Sally bisa meminta Subversion untuk memutahirkan copy pekerjaannya, dengan menggunakan perintah Subversion mutahirkan. Ini akan menyertakan perubahan Anda ke dalam copy pekerjaannya, juga bagi perubahan-perubahan lain yang telah dikomit sejak Sally melakukan check out.
Catatan bahwa Sally tidak perlu untuk menetapkan file yang mana yang dimutahirkan; Subversion menggunakan informasi dalam direktori .svn, dan informasi lebih lanjut dalam repositori, untuk memutuskan file yang perlu dimutahirkan.
Repositori Subversion bisa diakses melalui banyak metode berbeda - pada diska lokal, atau melalui berbagai protokol jaringan. Lokasi repositori, bagaimanapun juga, selalu URL. Skema URL menunjukan metode akses:
Tabel 2.1. URL Akses Repositori
| Skema | Metode Akses |
|---|---|
file://
| Akses repositori langsung pada drive lokal atau jaringan. |
http://
| Mengakses via protokol WebDAV ke server Apache yang mengenal Subversion. |
https://
| Sama seperti http://, tapi dengan enkripsi SSL. |
svn://
| Unauthenticated TCP/IP access via custom protocol to a svnserve server. |
svn+ssh://
| authenticated, encrypted TCP/IP access via custom protocol to a svnserve server. |
For the most part, Subversion's URLs use the standard syntax, allowing for server names and port numbers to be specified as part of the URL. The file:// access method is normally used for local access, although it can be used with UNC paths to a networked host. The URL therefore takes the form file://hostname/path/to/repos. For the local machine, the hostname portion of the URL is required to be either absent or localhost. For this reason, local paths normally appear with three slashes, file:///path/to/repos.
Also, users of the file:// scheme on Windows platforms will need to use an unofficially “standard” syntax for accessing repositories that are on the same machine, but on a different drive than the client's current working drive. Either of the two following URL path syntaxes will work where X is the drive on which the repository resides:
file:///X:/path/to/repos
...
file:///X|/path/to/repos
...
Perlu dicatat bahwa URL menggunakan garis miring biasa meskipun bentuk asli (non-URL) suatu path pada Windows menggunakan garis miring terbalik.
You can access a FSFS repository via a network share, but this is not recommended for various reasons:
You are giving direct write access to all users, so they could accidentally delete or corrupt the repository file system.
Not all network file sharing protocols support the locking that Subversion requires. One day you will find your repository has been subtly corrupted.
You have to set the access permissions in just the right way. SAMBA is particularly difficult in this respect.
If one person installs a newer version of the client which upgrades the repository format, then everyone else will be unable to access the repository until they also upgrade to the new client version.
A svn commit operation can publish changes to any number of files and directories as a single atomic transaction. In your working copy, you can change files' contents, create, delete, rename and copy files and directories, and then commit the complete set of changes as a unit.
In the repository, each commit is treated as an atomic transaction: either all the commits changes take place, or none of them take place. Subversion retains this atomicity in the face of program crashes, system crashes, network problems, and other users' actions.
Setiap kali repositori menerima komit, ia membuat kondisi baru pada susunan sistem file, disebut revisi. Setiap revisi ditempati angka alami unik, satu lebih besar dari jumlah revisi sebelumnya. Revisi awal dari repositori yang baru dibuat diberi angka nol, dan tidak terdiri dari apapun tapi direktori akar kosong.
Cara yang baik untuk memvisualisasikan repositori adalah sebagai satu seri pohon-pohon. Bayangkan jajaran dari angka revisi, dimulai dari 0, terentang dari kiri ke kanan. Setiap angka revisi mempunyai pohon sistem file bergantung dibawahnya, dan setiap pohon merupakan “potret” dari cara repositori terlihat setelah setiap komit.
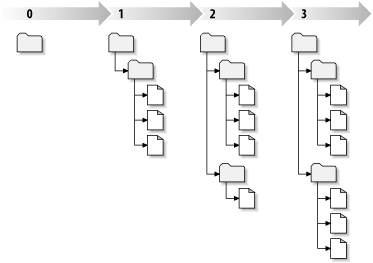
Penting untuk dicatat bahwa copy pekerjaan tidak selalu sesuai dengan setiap revisi tunggal dalam repositori; mereka bisa berisi file dari beberapa revisi. Sebagai contoh, anggaplah Anda melakukan check out copy pekerjaan dari repositori di mana revisi paling baru ialah 4:
calc/Makefile:4
integer.c:4
button.c:4
Sampai saat ini, direktori pekerjaan ini tepat sesuai terhadap revisi 4 dalam repositori. Tetapi, anggap Anda membuat perubahan pada button.c, dan mengkomit perubahan itu. Dengan menganggap tidak ada yang lain telah mengkomit, komit Anda akan membuat revisi 5 dari repositori, dan copy pekerjaan Anda sekarang akan terlihat seperti ini:
calc/Makefile:4
integer.c:4
button.c:5
Anggap bahwa pada titik ini Sally mengkomit perubahan integer.c yang menyebabkan pembuatan revisi 6. Jika Anda menggunakan svn update untuk menjadikan copy pekerjaan Anda mutahir, maka ia akan terlihat seperti ini:
calc/Makefile:6
integer.c:6
button.c:6
Perubahan Sally pada integer.c akan terlihat dalam copy pekerjaan Anda, dan perubahan Anda masih akan ada dalam button.c. Dalam contoh ini, teks Makefile sama persis dalam revisi 4, 5, dan 6, tapi Subversion akan menandai copy pekerjaan Anda untuk Makefile dengan revisi 6 untuk menunjukan bahwa ia masih saat ini. Maka, setelah Anda melakukan pemutahiran bersih pada puncak dari copy pekerjaan Anda, ia umumnya akan merujuk ke tepat satu revisi dalam repositori.
Untuk setiap file dalam direktori pekerjaan, Subversion merekam dua bagian esensial dari informasi dalam area administratif .svn/:
what revision your working file is based on (this is called the file's working revision ), and
suatu cap waktu yang merekam kapan copy lokal dimutahirkan terakhir kali oleh repositori.
Melalui informasi ini, dengan menghubungi repositori, Subversion bisa memberitahu suatu file pekerjaan dalam keadaan apa dari empat keadaan berikut:
- Tidak berubah, dan saat ini
File tidak diubah dalam direktori pekerjaan, dan tidak ada perubahan ke file itu yang telah dikomit ke repositori sejak revisi pekerjaannya. Komit file tidak akan melakukan apa-apa, dan mutahirkan file tidak akan mengerjakan apapun.
- Diubah secara lokal, dan saat ini
The file has been changed in the working directory, and no changes to that file have been committed to the repository since its base revision. There are local changes that have not been committed to the repository, thus a commit of the file will succeed in publishing your changes, and an update of the file will do nothing.
- Tidak berubah, dan ketinggalan jaman
The file has not been changed in the working directory, but it has been changed in the repository. The file should eventually be updated, to make it current with the public revision. A commit of the file will do nothing, and an update of the file will fold the latest changes into your working copy.
- Diubah secara lokal, dan ketinggalan jaman
The file has been changed both in the working directory, and in the repository. A commit of the file will fail with an out-of-date error. The file should be updated first; an update command will attempt to merge the public changes with the local changes. If Subversion can't complete the merge in a plausible way automatically, it leaves it to the user to resolve the conflict.
Kami menemukan sejumlah konsep fundamental Subversion dalam bab ini:
Kami telah mengenalkan pengertian dari repositori sentral, copy pekerjaan klien, dan larik dari susunan revisi repositori.
Kami melihat beberapa contoh sederhana bagaimana dua kolaborator bisa menggunakan Subversion untuk menerbitkan dan menerima perubahan dari yang lain, menggunakan model 'copy-ubah-gabung'.
Kami telah membicarakan sedikit tentang cara Subversion melacak dan mengatur informasi dalam sebuah copy pekerjaan.
Daftar Isi
Tidak masalah protokol yang Anda gunakan untuk mengakses repositori Anda, Anda selalu perlu untuk membuat setidaknya satu repositori. Ini bisa dikerjakan dengan klien baris perintah Subversion atau dengan TortoiseSVN.
Jika Anda belum membuat repositori Subversion, inilah waktu untuk membuatnya sekarang.
Buat folder kosong dengan nama SVN (contoh
D:\SVN\), yang akan digunakan sebagai akar dari semua repositori Anda.Buat folder lain
MyNewRepositorydi dalamD:\SVN\.Open the command prompt (or DOS-Box), change into
D:\SVN\and typesvnadmin create --fs-type fsfs MyNewRepository
Sekarang Anda sudah mendapatkan repositori baru ditempatkan di D:\SVN\MyNewRepository.
Buka windows explorer
Buat folder baru dan beri nama, misalnya
SVNRepositoryRight click on the newly created folder and select → .
Repositori kemudian dibuat di dalam folder baru. Jangan edit file itu oleh Anda sendiri!!!. Jika Anda mendapatkan kesalahan pastikan bahwa folder kosong dan tidak dilindung tulis.
You will also be asked whether you want to create a directory structure within the repository. Find out about layout options in bagian bernama “Tata Letak Repositori”.
TortoiseSVN will set a custom folder icon when it creates a repository so you can identify local repositories more easily. If you create a repository using the official command line client this folder icon is not assigned.
Tip
We also recommend that you don't use file:// access at all, apart from local testing purposes. Using a server is more secure and more reliable for all but single-developer use.
Untuk mengakses repositori lokal Anda memerlukan path ke folder itu. Ingatlah bahwa Subversion mengharapkan semua path repositori dalam bentuk file:///C:/SVNRepository/. Perlu dicatat penggunaan dari garis miring maju.
Untuk mengakses repositori yang ditempatkan pada jaringan berbagi Anda bisa menggunakan pemetaan drive, atau Anda bisa menggunakan path UNC. Untuk path UNC, bentuknya adalah file://ServerName/path/to/repos/. Catatan bahwa hanya ada 2 garis miring didepannya disini.
Sebelum SVN 1.2, path UNC harus diberikan dalam bentuk lebih kabur file:///\ServerName/path/to/repos. Bentuk ini masih didukung, tapi tidak direkomendasikan.
Although in theory it is possible to put a FSFS repository on a network share and have multiple users access it using file:// protocol, this is most definitely not recommended. In fact we would strongly discourage it, and do not support such use for various reasons:
Firstly you are giving every user direct write access to the repository, so any user could accidentally delete the entire repository or make it unusable in some other way.
Secondly not all network file sharing protocols support the locking that Subversion requires, so you may find your repository gets corrupted. It may not happen straight away, but one day two users will try to access the repository at the same time.
Thirdly the file permissions have to be set just so. You may just about get away with it on a native Windows share, but SAMBA is particularly difficult.
If one person installs a newer version of the client which upgrades the repository format, then everyone else will be unable to access the repository until they also upgrade to the new client version.
file:// access is intended for local, single-user access only, particularly testing and debugging. When you want to share the repository you really need to set up a proper server, and it is not nearly as difficult as you might think. Read bagian bernama “Akses ke Repositori” for guidelines on choosing and setting up a server.
Sebelum Anda mengimpor data Anda ke dalam repositori, pertama Anda harus memikirkan tentang bagaimana Anda ingin mengatur data Anda. Jika Anda menggunakan salah satu tata letak yang direkomendasikan nantinya akan lebih mudah.
There are some standard, recommended ways to organize a repository. Most people create a trunk directory to hold the “main line” of development, a branches directory to contain branch copies, and a tags directory to contain tag copies. If a repository holds only one project, then often people create these top-level directories:
/trunk
/branches
/tags
Because this layout is so commonly used, when you create a new repository using TortoiseSVN, it will also offer to create the directory structure for you.
Jika repositori berisi multipel proyek, orang sering mengindeks tata letaknya dengan cabang:
/trunk/paint
/trunk/calc
/branches/paint
/branches/calc
/tags/paint
/tags/calc
...atau dengan proyek:
/paint/trunk
/paint/branches
/paint/tags
/calc/trunk
/calc/branches
/calc/tags
Mengindeks dengan proyek masuk akal jika proyek tidak terkait erat dengan salah satu yang di-check out secara individu. Untuk proyek terkait dimana Anda mungkin ingin melakukan check out semua proyek dalam sekali jalan, atau dimana proyek adalah terkait semua dalam satu paket distribusi, sering lebih baik untuk diindeks dengan cabang. Dengan cara ini Anda hanya mempunyai satu trunk untuk di-checkout, dan hubungan antara sub-proyek nampak lebih mudah.
Jika Anda mengadopsi pendekatan tingkat atas /trunk /tags /branches, Anda harus mengcopy seluruh trunk untuk setiap cabang dan tag, dan dalam beberapa cara struktur ini menawarkan fleksibilitas terbanyak.
Untuk proyek tidak terkait Anda mungkin lebih ingin menggunakan repositori terpisah. Ketika Anda mengkomit perubahan, angka revisi dari seluruh repositori yang berubah, bukan angka revisi proyek. Mempunyai 2 proyek tidak terkait berbagi repositori bisa membuat ruang besar dalam angka revisi. Proyek Subversion dan TortoiseSVN nampak di alamat host yang sama, tapi sebenarnya memisahkan sepenuhnya repositori yang membolehkan pengembangan independen, dan tidak ada kebingungan pada angka pembuatan.
Tentu saja, Anda bebas untuk mengabaikan tata letak umum ini. Anda bisa membuat variasi apapun, apa saja yang bekerja terbaik bagi Anda atau tim Anda. Ingat bahwa apapun pilihan Anda, itu bukan komitmen permanen. Anda bisa mengatur ulang repositori Anda kapan saja. Karena cabang dan tag sebenarnya direktori, TortoiseSVN bisa memindahkan atau mengganti namanya sesuai yang Anda inginkan.
Menukar dari satu tata letak ke lainnya hanyalah masalah menerbitkan seri perpindahan dari sisi-server; Jika Anda tidak menyukai cara kerja yang diatur dalam repositori, aturlah kembali direktori.
So if you haven't already created a basic folder structure inside your repository you should do that now. There are two ways to achieve this. If you simply want to create a /trunk /tags /branches structure, you can use the repository browser to create the three folders (in three separate commits). If you want to create a deeper hierarchy then it is simpler to create a folder structure on disk first and import it in a single commit, like this:
buat folder kosong baru pada hard disk Anda
buat struktur folder tingkat-atas yang Anda inginkan, di dalam folder itu - jangan simpan dulu file apapun!
import this structure into the repository via a right click on the folder that contains this folder structure and selecting → In the import dialog enter the URL to your repository and click OK. This will import your temp folder into the repository root to create the basic repository layout.
Note that the name of the folder you are importing does not appear in the repository, only its contents. For example, create the following folder structure:
C:\Temp\New\trunk
C:\Temp\New\branches
C:\Temp\New\tags
Import C:\Temp\New into the repository root, which will then look like this:
/trunk
/branches
/tags
Apapun tipe repositori yang Anda gunakan, adalah sangat penting bahwa Anda memelihara cadangan reguler, dan bahwa Anda memverifikasi cadangan. Jika server gagal, Anda mungkin bisa mengakses versi terbaru dari file Anda, tapi tanpa repositori semua histori Anda hilang selamanya.
The simplest (but not recommended) way is just to copy the repository folder onto the backup medium. However, you have to be absolutely sure that no process is accessing the data. In this context, access means any access at all. If your repository is accessed at all during the copy, (web browser left open, WebSVN, etc.) the backup will be worthless.
The recommended method is to run
svnadmin hotcopy path/to/repository path/to/backup
to create a copy of your repository in a safe manner. Then backup the copy.
The svnadmin tool is installed automatically when you install the Subversion command line client. The easiest way to get this is to check the option to include the command line tools when installing TortoiseSVN, but if you prefer you can download the latest version of command line tools directly from the Subversion website.
A hook script is a program triggered by some repository event, such as the creation of a new revision or the modification of an unversioned property. Each hook is handed enough information to tell what that event is, what target(s) it's operating on, and the username of the person who triggered the event. Depending on the hook's output or return status, the hook program may continue the action, stop it, or suspend it in some way. Please refer to the chapter on Hook Scripts in the Subversion Book for full details about the hooks which are implemented.
These hook scripts are executed by the server that hosts the repository. TortoiseSVN also allows you to configure client side hook scripts that are executed locally upon certain events. See bagian bernama “Client Side Hook Scripts” for more information.
Sample hook scripts can be found in the hooks directory of the repository. These sample scripts are suitable for Unix/Linux servers but need to be modified if your server is Windows based. The hook can be a batch file or an executable. The sample below shows a batch file which might be used to implement a pre-revprop-change hook.
rem Only allow log messages to be changed.
if "%4" == "svn:log" exit 0
echo Property '%4' cannot be changed >&2
exit 1
Note that anything sent to stdout is discarded. If you want a message to appear in the Commit Reject dialog you must send it to stderr. In a batch file this is achieved using >&2.
Overriding Hooks
If a hook script rejects your commit then its decision is final. But you can build an override mechanism into the script itself using the Magic Word technique. If the script wants to reject the operation it first scans the log message for a special pass phrase, either a fixed phrase or perhaps the filename with a prefix. If it finds the magic word then it allows the commit to proceed. If the phrase is not found then it can block the commit with a message like “You didn't say the magic word”. :-)
If you want to make your Subversion repository available to others you may want to include a link to it from your website. One way to make this more accessible is to include a checkout link for other TortoiseSVN users.
When you install TortoiseSVN, it registers a new tsvn: protocol. When a TortoiseSVN user clicks on such a link, the checkout dialog will open automatically with the repository URL already filled in.
Untuk menyertakan link tersebut dalam halaman html Anda sendiri, Anda perlu menambah kode yang mirip dengan ini:
<a href="tsvn:http://project.domain.org/svn/trunk">
</a>
Of course it would look even better if you included a suitable picture. You can use the TortoiseSVN logo or you can provide your own image.
<a href="tsvn:http://project.domain.org/svn/trunk">
<img src=TortoiseCheckout.png></a>
Anda juga dapat membuat link menunjuk ke revisi tertentu, misalnya
<a href="tsvn:http://project.domain.org/svn/trunk?100">
</a>
To use TortoiseSVN (or any other Subversion client), you need a place where your repositories are located. You can either store your repositories locally and access them using the file:// protocol or you can place them on a server and access them with the http:// or svn:// protocols. The two server protocols can also be encrypted. You use https:// or svn+ssh://, or you can use svn:// with SASL.
If you are using a public hosting service such as SourceForge or your server has already been setup by someone else then there is nothing else you need to do. Move along to Bab 4, Bimbingan Penggunaan Harian.
If you don't have a server and you work alone, or if you are just evaluating Subversion and TortoiseSVN in isolation, then local repositories are probably your best choice. Just create a repository on your own PC as described earlier in Bab 3, Repositori. You can skip the rest of this chapter and go directly to Bab 4, Bimbingan Penggunaan Harian to find out how to start using it.
Jika Anda berpikir tentang pengaturan multi-user repositori pada jaringan berbagi, pikirkan lagi. Baca bagian bernama “Accessing a Repository on a Network Share” untuk mencari tahu mengapa kami pikir ini adalah ide yang buruk. Menyiapkan server tidak sesulit kedengarannya, dan akan memberikan keandalan yang lebih baik dan mungkin juga kecepatan.
More detailed information on the Subversion server options, and how to choose the best architecture for your situation, can be found in the Subversion book under Server Configuration.
In the early days of Subversion, setting up a server required a good understanding of server configuration and in previous versions of this manual we included detailed descriptions of how to set up a server. Since then things have become easier as there are now several pre-packaged server installers available which guide you through the setup and configuration process. These links are for some of the installers we know about:
You can always find the latest links on the Subversion website.
You can find further How To guides on the TortoiseSVN website.
Daftar Isi
- General Features
- Mengimpor Data Ke dalam Suatu Repositori
- Melakukan Checkout Copy Pekerjaan
- Mengirimkan Perubahan Anda Ke Repositori
- Memutahirkan Copy Pekerjaan Anda Dengan Perubahan Dari Yang Lain
- Menyelesaikan Konflik
- Mendapatkan Informasi Status
- Daftar Perubahan
- Shelving
- Dialog Log Revisi
- Melihat Perbedaan
- Menambah File Dan Direktori Baru
- Copying/Moving/Renaming Files and Folders
- Mengabaikan File Dan Direktori
- Deleting, Moving and Renaming
- Memulihkan Perubahan
- Membersihkan
- Seting Proyek
- External Items
- Pencabangan / Pembuatan Tag
- Penggabungan
- Penguncian
- Membuat dan Menerapkan Patch
- Siapa Yang Mengubah Baris Mana?
- Browser Repositori
- Grafik Revisi
- Mengekspor suatu Copy Pekerjaan Subversion
- Merelokasi copy pekerjaan
- Integration with Bug Tracking Systems / Issue Trackers
- Integrasi dengan Pelihat Repositori Berbasis Web
- Seting TortoiseSVN
- Langkah terakhir
Dokumen ini menjelaskan penggunaan dari hari ke hari klien TortoiseSVN. Ini bukan pengenalan ke sistem kontrol versi, dan bukan pengenalan pada Subversion (SVN). Ini lebih mirip tempat Anda kembali ketika Anda mengetahui secara tepat apa yang ingin Anda lakukan, tapi tidak begitu ingat bagaimana melakukannya.
Jika Anda memerlukan pengenalan terhadap kontrol versi dengan Subversion, maka kami merekomendasikan Anda untuk membaca buku fantastik: Version control with Subversion.
Dokumen ini juga pekerjaan yang sedang berjalan, seperti halnya TortoiseSVN dan Subversion. Jika Anda menemukan kesalahan, silahkan melaporkannya ke milis agar kami bisa memutahirkan dokumentasi. Beberapa foto layar dalam Petunjuk Penggunaan Harian (DUG) mungkin tidak merefleksikan kondisi software saat ini. Tolong maafkan kami. Kami sedang bekerja pada TortoiseSVN dalam waktu bebas kami.
Untuk mendapatkan manfaat terbanyak dari Pedoman Penggunaan Harian:
Anda harus sudah menginstalasi TortoiseSVN.
Anda harus terbiasa dengan sistem kontrol versi.
Anda harus mengetahui dasar dari Subversion.
Anda harus sudah menyiapkan server dan/atau mempunyai akses ke repositori Subversion.
This section describes some of the features of TortoiseSVN which apply to just about everything in the manual. Note that many of these features will only show up within a Subversion working copy.
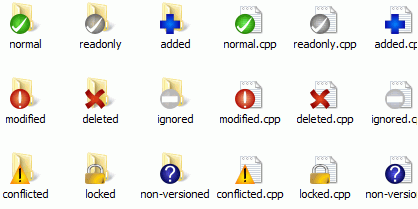
Salah satu fitur yang paling terlihat dari TortoiseSVN adalah lapisan ikon yang muncul pada file dalam copy pekerjaan Anda. Ini memperlihatkan kepada Anda sekilas file mana yang sudah dimodifikasi. Lihat bagian bernama “Lapisan Ikon” untuk mengetahui apa yang diwakili oleh lapisan yang berbeda.
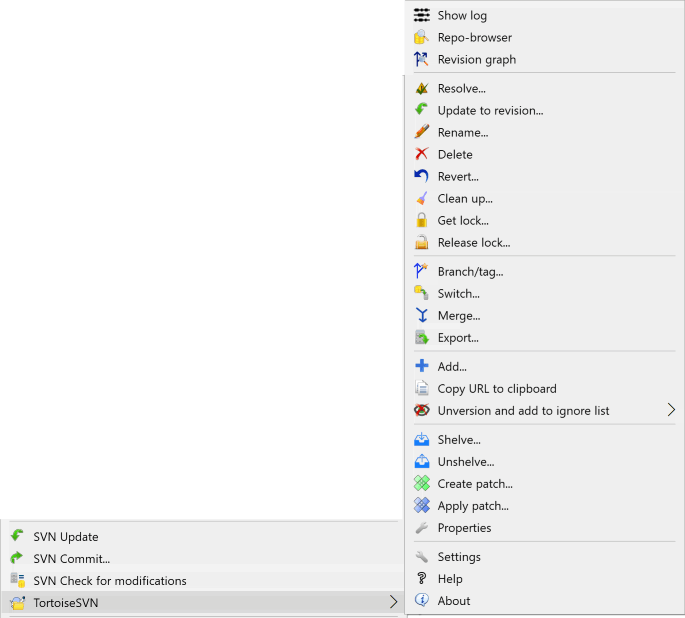
Semua perintah TortoiseSVN dijalankan dari menu konteks dari windows explorer. Kebanyakan terlihat secara langsung, ketika Anda mengklik kanan pada file atau folder. Perintah yang tersedia tergantung pada apakah file atau folder atau folder leluhurnya dibawah kontrol versi atau tidak. Anda juga bisa melihat menu TortoiseSVN sebagai bagian dari menu file Explorer.
Tip
Some commands which are very rarely used are only available in the extended context menu. To bring up the extended context menu, hold down the Shift key when you right click.
Dalam beberapa kasus Anda mungkin melihat beberapa entri TortoiseSVN. Ini bukan bug!
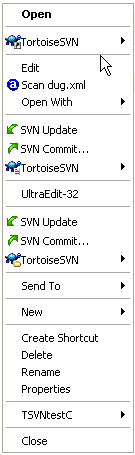
Contoh ini adalah untuk jalan pintas tidak berversi di dalam folder berversi, dan dalam menu file Explorer ada tiga entri untuk TortoiseSVN. Satu untuk folder, satu untuk jalan pintas sendiri, dan ketiga untuk obyek yang dirujuk jalan pintas. Untuk membantu Anda membedakannya, ikon mempunyai indikator di pojok kanan dibawahnya untuk memperlihatkan apakah entri menu untuk file, folder, jalan pintas atau item multipel yang dipilih.
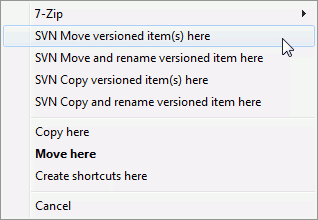
Perintah lain yang tersedia sebgagi pengendali drag, ketika Anda men-drag kanan file atau folder ke lokasi baru di dalam copy pekerjaan atau ketika Anda men-drag kanan file atau folder tidak-berversi ke dalam direktori yang dibawah kontrol versi.
Some common operations have well-known Windows shortcuts, but do not appear on buttons or in menus. If you can't work out how to do something obvious, like refreshing a view, check here.
- F1
Bantuan, tentu saja.
- F5
Segarkan tampilan saat ini. Ini barangkali perintah satu-tombol yang paling berguna. Sebagai contoh ... Dalam Explorer ini akan menyegarkan lapisan ikon pada copy pekerjaan Anda. Dalam dialog komit akan memindai ulang copy pekerjaan untuk melihat apa yang perlu dikomit. Dalam dialog Log Revisi akan menghubungi repositori lagi untuk memeriksa perubahan paling baru.
- Ctrl-A
Memilih semua. Ini bisa digunakan jika Anda mendapatkan kesalahan dan ingin melakukan copy dan paste ke dalam email. Gunakan Ctrl-A untuk memilih pesan kesalahan dan lalu ...
- Ctrl-C
Copy the selected text. In case no text is selected but e.g. a list entry or a message box, then the content of that list entry or the message box is copied to the clipboard.
If the repository that you are trying to access is password protected, an authentication Dialog will show up.
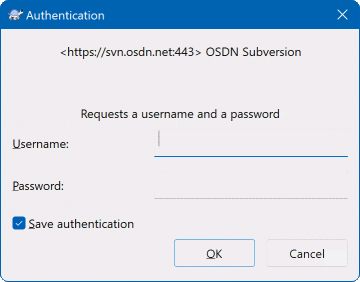
Enter your username and password. The checkbox will make TortoiseSVN store the credentials in Subversion's default directory: %APPDATA%\Subversion\auth in three subdirectories:
svn.simplecontains credentials for basic authentication (username/password). Note that passwords are stored using the WinCrypt API, not in plain text form.svn.ssl.serverberisi sertifikat server SSLsvn.usernameberisi mandat untuk otentikasi hanya-nama pengguna (kata sandi tidak diperlukan).
If you want to clear the authentication cache, you can do so from the Saved Data page of TortoiseSVN's settings dialog. The button will clear the cached authentication data for all repositories. The button however will show a dialog where you can chose which cached authentication data should be deleted. Refer to bagian bernama “Seting Data Tersimpan”.
Some people like to have the authentication data deleted when they log off Windows, or on shutdown. The way to do that is to use a shutdown script to delete the %APPDATA%\Subversion\auth directory, e.g.
@echo off
rmdir /s /q "%APPDATA%\Subversion\auth"
You can find a description of how to install such scripts at http://www.windows-help-central.com/windows-shutdown-script.html.
For more information on how to set up your server for authentication and access control, refer to bagian bernama “Akses ke Repositori”.
Many of TortoiseSVN's dialogs have a lot of information to display, but it is often useful to maximize only the height, or only the width, rather than maximizing to fill the screen. As a convenience, there are shortcuts for this on the Maximize button. Use the middle mouse button to maximize vertically, and right mouse to maximize horizontally.
If you are importing into an existing repository which already contains some projects, then the repository structure will already have been decided. If you are importing data into a new repository, then it is worth taking the time to think about how it will be organised. Read bagian bernama “Tata Letak Repositori” for further advice.
This section describes the Subversion import command, which was designed for importing a directory hierarchy into the repository in one shot. Although it does the job, it has several shortcomings:
There is no way to select files and folders to include, aside from using the global ignore settings.
The folder imported does not become a working copy. You have to do a checkout to copy the files back from the server.
It is easy to import to the wrong folder level in the repository.
For these reasons we recommend that you do not use the import command at all but rather follow the two-step method described in bagian bernama “Impor di tempat”, unless you are performing the simple step of creating an initial /trunk /tags /branches structure in your repository. Since you are here, this is how the basic import works ...
Sebelum Anda mengimpor proyek Anda ke dalam repositori Anda harus:
Menghapus semua file yang tidak diperlukan untuk membangun proyek (file temporal, file yang dibuat oleh kompilator seperti. *.obj, biner terkompilasi, ...)
Organize the files in folders and sub-folders. Although it is possible to rename/move files later it is highly recommended to get your project's structure straight before importing!
Sekarang pilih folder tingkat-atas dari struktur direktori proyek Anda dalam windows explorer dan klik kanan untuk membuka menu konteks. Pilih perintah → yang membawa kotak dialog:
In this dialog you have to enter the URL of the repository location where you want to import your project. It is very important to realise that the local folder you are importing does not itself appear in the repository, only its content. For example if you have a structure:
C:\Projects\Widget\source
C:\Projects\Widget\doc
C:\Projects\Widget\images
and you import C:\Projects\Widget into http://mydomain.com/svn/trunk then you may be surprised to find that your subdirectories go straight into trunk rather than being in a Widget subdirectory. You need to specify the subdirectory as part of the URL, http://mydomain.com/svn/trunk/Widget-X. Note that the import command will automatically create subdirectories within the repository if they do not exist.
Pesan impor digunakan sebagai pesan log.
Secara bawaan, file dan folder yang sama dengan pola abaikan-global tidak diimpor. Untuk menimpa perlaku ini Anda bisa menggunakan kotak centang Sertakan file diabaikan. Lihat bagian bernama “Seting Umum” untuk informasi lebih jauh pada menyeting pola abaikan global.
As soon as you press TortoiseSVN imports the complete directory tree including all files into the repository. The project is now stored in the repository under version control. Please note that the folder you imported is NOT under version control! To get a version-controlled working copy you need to do a Checkout of the version you just imported. Or read on to find out how to import a folder in place.
Dengan berasumsi bahwa Anda sudah memiliki sebuah repositori, dan Anda ingin menambahkan sebuah struktur folder baru ke dalamnya, cukup ikuti langkah-langkah berikut:
Use the repository browser to create a new project folder directly in the repository. If you are using one of the standard layouts you will probably want to create this as a sub-folder of trunk rather than in the repository root. The repository browser shows the repository structure just like Windows explorer, so you can see how things are organised.
Checkout the new folder over the top of the folder you want to import. You will get a warning that the local folder is not empty. Ignore the warning. Now you have a versioned top level folder with unversioned content.
Pilih → atas folder berversi ini untuk menambahkan beberapa atau semua isi. Anda dapat menambah dan menghapus berkas-berkas, mengeset properti-properti
svn:ignoredi folder-folder dan membuat perubahan-perubahan lain yang Anda perlukan.Komit folder level puncak tersebut, dan Anda memiliki suatu pohon berversi yang baru, dan sebuah salinan perkerjaan lokal, dibuat dari folder Anda yang sudah ada.
Ada kalanya Anda perlu mempunyai file dibawah kontrol versi yang berisi data pengguna tertentu. Itu berarti Anda mempunyai file yang perlu dimodifikasi oleh setiap pengembang/pengguna untuk memenuhi setup lokalnya. Tapi memversi file demikian sulit karena setiap pengguna akan mengkomit perubahannya setiap kali ke repositori.
In such cases we suggest to use template files. You create a file which contains all the data your developers will need, add that file to version control and let the developers check this file out. Then, each developer has to make a copy of that file and rename that copy. After that, modifying the copy is not a problem anymore.
As an example, you can have a look at TortoiseSVN's build script. It calls a file named default.build.user which doesn't exist in the repository. Only the file default.build.user.tmpl. default.build.user.tmpl is the template file which every developer has to create a copy from and rename that file to default.build.user. Inside that file, we added comments so that the users will see which lines they have to edit and change according to their local setup to get it working.
So as not to disturb the users, we also added the file default.build.user to the ignore list of its parent folder, i.e. we've set the Subversion property svn:ignore to include that filename. That way it won't show up as unversioned on every commit.
Untuk mendapatkan copy pekerjaan Anda perlu melakukan checkout dari repositori.
Pilih suatu direktori dalam windows explorer dimana Anda ingin menempatkan copy pekerjaan Anda. Klik kanan untuk menampilkan menu konteks dan pilih perintah → , yang menampilkan kotak dialog berikut:
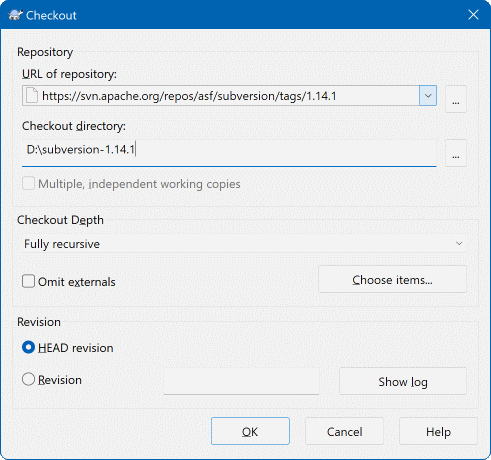
Jika Anda memasukan nama folder yang belum ada, maka direktori dengan nama itu akan dibuat.
Penting
In the default setting, the checkout menu item is not located in the TortoiseSVN submenu but is shown at the top explorer menu. TortoiseSVN commands that are not in the submenu have SVN prepended:
You can choose the depth you want to checkout, which allows you to specify the depth of recursion into child folders. If you want just a few sections of a large tree, You can checkout the top level folder only, then update selected folders recursively.
- Rekursif penuh
Checkout the entire tree, including all child folders and sub-folders.
- Anak yang langsung, termasuk folder-folder
Checkout the specified directory, including all files and child folders, but do not populate the child folders.
- Hanya anak berkas
Checkout the specified directory, including all files but do not checkout any child folders.
- Hanya benda ini
Checkout the directory only. Do not populate it with files or child folders.
- Copy pekerjaan
Retain the depth specified in the working copy. This option is not used in the checkout dialog, but it is the default in all other dialogs which have a depth setting.
- Kecualikan
Used to reduce working copy depth after a folder has already been populated. This option is only available in the Update to revision dialog.
To easily select only the items you want for the checkout and force the resulting working copy to keep only those items, click the button. This opens a new dialog where you can check all items you want in your working copy and uncheck all the items you don't want. The resulting working copy is then known as a sparse checkout. An update of such a working copy will not fetch the missing files and folders but only update what you already have in your working copy.
If you check out a sparse working copy (i.e., by choosing something other than fully recursive for the checkout depth), you can easily add or remove sub-folders later using one of the following methods.
Right click on the checked out folder, then use → and select . This opens the same dialog that was available in the original checkout and allows you to select or deselect items to include in the checkout. This method is very flexible but can be slow as every item in the folder is updated individually.
Right click on the checked out folder, then use → to bring up the repository browser. Find the sub-folder you would like to add to your working copy, then use → .
In the check for modifications dialog, first shift click on the button . The dialog will show all the files and folders which are in the repository but which you have not checked out as remotely added. Right click on the folder(s) you would like to add to your working copy, then use → .
This feature is very useful when you only want to checkout parts of a large tree, but you want the convenience of updating a single working copy. Suppose you have a large tree which has sub-folders Project01 to Project99, and you only want to checkout Project03, Project25 and Project76/SubProj. Use these steps:
Checkout the parent folder with depth “Only this item” You now have an empty top level folder.
Select the new folder and use → to display the repository content.
Right click on
Project03and → . Keep the default settings and click on . You now have that folder fully populated.Repeat the same process for
Project25.Navigate to
Project76/SubProjand do the same. This time note that theProject76folder has no content except forSubProj, which itself is fully populated. Subversion has created the intermediate folders for you without populating them.
Changing working copy depth
Once you have checked out a working copy to a particular depth you can change that depth later to get more or less content using → . In that dialog, be sure to check the Make depth sticky checkbox.
Using an older server
Pre-1.5 servers do not understand the working copy depth request, so they cannot always deal with requests efficiently. The command will still work, but an older server may send all the data, leaving the client to filter out what is not required, which may mean a lot of network traffic. If possible you should upgrade your server to at least 1.5.
Jika proyek berisi referensi ke proyek eksternal yang tidak ingin Anda checked out dalam waktu yang sama, gunakan kotak centang Abaikan eksternal.
Penting
If Omit externals is checked, or if you wish to increase the depth value, you will have to perform updates to your working copy using → instead of → . The standard update will include all externals and keep the existing depth.
It is recommended that you check out only the trunk part of the directory tree, or lower. If you specify the parent path of the directory tree in the URL then you might end up with a full hard disk since you will get a copy of the entire repository tree including every branch and tag of your project!
Mengekspor
Ada kalanya Anda ingin membuat copy lokal tanpa direktori .svn, contoh untuk membuat zipped tarball dari sumber Anda. Baca bagian bernama “Mengekspor suatu Copy Pekerjaan Subversion” untuk menemukan bagaimana cara melakukannya.
Mengirimkan perubahan yang Anda buat ke copy pekerjaan Anda dikenal sebagai mengkomit perubahan. Tapi sebelum Anda mengkomit Anda harus memastikan bahwa copy pekerjaan Anda mutahir. Anda bisa menggunakan → secara langsung. Atau Anda bisa menggunakan → pertama, untuk melihat file yang mana yang telah berubah secara lokal atau pada server.
Jika copy pekerjaan Anda mutahir dan di sana tidak ada konflik, Anda siap untuk mengkomit perubahan Anda. Pilih file/folder mana saja yang ingin Anda komit, lalu → .
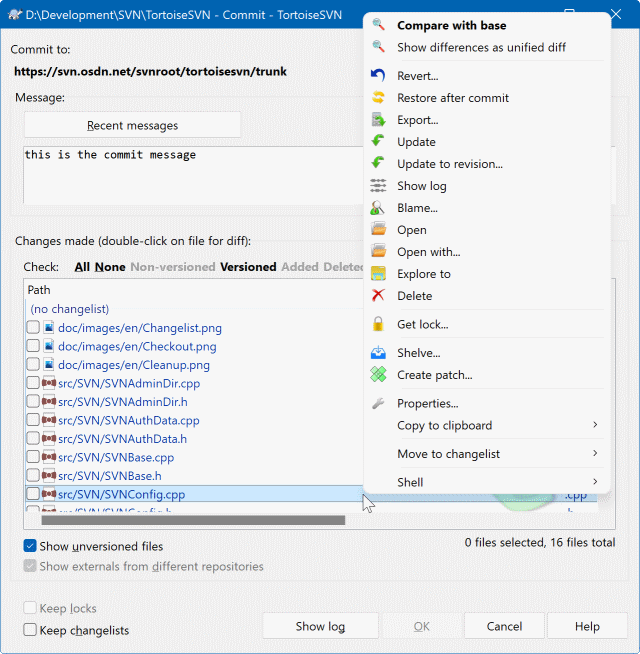
Dialog komit akan memperlihatkan kepada Anda setiap file yang diubah, termasuk yang ditambahkan, dihapus dan file tidak berversi. Jika Anda tidak ingin file yang diubah dikomit, cukup jangan centang file itu. Jika Anda ingin menyertakan file tidak berversi, centang file itu untuk ditambahkan ke komit.
To quickly check or uncheck types of files like all versioned files or all modified files, click the link items just above the list of shown items.
For information on the coloring and overlays of the items according to their status, please see bagian bernama “Status Lokal dan Remote”.
Item-item yang sudah ditukar ke path repositori yang berbeda juga ditunjukan menggunakan tanda (s). Anda mungkin telah menukar sesuatu sementara bekerja pada cabang dan lupa untuk menukarnya kembali ke trunk. Ini adalah tanda peringatan Anda!
Komit file atau folder?
Ketika Anda mengkomit file, dialog komit hanya menampilkan file yang telah Anda pilih. Ketika Anda mengkomit folder dialog komit akan memilih file yang diubah secara otomatis. Jika Anda lupa tentang file baru yang Anda buat, mengkomit folder akan membuat Anda menemukannya. Mengkomit folder tidak berarti bahwa setiap file ditandai sebagai diubah; ini hanya memudahkan hidup Anda dengan melakukan pekerjaan lebih bagi Anda.
Banyak file tidak berversi dalam dialog komit
If you think that the commit dialog shows you too many unversioned (e.g. compiler generated or editor backup) files, there are several ways to handle this. You can:
menambah file (atau suatu ekstensi wildcard) ke daftar file untuk dikecualikan pada halaman seting. Ini akan mempengaruhi setiap copy pekerjaan yang Anda miliki.
menambah file ke daftar
svn:ignoremenggunakan → Ini hanya akan mempengaruhi direktori di mana Anda mengeset propertisvn:ignore. Dengan menggunakan Dialog Properti SVN, Anda bisa mengubah propertisvn:ignoreuntuk direktori.add the file to the
svn:global-ignoreslist using → This will affect the directory on which you set thesvn:global-ignoresproperty and all subfolders as well.
Read bagian bernama “Mengabaikan File Dan Direktori” for more information.
Double clicking on any modified file in the commit dialog will launch the external diff tool to show your changes. The context menu will give you more options, as shown in the screenshot. You can also drag files from here into another application such as a text editor or an IDE.
You can select or deselect items by clicking on the checkbox to the left of the item. For directories you can use Shift-select to make the action recursive.
Kolom yang ditampilkan di pane bawah bisa diatur sesuai kesukaan Anda. Jika Anda mengklik kanan pada header kolom apa saja, Anda akan melihat suatu menu konteks yang membolehkan Anda untuk memilih kolom mana yang ditampilkan. Anda juga bisa mengubah panjang kolom dengan menggunakan kendali drag yang muncul ketika Anda memindahkan mouse melalui batas kolom. Kustomisasi ini tersimpan sehingga Anda akan melihat heading yang sama nantinya.
By default when you commit changes, any locks that you hold on files are released automatically after the commit succeeds. If you want to keep those locks, make sure the Keep locks checkbox is checked. The default state of this checkbox is taken from the no_unlock option in the Subversion configuration file. Read bagian bernama “Seting Umum” for information on how to edit the Subversion configuration file.
Warning when committing to a tag
Usually, commits are done to the trunk or a branch, but not to tags. After all, a tag is considered fixed and should not change.
If a commit is attempted to a tag URL, TortoiseSVN shows a confirmation dialog first to ensure whether this is really what is intended. Because most of the time such a commit is done by accident.
However, this check only works if the repository layout is one of the recommended ones, meaning it uses the names trunk, branches and tags to mark the three main areas. In case the setup is different, the detection of what is a tag/branch/trunk (also known as classification patterns), can be configured in the settings dialog: bagian bernama “Revision Graph Settings”
Drag dan Drop
Anda bisa menggeret file ke dalam dialog komit dari mana saja, selama copy pekerjaan di-check out dari repositori yang sama. Sebagai contoh, Anda mempunyai copy pekerjaan yang besar dengan beberapa explorer windows terbuka untuk melihat jarak folder dari hirarki. Jika Anda ingin menghindari komit dari folder tingkat atas (dengan panjang folder yang sulit memeriksa perubahan) Anda bisa membuka dialog komit untuk satu folder dan menggeret item dari jendela lain untuk disertakan di dalam komit atomis yang sama.
Anda dapat menggeret file-file tidak berversi yang berada dalam suatu copy pekerjaan ke dalam dialog komit dan mereka akan ditambah-SVN-kan secara otomatis.
Dragging files from the list at the bottom of the commit dialog to the log message edit box will insert the paths as plain text into that edit box. This is useful if you want to write commit log messages that include the paths that are affected by the commit.
Terkadang file-file diubah namanya di luar Subversion, dan mereka muncul di daftar file sebagai file yang hilang dan file yang tidak terversi. Untuk menghindari kehilangan sejarah tersebut, Anda perlu untuk memberitahu Subversion tentang koneksi tersebut. Cukup pilih nama lama (hilang) dan nama baru (tidak terversi) dan gunakan → untuk memasangkan kedua file tersebut sebagai suatu perubahan nama.
Repairing External Copies
If you made a copy of a file but forgot to use the Subversion command to do so, you can repair that copy so the new file doesn't lose its history. Simply select both the old name (normal or modified) and the new name (unversioned) and use → to pair the two files as a copy.
The commit dialog supports Subversion's changelist feature to help with grouping related files together. Find out about this feature in bagian bernama “Daftar Perubahan”.
Sometimes you want to only commit parts of the changes you made to a file. Such a situation usually happens when you're working on something but then an urgent fix needs to be committed, and that fix happens to be in the same file you're working on.
right click on the file and use → . This will create a copy of the file as it is. Then you can edit the file, e.g. in a text editor and undo all the changes you don't want to commit. After saving those changes you can commit the file.
Menggunakan TortoiseMerge
If you use TortoiseMerge to edit the file, you can either edit the changes as you're used to, or mark all the changes that you want to include. right click on a modified block and use → to include that change. Finally right click and use → which will change the right view to only include the changes you've marked before and undo the changes you have not marked.
After the commit is done, the copy of the file is restored automatically, and you have the file with all your modifications that were not committed back.
Sometimes you have versioned files that change frequently but that you really don't want to commit. Sometimes this indicates a flaw in your build process - why are those files versioned? should you be using template files? But occasionally it is inevitable. A classic reason is that your IDE changes a timestamp in the project file every time you build. The project file has to be versioned as it includes all the build settings, but it doesn't need to be committed just because the timestamp changed.
To help out in awkward cases like this, we have reserved a changelist called ignore-on-commit. Any file added to this changelist will automatically be unchecked in the commit dialog. You can still commit changes, but you have to select it manually in the commit dialog.
Pastikan untuk memasukkan log pesan yang menjelaskan perubahan yang Anda komit. Ini akan membantu Anda untuk melihat apa yang terjadi dan kapan saat Anda melihat pesan log proyek pada lain waktu. Pesan bisa sepanjang atau sesingkat yang Anda inginkan; banyak proyek mempunyai petunjuk untuk apa yang seharusnya disertakan, bahasa yang digunakan, dan ada kalanya bahkan format ketat.
Anda bisa menyediakan format sederhana ke log pesan Anda menggunakan konvensi mirip ke yang digunakan di dalam email. Untuk menerapkan ke teks, gunakan *text* untuk tebal, _text_ untuk garis bawah, dan ^text^ untuk miring.
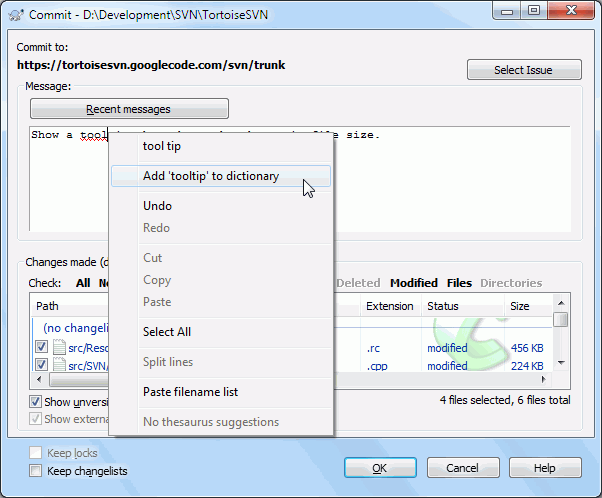
TortoiseSVN menyertakan pemeriksa ejaan untuk membantu Anda mendapatkan log pesan yang benar. Ini akan menerangi setiap kata yang salah eja. Gunakan menu konteks untuk mengakses koreksi yang disarankan. Tentu saja, ia tidak mengetahui setiap istilah teknis yang Anda ketahui sehingga ejaan kata yang benar akan tetap muncul sebagai kesalahan. Tapi jangan khawatir. Anda bisa menambahkannya ke kamus pribadi Anda menggunakan menu konteks.
The log message window also includes a filename and function auto-completion facility. This uses regular expressions to extract class and function names from the (text) files you are committing, as well as the filenames themselves. If a word you are typing matches anything in the list (after you have typed at least 3 characters, or pressed Ctrl+Space), a drop-down appears allowing you to select the full name. The regular expressions supplied with TortoiseSVN are held in the TortoiseSVN installation bin folder. You can also define your own regexes and store them in %APPDATA%\TortoiseSVN\autolist.txt. Of course your private autolist will not be overwritten when you update your installation of TortoiseSVN. If you are unfamiliar with regular expressions, take a look at the introduction at https://en.wikipedia.org/wiki/Regular_expression, and the online documentation and tutorial at http://www.regular-expressions.info/.
Getting the regex just right can be tricky, so to help you sort out a suitable expression there is a test dialog which allows you to enter an expression and then type in filenames to test it against. Start it from the command prompt using the command TortoiseProc.exe /command:autotexttest.
The log message window also includes a commit message snippet facility. These snippets are shown in the autocomplete dropdown once you type a snippet shortcut, and selecting the snippet in the autocomplete dropdown then inserts the full text of the snippet. The snippets supplied with TortoiseSVN are held in the TortoiseSVN installation bin folder. You can also define your own snippets and store them in %APPDATA%\TortoiseSVN\snippet.txt. # is the comment character. Newlines can be inserted by escaping them like this: \n and \r. To insert a backslash, escape it like this: \\.
You can re-use previously entered log messages. Just click on to view a list of the last few messages you entered for this working copy. The number of stored messages can be customized in the TortoiseSVN settings dialog.
You can clear all stored commit messages from the Saved data page of TortoiseSVN's settings, or you can clear individual messages from within the Recent messages dialog using the Delete key.
If you want to include the checked paths in your log message, you can use the command → in the edit control.
Another way to insert the paths into the log message is to simply drag the files from the file list onto the edit control.
Properti Folder Khusus
Ada beberapa properti folder khusus yang bisa digunakan untuk membantu memberikan kontrol lebih melalui format dari pesan log komit dan bahasa yang digunakan oleh modul pemeriksa ejaan. Baca bagian bernama “Seting Proyek” untuk informasi lengkap.
Integration with Bug Tracking Tools
If you have activated the bug tracking system, you can set one or more Issues in the Bug-ID / Issue-Nr: text box. Multiple issues should be comma separated. Alternatively, if you are using regex-based bug tracking support, just add your issue references as part of the log message. Learn more in bagian bernama “Integration with Bug Tracking Systems / Issue Trackers”.
Setelah menekan , dialog muncul menampilkan progres dari komit.
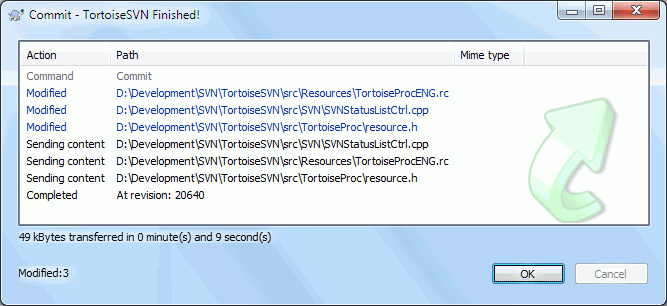
Dialog progres menggunakan kode warna untuk menerangi tindakan komit yang berbeda
- Biru
Mengkomit modifikasi.
- Ungu
Mengkomit tambahan baru.
- Merah tua
Mengkomit penghapusan atau penggantian.
- Hitam
Item-item lainnya.
Ini adalah skema warna standar, tapi Anda bisa mengkustomisasi warna menggunakan dialog seting. Baca bagian bernama “Seting Warna TortoiseSVN” untuk informasi lengkap.
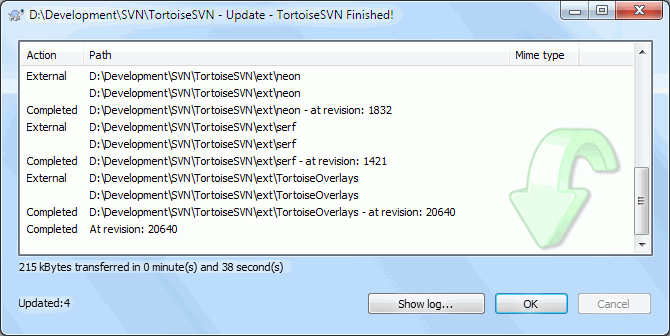
Periodically, you should ensure that changes done by others get incorporated in your local working copy. The process of getting changes from the server to your local copy is known as updating. Updating may be done on single files, a set of selected files, or recursively on entire directory hierarchies. To update, select the files and/or directories you want, right click and select → in the explorer context menu. A window will pop up displaying the progress of the update as it runs. Changes done by others will be merged into your files, keeping any changes you may have done to the same files. The repository is not affected by an update.
Dialog kemajuan menggunakan kode warna untuk menerangi tindakan pemutahiran yang berbeda
- Ungu
Item baru ditambahkan ke WC Anda.
- Merah tua
Kelebihan item dihapus dari WC Anda, atau item hilang diganti dalam WC Anda.
- Hijau
Perubahan dari repositori digabung dengan sukses dengan perubahan lokal Anda.
- Merah terang
Perubahan dari repositori yang digabung dengan perubahan lokal, menghasilkan konflik yang perlu Anda selesaikan.
- Hitam
Item yang tidak diubah dalam WC Anda dimutahirkan dengan versi lebih baru dari repositori.
Ini adalah skema warna standar, tapi Anda bisa mengkustomisasi warna menggunakan dialog seting. Baca bagian bernama “Seting Warna TortoiseSVN” untuk informasi lengkap.
If you get any conflicts during an update (this can happen if others changed the same lines in the same file as you did and those changes don't match) then the dialog shows those conflicts in red. You can double click on these lines to start the external merge tool to resolve the conflicts.
When the update is complete, the progress dialog shows a summary of the number of items updated, added, removed, conflicted, etc. below the file list. This summary information can be copied to the clipboard using Ctrl+C.
The standard Update command has no options and just updates your working copy to the HEAD revision of the repository, which is the most common use case. If you want more control over the update process, you should use → instead. This allows you to update your working copy to a specific revision, not only to the most recent one. Suppose your working copy is at revision 100, but you want it to reflect the state which it had in revision 50 - then simply update to revision 50.
In the same dialog you can also choose the depth at which to update the current folder. The terms used are described in bagian bernama “Checkout Depth”. The default depth is Working copy, which preserves the existing depth setting. You can also set the depth sticky which means subsequent updates will use that new depth, i.e. that depth is then used as the default depth.
To make it easier to include or exclude specific items from the checkout click the button. This opens a new dialog where you can check all items you want in your working copy and uncheck all the items you don't want.
You can also choose whether to ignore any external projects in the update (i.e. projects referenced using svn:externals).
Perhatian
If you update a file or folder to a specific revision, you should not make changes to those files. You will get “out of date” error messages when you try to commit them! If you want to undo changes to a file and start afresh from an earlier revision, you can rollback to a previous revision from the revision log dialog. Take a look at bagian bernama “Roll back (Undo) revisions in the repository” for further instructions, and alternative methods.
can occasionally be useful to see what your project looked like at some earlier point in its history. But in general, updating individual files to an earlier revision is not a good idea as it leaves your working copy in an inconsistent state. If the file you are updating has changed name, you may even find that the file just disappears from your working copy because no file of that name existed in the earlier revision. You should also note that the item will show a normal green overlay, so it is indistinguishable from files which are up-to-date.
If you simply want a local copy of an old version of a file it is better to use the → command from the log dialog for that file.
Multipel File/Folder
Jika Anda memilih multipel file dan folder dalam explorer dan memilih , semua file/folder itu dimutahirkan satu demi satu. TortoiseSVN memastikan bahwa semua file/folder itu yang dari repositori yang sama dimutahirkan ke revisi yang persis sama! Bahkan jika diantara pemutahiran itu terjadi komit lain.
Terkadang, anda akan mendapat konflik ketika anda memperbarukan/menggabungkan file file anda dari repositori atau ketika anda mengubah copy pekerjaan anda ke URL yang berbeda. Ada dua macam konflik:
- file conflicts
File konflik terjadi apabila dua (atau lebih) pengembang telah mengubah beberapa baris yang sama dari sebuah file
- tree conflicts
Susunan konflik terjadi ketika seorang pengembang telah memindahkan/mengubah nama/menghapus sebuah file atau folder, dimana pengembang lain juga telah memindahkan/mengubah nama/menghapus atau baru mengubahnya.
A file conflict occurs when two or more developers have changed the same few lines of a file. As Subversion knows nothing of your project, it leaves resolving the conflicts to the developers. The conflicting area in a text file is marked like this:
<<<<<<< filename
your changes
=======
code merged from repository
>>>>>>> revision
Also, for every conflicted file Subversion places three additional files in your directory:
- filename.ext.mine
Ini adalah file Anda karena ia ada dalam copy pekerjaan Anda sebelum Anda memutahirkan copy pekerjaan Anda - yakni, tanpa tanda konflik. File ini mempunyai perubahan terakhir di dalamnya dan tidak ada yang lain.
- filename.ext.rOLDREV
Ini adalah file daru revisi BASE sebelum Anda memutahirkan copy pekerjaan Anda. Yaitu file yang Anda check out sebelum Anda membuat pengeditan terakhir.
- filename.ext.rNEWREV
Ini adalah file dimana klien Subversion Anda menerimanya dari server ketika Anda memutahirkan copy pekerjaan Anda. File ini terkait ke revisi HEAD dari repositori.
You can either launch an external merge tool / conflict editor with → or you can use any text editor to resolve the conflict manually. You should decide what the code should look like, do the necessary changes and save the file. Using a merge tool such as TortoiseMerge or one of the other popular tools is generally the easier option as they generally present the files involved in a 3-pane view and you don't have to worry about the conflict markers. If you do use a text editor then you should search for lines starting with the string <<<<<<<.
Selanjutnya jalankan perintah → dan komit modifikasi Anda ke repositori. Harap dicatat bahwa perintah Selesaikan tidak benar-benar menyelesaikan konflik. Ia hanya menghapus file filename.ext.mine dan filename.ext.r*, untuk membolehkan Anda mengkomit perubahan Anda.
Jika Anda mempunyai konflik dengan file biner, Subversion tidak mencoba untuk menggabung file itu sendiri. File lokal tetap tidak diubah (persis seperti perubahan terakhir Anda) dan Anda mempunyai file filename.ext.r*. Jika Anda ingin mengabaikan perubahan Anda dan membiarkan versi repositori, cukup gunakan perintah Pulihkan. Jika Anda ingin memelihara versi Anda dan menimpa versi repositori, gunakan perintah Diselesaikan, lalu komit versi Anda.
Anda bisa menggunakan perintah Diselesaikan untuk multipel file jika Anda mengklik kanan pada folder leluhur dan memilih → Ini akan memunculkan dialog yang mendaftarkan semua file yang konflik dalam folder itu, dan Anda bisa memilih yang mana untuk ditandai sebagai diselesaikan.
A property conflict occurs when two or more developers have changed the same property. As with file content, resolving the conflict can only be done by the developers.
If one of the changes must override the other then choose the option to Resolve using local property or Resolve using remote property. If the changes must be merged then select Manually edit property, sort out what the property value should be and mark as resolved.
A tree conflict occurs when a developer moved/renamed/deleted a file or folder, which another developer either also has moved/renamed/deleted or just modified. There are many different situations that can result in a tree conflict, and all of them require different steps to resolve the conflict.
When a file is deleted locally in Subversion, the file is also deleted from the local file system, so even if it is part of a tree conflict it cannot show a conflicted overlay and you cannot right click on it to resolve the conflict. Use the Check for Modifications dialog instead to access the Edit conflicts option.
TortoiseSVN bisa membantu untuk mencari tempat yang benar untuk menggabungkan perubahan perubahan, tetapi pekerjaan tambahan mungkin diperlukan untung menyelesaikan konflik. Ingat, setelah pembaruan (an update), dasar kerjanya akan selalu mengandung revisi untuk setiap hal seperti didalam repositori di saat pembaruan. Jika anda mengembalikan perubahan setelah mempembarukan, itu akan mengembalikan ke keadaan repositori, bukan kembali ke keadaan disaat anda memulai mengubah lokal copy anda.
Developer A modifies
Foo.cand commits it to the repository.Pengembang B telah memindahkan
Foo.ckeBar.csecara bersamaan didalam duplikasi kerja dia, atau telah menghapusFoo.catau induk foldernya.
Pembarukan dari pengembang B duplikasi kerja menghasilkan konflik pohon:
Foo.ctelah dihapus dari duplikasi kerja, tetapi ditandai dengan konflik pohon.Apabila konflik itu terjadi dari mengubah nama daripada menghapus,
Bar.cditandai dengan ditambahkan (added), tetapi tidak mengandung perubahan pengembang A.
Developer B now has to choose whether to keep Developer A's changes. In the case of a file rename, he can merge the changes to Foo.c into the renamed file Bar.c. For simple file or directory deletions he can choose to keep the item with Developer A's changes and discard the deletion. Or, by marking the conflict as resolved without doing anything he effectively discards Developer A's changes.
The conflict edit dialog offers to merge changes if it can find the original file of the renamed Bar.c. If there are multiple files that are possible move sources, then a button for each of these files is shown which allow you to chose the correct file.
Developer A moves
Foo.ctoBar.cand commits it to the repository.Pengembang B mengubah
Foo.cdidalam duplikasi kerja dia.
Atau di dalam kasus memindahkan folder ...
Pengembang A memindahkan induk folder
FooFolderkeBarFolderdan me-komit kedalam repositoriPengembang B mengubah
Foo.cdidalam duplikasi kerja dia.
Pembaruan dari duplikasi kerja pengembang B menghasilkan konflik. Untuk file konflik yang sederhana:
Bar.cditambahkan ke dalam duplikat kerja sebagai file biasa.Foo.cditandai sebagai tambahan (dengan sejarah) dan mempunyai konflik pohon.
For a folder conflict:
BarFolderditambahkan ke dalam duplikasi kerja sebagain folder biasa.filename>FooFolder ditandai sebagain tambahan (dengan sejarah) dan mempunyari konflik pohon.Foo.c ditandai sebagain diubah (modified).
Sekarang Pengembang B memutuskan untuk menyetujui pengembang A reorganisasi dan menggabungkan perubahan dia ke dalam file yang bersangkutan di dalam struktur yang baru, atau hanya mengubah kembali perubahan pengembang A dan menyimpan file lokal.
To merge her local changes with the reshuffle, Developer B must first find out to what filename the conflicted file Foo.c was renamed/moved in the repository. This can be done by using the log dialog. Then use the button which shows the correct source file to resolve the conflict.
If Developer B decides that A's changes were wrong then she must choose the Mark as resolved button in the conflict editor dialog. This marks the conflicted file/folder as resolved, but Developer A's changes need to be removed by hand. Again the log dialog helps to track down what was moved.
Developer A moves
Foo.ctoBar.cand commits it to the repository.Developer B moves
Foo.ctoBix.c.
Pembarukan dari pengembang B duplikasi kerja menghasilkan konflik pohon:
Bix.cditandai sebagai tambahan dengan sejarah.Bar.cditambahi ke duplikasi kerja dengan 'normal' status.Foo.cditandai sebagai terhapus dan mempunyai konflik pohon.
To resolve this conflict, Developer B has to find out to what filename the conflicted file Foo.c was renamed/moved in the repository. This can be done by using the log dialog.
Then developer B has to decide which new filename of Foo.c to keep - the one done by developer A or the rename done by himself.
Setelah pengembang B menyelesaikan konflik secara manual, pohon konflik harus ditandai dengan selesai dengan tombol yang ada di konflik editor dialog.
Developer A working on trunk modifies
Foo.cand commits it to the repositoryDeveloper B working on a branch moves
Foo.ctoBar.cand commits it to the repository
A merge of developer A's trunk changes to developer B's branch working copy results in a tree conflict:
Bar.csudah ada di dalam duplikasi kerja dengan 'normal' status.Foo.cditandai sebagain hilang (missing) dengan konflik pohon.
To resolve this conflict, Developer B has to mark the file as resolved in the conflict editor dialog, which will remove it from the conflict list. She then has to decide whether to copy the missing file Foo.c from the repository to the working copy, whether to merge Developer A's changes to Foo.c into the renamed Bar.c or whether to ignore the changes by marking the conflict as resolved and doing nothing else.
Note that if you copy the missing file from the repository and then mark as resolved, your copy will be removed again. You have to resolve the conflict first.
Developer A working on trunk moves
Foo.ctoBar.cand commits it to the repository.Developer B working on a branch modifies
Foo.cand commits it to the repository.
Developer A working on trunk moves parent folder
FooFoldertoBarFolderand commits it to the repository.Developer B working on a branch modifies
Foo.cin her working copy.
A merge of developer A's trunk changes to developer B's branch working copy results in a tree conflict:
Bar.cditandai dengan tambahan (added).Foo.cditandai sebagai terubah dengan konflik pohon.
Sekarang Pengembang B memutuskan untuk menyetujui pengembang A reorganisasi dan menggabungkan perubahan dia ke dalam file yang bersangkutan di dalam struktur yang baru, atau hanya mengubah kembali perubahan pengembang A dan menyimpan file lokal.
To merge her local changes with the reshuffle, Developer B must first find out to what filename the conflicted file Foo.c was renamed/moved in the repository. This can be done by using the log dialog for the merge source. The conflict editor only shows the log for the working copy as it does not know which path was used in the merge, so you will have to find that yourself. The changes must then be merged by hand as there is currently no way to automate or even simplify this process. Once the changes have been ported across, the conflicted path is redundant and can be deleted.
If Developer B decides that A's changes were wrong then she must choose the Mark as resolved button in the conflict editor dialog. This marks the conflicted file/folder as resolved, but Developer A's changes need to be removed by hand. Again the log dialog for the merge source helps to track down what was moved.
Developer A working on trunk moves
Foo.ctoBar.cand commits it to the repository.Developer B working on a branch moves
Foo.ctoBix.cand commits it to the repository.
A merge of developer A's trunk changes to developer B's branch working copy results in a tree conflict:
Bix.cditandai sebagai status normal (tidak diubah, unmodified).Bar.cditandai sebagai tambahan dengan sejarah.Foo.cditandai dengan hilang dan mempunyai konflik pohon.
To resolve this conflict, Developer B has to find out to what filename the conflicted file Foo.c was renamed/moved in the repository. This can be done by using the log dialog for the merge source.
Then developer B has to decide which new filename of Foo.c to keep - the one done by developer A or the rename done by himself.
Setelah pengembang B menyelesaikan konflik secara manual, pohon konflik harus ditandai dengan selesai dengan tombol yang ada di konflik editor dialog.
There are other cases which are labelled as tree conflicts simply because the conflict involves a folder rather than a file. For example if you add a folder with the same name to both trunk and branch and then try to merge you will get a tree conflict. If you want to keep the folder from the merge target, just mark the conflict as resolved. If you want to use the one in the merge source then you need to SVN delete the one in the target first and run the merge again. If you need anything more complicated then you have to resolve manually.
Ketika Anda bekerja pada copy pekerjaan Anda, Anda sering perlu untuk mengetahui file mana yang telah Anda ubah/tambah/hapus atau ganti nama, atau bahkan file mana yang diubah dan dikomit orang lain.
Sekarang bahwa Anda sudah melakukan check out copy pekerjaan dari repositori Subversion Anda bisa melihat file dalam windows explorer dengan ikon yang diubah. Ini adalah salah satu alasan mengapa TortoiseSVN sangat populer. TortoiseSVN menambahkan apa yang disebut lapisan ikon ke setiap file yang menimpa ikon file aslinya. Lapisan ikon berbeda tergantung pada status Subversion terhadap file.

A fresh checked out working copy has a green checkmark as overlay. That means the Subversion status is normal.

As soon as you start editing a file, the status changes to modified and the icon overlay then changes to a red exclamation mark. That way you can easily see which files were changed since you last updated your working copy and need to be committed.

If during an update a conflict occurs then the icon changes to a yellow exclamation mark.

If you have set the svn:needs-lock property on a file, Subversion makes that file read-only until you get a lock on that file. Such files have this overlay to indicate that you have to get a lock first before you can edit that file.

If you hold a lock on a file, and the Subversion status is normal, this icon overlay reminds you that you should release the lock if you are not using it to allow others to commit their changes to the file.

This icon shows you that some files or folders inside the current folder have been scheduled to be deleted from version control or a file under version control is missing in a folder.

The plus sign tells you that a file or folder has been scheduled to be added to version control.

The bar sign tells you that a file or folder is ignored for version control purposes. This overlay is optional.

Icon ini menunjukan file file dan folder folder yang tidak di dalam versi kontrol, tetapi tidak di abaikan. Overlay ini adalah opsional.
In fact, you may find that not all of these icons are used on your system. This is because the number of overlays allowed by Windows is very limited and if you are also using an old version of TortoiseCVS, then there are not enough overlay slots available. TortoiseSVN tries to be a “Good Citizen (TM)” and limits its use of overlays to give other apps a chance too.
Now that there are more Tortoise clients around (TortoiseCVS, TortoiseHg, ...) the icon limit becomes a real problem. To work around this, the TortoiseSVN project introduced a common shared icon set, loaded as a DLL, which can be used by all Tortoise clients. Check with your client provider to see if this has been integrated yet :-)
For a description of how icon overlays correspond to Subversion status and other technical details, read bagian bernama “Lapisan Ikon”.
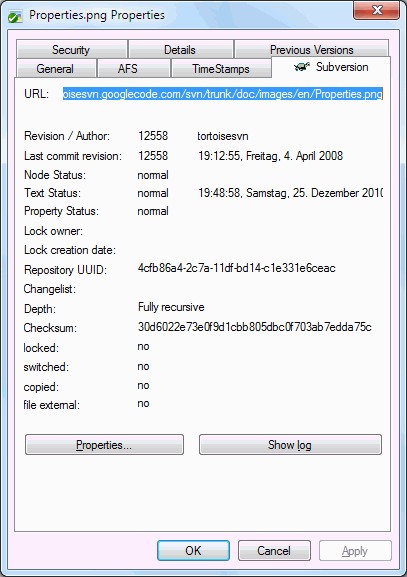
Ada kalanya Anda ingin mempunyai informasi terinci tentang file/direktori daripada hanya lapisan ikon. Anda bisa mendapatkan semua informasi yang disediakan Subversion dalam dialog properti explorer. Pilih file atau direktori dan pilih → dalam menu konteks (catatan: ini properti normal entri menu yang disediakan explorer, bukan yang ada dalam submenu TortoiseSVN!). Dalam kotak dialog properti sudah ditambahkan halaman properti baru untuk file/folder dibawah kontrol Subversion, dimana Anda bisa melihat semua informasi relevan tenang file/direktori yang dipilih.
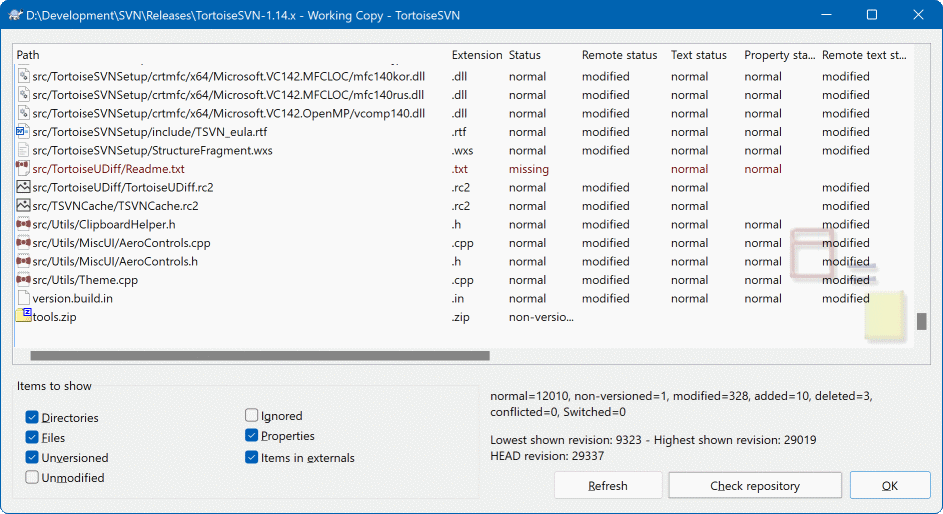
Ini sangat berguna untuk mengetahui file mana yang telah Anda ubah dan juga file yang diubah dan dikomit orang lain. Itulah dimana perintah → akan berguna. Dialog ini akan memperlihatkan kepada Anda setiap file yang diubah dengan cara apapun dalam copy pekerjaan Anda, juga file tidak berversi yang mungkin Anda miliki.
If you click on the then you can also look for changes in the repository. That way you can check before an update if there's a possible conflict. You can also update selected files from the repository without updating the whole folder. By default, the button only fetches the remote status with the checkout depth of the working copy. If you want to see all files and folders in the repository, even those you have not checked out, then you have to hold down the Shift key when you click on the button.
Dialog menggunakan kode warna untuk menerangi status.
- Biru
Item yang diubah secara lokal.
if unchanged files are inside a directory that's been moved, the status will show a
+sign in the status column, and it will be colored in blue as well.- Ungu
Item yang ditambahkan. Item yang telah ditambahkan dengan histori mempunyai tanda
+dalam kolom Status Teks, dan tooltip yang menampilkan asal item itu dicopy.- Merah tua
Item yang dihapus atau hilang.
- Hijau
Item yang diubah secara lokal dan dalam repositori. Perubahan akan digabung saat memutahirkan. Ini bisa menghasilkan konflik saat pemutahiran.
- Merah terang
Item yang diubah secara lokal dan dihapus dalam repositori, atau diubah dalam repositori dan dihapus secara lokal. Ini akan menghasilkan konflik saat pemutahiran.
- Hitam
Tidak berubah dan item tidak mempunyai versi.
Ini adalah skema warna standar, tapi Anda bisa mengkustomisasi warna menggunakan dialog seting. Baca bagian bernama “Seting Warna TortoiseSVN” untuk informasi lengkap.
Overlay icons are used to indicate other states as well. The screenshot below shows all the possible overlays that are shown if necessary.
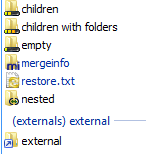
Overlays are shown for the following states:
Checkout depth
empty, meaning only the item itself.Checkout depth
files, meaning only the item itself and all file children without child folders.Checkout depth
immediates, meaning only the item itself and all file and folder children, but without children of the child folders.Nested items, i.e., working copies inside the working copy.
External items, i.e., all items that are added via an
svn:externalsproperty.Items that are restored after a commit. See bagian bernama “Commit only parts of files” for details.
Items that have property modifications, but only to the
svn:mergeinfoproperty. If any other property is modified, the overlay is not used.
Items which have been switched to a different repository path are also indicated using an (s) marker. You may have switched something while working on a branch and forgotten to switch back to trunk. This is your warning sign! The context menu allows you to switch them back to the normal path again.
Dari menu konteks pada dialog Anda bisa menampilkan diff dari perubahan. Periksalah perubahan lokal yang sudah Anda buat dengan menggunakan → . Periksa perubahan dalam repositori yang dibuat orang lain dengan menggunakan → .
You can also revert changes in individual files. If you have deleted a file accidentally, it will show up as Missing and you can use Revert to recover it.
File tidak berversi dan abaikan bisa dikirimkan ke recycle bin dari sini menggunakan → . Jika Anda ingin menghapus file secara permanen (melewati recycle bin) tekan tombol Shift sementara mengklik Hapus.
If you want to examine a file in detail, you can drag it from here into another application such as a text editor or IDE, or you can save a copy simply by dragging it into a folder in explorer.
Kolom-kolom dapat disesuaikan dengan kebutuhan Anda. Jika Anda mengklik kanan pada setiap judul kolom, Anda akan melihat menu konteks yang membolehkan Anda untuk memilih kolom mana yang ditampilkan. Anda juga bisa mengubah panjang kolom dengan menggunakan kendali drag yang muncul ketika Anda memindahkan mouse melalui batas kolom. Kustomisasi ini tersimpan sehingga Anda akan melihat heading yang sama nantinya.
Jika Anda bekerja pada beberapa tugas yang tidak berhubungan sekaligus, Anda juga dapat mengelompokkan file-file menjadi satu dalam daftar perubahan. Baca bagian bernama “Daftar Perubahan” untuk informasi lanjut.
At the bottom of the dialog you can see a summary of the range of repository revisions in use in your working copy. These are the commit revisions, not the update revisions; they represent the range of revisions where these files were last committed, not the revisions to which they have been updated. Note that the revision range shown applies only to the items displayed, not to the entire working copy. If you want to see that information for the whole working copy you must check the Show unmodified files checkbox.
Tip
Jika Anda ingin tampilan datar dari copy pekerjaan Anda, misalnya semua file dan folder pada setiap tingkat dari hirarki folder, maka dialog Periksa Modifikasi adalah cara termudah untuk melaksanakan itu. Cukup centang kotak centang Tampilkan file yang tidak diubah untuk menampilkan semua file dalam copy pekerjaan Anda.
Terkadang file-file diubah namanya di luar Subversion, dan mereka muncul di daftar file sebagai file yang hilang dan file yang tidak terversi. Untuk menghindari kehilangan sejarah tersebut, Anda perlu untuk memberitahu Subversion tentang koneksi tersebut. Cukup pilih nama lama (hilang) dan nama baru (tidak terversi) dan gunakan → untuk memasangkan kedua file tersebut sebagai suatu perubahan nama.
Repairing External Copies
If you made a copy of a file but forgot to use the Subversion command to do so, you can repair that copy so the new file doesn't lose its history. Simply select both the old name (normal or modified) and the new name (unversioned) and use → to pair the two files as a copy.
Seringkali Anda ingin melihat ke dalam file Anda, untuk melihat apa yang sudah Anda ubah. Anda bisa melaksanakan ini dengan memilih file yang sudah diubah dan memilih dari menu konteks TortoiseSVN. Ini memulai peninjau-diff eksternal, yang akan membandingkan file saat ini dengan copy murni (revisi BASE), yang disimpan setelah checkout atau pemutahiran terakhir.
Tip
Bahkan ketika tidak di dalam copy pekerjaan Anda atau ketika Anda mempunyai multipel versi file yang ada, Anda masih bisa menampilkan diff:
Pilih dua file yang ingin Anda bandingkan dalam explorer (contoh menggunakan Ctrl dan mouse) dan pilih dari menu konteks TortoiseSVN. File yang diklik terakhir (satu difokus, misalnya kotak bertitik) akan dianggap sebagai yang terakhir.
Dalam dunia ideal, Anda hanya perlu mengerjakan satu hal pada suatu saat dan copy pekerjaan Anda mengandung satu set perubahan-perubahan logikal. Oke, kembali ke realita. Seringkali terjadi bahwa Anda harus bekerja pada beberapa tugas yang tidak berhubungan sekaligus, dan saat Anda melihat di dialog komit, semua perubahan tercampur menjadi satu. Fitur daftar perubahan menolong Anda mengelompokkan file-file, membuat Anda lebih mudah melihat apa yang sedang Anda kerjakan. Tentu saja ini hanya akan dapat bekerja jika perubahan-perubahan tersebut tidak bertumpukan. Jika dua jenis tugas yang berbeda memengaruhi file yang sama, tidak ada cara untuk memisahkan perubahan-perubahan tersebut.
You can see changelists in several places, but the most important ones are the commit dialog and the check-for-modifications dialog. Let's start in the check-for-modifications dialog after you have worked on several features and many files. When you first open the dialog, all the changed files are listed together. Suppose you now want to organise things and group those files according to feature.
Select one or more files and use → to add an item to a changelist. Initially there will be no changelists, so the first time you do this you will create a new changelist. Give it name which describes what you are using it for, and click . The dialog will now change to show groups of items.
Once you have created a changelist you can drag and drop items into it, either from another changelist, or from Windows Explorer. Dragging from Explorer can be useful as it allows you to add items to a changelist before the file is modified. You could do that from the check-for-modifications dialog, but only by displaying all unmodified files.
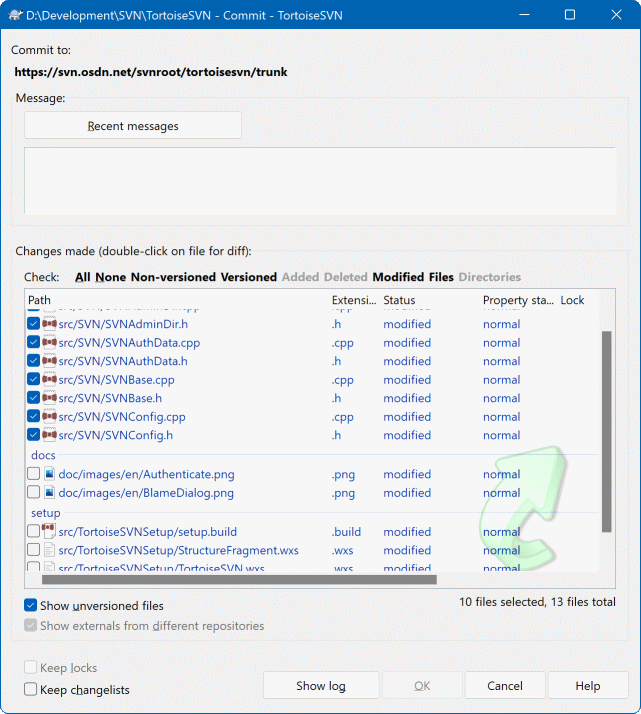
In the commit dialog you can see those same files, grouped by changelist. Apart from giving an immediate visual indication of groupings, you can also use the group headings to select which files to commit.
TortoiseSVN reserves one changelist name for its own use, namely ignore-on-commit. This is used to mark versioned files which you almost never want to commit even though they have local changes. This feature is described in bagian bernama “Excluding Items from the Commit List”.
Ketika anda mengkomit file-file ke changelist maka biasanya anda akan mengharapkan bahwa keanggotaan changelist tidak lagi dibutuhkan. Maka dari itu, file-file akan dihapus dari changelist secara otomatis ketika komit. Apabila anda masih menginginkan file tersebut di changelist, gunakan checkbox Keep changelists di bagian bawah dialog komit.
Tip
Changelists are purely a local client feature. Creating and removing changelists will not affect the repository, nor anyone else's working copy. They are simply a convenient way for you to organise your files.
Awas
Note that if you use changelists, externals will no longer show up in their own groups anymore. Once there are changelists, files and folders are grouped by changelist, not by external anymore.
More often than wanted, it's necessary to stop what you were working on and work on something else. For example a serious problem needs immediate dealing with and you have to stop working on the new feature. If possible, you should commit the changes you have done so far and then start working on the urgent issue, but often those changes would break the build or are just not ready for committing yet.
So if you can't commit your local changes yet, you have to put them aside while you're working on the urgent issue. The shelving feature helps you do exactly that: you can store your local changes on a shelve, get your working copy in a clean state again and work on the issue. After you're finished with the urgent issue and you've committed those changes, you can unshelve your shelved work and continue working on your previous task again.
Two new commands are implemented for this. One for shelving and one for unshelving.
To shelve your local changes, select your working copy and use → The following dialog allows you to select the files you want to shelve and give a name under which you want to store them.
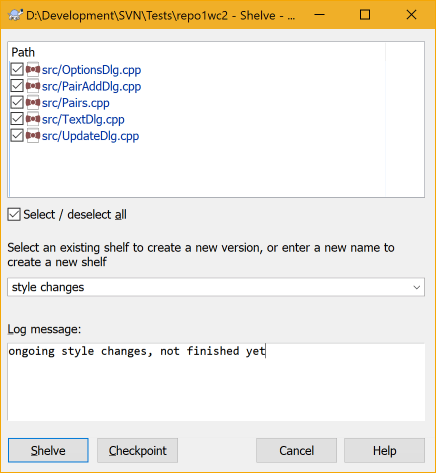
If you select an existing shelf, then a new version is created for that shelf. If you provide a new name, a new shelf is created for the selected files.
If you click the button, the shelf is created and your working copy files are reset to a clean state. If you click the button, the shelf is created but your local modifications are kept.
To unshelve your changes, use → to get the unshelve dialog. This dialog shows you a list of all shelved items. Select the shelved item you want and the version to apply back to your working copy and click .
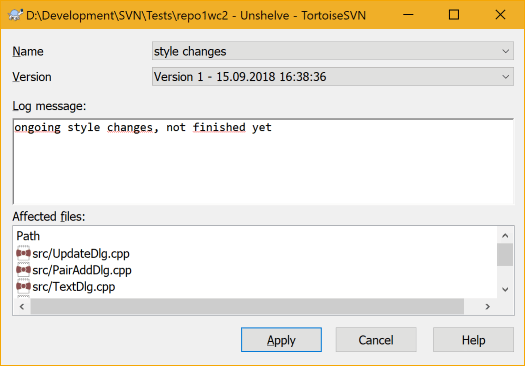
Tip
Shelves are purely a local client feature. Creating and removing Shelves will not affect the repository, nor anyone else's working copy.
Experimental
The shelving feature is still marked as experimental.
That means that while shelving works as advertised, it is still in a stage where it's heavily improved and worked on. That also means that there's no guarantee that the shelves you create are upwards compatible and future versions might not be able to use them. And of course the UI might change as well in future versions to accommodate new features and behaviors.
Untuk setiap perubahan yang Anda buat dan komit, Anda harus menyediakan pesan log untuk perubahan itu. Dengan cara itu nantinya Anda bisa menemukan perubahan apa yang telah dibuat dan mengapa, dan Anda mempunyai log detil atas proses pengembangan Anda.
Dialog Log Revisi mengambil semua pesan log itu dan menampilkannya untuk Anda. Tampilan menjadi 3 pane.
Pane atas menampilkan daftar revisi dimana perubahan terhadap file/folder sudah dikomit. Ringkasan ini menyertakan tanggal dan jam, orang yang mengkomit revisi dan awal dari pesan log.
Baris yang ditampilkan dalam warna biru menunjukan bahwa sesuatu telah dicopy ke baris pengembangan ini (mungkin dari cabang).
Pane tengah menampilkan pesan log lengkap untuk revisi yang dipilih.
Pane bawah menampilkan daftar semua file dan folder yang sudah diubah sebagai bagian dari revisi yang dipilih.
Tapi ia lebih dari itu - ia menyediakan perintah menu konteks yang bisa Anda gunakan untuk mendapatkan bahkan lebih banyak informasi tentang histori proyek.
Ada beberapa tempat dari dimana Anda bisa menampilkan dialog Log:
Dari submenu konteks TortoiseSVN
Dari halaman properti
Dari dialog progres setelah pemutahiran selesai. Maka dialog Log hanya menampilkan revisi itu yang diubah sejak pemutahiran Anda yang terakhir
From the repository browser
Apabila repositori tidak tersedia anda akan melihat dialog Apakah anda ingin offline?, seperti pada bagian bernama “Offline Mode”.
The top pane has an Actions column containing icons that summarize what has been done in that revision. There are four different icons, each shown in its own column.

If a revision modified a file or directory, the modified icon is shown in the first column.

If a revision added a file or directory, the added icon is shown in the second column.

If a revision deleted a file or directory, the deleted icon is shown in the third column.

If a revision replaced a file or directory, the replaced icon is shown in the fourth column.

If a revision moved or renamed a file or directory, the moved icon is shown in the fourth column.

If a revision replaced a file or directory by moving/renaming it, the move replaced icon is shown in the fourth column.

If a revision merged a file or directory, the merged icon is shown in the fourth column.

If a revision reverse merged a file or directory, the reverse merged icon is shown in the fourth column.
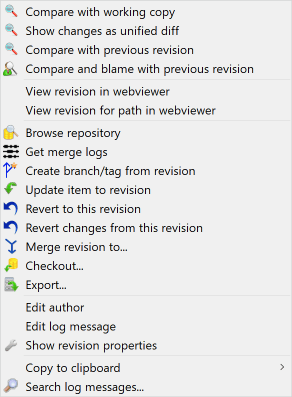
The top pane of the Log dialog has a context menu that allows you to access much more information. Some of these menu entries appear only when the log is shown for a file, and some only when the log is shown for a folder.
- Compare with working copy
Membandingkan revisi yang dipilih dengan copy pekerjaan Anda. Piranti-Diff standar adalah TortoiseMerge yang disertakan dengan TortoiseSVN. Jika dialog log adalah untuk folder, ini akan memperlihatkan kepada Anda daftar dari file yang diubah, dan membolehkan Anda untuk meninjau ulang perubahan yang dibuat ke setiap file secara individu.
- Compare and blame with working BASE
Blame the selected revision, and the file in your working BASE and compare the blame reports using a visual diff tool. Read bagian bernama “Blame Perbedaan” for more detail. (files only)
- Show changes as unified diff
Melihat perubahan yang dibuat dalam revisi yang dipilih sebagai fileUnified-Diff (GNU patch format). Ini memperlihatkan hanya perbedaan dengan beberapa baris dari konteks. Ini lebih sulit untuk dibaca daripada perbandingan file visual, tapi akan menampilkan semua perubahan file sekaligus dalam format yang kompak.
If you hold down the Shift key when clicking on the menu item, a dialog shows up first where you can set options for the unified diff. These options include the ability to ignore changes in line endings and whitespaces.
- Bandingkan dengan revisi sebelumnya
Compare the selected revision with the previous revision. This works in a similar manner to comparing with your working copy. For folders this option will first show the changed files dialog allowing you to select files to compare.
- Bandingkan dan salahkan dengan revisi sebelumnya
Show the changed files dialog allowing you to select files. Blame the selected revision, and the previous revision, and compare the results using a visual diff tool. (folders only)
- Save revision to...
Save the selected revision to a file so you have an older version of that file. (files only)
- Open / Open with...
Open the selected file, either with the default viewer for that file type, or with a program you choose. (files only)
- Salahkan...
Blame the file up to the selected revision. (files only)
- Browse repository
Open the repository browser to examine the selected file or folder in the repository as it was at the selected revision.
- Create branch/tag from revision
Create a branch or tag from a selected revision. This is useful e.g. if you forgot to create a tag and already committed some changes which weren't supposed to get into that release.
- Update item to revision
Update your working copy to the selected revision. Useful if you want to have your working copy reflect a time in the past, or if there have been further commits to the repository and you want to update your working copy one step at a time. It is best to update a whole directory in your working copy, not just one file, otherwise your working copy could be inconsistent.
If you want to undo an earlier change permanently, use Revert to this revision instead.
- Revert to this revision
Revert to an earlier revision. If you have made several changes, and then decide that you really want to go back to how things were in revision N, this is the command you need. The changes are undone in your working copy so this operation does not affect the repository until you commit the changes. Note that this will undo all changes made after the selected revision, replacing the file/folder with the earlier version.
If your working copy is in an unmodified state, after you perform this action your working copy will show as modified. If you already have local changes, this command will merge the undo changes into your working copy.
What is happening internally is that Subversion performs a reverse merge of all the changes made after the selected revision, undoing the effect of those previous commits.
If after performing this action you decide that you want to undo the undo and get your working copy back to its previous unmodified state, you should use → from within Windows Explorer, which will discard the local modifications made by this reverse merge action.
If you simply want to see what a file or folder looked like at an earlier revision, use Update to revision or Save revision as... instead.
- Revert changes from this revision
Undo changes from which were made in the selected revision. The changes are undone in your working copy so this operation does not affect the repository at all! Note that this will undo the changes made in that revision only; it does not replace your working copy with the entire file at the earlier revision. This is very useful for undoing an earlier change when other unrelated changes have been made since.
If your working copy is in an unmodified state, after you perform this action your working copy will show as modified. If you already have local changes, this command will merge the undo changes into your working copy.
What is happening internally is that Subversion performs a reverse merge of that one revision, undoing its effect from a previous commit.
You can undo the undo as described above in Revert to this revision.
- Gabung revisi ke...
Merge the selected revision(s) into a different working copy. A folder selection dialog allows you to choose the working copy to merge into, but after that there is no confirmation dialog, nor any opportunity to try a test merge. It is a good idea to merge into an unmodified working copy so that you can revert the changes if it doesn't work out! This is a useful feature if you want to merge selected revisions from one branch to another.
- Checkout...
Melakukan suatu checkout baru dari folder terpilih pada revisi terpilih. Hal ini akan menampilkan suatu dialog di mana Anda dapat mengkonfirmasi URL dan revisi tersebut dan memilih sebuah lokasi untuk checkout itu.
- Export...
Mengekspor file/folder terpilih pada revisi terpilih. Hal ini akan menampilkan suatu dialog dimana Anda dapat mengkonfirmasi URL dan revisi tersebut dan memilih sebuah lokasi untuk ekspor itu.
- Edit author / log message
Mengedit pesan log atau pembuat yang terlampir ke komit sebelumnya. Baca bagian bernama “Mengubah Pesan Log dan Pembuat” untuk mengetahui bagaimana ini bekerja.
- Tampilkan properti-properti revisi
View and edit any revision property, not just log message and author. Refer to bagian bernama “Mengubah Pesan Log dan Pembuat”.
- Copy ke clipboard
Menyalin rincian log dari revisi-revisi terpilih ke clipboard. Tindakan ini akan menyalin nomor revisi, pengarang, tanggal, pesan log dan daftar hal-hal yang berubah untuk setiap revisi.
- Search log messages...
Mencari pesan log untuk teks yang Anda masukan. Ini mencari pesan log yang Anda masukan dan juga ringkasan tindakan yang dibuat oleh Subversion (ditampilkan dalam pane bawah). Pencarian tidak sensitif huruf.
- Create code collaborator review...
This menu is shown only if the SmartBear code collaborator tool is installed. When invoked for the first time, a dialog is shown prompting the user to enter user credentials for both code collaborator and SVN. Once the settings are stored, the settings dialog is no longer shown when the menu is invoked, unless the user holds Ctrl while executing the menu item. The configuration and the chosen revision(s) are used to invoke the code collaborator graphical user interface client, which creates a new review with the selected revisions.
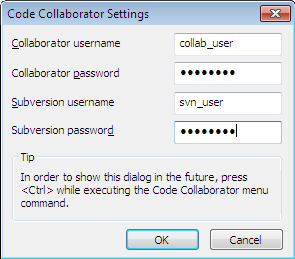
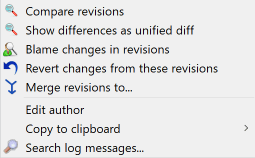
Jika Anda memilih dua revisi sekaligus (menggunakan Ctrl-modifier biasa), menu konteks berubah dan memberikan opsi lebih sedikit:
- Compare revisions
Membandingkan dua revisi yang dipilih menggunkan piranti pembeda visual. Piranti-Diff standar adalah TortoiseMerge yang disertakan dengan TortoiseSVN.
Jika Anda memilih opsi ini untuk folder, dialog selanjutnya muncul mendaftarkan file yang diubah dan menawarkan opsi diff berikutnya. Baca tentang dialog Membandingkan Revisi dalam bagian bernama “Membandingkan Folder”.
- Blame revisions
Blame the two revisions and compare the blame reports using a visual difference tool. Read bagian bernama “Blame Perbedaan” for more detail.
- Show differences as unified diff
Melihat perbedaan antara dua revisi yang dipilih sebagai file Unified-Diff. Pekerjaan ini untuk file dan folder.
- Copy ke clipboard
Cari pesan log seperti dijelaskan di atas.
- Search log messages...
Cari pesan log seperti dijelaskan di atas.
If you select two or more revisions (using the usual Ctrl or Shift modifiers), the context menu will include an entry to Revert all changes which were made in the selected revisions. This is the easiest way to rollback a group of revisions in one go.
You can also choose to merge the selected revisions to another working copy, as described above.
If all selected revisions have the same author, you can edit the author of all those revisions in one go.
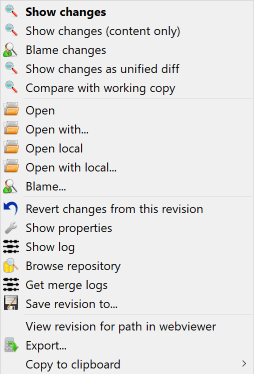
The bottom pane of the Log dialog also has a context menu that allows you to
- Show changes
Show changes made in the selected revision for the selected file.
- Blame changes
Blame the selected revision and the previous revision for the selected file, and compare the blame reports using a visual diff tool. Read bagian bernama “Blame Perbedaan” for more detail.
- Show as unified diff
Show file changes in unified diff format. This context menu is only available for files shown as modified.
- Open / Open with...
Membuka file yang dipilih, baik dengan peninjau standar untuk tipe file itu, ataupun dengan program yang Anda sukai.
- Salahkan...
Opens the Blame dialog, allowing you to blame up to the selected revision.
- Revert changes from this revision
Memulihkan perubahan yang dibuat untuk file terpilih dalam revisi itu.
- Show properties
Melihat properti Subversion untuk item yang dipilih.
- Show log
Menampilkan log revisi untuk file tunggal yang dipilih.
- Dapatkan log penggabungan
Show the revision log for the selected single file, including merged changes. Find out more in bagian bernama “Merge Tracking Features”.
- Save revision to...
Menyimpan revisi yang dipilih ke file agar Anda mempunyai versi lama dari file itu.
- Export...
Export the selected items in this revision to a folder, preserving the file hierarchy.
When multiple files are selected in the bottom pane of the Log dialog, the context menu changes to the following:
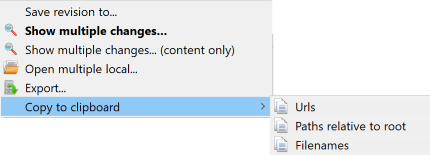
- Save revision to...
Menyimpan revisi yang dipilih ke file agar Anda mempunyai versi lama dari file itu.
- Show multiple changes...
Show changes made in the selected revision for the selected files. Note that the show changes functionality is invoked multiple times, which may bring up multiple copies of your selected diff tool, or just add a new comparison tab in your diff tool. If you have selected more than 15 files, you will be prompted to confirm the action.
- Open multiple local...
This will open local working copy files that correspond to your selected files using the application that is registered for the extension. [The behavior is the one you would get double-clicking the working-copy file(s) in Windows explorer]. Depending on how your file extension is associated to an application and the capabilities of the application, this may be a slow operation. In the worst case, new instances of the application may be launched by Windows for each file that was selected.
If you hold Ctrl while invoking this command, the working copy files are always loaded into Visual Studio. This only works when the following conditions are met: Visual Studio must be running in the same user context while having the same process integrity level [running as admin or not] as TortoiseProc.exe. It may be desirable to have the solution containing the changed files loaded, although this is not strictly necessary. Only files that exist on disk with extensions [.cpp, .h, .cs, .rc, .resx, .xaml, .js, .html, .htm, .asp, .aspx, .php, .css and .xml] will be loaded. A maximum of 100 files can be loaded into Visual Studio at one time, and the files are always loaded as new tabs into the currently open instance of Visual Studio. The benefit of reviewing code changes in Visual Studio lies in the fact that you can then use the built-in code navigation, reference finding, static code analysis and other tools built into Visual Studio.
- Export...
Export the selected files/folder at the selected revision. This brings up a dialog for you to confirm the URL and revision, and select a location for the export.
Tip
You may notice that sometimes we refer to changes and other times to differences. What's the difference?
Subversion uses revision numbers to mean 2 different things. A revision generally represents the state of the repository at a point in time, but it can also be used to represent the changeset which created that revision, e.g. “Done in r1234” means that the changes committed in r1234 implement feature X. To make it clearer which sense is being used, we use two different terms.
If you select two revisions N and M, the context menu will offer to show the difference between those two revisions. In Subversion terms this is diff -r M:N.
If you select a single revision N, the context menu will offer to show the changes made in that revision. In Subversion terms this is diff -r N-1:N or diff -c N.
The bottom pane shows the files changed in all selected revisions, so the context menu always offers to show changes.
Dialog Log tidak selalu menampilkan semua perubahan yang dibuat untuk sejumlah alasan:
For a large repository there may be hundreds or even thousands of changes and fetching them all could take a long time. Normally you are only interested in the more recent changes. By default, the number of log messages fetched is limited to 100, but you can change this value in → (bagian bernama “Seting Dialog TortoiseSVN 1”),
Ketika kotak Hentikan copy/ganti nama dicentang, Tampilkan Log akan berhenti pada titik file atau folder yang dipilih dari mana saja di dalam repositori. Ini bisa berguna saat pencarian di cabang (atau tag) karena ia berhenti di akar dari cabang itu, dan memberikan indikasi cepat dari perubahan hanya dalam cabang itu.
Biasanya Anda ingin membiarkan opsi ini tidak dicentang. TortoiseSVN mengingat kondisi dari kotak centang, maka ia akan menghormati preferensi Anda.
Ketika dialog Tampilkan Log diminta dari dalam dialog Merge, secara bawaan kotak itu selalu dicentang. Ini dikarenakan penggabungan adalah paling sering mencari perubahan pada cabang, dan kembali diluar akar dari cabang tidak masuk akal dalam kejadian itu.
Catatan bahwa Subversion saat ini mengimplementasi penggantian nama sebagai pasangan copy/hapus, maka mengganti nama file atau folder juga akan menyebabkan tampilan log berhenti jika opsi ini dicentang.
Jika Anda ingin melihat log pesan lebih, klik untuk mengambil 100 pesan log berikutnya. Anda bisa mengulang ini sebanyak yang Anda butuhkan.
Disebelah tombol ini ada tombol multi-fungsi yang mengingat opsi terakhir yang Anda gunakan. Klik pada panah untuk melihat opsi lain yang ditawarkan.
Gunakan jika Anda ingin meninjau jangkauan revisi tertentu. Dialog akan meminta Anda untuk memasukan awal dan akhir revisi.
Gunakan jika Anda ingin melihat semua pesan log dari HEAD kembali ke revisi 1.
To refresh the latest revision in case there were other commits while the log dialog was open, hit the F5 key.
To refresh the log cache, hit the Ctrl-F5 keys.
Because the log dialog shows you the log from HEAD, not from the current working copy revision, it often happens that there are log messages shown for content which has not yet been updated in your working copy. To help make this clearer, the commit message which corresponds to the revision you have in your working copy is shown in bold.
When you show the log for a folder the revision highlighted is the highest revision found anywhere within that folder, which requires a crawl of the working copy. The crawl takes place within a separate thread so as not to delay showing the log, but as a result highlighting for folders may not appear immediately.
Subversion 1.5 and later keeps a record of merges using properties. This allows us to get a more detailed history of merged changes. For example, if you develop a new feature on a branch and then merge that branch back to trunk, the feature development will show up on the trunk log as a single commit for the merge, even though there may have been 1000 commits during branch development.
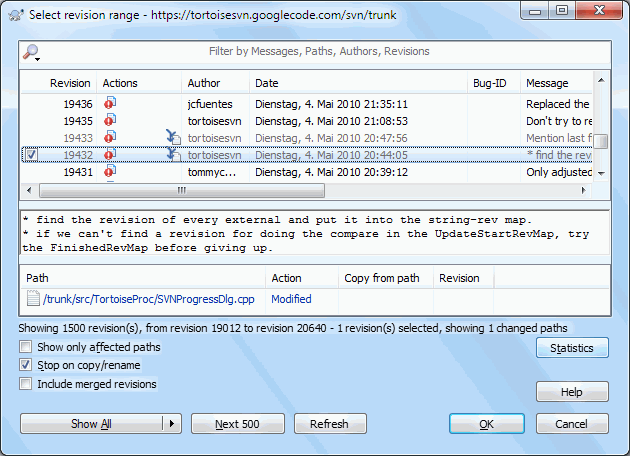
If you want to see the detail of which revisions were merged as part of that commit, use the Include merged revisions checkbox. This will fetch the log messages again, but will also interleave the log messages from revisions which were merged. Merged revisions are shown in grey because they represent changes made on a different part of the tree.
Of course, merging is never simple! During feature development on the branch there will probably be occasional merges back from trunk to keep the branch in sync with the main line code. So the merge history of the branch will also include another layer of merge history. These different layers are shown in the log dialog using indentation levels.
Revision properties are completely different from the Subversion properties of each item. Revprops are descriptive items which are associated with one specific revision number in the repository, such as log message, commit date and committer name (author).
Ada kalanya Anda mungkin ingin mengubah pesan log yang pernah Anda masukan, mungkin karena ada kesalahan ejaan didalamnya atau Anda ingin meningkatkan pesan atau mengubahnya untuk alasan lain. Atau Anda ingin mengubah pembuat dari komit karena Anda lupa untuk menyiapkan otentikasi atau ...
Subversion lets you change revision properties any time you want. But since such changes can't be undone (those changes are not versioned) this feature is disabled by default. To make this work, you must set up a pre-revprop-change hook. Please refer to the chapter on Hook Scripts in the Subversion Book for details about how to do that. Read bagian bernama “Server side hook scripts” to find some further notes on implementing hooks on a Windows machine.
Once you've set up your server with the required hooks, you can change the author and log message (or any other revprop) of any revision, using the context menu from the top pane of the Log dialog. You can also edit a log message using the context menu for the middle pane.
Awas
Karena properti revisi Subversion tidak diversi, membuat perubahan ke properti demikian (sebagai contoh, properti pesan komit svn:log) akan menimpa nilai sebelumnya dari properti itu selamanya.
Penting
Since TortoiseSVN keeps a cache of all the log information, edits made for author and log messages will only show up on your local installation. Other users using TortoiseSVN will still see the cached (old) authors and log messages until they refresh the log cache. Refer to bagian bernama “Refreshing the View”
Jika Anda ingin membatasi pesan log untuk ditampilkan hanya yang menarik bagi Anda daripada menggulung melalui daftar ratusan, Anda bisa menggunakan kontrol filter di atas dari Dialog Log. Kontrol awal dan akhir tanggal membolehkan Anda untuk membatasi output ke jangkauan tanggal yang diketahui. Kotak pencarian membolehkan Anda untuk menampilkan hanya pesan yang berisi frase tertentu.
Click on the search icon to select which information you want to search in, and to choose regex mode. Normally you will only need a simple sub-string search, but if you need to more flexible search terms, you can use regular expressions. If you hover the mouse over the box, a tooltip will give hints on how to use the regex functions, or the sub-string functions. The filter works by checking whether your filter string matches the log entries, and then only those entries which match the filter string are shown.
Simple sub-string search works in a manner similar to a search engine. Strings to search for are separated by spaces, and all strings must match. You can use a leading - to specify that a particular sub-string is not found (invert matching for that term), and you can use ! at the start of the expression to invert matching for the entire expression. You can use a leading + to specify that a sub-string should be included, even if previously excluded with a -. Note that the order of inclusion/exclusion is significant here. You can use quote marks to surround a string which must contain spaces, and if you want to search for a literal quotation mark you can use two quotation marks together as a self-escaping sequence. Note that the backslash character is not used as an escape character and has no special significance in simple sub-string searches. Examples will make this easier:
Alice Bob -Eve
searches for strings containing both Alice and Bob but not Eve
Alice -Bob +Eve
searches for strings containing both Alice but not Bob, or strings which contain Eve.
-Case +SpecialCase
searches for strings which do not contain Case, but still include strings which contain SpecialCase.
!Alice Bob
searches for strings which do not contain both Alice and Bob
!-Alice -Bob
do you remember De Morgan's theorem? NOT(NOT Alice AND NOT Bob) reduces to (Alice OR Bob).
"Alice and Bob"
searches for the literal expression “Alice and Bob”
""
searches for a double-quote anywhere in the text
"Alice says ""hi"" to Bob"
searches for the literal expression “Alice says "hi" to Bob”.
Describing the use of regular expression searches is beyond the scope of this manual, but you can find online documentation and a tutorial at http://www.regular-expressions.info/.
Catatan bahwa filter ini bertindak pada pesan yang sudah diterima. Mereka tidak mengontrol pengambilan pesan dari repositori.
You can also filter the path names in the bottom pane using the Show only affected paths checkbox. Affected paths are those which contain the path used to display the log. If you fetch the log for a folder, that means anything in that folder or below it. For a file it means just that one file. Normally the path list shows any other paths which are affected by the same commit, but in grey. If the box is checked, those paths are hidden.
Sometimes your working practices will require log messages to follow a particular format, which means that the text describing the changes is not visible in the abbreviated summary shown in the top pane. The property tsvn:logsummary can be used to extract a portion of the log message to be shown in the top pane. Read bagian bernama “TortoiseSVN Project Properties” to find out how to use this property.
No Log Formatting from Repository Browser
Because the formatting depends upon accessing Subversion properties, you will only see the results when using a checked out working copy. Fetching properties remotely is a slow operation, so you will not see this feature in action from the repo browser.
Tombol memunculkan kotak yang menampilkan beberapa informasi menarik tentang revisi yang ditampikan dalam dialog Log. Ini menampilkan berapa banyak pembuat sudah bekerja, berapa banyak komit yang telah dibuat, kemajuan dengan minggu, dan masih banyak lagi. Sekarang Anda bisa melihat sekaligus siap yang sudah bekerja paling keras dan siapa yang malas ;-)
Halaman ini memberikan Anda semua angka yang bisa Anda pikirkan dalam periode dan jumlah revisi tertentu yang ditemukan, dan beberapa nilai min/max/rata-rata.

Grafik ini memperlihatkan kepada Anda pembuat yang aktif pada proyek sebagai histogram sederhana, histogram bertumpuk atau pie chart.
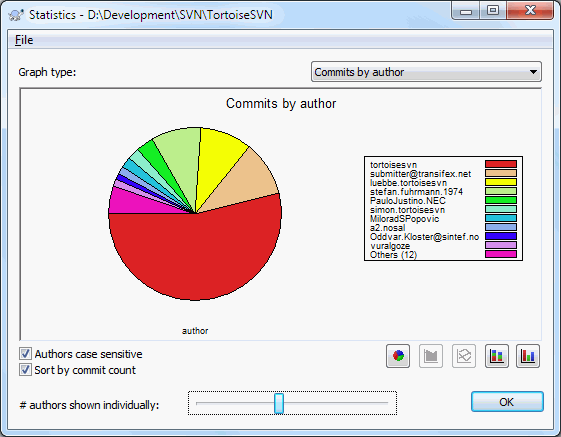
Where there are a few major authors and many minor contributors, the number of tiny segments can make the graph more difficult to read. The slider at the bottom allows you to set a threshold (as a percentage of total commits) below which any activity is grouped into an Others category.
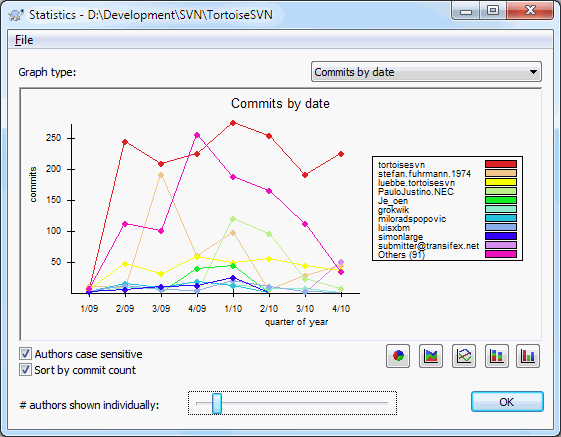
Halaman ini memberikan gambaran grafis dari aktivitas proyek dalam batasan jumlah komit dan pembuat. Ini memberikan ide kapan proyek dikerjakan, dan siapa yang mengerjakannya pada waktu kapan.
Ketika ada beberapa pembuat, Anda akan mendapatkan banyak baris pada grafik. Ada dua tampilan tersedia disini: normal, dimana setiap aktivitas pembuat relatif ke baris base, dan ditumpuk, dimana aktivitas pembuat relatif ke baris dibawahnya. Opsi terakhir menghindari baris saling silang, yang bisa membuat grafik mudah untuk dibaca, tapi kurang mudah bagi satu output pembuat.
By default the analysis is case-sensitive, so users PeterEgan and PeteRegan are treated as different authors. However, in many cases user names are not case-sensitive, and are sometimes entered inconsistently, so you may want DavidMorgan and davidmorgan to be treated as the same person. Use the Authors case insensitive checkbox to control how this is handled.
Catatan bahwa statistik mencakup periode yang sama dengan dialog Log. Jika itu hanya menampilkan satu revisi maka statistik tidak akan memberitahu lebih banyak.
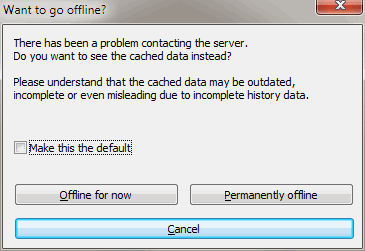
If the server is not reachable, and you have log caching enabled you can use the log dialog and revision graph in offline mode. This uses data from the cache, which allows you to continue working although the information may not be up-to-date or even complete.
Here you have three options:
- Offline for now
Complete the current operation in offline mode, but retry the repository next time log data is requested.
- Permanently offline
Remain in offline mode until a repository check is specifically requested. See bagian bernama “Refreshing the View”.
- Batal
If you don't want to continue the operation with possibly stale data, just cancel.
The Make this the default checkbox prevents this dialog from re-appearing and always picks the option you choose next. You can still change (or remove) the default after doing this from → .
If you want to check the server again for newer log messages, you can simply refresh the view using F5. If you are using the log cache (enabled by default), this will check the repository for newer messages and fetch only the new ones. If the log cache was in offline mode, this will also attempt to go back online.
If you are using the log cache and you think the message content or author may have changed, you can use Shift-F5 or Ctrl-F5 to re-fetch the displayed messages from the server and update the log cache. Note that this only affects messages currently shown and does not invalidate the entire cache for that repository.
One of the commonest requirements in project development is to see what has changed. You might want to look at the differences between two revisions of the same file, or the differences between two separate files. TortoiseSVN provides a built-in tool named TortoiseMerge for viewing differences of text files. For viewing differences of image files, TortoiseSVN also has a tool named TortoiseIDiff. Of course, you can use your own favourite diff program if you like.
- Perubahan lokal
Jika Anda ingin melihat apa yang telah Anda ubah dalam copy pekerjaan Anda, cukup gunakan menu konteks explorer dan pilih → .
- Perbedaan ke cabang/tag lain
Jika Anda ingin melihat apa yang berubah pada trunk (jika Anda bekerja pada cabang) atau pada cabang tertentu (jika Anda bekerja pada trunk), Anda bisa menggunakan menu konteks explorer. Tekan tombol Shift sementara Anda mengklik pada file. Lalu pilih → . Dalam dialog berikut, tetapkan URL dalam repositori dengan file lokal yang Anda ingin bandingkan.
Anda juga bisa menggunakan browser repositori dan memilih dua susunan untuk diff, mungkin dua tag, atau cabang/tag dan trunk. Menu konteks disana membolehkan Anda untuk membandingkannya menggunakan . Baca selengkapnya dalam bagian bernama “Membandingkan Folder”.
- Perbedaan dari revisi sebelumnya
Jika Anda ingin melihat perbedaan antara revisi tertentu dan copy pekerjaan Anda, gunakan dialog Log Revisi, pilih revisi yang menarik, lalu pilih dari menu konteks.
If you want to see the difference between the last committed revision and your working copy, assuming that the working copy hasn't been modified, just right click on the file. Then select → . This will perform a diff between the revision before the last-commit-date (as recorded in your working copy) and the working BASE. This shows you the last change made to that file to bring it to the state you now see in your working copy. It will not show changes newer than your working copy.
- Perbedaan antara dua revisi sebelumnya
Jika Anda ingin melihat perbedaan antara dua revisi yang sudah dikomit, gunakan dialog Log Revisi dan pilih dua revisi yang Anda inginkan untuk dibandingkan (menggunakan Ctrl-modifier biasa). Lalu pilih dari menu konteks.
Jika Anda melakukan ini dari log revisi untuk folder, dialog Bandingkan Revisi muncul, menampilkan daftar file yang diubah dalam folder itu. Baca selengkapnya dalam bagian bernama “Membandingkan Folder”.
- Semua perubahan yang dibuat dalam komit
Jika Anda ingin melihat perubahan yang dibuat terhadap semua file dalam revisi tertentu dalam satu tampilan, Anda bisa menggunakan output Unified-Diff (GNU patch format). Ini hanya menampilkan perbedaan dengan beberapa baris dari konteks. Ini agak sulit untuk dibaca daripada pembandingan file visual, tapi akan menampilkan semua perubahan bersamaan. Dari dialog Log Revisi pilih revisi yang menarik, lalu pilih dari menu konteks.
- Perbedaan di antara beberapa file
Jika Anda ingin melihat perbedaan diantara dua file berbeda, Anda bisa melakukan itu secara langsung dalam explorer dengan memilih kedua file (menggunakan Ctrl-modifier biasa). Lalu dari menu konteks explorer pilih → .
If the files to compare are not located in the same folder, use the command → to mark the first file for diffing, then browse to the second file and use → . To remove the marked file, use the command → again, but hold down the Ctrl-modifier while clicking on it.
- Perbedaan antara WC file/folder dan URL
If you want to see the differences between a file in your working copy, and a file in any Subversion repository, you can do that directly in explorer by selecting the file then holding down the Shift key whilst right clicking to obtain the context menu. Select → . You can do the same thing for a working copy folder. TortoiseMerge shows these differences in the same way as it shows a patch file - a list of changed files which you can view one at a time.
- Perbedaan dengan informasi blame
Jika Anda ingin melihat tidak hanya perbedaan tapi juga pembuat, revisi dan tanggal perubahan dibuat, Anda bisa menggabungkan diff dan laporan blame dari dalam dialog log revisi. Baca selengkapnya bagian bernama “Blame Perbedaan”.
- Perbedaan antara beberapa folder
The built-in tools supplied with TortoiseSVN do not support viewing differences between directory hierarchies. But if you have an external tool which does support that feature, you can use that instead. In bagian bernama “Eksternal Diff/Merge Tools” we tell you about some tools which we have used.
If you have configured a third party diff tool, you can use Shift when selecting the Diff command to use the alternate tool. Read bagian bernama “Seting Program Eksternal” to find out about configuring other diff tools.
Sometimes in the life of a project you might change the line endings from CRLF to LF, or you may change the indentation of a section. Unfortunately this will mark a large number of lines as changed, even though there is no change to the meaning of the code. The options here will help to manage these changes when it comes to comparing and applying differences. You will see these settings in the Merge and Blame dialogs, as well as in the settings for TortoiseMerge.
Ignore line endings excludes changes which are due solely to difference in line-end style.
Compare whitespaces includes all changes in indentation and inline whitespace as added/removed lines.
Ignore whitespace changes excludes changes which are due solely to a change in the amount or type of whitespace, e.g. changing the indentation or changing tabs to spaces. Adding whitespace where there was none before, or removing a whitespace completely is still shown as a change.
Ignore all whitespaces excludes all whitespace-only changes.
Naturally, any line with changed content is always included in the diff.
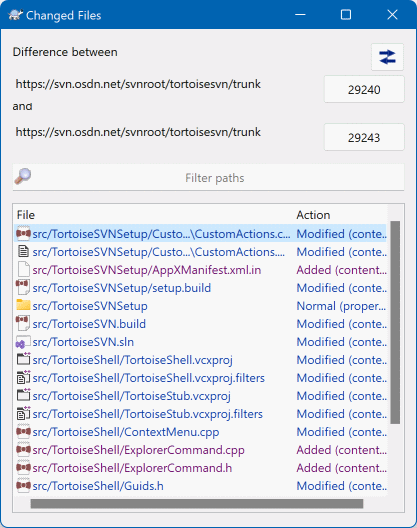
Ketika Anda memilih dua susunan dalam browser repositori, atau ketika Anda memilih dua revisi dari sebuah folder dalam dialog, Anda bisa → .
Dialog ini memperlihatkan daftar dari semua file yang sudah diubah dan membolehkan Anda untuk membandingkan atau blame secara individu menggunakan menu konteks.
You can export a change tree, which is useful if you need to send someone else your project tree structure, but containing only the files which have changed. This operation works on the selected files only, so you need to select the files of interest - usually that means all of them - and then → . You will be prompted for a location to save the change tree.
You can also export the list of changed files to a text file using → .
If you want to export the list of files and the actions (modified, added, deleted) as well, you can do that using → .
Tombol di atas membolehkan Anda untuk mengubah arah dari perbandingan. Anda bisa menampilkan perubahan yang diperlukan dari A ke B, atau jika diinginkan, dari B ke A.
Tombol-tombol yang berisi nomor revisi dapat digunakan untuk mengubah suatu rentang revisi yang berbeda. Jika Anda memilih rentang tersebut, daftar hal-hal yang berbeda diantara kedua revisi akan dimutahirkan secara otomatis.
If the list of filenames is very long, you can use the search box to reduce the list to filenames containing specific text. Note that a simple text search is used, so if you want to restrict the list to C source files you should enter .c rather than *.c.
Ada banyak piranti tersedia untuk melakukan diff file teks, termasuk TortoiseMerge itu sendiri, tapi kami sering menemukan keinginan untuk melihat bagaimana file gambar diubah juga. Itulah mengapa kami membuat TortoiseIDiff.
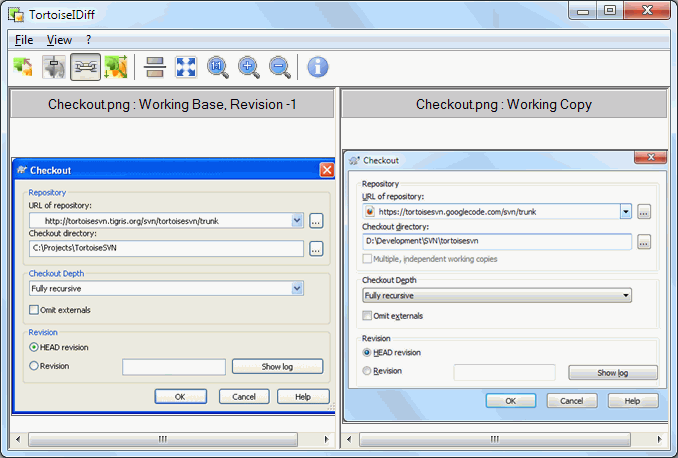
→ for any of the common image file formats will start TortoiseIDiff to show image differences. By default the images are displayed side-by-side but you can use the View menu or toolbar to switch to a top-bottom view instead, or if you prefer, you can overlay the images and pretend you are using a lightbox.
Naturally you can also zoom in and out and pan around the image. You can also pan the image simply by left-dragging it. If you select the Link images together option, then the pan controls (scrollbars, mousewheel) on both images are linked.
An image info box shows details about the image file, such as the size in pixels, resolution and colour depth. If this box gets in the way, use → to hide it. You can get the same information in a tooltip if you hover the mouse over the image title bar.
When the images are overlaid, the relative intensity of the images (alpha blend) is controlled by a slider control at the left side. You can click anywhere in the slider to set the blend directly, or you can drag the slider to change the blend interactively. Ctrl+Shift-Wheel to change the blend.
The button above the slider toggles between 0% and 100% blends, and if you double click the button, the blend toggles automatically every second until you click the button again. This can be useful when looking for multiple small changes.
Sometimes you want to see a difference rather than a blend. You might have the image files for two revisions of a printed circuit board and want to see which tracks have changed. If you disable alpha blend mode, the difference will be shown as an XOR of the pixel colour values. Unchanged areas will be plain white and changes will be coloured.
When you want to diff non-text documents you normally have to use the software used to create the document as it understands the file format. For the commonly used Microsoft Office and Open Office suites there is indeed some support for viewing differences and TortoiseSVN includes scripts to invoke these with the right settings when you diff files with the well-known file extensions. You can check which file extensions are supported and add your own by going to → and clicking in the External Programs section.
Problems with Office 2010
If you installed the Click-to-Run version of Office 2010 and you try to diff documents you may get an error message from Windows Script Host something like this: “ActiveX component can't create object: word.Application”. It seems you have to use the MSI-based version of Office to get the diff functionality.
Jika piranti yang kami sediakan tidak mencukupi Anda, coba salah satu dari banyak sumber-terbuka atau program komersil yang tersedia. Setiap orang mempunyai favorit sendiri, dan daftar ini tidak berarti lengkap, tapi ini adalah beberapa yang bisa Anda pertimbangkan:
- WinMerge
WinMerge is a great open-source diff tool which can also handle directories.
- Perforce Merge
Perforce is a commercial RCS, but you can download the diff/merge tool for free. Get more information from Perforce.
- KDiff3
KDiff3 adalah piranti diff gratis yang juga bisa menangani direktori. Anda bisa mendownloadnya dari disini.
- SourceGear DiffMerge
SourceGear Vault is a commercial RCS, but you can download the diff/merge tool for free. Get more information from SourceGear.
- ExamDiff
ExamDiff Standard adalah gratis. Ia bisa menangani file tapi tidak pada direktori. ExamDiff Pro adalah shareware dan menambah jumlah perangkatnya termasuk diff direktori dan kemampuan pengeditan. Dalam kedua selera, versi 3.2 dan diatasnya bisa menangani unicode. Anda bisa mendownloadnya dari PrestoSoft.
- Beyond Compare
Similar to ExamDiff Pro, this is an excellent shareware diff tool which can handle directory diffs and unicode. Download it from Scooter Software.
- Araxis Merge
Araxis Merge is a useful commercial tool for diff and merging both files and folders. It does three-way comparison in merges and has synchronization links to use if you've changed the order of functions. Download it from Araxis.
Baca bagian bernama “Seting Program Eksternal” untuk informasi bagaimana menyiapkan TortoiseSVN menggunakan piranti ini.
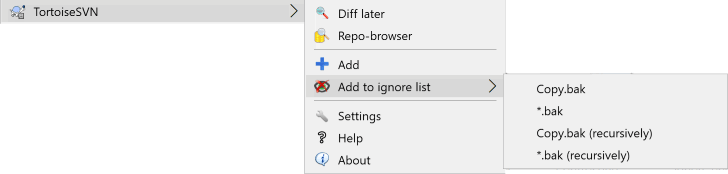
Jika Anda membuat file dan/atau direktori baru selama proses pengembangan Anda maka Anda perlu untuk menambahkannya ke kontrol sumber juga. Pilih file dan/atau direktori dan gunakan → .
Setelah Anda menambahkan file/directori ke kontrol sumber, file muncul dengan lapisan ikon ditambahkan yang berarti pertama Anda harus mengkomit copy pekerjaan Anda untuk membuat file/direktori itu tersedia bagi para pengembang lain. Menambahkan file/directori tidak mempengaruhi repositori!
Banyak Menambah
You can also use the Add command on already versioned folders. In that case, the add dialog will show you all unversioned files inside that versioned folder. This helps if you have many new files and need to add them all at once.
Untuk menambah file dari luar copy pekerjaan Anda bisa menggunakan pengendali drag-dan-drop:
pilih file yang ingin Anda tambahkan
right drag them to the new location inside the working copy
lepaskan tombol kanan mouse
pilih → . File akan dicopy ke copy pekerjaan dan ditambahkan ke kontrol versi.
Anda juga dapat menambahkan file-file di dalam suatu copy pekerjaan cukup dengan menyeret-kiri dan menjatuhkan mereka pada dialog komit.
If you add a file or folder by mistake, you can undo the addition before you commit using → .
It often happens that you already have the files you need in another project in your repository, and you simply want to copy them across. You could simply copy the files and add them, but that would not give you any history. And if you subsequently fix a bug in the original files, you can only merge the fix automatically if the new copy is related to the original in Subversion.
The easiest way to copy files and folders from within a working copy is to use the right drag menu. When you right drag a file or folder from one working copy to another, or even within the same folder, a context menu appears when you release the mouse.
Now you can copy existing versioned content to a new location, possibly renaming it at the same time.
You can also copy or move versioned files within a working copy, or between two working copies, using the familiar cut-and-paste method. Use the standard Windows Copy or Cut to copy one or more versioned items to the clipboard. If the clipboard contains such versioned items, you can then use → (note: not the standard Windows Paste) to copy or move those items to the new working copy location.
You can copy files and folders from your working copy to another location in the repository using → . Refer to bagian bernama “Membuat Cabang atau Tag” to find out more.
You can locate an older version of a file or folder in the log dialog and copy it to a new location in the repository directly from the log dialog using → . Refer to bagian bernama “Mendapatkan Informasi Tambahan” to find out more.
You can also use the repository browser to locate content you want, and copy it into your working copy directly from the repository, or copy between two locations within the repository. Refer to bagian bernama “Browser Repositori” to find out more.
Cannot copy between repositories
Whilst you can copy or move files and folders within a repository, you cannot copy or move from one repository to another while preserving history using TortoiseSVN. Not even if the repositories live on the same server. All you can do is copy the content in its current state and add it as new content to the second repository.
If you are uncertain whether two URLs on the same server refer to the same or different repositories, use the repo browser to open one URL and find out where the repository root is. If you can see both locations in one repo browser window then they are in the same repository.
In most projects you will have files and folders that should not be subject to version control. These might include files created by the compiler, *.obj, *.lst, maybe an output folder used to store the executable. Whenever you commit changes, TortoiseSVN shows your unversioned files, which fills up the file list in the commit dialog. Of course you can turn off this display, but then you might forget to add a new source file.
Cara terbaik untuk menghindari masalah ini adalah menambah file ke daftar abaikan proyek. Cara itu mereka tidak akan pernah ditampilkan dalam dialog komit, tetapi file sumber tidak berversi aslinya masih akan ditandai.
If you right click on a single unversioned file, and select the command → from the context menu, a submenu appears allowing you to select just that file, or all files with the same extension. Both submenus also have a (recursively) equivalent. If you select multiple files, there is no submenu and you can only add those specific files/folders.
If you choose the (recursively) version of the ignore context menu, the item will be ignored not just for the selected folder but all subfolders as well. However this requires SVN clients version 1.8 or higher.
Jika Anda ingin menghapus satu atau lebih item dari daftar abaikan, klik kanan pada item-item itu dan pilih → Anda juga bisa mengakses properti direktori svn:ignore secara langsung. Itu membolehkan Anda untuk menetapkan pola lebih umum menggunakan nama file globbing, dijelaskan dalam seksi berikut. Baca bagian bernama “Seting Proyek” untuk informasi lebih jauh pada menyeting properti secara langsung. Perhatikan bahwa setiap pola abaikan harus diletakkan di baris yang terpisah. Memisahkan mereka dengan spasi tidak bekerja.
Daftar Abaikan global
Cara lain untuk mengabaikan file adalah menambahkannya ke daftar abaikan global. Perbedaan besar disini adalah bahwa daftar abaikan global adalah properti klien. Ia berlaku untuk semua proyek Subversion, tapi hanya pada klien PC. Secara umum lebih baik untuk menggunakan properti svn:ignore bila mungkin, karena ia bisa diterapkan ke area proyek tertentu, dan bekerja bagi setiap orang yang melakukan check out proyek. Baca bagian bernama “Seting Umum” untuk informasi lengkapnya.
Mengabaikan Item Berversi
File dan folder berversi tidak pernah diabaikan - itu adalah fitur dari Subversion. Jika Anda memversi file karena kesalahan, baca bagian bernama “Abaikan file yang sudah diversi” untuk instruksi bagaimana untuk “Tidak memversi” it.
Pola abaikan Subversion menggunakan globbing nama file, satu teknik yang asalnya digunakan dalam Unix untuk menetapkan file menggunakan meta-karakter sebagai wildcard. Karakter berikut mempunyai arti khusus:
- *
Sama pada setiap karakter string, termasuk string kosong (tidak ada karakter).
- ?
Sama pada setiap karakter tunggal.
- [...]
Salam pada salah satu karakter yang ditutupi dalam kurung kotak. Didalam kurung, pasangan karakter dipisahkan oleh “-” sama pada setiap karakter secara leksikal diantara keduanya. Sebagai contoh
[AGm-p]sama dengan salah satu dariA,G,m,n,oataup.
Pattern matching is case sensitive, which can cause problems on Windows. You can force case insensitivity the hard way by pairing characters, e.g. to ignore *.tmp regardless of case, you could use a pattern like *.[Tt][Mm][Pp].
Jika Anda ingin definisi resmi untuk globbing, Anda bisa menemukannya dalam spesifikasi IEEE untuk bahasa perintah shell Pattern Matching Notation.
No Paths in Global Ignore List
You should not include path information in your pattern. The pattern matching is intended to be used against plain file names and folder names. If you want to ignore all CVS folders, just add CVS to the ignore list. There is no need to specify CVS */CVS as you did in earlier versions. If you want to ignore all tmp folders when they exist within a prog folder but not within a doc folder you should use the svn:ignore property instead. There is no reliable way to achieve this using global ignore patterns.
Subversion allows renaming and moving of files and folders. So there are menu entries for delete and rename in the TortoiseSVN submenu.
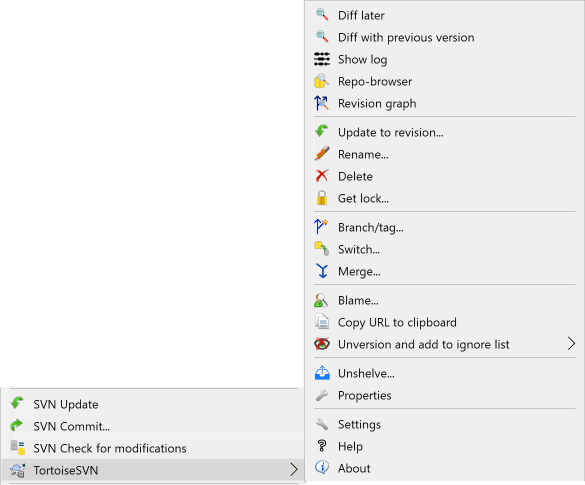
Use → to remove files or folders from Subversion.
When you → a file or folder, it is removed from your working copy immediately as well as being marked for deletion in the repository on next commit. The item's parent folder shows a “modified” icon overlay. Up until you commit the change, you can get the file back using → on the parent folder.
If you want to delete an item from the repository, but keep it locally as an unversioned file/folder, use → . You have to hold the Shift key while right clicking on the item in the explorer list pane (right pane) in order to see this in the extended context menu.
If an item is deleted via the explorer instead of using the TortoiseSVN context menu, the commit dialog shows those items as missing and lets you remove them from version control too before the commit. However, if you update your working copy, Subversion will spot the missing item and replace it with the latest version from the repository. If you need to delete a version-controlled file, always use → so that Subversion doesn't have to guess what you really want to do.
Mendapatkan kembali file atau folder terhapus
If you have deleted a file or a folder and already committed that delete operation to the repository, then a normal → can't bring it back anymore. But the file or folder is not lost at all. If you know the revision the file or folder got deleted (if you don't, use the log dialog to find out) open the repository browser and switch to that revision. Then select the file or folder you deleted, right click and select → as the target for that copy operation select the path to your working copy.
If you want to do a simple in-place rename of a file or folder, use → Enter the new name for the item and you're done.
If you want to move files around inside your working copy, perhaps to a different sub-folder, use the right mouse drag-and-drop handler:
pilih file atau direktori yang ingin Anda pindahkan
right drag them to the new location inside the working copy
lepaskan tombol kanan mouse
dalam menu popup pilih →
Komit folder leluhur
Since renames and moves are done as a delete followed by an add you must commit the parent folder of the renamed/moved file so that the deleted part of the rename/move will show up in the commit dialog. If you don't commit the removed part of the rename/move, it will stay behind in the repository and when your co-workers update, the old file will not be removed. i.e. they will have both the old and the new copies.
Anda harus mengkomit ganti nama folder sebelum pengubahan setiap file di dalam folder, sebaliknya copy pekerjaan Anda akan menjadi kacau.
Another way of moving or copying files is to use the Windows copy/cut commands. Select the files you want to copy, right click and choose → from the explorer context menu. Then browse to the target folder, right click and choose → . For moving files, choose → instead of → .
You can also use the repository browser to move items around. Read bagian bernama “Browser Repositori” to find out more.
Jangan SVN Pindahkan Eksternal
Anda tidak boleh menggunakan perintah TortoiseSVN Memindahkan atau Mengganti nama pada folder yang sudah dibuat menggunakan svn:externals. Tindakan ini akan menyebabkan item eksternal dihapus dari repositori leluhurnya, mungkin membuat marah banyak orang lain. Jika Anda perlu untuk memindahkan folder eksternal Anda harus menggunakan shell memindahkan biasa, lalu sesuaikan properti svn:externals dari sumber dan tujuan folder leluhur.
If the repository already contains two files with the same name but differing only in case (e.g. TEST.TXT and test.txt), you will not be able to update or checkout the parent directory on a Windows client. Whilst Subversion supports case-sensitive filenames, Windows does not.
This sometimes happens when two people commit, from separate working copies, files which happen to have the same name, but with a case difference. It can also happen when files are committed from a system with a case-sensitive file system, like Linux.
Dalam hal itu, Anda harus memutuskan yang mana yang ingin Anda biarkan dan hapus (atau ganti nama) yang lain dari repositori.
Menjaga dua file dengan nama sama
There is a server hook script available at: https://svn.apache.org/repos/asf/subversion/trunk/contrib/hook-scripts/ that will prevent checkins which result in case conflicts.
Terkadang IDE Anda yang ramah akan mengubah nama file-file untuk Anda sebagai bagian praktek perefaktoran, dan tentu saja ia tidak memberitahu Subversion. Jika Anda mencoba untuk mengkomit perubahan-perubahan Anda, Subversion akan melihat nama file lama sebagai hilang dan yang baru sebagai file tidak berversi. Anda dapat saja mencawang nama file baru tersebut untuk membuatnya ditambahkan kedalamnya, tetapi Anda akan kehilangan jejak sejarahnya karena Subversion tidak mengetahui bahwa file-file tersebut berhubungan.
Cara yang lebih baik adalah memberitahu Subversion bahwa perubahan ini sebetulnya adalah perubahan nama dan Anda dapat melakukan ini dalam dialog Komit dan Periksa Modifikasi. Cukup pilih nama lama (hilang) dan nama baru (tidak berversi) dan gunakan → untuk memasangkan kedua file tersebut sebagai suatu perubahan nama.
Biasanya Anda mengeset daftar abaikan Anda sedemikian rupa sehingga semua file-file yang digenerasi diabaikan dalam Subversion. Tetapi bagaimana jika Anda ingin menghilangkan semua file-file diabaikan tersebut untuk menghasilkan suatu pembangunan bersih? Biasanya Anda akan mengesetnya dalam makefile Anda, tetapi jika Anda sedang mendebug makefile tersebut atau sedang mengganti sistem pembangunan, suatu cara untuk membersihkannya akan menjadi berguna.
TortoiseSVN menyediakan opsi demikian dengan → . Anda harus menahan Shift sambil mengeklik kanan pada suatu folder dalam pane daftar explorer (pane kanan) untuk melihat ini pada menu konteks lanjutan. Ini akan menghasilkan sebuah dialog yang mendaftar semua file-file tidak berversi dimanapun dalam copy pekerjaan Anda. Anda selanjutnya dapat memilih atau tidak memilih item-item yang akan dihapus.
Saat item-item tersebut dihapus, tampungan daur ulang digunakan, jadi jika Anda membuat kesalahan disini dan menghapus suatu file yang seharusnya diversi, Anda masih dapat memulihkannya.
Jika Anda ingin membatalkan semua perubahan yang Anda buat dalam suatu file sejak pemutahiran terakhir, Anda perlu memilih file tersebut, klik kanan untuk menampilkan menu konteks dan lalu pilih perintah → Sebuah dialog akan muncul memperlihatkan kepada Anda file yang telah Anda ubah dan bisa dipulihkan. Pilih yang ingin Anda pulihkan dan klik pada .
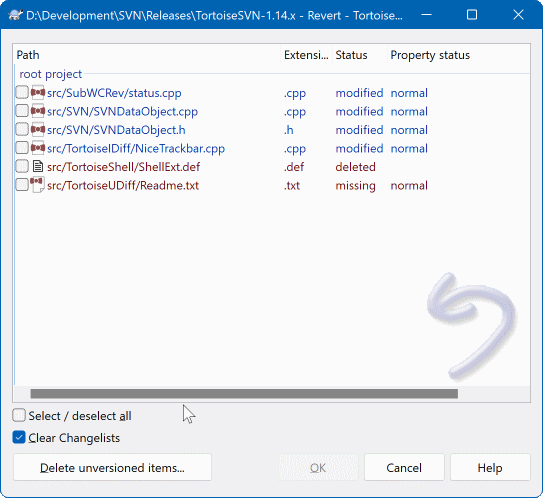
If you also want to clear all the changelists that are set, check the box at the bottom of the dialog.
If you want to undo a deletion or a rename, you need to use Revert on the parent folder as the deleted item does not exist for you to right click on.
If you want to undo the addition of an item, this appears in the context menu as → . This is really a revert as well, but the name has been changed to make it more obvious.
Kolom dalam dialog ini bisa dikustomisasi dalam cara yang sama seperti kolom dalam dialog Periksa modifikasi. Baca bagian bernama “Status Lokal dan Remote” untuk detil selanjutnya.
Since revert is sometimes used to clean up a working copy, there is an extra button which allows you to delete unversioned items as well. When you click this button another dialog comes up listing all the unversioned items, which you can then select for deletion.
Memulihkan Perubahan yang sudah Di Komit
hanya akan membatalkan perubahan lokal Anda. Ia tidak membatalkan setiap perubahan yang sudah dikomit. Jika Anda ingin membatalkan semua perubahan yang dikomit dalam revisi tertentu, baca bagian bernama “Dialog Log Revisi” untuk informasi lebih jauh.
Revert is Slow
When you revert changes you may find that the operation takes a lot longer than you expect. This is because the modified version of the file is sent to the recycle bin, so you can retrieve your changes if you reverted by mistake. However, if your recycle bin is full, Windows takes a long time to find a place to put the file. The solution is simple: either empty the recycle bin or deactivate the Use recycle bin when reverting box in TortoiseSVN's settings.
If a Subversion command cannot complete successfully, perhaps due to server problems, your working copy can be left in an inconsistent state. In that case you need to use → on the folder. It is a good idea to do this at the top level of the working copy.
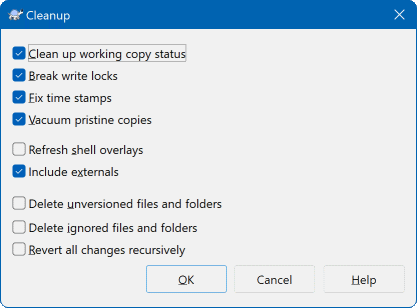
In the cleanup dialog, there are also other useful options to get the working copy into a clean state.
- Clean up working copy status
As stated above, this option tries to get an inconsistent working copy into a workable and usable state. This doesn't affect any data you have but only the internal states of the working copy database. This is the actual
Cleanupcommand you know from older TortoiseSVN clients or other SVN clients.- Break write locks
If checked, all write locks are removed from the working copy database. For most situations, this is required for the cleanup to work!
Only uncheck this option if the working copy is used by other users/clients at the time. But if the cleanup then fails, you have to check this option for the cleanup to succeed.
- Fix time stamps
Adjusts the recorded time stamps of all files, speeding up future status checks. This can speed up all dialogs that show working copy file lists, for example the Commit dialog.
- Vacuum pristine copies
Removes unused pristine copies and compresses all remaining pristine copies of working copy files.
- Refresh shell overlays
Sometimes the shell overlays, especially on the tree view on the left side of the explorer don't show the current status, or the status cache failed to recognize changes. In this situation, you can use this command to force a refresh.
- Include externals
If this is checked, then all actions are done for all files and folders included with the
svn:externalsproperty as well.- Delete unversioned files and folders, Delete ignored files and folders
This is a fast and easy way to remove all generated files in your working copy. All files and folders that are not versioned are moved to the trash bin.
Note: you can also do the same from the → dialog. There you also get a list of all the unversioned files and folders to select for removal.
- Revert all changes recursively
This command reverts all your local modifications which are not committed yet.
Note: it's better to use the → command instead, because there you can first see and select the files which you want to revert.
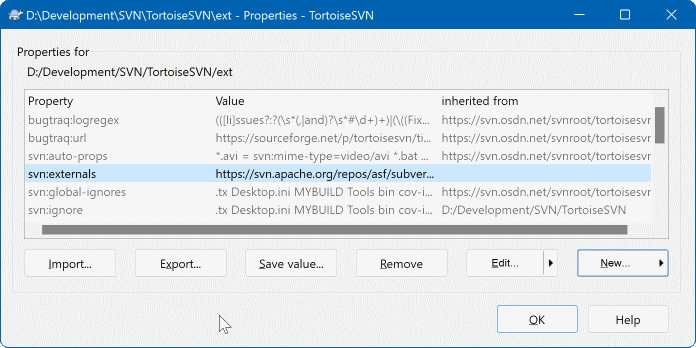
You can read and set the Subversion properties from the Windows properties dialog, but also from → and within TortoiseSVN's status lists, from → .
You can add your own properties, or some properties with a special meaning in Subversion. These begin with svn:. svn:externals is such a property; see how to handle externals in bagian bernama “External Items”.
Subversion supports CVS-like keyword expansion which can be used to embed filename and revision information within the file itself. Keywords currently supported are:
- $Date$
Date of last known commit. This is based on information obtained when you update your working copy. It does not check the repository to find more recent changes.
- $Revision$
Revision of last known commit.
- $Author$
Author who made the last known commit.
- $HeadURL$
The full URL of this file in the repository.
- $Id$
A compressed combination of the previous four keywords.
To find out how to use these keywords, look at the svn:keywords section in the Subversion book, which gives a full description of these keywords and how to enable and use them.
For more information about properties in Subversion see the Special Properties.
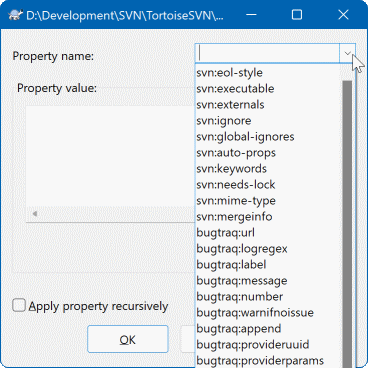
To add a new property, first click on New.... Select the required property name from the menu, and then fill in the required information in the specific property dialog. These specific property dialogs are described in more detail in bagian bernama “Property Editors”.
To add a property that doesn't have its own dialog, choose from the New... menu. Then either select an existing property in the combo box or enter a custom property name.
If you want to apply a property to many items at once, select the files/folders in explorer, then select → .
Jika Anda ingin menerapkan properti ke setiap file dan folder dalam hirarki dibawah folder saat ini, centang kotak centang Rekursif.
Jika Anda ingin mengedit properti yang sudah ada, pilih properti dari daftar properti yang sudah ada, lalu klik .
Jika Anda ingin menghapus properti yang sudah ada, pilih properti itu dari daftar properti yang ada, lalu klik .
The svn:externals property can be used to pull in other projects from the same repository or a completely different repository. For more information, read bagian bernama “External Items”.
Edit properties at HEAD revision
Because properties are versioned, you cannot edit the properties of previous revisions. If you look at properties from the log dialog, or from a non-HEAD revision in the repository browser, you will see a list of properties and values, but no edit controls.
Seringkali Anda akan menemukan diri Anda menerapkan sekumpulan properti yang sama berulang kali, contohnya bugtraq:logregex. Untuk memudahkan proses penyalinan properti-properti dari satu proyek ke proyek lainnya, Anda dapat menggunakan fitur Ekspor/Impor.
Dari berkas atau folder di mana properti-properti sudah terset, gunakan → , pilih properti-properti yang ingin Anda ekspor dan klik . Anda akan diminta menyebutkan nama berkas dimana nama-nama dan nilai-nilai properti akan disimpan.
Dari folder di mana Anda ingin untuk menerapkan properti-properti ini, gunakan → dan klik pada . Anda akan diminta menyebutkan sebuah nama berkas yang akan diimpor, jadi pergilah ke tempat Anda menyimpan berkas yang telah Anda ekspor sebelumnya dan pilihlah berkas itu. Properti-properti tersebut akan ditambahkan ke folder-folder secara tidak rekursif.
If you want to add properties to a tree recursively, follow the steps above, then in the property dialog select each property in turn, click on , check the Apply property recursively box and click on .
The Import file format is binary and proprietary to TortoiseSVN. Its only purpose is to transfer properties using Import and Export, so there is no need to edit these files.
TortoiseSVN bisa menangani nilai properti biner menggunakan file. Untuk membaca nilai properti biner, ke file. Untuk mengeset nilai biner, gunakan editor heksa atau piranti terkait lain untuk membuat file dengan isi yang Anda butuhkan, kemudian tool to create a file with the content you require, then dari file itu.
Meskipun properti biner tidak sering digunakan, mereka bisa berguna dalam beberapa aplikasi. Sebagai contoh jika Anda menyimpan file grafik besar atau jika aplikasi yang digunakan untuk mengambil file besar, mungkin Anda ingin menyimpan thumbnail sebagai properti agar Anda bisa mendapatkan peninjauan dengan cepat.
You can configure Subversion and TortoiseSVN to set properties automatically on files and folders when they are added to the repository. There are two ways of doing this.
You can edit the Subversion configuration file to enable this feature on your client. The General page of TortoiseSVN's settings dialog has an edit button to take you there directly. The config file is a simple text file which controls some of Subversion's workings. You need to change two things: firstly in the section headed miscellany uncomment the line enable-auto-props = yes. Secondly you need to edit the section below to define which properties you want added to which file types. This method is a standard Subversion feature and works with any Subversion client. However it has to be defined on each client individually - there is no way to propagate these settings from the repository.
An alternative method is to set the tsvn:autoprops property on folders, as described in the next section. This method only works for TortoiseSVN clients, but it does get propagated to all working copies on update.
As of Subversion 1.8, you can also set the property svn:auto-props on the root folder. The property value is automatically inherited by all child items.
Whichever method you choose, you should note that auto-props are only applied to files at the time they are added to the working copy. Auto-props will never change the properties of files which are already versioned.
If you want to be absolutely sure that new files have the correct properties applied, you should set up a repository pre-commit hook to reject commits where the required properties are not set.
Properti Komit
Properti Subversion adalah berversi. Setelah Anda mengubah atau menambah properti Anda harus mengkomit perubahan Anda.
Konflik pada properti
Jika ada konflik pada komit perubahan, karena pengguna lain telah mengubah properti yang sama, Subversion membuat file .prej. Hapus file ini setelah Anda menyelesaikan konflik.
TortoiseSVN mempunyai beberapa properti khusus, dan ini dimulai dengan tsvn:.
tsvn:logminsizemengeset panjang minimum dari pesan log untuk komit. Jika Anda memasukan pesan lebih pendek daripada yang ditetapkan disini, komit dimatikan. Fitur ini sangat berguna untuk mengingatkan Anda untuk menyertakan pesan deskriptif yang benar untuk komit. Jika properti ini tidak di set, atau nilainya nol, pesan log kosong dibolehkan.tsvn:lockmsgminsizeMengeset panjang minimum dari pesan kunci. Jika Anda memasukan pesan lebih pendek daripada yang ditetapkan disini, kunci dimatikan. Fitur ini sangat berguna untuk mengingatkan Anda untuk menyertakan pesan deskriptif yang benar untuk setiap kunci yang Anda peroleh. Jika properti ini tidak di set, atau nilainya nol, pesan kunci kosong dibolehkan.tsvn:logwidthmarkerdigunakan dengan proyek yang membutuhkan pesan log dibentuk dengan panjang maksimum (biasanya 80 karakter) sebelum baris pemisah. Menyeting properti ini ke nilai bukan-nol akan melakukan 2 hal dalam dialog entri pesan log: menempatkan tanda untuk menunjukan panjang maksimum, dan mematikan gulung kata dalam tampilan, agar Anda bisa melihat teks yang Anda masukan terlalu panjang. Catatan: fitur ini hanya akan bekerja dengan benar jika Anda mempunyai font panjang-tetap dari pesan log yang dipilih.tsvn:logtemplatedigunakan dengan proyek yang mempunyai aturan tentang pembentukan pesan log. Properti menampung multi-baris string teks yang akan disisipkan dalam kotak pesan komit saat Anda mulai mengkomit. Anda bisa mengeditnya untuk menyertakan informasi yang dibutuhkan. Catatan: jika Anda juga menggunakantsvn:logminsize, pastikan untuk mengeset lebih panjang dari template atau Anda akan kehilangan mekanisme perlindungan.There are also action specific templates which you can use instead of
tsvn:logtemplate. The action specific templates are used if set, buttsvn:logtemplatewill be used if no action specific template is set.The action specific templates are:
tsvn:logtemplatecommitis used for all commits from a working copy.tsvn:logtemplatebranchis used when you create a branch/tag, or when you copy files or folders directly in the repository browser.tsvn:logtemplateimportis used for imports.tsvn:logtemplatedeleteis used when deleting items directly in the repository browser.tsvn:logtemplatemoveis used when renaming or moving items in the repository browser.tsvn:logtemplatemkdiris used when creating directories in the repository browser.tsvn:logtemplatepropsetis used when modifying properties in the repository browser.tsvn:logtemplatelockis used when getting a lock.
Subversion allows you to set “autoprops” which will be applied to newly added or imported files, based on the file extension. This depends on every client having set appropriate autoprops in their Subversion configuration file.
tsvn:autopropscan be set on folders and these will be merged with the user's local autoprops when importing or adding files. The format is the same as for Subversion autoprops, e.g.*.sh = svn:eol-style=native;svn:executablesets two properties on files with the.shextension.If there is a conflict between the local autoprops and
tsvn:autoprops, the project settings take precedence because they are specific to that project.As of Subversion 1.8, you should use the property
svn:auto-propsinstead oftsvn:autopropssince this has the very same functionality but works with all svn clients and is not specific to TortoiseSVN.In the Commit dialog you have the option to paste in the list of changed files, including the status of each file (added, modified, etc).
tsvn:logfilelistenglishdefines whether the file status is inserted in English or in the localized language. If the property is not set, the default istrue.TortoiseSVN can use a spell checker. On Windows 10, the spell checker of the OS is used. On earlier Windows versions, it can use spell checker modules which are also used by OpenOffice and Mozilla. If you have those installed this property will determine which spell checker to use, i.e. in which language the log messages for your project should be written.
tsvn:projectlanguagesets the language module the spell checking engine should use when you enter a log message. You can find the values for your language on this page: MSDN: Language Identifiers.Anda bisa memasukan nilai ini dalam desimal, atau heksadesimal jika diawali prefiks
0x. Sebagai contoh English (US) bisa dimasukkan sebagai0x0409atau1033.The property
tsvn:logsummaryis used to extract a portion of the log message which is then shown in the log dialog as the log message summary.The value of the
tsvn:logsummaryproperty must be set to a one line regex string which contains one regex group. Whatever matches that group is used as the summary.An example:
\[SUMMARY\]:\s+(.*)Will catch everything after “[SUMMARY]” in the log message and use that as the summary.The property
tsvn:logrevregexdefines a regular expression which matches references to revisions in a log message. This is used in the log dialog to turn such references into links which when clicked will either scroll to that revision (if the revision is already shown in the log dialog, or if it's available from the log cache) or open a new log dialog showing that revision.The regular expression must match the whole reference, not just the revision number. The revision number is extracted from the matched reference string automatically.
If this property is not set, a default regular expression is used to link revision references.
There are several properties available to configure client-side hook scripts. Each property is for one specific hook script type.
The available properties/hook-scripts are
- tsvn:startcommithook
- tsvn:precommithook
- tsvn:postcommithook
- tsvn:startupdatehook
- tsvn:preupdatehook
- tsvn:postupdatehook
- tsvn:prelockhook
- tsvn:postlockhook
The parameters are the same as if you would configure the hook scripts in the settings dialog. See bagian bernama “Client Side Hook Scripts” for the details.
Since not every user has his or her working copy checked out at the same location with the same name, you can configure a script/tool to execute that resides in your working copy by specifying the URL in the repository instead, using
%REPOROOT%as the part of the URL to the repository root. For example, if your hook script is in your working copy undercontrib/hook-scripts/client-side/checkyear.js, you would specify the path to the script as%REPOROOT%/trunk/contrib/hook-scripts/client-side/checkyear.js. This way even if you move your repository to another server you do not have to adjust the hook script properties.Instead of
%REPOROOT%you can also specify%REPOROOT+%. The+is used to insert any number of folder paths necessary to find the script. This is useful if you want to specify your script so that if you create a branch the script is still found even though the url of the working copy is now different. Using the example above, you would specify the path to the script as%REPOROOT+%/contrib/hook-scripts/client-side/checkyear.js.The following screenshot shows how the script to check for current copyright years in source file headers is configured for TortoiseSVN.
Saat Anda ingin menambah sebuah properti baru, Anda dapat memilihnya dari daftar dalam kotak kombo, atau Anda dapat memasukkan nama properti apa saja yang Anda suka. Jika proyek Anda menggunakan beberapa properti kostum, dan Anda ingin properti-properti tersebut muncul dalam daftar pada kotak kombo (untuk menghindari kesalahan ketik saat Anda memasukkan nama properti), Anda dapat membuat suatu daftar untuk properti-properti kostum Anda menggunakan
tsvn:userfilepropertiesdantsvn:userdirproperties. Terapkan properti-properti ini pada suatu folder. Saat Anda mengedi properti-properti pada item anak apa saja, properti kostum Anda akan muncul dalam daftar nama properti yang telah dipredefinisi.You can also specify whether a custom dialog is used to add/edit your property. TortoiseSVN offers four different dialog, depending on the type of your property.
- bool
If your property can only have two states, e.g., true and false, then you can configure your property as a
booltype.
Specify your property like this:propertyname=bool;labeltext(YESVALUE;NOVALUE;Checkboxtext)the
labeltextis the text shown in the dialog above the checkbox where you can explain the purpose and use of the property. The other parameters should be self explanatory.- state
If your property represents one of many possible states, e.g.,
yes, no, maybe, then you can configure your property as astate
property like this:propertyname=state;labeltext(DEFVAL;VAL1;TEXT1;VAL2;TEXT2;VAL3;TEXT3;...)The parameters are the same as for the
boolproperty, withDEFVALbeing the default value to be used if the property isn't set yet or has a value that's not configured.For up to three different values, the dialog shows up to three radio buttons. If there are more values configured, it uses a combo box from where the user can select the required state.
- singleline
For properties that consist of one line of text, use the
singlelineproperty type:propertyname=singleline;labeltext(regex)the
regexspecifies a regular expression which is used to validate (match) the text the user entered. If the text does not match the regex, then the user is shown an error and the property isn't set.- multiline
For properties that consist of multiple lines of text, use the
multilineproperty type:propertyname=multiline;labeltext(regex)the
regexspecifies a regular expression which is used to validate (match) the text the user entered. Don't forget to include the newline (\n) character in the regex!
The screenshots above were made with the following
tsvn:userdirproperties:my:boolprop=bool;This is a bool type property. Either check or uncheck it.(true;false;my bool prop) my:stateprop1=state;This is a state property. Select one of the two states.(true;true;true value;false;false value) my:stateprop2=state;This is a state property. Select one of the three states.(maybe;true;answer is correct;false;answer is wrong;maybe;not answered) my:stateprop3=state;Specify the day to set this property.(1;1;Monday;2;Tuesday;3;Wednesday;4;Thursday;5;Friday;6;Saturday;7;Sunday) my:singlelineprop=singleline;enter a small comment(.*) my:multilineprop=multiline;copy and paste a full chapter here(.*)
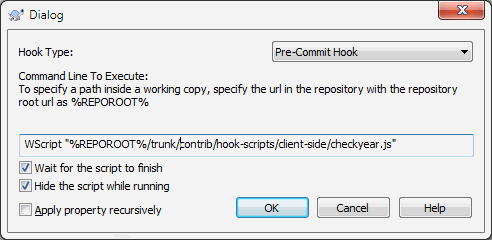
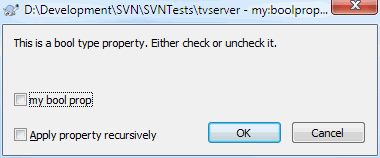
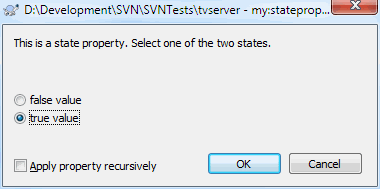
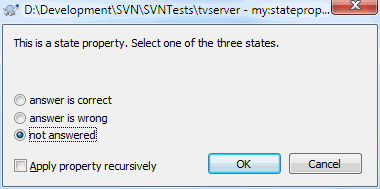
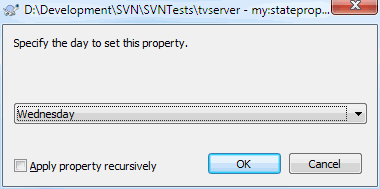
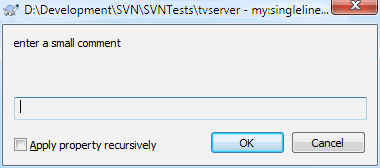
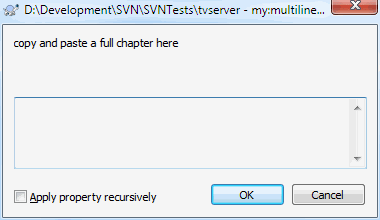
TortoiseSVN can integrate with some bug tracking tools. This uses project properties that start with bugtraq:. Read bagian bernama “Integration with Bug Tracking Systems / Issue Trackers” for further information.
It can also integrate with some web-based repository browsers, using project properties that start with webviewer:. Read bagian bernama “Integrasi dengan Pelihat Repositori Berbasis Web” for further information.
Set the project properties on folders
These special project properties must be set on folders for the system to work. When you use a TortoiseSVN command which uses these properties, the properties are read from the folder you clicked on. If the properties are not found there, TortoiseSVN will search upwards through the folder tree to find them until it comes to an unversioned folder, or the tree root (e.g. C:\) is found. If you can be sure that each user checks out only from e.g trunk/ and not some sub-folder, then it is sufficient to set the properties on trunk/. If you can't be sure, you should set the properties recursively on each sub-folder. If you set the same property but you use different values at different depths in your project hierarchy then you will get different results depending on where you click in the folder structure.
For project properties only, i.e. tsvn:, bugtraq: and webviewer: you can use the Recursive checkbox to set the property to all sub-folders in the hierarchy, without also setting it on all files.
When you add new sub-folders to a working copy using TortoiseSVN, any project properties present in the parent folder will automatically be added to the new child folder too.
Limitations Using the Repository Browser
Fetching properties remotely is a slow operation, so some of the features described above will not work in the repository browser as they do in a working copy.
When you add a property using the repo browser, only the standard
svn:properties are offered in the pre-defined list. Any other property name must be entered manually.Properties cannot be set or deleted recursively using the repo browser.
Project properties will not be propagated automatically when a child folder is added using the repo browser.
tsvn:autopropswill not set properties on files which are added using the repo browser.
Perhatian
Although TortoiseSVN's project properties are extremely useful, they only work with TortoiseSVN, and some will only work in newer versions of TortoiseSVN. If people working on your project use a variety of Subversion clients, or possibly have old versions of TortoiseSVN, you may want to use repository hooks to enforce project policies. project properties can only help to implement a policy, they cannot enforce it.
Some properties have to use specific values, or be formatted in a specific way in order to be used for automation. To help get the formatting correct, TortoiseSVN presents edit dialogs for some particular properties which show the possible values or break the property into its individual components.
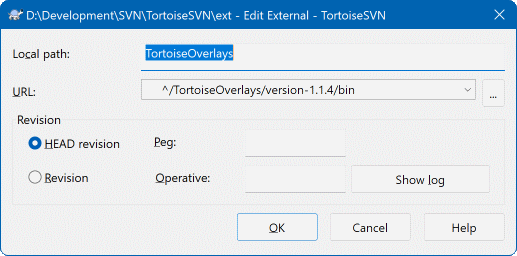
The svn:externals property can be used to pull in other projects from the same repository or a completely different repository as described in bagian bernama “External Items”.
You need to define the name of the sub-folder that the external folder is checked out as, and the Subversion URL of the external item. You can check out an external at its HEAD revision, so when the external item changes in the repository, your working copy will receive those changes on update. However, if you want the external to reference a particular stable point then you can specify the specific revision to use. IN this case you may also want to specify the same revision as a peg revision. If the external item is renamed at some point in the future then Subversion will not be able to update this item in your working copy. By specifying a peg revision you tell Subversion to look for an item that had that name at the peg revision rather than at HEAD.
The button fetches the HEAD revision of every external URL and shows that HEAD revision in the rightmost column. After the HEAD revision is known, a simple right click on an external gives you the command to peg the selected externals to their explicit HEAD revision. In case the HEAD revision is not known yet, the right click command will fetch the HEAD revision first.
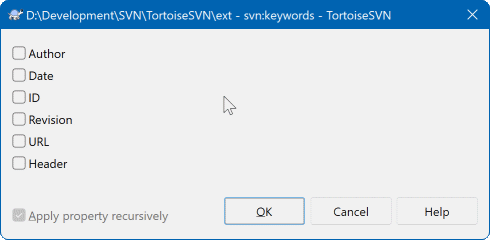
Select the keywords that you would like to be expanded in your file.
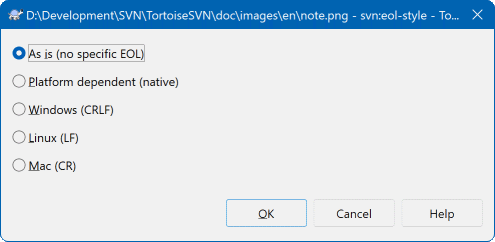
Select the end-of-line style that you wish to use and TortoiseSVN will use the correct property value.
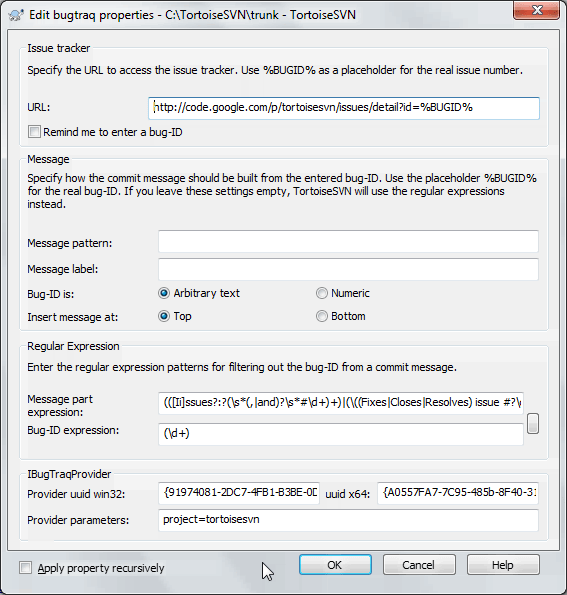
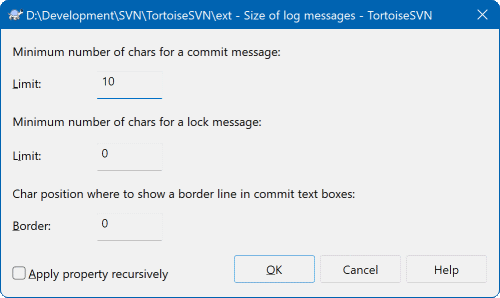
These 3 properties control the formatting of log messages. The first 2 disable the in the commit or lock dialogs until the message meets the minimum length. The border position shows a marker at the given column width as a guide for projects which have width limits on their log messages. Setting a value to zero will delete the property.
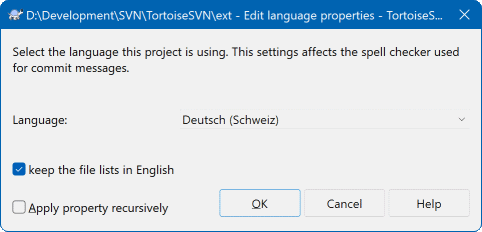
Choose the language to use for spell-checking log messages in the commit dialog. The file lists checkbox comes into effect when you right click in the log message pane and select Paste file list. By default the Subversion status will be shown in your local language. When this box is checked the status is always given in English, for projects which require English-only log messages.
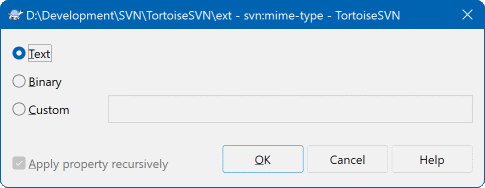
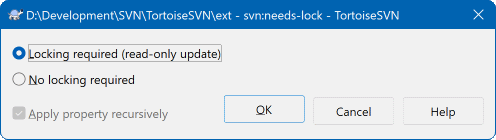
This property simply controls whether a file will be checked out as read-only if there is no lock held for it in the working copy.
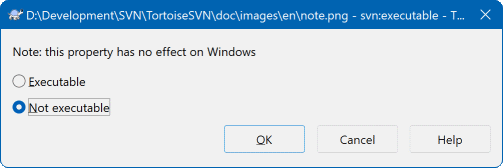
This property controls whether a file will be given executable status when checked out on a Unix/Linux system. It has no effect on a Windows checkout.
Whenever revisions are merged into a working copy, TortoiseSVN generates a log message from all the merged revisions. Those are then available from the button in the commit dialog.
You can customize that generated message with the following properties:
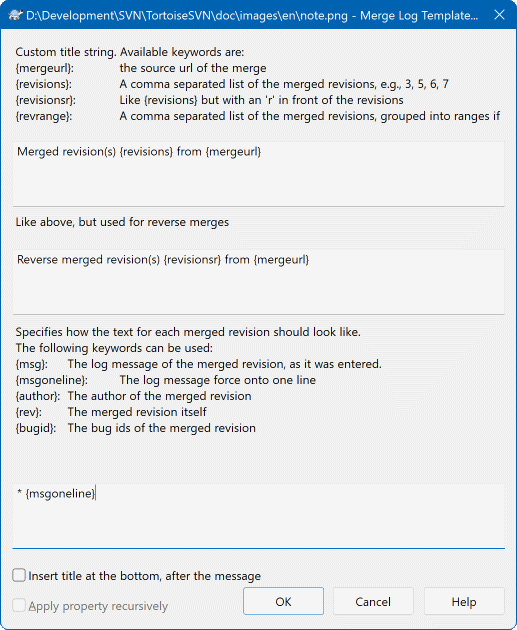
- tsvn:mergelogtemplatetitle, tsvn:mergelogtemplatereversetitle
This property specifies the first part of the generated log message. The following keywords can be used:
- {revisions}
A comma separated list of the merged revisions, e.g.,
3, 5, 6, 7- {revisionsr}
Like
{revisions}, but with each revision preceded with anr, e.g.,r3, r5, r6, r7- {revrange}
A comma separated list of the merged revisions, grouped into ranges if possible, e.g.,
3, 5-7- {mergeurl}
The source URL of the merge, i.e., where the revisions are merged from.
The default value for this string is
Merged revision(s) {revrange} from {mergeurl}:with a newline at the end.- tsvn:mergelogtemplatemsg
This property specifies how the text for each merged revision should look like. The following keywords can be used:
- {msg}
The log message of the merged revision, as it was entered.
- {msgoneline}
Like
{msg}, but all newlines are replaced with a space, so that the whole log message appears on one single line.- {author}
The author of the merged revision.
- {rev}
The merged revision itself.
- {bugids}
The bug IDs of the merged revision, if there are any.
- tsvn:mergelogtemplatemsgtitlebottom
This property specifies the position of the title string specified with the
tsvn:mergelogtemplatetitleortsvn:mergelogtemplatereversetitle. If the property is set toyesortrue, then the title string is appended at the bottom instead of the top.
Penting
This only works if the merged revisions are already in the log cache. If you have disabled the log cache or not shown the log first before the merge, the generated message won't contain any information about the merged revisions.
Sometimes it is useful to construct a working copy that is made out of a number of different checkouts. For example, you may want different files or subdirectories to come from different locations in a repository, or perhaps from different repositories altogether. If you want every user to have the same layout, you can define the svn:externals properties to pull in the specified resource at the locations where they are needed.
Let's say you check out a working copy of /project1 to D:\dev\project1. Select the folder D:\dev\project1, right click and choose → from the context menu. The Properties Dialog comes up. Then go to the Subversion tab. There, you can set properties. Click . In the properties dialog, either double click on the svn:externals if it already exists, or click on the button and select externals from the menu. To add a new external, click the and then fill in the required information in the shown dialog.
Perhatian
URLs must be properly escaped or they will not work, e.g. you must replace each space with %20.
If you want the local path to include spaces or other special characters, you can enclose it in double quotes, or you can use the \ (backslash) character as a Unix shell style escape character preceding any special character. Of course this also means that you must use / (forward slash) as a path delimiter. Note that this behaviour is new in Subversion 1.6 and will not work with older clients.
Use explicit revision numbers
You should strongly consider using explicit revision numbers in all of your externals definitions, as described above. Doing so means that you get to decide when to pull down a different snapshot of external information, and exactly which snapshot to pull. Besides the common sense aspect of not being surprised by changes to third-party repositories that you might not have any control over, using explicit revision numbers also means that as you backdate your working copy to a previous revision, your externals definitions will also revert to the way they looked in that previous revision, which in turn means that the external working copies will be updated to match the way they looked back when your repository was at that previous revision. For software projects, this could be the difference between a successful and a failed build of an older snapshot of your complex code base.
The edit dialog for svn:externals properties allows you to select the externals and automatically set them explicitly to the HEAD revision.
If the external project is in the same repository, any changes you make there will be included in the commit list when you commit your main project.
If the external project is in a different repository, any changes you make to the external project will be shown or indicated when you commit the main project, but you have to commit those external changes separately.
If you use absolute URLs in svn:externals definitions and you have to relocate your working copy (i.e., if the URL of your repository changes), then your externals won't change and might not work anymore.
To avoid such problems, Subversion clients version 1.5 and higher support relative external URLs. Four different methods of specifying a relative URL are supported. In the following examples, assume we have two repositories: one at http://example.com/svn/repos-1 and another at http://example.com/svn/repos-2. We have a checkout of http://example.com/svn/repos-1/project/trunk into C:\Working and the svn:externals property is set on trunk.
- Relative to parent directory
These URLs always begin with the string
../for example:../../widgets/foo common/foo-widgetThis will extract
http://example.com/svn/repos-1/widgets/foointoC:\Working\common\foo-widget.Note that the URL is relative to the URL of the directory with the
svn:externalsproperty, not to the directory where the external is written to disk.- Relative to repository root
These URLs always begin with the string
^/for example:^/widgets/foo common/foo-widgetThis will extract
http://example.com/svn/repos-1/widgets/foointoC:\Working\common\foo-widget.You can easily refer to other repositories with the same
SVNParentPath(a common directory holding several repositories). For example:^/../repos-2/hammers/claw common/claw-hammerThis will extract
http://example.com/svn/repos-2/hammers/clawintoC:\Working\common\claw-hammer.- Relative to scheme
URLs beginning with the string
//copy only the scheme part of the URL. This is useful when the same hostname must the accessed with different schemes depending upon network location; e.g. clients in the intranet usehttp://while external clients usesvn+ssh://. For example://example.com/svn/repos-1/widgets/foo common/foo-widgetThis will extract
http://example.com/svn/repos-1/widgets/fooorsvn+ssh://example.com/svn/repos-1/widgets/foodepending on which method was used to checkoutC:\Working.- Relative to the server's hostname
URLs beginning with the string
/copy the scheme and the hostname part of the URL, for example:/svn/repos-1/widgets/foo common/foo-widgetThis will extract
http://example.com/svn/repos-1/widgets/foointoC:\Working\common\foo-widget. But if you checkout your working copy from another server atsvn+ssh://another.mirror.net/svn/repos-1/project1/trunkthen the external reference will extractsvn+ssh://another.mirror.net/svn/repos-1/widgets/foo.
You can also specify a peg and operative revision for the URL if required. To learn more about peg and operative revisions, please read the corresponding chapter in the Subversion book.
Penting
If you specify the target folder for the external as a subfolder like in the examples above, make sure that all folders in between are versioned as well. So for the examples above, the folder common should be versioned!
While the external will work in most situations properly if folders in between are not versioned, there are some operations that won't work as you expect. And the status overlay icons in explorer will also not show the correct status.
Jika Anda memerlukan informasi lebih lengkap bagaimana TortoiseSVN menangani Properti baca bagian bernama “Seting Proyek”.
Untuk mencari tentang metode yang berbeda dari pengaksesan sub-proyek umum baca bagian bernama “Sertakan sub-proyek umum”.
As of Subversion 1.6 you can add single file externals to your working copy using the same syntax as for folders. However, there are some restrictions.
The path to the file external must be a direct child of the folder where you set the
svn:externalsproperty.The URL for a file external must be in the same repository as the URL that the file external will be inserted into; inter-repository file externals are not supported.
A file external behaves just like any other versioned file in many respects, but they cannot be moved or deleted using the normal commands; the svn:externals property must be modified instead.
If you already have a working copy of the files or folders you want to include as externals in another working copy, you can simply add those via drag and drop from the windows explorer.
Simply right drag the file or folder from one working copy to where you want those to be included as externals. A context menu appears when you release the mouse button: if you click on that context menu entry, the svn:externals property is automatically added. All you have to do after that is commit the property changes and update to get those externals properly included in your working copy.
Salah satu fitur dari sistem kontrol versi adalah kemampuan untuk mengisolasi perubahan ke dalam baris terpisah dari pengembangan. Baris ini dikenal sebagai cabang. Cabang sering digunakan untuk mencoba fitur baru tanpa mengganggu baris pengembangan utama dengan kesalahan kompilator dan bug. Segera setelah fitur baru cukup stabil maka cabang pengembangan digabung kembali ke dalam cabang utama (trunk).
Fitur lain dari sistem kontrol versi adalah kemampuan untuk menandai revisi tertentu (contoh. versi rilis), agar Anda bisa membuat ulang kapan saja buatan tertentu atau lingkungan. Proses ini dikenal sebagai pembuatan tag.
Subversion does not have special commands for branching or tagging, but uses so-called “cheap copies” instead. Cheap copies are similar to hard links in Unix, which means that instead of making a complete copy in the repository, an internal link is created, pointing to a specific tree/revision. As a result branches and tags are very quick to create, and take up almost no extra space in the repository.
Jika Anda sudah mengimpor proyek Anda dengan struktur direktori yang direkomendasikan, membuat sebuah cabang atau versi tag sangat sederhana:
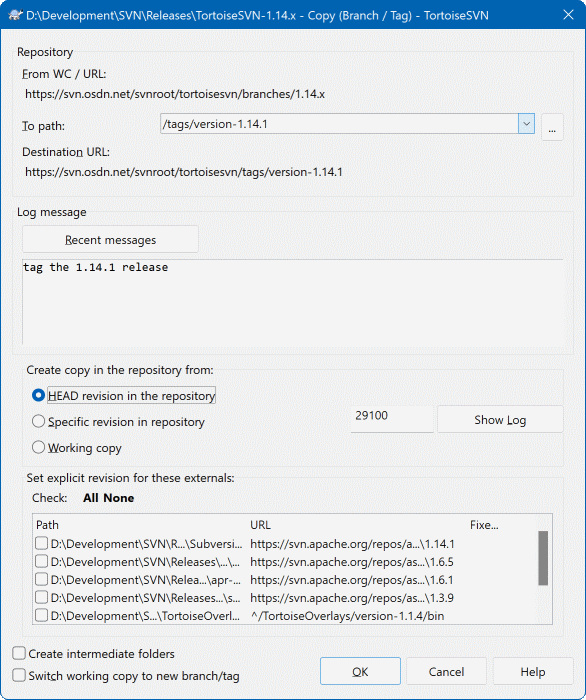
Pilih folder dalam copy pekerjaan Anda yang ingin Anda copy ke cabang atau tag, lalu pilih perintah → .
The default destination URL for the new branch will be the source URL on which your working copy is based. You will need to edit that URL to the new path for your branch/tag. So instead of
http://svn.collab.net/repos/ProjectName/trunk
you might now use something like
http://svn.collab.net/repos/ProjectName/tags/Release_1.10
If you can't remember the naming convention you used last time, click the button on the right to open the repository browser so you can view the existing repository structure.
intermediate folders
When you specify the target URL, all the folders up to the last one must already exist or you will get an error message. In the above example, the URL http://svn.collab.net/repos/ProjectName/tags/ must exist to create the Release_1.10 tag.
However if you want to create a branch/tag to an URL that has intermediate folders that don't exist yet you can check the option Create intermediate folders at the bottom of the dialog. If that option is activated, all intermediate folders are automatically created.
Note that this option is disabled by default to avoid typos. For example, if you typed the target URL as http://svn.collab.net/repos/ProjectName/Tags/Release_1.10 instead of http://svn.collab.net/repos/ProjectName/tags/Release_1.10, you would get an error with the option disabled, but with the option enabled a folder Tags would be automatically created, and you would end up with a folder Tags and a folder tags.
Sekarang Anda harus memilih sumber yang dicopy. Disini Anda mempunyai tiga opsi:
- Revisi HEAD dalam repositori
Cabang baru dicopy secara langsung dalam repositori dari revisi HEAD. Tidak ada data perlu ditransfer dari copy pekerjaan Anda, dan cabang dibuat sangat cepat.
- Revisi tertentu dalam repositori
Cabang baru dicopy secara langsung dalam repositori tapi Anda bisa memilih revisi yang lebih lama. Ini berguna jika Anda lupa untuk membuat tag saat Anda merilis proyek Anda minggu lalu. Jika Anda tidak ingat angka revisi, klik tombol di kanan untuk menampilkan log revisi, dan memilih angka revisi dari sana. Sekali lagi tidak ada data yang ditransfer dari copy pekerjaan Anda, dan cabang dibuat dengan sangat cepat.
- Copy pekerjaan
Cabang baru adalah copy identik dari copy pekerjaan lokal Anda. Jika Anda telah memutahirkan beberapa file ke revisi lebih lama dalam WC Anda, atau jika Anda telah membuat perubahan lokal, itulah yang akan masuk ke dalam copy. Secara alami ini semacam tag kompleks yang melibatkan pentransferan data dari WC Anda kembali ke repositori jika belum ada disana.
Jika Anda ingin copy pekerjaan Anda ditukar ke cabang yang baru dibuat secara otomatis, gunakan kotak centang Tukar copy pekerjaan ke cabang/tag baru. Tapi jika Anda melakukannya, pertama pastikan bahwa copy pekerjaan Anda tidak berisi modifikasi. Jika ada, perubahan itu akan digabung ke dalam cabang WC ketika Anda menukar.
If your working copy has other projects included with svn:externals properties, those externals will be listed at the bottom of the branch/tag dialog. For each external, the target path and the source URL is shown.
If you want to make sure that the new tag always is in a consistent state, check all the externals to have their revisions pinned. If you don't check the externals and those externals point to a HEAD revision which might change in the future, checking out the new tag will check out that HEAD revision of the external and your tag might not compile anymore. So it's always a good idea to set the externals to an explicit revision when creating a tag.
The externals are automatically pinned to either the current HEAD revision or the working copy BASE revision, depending on the source of the branch/tag:
Tabel 4.1. Pinned Revision
| Copy Source | Pinned Revision |
|---|---|
| Revisi HEAD dalam repositori | external's repos HEAD revision |
| Revisi spesifik dalam repositori | external's repos HEAD revision |
| Copy pekerjaan | external's WC BASE revision |
externals within externals
If a project that is included as an external has itself included externals, then those will not be tagged! Only externals that are direct children can be tagged.
Tekan untuk mengkomit copy baru ke repositori. Jangan lupa untuk menyertakan log pesan. Catatan bahwa copy dibuat di dalam repositori.
Note that unless you opted to switch your working copy to the newly created branch, creating a Branch or Tag does not affect your working copy. Even if you create the branch from your WC, those changes are committed to the new branch, not to the trunk, so your WC may still be marked as modified with respect to the trunk.
You can also create a branch or tag without having a working copy. To do that, open the repository browser. You can there drag folders to a new location. You have to hold down the Ctrl key while you drag to create a copy, otherwise the folder gets moved, not copied.
You can also drag a folder with the right mouse button. Once you release the mouse button you can choose from the context menu whether you want the folder to be moved or copied. Of course to create a branch or tag you must copy the folder, not move it.
Yet another way is from the log dialog. You can show the log dialog for e.g. trunk, select a revision (either the HEAD revision at the very top or an earlier revision), right click and choose .
...that is (not really) the question. While a checkout downloads everything from the desired branch in the repository to your working directory, → only transfers the changed data to your working copy. Good for the network load, good for your patience. :-)
To be able to work with your freshly generated branch or tag you have several ways to handle it. You can:
→ untuk membuat checkout segar dalam folder kosong. Anda bisa memeriksa setiap lokasi pada disk lokal Anda dan Anda bisa membuat banyak copy pekerjaan dari repositori sesuka Anda.
Menukar copy pekerjaan Anda ke copy yang baru saja dibuat dalam repositori Anda. Sekali lagi pilih level atas folder dari proyek Anda dan gunakan → dari menu konteks.
Dalam dialog berikut masukan URL dari cabang yang baru Anda buat. Pilih Revisi Head tombol radio dan klik . Copy pekerjaan Anda ditukar ke cabang/tag Anda.
Menukar pekerjaan mirip seperti Mutahirkan dalam kecuali ia tidak pernah mengabaikan perubahan lokal Anda. Setiap perubahan Anda telah membuat copy pekerjaan Anda yang belum dikomit akan digabung ketika Anda melakukan Tukar. Jika Anda tidak ingin ini terjadi ketika Anda harus baik mengkomit perubahan sebelum penukaran, atau memulihkan copy pekerjaan Anda ke revisi yang sudah-dikomit (umumnya HEAD).
If you want to work on trunk and branch, but don't want the expense of a fresh checkout, you can use Windows Explorer to make a copy of your trunk checkout in another folder, then → that copy to your new branch.
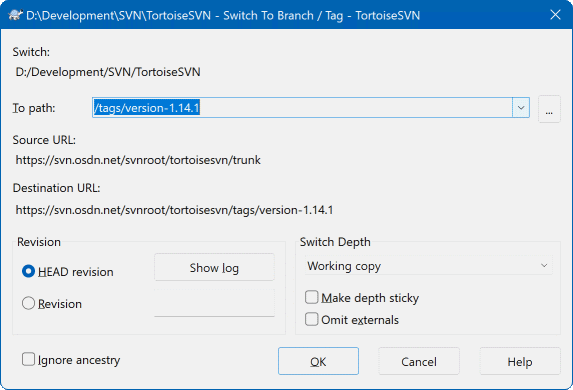
Meskipun Subversion sendiri tidak membuat perbedaan antara tag dan cabang, cara mereka biasanya digunakan agak sedikit berbeda.
Tags are typically used to create a static snapshot of the project at a particular stage. As such they are not normally used for development - that's what branches are for, which is the reason we recommended the
/trunk /branches /tagsrepository structure in the first place. Working on a tag revision is not a good idea, but because your local files are not write protected there is nothing to stop you doing this by mistake. However, if you try to commit to a path in the repository which contains/tags/, TortoiseSVN will warn you.Itu dimungkinkan bahwa Anda perlu untuk membuat perubahan selanjutnya ke rilis yang sudah Anda tag. Cara yang benar untuk menangani ini adalah membuat cabang baru dari tag pertama dan mengkomit ke cabang. Lakukan perubahan Anda pada cabang ini dan lalu buat tag baru dari cabang baru ini, contoh
Versi_1.0.1.Jika Anda mengubah copy pekerjaan yang dibuat dari cabang dan mengkomit, maka semua perubahan pergi ke cabang baru dan bukan ke trunk. Hanya modifikasi yang disimpan. Sisanya tetap copy murah.
Dimana cabang digunakan untuk memelihara baris terpisah dari pengembangan pada beberapa tahap Anda akan menginginkan untuk menggabung perubahan yang dibuat pada satu cabang kembali ke dalam trunk, atau sebaliknya.
It is important to understand how branching and merging works in Subversion before you start using it, as it can become quite complex. It is highly recommended that you read the chapter Branching and Merging in the Subversion book, which gives a full description and many examples of how it is used.
The next point to note is that merging always takes place within a working copy. If you want to merge changes into a branch, you have to have a working copy for that branch checked out, and invoke the merge wizard from that working copy using → .
Secara umum adalah ide yang baik untuk melakukan penggabungan ke dalam copy pekerjaan yang tidak diubah. Jika Anda membuat perubahan lain dalam WC Anda, komit itu dulu. Jika penggabungan tidak seperti yang Anda harapkan, Anda mungkin ingin memulihkan perubahan, dan perintah Pulihkan akan mengabaikan semua perubahan termasuk setiap yang Anda buat sebelum penggabungan.
There are three common use cases for merging which are handled in slightly different ways, as described below. The first page of the merge wizard asks you to select the method you need.
- Merge a range of revisions
Metode ini mengetengahkan kasus ketika Anda sudah membuat satu atau lebih revisi ke cabang (atau ke trunk) dan Anda ingin mengirimkan perubahan itu ke cabang yang berbeda.
What you are asking Subversion to do is this: “ Calculate the changes necessary to get [FROM] revision 1 of branch A [TO] revision 7 of branch A, and apply those changes to my working copy (of trunk or branch B). ”
If you leave the revision range empty, Subversion uses the merge-tracking features to calculate the correct revision range to use. This is known as a reintegrate or automatic merge.
- Merge two different trees
This is a more general case of the reintegrate method. What you are asking Subversion to do is: “ Calculate the changes necessary to get [FROM] the head revision of the trunk [TO] the head revision of the branch, and apply those changes to my working copy (of the trunk). ” The net result is that trunk now looks exactly like the branch.
If your server/repository does not support merge-tracking then this is the only way to merge a branch back to trunk. Another use case occurs when you are using vendor branches and you need to merge the changes following a new vendor drop into your trunk code. For more information read the chapter on vendor branches in the Subversion Book.
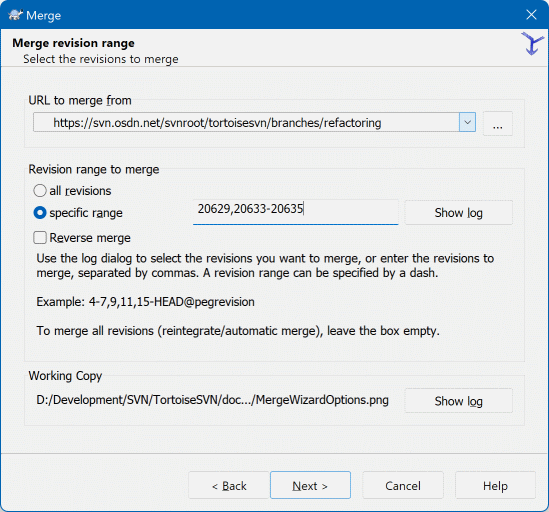
In the From: field enter the full folder URL of the branch or tag containing the changes you want to port into your working copy. You may also click to browse the repository and find the desired branch. If you have merged from this branch before, then just use the drop down list which shows a history of previously used URLs.
If you are merging from a renamed or deleted branch then you will have to go back to a revision where that branch still existed. In this case you will also need to specify that revision as a peg revision in the range of revisions being merged (see below), otherwise the merge will fail when it can't find that path at HEAD.
In the Revision range to merge field enter the list of revisions you want to merge. This can be a single revision, a list of specific revisions separated by commas, or a range of revisions separated by a dash, or any combination of these.
If you need to specify a peg revision for the merge, add the peg revision at the end of the revisions, e.g. 5-7,10@3. In the above example, the revisions 5,6,7 and 10 would be merged, with 3 being the peg revision.
Penting
There is an important difference in the way a revision range is specified with TortoiseSVN compared to the command line client. The easiest way to visualise it is to think of a fence with posts and fence panels.
With the command line client you specify the changes to merge using two “fence post” revisions which specify the before and after points.
With TortoiseSVN you specify the changeset to merge using “fence panels”. The reason for this becomes clear when you use the log dialog to specify revisions to merge, where each revision appears as a changeset.
If you are merging revisions in chunks, the method shown in the Subversion book will have you merge 100-200 this time and 200-300 next time. With TortoiseSVN you would merge 100-200 this time and 201-300 next time.
This difference has generated a lot of heat on the mailing lists. We acknowledge that there is a difference from the command line client, but we believe that for the majority of GUI users it is easier to understand the method we have implemented.
The easiest way to select the range of revisions you need is to click on , as this will list recent changes with their log comments. If you want to merge the changes from a single revision, just select that revision. If you want to merge changes from several revisions, then select that range (using the usual Shift-modifier). Click on and the list of revision numbers to merge will be filled in for you.
If you want to merge changes back out of your working copy, to revert a change which has already been committed, select the revisions to revert and make sure the Reverse merge box is checked.
If you have already merged some changes from this branch, hopefully you will have made a note of the last revision merged in the log message when you committed the change. In that case, you can use for the Working Copy to trace that log message. Remembering that we are thinking of revisions as changesets, you should Use the revision after the end point of the last merge as the start point for this merge. For example, if you have merged revisions 37 to 39 last time, then the start point for this merge should be revision 40.
If you are using the merge tracking features of Subversion, you do not need to remember which revisions have already been merged - Subversion will record that for you. If you leave the revision range blank, all revisions which have not yet been merged will be included. Read bagian bernama “Merge Tracking” to find out more.
When merge tracking is used, the log dialog will show previously merged revisions, and revisions pre-dating the common ancestor point, i.e. before the branch was copied, as greyed out. The Hide non-mergeable revisions checkbox allows you to filter out these revisions completely so you see only the revisions which can be merged.
Jika orang lain boleh mengkomit perubahan maka hati-hati terhadap penggunaan revisi HEAD. Ia tidak boleh merujuk ke revisi yang Anda pikir benar jika orang lain mengkomit setetlah pemutahiran Anda yang terkahir.
If you leave the range of revisions empty or have the radio button all revisions checked, then Subversion merges all not-yet merged revisions. This is known as a reintegrate or automatic merge.
There are some conditions which apply to a reintegrate merge. Firstly, the server must support merge tracking. The working copy must be of depth infinite (no sparse checkouts), and it must not have any local modifications, switched items or items that have been updated to revisions other than HEAD. All changes to trunk made during branch development must have been merged across to the branch (or marked as having been merged). The range of revisions to merge will be calculated automatically.
Click and go to bagian bernama “Merge Options”.
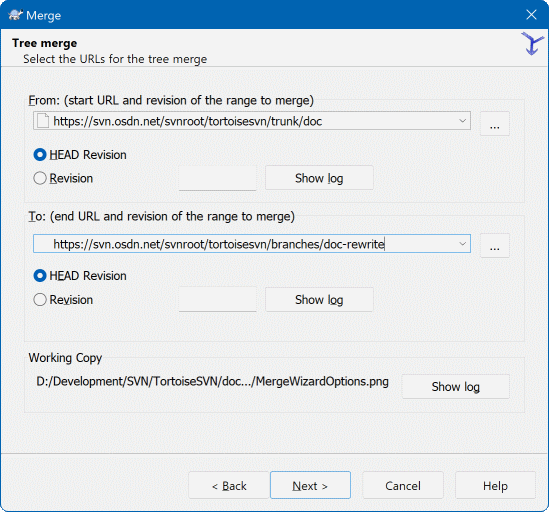
If you are using this method to merge a feature branch back to trunk, you need to start the merge wizard from within a working copy of trunk.
In the From: field enter the full folder URL of the trunk. This may sound wrong, but remember that the trunk is the start point to which you want to add the branch changes. You may also click to browse the repository.
In the To: field enter the full folder URL of the feature branch.
Dalam kedua field Dari Revisi dan field Ke Revisi, masukkan angka revisi terakhir dimana dua susunan disinkronisasi. Jika Anda yakin tidak-ada yang lain melakukan komit Anda bisa menggunakan revisi HEAD dalam kedua kasus. Jika ada kesempatan dimana orang lain sudah melakukan komit sejak sinkronisasi, gunakan angka revisi tertenu untuk menghindari kehilangan komit terbaru.
You can also use to select the revision.
This page of the wizard lets you specify advanced options, before starting the merge process. Most of the time you can just use the default settings.
You can specify the depth to use for the merge, i.e. how far down into your working copy the merge should go. The depth terms used are described in bagian bernama “Checkout Depth”. The default depth is Working copy, which uses the existing depth setting, and is almost always what you want.
Most of the time you want merge to take account of the file's history, so that changes relative to a common ancestor are merged. Sometimes you may need to merge files which are perhaps related, but not in your repository. For example you may have imported versions 1 and 2 of a third party library into two separate directories. Although they are logically related, Subversion has no knowledge of this because it only sees the tarballs you imported. If you attempt to merge the difference between these two trees you would see a complete removal followed by a complete add. To make Subversion use only path-based differences rather than history-based differences, check the Ignore ancestry box. Read more about this topic in the Subversion book, Noticing or Ignoring Ancestry.
You can specify the way that line ending and whitespace changes are handled. These options are described in bagian bernama “Line-end and Whitespace Options”. The default behaviour is to treat all whitespace and line-end differences as real changes to be merged.
The checkbox marked Force the merge is used to avoid a tree conflict where an incoming delete affects a file that is either modified locally or not versioned at all. If the file is deleted then there is no way to recover it, which is why that option is not checked by default.
If you are using merge tracking and you want to mark a revision as having been merged, without actually doing the merge here, check the Only record the merge checkbox. There are two possible reasons you might want to do this. It may be that the merge is too complicated for the merge algorithms, so you code the changes by hand, then mark the change as merged so that the merge tracking algorithm is aware of it. Or you might want to prevent a particular revision from being merged. Marking it as already merged will prevent the merge occurring with merge-tracking-aware clients.
Now everything is set up, all you have to do is click on the button. If you want to preview the results simulates the merge operation, but does not modify the working copy at all. It shows you a list of the files that will be changed by a real merge, and notes files where conflicts may occur. Because merge tracking makes the merge process a lot more complicated, there is no guaranteed way to find out in advance whether the merge will complete without conflicts, so files marked as conflicted in a test merge may in fact merge without any problem.
The merge progress dialog shows each stage of the merge, with the revision ranges involved. This may indicate one more revision than you were expecting. For example if you asked to merge revision 123 the progress dialog will report “ Merging revisions 122 through 123 ”. To understand this you need to remember that Merge is closely related to Diff. The merge process works by generating a list of differences between two points in the repository, and applying those differences to your working copy. The progress dialog is simply showing the start and end points for the diff.
The merge is now complete. It's a good idea to have a look at the merge and see if it's as expected. Merging is usually quite complicated. Conflicts often arise if the branch has drifted far from the trunk.
Tip
Whenever revisions are merged into a working copy, TortoiseSVN generates a log message from all the merged revisions. Those are then available from the button in the commit dialog.
To customize that generated message, set the corresponding project properties on your working copy. See bagian bernama “Merge log message templates”
For Subversion clients and servers prior to 1.5, no merge information is stored and merged revisions have to be tracked manually. When you have tested the changes and come to commit this revision, your commit log message should always include the revision numbers which have been ported in the merge. If you want to apply another merge at a later time you will need to know what you have already merged, as you do not want to port a change more than once. For more information about this, refer to Best Practices for Merging in the Subversion book.
If your server and all clients are running Subversion 1.5 or higher, the merge tracking facility will record the revisions merged and avoid a revision being merged more than once. This makes your life much simpler as you can simply merge the entire revision range each time and know that only new revisions will actually be merged.
Manajemen cabang penting. Jika Anda ingin membiarkan cabang ini mutahir dengan trunk, Anda harus memastikan untuk sering menggabung agar cabang dan trunk tidak berselisih terlalu jauh. Tentu saja, Anda masih harus menghindari pengulangan penggabungan perubahan seperti dijelaskan di atas.
Tip
If you have just merged a feature branch back into the trunk, the trunk now contains all the new feature code, and the branch is obsolete. You can now delete it from the repository if required.
Penting
Subversion can't merge a file with a folder and vice versa - only folders to folders and files to files. If you click on a file and open up the merge dialog, then you have to give a path to a file in that dialog. If you select a folder and bring up the dialog, then you must specify a folder URL for the merge.
Subversion 1.5 introduced facilities for merge tracking. When you merge changes from one tree into another, the revision numbers merged are stored and this information can be used for several different purposes.
You can avoid the danger of merging the same revision twice (repeated merge problem). Once a revision is marked as having been merged, future merges which include that revision in the range will skip over it.
When you merge a branch back into trunk, the log dialog can show you the branch commits as part of the trunk log, giving better traceability of changes.
When you show the log dialog from within the merge dialog, revisions already merged are shown in grey.
When showing blame information for a file, you can choose to show the original author of merged revisions, rather than the person who did the merge.
You can mark revisions as do not merge by including them in the list of merged revisions without actually doing the merge.
Merge tracking information is stored in the svn:mergeinfo property by the client when it performs a merge. When the merge is committed the server stores that information in a database, and when you request merge, log or blame information, the server can respond appropriately. For the system to work properly you must ensure that the server, the repository and all clients are upgraded. Earlier clients will not store the svn:mergeinfo property and earlier servers will not provide the information requested by new clients.
Find out more about merge tracking from Subversion's Merge tracking documentation.
Penting
The text in the conflict resolver dialogs are provided by the SVN library and might therefore not (yet) be translated as the TortoiseSVN dialogs are. Sorry for that.
Merging does not always go smoothly. Sometimes there is a conflict. TortoiseSVN helps you through this process by showing the merge conflict dialog.
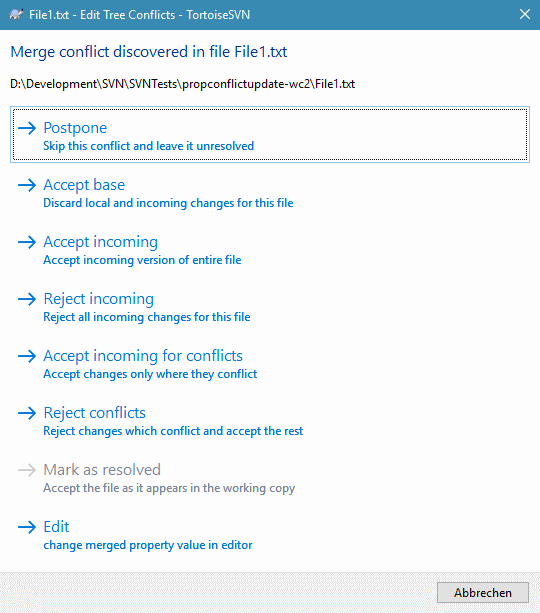
It is likely that some of the changes will have merged smoothly, while other local changes conflict with changes already committed to the repository. All changes which can be merged are merged. The Merge Conflict dialog gives you different ways of handling the lines which are in conflict.
For normal conflicts that happen due to changes in the file content or its properties, the dialog shows buttons which allow you to chose which of the conflicting parts to keep or reject.
- Postpone
Don't deal with the conflict now. Let the merge continue and resolve the conflicts after the merge is done.
- Accept base
This leaves the file as it was, without neither the changes coming from the merge nor the changes you've made in your working copy.
- Accept incoming
This discards all your local changes and uses the file as it arrives from the merge source.
- Reject incoming
This discards all the changes from the merge source and leaves the file with your local edits.
- Accept incoming for conflicts
This discards your local changes where they conflict with the changes from the merge source. But it leaves all your local changes which don't conflict.
- Reject conflicts
This discards changes from the merge source which conflict with your local changes. But it keeps all changes that don't conflict with your local changes.
- Mark as resolved
Marks the conflicts as resolved. This button is disabled until you use the button to edit the conflict manually and save those changes back to the file. Once the changes are saved, the button becomes enabled.
- Edit
Starts the merge editor so you can resolve the conflicts manually. Don't forget to save the file so the button becomes enabled.
If there's a tree conflict, please first see bagian bernama “Tree Conflicts” about the various types of tree conflicts and how and why they can happen.
To resolve tree conflicts after a merge, a dialog is shown with various options on how to resolve the conflict:
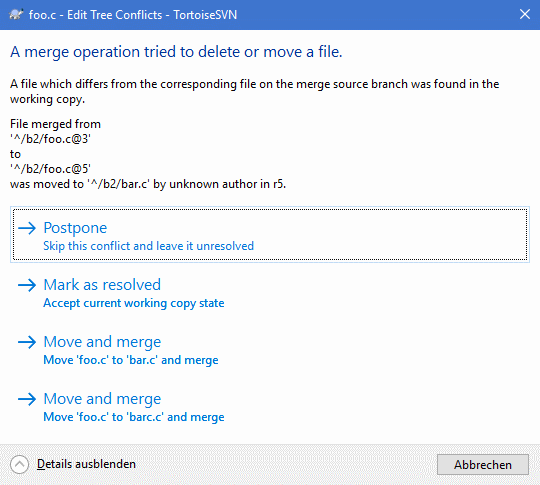
Since there are various possible tree conflict situations, the dialog will show buttons to resolve those depending on the specific conflict. The button texts and labels explain what the option to resolve the conflict does. If you're not sure, either cancel the dialog or use the button to resolve the conflict later.
When you develop a new feature on a separate branch it is a good idea to work out a policy for re-integration when the feature is complete. If other work is going on in trunk at the same time you may find that the differences become significant over time, and merging back becomes a nightmare.
If the feature is relatively simple and development will not take long then you can adopt a simple approach, which is to keep the branch entirely separate until the feature is complete, then merge the branch changes back into trunk. In the merge wizard this would be a simple Merge a range of revisions, with the revision range being the revision span of the branch.
If the feature is going to take longer and you need to account for changes in trunk, then you need to keep the branch synchronised. This simply means that periodically you merge trunk changes into the branch, so that the branch contains all the trunk changes plus the new feature. The synchronisation process uses Merge a range of revisions. When the feature is complete then you can merge it back to trunk using either Reintegrate a branch or Merge two different trees.
Another (fast) way to merge all changes from trunk to the feature branch is to use the → from the extended context menu (hold down the Shift key while you right click on the file).
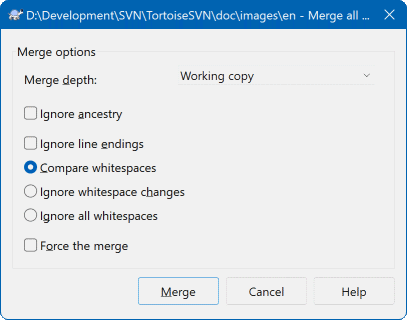
This dialog is very easy. All you have to do is set the options for the merge, as described in bagian bernama “Merge Options”. The rest is done by TortoiseSVN automatically using merge tracking.
Subversion umumnya bekerja baik tanpa penguncian, menggunakan metode “Copy-Ubah-Gabung” seperti dijelaskan sebelumnya dalam bagian bernama “Solusi Copy-Ubah-Gabung”. Akan tetapi ada sedikit turunan ketika Anda mungkin perlu untuk mengimplementasikan beberapa bentuk dari aturan penguncian.
Anda menggunakan file “tidak bisa digabung”, sebagai contoh, file grafik. Jika dua orang mengubah file yang sama, penggabungan tidak mungkinm, maka salah satu dari Anda akan kehilangan perubahannya.
Your company has always used a locking revision control system in the past and there has been a management decision that “locking is best”.
Firstly you need to ensure that your Subversion server is upgraded to at least version 1.2. Earlier versions do not support locking at all. If you are using file:// access, then of course only your client needs to be updated.
The Three Meanings of “Lock”
In this section, and almost everywhere in this book, the words “lock” and “locking” describe a mechanism for mutual exclusion between users to avoid clashing commits. Unfortunately, there are two other sorts of “lock” with which Subversion, and therefore this book, sometimes needs to be concerned.
The second is working copy locks, used internally by Subversion to prevent clashes between multiple Subversion clients operating on the same working copy. Usually you get these locks whenever a command like update/commit/... is interrupted due to an error. These locks can be removed by running the cleanup command on the working copy, as described in bagian bernama “Membersihkan”.
And third, files and folders can get locked if they're in use by another process, for example if you have a word document opened in Word, that file is locked and can not be accessed by TortoiseSVN.
You can generally forget about these other kinds of locks until something goes wrong that requires you to care about them. In this book, “lock” means the first sort unless the contrary is either clear from context or explicitly stated.
Standarnya, tidak ada yang dikunci dan setiap orang yang mempunyai akses komit bisa mengkomit perubahan ke file apapun kapan saja. Yang lain akan memutahirkan copy pekerjaannya secara periodik dan perubahan dalam repositori akan digabung dengan perubahan lokal.
Jika Anda Mendapat Kunci pada file, maka hanya Anda yang bisa mengkomit file itu. Mengkomit dengan semua pengguna lain akan diblok sampai Anda melepas kuncian. File terkunci tidak bisa diubah dengan cara apapun dalam repositori, ia tidak bisa dihapus atau diganti nama juga, kecuali oleh pemilik kunci.
Penting
A lock is not assigned to a specific user, but to a specific user and a working copy. Having a lock in one working copy also prevents the same user from committing the locked file from another working copy.
As an example, imagine that user Jon has a working copy on his office PC. There he starts working on an image, and therefore acquires a lock on that file. When he leaves his office he's not finished yet with that file, so he doesn't release that lock. Back at home Jon also has a working copy and decides to work a little more on the project. But he can't modify or commit that same image file, because the lock for that file resides in his working copy in the office.
Akan tetapi, pengguna lain tidak perlu mengetahui bahwa Anda telah mengambil kunci. Kecuali mereka memeriksa status kunci secara reguler, pertama mereka akan mengetahuinya ketika komit mereka gagal, yang dalam banyak akasus tidak begitu berguna. Untuk memudahkan pengaturan kunci, ada properti baru Subversion svn:needs-lock. Bila properti ini di-set (ke nilai apapun) pada file, kapan saja filedi check out atau dimutahirkan, copy lokal dibuat hanya-baca kecuali copy pekerjaan itu menampung kuncian untuk file. Tindakan ini sebagai peringatan bahwa Anda tidak boleh mengedit file itu kecuali Anda mendapatkan kunci yang dibutuhkan. File yang diversi dan hanya-baca ditandai dengan lapisan khusus dalam TortoiseSVN untuk menunjukan bahwa Anda perlu mendapatkan kunci sebelum pengeditan.
Kuncian direkam oleh lokasi copy pekerjaan juga oleh pemilik. Jika Anda mempunyai beberapa copy pekerjaan (di rumah, di tempat kerja) maka Anda hanya bisa menampung kunci dalam salah satu dari copy pekerjaan itu.
Jika salah satu dari co-worker Anda memerlukan kunci dan kemudian pergi berlibur tanpa melepaskannya, apa yang Anda lakukan? Subversion menyediakan dalam artian untuk memaksa kuncian. Pelepasan kunci yang dipegang oleh orang lain dirujuk sebagai Membongkar kunci, dan dipaksa untuk mendapatkan kunci yang sudah dipegang orang lain dirujuk sebagai Pencurian kunci. Umumnya ini bukan hal yang harus Anda lakukan jika Anda ingin tetap berteman dengan co-worker Anda.
Kuncian direkam dalam repositori, dan token kunci dibuat dalam copy pekerjaan Anda. Jika ada ketidaksesuaian, sebagai contoh jika orang lain telah membongkar kunci, kunci lokal menjadi tidak benar. Repositori selalu menjadi referensi definitif.
Pilih file-file dalam copy pekerjaan Anda yang ingin Anda perlukan kunci, lalu pilih perintah → .
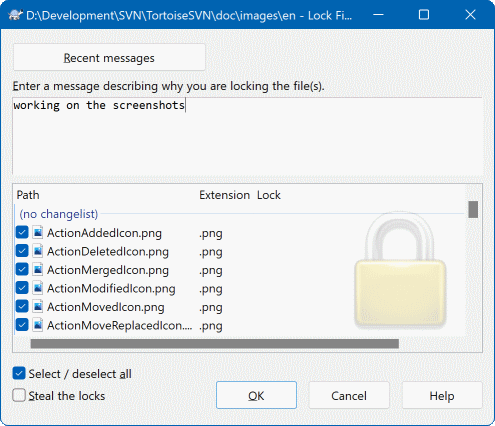
Dialog muncul, membolehkan Anda untuk memasukan komentar, agar yang lain bisa melihat mengapa Anda mengunci file. Komentar bersifat opsional dan saat ini hanya digunakan dengan repositori berbasis Svnserve. Jika (dan hanya jika) Anda perlu mencuri kunci dari orang lain, centang kotak Curi kunci, lalu klik .
You can set the project property tsvn:logtemplatelock to provide a message template for users to fill in as the lock message. Refer to bagian bernama “Seting Proyek” for instructions on how to set properties.
If you select a folder and then use → the lock dialog will open with every file in every sub-folder selected for locking. If you really want to lock an entire hierarchy, that is the way to do it, but you could become very unpopular with your co-workers if you lock them out of the whole project. Use with care ...
Untuk memastikan Anda tidak lupa melepaskan kunci yang tidak Anda perlukan lagi, file terkunci ditampilkan dalam dialog komit dan dipilih secara standar. Jika Anda melanjurkan dengan komit, kuncian yang Anda pegang pada file yang dipilih akan dihapus, bahkan jika file belum diubah. Jika Anda tidak ingin melepaskan kunci pada file tertentu, Anda bisa tidak mencentangnya (jika tidak diubah). Jika Anda ingin membiarkan kunci pada file yang telah Anda ubah, Anda harus menghidupkan kotak centang Biarkan kunci sebelum Anda mengkomit perubahan Anda.
To release a lock manually, select the file(s) in your working copy for which you want to release the lock, then select the command → Tidak ada yang harus dimasukan selanjutnya maka TortoiseSVN akan menghubungi repositori dan melepaskan kunci. Anda juga bisa menggunakan perintah ini pada folder untuk melepaskan semua kunci secara rekursif.
Untuk melihat kunci apa yang Anda dan lainnya pegang, Anda bisa menggunakan → . Secara lokal kunci yang dipegang segera tampil. Untuk memeriksa kunci yang dipegang orang lain (dan melihat jika kunci Anda rusak atau dicuri) Anda perlu untuk mengklik pada .
Dari menu konteks disini, Anda juga bisa mendapatkan dan melepaskan kunci, juga pembongkaran dan pencurian kunci yang dipegang orang lain.
Hindari Pembongkaran dan Pencurian Kunci
Jika Anda membongkar atau mencuri kunci orang lain tanpa memberitahunya, Anda bisa menyebabkan kehiilangan pekerjaan. Jika Anda bekerja dengan tipe file tidak bisa digabung dan Anda mencuri kunci orang lain, sekali Anda melepaskan kunci mereka bebas memeriksanya dalam perubahan mereka dan menimpa punya Anda. Subversion tidak kehilangan data, tapi Anda kehilangan proteksi tim-kerja yang memberikan kunci kepada Anda.
Seperti telah disebutkan diatas, cara yang paling efektif untuk menggunakan kuncian adalah mengeset properti svn:needs-lock pada file. Lihat bagian bernama “Seting Proyek” untuk instruksi bagaimana mengeset properti. File dengan properti ini diset akan selalu di check out dan dimutahirkan dengan tanda hanya-baca di-set kecuali copy pekerjaan Anda memegang kunci.
Sebagai pengingat, TortoiseSVN menggunakan lapisan khusus untuk menunjukan ini.
If you operate a policy where every file has to be locked then you may find it easier to use Subversion's auto-props feature to set the property automatically every time you add new files. Read bagian bernama “Seting properti otomatis” for further information.
Ketika Anda membuat repositori baru dengan Subversion 1.2 atau lebih tinggi, empat template hook dibuat dalam direktori repositori hooks. Ini disebut sebelum dan setelah mendapatkan kunci, dan sebelum serta setelah melepaskan kunci.
Adalah ide yang baik untuk menginstalasi naskah hook setelah-kunci dan setelah-buka-kunci pada server yang mengirim email menunjukan file yang sedang dikunci. Dengan naskah itu ditempatnya, semua pengguna Anda bisa diberitahu jika seseorang mengunci/membuka kunci file. Anda bisa menemukan contoh naskah hook hooks/post-lock.tmpl dalam folder repositori Anda.
Mungkin Anda juga menggunakan hook untuk tidak membolehkan pemisahakan atau seting kuncian, atau barangkali membatasinya ke nama administrator. Atau mungkin Anda ingin mengirim email kepada pemilik ketika salah satu dari kunciannya rusak atau dicuri.
Baca selengkapnya bagian bernama “Server side hook scripts”.
Untuk proyek sumber terbuka (seperti yang satu ini) setiap orang mempunyai akses baca ke repositori, dan setiap orang bisa melakukan kontribusi terhadap proyek. Lalu bagaimana kontribusi itu dikontrol? Jika setiap orang bisa mengkomit perubahan, proyek akan tidak stabil secara permanen dan mungkin rusak secara permanen. Dalam situasi ini perubahan diatur dengan mengirimkan file patch ke tim pengembangan, yang mempunyai akses tulis. Mereka bisa meninjau ulang dulu file patch, dan kemudian mengirimkannya ke repositori atau menolaknya kembali ke pembuat.
File Patch adalah file Unified-Diff yang menampilkan perbedaan antara copy pekerjaan Anda dan revisi base.
Pertama Anda perlu membuat dan menguji perubahan Anda. Kemudian daripada menggunakan → pada folder di atasnya, Anda pilih →
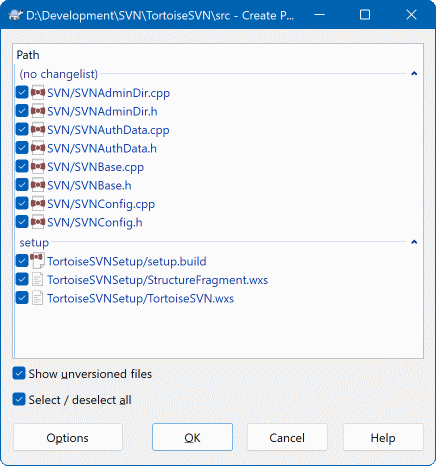
Sekarang Anda bisa memilih file yang ingin Anda sertakan dalam patch, seperti yang Anda inginkan dengan komit penuh. Ini akan menghasilkan file tunggal berisi ringkasan dari semua perubahan yang sudah Anda buat ke file yang dipilih sejak pemutahiran terakhir dari repositori.
Kolom dalam dialog ini bisa dikustomisasi dalam cara yang sama seperti kolom dalam dialog Periksa modifikasi. Baca bagian bernama “Status Lokal dan Remote” untuk detil selanjutnya.
By clicking on the Options button you can specify how the patch is created. For example you can specify that changes in line endings or whitespaces are not included in the final patch file.
Anda bisa menghasilkan patch terpisah yang berisi perubahan ke set file yang berbeda. Tentunya, jika Anda membuat file patch, buat beberapa perubahan lagi ke file yang sama dan kemudian buat patch lain, file patch kedua akan menyertakan kedua set perubahan.
Simpan file menggunakan nama file pilihan Anda. File patch bisa memiliki ekstensi yang Anda sukai, tapi konvensi seharusnya .patch atau ekstensi .diff. Sekarang Anda siap untuk mengirimkan file patch Anda.
Tip
Do not save the patch file with a.txt extension if you intend to send it via email to someone else. Plain text files are often mangled with by the email software and it often happens that whitespaces and newline chars are automatically converted and compressed. If that happens, the patch won't apply smoothly. So use .patch or .diff as the extension when you save the patch file.Selain ke suatu file, Anda dapat juga menyimpan patch tersebut ke clipboard. Anda mungkin ingin untuk melakukannya supaya Anda dapat menempelkannya ke dalam email untuk dikaji ulang oleh orang-orang lain. Atau jika Anda memiliki dua copy pekerjaan di satu mesin dan Anda ingin memindahkan perubahan-perubahan dari satu ke yang lain, suatu patch ke clipboard adalah cara yang cukup nyaman untuk melakukannya.
If you prefer, you can create a patch file from within the Commit or Check for Modifications dialogs. Just select the files and use the context menu item to create a patch from those files. If you want to see the Options dialog you have to hold shift when you right click.
Patch files are applied to your working copy. This should be done from the same folder level as was used to create the patch. If you are not sure what this is, just look at the first line of the patch file. For example, if the first file being worked on was doc/source/english/chapter1.xml and the first line in the patch file is Index: english/chapter1.xml then you need to apply the patch to the doc/source/ folder. However, provided you are in the correct working copy, if you pick the wrong folder level, TortoiseSVN will notice and suggest the correct level.
Untuk menerapkan file patch ke copy pekerjaan Anda, Anda perlu mempunyai akses baca ke repositori. Alasan ini adalah bahwa program penggabung harus merujuk perubahan kembali ke revisi terhadap perubahan dibuat oleh pengembang secara remote.
From the context menu for that folder, click on → This will bring up a file open dialog allowing you to select the patch file to apply. By default only .patch or .diff files are shown, but you can opt for “All files”. If you previously saved a patch to the clipboard, you can use in the file open dialog. Note that this option only appears if you saved the patch to the clipboard using → . Copying a patch to the clipboard from another app will not make the button appear.
Alternatifnya, jika file patch mempunyai ekstensi .patch atau .diff, Anda bisa mengklik kanan padanya secara langsung dan pilih → . Dalam hal ini Anda akan ditanya untuk memasukan lokasi copy pekerjaan.
Dua metode ini menawarkan cara berbeda dalam melakukan hal yang sama. Dengan metode pertama Anda milih WC dan melihat file patch. Yang kedua Anda memilih file patch dan melihat ke WC.
Sekali Anda memilih file patch dan lokasi copy pekerjaan, TortoiseMerge dijalankan untuk menggabung perubahan dari file patch dengan copy pekerjaan Anda. Jendela kecil mendaftar file yang sudah diubah. Klik ganda pada setiap file untuk meninjau perubahan dan simpan file gabungan.
Patfh pengembang remote sekarang sudah menerapkan ke copy pekerjaan Anda, maka Anda perlu mengkomit untuk membolehkan orang lain untuk mengakses perubahan dari repositori.
Kadang kala Anda perlu mengetahui tidak hanya baris apa yang berubah, tapi juga siapa sebenarnya yang mengubah baris tertentu dalam file. Itulah ketika perintah, → kadang-kadang juga dirujuk sebagai perintah anotasi dengan mudah.
Perintah ini mendaftar, untuk setiap baris dalam sebuah file, pembuat dan revisi dimana baris diubah.
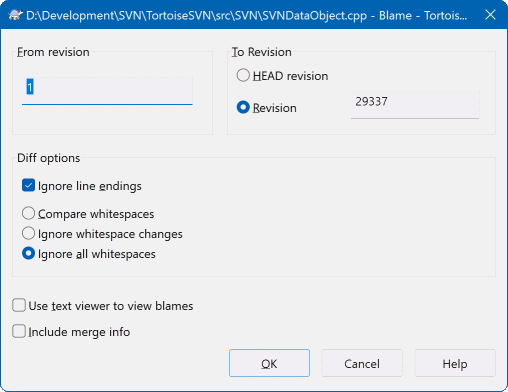
Jika Anda tidak tertarik dalam perubahan dari revisi sebelumnya Anda bisa men-set revisi dari dimana blame seharusnya dimulai. Set ini ke 1, jika Anda ingin blame untuk setiap revisi.
By default the blame file is viewed using TortoiseBlame, which highlights the different revisions to make it easier to read. If you wish to print or edit the blame file, select Use Text viewer to view blames.
You can specify the way that line ending and whitespace changes are handled. These options are described in bagian bernama “Line-end and Whitespace Options”. The default behaviour is to treat all whitespace and line-end differences as real changes, but if you want to ignore an indentation change and find the original author, you can choose an appropriate option here.
You can include merge information as well if you wish, although this option can take considerably longer to retrieve from the server. When lines are merged from another source, the blame information shows the revision the change was made in the original source as well as the revision when it was merged into this file.
Once you press TortoiseSVN starts retrieving the data to create the blame file. Once the blame process has finished the result is written into a temporary file and you can view the results.
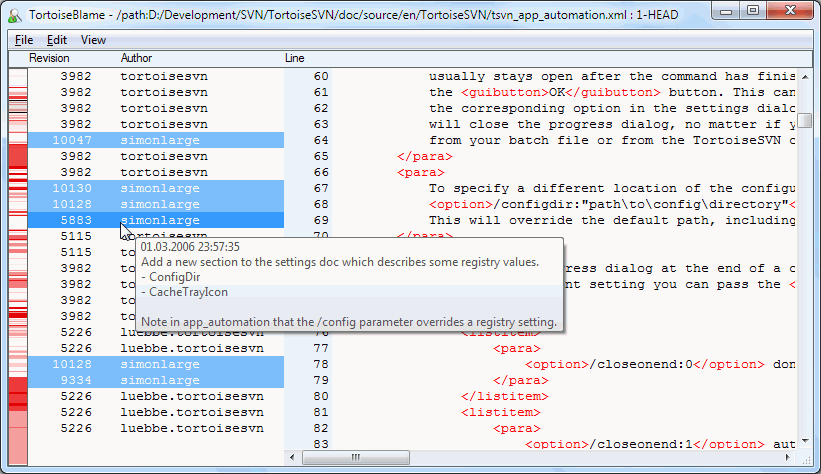
TortoiseBlame, yang disertakan dengan TortoiseSVN, membuat file blame lebih mudah dibaca. Ketika Anda membawa mouse diatas baris dalam kolom info blame, semua baris dengan revisi sama ditampilkan dengan latar belakang lebih gelap. Baris dari revisi lain yang diubah oleh pembuat yang sama ditampilkan dengan latar belakang terang. Pewarnaan mungkin tidak bekerja dengan jelas jika Anda mempunyai layar yang di-set ke mode warna 256.
Jika Anda mengklik kiri pada sebuah baris, semua baris dengan revisi sama diterangi, dan baris dari revisi lain oleh pembuat yang sama diterangi dalam warna lebih terang. Penerangan ini lengket, membolehkan Anda untuk memindahkan mouse tanpa kehilangan penerangan. Klik pada revisi itu lagi untuk mematikan penerangan.
Komentar revisi ditampilkan dalam kotak petunjuk kapan saja mouse berjalan di atas kolom info blame. Jika Anda ingin menyalin pesan log untuk revisi itu, gunakan menu konteks yang muncul jika Anda mengeklik kanan pada kolom info blame.
Anda bisa mencari di dalam laporan Blame menggunakan → . Ini membolehkan Anda untuk mencari angka revisi, pembuat dan isi dari file itu sendiri. Log pesan tidak disertakan dalam pencarian - Anda harus menggunakan Dialog Log untuk mencarinya.
Anda juga dapat lompat ke suatu baris spesifik menggunakan → .
When the mouse is over the blame info columns, a context menu is available which helps with comparing revisions and examining history, using the revision number of the line under the mouse as a reference. → generates a blame report for the same file, but using the previous revision as the upper limit. This gives you the blame report for the state of the file just before the line you are looking at was last changed. → starts your diff viewer, showing you what changed in the referenced revision. → displays the revision log dialog starting with the referenced revision.
If you need a better visual indicator of where the oldest and newest changes are, select → . This will use a colour gradient to show newer lines in red and older lines in blue. The default colouring is quite light, but you can change it using the TortoiseBlame settings.
If you are using Merge Tracking and you requested merge info when starting the blame, merged lines are shown slightly differently. Where a line has changed as a result of merging from another path, TortoiseBlame will show the revision and author of the last change in the original file rather than the revision where the merge took place. These lines are indicated by showing the revision and author in italics. The revision where the merge took place is shown separately in the tooltip when you hover the mouse over the blame info columns. If you do not want merged lines shown in this way, uncheck the Include merge info checkbox when starting the blame.
If you want to see the paths involved in the merge, select → . This shows the path where the line was last changed, excluding changes resulting from a merge.
The revision shown in the blame information represents the last revision where the content of that line changed. If the file was created by copying another file, then until you change a line, its blame revision will show the last change in the original source file, not the revision where the copy was made. This also applies to the paths shown with merge info. The path shows the repository location where the last change was made to that line.
The settings for TortoiseBlame can be accessed using → on the TortoiseBlame tab. Refer to bagian bernama “TortoiseBlame Settings”.
One of the limitations of the Blame report is that it only shows the file as it was in a particular revision, and the last person to change each line. Sometimes you want to know what change was made, as well as who made it. If you right click on a line in TortoiseBlame you have a context menu item to show the changes made in that revision. But if you want to see the changes and the blame information simultaneously then you need a combination of the diff and blame reports.
Dialog log revisi menyertakan beberapa opsi yang membolehkan Anda melakukan ini.
- Revisi Blame
Dalam pane atas, pilih 2 revisi, lalu pilih → . Ini akan mengambil data blame untuk 2 revisi, lalu gunakan peninjau diff untuk membandingkan dua file blame.
- Blame Changes
Select one revision in the top pane, then pick one file in the bottom pane and select → . This will fetch the blame data for the selected revision and the previous revision, then use the diff viewer to compare the two blame files.
- Bandingkan dan Blame dengan BASE Pekerjaan
Menampilkan log untuk file tunggal, dan dalam pane atas, pilih revisi tunggal, lalu pilih → . Ini akan mengambil data blame untuk revisi yang dipilih, dan untuk file dalam BASE pekerjaan, kemudian gunakan peninjau diff untuk membandingkan dua file blame.
Kadang-kadang Anda perlu untuk bekerja secara langsung pada repositori, tanpa copy pekerjaan. Itulah kegunaan Browser Repositori. Seperti halnya explorer dan lapisan ikon membolehkan Anda untuk melihat copy pekerjaan Anda, agar Browser Repositori membolehkan Anda untuk melihat struktur dan status repositori.
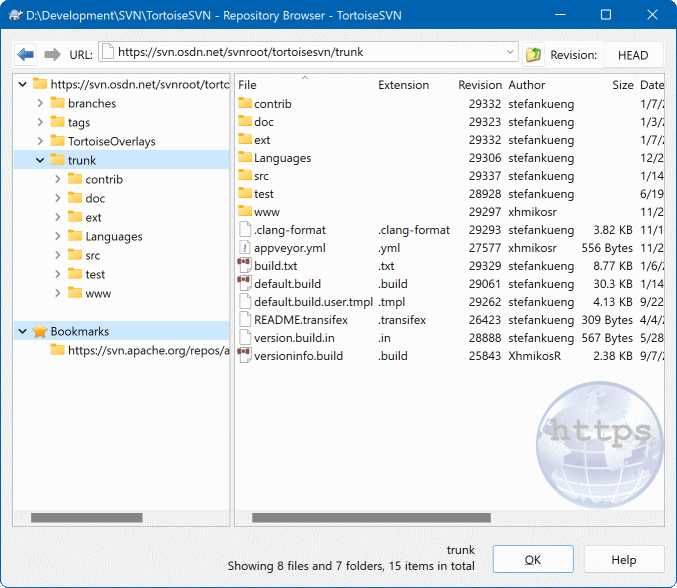
Dengan Browser Repositori Anda bisa menjalankan perintah seperti salin, pindah, ganti nama, ... secara langsung pada repositori.
The repository browser looks very similar to the Windows explorer, except that it is showing the content of the repository at a particular revision rather than files on your computer. In the left pane you can see a directory tree, and in the right pane are the contents of the selected directory. At the top of the Repository Browser Window you can enter the URL of the repository and the revision you want to browse.
Folders included with the svn:externals property are also shown in the repository browser. Those folders are shown with a small arrow on them to indicate that they are not part of the repository structure, just links.
Just like Windows explorer, you can click on the column headings in the right pane if you want to set the sort order. And as in explorer there are context menus available in both panes.
The context menu for a file allows you to:
Membuka file yang dipilih, baik dengan peninjau standar untuk tipe file itu, ataupun dengan program yang Anda sukai.
Edit the selected file. This will checkout a temporary working copy and start the default editor for that file type. When you close the editor program, if changes were saved then a commit dialog appears, allowing you to enter a comment and commit the change.
Show the revision log for that file, or show a graph of all revisions so you can see where the file came from.
Blame the file, to see who changed which line and when.
Checkout a single file. This creates a “sparse” working copy which contains just this one file.
Delete or rename the file.
Save an unversioned copy of the file to your hard drive.
Copy the URL shown in the address bar to the clipboard.
Make a copy of the file, either to a different part of the repository, or to a working copy rooted in the same repository.
View/Edit the file's properties.
Create a shortcut so that you can quickly start repo browser again, opened directly at this location.
The context menu for a folder allows you to:
Show the revision log for that folder, or show a graph of all revisions so you can see where the folder came from.
Export the folder to a local unversioned copy on your hard drive.
Checkout the folder to produce a local working copy on your hard drive.
Create a new folder in the repository.
Add unversioned files or folders directly to the repository. This is effectively the Subversion Import operation.
Delete or rename the folder.
Make a copy of the folder, either to a different part of the repository, or to a working copy rooted in the same repository. This can also be used to create a branch/tag without the need to have a working copy checked out.
View/Edit the folder's properties.
Mark the folder for comparison. A marked folder is shown in bold.
Compare the folder with a previously marked folder, either as a unified diff, or as a list of changed files which can then be visually diffed using the default diff tool. This can be particularly useful for comparing two tags, or trunk and branch to see what changed.
If you select two folders in the right pane, you can view the differences either as a unified-diff, or as a list of files which can be visually diffed using the default diff tool.
If you select multiple folders in the right pane, you can checkout all of them at once into a common parent folder.
Jika Anda memilih 2 tag yang dicopy dari akar yang sama (biasanya /trunk/), Anda bisa menggunakan → untuk melihat daftar revisi diantara dua titik tag.
External items (referenced using svn:externals are also shown in the repository browser, and you can even drill down into the folder contents. External items are marked with a red arrow over the item.
You can use F5 to refresh the view as usual. This will refresh everything which is currently displayed. If you want to pre-fetch or refresh the information for nodes which have not been opened yet, use Ctrl-F5. After that, expanding any node will happen instantly without a network delay while the information is fetched.
You can also use the repository browser for drag-and-drop operations. If you drag a folder from explorer into the repo-browser, it will be imported into the repository. Note that if you drag multiple items, they will be imported in separate commits.
If you want to move an item within the repository, just left drag it to the new location. If you want to create a copy rather than moving the item, Ctrl-left drag instead. When copying, the cursor has a “plus” symbol on it, just as it does in Explorer.
If you want to copy/move a file or folder to another location and also give it a new name at the same time, you can right drag or Ctrl-right drag the item instead of using left drag. In that case, a rename dialog is shown where you can enter a new name for the file or folder.
Kapan saja Anda membuat perubahan dalam repositori menggunakan salah satu dari metode ini, Anda akan disodorkan dengan dialog entri pesan log. Jika Anda men-drag sesuatu karena kesalahan, ini juga kesempatan Anda untuk membatalkan tindakan.
Sometimes when you try to open a path you will get an error message in place of the item details. This might happen if you specified an invalid URL, or if you don't have access permission, or if there is some other server problem. If you need to copy this message to include it in an email, just right click on it and use → , or simply use Ctrl+C.
Bookmarked urls/repositories are shown below the current repository folders in the left tree view. You can add entries there by right clicking on any file or folder and select → . Clicking on a bookmark will browse to that repository and file/folder.
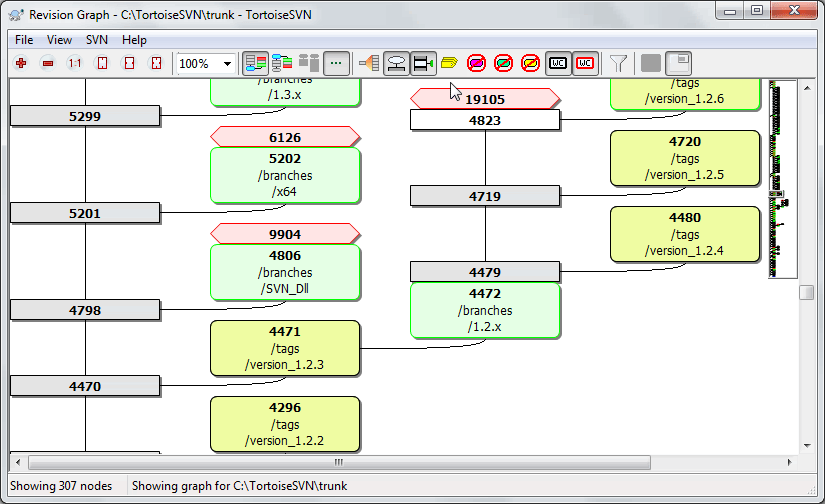
Ada kalanya Anda perlu mengetahui darimana cabang dan tag diambil dari trunk, dan cara ideal untuk melihat informasi semacam ini adalah grafik atau struktur susunan. Itulah saatnya Anda menggunakan →
Perintah ini menganalisa histori revisi dan mencoba untuk membuat susunan memperlihatkan titik dimana copy diambil, dan ketika cabang/tag dihapus.
Penting
In order to generate the graph, TortoiseSVN must fetch all log messages from the repository root. Needless to say this can take several minutes even with a repository of a few thousand revisions, depending on server speed, network bandwidth, etc. If you try this with something like the Apache project which currently has over 500,000 revisions you could be waiting for some time.
The good news is that if you are using log caching, you only have to suffer this delay once. After that, log data is held locally. Log caching is enabled in TortoiseSVN's settings.
Each revision graph node represents a revision in the repository where something changed in the tree you are looking at. Different types of node can be distinguished by shape and colour. The shapes are fixed, but colours can be set using →
- Added or copied items
Items which have been added, or created by copying another file/folder are shown using a rounded rectangle. The default colour is green. Tags and trunks are treated as a special case and use a different shade, depending on the → .
- Deleted items
Deleted items e.g. a branch which is no longer required, are shown using an octagon (rectangle with corners cut off). The default colour is red.
- Renamed items
Renamed items are also shown using an octagon, but the default colour is blue.
- Revisi tip cabang
The graph is normally restricted to showing branch points, but it is often useful to be able to see the respective HEAD revision for each branch too. If you select Show HEAD revisions, each HEAD revision nodes will be shown as an ellipse. Note that HEAD here refers to the last revision committed on that path, not to the HEAD revision of the repository.
- Working copy revision
If you invoked the revision graph from a working copy, you can opt to show the BASE revision on the graph using Show WC revision, which marks the BASE node with a bold outline.
- Modified working copy
If you invoked the revision graph from a working copy, you can opt to show an additional node representing your modified working copy using Show WC modifications. This is an elliptical node with a bold outline in red by default.
- Normal item
Semua item lain ditampilkan menggunakan kotak biasa.
Note that by default the graph only shows the points at which items were added, copied or deleted. Showing every revision of a project will generate a very large graph for non-trivial cases. If you really want to see all revisions where changes were made, there is an option to do this in the View menu and on the toolbar.
The default view (grouping off) places the nodes such that their vertical position is in strict revision order, so you have a visual cue for the order in which things were done. Where two nodes are in the same column the order is very obvious. When two nodes are in adjacent columns the offset is much smaller because there is no need to prevent the nodes from overlapping, and as a result the order is a little less obvious. Such optimisations are necessary to keep complex graphs to a reasonable size. Please note that this ordering uses the edge of the node on the older side as a reference, i.e. the bottom edge of the node when the graph is shown with oldest node at the bottom. The reference edge is significant because the node shapes are not all the same height.
Because a revision graph is often quite complex, there are a number of features which can be used to tailor the view the way you want it. These are available in the View menu and from the toolbar.
- Group branches
The default behavior (grouping off) has all rows sorted strictly by revision. As a result, long-living branches with sparse commits occupy a whole column for only a few changes and the graph becomes very broad.
This mode groups changes by branch, so that there is no global revision ordering: Consecutive revisions on a branch will be shown in (often) consecutive lines. Sub-branches, however, are arranged in such a way that later branches will be shown in the same column above earlier branches to keep the graph slim. As a result, a given row may contain changes from different revisions.
- Oldest on top
Normally the graph shows the oldest revision at the bottom, and the tree grows upwards. Use this option to grow down from the top instead.
- Jajarkan pohon-pohon di atas
When a graph is broken into several smaller trees, the trees may appear either in natural revision order, or aligned at the bottom of the window, depending on whether you are using the Group Branches option. Use this option to grow all trees down from the top instead.
- Reduce cross lines
This option is normally enabled and avoids showing the graph with a lot of confused crossing lines. However this may also make the layout columns appear in less logical places, for example in a diagonal line rather than a column, and the graph may require a larger area to draw. If this is a problem you can disable the option from the View menu.
- Differential path names
Long path names can take a lot of space and make the node boxes very large. Use this option to show only the changed part of a path, replacing the common part with dots. E.g. if you create a branch
/branches/1.2.x/doc/htmlfrom/trunk/doc/htmlthe branch could be shown in compact form as/branches/1.2.x/..because the last two levels,docandhtml, did not change.- Show all revisions
This does just what you expect and shows every revision where something (in the tree that you are graphing) has changed. For long histories this can produce a truly huge graph.
- Tampilkan revisi-revisi HEAD
This ensures that the latest revision on every branch is always shown on the graph.
- Exact copy sources
When a branch/tag is made, the default behaviour is to show the branch as taken from the last node where a change was made. Strictly speaking this is inaccurate since the branches are often made from the current HEAD rather than a specific revision. So it is possible to show the more correct (but less useful) revision that was used to create the copy. Note that this revision may be younger than the HEAD revision of the source branch.
- Fold tags
When a project has many tags, showing every tag as a separate node on the graph takes a lot of space and obscures the more interesting development branch structure. At the same time you may need to be able to access the tag content easily so that you can compare revisions. This option hides the nodes for tags and shows them instead in the tooltip for the node that they were copied from. A tag icon on the right side of the source node indicates that tags were made. This greatly simplifies the view.
Note that if a tag is itself used as the source for a copy, perhaps a new branch based on a tag, then that tag will be shown as a separate node rather than folded.
- Hide deleted paths
Hides paths which are no longer present at the HEAD revision of the repository, e.g. deleted branches.
If you have selected the Fold tags option then a deleted branch from which tags were taken will still be shown, otherwise the tags would disappear too. The last revision that was tagged will be shown in the colour used for deleted nodes instead of showing a separate deletion revision.
If you select the Hide tags option then these branches will disappear again as they are not needed to show the tags.
- Hide unused branches
Hides branches where no changes were committed to the respective file or sub-folder. This does not necessarily indicate that the branch was not used, just that no changes were made to this part of it.
- Show WC revision
Marks the revision on the graph which corresponds to the update revision of the item you fetched the graph for. If you have just updated, this will be HEAD, but if others have committed changes since your last update your WC may be a few revisions lower down. The node is marked by giving it a bold outline.
- Show WC modifications
If your WC contains local changes, this option draws it as a separate elliptical node, linked back to the node that your WC was last updated to. The default outline colour is red. You may need to refresh the graph using F5 to capture recent changes.
- Filter
Sometimes the revision graph contains more revisions than you want to see. This option opens a dialog which allows you to restrict the range of revisions displayed, and to hide particular paths by name.
If you hide a particular path and that node has child nodes, the children will be shown as a separate tree. If you want to hide all children as well, use the Remove the whole subtree(s) checkbox.
- Tree stripes
Where the graph contains several trees, it is sometimes useful to use alternating colours on the background to help distinguish between trees.
- Show overview
Shows a small picture of the entire graph, with the current view window as a rectangle which you can drag. This allows you to navigate the graph more easily. Note that for very large graphs the overview may become useless due to the extreme zoom factor and will therefore not be shown in such cases.
To make it easier to navigate a large graph, use the overview window. This shows the entire graph in a small window, with the currently displayed portion highlighted. You can drag the highlighted area to change the displayed region.
Tanggal revisi, pembuat dan komentar ditampilkan dalam kotak petunjuk kapan saja mouse melalui kotak revisi.
If you select two revisions (Use Ctrl-left click), you can use the context menu to show the differences between these revisions. You can choose to show differences as at the branch creation points, but usually you will want to show the differences at the branch end points, i.e. at the HEAD revision.
Anda bisa melihat perbedaan sebagai file Unified-Diff, yang menampilkan semua perbedaan dalam file tunggal dengan konteks minimal. Jika Anda memilih ke → Anda akan disodorkan dengan daftar file yang diubah. Klik ganda pada nama file utnuk mengambil kedua revisi dari file dan membandingkannya menggunakan piranti pembeda visual.
Jika Anda mengklik kanan pada revisi Anda bisa menggunakan → untuk melihat histori.
You can also merge changes in the selected revision(s) into a different working copy. A folder selection dialog allows you to choose the working copy to merge into, but after that there is no confirmation dialog, nor any opportunity to try a test merge. It is a good idea to merge into an unmodified working copy so that you can revert the changes if it doesn't work out! This is a useful feature if you want to merge selected revisions from one branch to another.
Learn to Read the Revision Graph
First-time users may be surprised by the fact that the revision graph shows something that does not match the user's mental model. If a revision changes multiple copies or branches of a file or folder, for instance, then there will be multiple nodes for that single revision. It is a good practice to start with the leftmost options in the toolbar and customize the graph step-by-step until it comes close to your mental model.
All filter options try lose as little information as possible. That may cause some nodes to change their color, for instance. Whenever the result is unexpected, undo the last filter operation and try to understand what is special about that particular revision or branch. In most cases, the initially expected outcome of the filter operation would either be inaccurate or misleading.
If you want to check the server again for newer information, you can simply refresh the view using F5. If you are using the log cache (enabled by default), this will check the repository for newer commits and fetch only the new ones. If the log cache was in offline mode, this will also attempt to go back online.
If you are using the log cache and you think the message content or author may have changed, you should use the log dialog to refresh the messages you need. Since the revision graph works from the repository root, we would have to invalidate the entire log cache, and refilling it could take a very long time.
A large tree can be difficult to navigate and sometimes you will want to hide parts of it, or break it down into a forest of smaller trees. If you hover the mouse over the point where a node link enters or leaves the node you will see one or more popup buttons which allow you to do this.

Click on the minus button to collapse the attached sub-tree.

Click on the plus button to expand a collapsed tree. When a tree has been collapsed, this button remains visible to indicate the hidden sub-tree.

Click on the cross button to split the attached sub-tree and show it as a separate tree on the graph.

Click on the circle button to reattach a split tree. When a tree has been split away, this button remains visible to indicate that there is a separate sub-tree.
Click on the graph background for the main context menu, which offers options to Expand all and Join all. If no branch has been collapsed or split, the context menu will not be shown.
Sometimes you may want a clean copy of your working tree without the .svn directory, e.g. to create a zipped tarball of your source, or to export to a web server. Instead of making a copy and then deleting the .svn directory manually, TortoiseSVN offers the command → . Exporting from a URL and exporting from a working copy are treated slightly differently.
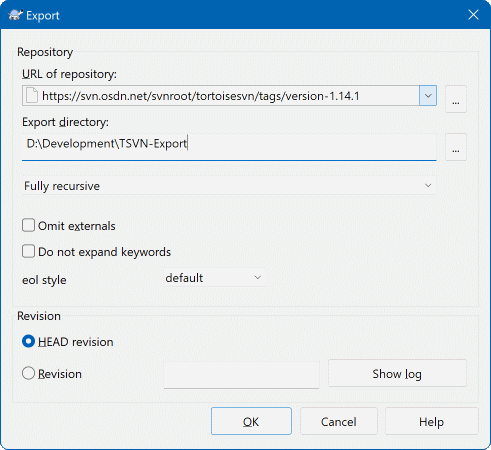
Jika Anda mengeksekusi perintah ini pada folder tidak berversi, TortoiseSVN akan mengasumsi bahwa folder terpilih adalah target dan membuka suatu dialog dimana Anda dapat mengisi URL dan revisi asal ekspor. Dialog ini memiliki pilihan-pilihan untuk mengekspor hanya folder level atas, untuk menghilangkan referensi eksternal, dan untuk menimpa gaya akhir baris pada file-file yang memiliki property svn:eol-style terset.
Tentu saja Anda juga dapat mengekspor secara langsung dari repositori. Gunakan Browser Repositori untuk pergi ke anak pohon yang relevan dalam repositori Anda kemudian gunakan → . Anda akan mendapatkan dialog Eskpor dari URL yang dijelaskan di atas.
If you execute this command on your working copy you'll be asked for a place to save the clean working copy without the .svn folder. By default, only the versioned files are exported, but you can use the Export unversioned files too checkbox to include any other unversioned files which exist in your WC and not in the repository. External references using svn:externals can be omitted if required.
Another way to export from a working copy is to right drag the working copy folder to another location and choose → or → or → . The second option includes the unversioned files as well. The third option exports only modified items, but maintains the folder structure.
When exporting from a working copy, if the target folder already contains a folder of the same name as the one you are exporting, you will be given the option to overwrite the existing content, or to create a new folder with an automatically generated name, e.g. Target (1).
Exporting single files
The export dialog does not allow exporting single files, even though Subversion can.
To export single files with TortoiseSVN, you have to use the repository browser (bagian bernama “Browser Repositori”). Simply drag the file(s) you want to export from the repository browser to where you want them in the explorer, or use the context menu in the repository browser to export the files.
Exporting a Change Tree
If you want to export a copy of your project tree structure but containing only the files which have changed in a particular revision, or between any two revisions, use the compare revisions feature described in bagian bernama “Membandingkan Folder”.
If you want to export your working copy tree structure but containing only the files which are locally modified, refer to SVN Export changed items here above.
Sometimes you have a working copy which you want to convert back to a normal folder without the .svn directory. All you need to do is delete the .svn directory from the working copy root.
Alternatively you can export the folder to itself. In Windows Explorer right drag the working copy root folder from the file pane onto itself in the folder pane. TortoiseSVN detects this special case and asks if you want to make the working copy unversioned. If you answer yes the control directory will be removed and you will have a plain, unversioned directory tree.
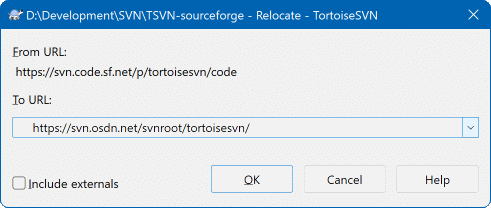
If your repository has for some reason changed it's location (IP/URL). Maybe you're even stuck and can't commit and you don't want to checkout your working copy again from the new location and to move all your changed data back into the new working copy, → is the command you are looking for. It basically does very little: it rewrites all URLs that are associated with each file and folder with the new URL.
Catatan
This operation only works on working copy roots. So the context menu entry is only shown for working copy roots.
You may be surprised to find that TortoiseSVN contacts the repository as part of this operation. All it is doing is performing some simple checks to make sure that the new URL really does refer to the same repository as the existing working copy.
Awas
Ini adalah operasi yang sangat jarang digunakan. Perintah relokasi hanya digunakan jika URL dari akar repositori berubah. Alasan yang mungkin adalah:
Alamat IP server sudah berubah.
Protokol berubah (contoh http:// to https://).
Path akar repositori dalam penyiapan server berubah.
Dengan kata lain, Anda perlu untuk merelokasi saat copy pekerjaan Anda merujuk ke lokasi yang sama dalam repositori yang sama, tapi repositori itu sendiri sudah dipindahkan.
Ini tidak berlaku jika:
Anda ingin memindahkan repositori Subversion ke lokasi berbeda. Dalam hal itu Anda harus melakukan checkout bersih dari lokasi repositori baru.
Anda ingin menukar ke cabang berbeda atau direktori di dalam repositori yang sama. Untuk melakukan itu Anda harus menggunakan → . Baca bagian bernama “Untuk Checkout atau Menukar...” untuk informasi selengkapnya.
Jika anga menggunakan relokasi dalam kasus di atas, ini akan merusak copy pekerjaan Anda dan Anda akan mendapatkan banyak pesan kesalahan yang tidak bisa dijelaskan saat memutahirkan, mengkomit, dll. Saat itu terjadi, satu-satunya perbaikan yang dapat dilakukan adalah checkout segar.
Sudah sangat umum dalam Pengembangan Software untuk perubahan dikaitkan ke ID bug atau isu tertentu. Para pengguna dari sistem pelacakan bug (pelacak isu) ingin mengaitkan perubahan yang mereka lakukan dalam Subversion dengan ID tertentu dalam pelacak isu mereka. Kebanyakan pelacak isu menyediakan naskah hook pre-commit yang mengoper log pesan untuk mencari bug ID dimana komit dikaitkan. Ini cenderung merupakan kesalahan karena ia tergantung pada pengguna untuk menulis log pesan dengan benar agar naskah hook pre-commit bisa mengurainya dengan benar.
TortoiseSVN bisa membantu pengguna dalam dua cara:
Ketika pengguna memasukan log pesan, baris yang didefinisikan dengan baik yang termasuk didalamnya adalah nomor isu terkait dengan komit tersebut bisa ditambahkan secara otomatis. Ini mengurangi resiko bahwa pengguna memasukan nomor isu dalam hal piranti pelacakan bug tidak bisa mengurai dengan benar.
Atau TortoiseSVN bisa menerangi bagian dari log pesan yang dimasukan yang dikenal oleh pelacak isu. Cara itu pengguna mengetahui bahwa log pesan bisa diurai dengan benar.
Ketika pengguna melihat log pesan, TortoiseSVN membuat link dari setiap bug ID dalam log pesan yang memicu browser ke isu yang disebutkan.
You can integrate a bug tracking tool of your choice in TortoiseSVN. To do this, you have to define some properties, which start with bugtraq:. They must be set on Folders: (bagian bernama “Seting Proyek”)
When you edit any of the bugtraq properties a special property editor is used to make it easier to set appropriate values.
There are two ways to integrate TortoiseSVN with issue trackers. One is based on simple strings, the other is based on regular expressions. The properties used by both approaches are:
- bugtraq:url
Set this property to the URL of your bug tracking tool. It must be properly URI encoded and it has to contain
%BUGID%.%BUGID%is replaced with the Issue number you entered. This allows TortoiseSVN to display a link in the log dialog, so when you are looking at the revision log you can jump directly to your bug tracking tool. You do not have to provide this property, but then TortoiseSVN shows only the issue number and not the link to it. e.g the TortoiseSVN project is usinghttp://issues.tortoisesvn.net/?do=details&id=%BUGID%.You can also use relative URLs instead of absolute ones. This is useful when your issue tracker is on the same domain/server as your source repository. In case the domain name ever changes, you don't have to adjust the
bugtraq:urlproperty. There are two ways to specify a relative URL:If it begins with the string
^/it is assumed to be relative to the repository root. For example,^/../?do=details&id=%BUGID%will resolve tohttps://tortoisesvn.net/?do=details&id=%BUGID%if your repository is located onhttps://tortoisesvn.net/svn/trunk/.A URL beginning with the string
/is assumed to be relative to the server's hostname. For example/?do=details&id=%BUGID%will resolve tohttps://tortoisesvn.net/?do=details&id=%BUGID%if your repository is located anywhere onhttps://tortoisesvn.net.- bugtraq:warnifnoissue
Set this to
true, if you want TortoiseSVN to warn you because of an empty issue-number text field. Valid values aretrue/false. If not defined,falseis assumed.
Dalam pendekatan sederhana, TortoiseSVN menampilkan kepada pengguna field input terpisah dimana bug ID bisa dimasukan. Lalu baris terpisah ditambahkan/prepended ke log pesan yang dimasukan pengguna.
- bugtraq:message
This property activates the bug tracking system in Input field mode. If this property is set, then TortoiseSVN will prompt you to enter an issue number when you commit your changes. It's used to add a line at the end of the log message. It must contain
%BUGID%, which is replaced with the issue number on commit. This ensures that your commit log contains a reference to the issue number which is always in a consistent format and can be parsed by your bug tracking tool to associate the issue number with a particular commit. As an example you might useIssue : %BUGID%, but this depends on your Tool.- bugtraq:label
This text is shown by TortoiseSVN on the commit dialog to label the edit box where you enter the issue number. If it's not set,
Bug-ID / Issue-Nr:will be displayed. Keep in mind though that the window will not be resized to fit this label, so keep the size of the label below 20-25 characters.- bugtraq:number
If set to
trueonly numbers are allowed in the issue-number text field. An exception is the comma, so you can comma separate several numbers. Valid values aretrue/false. If not defined,trueis assumed.- bugtraq:append
Properti ini mendefinisikan jika bug-ID ditambahkan (true) ke akhir dari log pesan atau disisipkan (false) di awal dari log pesan. Nilai yang benar adalah
true/false. Jika tidak didefinisikan, dianggaptrue, maka proyek yang sudah ada tidak terpisah.
In the approach with regular expressions, TortoiseSVN doesn't show a separate input field but marks the part of the log message the user enters which is recognized by the issue tracker. This is done while the user writes the log message. This also means that the bug ID can be anywhere inside a log message! This method is much more flexible, and is the one used by the TortoiseSVN project itself.
- bugtraq:logregex
This property activates the bug tracking system in Regex mode. It contains either a single regular expressions, or two regular expressions separated by a newline.
If two expressions are set, then the first expression is used as a pre-filter to find expressions which contain bug IDs. The second expression then extracts the bare bug IDs from the result of the first regex. This allows you to use a list of bug IDs and natural language expressions if you wish. e.g. you might fix several bugs and include a string something like this: “This change resolves issues #23, #24 and #25”.
If you want to catch bug IDs as used in the expression above inside a log message, you could use the following regex strings, which are the ones used by the TortoiseSVN project:
[Ii]ssues?:?(\s*(,|and)?\s*#\d+)+and(\d+).The first expression picks out “issues #23, #24 and #25” from the surrounding log message. The second regex extracts plain decimal numbers from the output of the first regex, so it will return “23”, “24” and “25” to use as bug IDs.
Breaking the first regex down a little, it must start with the word “issue”, possibly capitalised. This is optionally followed by an “s” (more than one issue) and optionally a colon. This is followed by one or more groups each having zero or more leading whitespace, an optional comma or “and” and more optional space. Finally there is a mandatory “#” and a mandatory decimal number.
If only one expression is set, then the bare bug IDs must be matched in the groups of the regex string. Example:
[Ii]ssue(?:s)? #?(\d+)This method is required by a few issue trackers, e.g. trac, but it is harder to construct the regex. We recommend that you only use this method if your issue tracker documentation tells you to.If you are unfamiliar with regular expressions, take a look at the introduction at https://en.wikipedia.org/wiki/Regular_expression, and the online documentation and tutorial at http://www.regular-expressions.info/.
It's not always easy to get the regex right so to help out there is a test dialog built into the bugtraq properties dialog. Click on the button to the right of the edit boxes to bring it up. Here you can enter some test text, and change each regex to see the results. If the regex is invalid the edit box background changes to red.
Jika bugtraq:message dan bugtraq:logregex properti keduanya di-set, logregex diproses lebih dulu.
Tip
Meskipun Anda tidak mempunyai pelacak isu dengan hook pre-commit menguraikan log pesan Anda, Anda masih bisa menggunakan ini untuk kembali ke isu seperti disebutkan dalam log pesan ke dalam link!
And even if you don't need the links, the issue numbers show up as a separate column in the log dialog, making it easier to find the changes which relate to a particular issue.
Some tsvn: properties require a true/false value. TortoiseSVN also understands yes as a synonym for true and no as a synonym for false.
Set Properti pada Folder
These properties must be set on folders for the system to work. When you commit a file or folder the properties are read from that folder. If the properties are not found there, TortoiseSVN will search upwards through the folder tree to find them until it comes to an unversioned folder, or the tree root (e.g. C:\) is found. If you can be sure that each user checks out only from e.g trunk/ and not some sub-folder, then it's enough if you set the properties on trunk/. If you can't be sure, you should set the properties recursively on each sub-folder. A property setting deeper in the project hierarchy overrides settings on higher levels (closer to trunk/).
As of version 1.8, TortoiseSVN and Subversion use so called inherited properties, which means a property that is set on a folder is automatically also implicitly set on all subfolders. So there's no need to set the properties on all folders anymore but only on the root folder.
For project properties only, i.e. tsvn:, bugtraq: and webviewer: you can use the Recursive checkbox to set the property to all sub-folders in the hierarchy, without also setting it on all files.
When you add new sub-folders to a working copy using TortoiseSVN, any project properties present in the parent folder will automatically be added to the new child folder too.
No Issue Tracker Information from Repository Browser
Because the issue tracker integration depends upon accessing Subversion properties, you will only see the results when using a checked out working copy. Fetching properties remotely is a slow operation, so you will not see this feature in action from the repo browser unless you started the repo browser from your working copy. If you started the repo browser by entering the URL of the repository you won't see this feature.
For the same reason, project properties will not be propagated automatically when a child folder is added using the repo browser.
This issue tracker integration is not restricted to TortoiseSVN; it can be used with any Subversion client. For more information, read the full Issue Tracker Integration Specification in the TortoiseSVN source repository. (bagian bernama “lisensi” explains how to access the repository.)
The previous section deals with adding issue information to the log messages. But what if you need to get information from the issue tracker? The commit dialog has a COM interface which allows integration an external program that can talk to your tracker. Typically you might want to query the tracker to get a list of open issues assigned to you, so that you can pick the issues that are being addressed in this commit.
Any such interface is of course highly specific to your issue tracker system, so we cannot provide this part, and describing how to create such a program is beyond the scope of this manual. The interface definition and sample plugins in C# and C++/ATL can be obtained from the contrib folder in the TortoiseSVN repository. (bagian bernama “lisensi” explains how to access the repository.) A summary of the API is also given in Bab 7, IBugtraqProvider interface. Another (working) example plugin in C# is Gurtle which implements the required COM interface to interact with the Google Code issue tracker.
For illustration purposes, let's suppose that your system administrator has provided you with an issue tracker plugin which you have installed, and that you have set up some of your working copies to use the plugin in TortoiseSVN's settings dialog. When you open the commit dialog from a working copy to which the plugin has been assigned, you will see a new button at the top of the dialog.
In this example you can select one or more open issues. The plugin can then generate specially formatted text which it adds to your log message.
There are several web-based repository viewers available for use with Subversion such as ViewVC and WebSVN. TortoiseSVN provides a means to link with these viewers.
You can integrate a repo viewer of your choice in TortoiseSVN. To do this, you have to define some properties which define the linkage. They must be set on Folders: (bagian bernama “Seting Proyek”)
- webviewer:revision
Set this property to the URL of your repo viewer to view all changes in a specific revision. It must be properly URI encoded and it has to contain
%REVISION%.%REVISION%is replaced with the revision number in question. This allows TortoiseSVN to display a context menu entry in the log dialog → .- webviewer:pathrevision
Set this property to the URL of your repo viewer to view changes to a specific file in a specific revision. It must be properly URI encoded and it has to contain
%REVISION%and%PATH%.%PATH%is replaced with the path relative to the repository root. This allows TortoiseSVN to display a context menu entry in the log dialog → For example, if you right click in the log dialog bottom pane on a file entry/trunk/src/filethen the%PATH%in the URL will be replaced with/trunk/src/file.
You can also use relative URLs instead of absolute ones. This is useful in case your web viewer is on the same domain/server as your source repository. In case the domain name ever changes, you don't have to adjust the webviewer:revision and webviewer:pathrevision property. The format is the same as for the bugtraq:url property. See bagian bernama “Integration with Bug Tracking Systems / Issue Trackers”.
Set Properti pada Folder
These properties must be set on folders for the system to work. When you commit a file or folder the properties are read from that folder. If the properties are not found there, TortoiseSVN will search upwards through the folder tree to find them until it comes to an unversioned folder, or the tree root (e.g. C:\) is found. If you can be sure that each user checks out only from e.g trunk/ and not some sub-folder, then it's enough if you set the properties on trunk/. If you can't be sure, you should set the properties recursively on each sub-folder. A property setting deeper in the project hierarchy overrides settings on higher levels (closer to trunk/).
For project properties only, i.e. tsvn:, bugtraq: and webviewer: you can use the Recursive checkbox to set the property to all sub-folders in the hierarchy, without also setting it on all files.
When you add new sub-folders to a working copy using TortoiseSVN, any project properties present in the parent folder will automatically be added to the new child folder too.
Limitations Using the Repository Browser
Because the repo viewer integration depends upon accessing Subversion properties, you will only see the results when using a checked out working copy. Fetching properties remotely is a slow operation, so you will not see this feature in action from the repo browser unless you started the repo browser from your working copy. If you started the repo browser by entering the URL of the repository you won't see this feature.
For the same reason, project properties will not be propagated automatically when a child folder is added using the repo browser.
Untuk menemukan seting yang berbeda, cukup arahkan penunjuk mouse ke kotak edit/kotak centang... dan tooltip yang menolong akan muncul.
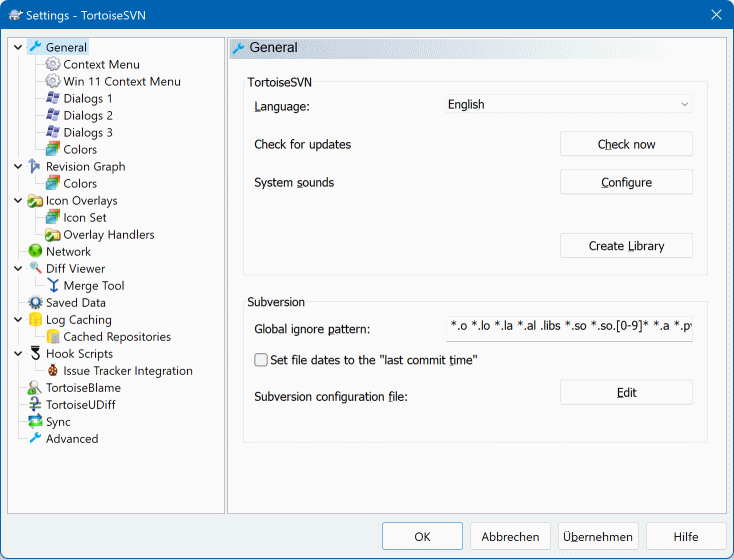
Dialog ini membolehkan Anda untuk menetapkan bahasa yang diinginkan, dan seting Subversion-tertentu.
- Bahasa
Selects your user interface language. Of course, you have to install the corresponding language pack first to get another UI language than the default English one.
- Cek pembaruan
TortoiseSVN will contact its download site periodically to see if there is a newer version of the program available. If there is it will show a notification link in the commit dialog. Use if you want an answer right away. The new version will not be downloaded; you simply receive an information dialog telling you that the new version is available.
- Suara sistem
TortoiseSVN mempunyai tiga suara bebas yang terinstalasi secara standar.
Salah
Pemberitahuan
Peringatan
Anda bisa memilih suara berbeda (atau mematikan suara ini sepenuhnya) menggunakan Panel Kontrol Windows. adalah jalan pintas ke Panel Kontrol.
- Use Aero Dialogs
On Windows Vista and later systems this controls whether dialogs use the Aero styling.
- Create Library
On Windows 7 you can create a Library in which to group working copies which are scattered in various places on your system.
- Pola abaikan global
Global ignore patterns are used to prevent unversioned files from showing up e.g. in the commit dialog. Files matching the patterns are also ignored by an import. Ignore files or directories by typing in the names or extensions. Patterns are separated by spaces e.g.
bin obj *.bak *.~?? *.jar *.[Tt]mp. These patterns should not include any path separators. Note also that there is no way to differentiate between files and directories. Read bagian bernama “Pencocokan Pola dalam Daftar Abaikan” for more information on the pattern-matching syntax.Catatan bahwa pola abaikan yang Anda tetapkan disini juga akan mempengaruhi klien Subversion lain yang berjalan pada PC Anda, termasuk klien baris perintah.
Perhatian
Jika Anda menggunakan file konfigurasi Subversion untuk mengeset pola
abaikan-global, ia akan menimpa seting yang Anda buat disini. File konfigurasi Subversion diakses menggunakan seperti dijelaskan dibawah.This ignore pattern will affect all your projects. It is not versioned, so it will not affect other users. By contrast you can also use the versioned
svn:ignoreorsvn:global-ignoresproperty to exclude files or directories from version control. Read bagian bernama “Mengabaikan File Dan Direktori” for more information.- Set file dates to the “last commit time”
This option tells TortoiseSVN to set the file dates to the last commit time when doing a checkout or an update. Otherwise TortoiseSVN will use the current date. If you are developing software it is generally best to use the current date because build systems normally look at the date stamps to decide which files need compiling. If you use “last commit time” and revert to an older file revision, your project may not compile as you expect it to.
- File konfigurasi Subversion
Use to edit the Subversion configuration file directly. Some settings cannot be modified directly by TortoiseSVN, and need to be set here instead. For more information about the Subversion
configfile see the Runtime Configuration Area. The section on Automatic Property Setting is of particular interest, and that is configured here. Note that Subversion can read configuration information from several places, and you need to know which one takes priority. Refer to Configuration and the Windows Registry to find out more.- Apply local modifications to svn:externals when updating
This option tells TortoiseSVN to always apply local modifications to the
svn:externalsproperty when updating the working copy.
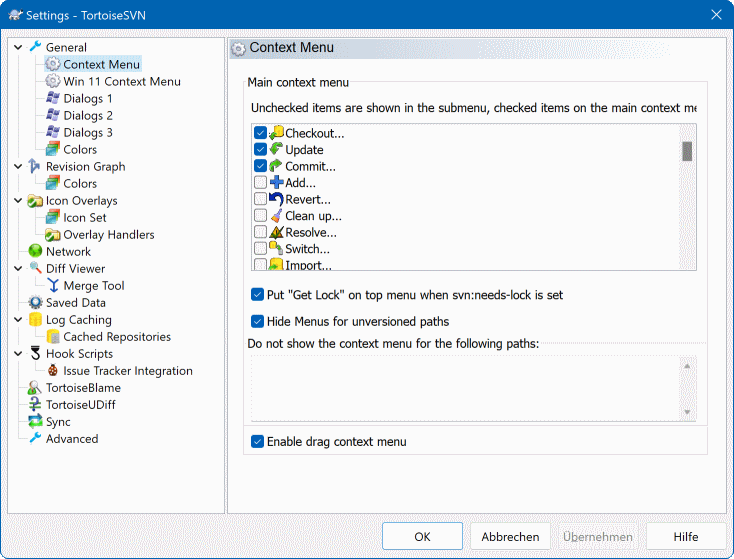
Halaman ini membolehkan Anda untuk menetapkan entri menu konteks mana yang ditampilkan TortoiseSVN dalam menu konteks utama, dan yang mana yang muncul dalam submenu TortoiseSVN. Standarnya hampir semua item dicentang dan terlihat dalam submenu.
Ada kasus khusus untuk Dapatkan Kunci. Anda tentu saja dapat mempromosikannya ke tingkat atas dengan menggunakan daftar di atas, tetapi karena kebanyakan file tidak memerlukan penguncian, ini hanya akan menambah kekacauan. Bagaimanapun juga, suatu file dengan properti svn:needs-lock memerlukan tindakan ini setiap kali ia diedit, sehingga dalam kasus ini, sangatlah berguna untuk memilikinya pada tingkat atas. Pencawangan kotak tersebut berarti bahwa saat suatu file yang memiliki properti svn:needs-lock terset dipilih , Dapatkan Kunci akan selalu muncul pada tingkat atas.
Most of the time, you won't need the TortoiseSVN context menu, apart for folders that are under version control by Subversion. For non- versioned folders, you only really need the context menu when you want to do a checkout. If you check the option Hide menus for unversioned paths , TortoiseSVN will not add its entries to the context menu for unversioned folders. But the entries are added for all items and paths in a versioned folder. And you can get the entries back for unversioned folders by holding the Shift key down while showing the context menu.
If there are some paths on your computer where you just don't want TortoiseSVN's context menu to appear at all, you can list them in the box at the bottom.
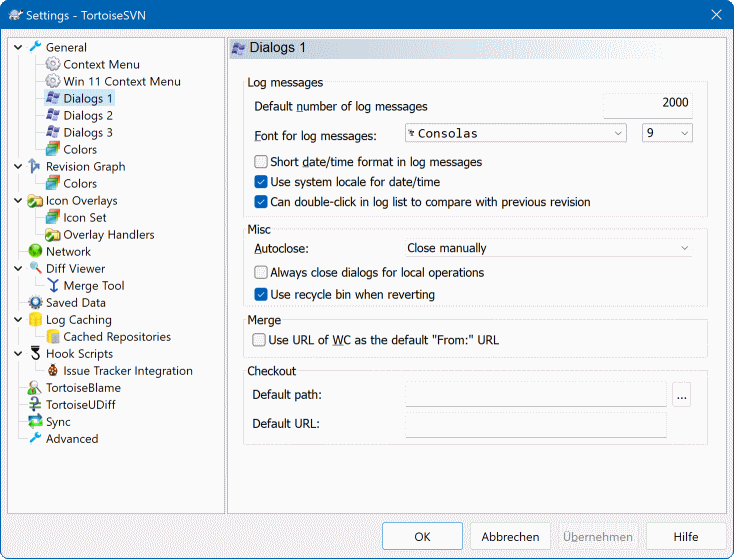
Dialog ini membolehkan Anda untuk mengkonfigurasi beberapa dialog TortoiseSVN dengan cara yang Anda sukai.
- Jumlah pesan log bawaan
Limits the number of log messages that TortoiseSVN fetches when you first select → Useful for slow server connections. You can always use or to get more messages.
- Font untuk pesan log
Pilih tampilan font dan ukuran yang digunakan untuk ditampilkan pesan log sendiri dalam pane tengah pada dialog Log Revisi, dan ketika mengarang pesan log dalam dialog Komit.
- Format tanggal / waktu pendek dalam pesan log
Jika pesan log standar yang digunakan sampai terlalu banyak pada layar Anda menggunakan format pendek.
- Can double click in log list to compare with previous revision
If you frequently find yourself comparing revisions in the top pane of the log dialog, you can use this option to allow that action on double click. It is not enabled by default because fetching the diff is often a long process, and many people prefer to avoid the wait after an accidental double click, which is why this option is not enabled by default.
- Auto-close
TortoiseSVN bisa menutup semua dialog progres secara otomatis saat tindakan selesai tanpa kesalahan. Seting ini membolehkan Anda untuk memilih kondisi untuk penutupan dialog. Seting standar (direkomendasikan) adalah Tutup secara manual yang membolehkan Anda untuk meninjau semua pesan dan memeriksa apa yang terjadi. Akan tetapi, Anda boleh memutuskan bahwa Anda ingin mengabaikan beberapa tipe pesan dan dialog ditutup secara otomatis jika tidak ada perubahan kritis.
Otomatis-tutup jika tidak ada gabungan, tambahan atau penghapusan berarti bahwa dialog progres akan menutup jika ada pemutahiran simpel, tapi jika perubahan dari repositori digabung dengan punya Anda, atau jika setiap file ditambahkan atau dihapus, dialog akan tetap terbuka. Ini juga akan tetap terbuka jika ada konflik atau kesalahan selama operasi.
Otomatis-tutup jika tidak ada konflik menenangkan kriteria selanjutnya dan akan menutup dialog bahkan jika ada penggabungan, penambahan, atau penghapusan. Tetapi jika ada konflik atau kesalahan, dialog akan tetap terbuka.
Otomatis-tutup jika tidak ada kesalahan selalu menutup dialog bahkan jika ada konflik. Kondisi yang membiarkan dialog terbuka adalah kondisi kesalahan, yang terjadi saat Subversion tidak bisa menyelesaikan tugas. Sebagai contoh, pemutahiran gagal karena server tidak bisa diakses, atau komit gagal karena copy pekerjaan ketinggalan jaman.
- Selalu menutup dialog untuk operasi lokal
Local operations like adding files or reverting changes do not need to contact the repository and complete quickly, so the progress dialog is often of little interest. Select this option if you want the progress dialog to close automatically after these operations, unless there are errors.
- Gunakan tampungan daur ulang saat membalik
When you revert local modifications, your changes are discarded. TortoiseSVN gives you an extra safety net by sending the modified file to the recycle bin before bringing back the pristine copy. If you prefer to skip the recycle bin, uncheck this option.
- Use URL of WC as the default “From:” URL
Dalam dialog gabung, tindakan standar untuk URL Dari: diingat diantara penggabungan. Akan tetapi, beberapa orang menyukai untuk melakukan penggabungan dari banyak titik berbeda dalam hirarkinya, dan merasa lebih mudah untuk memulai dengan URL dari copy pekerjaan saat ini. Kemudian ini bisa diedit untuk merujuk path paralel pada cabang lain.
- Path checkout bawaan
Anda dapat menentukan path bawaan untuk checkout-checkout. Jika Anda menyimpan semua checkout Anda pada satu tempat, akan menjadi berguna jika drive dan folder telah terisi sebelumnya sehingga Anda tinggal menambah nama folder baru di akhirnya.
- URL checkout bawaan
Anda juga dapat menentukan URL bawaan untuk checkout-checkout. Jika Anda sering men-checkout subproyek-subproyek dari proyek yang sangat besar, adalah berguna jika URL telah terisi sebelumnya sehingga Anda cukup menambahkan nama subproyek di akhirnya.
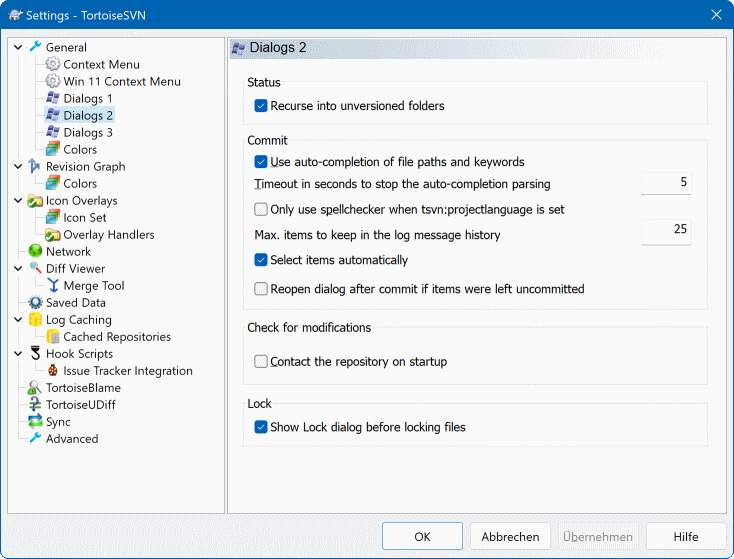
- Rekursif ke dalam folder tidak berversi
Jika kotak ini dicentang (kondisi bawaan), maka kapan saja status dari folder tidak berversi ditampilkan dalam Tambah, Komit or Periksa Modifikasi dialog, setiap file anak dan folder juga ditampilkan. Jika Anda tidak mencentang kotak ini, hanya leluhur tidak berversi yang ditampilkan. Tidak mencentang mengurangi kekacauan dalam dialog ini. Dalam hal itu jika Anda memilih folder tidak berversi untuk Tambah, ia akan ditambahkan secara rekursif.
In the Check for Modifications dialog you can opt to see ignored items. If this box is checked then whenever an ignored folder is found, all child items will be shown as well.
- Use auto-completion of file paths and keywords
The commit dialog includes a facility to parse the list of filenames being committed. When you type the first 3 letters of an item in the list, the auto-completion box pops up, and you can press Enter to complete the filename. Check the box to enable this feature.
- Timeout in seconds to stop the auto-completion parsing
The auto-completion parser can be quite slow if there are a lot of large files to check. This timeout stops the commit dialog being held up for too long. If you are missing important auto-completion information, you can extend the timeout.
- Only use spellchecker when
tsvn:projectlanguageis set Jika Anda tidak ingin menggunakan pemeriksa ejaan untuk semua komit, centang kotak ini. Pemeriksa ejaan masih akan dihidupkan dimana properti proyek memerlukannya.
- Max. item untuk dipelihara dalam histori pesan log
When you type in a log message in the commit dialog, TortoiseSVN stores it for possible re-use later. By default it will keep the last 25 log messages for each repository, but you can customize that number here. If you have many different repositories, you may wish to reduce this to avoid filling your registry.
Note that this setting applies only to messages that you type in on this computer. It has nothing to do with the log cache.
- Pilih item-item secara otomatis
The normal behaviour in the commit dialog is for all modified (versioned) items to be selected for commit automatically. If you prefer to start with nothing selected and pick the items for commit manually, uncheck this box.
- Reopen dialog after commit if items were left uncommitted
This reopens the commit dialog automatically at the same directory after a successful commit. The dialog is reopened only if there still are items left to commit.
- Hubungi repositori saat mulai
Dialog Pemeriksaan Modifikasi memeriksa copy pekerjaan secara standar, dan hanya menghubungi repositori saat Anda mengklik . Jika Anda selalu ingin memeriksa repositori, Anda bisa menggunakan seting ini untuk membuat tindakan itu terjadi secara otomatis.
- Tampilkan dialog Kunci sebelum mengunci berkas
When you select one or more files and then use → to take out a lock on those files, on some projects it is customary to write a lock message explaining why you have locked the files. If you do not use lock messages, you can uncheck this box to skip that dialog and lock the files immediately.
If you use the lock command on a folder, you are always presented with the lock dialog as that also gives you the option to select files for locking.
If your project is using the
tsvn:lockmsgminsizeproperty, you will see the lock dialog regardless of this setting because the project requires lock messages.
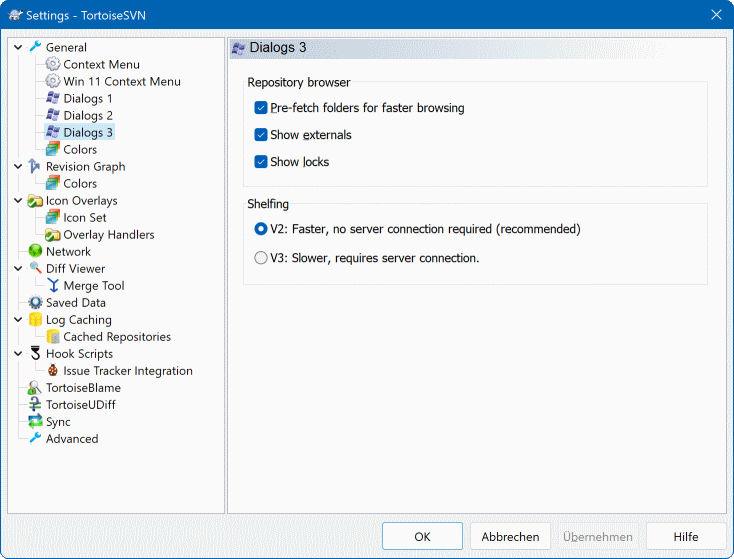
Settings for the repository browser:
- Pre-fetch folders for faster browsing
If this box is checked (default state), then the repository browser fetches information about shown folders in the background. That way as soon as you browse into one of those folders, the information is already available.
Some servers however can't handle the multiple requests this causes or when not configured correctly treat so many requests as something bad and start blocking them. In this case you can disable the pre-fetching here.
- Show externals
If this box is checked (default state), then the repository browser shows files and folders that are included with the
svn:externalsproperty as normal files and folders, but with an overlay icon to mark them as from an external source.As with the pre-fetch feature explained above, this too can put too much stress on weak servers. In this case you can disable this feature here.
There are two versions of shelfing implemented in SVN. Here you can select which version you want to use. Note that changing this setting might require an OS restart to take effect.
- V2
this version is much faster than
V3and is the recommended version to use.However, the speed comes at a prize:
V2does not handle directory changes, and can't handle copies and moves of files.- V3
this is the latest version of the shelfing feature. It can handle changes to directories as well as file moves/copies.
However,
V3is much slower thanV2and can be unusably slow for big repositories or if you have a slow connection to the repository.
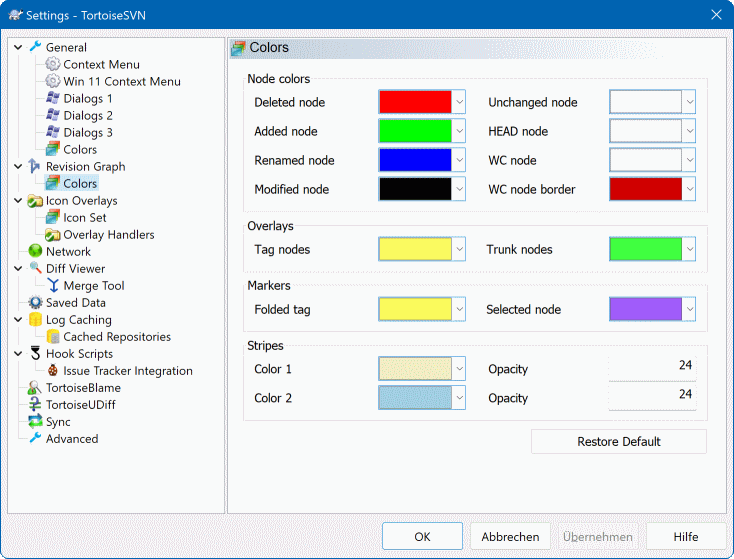
Dialog ini membolehkan Anda untuk mengkonfigurasi warna teks yang digunakan dalam dialog TortoiseSVN dengan cara yang Anda sukai.
- Konflik yang mungkin atau nyata / terhambat
Konflik telah terjadi selama pemutahiran, atau mungkin terjadi selama penggabungan. Pemutahiran terhambat dengan adanya file / folder tidak berversi dari nama yang sama seperti yang berversi.
Warna ini juga digunakan untuk pesan kesalahan dalam dialog progres.
- File ditambahkan
Item yang ditambahkan ke repositori.
- Hilang / dihapus / ditimpa
Item yang dihapus dari repositori, hilang dari copy pekerjaan, atau dihapus dari copy pekerjaan dan ditimpa dengan file lain dengan nama yang sama.
- Digabung
Perubahan dari repositori digabung dengan sukses ke dalam WC tanpa menghasilkan konflik.
- Diubah / dicopy
Menambah dengan histori, atau path dicopy dalam repositori. Juga digunakan dalam dialog log untuk entri yang menyertakan item yang dicopy.
- Node dihapus
Item yang dihapus dari repositori.
- Node ditambah
Item yang sudah ditambahkan ke repositori, dengan tambah, copy atau operasi pemindahan.
- Node diganti nama
Item sudah diganti nama di dalam repositori.
- Node ditimpa
Item original sudah dihapus dan item baru dengan nama sama mengantikannya.
- Kecocokan filter
When using filtering in the log dialog, search terms are highlighted in the results using this colour.
other settings:
- Dark theme
The dialogs in TortoiseSVN can be shown in a dark mode on Windows 10 1809 and later. This feature also requires that dark mode for applications is enabled in the Windows 10 settings.
Penting
Note that not all controls in all dialogs are shown in a dark theme.
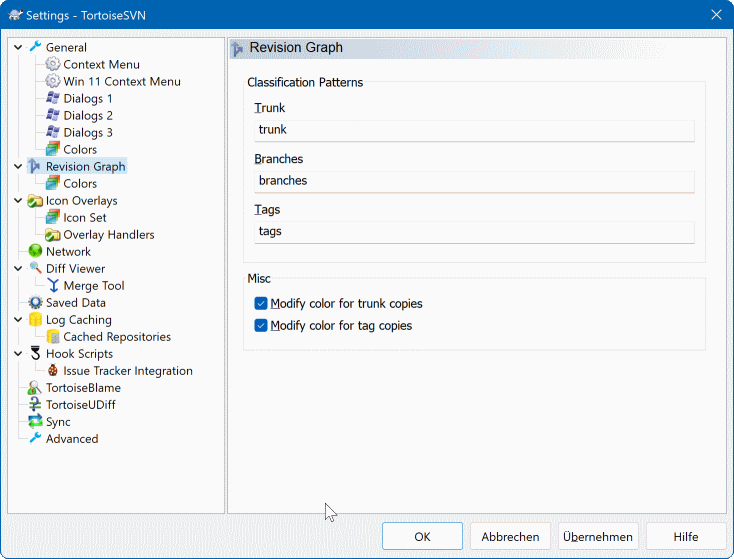
- Pola-Pola Klasifikasi
The revision graph attempts to show a clearer picture of your repository structure by distinguishing between trunk, branches and tags. As there is no such classification built into Subversion, this information is extracted from the path names. The default settings assume that you use the conventional English names as suggested in the Subversion documentation, but of course your usage may vary.
Specify the patterns used to recognise these paths in the three boxes provided. The patterns will be matched case-insensitively, but you must specify them in lower case. Wild cards
*and?will work as usual, and you can use;to separate multiple patterns. Do not include any extra white space as it will be included in the matching specification.Commit tag detection
Please note that these patterns are also used to detect commits to a tag, not just for the revision graph.
- Modify Colors
Colors are used in the revision graph to indicate the node type, i.e. whether a node is added, deleted, renamed. In order to help pick out node classifications, you can allow the revision graph to blend colors to give an indication of both node type and classification. If the box is checked, blending is used. If the box is unchecked, color is used to indicate node type only. Use the color selection dialog to allocate the specific colors used.
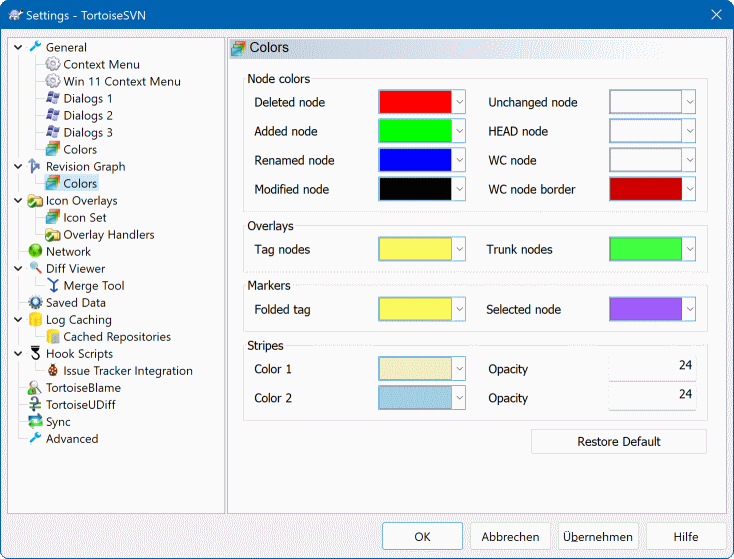
This page allows you to configure the colors used. Note that the color specified here is the solid color. Most nodes are colored using a blend of the node type color, the background color and optionally the classification color.
- Deleted Node
Items which have been deleted and not copied anywhere else in the same revision.
- Added Node
Items newly added, or copied (add with history).
- Renamed Node
Items deleted from one location and added in another in the same revision.
- Modified Node
Simple modifications without any add or delete.
- Unchanged Node
May be used to show the revision used as the source of a copy, even when no change (to the item being graphed) took place in that revision.
- Node HEAD
Current HEAD revision in the repository.
- WC Node
If you opt to show an extra node for your modified working copy, attached to its last-commit revision on the graph, use this color.
- WC Node Border
If you opt to show whether the working copy is modified, use this color border on the WC node when modifications are found.
- Tag Nodes
Nodes classified as tags may be blended with this color.
- Trunk Nodes
Nodes classified as trunk may be blended with this color.
- Folded Tag Markers
If you use tag folding to save space, tags are marked on the copy source using a block in this color.
- Selected Node Markers
When you left click on a node to select it, the marker used to indicate selection is a block in this color.
- Garis
These colors are used when the graph is split into sub-trees and the background is colored in alternating stripes to help pick out the separate trees.

This page allows you to choose the items for which TortoiseSVN will display icon overlays.
Since it takes quite a while to fetch the status of a working copy, TortoiseSVN uses a cache to store the status so the explorer doesn't get hogged too much when showing the overlays. You can choose which type of cache TortoiseSVN should use according to your system and working copy size here:
- Bawaan
Caches all status information in a separate process (
TSVNCache.exe). That process watches all drives for changes and fetches the status again if files inside a working copy get modified. The process runs with the least possible priority so other programs don't get hogged because of it. That also means that the status information is not real time but it can take a few seconds for the overlays to change.Advantage: the overlays show the status recursively, i.e. if a file deep inside a working copy is modified, all folders up to the working copy root will also show the modified overlay. And since the process can send notifications to the shell, the overlays on the left tree view usually change too.
Kerugian: Proses berjalan secara konstan, bahkan jika Anda tidak bekerja pada proyek Anda. Ia juga menggunakan sekitar 10-50 MB dari RAM tergantung pada jumlah dan besarnya copy pekerjaan Anda.
- Shell
Caching dikerjakan secara langsung di dalam dll ekstensi shell, tapi hanya untuk folder yang saat ini nampak. Setiap kali Anda membawa ke folder lain, informasi status diambil lagi.
Advantage: needs only very little memory (around 1 MB of RAM) and can show the status in real time.
Kerugian: Karena hanya satu folder di-cache, lapisan tidak menampilkan status secara rekursif. Untuk copy pekerjaan besar, ia memerlukan banyak waktu untuk menampilkan folder dalam explorer daripada dengan cache standar. Juga kolom tipe-mime tidak tersedia.
- Tidak ada
Dengan seting ini, TortoiseSVN tidak mengambil status sama sekali dalam Explorer. Karena itu, file tidak mendapatkan lapisan dan folder hanya mendapatkan lapisan 'normal' jika mereka diversi. Tidak ada lapisan lain yang ditampilkan, dan juga tidak ada kolom ekstra tersedia.
Keuntungan: tidak menggunakan memori tambahan dan tidak memperlambat Explorer sama sekali ketika melihat.
Disadvantage: Status information of files and folders is not shown in Explorer. To see if your working copies are modified, you have to use the “Check for modifications” dialog.
By default, overlay icons and context menus will appear in all open/save dialogs as well as in Windows Explorer. If you want them to appear only in Windows Explorer, check the Show overlays and context menu only in explorer box.
You can force the status cache to None for elevated processes by checking the Disable status cache for elevated processes box. This is useful if you want to prevent another TSVNCache.exe process getting created with elevated privileges.
You can also choose to mark folders as modified if they contain unversioned items. This could be useful for reminding you that you have created new files which are not yet versioned. This option is only available when you use the default status cache option (see below).
If you have files in the ignore-on-commit changelist, you can chose to make those files not propagate their status to the parent folder. That way if only files in that changelist are modified, the parent folder still shows the unmodified overlay icon.
The next group allows you to select which classes of storage should show overlays. By default, only hard drives are selected. You can even disable all icon overlays, but where's the fun in that?
Network drives can be very slow, so by default icons are not shown for working copies located on network shares.
USB Flash drive nampak menjadi kasus khusus dalam tipe drive yang diidentifikasi oleh peralatan itu sendiri. Beberapa nampak sebagai drive tetap, dan beberapa sebagai drive removable.
The Exclude Paths are used to tell TortoiseSVN those paths for which it should not show icon overlays and status columns. This is useful if you have some very big working copies containing only libraries which you won't change at all and therefore don't need the overlays, or if you only want TortoiseSVN to look in specific folders.
Any path you specify here is assumed to apply recursively, so none of the child folders will show overlays either. If you want to exclude only the named folder, append ? after the path.
Hal yang sama diterapkan ke Sertakan Paths. Kecuali bahwa untuk path itu lapisan ditampilkan bahkan jika lapisan dimatikan untuk tipe drive tertentu, atau dengan mengecualikan path yang ditetapkan di atas.
Users sometimes ask how these three settings interact. For any given path check the include and exclude lists, seeking upwards through the directory structure until a match is found. When the first match is found, obey that include or exclude rule. If there is a conflict, a single directory spec takes precedence over a recursive spec, then inclusion takes precedence over exclusion.
An example will help here:
Exclude:
C:
C:\develop\?
C:\develop\tsvn\obj
C:\develop\tsvn\bin

Include:
C:\develop
These settings disable icon overlays for the C: drive, except for c:\develop. All projects below that directory will show overlays, except the c:\develop folder itself, which is specifically ignored. The high-churn binary folders are also excluded.
TSVNCache.exe juga menggunakan path ini untuk membatasi pemindaiannya. Jika Anda menginginkan ia melihat hanya folder tertentu, matikan tipe semua drive dan sertakan hanya folder yang akan dipindai secara khusus.
Exclude SUBST Drives
It is often convenient to use a SUBST drive to access your working copies, e.g. using the command
subst T: C:\TortoiseSVN\trunk\doc
However this can cause the overlays not to update, as TSVNCache will only receive one notification when a file changes, and that is normally for the original path. This means that your overlays on the subst path may never be updated.
An easy way to work around this is to exclude the original path from showing overlays, so that the overlays show up on the subst path instead.
Sometimes you will exclude areas that contain working copies, which saves TSVNCache from scanning and monitoring for changes, but you still want a visual indication that a folder contains a working copy. The Show excluded root folders as 'normal' checkbox allows you to do this. With this option, working copy root folders in any excluded area (drive type not checked, or specifically excluded) will show up as normal and up-to-date, with a green check mark. This reminds you that you are looking at a working copy, even though the folder overlays may not be correct. Files do not get an overlay at all. Note that the context menus still work, even though the overlays are not shown.
As a special exception to this, drives A: and B: are never considered for the Show excluded folders as 'normal' option. This is because Windows is forced to look on the drive, which can result in a delay of several seconds when starting Explorer, even if your PC does have a floppy drive.
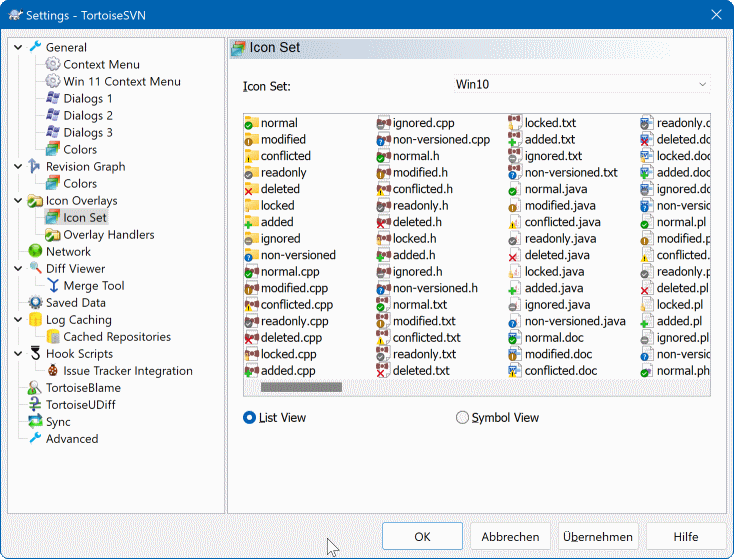
Anda bisa mengubah lapisan set ikon ke satu yang paling Anda sukai. Catatan bahwa jika Anda mengubah lapisan set, Anda harus memulai lagi komputer Anda agar perubahan bisa terlihat.
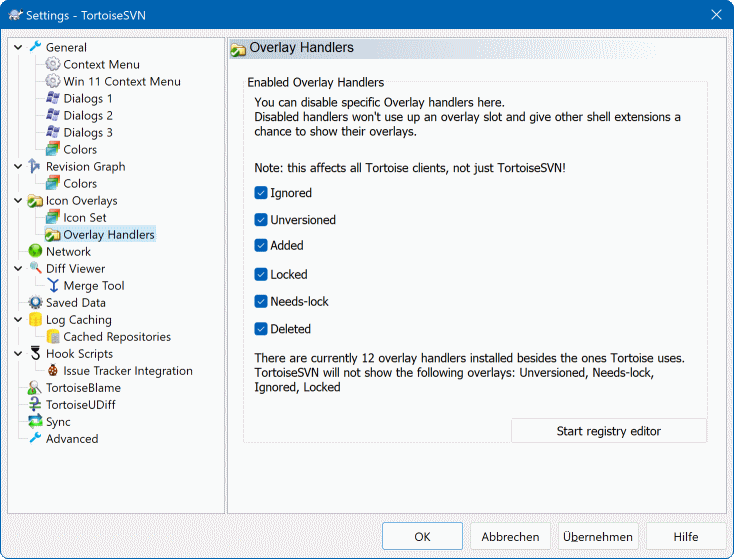
Because the number of overlays available is severely restricted, you can choose to disable some handlers to ensure that the ones you want will be loaded. Because TortoiseSVN uses the common TortoiseOverlays component which is shared with other Tortoise clients (e.g. TortoiseCVS, TortoiseHg) this setting will affect those clients too.
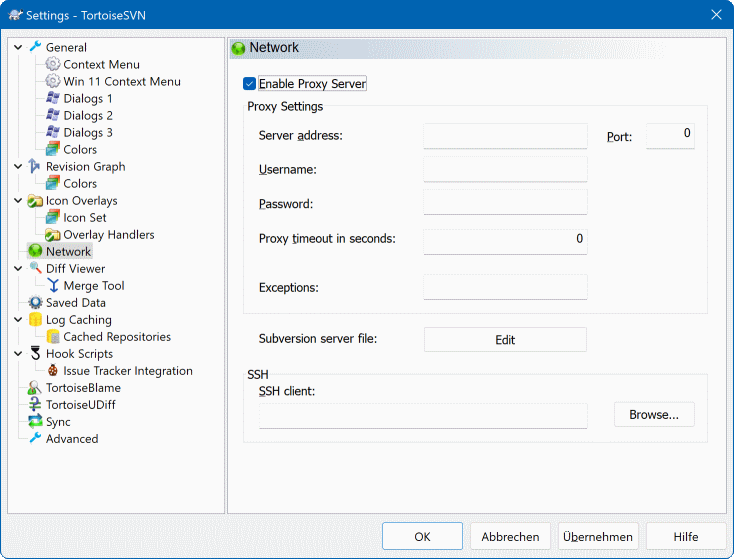
Disini Anda bisa mengkonfigurasi server proxy Anda, jika Anda memerlukannya untuk mendapatkan melalui firewall perusahaan Anda.
If you need to set up per-repository proxy settings, you will need to use the Subversion servers file to configure this. Use to get there directly. Consult the Runtime Configuration Area for details on how to use this file.
Anda juga bisa menetapkan program TortoiseSVN yang harus digunakan untuk melaksanakan koneksi aman ke repositori svn+ssh. Kami merekomendasikan bahwa Anda menggunakan TortoisePlink.exe. Ini adalah versi dari program Plink populer, dan disertakan dengan TortoiseSVN, tapi dikompilasi sebagai aplikasi Windowless, maka Anda tidak mendapatkan kotak DOS muncul setiap kali Anda mengotentikasi.
You must specify the full path to the executable. For TortoisePlink.exe this is the standard TortoiseSVN bin directory. Use the button to help locate it. Note that if the path contains spaces, you must enclose it in quotes, e.g.
"C:\Program Files\TortoiseSVN\bin\TortoisePlink.exe"
Satu efek-samping bila tidak mempunyai jendela adalah bahwa tidak ada pesan kesalahan yang muncul, maka jika otentikasi gagal Anda cukup mendapatkan pesan yang mengatakan sesuatu seperti “Tidak bisa menulis ke output standar”. Untuk alasan ini kami merekomendasikan bahwa pertama Anda menyiapkan menggunakan Plink standar. Ketika semuanya bekerja, Anda bisa menggunakan TortoisePlink dengan parameter yang persis sama.
TortoisePlink does not have any documentation of its own because it is just a minor variant of Plink. Find out about command line parameters from the PuTTY website.
To avoid being prompted for a password repeatedly, you might also consider using a password caching tool such as Pageant. This is also available for download from the PuTTY website.
Finally, setting up SSH on server and clients is a non-trivial process which is beyond the scope of this help file. However, you can find a guide in the TortoiseSVN FAQ listed under Subversion/TortoiseSVN SSH How-To.

Disini Anda bisa mendefinisikan program diff/merge Anda sendiri yang harus digunakan oleh TortoiseSVN. Seting standar adalah untuk menggunakan TortoiseMerge yang terinstalasi bersamaan dengan TortoiseSVN.
Baca bagian bernama “Eksternal Diff/Merge Tools” untuk daftar dari beberapa program eksternal diff/merge yang digunakan orang dengan TortoiseSVN.
Program eksternal diff mungkin digunakan untuk membandingkan revisi file yang berbeda. Program eksternal akan perlu untuk mendapatkan nama file dari baris perintah, bersama dengan parameter pengganti yang diawali dengan %. Ketika ia menemukan salah satu darinya akan memisahkan nilai terkait. Urutan parameter akan tergantung pada program Diff yang Anda gunakan.
- %base
File original tanpa perubahan Anda
- %bname
Judul jendela untuk file base
- %nqbname
The window title for the base file, without quotes
- %mine
File Anda sendiri, dengan perubahan Anda
- %yname
Judul jendela untuk file Anda
- %nqyname
The window title for your file, without quotes
- %burl
The URL of the original file, if available
- %nqburl
The URL of the original file, if available, without quotes
- %yurl
The URL of the second file, if available
- %nqyurl
The URL of the second file, if available, without quotes
- %brev
The revision of the original file, if available
- %nqbrev
The revision of the original file, if available, without quotes
- %yrev
The revision of the second file, if available
- %nqyrev
The revision of the second file, if available, without quotes
- %peg
The peg revision, if available
- %nqpeg
The peg revision, if available, without quotes
- %fname
The name of the file. This is an empty string if two different files are diffed instead of two states of the same file.
- %nqfname
The name of the file, without quotes
The window titles are not pure filenames. TortoiseSVN treats that as a name to display and creates the names accordingly. So e.g. if you're doing a diff from a file in revision 123 with a file in your working copy, the names will be filename : revision 123 and filename : working copy.
For example, with ExamDiff Pro:
C:\Path-To\ExamDiff.exe %base %mine --left_display_name:%bname
                                    --right_display_name:%yname
or with KDiff3:
C:\Path-To\kdiff3.exe %base %mine --L1 %bname --L2 %yname
or with WinMerge:
C:\Path-To\WinMerge.exe -e -ub -dl %bname -dr %yname %base %mine
or with Araxis:
C:\Path-To\compare.exe /max /wait /title1:%bname /title2:%yname
                       %base %mine
or with UltraCompare:
C:\Path-To\uc.exe %base %mine -title1 %bname -title2 %yname
or with DiffMerge:
C:\Path-To\DiffMerge.exe -nosplash -t1=%bname -t2=%yname %base %mine
If you use the svn:keywords property to expand keywords, and in particular the revision of a file, then there may be a difference between files which is purely due to the current value of the keyword. Also if you use svn:eol-style = native the BASE file will have pure LF line endings whereas your file will have CR-LF line endings. TortoiseSVN will normally hide these differences automatically by first parsing the BASE file to expand keywords and line endings before doing the diff operation. However, this can take a long time with large files. If Convert files when diffing against BASE is unchecked then TortoiseSVN will skip pre-processing the files.
You can also specify a different diff tool to use on Subversion properties. Since these tend to be short simple text strings, you may want to use a simpler more compact viewer.
If you have configured an alternate diff tool, you can access TortoiseMerge and the third party tool from the context menus. → uses the primary diff tool, and Shift+ → uses the secondary diff tool.
At the bottom of the dialog you can configure a viewer program for unified-diff files (patch files). No parameters are required. The Default setting is to use TortoiseUDiff which is installed alongside TortoiseSVN, and colour-codes the added and removed lines.
Since Unified Diff is just a text format, you can use your favourite text editor if you prefer.
Program merge eksternal digunakan untuk menyelesaikan file yang konflik. Penggantian parameter digunakan dalam cara yang sama dengan Program Diff.
- %base
file original tanpa perubahan Anda atau yang perubahan lain
- %bname
Judul jendela untuk file base
- %nqbname
The window title for the base file, without quotes
- %mine
file Anda sendiri, dengan perubahan Anda
- %yname
Judul jendela untuk file Anda
- %nqyname
The window title for your file, without quotes
- %theirs
file seperti yang ada di dalam repositori
- %tname
Judul jendela untuk file dalam repositori
- %nqtname
The window title for the file in the repository, without quotes
- %merged
file yang konflik, hasil dari operasi merge
- %mname
Judul jendela untuk file gabungan
- %nqmname
The window title for the merged file, without quotes
- %fname
The name of the conflicted file
- %nqfname
The name of the conflicted file, without quotes
For example, with Perforce Merge:
C:\Path-To\P4Merge.exe %base %theirs %mine %merged
or with KDiff3:
C:\Path-To\kdiff3.exe %base %mine %theirs -o %merged
                      --L1 %bname --L2 %yname --L3 %tname
or with Araxis:
C:\Path-To\compare.exe /max /wait /3 /title1:%tname /title2:%bname
                       /title3:%yname %theirs %base %mine %merged /a2
or with WinMerge (2.8 or later):
C:\Path-To\WinMerge.exe %merged
or with DiffMerge:
C:\Path-To\DiffMerge.exe -caption=%mname -result=%merged -merge
      -nosplash -t1=%yname -t2=%bname -t3=%tname %mine %base %theirs
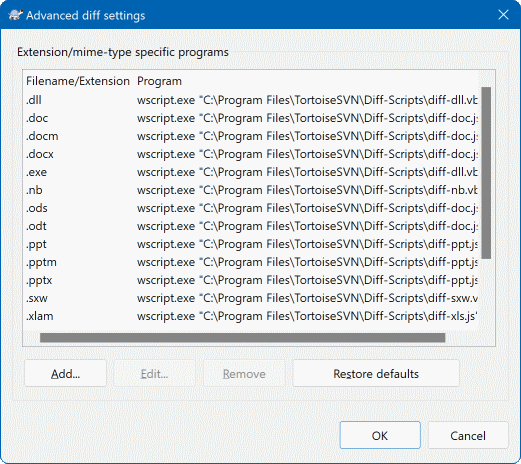
In the advanced settings, you can define a different diff and merge program for every file extension. For instance you could associate Photoshop as the “Diff” Program for .jpg files :-) You can also associate the svn:mime-type property with a diff or merge program.
To associate using a file extension, you need to specify the extension. Use .bmp to describe Windows bitmap files. To associate using the svn:mime-type property, specify the mime type, including a slash, for example text/xml.
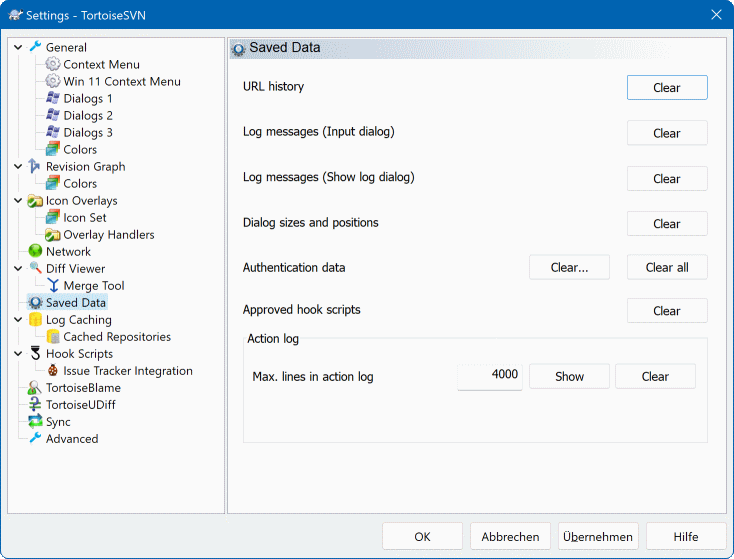
Untuk kenyamanan Anda, TortoiseSVN menyimpan banyak seting yang Anda pakai, dan mengingat diaman Anda terakhir kali berada. Jika Anda ingin membersihkan cache data itu, Anda bisa melakukannya disini.
- Histori URL
Kapan saja Anda melakukan checkout copy pekerjaan Anda, perubahan gabungan atau menggunakan browser repository, TortoiseSVN memelihara catatan dari URL yang terakhir digunakan dan menawarkannya dalam kotak kombo. Ada kalanya daftar menjadi kacau dengan URL yang ketinggalan jaman, oleh karenanya akan berguna untuk menyegarkannya secara periodik.
If you want to remove a single item from one of the combo boxes you can do that in-place. Just click on the arrow to drop the combo box down, move the mouse over the item you want to remove and type Shift+Del.
- Pesan Log (Dialog Masukan)
TortoiseSVN menyimpan pesan log komit yang Anda masukan. Ini disimpan per repositori, maka jika Anda mengakses banyak repositori daftar ini bisa bertambah banyak.
- Pesan-pesan log (Tampilkan dialog log)
TortoiseSVN caches log messages fetched by the Show Log dialog to save time when you next show the log. If someone else edits a log message and you already have that message cached, you will not see the change until you clear the cache. Log message caching is enabled on the Log Cache tab.
- Posisi dan ukuran dialog
Banyak dialog ingat ukuran dan posisi layar yang terakhir Anda gunakan.
- Data otentikasi
Ketika Anda mengotentikasi dengan server Subversion, nama pengguna dan kata sandi disimpan secara lokal agar Anda tidak harus tetap memasukannya. Anda mungkin ingin membersihkan ini untuk alasan keamanan, atau karena Anda ingin mengakses repositori dibawah nama pengguna yang berbeda ... apakah John tahu Anda menggunakan PCnya?
If you want to clear authentication data for one particular server only, use the instead of the button.
- Log tindakan
TortoiseSVN keeps a log of everything written to its progress dialogs. This can be useful when, for example, you want to check what happened in a recent update command.
The log file is limited in length and when it grows too big the oldest content is discarded. By default 4000 lines are kept, but you can customize that number.
From here you can view the log file content, and also clear it.
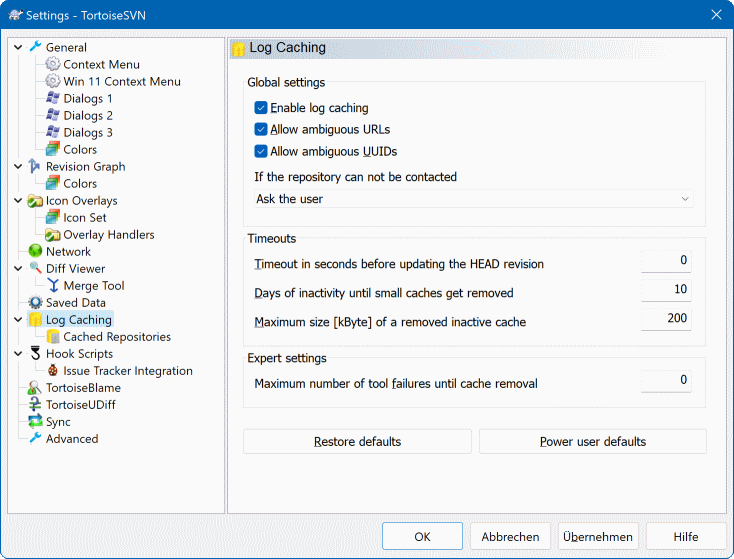
This dialog allows you to configure the log caching feature of TortoiseSVN, which retains a local copy of log messages and changed paths to avoid time-consuming downloads from the server. Using the log cache can dramatically speed up the log dialog and the revision graph. Another useful feature is that the log messages can still be accessed when offline.
- Enable log caching
Enables log caching whenever log data is requested. If checked, data will be retrieved from the cache when available, and any messages not in the cache will be retrieved from the server and added to the cache.
If caching is disabled, data will always be retrieved directly from the server and not stored locally.
- Allow ambiguous URLs
Occasionally you may have to connect to a server which uses the same URL for all repositories. Older versions of
svnbridgewould do this. If you need to access such repositories you will have to check this option. If you don't, unchecked it to improve performance.- Allow ambiguous UUIDs
Some hosting services give all their repositories the same UUID. You may even have done this yourself by copying a repository folder to create a new one. For all sorts of reasons this is a bad idea - a UUID should be unique. However, the log cache will still work in this situation if you check this box. If you don't need it, unchecked it to improve performance.
- If the repository cannot be contacted
If you are working offline, or if the repository server is down, the log cache can still be used to supply log messages already held in the cache. Of course the cache may not be up-to-date, so there are options to allow you to select whether this feature should be used.
When log data is being taken from the cache without contacting the server, the dialog using those message will show the offline state in its title bar.
- Timeout before updating the HEAD revision
When you invoke the log dialog you will normally want to contact the server to check for any newer log messages. If the timeout set here is non-zero then the server will only be contacted when the timeout has elapsed since the last time contact. This can reduce server round-trips if you open the log dialog frequently and the server is slow, but the data shown may not be completely up-to-date. If you want to use this feature we suggest using a value of 300 (5 minutes) as a compromise.
- Days of inactivity until small caches get removed
If you browse around a lot of repositories you will accumulate a lot of log caches. If you're not actively using them, the cache will not grow very big, so TortoiseSVN purges them after a set time by default. Use this item to control cache purging.
- Maximum size of removed inactive caches
Larger caches are more expensive to reacquire, so TortoiseSVN only purges small caches. Fine tune the threshold with this value.
- Maximum number of tool failures before cache removal
Occasionally something goes wrong with the caching and causes a crash. If this happens the cache is normally deleted automatically to prevent a recurrence of the problem. If you use the less stable nightly build you may opt to keep the cache anyway.
On this page you can see a list of the repositories that are cached locally, and the space used for the cache. If you select one of the repositories you can then use the buttons underneath.
Click on the to completely refresh the cache and fill in any holes. For a large repository this could be very time consuming, but useful if you are about to go offline and want the best available cache.
Click on the button to export the entire cache as a set of CSV files. This could be useful if you want to process the log data using an external program, although it is mainly useful to the developers.
Click on to remove all cached data for the selected repositories. This does not disable caching for the repository so the next time you request log data, a new cache will be created.
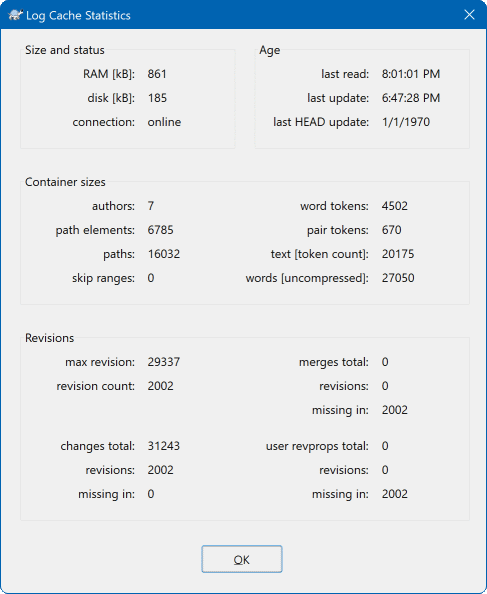
Click on the button to see detailed statistics for a particular cache. Many of the fields shown here are mainly of interest to the developers of TortoiseSVN, so they are not all described in detail.
- RAM
The amount of memory required to service this cache.
- Diska
The amount of disk space used for the cache. Data is compressed, so disk usage is generally fairly modest.
- Connection
Shows whether the repository was available last time the cache was used.
- Last update
The last time the cache content was changed.
- Last head update
The last time we requested the HEAD revision from the server.
- Pengarang
The number of different authors with messages recorded in the cache.
- Path
The number of paths listed, as you would see using
svn log -v.- Skip ranges
The number of revision ranges which we have not fetched, simply because they haven't been requested. This is a measure of the number of holes in the cache.
- Max revision
The highest revision number stored in the cache.
- Revision count
The number of revisions stored in the cache. This is another measure of cache completeness.
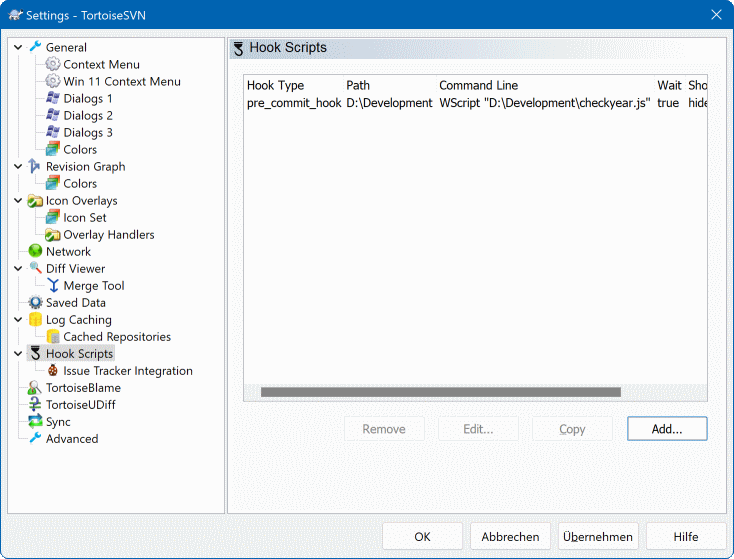
This dialog allows you to set up hook scripts which will be executed automatically when certain Subversion actions are performed. As opposed to the hook scripts explained in bagian bernama “Server side hook scripts”, these scripts are executed locally on the client.
Satu aplikasi untuk hook-hook tersebut dapat memanggil suatu program seperti SubWCRev.exe untuk memutahirkan nomor-nomor versi setelah suatu komit dan mungkin juga untuk memicu suatu pembangunan ulang.
Note that you can also specify such hook scripts using special properties on your working copy. See the section bagian bernama “TortoiseSVN Project Properties” for details.
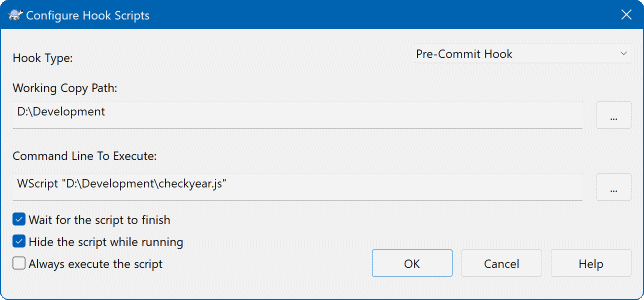
Untuk menambah skrip hook baru, cukup klik dan isi rinciannya.
There are currently these types of hook script available
- Mulai-komit
Called before the commit dialog is shown. You might want to use this if the hook modifies a versioned file and affects the list of files that need to be committed and/or commit message. However you should note that because the hook is called at an early stage, the full list of objects selected for commit is not available.
- Manual Pre-commit
If this is specified, the commit dialog shows a button which when clicked runs the specified hook script. The hook script receives a list of all checked files and folders and the commit message if there was one entered.
- Check-commit
Called after the user clicks in the commit dialog, and before the commit dialog closes. This hook gets a list of all the checked files. If the hook returns an error, the commit dialog stays open.
If the returned error message contains paths on newline separated lines, those paths will get selected in the commit dialog after the error message is shown.
- Pre-komit
Called after the user clicks in the commit dialog, and before the actual commit begins. This hook has a list of exactly what will be committed.
- Pos-komit
Called after the commit finishes successfully.
- Mulai-mutahirkan
Dipanggil sebelum dialog mutahirkan-ke-revisi ditampilkan.
- Pre-mutahirkan
Called before the actual Subversion update or switch begins.
- Pos-mutahirkan
Called after the update, switch or checkout finishes (whether successful or not).
- Pre-connect
Called before an attempt to contact the repository. Called at most once in five minutes.
- Pre-lock
Called before an attempt to lock a file.
- Post-lock
Called after a file has been locked.
Suatu hook didefinisikan untuk path copy pekerjaan tertentu. Anda hanya perlu menentukan path level atas; jika Anda melakukan suatu operasi di sub-folder, TortoiseSVN akan secara otomatis mencari path yang cocok ke arah atas.
Next you must specify the command line to execute, starting with the path to the hook script or executable. This could be a batch file, an executable file or any other file which has a valid windows file association, e.g. a perl script. Note that the script must not be specified using a UNC path as Windows shell execute will not allow such scripts to run due to security restrictions.
The command line includes several parameters which get filled in by TortoiseSVN. The parameters passed depend upon which hook is called. Each hook has its own parameters which are passed in the following order:
- Mulai-komit
PATHMESSAGEFILECWD- Manual Pre-commit
PATHMESSAGEFILECWD- Check-commit
PATHMESSAGEFILECWD- Pre-komit
PATHDEPTHMESSAGEFILECWD- Pos-komit
PATHDEPTHMESSAGEFILEREVISIONERRORCWD- Mulai-mutahirkan
PATHCWD- Pre-mutahirkan
PATHDEPTHREVISIONCWD- Pos-mutahirkan
PATHDEPTHREVISIONERRORCWDRESULTPATH- Pre-connect
no parameters are passed to this script. You can pass a custom parameter by appending it to the script path.
- Pre-lock
PATHLOCKFORCEMESSAGEFILECWD- Post-lock
PATHLOCKFORCEMESSAGEFILEERRORCWD
The meaning of each of these parameters is described here:
- PATH
A path to a temporary file which contains all the paths for which the operation was started in UTF-8 encoding. Each path is on a separate line in the temp file.
Note that for operations done remotely, e.g. in the repository browser, those paths are not local paths but the urls of the affected items.
- DEPTH
The depth with which the commit/update is done.
Possible values are:
- -2
svn_depth_unknown- -1
svn_depth_exclude- 0
svn_depth_empty- 1
svn_depth_files- 2
svn_depth_immediates- 3
svn_depth_infinity
- MESSAGEFILE
Path to a file containing the log message for the commit. The file contains the text in UTF-8 encoding. After successful execution of the start-commit hook, the log message is read back, giving the hook a chance to modify it.
- REVISION
The repository revision to which the update should be done or after a commit completes.
- LOCK
Either
truewhen locking, orfalsewhen unlocking.- FORCE
Either
trueorfalse, depending on whether the operation was forced or not.- ERROR
Path to a file containing the error message. If there was no error, the file will be empty.
- CWD
The current working directory with which the script is run. This is set to the common root directory of all affected paths.
- RESULTPATH
A path to a temporary file which contains all the paths in UTF-8 encoding which were somehow touched by the operation. Each path is on a separate line in the temp file.
Note that although we have given these parameters names for convenience, you do not have to refer to those names in the hook settings. All parameters listed for a particular hook are always passed, whether you want them or not ;-)
Jika Anda ingin operasi Subversion ditunda sampai hook telah selesai, cawang Menunggu naskah diselesaikan.
Normally you will want to hide ugly DOS boxes when the script runs, so Hide the script while running is checked by default. Also you need to check this if your hook script might return an error that should stop the operation.
Theforce flag can be set if the user must not proceed with the operation without running the script, i.e. the script must always run. If the force flag is not checked, then the user is shown a button to retry the operation without running the hook script. Sample client hook scripts can be found in the contrib folder in the TortoiseSVN repository. (bagian bernama “lisensi” explains how to access the repository.)
When debugging hook scripts you may want to echo progress lines to the DOS console, or insert a pause to stop the console window disappearing when the script completes. Because I/O is redirected this will not normally work. However you can redirect input and output explicitly to CON to overcome this. e.g.
echo Checking Status > con
pause < con > con
A small tool is included in the TortoiseSVN installation folder named ConnectVPN.exe. You can use this tool configured as a pre-connect hook to connect automatically to your VPN before TortoiseSVN tries to connect to a repository. Just pass the name of the VPN connection as the first parameter to the tool.
TortoiseSVN can use a COM plugin to query issue trackers when in the commit dialog. The use of such plugins is described in bagian bernama “Getting Information from the Issue Tracker”. If your system administrator has provided you with a plugin, which you have already installed and registered, this is the place to specify how it integrates with your working copy.
Click on to use the plugin with a particular working copy. Here you can specify the working copy path, choose which plugin to use from a drop down list of all registered issue tracker plugins, and any parameters to pass. The parameters will be specific to the plugin, but might include your user name on the issue tracker so that the plugin can query for issues which are assigned to you.
If you want all users to use the same COM plugin for your project, you can specify the plugin also with the properties bugtraq:provideruuid, bugtraq:provideruuid64 and bugtraq:providerparams.
- bugtraq:provideruuid
This property specifies the COM UUID of the IBugtraqProvider, for example
{91974081-2DC7-4FB1-B3BE-0DE1C8D6CE4E}. (This example is the UUID of the Gurtle bugtraq provider, which is a provider for the Google Code issue tracker.)- bugtraq:provideruuid64
This is the same as
bugtraq:provideruuid, but for the 64-bit version of the IBugtraqProvider.- bugtraq:providerparams
This property specifies the parameters passed to the IBugtraqProvider.
Please check the documentation of your IBugtraqProvider plugin to find out what to specify in these two properties.
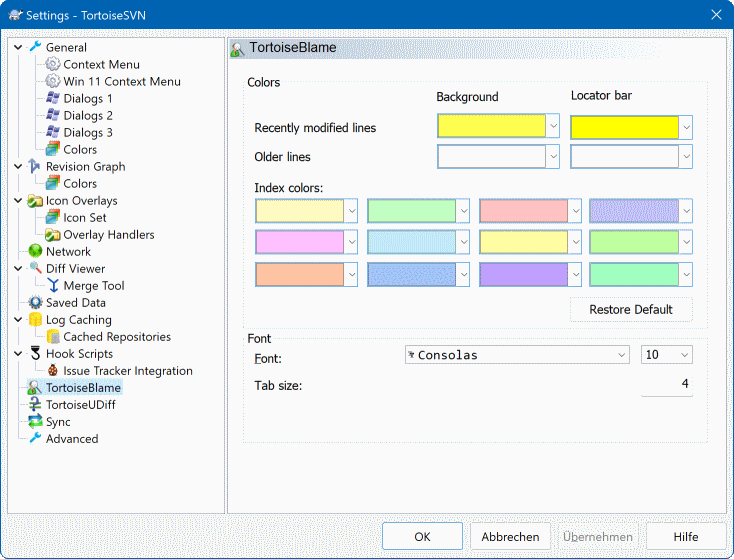
The settings used by TortoiseBlame are controlled from the main context menu, not directly with TortoiseBlame itself.
- Warna
TortoiseBlame can use the background colour to indicate the age of lines in a file. You set the endpoints by specifying the colours for the newest and oldest revisions, and TortoiseBlame uses a linear interpolation between these colours according to the repository revision indicated for each line.
You can specify different colours to use for the locator bar. The default is to use strong contrast on the locator bar while keeping the main window background light so that you can still read the text.
- Huruf
You can select the font used to display the text, and the point size to use. This applies both to the file content, and to the author and revision information shown in the left pane.
- Tabs
Defines how many spaces to use for expansion when a tab character is found in the file content.
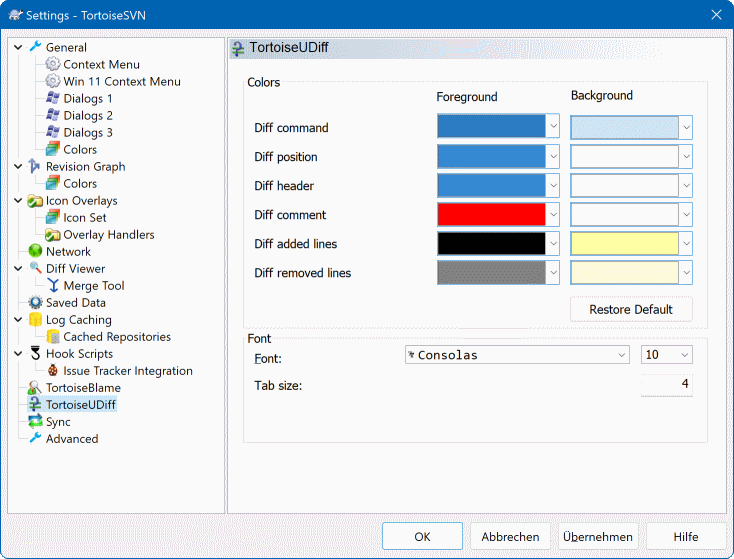
The settings used by TortoiseUDiff are controlled from the main context menu, not directly with TortoiseUDiff itself.
- Warna
The default colors used by TortoiseUDiff are usually ok, but you can configure them here.
- Huruf
You can select the font used to display the text, and the point size to use.
- Tabs
Defines how many spaces to use for expansion when a tab character is found in the file diff.
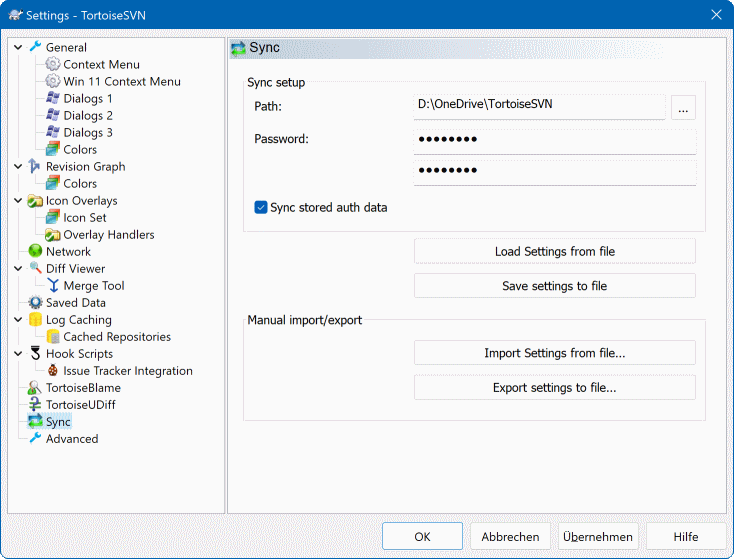
You can sync all TortoiseSVN settings to and from an encrypted file. The file is encrypted with the password you enter so you don't have to worry if you store that file on a cloud folder like OneDrive, GDrive, DropBox, ...
When a path and password is specified, TortoiseSVN will sync all settings automatically and keep them in sync.
You can also export/import an encrypted files with all the settings manually. When you do that, you're asked for the path of the file and the password to encrypt/decrypt the settings file.
When exporting the settings manually, you can also optionally include all local settings which are not included in a normal export or in a sync. Local settings are settings which include local paths which usually vary between computers. These local settings include the configured diff and merge tools and hook scripts.
A few infrequently used settings are available only in the advanced page of the settings dialog. These settings modify the registry directly and you have to know what each of these settings is used for and what it does. Do not modify these settings unless you are sure you need to change them.
- AllowAuthSave
Sometimes multiple users use the same account on the same computer. In such situations it's not really wanted to save the authentication data. Setting this value to
falsedisables thesave authenticationbutton in the authentication dialog.- AllowUnversionedObstruction
If an update adds a new file from the repository which already exists in the local working copy as an unversioned file, the default action is to keep the local file, showing it as a (possibly) modified version of the new file from the repository. If you would prefer TortoiseSVN to create a conflict in such situations, set this value to
false.- AlwaysExtendedMenu
As with the explorer, TortoiseSVN shows additional commands if the Shift key is pressed while the context menu is opened. To force TortoiseSVN to always show those extended commands, set this value to
true.- AutoCompleteMinChars
The minimum amount of chars from which the editor shows an auto-completion popup. The default value is
3.- AutocompleteRemovesExtensions
The auto-completion list shown in the commit message editor displays the names of files listed for commit. To also include these names with extensions removed, set this value to
true.- BlockPeggedExternals
File externals that are pegged to a specific revision are blocked by default from being selected for a commit. This is because a subsequent update would revert those changes again unless the pegged revision of the external is adjusted.
Set this value to
falsein case you still want to commit changes to such external files.- BlockStatus
If you don't want the explorer to update the status overlays while another TortoiseSVN command is running (e.g. Update, Commit, ...) then set this value to
true.- CacheTrayIcon
To add a cache tray icon for the TSVNCache program, set this value to
true. This is really only useful for developers as it allows you to terminate the program gracefully.- ColumnsEveryWhere
The extra columns the TortoiseSVN adds to the details view in Windows Explorer are normally only active in a working copy. If you want those to be accessible everywhere, not just in working copies, set this value to
true. Note that the extra columns are only available in XP. Vista and later doesn't support that feature any more. However some third-party explorer replacements do support those even on Windows versions later than XP.- ConfigDir
You can specify a different location for the Subversion configuration file here. This will affect all TortoiseSVN operations.
- CtrlEnter
In most dialogs in TortoiseSVN, you can use Ctrl+Enter to dismiss the dialog as if you clicked on the OK button. If you don't want this, set this value to
false.- Debug
Set this to
trueif you want a dialog to pop up for every command showing the command line used to start TortoiseProc.exe.- DebugOutputString
Set this to
trueif you want TortoiseSVN to print out debug messages during execution. The messages can be captured with special debugging tools only.- DialogTitles
The default format (value of 0) of dialog titles is
url/path - name of dialog - TortoiseSVN. If you set this value to 1, the format changes toname of dialog - url/path - TortoiseSVN.- DiffBlamesWithTortoiseMerge
TortoiseSVN allows you to assign an external diff viewer. Most such viewers, however, are not suited for change blaming (bagian bernama “Blame Perbedaan”), so you might wish to fall back to TortoiseMerge in this case. To do so, set this value to
true.- DlgStickySize
This value specifies the number of pixels a dialog has to be near a border before the dialog sticks to it. The default value is 3. To disable this value set the value to zero.
- FixCaseRenames
Some apps change the case of filenames without notice but those changes aren't really necessary nor wanted. For example a change from
file.txttoFILE.TXTwouldn't bother normal Windows applications, but Subversion is case sensitive in these situations. So TortoiseSVN automatically fixes such case changes.If you don't want TortoiseSVN to automatically fix such case changes for you, you can set this value to
false.- FullRowSelect
The status list control which is used in various dialogs (e.g., commit, check-for-modifications, add, revert, ...) uses full row selection (i.e., if you select an entry, the full row is selected, not just the first column). This is fine, but the selected row then also covers the background image on the bottom right, which can look ugly. To disable full row select, set this value to
false.- GroupTaskbarIconsPerRepo
This option determines how the Win7 taskbar icons of the various TortoiseSVN dialogs and windows are grouped together. This option has no effect on Vista!
The default value is 0. With this setting, the icons are grouped together by application type. All dialogs from TortoiseSVN are grouped together, all windows from TortoiseMerge are grouped together, ...
If set to 1, then instead of all dialogs in one single group per application, they're grouped together by repository. For example, if you have a log dialog and a commit dialog open for repository
A, and a check-for-modifications dialog and a log dialog for repositoryB, then there are two application icon groups shown in the Win7 taskbar, one group for each repository. But TortoiseMerge windows are not grouped together with TortoiseSVN dialogs.If set to 2, then the grouping works as with the setting set to 1, except that TortoiseSVN, TortoiseMerge, TortoiseBlame, TortoiseIDiff and TortoiseUDiff windows are all grouped together. For example, if you have the commit dialog open and then double click on a modified file, the opened TortoiseMerge diff window will be put in the same icon group on the taskbar as the commit dialog icon.
If set to 3, then the grouping works as with the setting set to 1, but the grouping isn't done according to the repository but according to the working copy. This is useful if you have all your projects in the same repository but different working copies for each project.
If set to 4, then the grouping works as with the setting set to 2, but the grouping isn't done according to the repository but according to the working copy.
- GroupTaskbarIconsPerRepoOverlay
This has no effect if the option
GroupTaskbarIconsPerRepois set to 0 (see above).If this option is set to
true, then every icon on the Win7 taskbar shows a small colored rectangle overlay, indicating the repository the dialogs/windows are used for.- HideExternalInfo
If this is set to
false, then everysvn:externalsis shown during an update separately.If it is set to
true(the default), then update information for externals is only shown if the externals are affected by the update, i.e. changed in some way. Otherwise nothing is shown as with normal files and folders.- HookCancelError
If this is set to
true, then cancelling the dialog to approve a hook script to run will show an error dialog indicating the user cancelled.- IncludeExternals
By default, TortoiseSVN always runs an update with externals included. This avoids problems with inconsistent working copies. If you have however a lot of externals set, an update can take quite a while. Set this value to
falseto run the default update with externals excluded. To update with externals included, either run theUpdate to revision...dialog or set this value totrueagain.- LogFindCopyFrom
When the log dialog is started from the merge wizard, already merged revisions are shown in gray, but revisions beyond the point where the branch was created are also shown. These revisions are shown in black because those can't be merged.
If this option is set to
truethen TortoiseSVN tries to find the revision where the branch was created from and hide all the revisions that are beyond that revision. Since this can take quite a while, this option is disabled by default. Also this option doesn't work with some SVN servers (e.g., Google Code Hosting, see issue #5471).- LogMultiRevFormat
A format string for the log messages when multiple revisions are selected in the log dialog.
You can use the following placeholders in your format string:
- %1!ld!
- gets replaced with the revision number text
- %2!s!
- gets replaced with the short log message of the revision
- LogStatusCheck
The log dialog shows the revision the working copy path is at in bold. But this requires that the log dialog fetches the status of that path. Since for very big working copies this can take a while, you can set this value to
falseto deactivate this feature.- MaxHistoryComboItems
Comboboxes for URLs and paths show a history of previously used URLs/paths if possible. This settings controls how many previous items are saved and shown. The default is 25 items.
- MergeLogSeparator
When you merge revisions from another branch, and merge tracking information is available, the log messages from the revisions you merge will be collected to make up a commit log message. A pre-defined string is used to separate the individual log messages of the merged revisions. If you prefer, you can set this to a value containing a separator string of your choice.
- NumDiffWarning
If you want to show the diff at once for more items than specified with this settings, a warning dialog is shown first. The default is 10.
- OldVersionCheck
TortoiseSVN checks whether there's a new version available about once a week. If an updated version is found, the commit dialog shows a link control with that info. If you prefer the old behavior back where a dialog pops up notifying you about the update, set this value to
true.- RepoBrowserTrySVNParentPath
The repository browser tries to fetch the web page that's generated by an SVN server configured with the SVNParentPath directive to get a list of all repositories. To disable that behavior, set this value to
false.- ScintillaBidirectional
This option enables the bidirectional mode for the commit message edit box. If enabled, right-to-left language text editing is done properly. Since this feature is expensive, it is disabled by default. You can enable this by setting this value to
true.- ScintillaDirect2D
This option enables the use of Direct2D accelerated drawing in the Scintilla control which is used as the edit box in e.g. the commit dialog, and also for the unified diff viewer. With some graphic cards however this sometimes doesn't work properly so that the cursor to enter text isn't always visible. If that happens, you can turn this feature off by setting this value to
false.- OutOfDateRetry
This parameter specifies how TortoiseSVN behaves if a commit fails due to an out-of-date error:
- 0
The user is asked whether to update the working copy or not, and the commit dialog is not reopened after the update.
- 1
This is the default. The user is asked whether to update the working copy or not, and the commit dialog is reopened after the update so the user can proceed with the commit right away.
- 2
Similar to
1, but instead of updating only the paths selected for a commit, the update is done on the working copy root. This helps to avoid inconsistent working copies.- 3
The user is not asked to update the working copy. The commit simply fails with the out-of-date error message.
- PlaySound
If set to
true, TortoiseSVN will play a system sound when an error or warning occurs, or another situation which is important and requires your attention. Set this tofalseif you want to keep TortoiseSVN quiet. Note that the project monitor has its own setting for playing sounds, which you can configure in its settings dialog.- ShellMenuAccelerators
TortoiseSVN uses accelerators for its explorer context menu entries. Since this can lead to doubled accelerators (e.g. the
SVN Commithas the Alt-C accelerator, but so does theCopyentry of explorer). If you don't want or need the accelerators of the TortoiseSVN entries, set this value tofalse.- ShowContextMenuIcons
This can be useful if you use something other than the windows explorer or if you get problems with the context menu displaying incorrectly. Set this value to
falseif you don't want TortoiseSVN to show icons for the shell context menu items. Set this value totrueto show the icons again.- ShowAppContextMenuIcons
If you don't want TortoiseSVN to show icons for the context menus in its own dialogs, set this value to
false.- ShowNotifications
Set this value to
falseif you don't want the project monitor to show notification popups when new commits are detected.- StyleCommitMessages
The commit and log dialog use styling (e.g. bold, italic) in commit messages (see bagian bernama “Pesan Log Komit” for details). If you don't want to do this, set the value to
false.- UpdateCheckURL
This value contains the URL from which TortoiseSVN tries to download a text file to find out if there are updates available. This might be useful for company admins who don't want their users to update TortoiseSVN until they approve it.
- UseCustomWordBreak
The standard edit controls do not stop on forward slashes like they're found in paths and urls. TortoiseSVN uses a custom word break procedure for the edit controls. If you don't want that and use the default instead, set this value to 0. If you only want the default for edit controls in combo boxes, set this value to 1.
- VersionCheck
TortoiseSVN checks whether there's a new version available about once a week. If you don't want TortoiseSVN to do this check, set this value to
false.
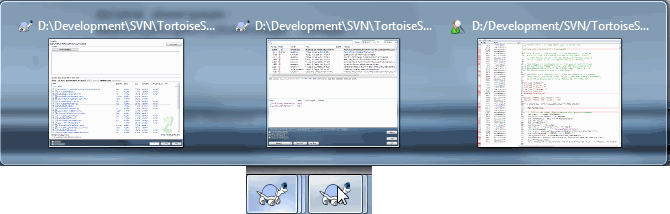
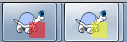
The project monitor is a helpful tool that monitors repositories and notifies you in case there are new commits.
The projects can be monitored via a working copy path or directly via their repository URLs.
The project monitor scans each project in a configurable interval, and every time new commits are detected a notification popup is shown. Also the icon that is added to the system tray changes to indicate that there are new commits.
Snarl
If Snarl is installed and active, then the project monitor automatically uses Snarl to show the notifications about newly detected commits.
If you first start the project monitor, the tree view on the left side is empty. To add projects, click on the button at the top of the dialog named .
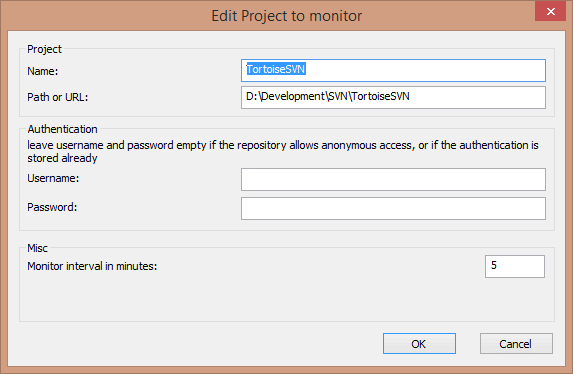
To add a project for monitoring, fill in the required information. The name of the project is not optional and must be filled in, all other information is optional.
If the box for Path or Url is left empty, then a folder is added. This is useful to group monitored projects.
If you want to monitor all repositories served via the SVNParentPath directive, enter the root Url for your repositories and check the box Url points to SVNParentPath list.
The fields Username and Password should only be filled in if the repository does not provide anonymous read access, and only if the authentication is not stored by Subversion itself. If you're accessing the monitored repository with TortoiseSVN or other svn clients and you've stored the authentication already, you should leave this empty: you won't have to edit those projects manually if the password changes.
The Monitor interval in minutes specifies the minutes to wait in between checks. The smallest interval is one minute.
check interval
If there are a lot of users monitoring the same repository and the bandwidth on the server is limited, a repository admin can set the minimum for check intervals using an svnrobots.txt file. A detailed explanation on how this works can be found on the project monitor website:
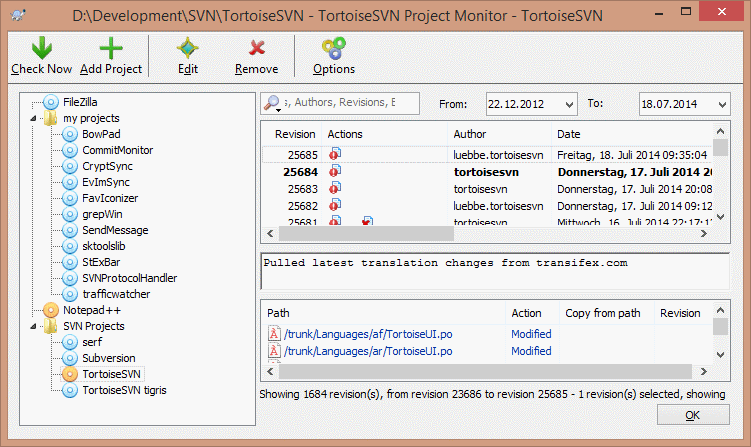
The project monitor shows all monitored projects on the left in a tree view. The projects can be moved around, for example one project can be moved below another project, making it a child/subproject.
A click on a project shows all the log messages of that project on the right.
Projects that have updates are shown in bold, with the number of new commits in brackets at the right. A click on a project marks it automatically as read.
The toolbar at the top of the dialog allows to configure and operate the project monitor.
- Check Now
While each monitored project is checked according to the interval that's set up, clicking this button will force a check of all projects immediately. Note that if there are updates, the notification won't show up until all projects have been checked.
- Add Project
Opens a new dialog to set up a new project for monitoring.
- Edit
Opens the configuration dialog for the selected project.
- Hapus
Removes the selected project after a confirmation dialog is shown.
- Mark all as read
Marks all revisions in all projects as read. Note that if you select a project with unread revisions, those revisions are automatically marked as read when you select another project.
If you hold down the Shift key when clicking the button, all error states are also cleared if there are any.
- Update all
Runs an Update on all monitored working copies. Projects that are monitored via an url are not updated, only those that are set up with a working copy path.
- Pilihan-pilihan
Shows a dialog to configure the behavior of the project monitor.
SubWCRev adalah program konsol Windows yang bisa digunakan untuk membaca status dari copy pekerjaan Subversion dan secara opsional melakukan substitusi kata kunci dalam file template. Ini sering dipakai sebagai bagian dari proses pembangunan dalam arti menyertakan informasi copy pekerjaan ke dalam obyek yang sedang Anda bangun. Biasanya mungkin digunakan untuk menyertakan angka revisi dalam kotak “Tentang”.
SubWCRev reads the Subversion status of all files in a working copy, excluding externals by default. It records the highest commit revision number found, and the commit timestamp of that revision, it also records whether there are local modifications in the working copy, or mixed update revisions. The revision number, update revision range and modification status are displayed on stdout.
SubWCRev.exe is called from the command line or a script, and is controlled using the command line parameters.
SubWCRev WorkingCopyPath [SrcVersionFile DstVersionFile] [-nmdfe]
WorkingCopyPath adalah path ke copy pekerjaan yang sedang diperiksa. Anda hanya bisa menggunakan SubWCRev pada copy pekerjaan, bukannya secara langsung pada repositori. Path bisa absolut atau relatif ke direktori pekerjaan saat ini.
Jika Anda ingin SubWCRev untuk melakukan penggantian kata kunci, agar field seperti revisi repositori dan URL disimpan ke file teks, Anda perlu menyediakan file template SrcVersionFile dan file output DstVersionFile yang berisi versi pengganti dari template.
You can specify ignore patterns for SubWCRev to prevent specific files and paths from being considered. The patterns are read from a file named .subwcrevignore. The file is read from the specified path, and also from the working copy root. If the file does not exist, no files or paths are ignored. The .subwcrevignore file can contain multiple patterns, separated by newlines. The patterns are matched against the paths relative to the repository root and paths relative to the path of the .subwcrevignore file. For example, to ignore all files in the doc folder of the TortoiseSVN working copy, the .subwcrevignore would contain the following lines:
/trunk/doc
/trunk/doc/*
Or, assuming the .subwcrevignore file is in the working copy root which is checked out from trunk, using the patterns
doc
doc/*
is the same as the example above.
To ignore all images, the ignore patterns could be set like this:
*.png
*.jpg
*.ico
*.bmp
Penting
The ignore patterns are case-sensitive, just like Subversion is.
Tip
To create a file with a starting dot in the Windows explorer, enter .subwcrevignore.. Note the trailing dot.
There are a number of optional switches which affect the way SubWCRev works. If you use more than one, they must be specified as a single group, e.g. -nm, not -n -m.
Tabel 6.1. Daftar saklar baris perintah yang tersedia
| Saklar | Deskripsi |
|---|---|
| -n | If this switch is given, SubWCRev will exit with ERRORLEVEL 7 if the working copy contains local modifications. This may be used to prevent building with uncommitted changes present. |
| -N | If this switch is given, SubWCRev will exit with ERRORLEVEL 11 if the working copy contains unversioned items that are not ignored. |
| -m | If this switch is given, SubWCRev will exit with ERRORLEVEL 8 if the working copy contains mixed revisions. This may be used to prevent building with a partially updated working copy. |
| -d | If this switch is given, SubWCRev will exit with ERRORLEVEL 9 if the destination file already exists. |
| -f | Jika saklar ini diberikan, SubWCRev akan menyertakan revisi folder yang terakhir-diubah. Tindakan standar adalah menggunakan hanya file saat mendapatkan angka revisi. |
| -e | If this switch is given, SubWCRev will examine directories which are included with svn:externals, but only if they are from the same repository. The default behaviour is to ignore externals. |
| -E | If this switch is given, same as -e, but it ignores the externals with explicit revisions, when the revision range inside of them is only the given explicit revision in the properties. So it doesn't lead to mixed revisions. |
| -x | If this switch is given, SubWCRev will output the revision numbers in HEX. |
| -X | If this switch is given, SubWCRev will output the revision numbers in HEX, with '0X' prepended. |
| -F | If this switch is given, SubWCRev will ignore any .subwcrevignore files and include all files. |
| -q | If this switch is given, SubWCRev will perform the keyword substitution without showing working copy status on stdout. |
If there is no error, SubWCRev returns zero. But in case an error occurs, the error message is written to stderr and shown in the console. And the returned error codes are:
Tabel 6.2. List of SubWCRev error codes
| Error Code | Deskripsi |
|---|---|
| 1 | Syntax error. One or more command line parameters are invalid. |
| 2 | The file or folder specified on the command line was not found. |
| 3 | The input file could not be opened, or the target file could not be created. |
| 4 | Could not allocate memory. This could happen if e.g. the source file is too big. |
| 5 | The source file can not be scanned properly. |
| 6 | SVN error: Subversion returned with an error when SubWCRev tried to find the information from the working copy. |
| 7 | The working copy has local modifications. This requires the -n switch. |
| 8 | The working copy has mixed revisions. This requires the -m switch. |
| 9 | The output file already exists. This requires the -d switch. |
| 10 | The specified path is not a working copy or part or one. |
| 11 | The working copy has unversioned files or folders in it. This requires the -N switch. |
Jika file sumber dan tujuan disediakan, SubWCRev mengcopy sumber ke tujuan, memperlihatkan penggantian kata kunci sebagai berikut:
Tabel 6.3. List of available keywords
| Kata Kunci | Deskripsi |
|---|---|
| $WCREV$ | Diganti dengan revisi komit tertinggi dalam copy pekerjaan. |
| $WCREV&$ | Replaced with the highest commit revision in the working copy, ANDed with the value after the & char. For example: $WCREV&0xFFFF$ |
| $WCREV-$, $WCREV+$ | Replaced with the highest commit revision in the working copy, with the value after the + or - char added or subtracted. For example: $WCREV-1000$ |
| $WCDATE$, $WCDATEUTC$ | Replaced with the commit date/time of the highest commit revision. By default, international format is used: yyyy-mm-dd hh:mm:ss. Alternatively, you can specify a custom format which will be used with strftime(), for example: $WCDATE=%a %b %d %I:%M:%S %p$. For a list of available formatting characters, look at the online reference. |
| $WCNOW$, $WCNOWUTC$ | Replaced with the current system date/time. This can be used to indicate the build time. Time formatting can be used as described for $WCDATE$. |
| $WCRANGE$ | Replaced with the update revision range in the working copy. If the working copy is in a consistent state, this will be a single revision. If the working copy contains mixed revisions, either due to being out of date, or due to a deliberate update-to-revision, then the range will be shown in the form 100:200. |
| $WCMIXED$ | $WCMIXED?TText:FText$ is replaced with TText if there are mixed update revisions, or FText if not. |
| $WCMODS$ | $WCMODS?TText:FText$ is replaced with TText if there are local modifications, or FText if not. |
| $WCUNVER$ | $WCUNVER?TText:FText$ is replaced with TText if there are unversioned items in the working copy, or FText if not. |
| $WCEXTALLFIXED$ | $WCEXTALLFIXED?TText:FText$ is replaced with TText if all externals are fixed to an explicit revision, or FText if not. |
| $WCISTAGGED$ | $WCISTAGGED?TText:FText$ is replaced with TText if the repository URL contains the tags classification pattern, or FText if not. |
| $WCURL$ | Diganti dengan URL repositori path copy pekerjaan dioper ke SubWCRev. |
| $WCINSVN$ | $WCINSVN?TText:FText$ is replaced with TText if the entry is versioned, or FText if not. |
| $WCNEEDSLOCK$ | $WCNEEDSLOCK?TText:FText$ is replaced with TText if the entry has the svn:needs-lock property set, or FText if not. |
| $WCISLOCKED$ | $WCISLOCKED?TText:FText$ is replaced with TText if the entry is locked, or FText if not. |
| $WCLOCKDATE$, $WCLOCKDATEUTC$ | Replaced with the lock date. Time formatting can be used as described for $WCDATE$. |
| $WCLOCKOWNER$ | Replaced with the name of the lock owner. |
| $WCLOCKCOMMENT$ | Replaced with the comment of the lock. |
| $WCUNVER$ | $WCUNVER?TText:FText$ is replaced with TText if there are unversioned files or folders in the working copy, or FText if not. |
SubWCRev does not directly support nesting of expressions, so for example you cannot use an expression like:
#define SVN_REVISION "$WCMIXED?$WCRANGE$:$WCREV$$"
But you can usually work around it by other means, for example:
#define SVN_RANGE       $WCRANGE$
#define SVN_REV         $WCREV$
#define SVN_REVISION    "$WCMIXED?SVN_RANGE:SVN_REV$"
Tip
Some of these keywords apply to single files rather than to an entire working copy, so it only makes sense to use these when SubWCRev is called to scan a single file. This applies to $WCINSVN$, $WCNEEDSLOCK$, $WCISLOCKED$, $WCLOCKDATE$, $WCLOCKOWNER$ and $WCLOCKCOMMENT$.
Contoh dibawah memperlihatkan bagaimana kata kunci dalam file template diganti dalam file output.
// Test file for SubWCRev

char *Revision      = "$WCREV$";
char *Revision16    = "$WCREV&0xFF$";
char *Revisionp100  = "$WCREV+100$";
char *Revisionm100  = "$WCREV-100$";
char *Modified      = "$WCMODS?Modified:Not modified$";
char *Unversioned   = "$WCUNVER?Unversioned items found:no unversioned items$";
char *Date          = "$WCDATE$";
char *CustDate      = "$WCDATE=%a, %d %B %Y$";
char *DateUTC       = "$WCDATEUTC$";
char *CustDateUTC   = "$WCDATEUTC=%a, %d %B %Y$";
char *TimeNow       = "$WCNOW$";
char *TimeNowUTC    = "$WCNOWUTC$";
char *RevRange      = "$WCRANGE$";
char *Mixed         = "$WCMIXED?Mixed revision WC:Not mixed$";
char *ExtAllFixed   = "$WCEXTALLFIXED?All externals fixed:Not all externals fixed$";
char *IsTagged      = "$WCISTAGGED?Tagged:Not tagged$";
char *URL           = "$WCURL$";
char *isInSVN       = "$WCINSVN?versioned:not versioned$";
char *needslck      = "$WCNEEDSLOCK?TRUE:FALSE$";
char *islocked      = "$WCISLOCKED?locked:not locked$";
char *lockdateutc   = "$WCLOCKDATEUTC$";
char *lockdate      = "$WCLOCKDATE$";
char *lockcustutc   = "$WCLOCKDATEUTC=%a, %d %B %Y$";
char *lockcust      = "$WCLOCKDATE=%a, %d %B %Y$";
char *lockown       = "$WCLOCKOWNER$";
char *lockcmt       = "$WCLOCKCOMMENT$";

#if $WCMODS?1:0$
#error Source is modified
#endif

// End of file
After running SubWCRev.exe path\to\workingcopy testfile.tmpl testfile.txt, the output file testfile.txt would looks like this:
// Test file for SubWCRev

char *Revision      = "22837";
char *Revision16    = "53";
char *Revisionp100  = "22937";
char *Revisionm100  = "22737";
char *Modified      = "Modified";
char *Unversioned   = "no unversioned items";
char *Date          = "2012/04/26 18:47:57";
char *CustDate      = "Thu, 26 April 2012";
char *DateUTC       = "2012/04/26 16:47:57";
char *CustDateUTC   = "Thu, 26 April 2012";
char *TimeNow       = "2012/04/26 20:51:17";
char *TimeNowUTC    = "2012/04/26 18:51:17";
char *RevRange      = "22836:22837";
char *Mixed         = "Mixed revision WC";
char *ExtAllFixed   = "All externals fixed";
char *IsTagged      = "Not tagged";
char *URL           = "https://svn.code.sf.net/p/tortoisesvn/code/trunk";
char *isInSVN       = "versioned";
char *needslck      = "FALSE";
char *islocked      = "not locked";
char *lockdateutc   = "1970/01/01 00:00:00";
char *lockdate      = "1970/01/01 01:00:00";
char *lockcustutc   = "Thu, 01 January 1970";
char *lockcust      = "Thu, 01 January 1970";
char *lockown       = "";
char *lockcmt       = "";

#if 1
#error Source is modified
#endif

// End of file
Tip
A file like this will be included in the build so you would expect it to be versioned. Be sure to version the template file, not the generated file, otherwise each time you regenerate the version file you need to commit the change, which in turn means the version file needs to be updated.
If you need to access Subversion revision information from other programs, you can use the COM interface of SubWCRev. The object to create is SubWCRev.object, and the following methods are supported:
Tabel 6.4. COM/automation methods supported
| Method | Deskripsi |
|---|---|
| .GetWCInfo | This method traverses the working copy gathering the revision information. Naturally you must call this before you can access the information using the remaining methods. The first parameter is the path. The second parameter should be true if you want to include folder revisions. Equivalent to the -f command line switch. The third parameter should be true if you want to include svn:externals. Equivalent to the -e command line switch. |
| .GetWCInfo2 | The same as GetWCInfo() but with a fourth parameter that sets the equivalent to the -E command line switch. |
| .Revision | The highest commit revision in the working copy. Equivalent to $WCREV$. |
| .Date | The commit date/time of the highest commit revision. Equivalent to $WCDATE$. |
| .Author | The author of the highest commit revision, that is, the last person to commit changes to the working copy. |
| .MinRev | The minimum update revision, as shown in $WCRANGE$ |
| .MaxRev | The maximum update revision, as shown in $WCRANGE$ |
| .HasModifications | True if there are local modifications |
| .HasUnversioned | True if there are unversioned items |
| .Url | Replaced with the repository URL of the working copy path used in GetWCInfo. Equivalent to $WCURL$. |
| .IsSvnItem | True if the item is versioned. |
| .NeedsLocking | True if the item has the svn:needs-lock property set. |
| .IsLocked | True if the item is locked. |
| .LockCreationDate | String representing the date when the lock was created, or an empty string if the item is not locked. |
| .LockOwner | String representing the lock owner, or an empty string if the item is not locked. |
| .LockComment | The message entered when the lock was created. |
The following example shows how the interface might be used.
// testCOM.js - javascript file
// test script for the SubWCRev COM/Automation-object

filesystem = new ActiveXObject("Scripting.FileSystemObject");

revObject1 = new ActiveXObject("SubWCRev.object");
revObject2 = new ActiveXObject("SubWCRev.object");
revObject3 = new ActiveXObject("SubWCRev.object");
revObject4 = new ActiveXObject("SubWCRev.object");

revObject1.GetWCInfo(
    filesystem.GetAbsolutePathName("."), 1, 1);
revObject2.GetWCInfo(
    filesystem.GetAbsolutePathName(".."), 1, 1);
revObject3.GetWCInfo(
    filesystem.GetAbsolutePathName("SubWCRev.cpp"), 1, 1);
revObject4.GetWCInfo2(
    filesystem.GetAbsolutePathName("..\\.."), 1, 1, 1);

wcInfoString1 = "Revision = " + revObject1.Revision +
                "\nMin Revision = " + revObject1.MinRev +
                "\nMax Revision = " + revObject1.MaxRev +
                "\nDate = " + revObject1.Date +
                "\nURL = " + revObject1.Url + "\nAuthor = " +
                revObject1.Author + "\nHasMods = " +
                revObject1.HasModifications + "\nIsSvnItem = " +
                revObject1.IsSvnItem + "\nNeedsLocking = " +
                revObject1.NeedsLocking + "\nIsLocked = " +
                revObject1.IsLocked + "\nLockCreationDate = " +
                revObject1.LockCreationDate + "\nLockOwner = " +
                revObject1.LockOwner + "\nLockComment = " +
                revObject1.LockComment;
wcInfoString2 = "Revision = " + revObject2.Revision +
                "\nMin Revision = " + revObject2.MinRev +
                "\nMax Revision = " + revObject2.MaxRev +
                "\nDate = " + revObject2.Date +
                "\nURL = " + revObject2.Url + "\nAuthor = " +
                revObject2.Author + "\nHasMods = " +
                revObject2.HasModifications + "\nIsSvnItem = " +
                revObject2.IsSvnItem + "\nNeedsLocking = " +
                revObject2.NeedsLocking + "\nIsLocked = " +
                revObject2.IsLocked + "\nLockCreationDate = " +
                revObject2.LockCreationDate + "\nLockOwner = " +
                revObject2.LockOwner + "\nLockComment = " +
                revObject2.LockComment;
wcInfoString3 = "Revision = " + revObject3.Revision +
                "\nMin Revision = " + revObject3.MinRev +
                "\nMax Revision = " + revObject3.MaxRev +
                "\nDate = " + revObject3.Date +
                "\nURL = " + revObject3.Url + "\nAuthor = " +
                revObject3.Author + "\nHasMods = " +
                revObject3.HasModifications + "\nIsSvnItem = " +
                revObject3.IsSvnItem + "\nNeedsLocking = " +
                revObject3.NeedsLocking + "\nIsLocked = " +
                revObject3.IsLocked + "\nLockCreationDate = " +
                revObject3.LockCreationDate + "\nLockOwner = " +
                revObject3.LockOwner + "\nLockComment = " +
                revObject3.LockComment;
wcInfoString4 = "Revision = " + revObject4.Revision +
                "\nMin Revision = " + revObject4.MinRev +
                "\nMax Revision = " + revObject4.MaxRev +
                "\nDate = " + revObject4.Date +
                "\nURL = " + revObject4.Url + "\nAuthor = " +
                revObject4.Author + "\nHasMods = " +
                revObject4.HasModifications + "\nIsSvnItem = " +
                revObject4.IsSvnItem + "\nNeedsLocking = " +
                revObject4.NeedsLocking + "\nIsLocked = " +
                revObject4.IsLocked + "\nLockCreationDate = " +
                revObject4.LockCreationDate + "\nLockOwner = " +
                revObject4.LockOwner + "\nLockComment = " +
                revObject4.LockComment;

WScript.Echo(wcInfoString1);
WScript.Echo(wcInfoString2);
WScript.Echo(wcInfoString3);
WScript.Echo(wcInfoString4);
The following listing is an example on how to use the SubWCRev COM object from C#:
using LibSubWCRev;
SubWCRev sub = new SubWCRev();
sub.GetWCInfo("C:\\PathToMyFile\\MyFile.cc", true, true);
if (sub.IsSvnItem == true)
{
    MessageBox.Show("versioned");
}
else
{
    MessageBox.Show("not versioned");
}
To get a tighter integration with issue trackers than by simply using the bugtraq: properties, TortoiseSVN can make use of COM plugins. With such plugins it is possible to fetch information directly from the issue tracker, interact with the user and provide information back to TortoiseSVN about open issues, verify log messages entered by the user and even run actions after a successful commit to e.g, close an issue.
We can't provide information and tutorials on how you have to implement a COM object in your preferred programming language, but we have example plugins in C++/ATL and C# in our repository in the contrib/issue-tracker-plugins folder. In that folder you can also find the required include files you need to build your plugin. (bagian bernama “lisensi” explains how to access the repository.)
Penting
You should provide both a 32-bit and 64-bit version of your plugin. Because the x64-Version of TortoiseSVN can not use a 32-bit plugin and vice-versa.
If you release an issue tracker plugin for TortoiseSVN, please do not name it Tortoise<Something>. We'd like to reserve the Tortoise prefix for a version control client integrated into the windows shell. For example: TortoiseCVS, TortoiseSVN, TortoiseHg, TortoiseGit and TortoiseBzr are all version control clients.
Please name your plugin for a Tortoise client Turtle<Something>, where <Something> refers to the issue tracker that you are connecting to. Alternatively choose a name that sounds like Turtle but has a different first letter. Nice examples are:
Gurtle - An issue tracker plugin for Google code
TurtleMine - An issue tracker plugin for Redmine
VurtleOne - An issue tracker plugin for VersionOne
TortoiseSVN 1.5 and later can use plugins which implement the IBugtraqProvider interface. The interface provides a few methods which plugins can use to interact with the issue tracker.
HRESULT ValidateParameters (
  // Parent window for any UI that needs to be
  // displayed during validation.
  [in] HWND hParentWnd,

  // The parameter string that needs to be validated.
  [in] BSTR parameters,

  // Is the string valid?
  [out, retval] VARIANT_BOOL *valid
);
This method is called from the settings dialog where the user can add and configure the plugin. The parameters string can be used by a plugin to get additional required information, e.g., the URL to the issue tracker, login information, etc. The plugin should verify the parameters string and show an error dialog if the string is not valid. The hParentWnd parameter should be used for any dialog the plugin shows as the parent window. The plugin must return TRUE if the validation of the parameters string is successful. If the plugin returns FALSE, the settings dialog won't allow the user to add the plugin to a working copy path.
HRESULT GetLinkText (
  // Parent window for any (error) UI that needs to be displayed.
  [in] HWND hParentWnd,

  // The parameter string, just in case you need to talk to your
  // web service (e.g.) to find out what the correct text is.
  [in] BSTR parameters,

  // What text do you want to display?
  // Use the current thread locale.
  [out, retval] BSTR *linkText
);
The plugin can provide a string here which is used in the TortoiseSVN commit dialog for the button which invokes the plugin, e.g., "Choose issue" or "Select ticket". Make sure the string is not too long, otherwise it might not fit into the button. If the method returns an error (e.g., E_NOTIMPL), a default text is used for the button.
HRESULT GetCommitMessage (
  // Parent window for your provider's UI.
  [in] HWND hParentWnd,

  // Parameters for your provider.
  [in] BSTR parameters,
  [in] BSTR commonRoot,
  [in] SAFEARRAY(BSTR) pathList,

  // The text already present in the commit message.
  // Your provider should include this text in the new message,
  // where appropriate.
  [in] BSTR originalMessage,

  // The new text for the commit message.
  // This replaces the original message.
  [out, retval] BSTR *newMessage
);
This is the main method of the plugin. This method is called from the TortoiseSVN commit dialog when the user clicks on the plugin button.
The parameters string is the string the user has to enter in the settings dialog when he configures the plugin. Usually a plugin would use this to find the URL of the issue tracker and/or login information or more.
The commonRoot string contains the parent path of all items selected to bring up the commit dialog. Note that this is not the root path of all items which the user has selected in the commit dialog. For the branch/tag dialog, this is the path which is to be copied.
The pathList parameter contains an array of paths (as strings) which the user has selected for the commit.
The originalMessage parameter contains the text entered in the log message box in the commit dialog. If the user has not yet entered any text, this string will be empty.
The newMessage return string is copied into the log message edit box in the commit dialog, replacing whatever is already there. If a plugin does not modify the originalMessage string, it must return the same string again here, otherwise any text the user has entered will be lost.
In TortoiseSVN 1.6 a new interface was added which provides more functionality for plugins. This IBugtraqProvider2 interface inherits from IBugtraqProvider.
HRESULT GetCommitMessage2 (
  // Parent window for your provider's UI.
  [in] HWND hParentWnd,

  // Parameters for your provider.
  [in] BSTR parameters,
  // The common URL of the commit
  [in] BSTR commonURL,
  [in] BSTR commonRoot,
  [in] SAFEARRAY(BSTR) pathList,

  // The text already present in the commit message.
  // Your provider should include this text in the new message,
  // where appropriate.
  [in] BSTR originalMessage,

  // You can assign custom revision properties to a commit
  // by setting the next two params.
  // note: Both safearrays must be of the same length.
  //       For every property name there must be a property value!

  // The content of the bugID field (if shown)
  [in] BSTR bugID,

  // Modified content of the bugID field
  [out] BSTR * bugIDOut,

  // The list of revision property names.
  [out] SAFEARRAY(BSTR) * revPropNames,

  // The list of revision property values.
  [out] SAFEARRAY(BSTR) * revPropValues,

  // The new text for the commit message.
  // This replaces the original message
  [out, retval] BSTR * newMessage
);
This method is called from the TortoiseSVN commit dialog when the user clicks on the plugin button. This method is called instead of GetCommitMessage(). Please refer to the documentation for GetCommitMessage for the parameters that are also used there.
The parameter commonURL is the parent URL of all items selected to bring up the commit dialog. This is basically the URL of the commonRoot path.
The parameter bugID contains the content of the bug-ID field (if it is shown, configured with the property bugtraq:message).
The return parameter bugIDOut is used to fill the bug-ID field when the method returns.
The revPropNames and revPropValues return parameters can contain name/value pairs for revision properties that the commit should set. A plugin must make sure that both arrays have the same size on return! Each property name in revPropNames must also have a corresponding value in revPropValues. If no revision properties are to be set, the plugin must return empty arrays.
HRESULT CheckCommit (
  [in] HWND hParentWnd,
  [in] BSTR parameters,
  [in] BSTR commonURL,
  [in] BSTR commonRoot,
  [in] SAFEARRAY(BSTR) pathList,
  [in] BSTR commitMessage,
  [out, retval] BSTR * errorMessage
);
This method is called right before the commit dialog is closed and the commit begins. A plugin can use this method to validate the selected files/folders for the commit and/or the commit message entered by the user. The parameters are the same as for GetCommitMessage2(), with the difference that commonURL is now the common URL of all checked items, and commonRoot the root path of all checked items.
For the branch/tag dialog, the commonURL is the source URL of the copy, and commonRoot is set to the target URL of the copy.
The return parameter errorMessage must either contain an error message which TortoiseSVN shows to the user or be empty for the commit to start. If an error message is returned, TortoiseSVN shows the error string in a dialog and keeps the commit dialog open so the user can correct whatever is wrong. A plugin should therefore return an error string which informs the user what is wrong and how to correct it.
HRESULT  OnCommitFinished (
  // Parent window for any (error) UI that needs to be displayed.
  [in] HWND hParentWnd,

  // The common root of all paths that got committed.
  [in] BSTR commonRoot,

  // All the paths that got committed.
  [in] SAFEARRAY(BSTR) pathList,


  // The text already present in the commit message.
  [in] BSTR logMessage,

  // The revision of the commit.
  [in] ULONG revision,


  // An error to show to the user if this function
  // returns something else than S_OK
  [out, retval] BSTR * error
);
This method is called after a successful commit. A plugin can use this method to e.g., close the selected issue or add information about the commit to the issue. The parameters are the same as for GetCommitMessage2.
HRESULT HasOptions(
  // Whether the provider provides options
  [out, retval] VARIANT_BOOL *ret
);
This method is called from the settings dialog where the user can configure the plugins. If a plugin provides its own configuration dialog with ShowOptionsDialog, it must return TRUE here, otherwise it must return FALSE.
HRESULT ShowOptionsDialog(
  // Parent window for the options dialog
  [in] HWND hParentWnd,

  // Parameters for your provider.
  [in] BSTR parameters,

  // The parameters string
  [out, retval] BSTR * newparameters
);
This method is called from the settings dialog when the user clicks on the "Options" button that is shown if HasOptions returns TRUE. A plugin can show an options dialog to make it easier for the user to configure the plugin.
The parameters string contains the plugin parameters string that is already set/entered.
The newparameters return parameter must contain the parameters string which the plugin constructed from the info it gathered in its options dialog. That paramameters string is passed to all other IBugtraqProvider and IBugtraqProvider2 methods.
Because TortoiseSVN is being developed all the time it is sometimes hard to keep the documentation completely up to date. We maintain an online FAQ which contains a selection of the questions we are asked the most on the TortoiseSVN mailing lists https://groups.google.com/forum/#!forum/tortoisesvn and https://groups.google.com/forum/#!forum/tortoisesvn-dev
If you have a question which is not answered anywhere else, the best place to ask it is on one of the mailing lists:
https://groups.google.com/forum/#!forum/tortoisesvn is the one to use if you have questions about using TortoiseSVN.
If you want to help out with the development of TortoiseSVN, then you should take part in discussions on https://groups.google.com/forum/#!forum/tortoisesvn-dev
Daftar Isi
- Memindahkan/copy banyak file sekaligus
- Memaksa pengguna untuk memasukan log pesan
- Mutahirkan file dari repositori
- Roll back (Undo) revisions in the repository
- Compare two revisions of a file or folder
- Sertakan sub-proyek umum
- Membuat jalan pintas ke repositori
- Abaikan file yang sudah diversi
- Unversion a working copy
- Remove a working copy
Apendiks ini berisi solusi terhadap masalah/pertanyaan yang mungkin Anda punyai saat menggunakan TortoiseSVN.
Memindahkan/Mengcopy satu file bisa dilakukan dengan menggunakan → . Tapi jika Anda ingin memindahkan/mengcopy banyak file, cara ini terlalu lambat dan terlalu banyak pekerjaan.
The recommended way is by right dragging the files to the new location. Simply right click on the files you want to move/copy without releasing the mouse button. Then drag the files to the new location and release the mouse button. A context menu will appear where you can either choose → . or → .

Ada dua cara untuk menjaga pengguna dari mengkomit dengan pesan log kosong. Pertama adalah spesifik bagi TortoiseSVN, yang lain bekerja untuk semua klien Subversion, tapi memerlukan akses ke server secara langsung.
Jika Anda mempunyai akses langsung ke server repositori, Anda bisas menginstalasi naskah hook pre-commit yang menolak semua komit dengan pesan log kosong atau terlalu pendek.
In the repository folder on the server, there's a sub-folder hooks which contains some example hook scripts you can use. The file pre-commit.tmpl contains a sample script which will reject commits if no log message is supplied, or the message is too short. The file also contains comments on how to install/use this script. Just follow the instructions in that file.
Metode ini adalah cara yang direkomendasikan jika pengguna Anda juga menggunakan klien Subversion lain daripada TortoiseSVN. Akibatnya adalah komit ditolak oleh server dan karenanya pengguna akan mendapatkan pesan kesalahan, Klien tidak bisa mengetahui sebelum komit yang akan ditolak. Jika Anda ingin membuat TortoiseSVN mempunyai tombol dimatikan sampai pesan log cukup panjang lalu silahkan gunakan metode yang dijelaskan di atas.
TortoiseSVN menggunakan properti untuk mengontrol beberapa fiturnya. Salah satu dari properti itu adalah properti tsvn:logminsize.
Jika Anda mengeset properti itu pada folder, maka TortoiseSVN akan mematikan tombol dalam semua dialog komit sampai pengguna telah memasukan pesan log dengan setidaknya panjang yang ditetapkan dalam properti.
For detailed information on those project properties, please refer to bagian bernama “Seting Proyek”.
Biasanya Anda memutahirkan copy pekerjaan Anda menggunakan → . Tapi jika Anda hanya ingin mengambil beberapa file baru yang telah ditambahkan kolega tanpa menggabung dalam setiap perubahan ke file lain pada saat yang sama, Anda membutuhkan pendekatan berbeda.
Gunakan → . dan klik untuk melihat apa yang berubah dalam repositori. Pilih file yang ingin Anda mutahirkan secara lokal, lalu gunakan menu konteks untuk memutahirkan hanya file itu.
By far the easiest way to revert the changes from one or more revisions, is to use the revision log dialog.
Pilih file atau folder yang ingin Anda pulihkan perubahannya. Jika Anda ingin memulihkan semua perubahan, ini haruslah folder tingkat atas.
Select → to display a list of revisions. You may need to use or to show the revision(s) you are interested in.
Select the revision you wish to revert. If you want to undo a range of revisions, select the first one and hold the Shift key while selecting the last one. If you want to pick out individual revisions and ranges, use the Ctrl key while selecting revisions. Right click on the selected revision(s), then select → .
Or if you want to make an earlier revision the new HEAD revision, right click on the selected revision, then select → . This will discard all changes after the selected revision.
Anda telah memulihkan perubahan di dalam copy pekerjaan Anda. Periksa hasil, lalu komit perubahan.
If you want to enter revision numbers as a list, you can use the Merge dialog. The previous method uses merging behind the scenes; this method uses it explicitly.
Dalam copy pekerjaan Anda pilih → .
In the Merge Type dialog select Merge a range of revisions.
In the From: field enter the full repository URL of your working copy folder. This should come up as the default URL.
In the Revision range to merge field enter the list of revisions to roll back (or use the log dialog to select them as described above).
Make sure the Reverse merge checkbox is checked.
In the Merge options dialog accept the defaults.
Click to complete the merge.
You have reverted the changes within your working copy. Check that the results are as expected, then commit the changes.
Karena TortoiseSVN tidak pernah kehilangan data, revisi yang “di-roll back” masih ada sebagai revisi langsung dalam repositori. Hanya revisi HEAD yang diubah ke keadaan sebelumnya. Jika Anda ingin membuat revisi hilang selamanya dari repositori Anda, menghapus semua jejak yang pernah ada, Anda harus menggunakan cara yang lebih ekstrim. Kecuali benar-benar ada alasan baik untuk melakukan ini, ini tidak direkomendasikan. Satu kemungkinan alasan bila seseorang mengkomit dokumen rahasia ke repositori umum.
The only way to remove data from the repository is to use the Subversion command line tool svnadmin. You can find a description of how this works in the Repository Maintenance.
If you want to compare two revisions in an item's history, for example revisions 100 and 200 of the same file, just use → to list the revision history for that file. Pick the two revisions you want to compare then use → .
If you want to compare the same item in two different trees, for example the trunk and a branch, you can use the repository browser to open up both trees, select the file in both places, then use → .
If you want to compare two trees to see what has changed, for example the trunk and a tagged release, you can use → Select the two nodes to compare, then use → . This will show a list of changed files, and you can then select individual files to view the changes in detail. You can also export a tree structure containing all the changed files, or simply a list of all changed files. Read bagian bernama “Membandingkan Folder” for more information. Alternatively use → to see a summary of all differences, with minimal context.
Sometimes you will want to include another project within your working copy, perhaps some library code. There are at least 4 ways of dealing with this.
Set the svn:externals property for a folder in your project. This property consists of one or more lines; each line has the name of a sub-folder which you want to use as the checkout folder for common code, and the repository URL that you want to be checked out there. For full details refer to bagian bernama “External Items”.
Commit the new folder. Now when you update, Subversion will pull a copy of that project from its repository into your working copy. The sub-folders will be created automatically if required. Each time you update your main working copy, you will also receive the latest version of all external projects.
If the external project is in the same repository, any changes you make there will be included in the commit list when you commit your main project.
If the external project is in a different repository, any changes you make to the external project will be shown or indicated when you commit the main project, but you have to commit those external changes separately.
Of the three methods described, this is the only one which needs no setup on the client side. Once externals are specified in the folder properties, all clients will get populated folders when they update.
Create a new folder within your project to contain the common code, but do not add it to Subversion.
Pilih → untuk folder baru dan checkout copy dari kode umum kedalamnya. Anda sekarang mempunyai copy pekerjaan terpisah berulang dalam copy pekerjaan utama Anda.
Dua copy pekerjaan independen. Ketika Anda mengkomit perubahan ke leluhurnya, perubahak ke WC berulang diabaikan. Demikian juga ketika Anda memutahirkan leluhurnya, WC berulang tidak dimutahirkan.
If you use the same common core code in several projects, and you do not want to keep multiple working copies of it for every project that uses it, you can just check it out to a separate location which is related to all the other projects which use it. For example:
C:\Projects\Proj1
C:\Projects\Proj2
C:\Projects\Proj3
C:\Projects\Common
and refer to the common code using a relative path, e.g. ..\..\Common\DSPcore.
If your projects are scattered in unrelated locations you can use a variant of this, which is to put the common code in one location and use drive letter substitution to map that location to something you can hard code in your projects, e.g. Checkout the common code to D:\Documents\Framework or C:\Documents and Settings\{login}\My Documents\framework then use
SUBST X: "D:\Documents\framework"
to create the drive mapping used in your source code. Your code can then use absolute locations.
#include "X:\superio\superio.h"
Metode ini hanya akan bekerja dalam semua lingkungan PC, dan Anda perlu mendokumentasi pemetaan drive yang dibutuhkan agar tim Anda mengetahui dimana file misterius ini berada. Metode ini langsung untuk digunakan dalam lingkungan pengembangan tertutup dan tidak direkomendasikan untuk penggunaan umum.
The maybe easiest way is to simply add the project in a subfolder to your own project working copy. However this has the disadvantage that you have to update and upgrade this external project manually.
To help with the upgrade, TortoiseSVN provides a command in the explorer right-drag context menu. Simply right-drag the folder where you unzipped the new version of the external library to the folder in your working copy, and then select → . This will then copy the new files over to the target folder while automatically adding new files and removing files that aren't in the new version anymore.
If you frequently need to open the repository browser at a particular location, you can create a desktop shortcut using the automation interface to TortoiseProc. Just create a new shortcut and set the target to:
TortoiseProc.exe /command:repobrowser /path:"url/to/repository"
Of course you need to include the real repository URL.
Jika Anda secara tidak sengaja menambah beberapa file yang seharusnya diabaikan, bagaimana Anda mendapatkan dari kontrol versi tanpa kehilangannya? Mungkin Anda mempunyai file konfigurasi IDE Anda sendiri yang bukan bagian dari proyek, tapi memakan waktu lama untuk menyiapkan seperti yang Anda sukai.
If you have not yet committed the add, then all you have to do is use → to undo the add. You should then add the file(s) to the ignore list so they don't get added again later by mistake.
If the files are already in the repository, they have to be deleted from the repository and added to the ignore list. Fortunately TortoiseSVN has a convenient shortcut for doing this. → will first mark the file/folder for deletion from the repository, keeping the local copy. It also adds this item to the ignore list so that it will not be added back into Subversion again by mistake. Once this is done you just need to commit the parent folder.
If you have a working copy which you want to convert back to a plain folder tree without the .svn directory, you can simply export it to itself. Read bagian bernama “Removing a working copy from version control” to find out how.
If you have a working copy which you no longer need, how do you get rid of it cleanly? Easy - just delete it in Windows Explorer! Working copies are private local entities, and they are self-contained. Deleting a working copy in Windows Explorer does not affect the data in the repository at all.
Daftar Isi
Apendiks ini berisi solusi terhadap masalah/pertanyaan yang mungkin Anda punyai saat Anda Anda bertanggung jawab mendistribusikan TortoiseSVN ke multipel komputer klien.
The TortoiseSVN installer comes as an MSI file, which means you should have no problems adding that MSI file to the group policies of your domain controller.
A good walk-through on how to do that can be found in the knowledge base article 314934 from Microsoft: http://support.microsoft.com/?kbid=314934.
TortoiseSVN must be installed under Computer Configuration and not under User Configuration. This is because TortoiseSVN needs the CRT and MFC DLLs, which can only be deployed per computer and not per user. If you really must install TortoiseSVN on a per user basis, then you must first install the MFC and CRT package version 12 from Microsoft on each computer you want to install TortoiseSVN as per user.
You can customize the MSI file if you wish so that all your users end up with the same settings. TSVN settings are stored in the registry under HKEY_CURRENT_USER\Software\TortoiseSVN and general Subversion settings (which affect all Subversion clients) are stored in config files under %APPDATA%\Subversion. If you need help with MSI customization, try one of the MSI transform forums or search the web for “MSI transform”.
TortoiseSVN checks if there's a new version available every few days. If there is a newer version available, a notification is shown in the commit dialog.
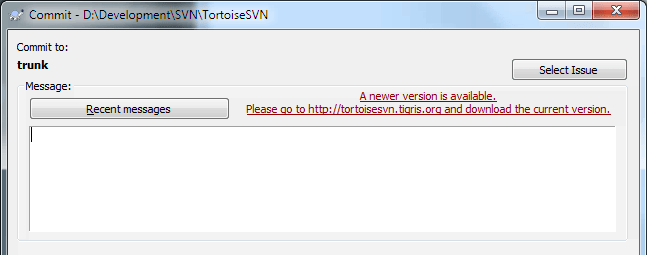
If you're responsible for a lot of users in your domain, you might want your users to use only versions you have approved and not have them install always the latest version. You probably don't want that upgrade notification to show up so your users don't go and upgrade immediately.
Versions 1.4.0 and later of TortoiseSVN allow you to redirect that upgrade check to your intranet server. You can set the registry key HKCU\Software\TortoiseSVN\UpdateCheckURL (string value) to an URL pointing to a text file in your intranet. That text file must have the following format:
1.9.1.6000
A new version of TortoiseSVN is available for you to download!
http://192.168.2.1/downloads/TortoiseSVN-1.9.1.6000-svn-1.9.1.msi
The first line in that file is the version string. You must make sure that it matches the exact version string of the TortoiseSVN installation package. The second line is a custom text, shown in the commit dialog. You can write there whatever you want. Just note that the space in the commit dialog is limited. Too long messages will get truncated! The third line is the URL to the new installation package. This URL is opened when the user clicks on the custom message label in the commit dialog. You can also just point the user to a web page instead of the MSI file directly. The URL is opened with the default web browser, so if you specify a web page, that page is opened and shown to the user. If you specify the MSI package, the browser will ask the user to save the MSI file locally.
As of version 1.4.0 and later, the TortoiseSVN installer doesn't provide the user with the option to set the SVN_ASP_DOT_NET_HACK environment variable anymore, since that caused many problems and confusion for users who always install everything no matter whether they know what it is for.
But the feature is still available in TortoiseSVN and other svn clients. To enable it you have to set the Windows environment variable named ASPDOTNETHACK to 1. Actually, the value of that environment variable doesn't matter: if the variable exists the feature is active.
Penting
Please note that this hack is only necessary if you're still using VS.NET2002. All later versions of Visual Studio do not require this hack to be activated! So unless you're using that ancient tool, DO NOT USE THIS!
As of version 1.5.0 and later, TortoiseSVN allows you to disable (actually, hide) context menu entries. Since this is a feature which should not be used lightly but only if there is a compelling reason, there is no GUI for this and it has to be done directly in the registry. This can be used to disable certain commands for users who should not use them. But please note that only the context menu entries in the explorer are hidden, and the commands are still available through other means, e.g. the command line or even other dialogs in TortoiseSVN itself!
The registry keys which hold the information on which context menus to show are HKEY_CURRENT_USER\Software\TortoiseSVN\ContextMenuEntriesMaskLow and HKEY_CURRENT_USER\Software\TortoiseSVN\ContextMenuEntriesMaskHigh.
Each of these registry entries is a DWORD value, with each bit corresponding to a specific menu entry. A set bit means the corresponding menu entry is deactivated.
Tabel C.1. Menu entries and their values
| Nilai | Menu entry |
|---|---|
| 0x0000000000000001 | Checkout |
| 0x0000000000000002 | Mutahirkan |
| 0x0000000000000004 | Komit |
| 0x0000000000000008 | Tambah |
| 0x0000000000000010 | Pulihkan |
| 0x0000000000000020 | Membersihkan |
| 0x0000000000000040 | Selesaikan |
| 0x0000000000000080 | Saklar |
| 0x0000000000000100 | Impor |
| 0x0000000000000200 | Ekspor |
| 0x0000000000000400 | Buat Repositori Di Sini |
| 0x0000000000000800 | Cabang/Tag |
| 0x0000000000001000 | Gabung |
| 0x0000000000002000 | Hapus |
| 0x0000000000004000 | Ganti nama |
| 0x0000000000008000 | Mutahirkan ke revisi |
| 0x0000000000010000 | Diff |
| 0x0000000000020000 | Tampilkan Log |
| 0x0000000000040000 | Edit Konflik |
| 0x0000000000080000 | Relokasi |
| 0x0000000000100000 | Periksa modifikasi |
| 0x0000000000200000 | Abaikan |
| 0x0000000000400000 | Browser Repositori |
| 0x0000000000800000 | Blame |
| 0x0000000001000000 | Buat Patch |
| 0x0000000002000000 | Terapkan Patch |
| 0x0000000004000000 | Grafik revisi |
| 0x0000000008000000 | Lock (Kunci) |
| 0x0000000010000000 | Lepaskan Kunci |
| 0x0000000020000000 | Properti-Properti |
| 0x0000000040000000 | Diff dengan URL |
| 0x0000000080000000 | Hapus item-item tidak berversi |
| 0x0000000100000000 | Merge All |
| 0x0000000200000000 | Diff with previous version |
| 0x0000000400000000 | Paste |
| 0x0000000800000000 | Upgrade salinan bekerja |
| 0x0000001000000000 | Diff later |
| 0x0000002000000000 | Diff with 'filename' |
| 0x0000004000000000 | Unified diff |
| 0x2000000000000000 | Pengaturan |
| 0x4000000000000000 | Bantuan |
| 0x8000000000000000 | Tentang |
Example: to disable the “Relocate” the “Delete unversioned items” and the “Settings” menu entries, add the values assigned to the entries like this:
0x0000000000080000
+ 0x0000000080000000
+ 0x2000000000000000
= 0x2000000080080000
The lower DWORD value (0x80080000) must then be stored in HKEY_CURRENT_USER\Software\TortoiseSVN\ContextMenuEntriesMaskLow, the higher DWORD value (0x20000000) in HKEY_CURRENT_USER\Software\TortoiseSVN\ContextMenuEntriesMaskHigh.
To enable the menu entries again, simply delete the two registry keys.
Daftar Isi
Karena semua perintah TortoiseSVN dikontrol melalui parameter baris perintah, Anda bisa mengotomasinya dengan naskah batch atau memulai perintah dan dialog tertentu dari program lain (contoh. editor teks favorit Anda).
Penting
Ingat bahwa TortoiseSVN adalah klien GUI, dan petunjuk otomasi ini memperlihatkan kepada Anda bagaimana untuk membuat dialog TortoiseSVN muncul untuk mengumpulkan input pengguna. Jika Anda ingin menulis naskah yang tidak memerlukan input, sebaliknya Anda harus menggunakan klien baris perintah Subversion resmi.
Program GUI TortoiseSVN dipanggil TortoiseProc.exe. Semua perintah ditetapkan dengan parameter /command:abcd dimana abcd adalah nama perintah yang diperlukan. Kebanyakan dari perintah ini membutuhkan setidaknya satu argumen path, yang diberikan dengan /path:"some\path". Dalam tabel berikut perintah merujuk ke parameter /command:abcd dan the path merujuk ke parameter /path:"some\path".
There's a special command that does not require the parameter /command:abcd but, if nothing is specified on the command line, starts the project monitor instead. If /tray is specified, the project monitor starts hidden and only adds its icon to the system tray.
Karena beberapa perintah bisa mengambil daftar path sasaran (contoh, mengkomit beberapa file tertentu) parameter /path bisa mengambil beberapa path, dipisahkan dengan karakter *.
You can also specify a file which contains a list of paths, separated by newlines. The file must be in UTF-16 format, without a BOM. If you pass such a file, use /pathfile instead of /path. To have TortoiseProc delete that file after the command is finished, you can pass the parameter /deletepathfile. If you don't pass /deletepathfile, you have to delete the file yourself or the file gets left behind.
The progress dialog which is used for commits, updates and many more commands usually stays open after the command has finished until the user presses the button. This can be changed by checking the corresponding option in the settings dialog. But using that setting will close the progress dialog, no matter if you start the command from your batch file or from the TortoiseSVN context menu.
To specify a different location of the configuration file, use the parameter /configdir:"path\to\config\directory". This will override the default path, including any registry setting.
To close the progress dialog at the end of a command automatically without using the permanent setting you can pass the /closeonend parameter.
/closeonend:0jangan tutup dialog secara otomatis/closeonend:1otomatis tutup jika tidak ada kesalahan/closeonend:2otomatis tutup jika tidak ada kesalahan dan konflik/closeonend:3otomatis tutup jika tidak ada kesalahan, konflik dan gabungan
To close the progress dialog for local operations if there were no errors or conflicts, pass the /closeforlocal parameter.
Tabel berikut mendaftarkan semua perintah yang bisa diakses menggunakan baris perintah TortoiseProc.exe. Seperti dijelaskan di atas, ini harus digunakan dalam bentuk /command:abcd. Dalam tabel, prefiks /command dihilangkan untuk menghemat ruang.
Tabel D.1. Daftar perintah dan opsi yang tersedia
| Perintah | Deskripsi |
|---|---|
| :about | Shows the about dialog. This is also shown if no command is given. |
| :log |
Opens the log dialog. The
An svn date revision can be in one of the following formats:
|
| :checkout |
Opens the checkout dialog. The If you specify |
| :import | Opens the import dialog. The /path specifies the directory with the data to import. You can also specify the /logmsg switch to pass a predefined log message to the import dialog. Or, if you don't want to pass the log message on the command line, use /logmsgfile:path, where path points to a file containing the log message. |
| :update | Updates the working copy in /path to HEAD. If the option /rev is given then a dialog is shown to ask the user to which revision the update should go. To avoid the dialog specify a revision number /rev:1234. Other options are /nonrecursive, /ignoreexternals and /ignoreexternals. The /stickydepth indicates that the specified depth should be sticky, creating a sparse checkout. The /skipprechecks can be set to skip all checks that are done before an update. If this is specified, then the Show log button is disabled, and the context menu to show diffs is also disabled after the update. |
| :commit | Opens the commit dialog. The /path specifies the target directory or the list of files to commit. You can also specify the /logmsg switch to pass a predefined log message to the commit dialog. Or, if you don't want to pass the log message on the command line, use /logmsgfile:path, where path points to a file containing the log message. To pre-fill the bug ID box (in case you've set up integration with bug trackers properly), you can use the /bugid:"id bug disini" to do that. |
| :add | Menambah file dalam /path ke kontrol versi. |
| :revert | Mengembalikan perubahan lokal dari copy pekerjaan. /path memberitahu item mana yang dikembalikan. |
| :cleanup | Cleans up interrupted or aborted operations and unlocks the working copy in /path. You also have to pass the /cleanup to actually do the cleanup. Use /noui to prevent the result dialog from popping up (either telling about the cleanup being finished or showing an error message). /noprogressui also disables the progress dialog. /nodlg disables showing the cleanup dialog where the user can choose what exactly should be done in the cleanup. The available actions can be specified with the options /cleanup for status cleanup, /breaklocks to break all locks, /revert to revert uncommitted changes, /delunversioned, /delignored, /refreshshell, /externals, /fixtimestamps and /vacuum. |
| :resolve | Menandai file yang konflik yang ditetapkan dalam /path sebagai terselsaikan. Jika /noquestion diberikan, maka penyelesaian dikerjakan tanpa menanyakan pengguna terlebih dulu jika itu benar-benar harus dilakukan. |
| :repocreate | Membuat repositori dalam /path |
| :switch | Opens the switch dialog. The /path specifies the target directory and /url the URL to switch to. |
| :export | Exports the working copy in /path to another directory. If the /path points to an unversioned directory, a dialog will ask for an URL to export to the directory in /path. If you specify the key /blockpathadjustments, the automatic export path adjustments are blocked. |
| :dropexport | Exports the working copy in /path to the directory specified in /droptarget. This exporting does not use the export dialog but executes directly. The option /overwrite specifies that existing files are overwritten without user confirmation, and the option /autorename specifies that if files already exist, the exported files get automatically renamed to avoid overwriting them. The option /extended can specify either localchanges to only export files that got changed locally, or unversioned to also export all unversioned items as well. |
| :dropvendor | Copies the folder in /path recursively to the directory specified in /droptarget. New files are added automatically, and missing files get removed in the target working copy, basically ensuring that source and destination are exactly the same. Specify /noui to skip the confirmation dialog, and /noprogressui to also disable showing the progress dialog. |
| :merge | Opens the merge dialog. The /path specifies the target directory. For merging a revision range, the following options are available: /fromurl:URL, /revrange:string. For merging two repository trees, the following options are available: /fromurl:URL, /tourl:URL, /fromrev:xxx and /torev:xxx. |
| :mergeall | Opens the merge all dialog. The /path specifies the target directory. |
| :copy | Brings up the branch/tag dialog. The /path is the working copy to branch/tag from. And the /url is the target URL. If the urls starts with a ^ it is assumed to be relative to the repository root. To already check the option Switch working copy to new branch/tag you can pass the /switchaftercopy switch. To check the option Create intermediate folders pass the /makeparents switch. You can also specify the /logmsg switch to pass a predefined log message to the branch/tag dialog. Or, if you don't want to pass the log message on the command line, use /logmsgfile:path, where path points to a file containing the log message. |
| :settings | Membuka dialog seting. |
| :remove | Menghapus file dalam /path dari kontrol versi. |
| :rename | Mengganti nama file dalam in /path. Nama baru untuk file yang ditanyakan dengan dialog. Untuk menghindari pertanyaan mengenai penggantian nama yang mirip dalam satu langkah, operkan /noquestion. |
| :diff | Starts the external diff program specified in the TortoiseSVN settings. The /path specifies the first file. If the option /path2 is set, then the diff program is started with those two files. If /path2 is omitted, then the diff is done between the file in /path and its BASE. If the specified file also has property modifications, the external diff tool is also started for each modified property. To prevent that, pass the option /ignoreprops. To explicitly set the revision numbers use /startrev:xxx and /endrev:xxx, and for the optional peg revision use /pegrevision:xxx. If /blame is set and /path2 is not set, then the diff is done by first blaming the files with the given revisions. The parameter /line:xxx specifies the line to jump to when the diff is shown. |
| :shelve | Shelves the specified paths in a new shelf. The option /shelfname:name specifies the name of the shelf. An optional log message can be specified with /logmsg:message. If option /checkpoint is passed, the modifications of the files are kept. |
| :unshelve | Applies the shelf with the name /shelfname:name to the working copy path. By default the last version of the shelf is applied, but you can specify a version with /version:X. |
| :showcompare |
Depending on the URLs and revisions to compare, this either shows a unified diff (if the option The options If the specified url also has property modifications, the external diff tool is also started for each modified property. To prevent that, pass the option If a unified diff is requested, an optional |
| :conflicteditor | Starts the conflict editor specified in the TortoiseSVN settings with the correct files for the conflicted file in /path. |
| :relocate | Membuka dialog relokasi. /path menetapkan path copy pekerjaan untuk direlokasi. |
| :help | Membuka file bantuan. |
| :repostatus | Opens the check-for-modifications dialog. The /path specifies the working copy directory. If /remote is specified, the dialog contacts the repository immediately on startup, as if the user clicked on the Check repository button. |
| :repobrowser |
Starts the repository browser dialog, pointing to the URL of the working copy given in An additional option If If |
| :ignore | Adds all targets in /path to the ignore list, i.e. adds the svn:ignore property to those files. |
| :blame |
Opens the blame dialog for the file specified in If the options If the option The options |
| :cat | Menyimpan file dari URL atau path copy pekerjaan yang diberikan dalam /path ke lokasi yang diberikan dalam /savepath:path. Revisi diberikan dalam /revision:xxx. Ini bisa digunakan untuk memperoleh file dengan revisi tertentu. |
| :createpatch | Creates a patch file for the path given in /path. To skip the file Save-As dialog you can pass /savepath:path to specify the path where to save the patch file to directly. To prevent the unified diff viewer from being started showing the patch file, pass /noview. If a unified diff is requested, an optional prettyprint option can be specified which will show the merge-info properties in a more user readable format. |
| :revisiongraph |
Shows the revision graph for the path given in To create an image file of the revision graph for a specific path, but without showing the graph window, pass Since the revision graph has many options that affect how it is shown, you can also set the options to use when creating the output image file. Pass these options with |
| :lock | Locks a file or all files in a directory given in /path. The 'lock' dialog is shown so the user can enter a comment for the lock. |
| :unlock | Unlocks a file or all files in a directory given in /path. |
| :rebuildiconcache | Rebuilds the windows icon cache. Only use this in case the windows icons are corrupted. A side effect of this (which can't be avoided) is that the icons on the desktop get rearranged. To suppress the message box, pass /noquestion. |
| :properties |
Shows the properties dialog for the path given in For dealing with versioned properties this command requires a working copy. Revision properties can be viewed/changed if To open the properties dialog directly for a specific property, pass the property name as |
| :sync |
Exports/imports settings, either depending on whether the current settings or the exported settings are newer, or as specified. If a path is passed with The parameter If neither If If The parameter |
Contoh (yang harus dimasukkan pada satu baris):
TortoiseProc.exe /command:commit
                 /path:"c:\svn_wc\file1.txt*c:\svn_wc\file2.txt"
                 /logmsg:"test log message" /closeonend:0

TortoiseProc.exe /command:update /path:"c:\svn_wc\" /closeonend:0

TortoiseProc.exe /command:log /path:"c:\svn_wc\file1.txt"
                 /startrev:50 /endrev:60 /closeonend:0
Using special URLs, it is also possible to call TortoiseProc from a web page.
TortoiseSVN registers a new protocol tsvncmd: which can be used to create hyperlinks that execute TortoiseSVN commands. The commands and parameters are the same as when automating TortoiseSVN from the command line.
The format of the tsvncmd: URL is like this:
tsvncmd:command:cmd?parameter:paramvalue?parameter:paramvalue
with cmd being one of the allowed commands, parameter being the name of a parameter like path or revision, and paramvalue being the value to use for that parameter. The list of parameters allowed depends on the command used.
The following commands are allowed with tsvncmd: URLs:
:update:commit:diff:repobrowser:checkout:export:blame:repostatus:revisiongraph:showcompare:log:properties
A simple example URL might look like this:
<a href="tsvncmd:command:update?path:c:\svn_wc?rev:1234">Update</a>
or in a more complex case:
<a href="tsvncmd:command:showcompare?
url1:https://svn.code.sf.net/p/stefanstools/code/trunk/StExBar/src/setup/Setup.wxs?
url2:https://svn.code.sf.net/p/stefanstools/code/trunk/StExBar/src/setup/Setup.wxs?
revision1:188?revision2:189">compare</a>
The image diff tool has a few command line options which you can use to control how the tool is started. The program is called TortoiseIDiff.exe.
The table below lists all the options which can be passed to the image diff tool on the command line.
Tabel D.2. Daftar opsi yang tersedia
| Pilihan | Deskripsi |
|---|---|
| :left | Path to the file shown on the left. |
| :lefttitle | A title string. This string is used in the image view title instead of the full path to the image file. |
| :right | Path to the file shown on the right. |
| :righttitle | A title string. This string is used in the image view title instead of the full path to the image file. |
| :overlay | If specified, the image diff tool switches to the overlay mode (alpha blend). |
| :fit | If specified, the image diff tool fits both images together. |
| :showinfo | Shows the image info box. |
Example (which should be entered on one line):
TortoiseIDiff.exe /left:"c:\images\img1.jpg" /lefttitle:"image 1"
                  /right:"c:\images\img2.jpg" /righttitle:"image 2"
                  /fit /overlay
The unified diff viewer has only two command line options:
Tabel D.3. Daftar opsi yang tersedia
| Pilihan | Deskripsi |
|---|---|
| :patchfile | Path to the unified diff file. |
| :p | Activates pipe mode. The unified diff is read from the console input. |
Examples (which should be entered on one line):
TortoiseUDiff.exe /patchfile:"c:\diff.patch"
If you create the diff from another command, you can use TortoiseUDiff to show that diff directly:
svn diff | TortoiseUDiff.exe /u
this also works if you omit the /p parameter:
svn diff | TortoiseUDiff.exe
Daftar Isi
- Konvensi dan Aturan Dasar
- Perintah TortoiseSVN
- Checkout
- Mutahirkan
- Mutahirkan ke Revisi
- Komit
- Diff
- Tampilkan Log
- Periksa Modifikasi
- Grafik Revisi
- Repo Browser
- Edit Konflik
- Diselesaikan
- Ganti nama
- Hapus
- Pulihkan
- Membersihkan
- Dapatkan Kunci
- Lepaskan Kunci
- Cabang/Tag
- Saklar
- Gabung
- Ekspor
- Relokasi
- Buat Repositori Disini
- Tambah
- Impor
- Blame
- Tambah ke Daftar Abaikan
- Buat Patch
- Terapkan Patch
Kadang-kadang manual ini mengarahkan Anda ke dokumentasi Subversion utama, yang menjelaskan Subversion dalam batas Interface Baris Perintah (CLI). Untuk membantu Anda mengerti apa yang dilakukan TortoiseSVN dibelakang layar, kami telah mengompilasi daftar yang memperlihatkan perintah mirip CLI untuk setiap operasi GUI dari TortoiseSVN.
Catatan
Meskipun ada yang mirip CLI terhadap apa yang dilakukan TortoiseSVN, ingat bahwa TortoiseSVN tidak memanggil CLI tapi menggunakan librari Subversion secara langsung.
If you think you have found a bug in TortoiseSVN, we may ask you to try to reproduce it using the CLI, so that we can distinguish TortoiseSVN issues from Subversion issues. This reference tells you which command to try.
In the descriptions which follow, the URL for a repository location is shown simply as URL, and an example might be https://svn.code.sf.net/p/tortoisesvn/code/trunk/. The working copy path is shown simply as PATH, and an example might be C:\TortoiseSVN\trunk.
Penting
Karena TortoiseSVN adalah Ekstensi Shell Windows, ia tidak bisa menggunakan pengertian direktori pekerjaan saat ini. Semua path copy pekerjaan harus diberikan menggunakan path absolut, bukan path relatif.
Item-item tertentu adalah opsional, dan ini sering dikontrol dengan kotak centang atau tombol radio dalam TortoiseSVN. Opsi-opsi ini ditampilkan dalam [kurung kotak] dalam definisi baris perintah.
svn checkout [-depth ARG] [--ignore-externals] [-r rev] URL PATH
The depth combo box items relate to the -depth argument.
Jika Omit eksternals dicentang, gunakan saklar --ignore-externals.
Jika Anda memeriksa revisi tertentu, tetapkan itu setelah URL menggunakan saklar -r.
svn info URL_of_WC
svn update [-r rev] PATH
Memutahirkan item-item multipel yang saat ini bukan operasi atomik dalam Subversion. Maka pertama TortoiseSVN mencari revisi HEAD dari repositori, dan kemudian memutahirkan semua item ke angka revisi tertentu untuk menghindari pembuatan revisi dari copy pekerjaan.
Jika hanya satu item yang dipilih untuk memutahirkan atau item yang dipilih tidak semuanya dari repositori yang sama, TortoiseSVN hanya memutahirkan ke HEAD.
Tidak ada opsi baris perintah yang digunakan disini. Mutahirkan ke revisi juga mengimplementasi perintah pemutahiran, tapi menawarkan opsi lebih.
svn info URL_of_WC
svn update [-r rev] [-depth ARG] [--ignore-externals] PATH
The depth combo box items relate to the -depth argument.
Jika Omit eksternals dicentang, gunakan saklar --ignore-externals.
Dalam TortoiseSVN, dialog komit menggunakan beberapa perintah Subversion. Langkah pertama adalah pemeriksaan status yang memeriksa item-item dalam copy pekerjaan Anda yang bisa berpotensial untuk dikomit. Anda bisa meninjau ulang daftar, diff file terhadap BASE dan memilih item-item yang ingin Anda sertakan dalam komit.
svn status -v PATH
Jika Tampilkan file tidak berversi dicentang, TortoiseSVN juga akan menampilkan file-file dan folder tidak berversi dalam hirarki copy pekerjaan, memperhitungkan aturan pengabaian. Fitur tertentu ini tidak langsung sama dalam Subversion, karena perintah svn status tidak berasal dari folder tidak berversi.
Jika Anda memeriksa setiap file dan folder tidak berversi, item-item itu pertama akan ditambahkan ke copy pekerjaan Anda.
svn add PATH...
Ketika Anda mengklik OK, komit Subversion dimulai. Jika Anda telah membiarkan semua kotak centang pilihan file dalam keadaan standar, TortoiseSVN menggunakan komit rekursif tunggal dari copy pekerjaan. Jika Anda tidak memilih beberapa file, maka komit non-rekursif (-N) harus digunakan, dan setiap path harus ditetapkan secara individual pada baris perintah komit.
svn commit -m "LogMessage" [-depth ARG] [--no-unlock] PATH...
LogMessage disini memberikan isi dari kotak edit pesan log. Ini bisa kosong.
Jika Biarkan kunci dicentang, gunakan saklar --no-unlock.
svn diff PATH
If you use Diff from the main context menu, you are diffing a modified file against its BASE revision. The output from the CLI command above also does this and produces output in unified-diff format. However, this is not what TortoiseSVN is using. TortoiseSVN uses TortoiseMerge (or a diff program of your choosing) to display differences visually between full-text files, so there is no direct CLI equivalent.
Anda juga bisa melakukan diff setiap 2 file menggunakan TortoiseSVN, apakah itu tidak terkontrol versi ataupun tidak. TortoiseSVN hanya memerlukan dua file ke dalam program diff yang dipilih dan membiarkan ia bekerja dimana perbedaan itu berada.
svn log -v -r 0:N --limit 100 [--stop-on-copy] PATH
or
svn log -v -r M:N [--stop-on-copy] PATH
Standarnya, TortoiseSVN mencoba untuk mengambil 100 pesan log menggunakan metode --limit. Jika seting menginstruksikannya untuk menggunakan API lama, maka bentuk kedua digunakan untuk mengambil pesan log untuk 100 revisi repositori.
Jika Hentikan copy/ganti nama dicentang, gunakan saklar --stop-on-copy.
svn status -v PATH
or
svn status -u -v PATH
Pemeriksaan status awal melihat hanya pada copy pekerjaan Anda. Jika Anda mengklik If maka repositori juga diperiksa untuk melihat file mana yang diubah oleh pemutahiran, yang memerlukan sakalar -u.
Jika Tampilkan file tidak berversi dicentang, TortoiseSVN juga akan menampilkan file-file dan folder tidak berversi dalam hirarki copy pekerjaan, memperhitungkan aturan pengabaian. Fitur tertentu ini tidak langsung sama dalam Subversion, karena perintah svn status tidak berasal dari folder tidak berversi.
Grafik revisi adalah hanya fitur TortoiseSVN. Tidak ada persamaan dalam klien baris perintah.
What TortoiseSVN does is an
svn info URL_of_WC
svn log -v URL
where URL is the repository root and then analyzes the data returned.
svn info URL_of_WC
svn list [-r rev] -v URL
Anda bisa menggunakan svn info untuk memeriksa akar repositori, yang adalah tingkat atas ditampilkan dalam browser repositori. Anda tidak bisa menavigasi Naik di atas tingkat ini. Juga, perintah ini menghasilkan semua informasi penguncian yang ditampilkan dalam browser repositori.
Pemanggilan svn list akan mendaftar isi direktori, berdasar URL dan revisi yang diberikan.
Perintah ini tidak mempunyai persamaan CLI. Ia meminta TortoiseMerge atau piranti eksternal 3-cara diff/merge untuk melihat file terkait konflik dan mengurut baris mana yang digunakan.
svn status -v PATH
Tahap pertama adalah pemeriksaan status yang memeriksa item dalam copy pekerjaan Anda yang berpotensi untuk dipulihkan. Anda bisa meninjau daftar, file diff terhadap BASE dan memilih item yang ingin Anda sertakan dalam pemulihan.
Ketika Anda mengklik OK, pemulihan Subversion dimulai. Jika Anda membiarkan kotak centang semua pilihan file dalam keadaan standar, TortoiseSVN menggunakan pemulihan rekursif tunggal (-R) dari copy pekerjaan Anda. Jika Anda tidak memilih beberapa file, maka setiap path harus ditetapkan secara individual [pda baris perintah pemulihan.
svn revert [-R] PATH...
svn status -v PATH
Tahap pertama adalah pemeriksaan status untuk memeriksa file copy pekerjaan Anda yang berpotensi untuk dikunci. Anda bisa memilih item-item yang ingin Anda kunci.
svn lock -m "LockMessage" [--force] PATH...
LockMessage disini menyediakan isi dari kotak edit pesan kunci. Ini bisa kosong.
Jika Curi kunci dicentang, gunakan saklar --force.
svn copy -m "LogMessage" URL URL
or
svn copy -m "LogMessage" URL@rev URL@rev
or
svn copy -m "LogMessage" PATH URL
Dialog Cabang/Tag melakukan penyalinan ke repositori. Ada 3 pilihan tombol radio:
- Revisi HEAD dalam repositori
- Revisi spesifik dalam repositori
- Copy pekerjaan
yang terhubung ke 3 varian baris perintah di atas.
LogMessage disini memberikan isi dari kotak edit pesan log. Ini bisa kosong.
svn merge [--dry-run] --force From_URL@revN To_URL@revM PATH
The performs the same merge with the --dry-run switch.
svn diff From_URL@revN To_URL@revM
menampilkan operasi diff yang akan digunakan untuk melakukan penggabungan.
svn export [-r rev] [--ignore-externals] URL Export_PATH
Formulir ini digunakan untuk mengakses dari folder tidak berversi, dan folder yang digunakan sebagai tujuan.
Mengekspor copy pekerjaan ke lokasi berbeda dikerjakan tanpa menggunakan librari Subversion, maka tidak ada persamaan baris perintah.
Apa yang dilakukan TortoiseSVN adalah mengcopy semmua file ke lokasi baru sementara memperlihatkan kepada Anda progres dari operasi. File/folder yang tidak berversi bisa diekspor juga secara opsional.
Dalam kedua kasus, jika Abaikan eksternal dicentang, gunakan saklar --ignore-externals.
svn add PATH...
Jika Anda memilih folder, pertama TortoiseSVN memindainya secara rekursif untuk item-item yang bisa ditambahkan.
svn import -m LogMessage PATH URL
LogMessage disini memberikan isi dari kotak edit pesan log. Ini bisa kosong.
svn blame -r N:M -v PATH
svn log -r N:M PATH
If you use TortoiseBlame to view the blame info, the file log is also required to show log messages in a tooltip. If you view blame as a text file, this information is not required.
svn propget svn:ignore PATH > tempfile
{edit new ignore item into tempfile}
svn propset svn:ignore -F tempfile PATH
Because the svn:ignore property is often a multi-line value, it is shown here as being changed via a text file rather than directly on the command line.
svn diff PATH > patch-file
TortoiseSVN creates a patch file in unified diff format by comparing the working copy with its BASE version.
Daftar Isi
This appendix contains a more detailed discussion of the implementation of some of TortoiseSVN's features.
Every file and folder has a Subversion status value as reported by the Subversion library. In the command line client, these are represented by single letter codes, but in TortoiseSVN they are shown graphically using the icon overlays. Because the number of overlays is very limited, each overlay may represent one of several status values.
The Conflicted overlay is used to represent the conflicted state, where an update or switch results in conflicts between local changes and changes downloaded from the repository. It is also used to indicate the obstructed state, which can occur when an operation is unable to complete.
The Modified overlay represents the modified state, where you have made local modifications, the merged state, where changes from the repository have been merged with local changes, and the replaced state, where a file has been deleted and replaced by another different file with the same name.
The Deleted overlay represents the deleted state, where an item is scheduled for deletion, or the missing state, where an item is not present. Naturally an item which is missing cannot have an overlay itself, but the parent folder can be marked if one of its child items is missing.
The Added overlay is simply used to represent the added status when an item has been added to version control.
The In Subversion overlay is used to represent an item which is in the normal state, or a versioned item whose state is not yet known. Because TortoiseSVN uses a background caching process to gather status, it may take a few seconds before the overlay updates.
The Needs Lock overlay is used to indicate when a file has the svn:needs-lock property set.
The Locked overlay is used when the local working copy holds a lock for that file.
The Ignored overlay is used to represent an item which is in the ignored state, either due to a global ignore pattern, or the svn:ignore property of the parent folder. This overlay is optional.
The Unversioned overlay is used to represent an item which is in the unversioned state. This is an item in a versioned folder, but which is not under version control itself. This overlay is optional.
If an item has Subversion status none (the item is not within a working copy) then no overlay is shown. If you have chosen to disable the Ignored and Unversioned overlays then no overlay will be shown for those files either.
An item can only have one Subversion status value. For example a file could be locally modified and it could be marked for deletion at the same time. Subversion returns a single status value - in this case deleted. Those priorities are defined within Subversion itself.
When TortoiseSVN displays the status recursively (the default setting), each folder displays an overlay reflecting its own status and the status of all its children. In order to display a single summary overlay, we use the priority order shown above to determine which overlay to use, with the Conflicted overlay taking highest priority.
In fact, you may find that not all of these icons are used on your system. This is because the number of overlays allowed by Windows is limited to 15. Windows uses 4 of those, and the remaining 11 can be used by other applications. If there are not enough overlay slots available, TortoiseSVN tries to be a Good Citizen (TM) and limits its use of overlays to give other apps a chance.
Since there are Tortoise clients available for other version control systems, we've created a shared component which is responsible for showing the overlay icons. The technical details are not important here, all you need to know is that this shared component allows all Tortoise clients to use the same overlays and therefore the limit of 11 available slots isn't used up by installing more than one Tortoise client. Of course there's one small drawback: all Tortoise clients use the same overlay icons, so you can't figure out by the overlay icons what version control system a working copy is using.
Normal, Modified and Conflicted are always loaded and visible.
Deleted is loaded if possible, but falls back to Modified if there are not enough slots.
Read-Only is loaded if possible, but falls back to Normal if there are not enough slots.
Locked is loaded if possible, but falls back to Normal if there are not enough slots.
Added is loaded if possible, but falls back to Modified if there are not enough slots.
Daftar Isi
The standard installer has support only for English, but you can download separate language packs and spell check dictionaries separately after installation.
The TortoiseSVN user interface has been translated into many different languages, so you may be able to download a language pack to suit your needs. You can find the language packs on our translation status page. And if there is no language pack available, why not join the team and submit your own translation ;-)
Each language pack is packaged as a .msi installer. Just run the install program and follow the instructions. After the installation finishes, the translation will be available.
The documentation has also been translated into several different languages. You can download translated manuals from the support page on our website.
TortoiseSVN uses the Windows spell checker if it's available (Windows 8 or later). Which means that if you want the spell checker to work in a different language than the default OS language, you have to install the spell checker module in the Windows settings (Settings > Time & Language > Region & Language).
TortoiseSVN will use that spell checker if properly configured with the tsvn:projectlanguage project property.
In case the Windows spell checker is not available, TortoiseSVN can also use spell checker dictionaries from OpenOffice and Mozilla.
The installer automatically adds the US and UK English dictionaries. If you want other languages, the easiest option is simply to install one of TortoiseSVN's language packs. This will install the appropriate dictionary files as well as the TortoiseSVN local user interface. After the installation finishes, the dictionary will be available too.
Or you can install the dictionaries yourself. If you have OpenOffice or Mozilla installed, you can copy those dictionaries, which are located in the installation folders for those applications. Otherwise, you need to download the required dictionary files from http://wiki.services.openoffice.org/wiki/Dictionaries.
Once you have got the dictionary files, you probably need to rename them so that the filenames only have the locale chars in it. Example:
en_US.affen_US.dic
Then just copy them into the %APPDATA%\TortoiseSVN\dic folder. If that folder isn't there, you have to create it first. TortoiseSVN will also search the Languages sub-folder of the TortoiseSVN installation folder (normally this will be C:\Program Files\TortoiseSVN\Languages); this is the place where the language packs put their files. However, the %APPDATA%-folder doesn't require administrator privileges and, thus, has higher priority. The next time you start TortoiseSVN, the spell checker will be available.
Jika Anda menginstalasi bermacam-macam kamus, TortoiseSVN menggunakan aturan ini untuk memilih salah satu yang digunakan.
Periksa seting
tsvn:projectlanguage. Rujuk ke bagian bernama “Seting Proyek” untuk infomasi tentang seting properti proyek.Jika bahasa proyek tidak di-set, atau bahasa itu tidak diinstalasi, coba bahasa yang terkait ke lokal Windows.
If the exact Windows locale doesn't work, try the “Base” language, e.g.
de_CH(Swiss-German) falls back tode_DE(German).If none of the above works, then the default language is English, which is included with the standard installation.
- Tambah
Perintah Subversion yang digunakan untuk menambah file atau direktori ke copy pekerjaan Anda. Item baru ditambahkan ke repositori saat Anda komit.
- BASE revisi
Revisi base saat ini dari file atau folder dalam copy pekerjaan. Anda. Ini adalah revisi file atau folder terakhir, ketika checkout terakhir, memutahirkan atau komit yang sudah dijalankan. Revisi BASE biasanya tidak sama dengan revisi HEAD.
- Blame
Perintah ini hanya untuk file teks, dan menambahkan catatan setiap baris untuk menampilkan revisi repositori dimana perubahan terakhir dilakukan, dan pembuat yang membuat perubahan itu. Implementasi GUI kami disebut TortoiseBlame dan ia juga menampilkan tanggal/jam komit dan log pesan ketika Anda membawa mouse ke angka revisi.
- Branch (Cabang)
Suatu istilah yang sering digunakan dalam sistem kontrol revisi untuk menjelaskan apa yang terjadi ketika garpu pengembangan pada titik tertentu dan mengikuti 2 path terpisah. Anda dapat membuat cabang dari baris pengembangan utama sehingga untuk mengembangkan fitur baru tanpa membuat jalur utama tidak stabil. Atau Anda dapat cabang rilis stabil ke mana Anda hanya membuat perbaikan bug, sementara pengembangan baru dilakukan pada batang tidak stabil. Dalam Subversion cabang diimplementasikan sebagai “salinan murahquote>.”
- Checkout
Perintah Subversion yang membuat copy pekerjaan lokal dalam direktori kosong dengan mendownload file berversi dari repositori.
- Membersihkan
Mengutip dari buku Subversion: “ Secara rekursif membersihkan copy pekerjaan, menghapus kuncian dan melanjutkan operasi yang belum selesai. Jika Anda pernah mendapatkan kesalahan salinan pekerjaan dikunci, jalankan perintah ini untuk menghapus kuncian basi dan mendapatkan salinan pekerjaan Anda kedalam kondisi yang berguna lagi. ” Catatan bahwa konteks “kunci” merujuk ke penguncian sistem file lokal, bukan penguncian repositori.
- Komit
Perintah Subversion ini digunakan untuk mengoper perubahan dalam copy pekerjaan Anda kembali ke dalam repositori, membuat revisi repositori baru.
- Conflict (Konflik)
Ketika perubahan dari repositori digabung dengan perubahan lokal, ada kalanya perubahan itu terjadi pada baris yang sama. Dalam hal ini Subversion tidak bisa secara otomatis menentukan versi yang mana untuk digunakan dan file yang dinyatakan sebagai konflik. Anda harus mengedit file secara manual dan menyelesaikan konflik sebelum Anda bisa mengkomit perubahan selanjutnya.
- Copy
Dalam repositori Subversion Anda bisa membuat copy dari file tunggal atau susunan keseluruhan. Ini diimplementasikan sebagai “copy murah” yang bertindak sedikit mirip link ke original didalamnya hampir tidak ada ruang. Membuat copy menjaga sejarah dari item dalam copy, dengan demikian Anda bisa melacak perubahan yang dibuat sebelum copy dibuat.
- Hapus
Ketika Anda menghapus item berversi (dan mengkomit perubahan tersebut) item tidak lagi ada dalam repositori setelah revisi yang dikomit. Tapi tentunya masih ada dalam revisi repositori sebelumnya, dan Anda masih bisa mengaksesnya. Jika perlu, Anda bisa mengcopy item yang dihapus dan “menghidupkannya” sepenuhnya dengan histori.
- Diff
Kependekan dari “Tampilkan Perbedaan”. Sangat berguna ketika Anda ingin melihat perubahan apa yang telah dibuat secara pasti.
- Ekspor
Perintah ini menghasilkan copy dari folder berversi, seperti copy pekerjaan, tapi tanpa folder
.svnlokal.- FSFS
Backend sistem file untuk repositori hak milik Subversion. Bisa digunakan pada jaringan berbagi. Standar untuk repositori 1.2 dan lebih baru.
- GPO
Group policy object.
- HEAD revisi
Revisi terbaru dari file atau folder dalam repositori.
- Impor
Perintah Subversion untuk mengimpor keseluruhan hirarki folder ke dalam revisi tunggal.
- Lock (Kunci)
Ketika Anda membawa kuncian pada item berversi, Anda menandainya dalam repositori sebagai tidak bisa dikomit, kecuali dari copy pekerjaan di mana kuncian tersebut dibawa.
- Log
Menampilkan histori revisi dari file atau folder. Juga dikenal sebagai “Histori”.
- Histori
Menampilkan histori revisi dari file atau folder. Juga dikenal sebagai “Log”.
- Gabung
Proses dimana perubahan dari repositori ditambahkan ke copy pekerjaan Anda tanpa mengganggu setiap perubahan yang sudah Anda buat secara lokal. Kadang kala perubahan ini tidak bisa disesuaikan secara otomatis dan copy pekerjaan dinyatakan dalam keadaan konflik.
Penggabungan terjadi secara otomatis ketika Anda memutahirkan copy pekerjaan Anda. Anda juga bisa menggabung perubahan spesifik dari cabang lain menggunakan perintah Merge TortoiseSVN.
- Patch
Jika copy pekerjaan sudah berubah ke hanya file teks, ini memungkinkan untuk menggunakan perintah Diff Subversion untuk menghasilkan ringkasan file tunggal dari perubahan itu dalam format Unified Diff. File dari tipe ini sering dirujuk sebagai “Patch”, dan bisa diemail ke orang lain (atau daftar mailing) dan diterapkan ke copy pekerjaan lain. Seseorang tanpa akses komit bisa membuat perubahan dan mengirimkan file patch untuk pengkomit yang diotorisasi untuk menerapkan. Atau jika Anda tidak yakin mengenai perubahan Anda bisa mengirimkan patch untuk ditinjau orang lain.
- Properti
Sebagai tambahan ke direktori dan file versi Anda, Subversion membolehkan Anda untuk menambahkan metadata yang diversi - dirujuk sebagai “properties” ke setiap direktori dan file yang diversi Anda. Setiap properti mempunyai nama dan nilai, mirip kunci registri. Subversion mempunyai beberapa properti khusus yang digunakan secara internal, seperti
svn:eol-style. TortoiseSVN juga mempunyai beberapa, sepertitsvn:logminsize. Anda bisa menambah properti Anda sendiri dengan setiap nama dan nilai yang Anda pilih.- Relokasi
Jika repositori Anda pindah, barangkali karena Anda telah memindahkannya ke direktori berbeda pada server Anda, atau nama domain server berubah, Anda perlu untuk “merelokasi” copy pekerjaan Anda agar URL repositorinya merujuk ke lokasi baru.
Catatan: Anda hanya menggunakan perintah ini jika copy pekerjaan Anda merujuk ke lokasi yang sama dalam repositori yang sama, tapi repositori itu sendiri sudah dipindah. Dalam persoalan lain sebaliknya Anda mungkin memerlukan perintah “Tukar”.
- Repositori
Repositori adalah pusat tempat dimana data disimpan dan dipelihara. Repositori bisa berupa tempat dimana database multipel atau file ditempatkan untuk distribusi melalui jaringan, atau repositori bisa berupa lokasi yang diakses secara langsung ke pengguna tanpa harus berjalan melalui jaringan.
- Selesaikan
Ketika file dalam copy pekerjaan dibiarkan dalam kondisi konflik mengikuti gabungan, konflik itu harus diurut oleh manusia menggunakan editor (atau mungkin TortoiseMerge). Proses ini dirujuk sebagai “Menyelesaikan Konflik”. Ketika ini lengkap Anda bisa menandai file yang konflik sebagai sudah diselesaikan, yang membolehkannya dikomit.
- Pulihkan
Subversion memelihara copy “murni” lokal dari setiap file seperti setelah saat terakhir Anda memutahirkan copy pekerjaan Anda. Jika Anda telah membuat perubahan dan menentukan Anda ingin membatalkannya, Anda bisa menggunakan perintah “pulihkan” untuk kembali ke copy murni.
- Revisi
Setiap kali Anda mengkomit set perubahan, Anda membuat satu “revisi” baru dalam repositori. Setiap revisi menggambarkan keadaan dari susunan repositori pada titik tertentu dalam historinya. Jika Anda ingin kembalike waktu Anda bisa memeriksa repositori seperti pada revisi N.
Dengan kata lain, revisi bisa merujuk ke set dari perubahan yang dibuat ketika revisi itu dibuat.
- Revisi Properti (revprop)
Seperti halnya file bisa mempunyai properti, juga setiap revisi dalam repositori. Beberapa revprops khusus ditambahkan secara otomatis ke revisi yang dibuat, yaitu
svn:date svn:author svn:logyang menggambarkan tanggal/jam komit, pengkomit dan log pesan masing-masing. Properti ini bisa diedit, tapi tidak diversi, maka setiap perubahan adalah permanen dan tidak bisa dibatalkan.- SVN
Sering-digunakan kependekan dari Subversion.
Nama dari protokol bebas Subversion yang digunakan oleh server repositori “svnserve”.
- Saklar
Seperti “Mutahirkan-ke-revisi” mengubah jendela waktu dari copy pekerjaan untuk melihat titik perbedaan dalam histori, maka “Tukar” mengubah jendela ruang dari copy pekerjaan agar merujuk ke bagian yang berbeda dari repositori. Ini kadang berguna ketika pekerjaan pada batang dan cabang dimana hanya sedikit file yang berbeda. Anda bisa menukar copy pekerjaan Anda antara dua dan hanya file yang berubah yang akan ditransfer.
- Mutahirkan
Perintah Subversion ini menarik perubahan terbaru dari repositori ke dalam copy pekerjaan Anda, menggabung setiap perubahan oleh orang lain dengan perubahan lokal dalam copy pekerjaan.
- Working Copy (Copy Pekerjaan)
Ini adalah “bak pasir” lokal Anda, area dimana Anda bekerja pada file berversi, dan biasanya berada pada hard disk lokal Anda. Anda membuat copy pekerjaan dengan melakukan “Checkout” dari repositori, dan mengisi perubahan Anda kembali ke dalam repositori menggunakan “Komit”.
Simbol
A
- abaikan, Mengabaikan File Dan Direktori
- abaikan global, Seting Umum
- add files to repository, Mengimpor Data Ke dalam Suatu Repositori
- Akses, Akses Lokal ke Repositori
- anotasi, Siapa Yang Mengubah Baris Mana?
- aturan grup, Mendistribusikan TortoiseSVN via aturan grup, Disable context menu entries
- authentication cache, Otentikasi
- auto-props, Seting properti otomatis
B
- backup, Cadangan Repositori
- bandingkan file, Compare two revisions of a file or folder
- baris perintah, Perintah TortoiseSVN, Perintah-Perintah TortoiseIDiff, TortoiseUDiff Commands
- blame, Siapa Yang Mengubah Baris Mana?
- Buat, Pembuatan Repositori dengan Klien Baris Perintah
- Apakah yang dimaksud dengan TortoiseSVN?, Membuat Repositori Dengan TortoiseSVN
- bug tracking, Integration with Bug Tracking Systems / Issue Trackers
- Buku Subversion,
C
- cabang, Copying/Moving/Renaming Files and Folders, Pencabangan / Pembuatan Tag
- check in, Mengirimkan Perubahan Anda Ke Repositori
- checkout, Melakukan Checkout Copy Pekerjaan
- clean, Memulihkan Perubahan
- CLI,
- COM, ,
- COM SubWCRev interface, COM interface
- commit message, Memaksa pengguna untuk memasukan log pesan
- commit messages, Dialog Log Revisi
- commit monitor,
- compare, Melihat Perbedaan
- compare folders, Compare two revisions of a file or folder
- context menu entries, Disable context menu entries
- copy, Pencabangan / Pembuatan Tag, Browser Repositori
- copy files, Copying/Moving/Renaming Files and Folders
- copy pekerjaan, Copy Pekerjaan
- create repository, Pembuatan Repositori
- create working copy, Melakukan Checkout Copy Pekerjaan
D
- daftar perubahan, Daftar Perubahan
- deploy, Mendistribusikan TortoiseSVN via aturan grup
- detach from repository, Abaikan file yang sudah diversi
- diff, Melihat Perbedaan, Membuat dan Menerapkan Patch
- diff gambar, Melakukan Diff Gambar Menggunakan TortoiseIDiff
- diffing, Melihat Diffs
- disable functions, Disable context menu entries
- domain controller, Mendistribusikan TortoiseSVN via aturan grup
- drag kanan, Drag dan Drop
- drag-n-drop, Drag dan Drop
E
- edit log/pembuat, Mengubah Pesan Log dan Pembuat
- ekspor, Mengekspor suatu Copy Pekerjaan Subversion
- ekspor perubahan, Membandingkan Folder
- eksternal, External Items, Sertakan sub-proyek umum
- empty message, Memaksa pengguna untuk memasukan log pesan
- expand keywords, svn:keywords
- explorer, Fitur TortoiseSVN
F
- FAQ,
- fetch changes, Memutahirkan Copy Pekerjaan Anda Dengan Perubahan Dari Yang Lain
- file khusus, File Khusus
- file temporal, Impor
- filter, Menyaring Pesan Log
G
- gabung, Penggabungan
- revision range, Menggabungkan Suatu Jangkauan Revisi
- two trees, Menggabung Dua Pohon yang Berbeda
- ganti nama, Moving files and folders, Browser Repositori, Memindahkan/copy banyak file sekaligus
- ganti nama berkas, Copying/Moving/Renaming Files and Folders
- globbing, Pencocokan Pola dalam Daftar Abaikan
- GPO, Mendistribusikan TortoiseSVN via aturan grup
- grafik, Grafik Revisi
H
- hanya baca, Penguncian
- hapus, Deleting files and folders
- hilangkan, Deleting files and folders
- histori, Dialog Log Revisi
- hook-hook klien, Client Side Hook Scripts
- hooks, Server side hook scripts
I
- IBugtraqProvider,
- ikon, Lapisan Ikon
- impor, Mengimpor Data Ke dalam Suatu Repositori
- impor di tempat, Impor di tempat
- instalasi, Instalasi
- issue tracker, Integration with Bug Tracking Systems / Issue Trackers,
J
- jalan pintas, Membuat jalan pintas ke repositori
- Jaringan Berbagi, Accessing a Repository on a Network Share
K
- kamus, Pemeriksa Ejaan
- keywords, svn:keywords
- klien baris perintah,
- komit, Mengirimkan Perubahan Anda Ke Repositori
- konflik, Solusi Copy-Ubah-Gabung, Menyelesaikan Konflik
- konflik pohon, Menyelesaikan Konflik
- kontrol versi,
L
- lapisan, Lapisan Ikon, Lapisan Ikon
- link, Link Checkout
- link checkout, Link Checkout
- log, Dialog Log Revisi
- log cache, Tembolok Log
- log messages, Dialog Log Revisi
- log pesan, Memaksa pengguna untuk memasukan log pesan
M
- mark release, Pencabangan / Pembuatan Tag
- maximize, Maximizing Windows
- membandingkan revisi-revisi, Membandingkan Folder
- membersihkan, Membersihkan
- memindahkan, Memindahkan/copy banyak file sekaligus
- menu konteks, Menu Konteks
- merge conflicts, Handling Conflicts after Merge
- merge tracking, Merge Tracking
- merge tracking log, Merge Tracking Features
- Microsoft Word, Diffing Office Documents
- modifikasi, Status Lokal dan Remote
- monitoring projects,
- moved server, Merelokasi copy pekerjaan
- msi, Mendistribusikan TortoiseSVN via aturan grup
- mutahirkan, Memutahirkan Copy Pekerjaan Anda Dengan Perubahan Dari Yang Lain, Mutahirkan file dari repositori
N
- Naskah Hook, Server side hook scripts, Client Side Hook Scripts
O
- otentikasi, Otentikasi
- otomasi, Perintah TortoiseSVN, Tsvncmd URL handler, Perintah-Perintah TortoiseIDiff, TortoiseUDiff Commands
- overlay priority, Lapisan Ikon
P
- paket bahasa, Paket Bahasa
- partial checkout, Melakukan Checkout Copy Pekerjaan
- patch, Membuat dan Menerapkan Patch
- Path UNC, Akses Lokal ke Repositori
- pelacakbug, Integration with Bug Tracking Systems / Issue Trackers
- pemeriksa ejaan, Pemeriksa Ejaan
- pemeriksaan pemutahiran, Pengalihan pemeriksaan pemutahiran
- pencocokan pola, Pencocokan Pola dalam Daftar Abaikan
- pengendali drag, Drag dan Drop
- penguncian, Penguncian
- penguraian versi,
- periksa versi baru, Pengalihan pemeriksaan pemutahiran
- perubahan, Compare two revisions of a file or folder
- pindahkan, Moving files and folders
- pindahkan berkas, Copying/Moving/Renaming Files and Folders
- piranti diff, Eksternal Diff/Merge Tools
- piranti merge, Eksternal Diff/Merge Tools
- plugin,
- pola kekecualian, Seting Umum
- project monitor,
- project properties, TortoiseSVN Project Properties
- proyek umum, Sertakan sub-proyek umum
- Proyek-proyek ASP, Menyeting variabel lingkungan SVN_ASP_DOT_NET_HACK
- pulihkan, Memulihkan Perubahan, Roll back (Undo) revisions in the repository
R
- registri, Advanced Settings
- relokasi, Merelokasi copy pekerjaan
- remote commits,
- remove versioning, Abaikan file yang sudah diversi
- reorganize, Memindahkan/copy banyak file sekaligus
- repo viewer, Integrasi dengan Pelihat Repositori Berbasis Web
- repo-browser, Browser Repositori
- repositori, Repositori, Mengimpor Data Ke dalam Suatu Repositori
- repositori eksternal, External Items
- repository URL changed, Merelokasi copy pekerjaan
- resolve, Menyelesaikan Konflik
- revisi, Revisi, Grafik Revisi
- revision graph, Grafik Revisi
- revision properties, Mengubah Pesan Log dan Pembuat
- revprops, Mengubah Pesan Log dan Pembuat
- right click, Menu Konteks
- rollback, Roll back (Undo) revisions in the repository
S
- sanjungan, Siapa Yang Mengubah Baris Mana?
- send changes, Mengirimkan Perubahan Anda Ke Repositori
- server moved, Merelokasi copy pekerjaan
- server proxy, Seting Jaringan
- server side hook scripts, Server side hook scripts
- server viewer, Browser Repositori
- seting, Seting TortoiseSVN
- Shell Windows, Fitur TortoiseSVN
- shelve, Shelving
- sparse checkout, Melakukan Checkout Copy Pekerjaan
- statistik, Informasi Statistik
- status, Mendapatkan Informasi Status, Status Lokal dan Remote
- suara, Seting Umum
- SUBST drives, Seting Lapisan Ikon
- Subversion properties, Properti Subversion
- SubWCRev,
- SVN_ASP_DOT_NET_HACK, Menyeting variabel lingkungan SVN_ASP_DOT_NET_HACK
T
- tag, Copying/Moving/Renaming Files and Folders, Pencabangan / Pembuatan Tag
- tambah, Menambah File Dan Direktori Baru
- terjemahan, Paket Bahasa
- tidak memversi, Removing a working copy from version control, Abaikan file yang sudah diversi
- tindakan sisi-server, Browser Repositori
- TortoiseIDiff, Melakukan Diff Gambar Menggunakan TortoiseIDiff
- TortoiseSVN link, Link Checkout
- TortoiseSVN properties, TortoiseSVN Project Properties
- tukar, Untuk Checkout atau Menukar...
U
- undo, Memulihkan Perubahan
- undo change, Roll back (Undo) revisions in the repository
- undo commit, Roll back (Undo) revisions in the repository
- unified diff, Membuat dan Menerapkan Patch
- unshelve, Shelving
- unversioned 'working copy', Mengekspor suatu Copy Pekerjaan Subversion
- unversioned files/folders, Mengabaikan File Dan Direktori
- URL berubah, Merelokasi copy pekerjaan
- URL handler, Tsvncmd URL handler
V
- vendor projects, Sertakan sub-proyek umum
- versi, Pengalihan pemeriksaan pemutahiran
- version new files, Menambah File Dan Direktori Baru
- version number in files,
- view changes, Mendapatkan Informasi Status
- ViewVC, Integrasi dengan Pelihat Repositori Berbasis Web
- VS2003, Menyeting variabel lingkungan SVN_ASP_DOT_NET_HACK
W
- web view, Integrasi dengan Pelihat Repositori Berbasis Web
- website, Link Checkout
- WebSVN, Integrasi dengan Pelihat Repositori Berbasis Web
- windows properties, Detailed Status
- working copy status, Mendapatkan Informasi Status