Um aplicativo do Subversion para Windows
Version 1.14
tradudor-créditos
Tradução2022/09/06 19:53:28 (r29447)
Índice
- Prefácio
- 1. Começando
- 2. Conceitos básicos do Controle de Versão
- 3. O Repositório
- 4. Guia do Uso Diário
- Características Gerais
- Importando Dados Para Um Repositório
- Obtendo Uma Cópia de Trabalho
- Submetendo Suas Alterações Para o Repositório
- Atualizar sua Cópia de Trabalho com mudanças feitas por outros
- Resolvendo Conflitos
- Obtendo Informações de Estado
- Lista de Alterações
- Shelving
- Janela de Revisão de Registro
- Invocando a Janela de Histórico de Revisão
- Histórico de Ações de Revisão
- Recuperando Informações Adicionais
- Obtendo mais mensagens de log
- Revisão da Cópia de Trabalho Atual
- Combinar Recursos Monitorados
- Alterando a Mensagem de Auditoria e o Autor
- Filtrando Mensagens de Log
- Informação Estatística
- Modo desconectado
- Atualizando a Visualização
- Visualizando as Diferenças
- Adicionando Novos Arquivos e Diretórios
- Copiando/Movendo/Renomeando Arquivos e Diretórios
- Ignorando Arquivos e Diretórios
- Apagando, Movendo e Renomeando
- Desfazendo Alterações
- Limpar
- Configurações do Projeto
- Itens Externos
- Ramificando / Rotulando
- Unificando
- Bloqueando
- Criando e Aplicando Correções
- Quem Mudou Qual Linha?
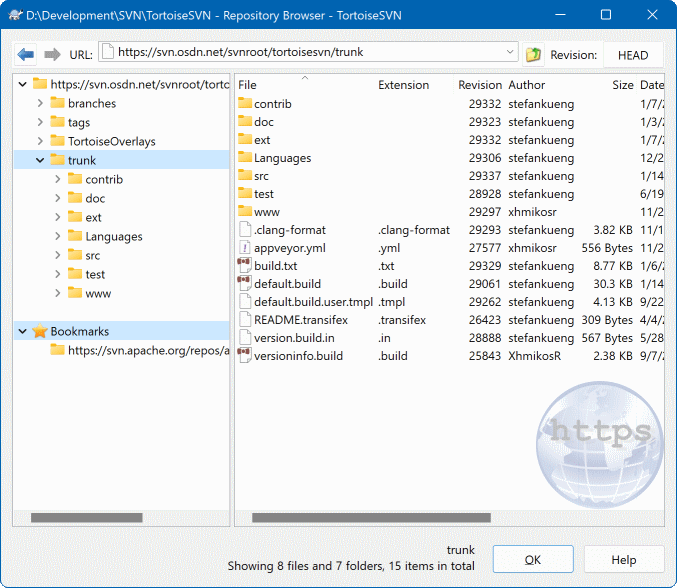
- O Navegador de Repositório
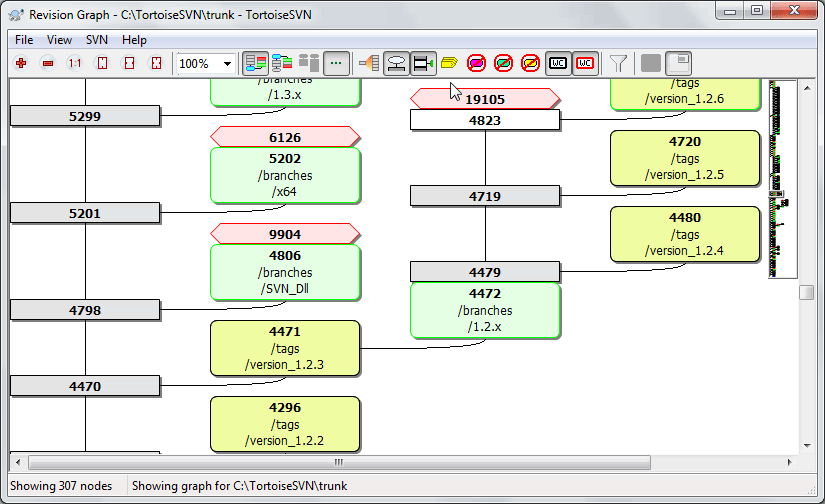
- Gráfico de Revisões
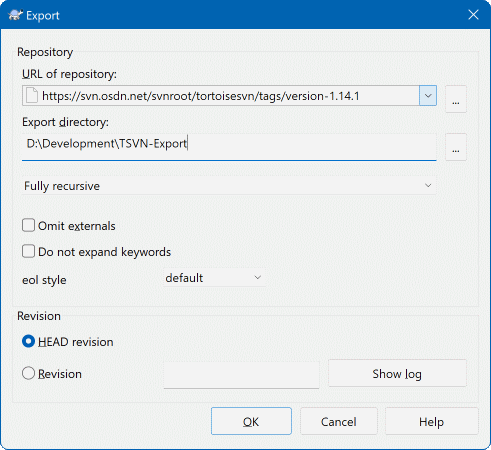
- Exportando um Cópia de Trabalho do Subversion
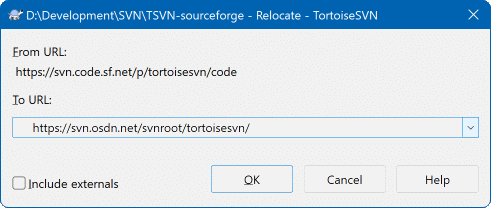
- Realocando uma cópia de trabalho
- Integração com Sistemas de Rastreamento de Erros / Rastreadores de Reportes
- Integração com visualizadores de repositórios locados na web
- Configurações do TortoiseSVN
- Configurações Gerais
- Configurações do Gráfico de Revisões
- Configurações de Sobreposição dos Ícones
- Configurações de rede
- Configuração de Programa Externo
- Dados de configuração salvos
- Cache de Log
- Client Side Hook Scripts
- Configurações TortoiseBlame
- TortoiseUDiff Settings
- Exportando preferências TSVN
- Configurações Avançadas
- Passo Final
- 5. Project Monitor
- 6. SubWCRev
- 7. IBugtraqProvider interface
- A. Frequently Asked Questions (FAQ)
- B. Como eu faço...
- Mover/copiar vários arquivos de uma só vez
- Usuario forçando para entrar uma messagem de log
- Atualizar os arquivos selecionados a partir do repositório
- Reverter (Desfazer) revisões no repositório
- Compare duas revisões de um arquivo ou pasta
- Inclua um subprojeto em comum
- Criar atalho para um repositório
- Ignorar arquivos que já estão versionados
- Unversion a working copy
- Remover uma cópia de trabalho
- C. Dicas Úteis para Administradores
- D. Automatizando o TortoiseSVN
- E. Command Line Interface Cross Reference
- Convenções e regras básicas
- Comandos do TortoiseSVN
- Obter
- Atualizar
- Atualizar para Revisão
- Submeter
- Diff
- Log
- Procurar por Modificações
- Gráfico de Revisões
- Navegador de
- Conflitos
- Resolvido
- Renomear
- Apagar
- Reverter
- Limpar
- Obter bloqueio
- Liberar bloqueio
- Ramificar/Rotular...
- Alternar
- Combinar
- Exportar
- Reposicionar
- Criar repositó aqui
- Adicionar
- Importar
- Autoria
- Adicionar à lista de ignorados
- Criar Correção
- Aplicar correção
- F. Detalhes da Implementação
- G. Pacotes de Idiomas e Corretores Ortográficos
- Glossário
- Índice Remissivo
Lista de Figuras
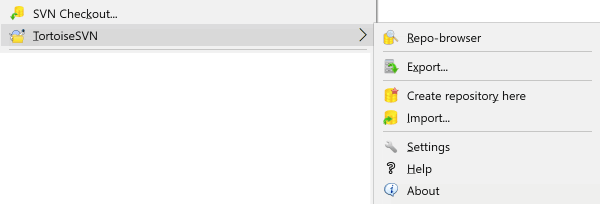
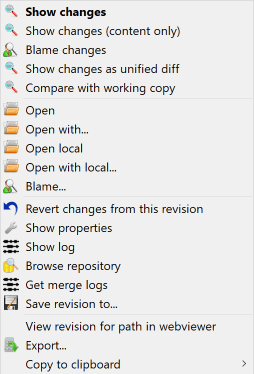
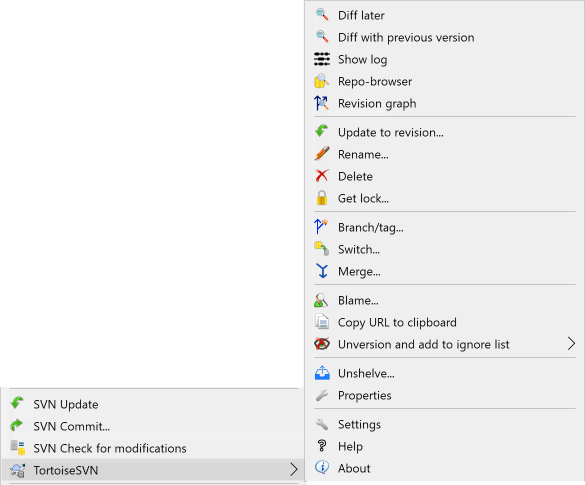
- 1.1. O menu do TortoiseSVN para diretórios não controlados
- 1.2. A Janela de Importação
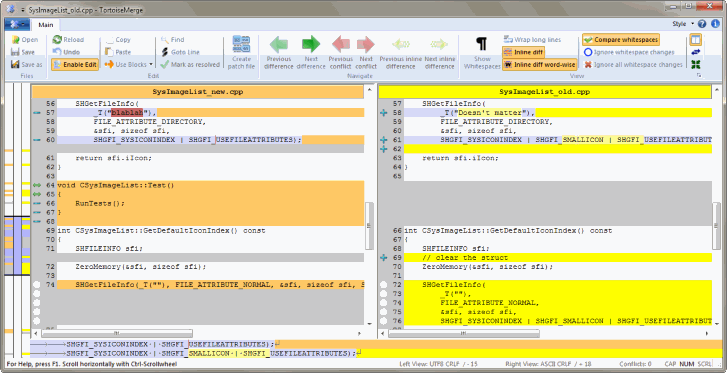
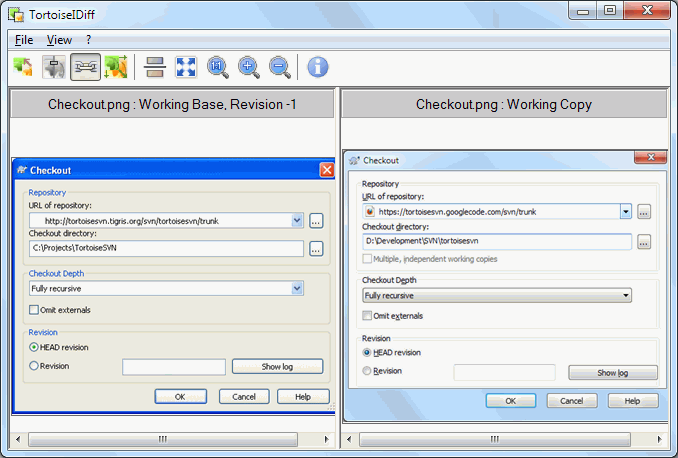
- 1.3. Visualizador das Diferenças do Arquivo
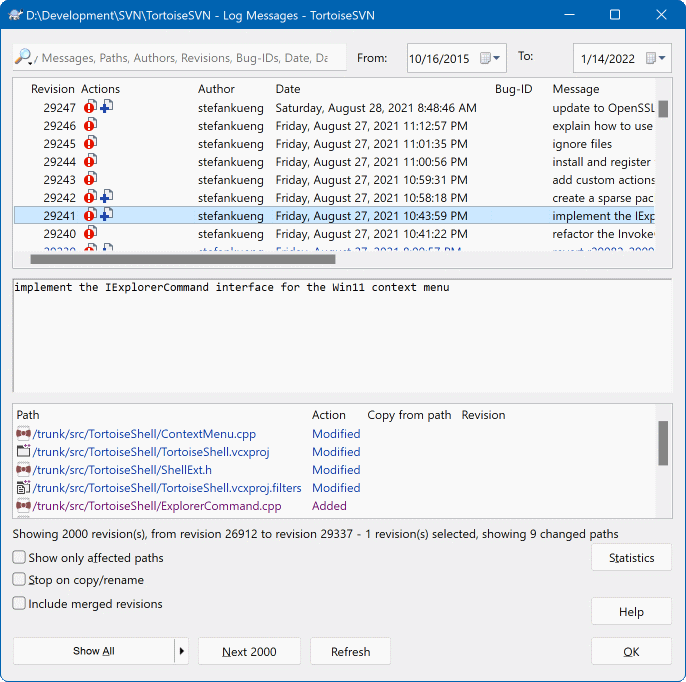
- 1.4. A Janela de Log
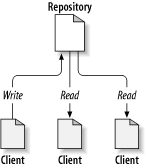
- 2.1. Um típico sistema Cliente/Servidor
- 2.2. O problema a ser evitado
- 2.3. A solução Alocar-Modificar-Desalocar
- 2.4. A solução Copiar-Modificar-Unificar
- 2.5. ...Continuando com Copiar-Modificar-Unificar
- 2.6. O Sistema de Arquivos do Repositório
- 2.7. O Repositório
- 3.1. O menu do TortoiseSVN para diretórios não controlados
- 4.1. Explorer mostra os ícones sobrepostos
- 4.2. Menu do contexto para diretórios controlados
- 4.3. Atalho no menu arquivo do Explorer em um diretório controlado
- 4.4. Menu de quando se clica com o botão direito e se arrasta um diretório que está sob o controle de versão.
- 4.5. Janela de Autenticação
- 4.6. A janela de Obtenção
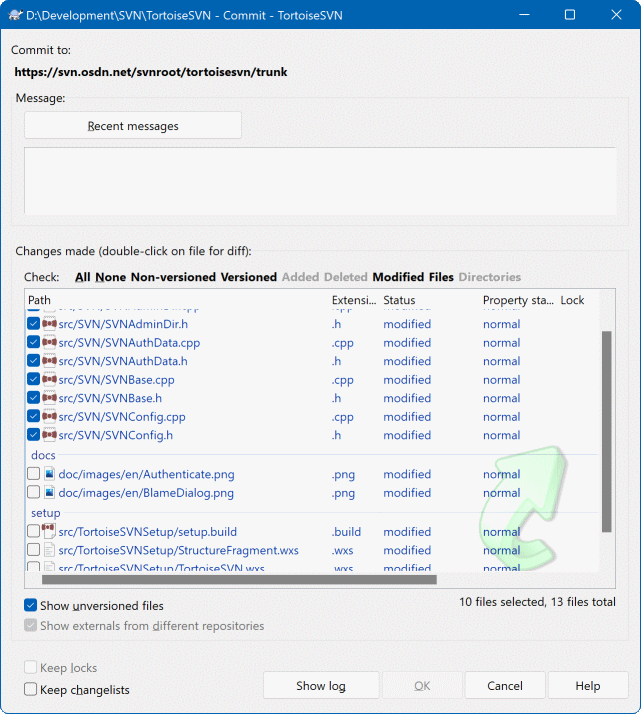
- 4.7. A janela de Submissão
- 4.8. A Janela de Submissão Com Corretor Ortográfico
- 4.9. A janela de Progresso mostra uma submissão em progresso
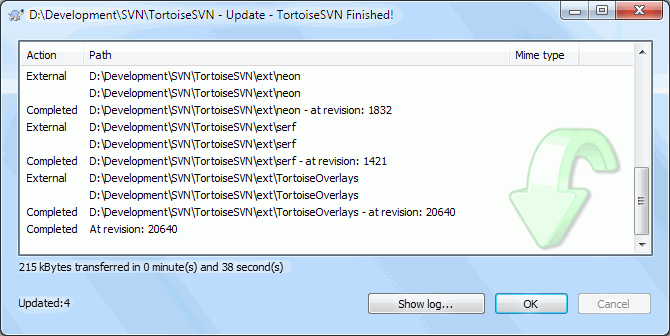
- 4.10. Janela de progresso mostrando atualização terminada
- 4.11. Explorer mostra os ícones sobrepostos
- 4.12. Página de propriedade do explorador, aba do Subversion
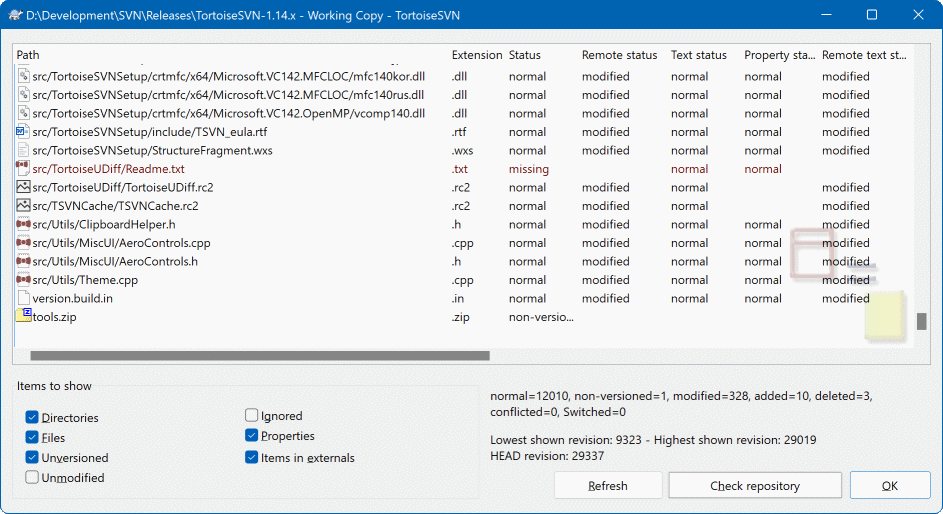
- 4.13. Procurar por Modificações
- 4.14. Janela de Submissão com Lista de Alterações
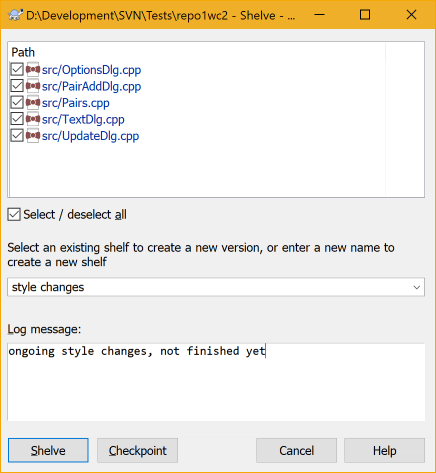
- 4.15. Shelve dialog
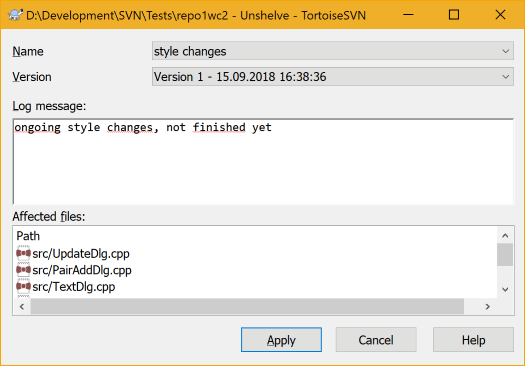
- 4.16. Unshelve dialog
- 4.17. A Janela de Histórico de Revisão
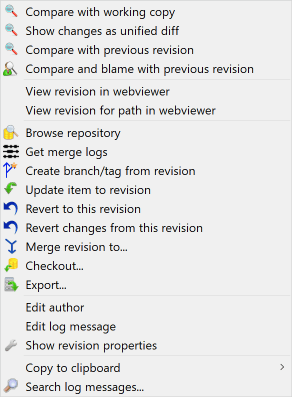
- 4.18. O Menu de Contexto do Painel Superior da Janela de Auditoria da Revisão
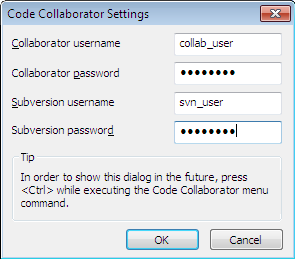
- 4.19. A Janela de Configurações do Colaborador de Código
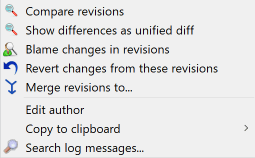
- 4.20. Menu de Contexto do Painel Superior para 2 Revisões Selecionadas
- 4.21. O Painel Inferior da Janela de Auditoria com Menu de Contexto
- 4.22. The Log Dialog Bottom Pane with Context Menu When Multiple Files Selected.
- 4.23. A Janela de Auditoria Mostrando as Revisões de Rastreamento de Combinação
- 4.24. Histograma de Submissões-por-autor
- 4.25. Gráfico de Pizza das Submissões-por-Autor
- 4.26. Gráfico de Submissões-por-data
- 4.27. Ir para Janela de Desconectado
- 4.28. A Janela de Comparação de Revisões
- 4.29. O visualizar de diferenças de imagem
- 4.30. Explorar o menu de contexto para arquivos não versionados
- 4.31. Menu de quando se clica com o botão direito e se arrasta um diretório que está sob o controle de versão.
- 4.32. Explorar o menu de contexto para arquivos não versionados
- 4.33. Menu de contexto do Explorerer para arquivos controlados
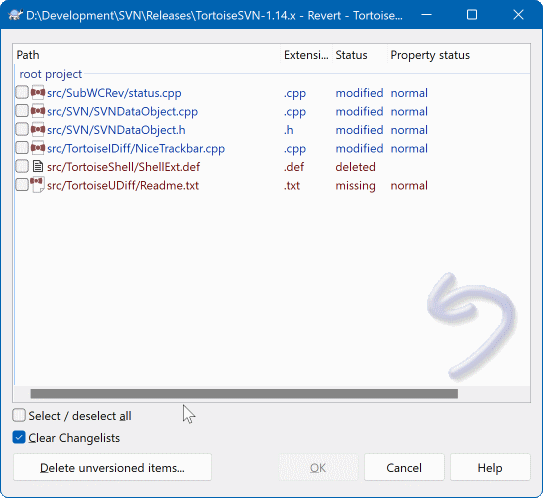
- 4.34. Janela de Reversão
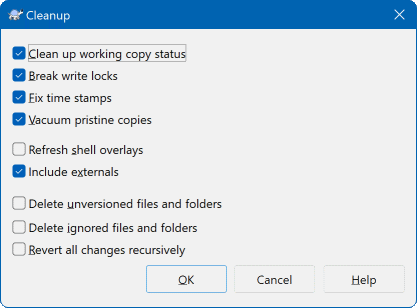
- 4.35. The Cleanup dialog
- 4.36. página de propriedades do Subversion
- 4.37. Adicionando propriedades
- 4.38. Caixa de diálogo de propriedades para scripts gancho
- 4.39. Caixa de diálogo da propriedade tipos de utilizador booleano
- 4.40. página da propriedade svn:externals
- 4.41. página da propriedade svn:keywords
- 4.42. página da propriedade svn:eol-style
- 4.43. página da propriedade tsvn:bugtraq
- 4.44. Página da propriedade do tamanho das mensagens de auditoria
- 4.45. Página da propriedade idioma
- 4.46. página da propriedade svn:mime-type
- 4.47. página da propriedade svn:needs-lock
- 4.48. página da propriedade svn:executable
- 4.49. Caixa de propriedades integra templates de mensagens de registo
- 4.50. A Janela de Ramificação/Rotulação
- 4.51. A Janela de Troca
- 4.52. O Assistente de Combinação - Selecionar Faixa de Revisões
- 4.53. O Assistente de Combinação - Árvore de Combinação
- 4.54. The Merge Conflict Dialog
- 4.55. The Merge Tree Conflict Dialog
- 4.56. The Merge-All Dialog
- 4.57. A Janela de Bloqueio
- 4.58. A Janela de Verificação de Modificações
- 4.59. A Janela de Criação de Correções
- 4.60. A Janela de Anotação / Autoria
- 4.61. TortoiseBlame
- 4.62. O Navegador de Repositório
- 4.63. Um Gráfico de Revisões
- 4.64. A Janela Exportar de uma URL
- 4.65. A Janela de Realocação
- 4.66. Caixa de diálogo de Propriedades do Bugtraq
- 4.67. Janela de exemplo de uma consulta de um rastreador de reportes
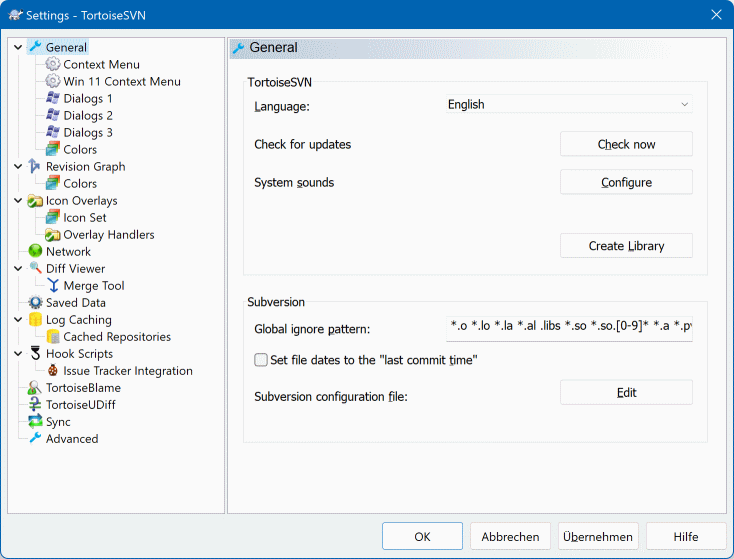
- 4.68. Janela de Configurações, Opção Geral
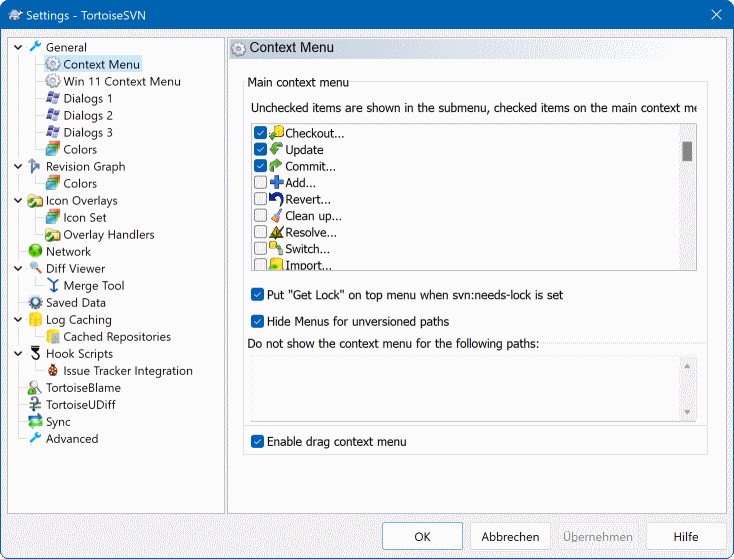
- 4.69. Janela de Configurações, Opção Menu de Contexto
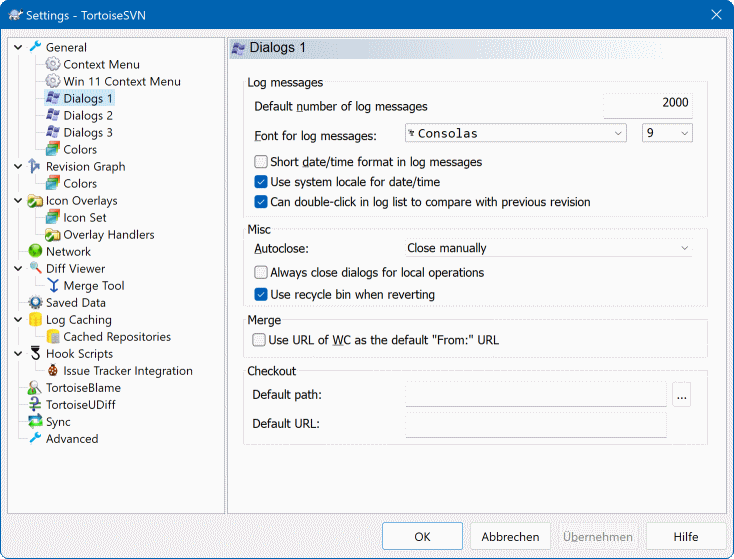
- 4.70. Janela de Configurações, Opção Janelas 1
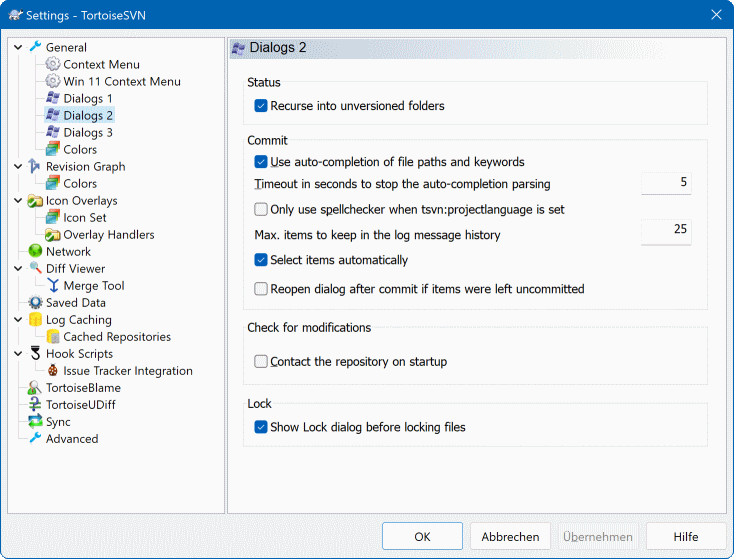
- 4.71. Janela de Configurações, Opção Janelas 2
- 4.72. Janela de Configurações, Opção Janela 3
- 4.73. Janela de Configurações, Opção Cores
- 4.74. Janela de Configurações, Opção Gráfico de Revisões
- 4.75. Janela de Configurações, Opção Cores do Gráfico de Revisões
- 4.76. Janela de Configurações, Opção Sobreposição de Ícones
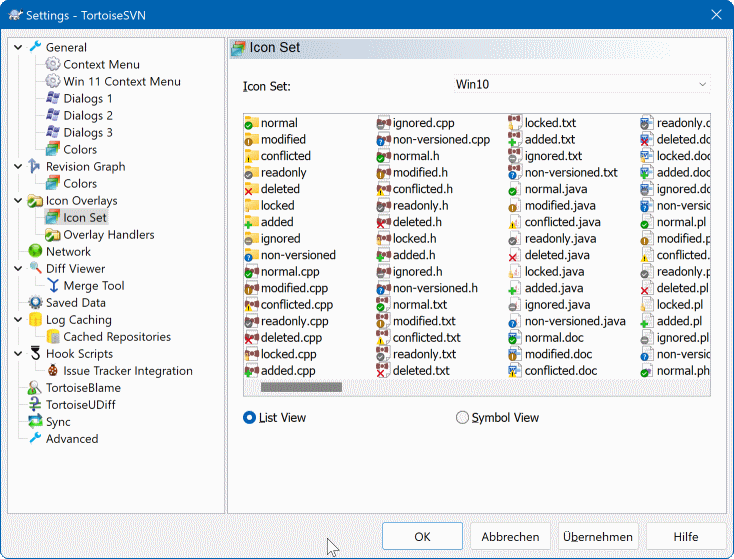
- 4.77. Janela de Configurações, Opção Definição de Ícones
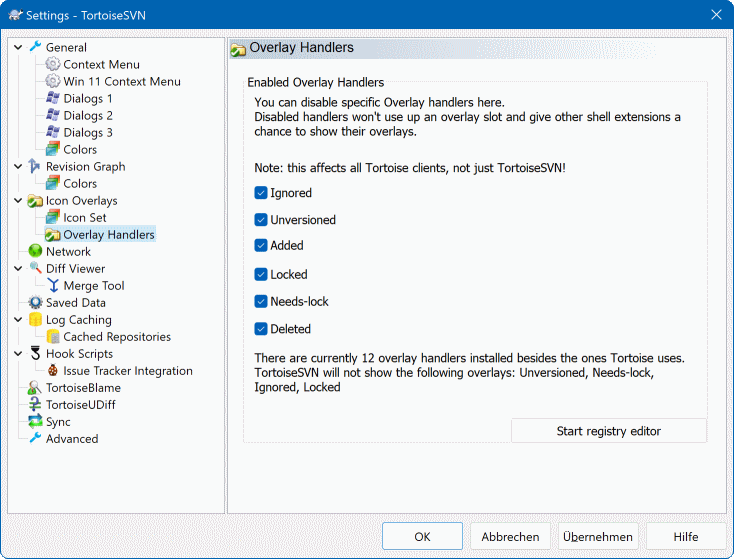
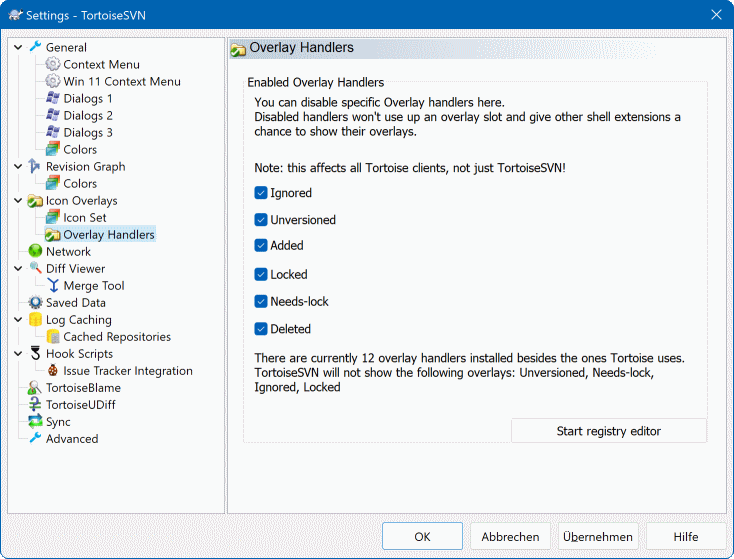
- 4.78. Janela de Configurações, Opção Manipuladores de Ícones
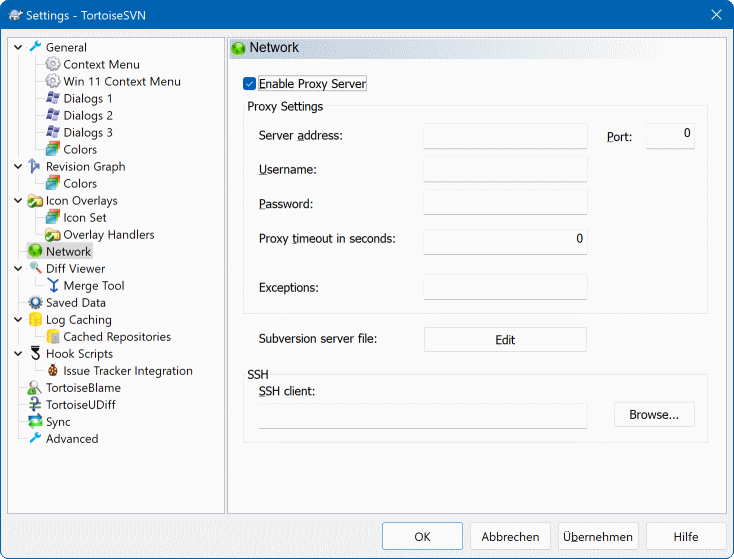
- 4.79. Janela de Configurações, Opção Rede
- 4.80. Janela de Configurações, Opção Visualizador de Diferenças
- 4.81. Janela de Configurações, Opção Diferenciação/Combinação Avançado
- 4.82. Janela de Configurações, Opção Dados Salvos
- 4.83. Janela de Configurações, Opção Cache da Auditoria
- 4.84. Janela de Configurações, Opção Estatísticas de Cache da Auditoria
- 4.85. Janela de Configurações, Opção Scripts de Gancho
- 4.86. Janela de Configurações, Opção Configuração de Scripts de Gancho
- 4.87. Janela de Configurações, Opção Integração com Rastreador de Reportes
- 4.88. Janela de Configurações, Opção Tortoise Autoria
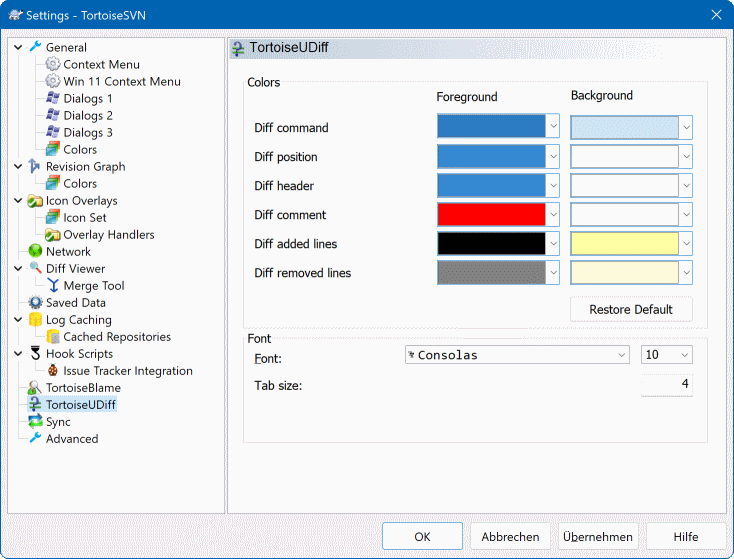
- 4.89. The Settings Dialog, TortoiseUDiff Page
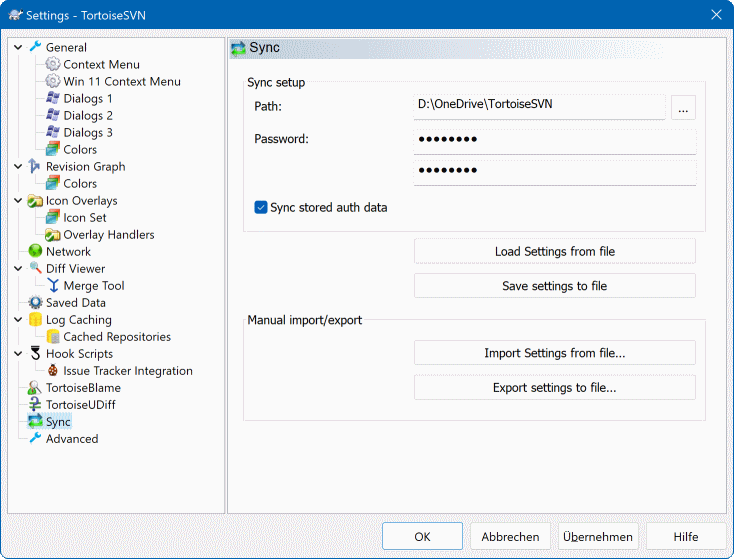
- 4.90. The Settings Dialog, Sync Page
- 4.91. Barra de tarefas com agrupamento padrão
- 4.92. Barra de tarefas com agrupamento por repositório
- 4.93. Barra de tarefas com agrupamento por repositório
- 4.94. Agrupamento da barra de tarefas com sobreposições de cores do repositório
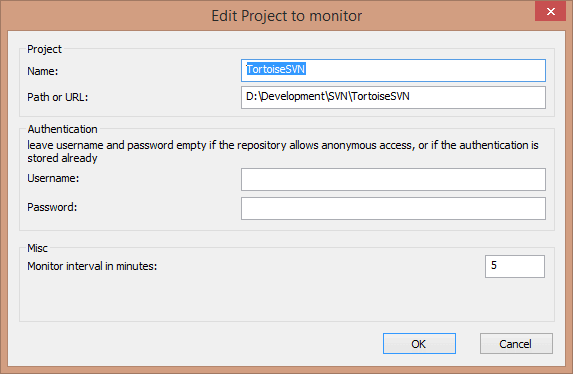
- 5.1. The edit project dialog of the project monitor
- 5.2. The main dialog of the project monitor
- B.1. The TortoiseSVN right drag context menu for moving files
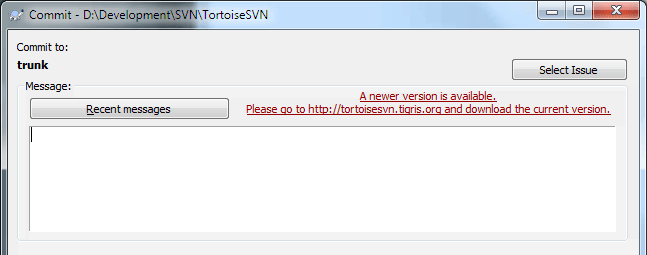
- C.1. Dialogo do commit, mostrando a notificação atualizada
Lista de Tabelas
- 2.1. URLs de Acesso ao Repositório
- 4.1. Revisãio Pinado
- 6.1. List of available command line switches
- 6.2. List of SubWCRev error codes
- 6.3. Lista de palavras-chave disponíveis
- 6.4. COM/automation methods supported
- C.1. Entradas do menu e seus valores
- D.1. Lista de comandos e opções disponíveis
- D.2. Lista de opções disponíveis
- D.3. Lista de opções disponíveis
Índice

Controle de versão é a arte de administrar as mudanças das informações. Isto é uma ferramenta crítica para programadores, que normalmente gastam horas fazendo pequenas modificações em seus aplicativos e então desfazem ou verificam algumas dessas modificações no dia seguinte. Imagine uma equipe de vários desenvolvedores trabalhando juntos - e talvez simultaneamente em mesmos arquivos! - e você precisa ver porque um bom controle é necessário para controlar uma possível desordem.
O TortoiseSVN é um cliente open-source gratuito para a plataforma Windows voltado para o sistema de controle de versão Apache™ Subversion®. Ou seja, o TortoiseSVN administra arquivos e diretórios no decorrer do tempo. Os arquivos são armazenados em um repositório central. O repositório parece-se muito com um servidor de arquivos comum, exceto pelo fato que ele consegue se lembrar de toda e qualquer alteração já feita em algum momento nos seus arquivos e diretórios. Isso permite a você recuperar versões antigas de seus arquivos e examinar o histórico de como, quando e por quem seus dados foram modificados. Esse é o motivo pelo qual muitas pessoas pensam no Subversion, e em sistemas de controle de versão em geral, como uma espécie de “máquina do tempo”.
Alguns sistemas de controle de versão também são um aplicativo de gerenciamento de configuração (SCM). Esses sistemas são especificamente adaptados para controlar estruturas de código fonte, e tem muitas características de um aplicativo específico de desenvolvimento - como um aplicativo para uma linguagem de programação específica, or fornecendo ferramentas de construção de software. Subversion, entretanto, não é um desses sistemas; é um sistema genérico que pode ser usado para administrar qualquer conjunto de arquivos, incluindo código fonte.
O que faz do TortoiseSVN um bom aplicativo cliente para Subversion? Aqui está uma pequena lista de recursos.
- Interface integrada
TortoiseSVN integra-se perfeitamente ao shell do Windows (ou seja, o Explorer). Isto significa que você pode continuar trabalhando com as ferramentas com as quais você já está familiarizado. E você não tem que mudar para uma aplicação diferente cada vez que precisar das funções de controle de versão.
E você não está limitado a usar o Windows Explorer; os menus de contexto do TortoiseSVN funcionam em muitos outros gerenciadores de arquivos, e também na caixa de diálogo Arquivo/Abrir que é comum na maioria dos aplicativos padrão Windows. Você deve, entretanto, ter em mente que o TortoiseSVN é intencionalmente desenvolvido como uma extensão para o Windows Explorer. Assim, é possível que em outras aplicações, a integração não seja tão completa e, por exemplo, as sobreposições de ícones podem não ser exibidas.
- Sobreposição dos ícones
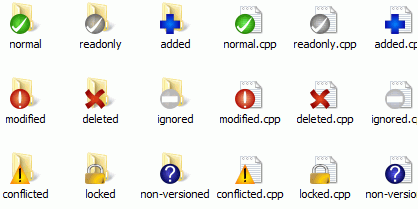
A situação de cada arquivo e diretório controlado é indicado por uma pequena sobreposição de ícones. O que permite a você ver rapidamente qual é a situação da sua cópia de trabalho.
- Interface Gráfica de Usuário
Quando você lista as alterações em um arquivo ou pasta, você pode clicar em uma revisão para ver os comentários para aquela submissão. Você também pode ver uma lista de arquivos alterados - basta clicar duas vezes em um arquivo para ver exatamente o que mudou.
A caixa de diálogo de submissões lista todos os itens que serão incluídos em uma submissão, e cada item tem uma caixa de seleção para que você possa escolher os itens que você deseja incluir. Arquivos sem versão também podem ser listados, no caso de você ter esquecido de adicionar aquele novo arquivo.
- Fácil acesso aos comandos do Subversion
Todos os comandos do Subversion estão disponíveis nos menus do explorer. TortoiseSVN adiciona seu próprio submenu.
Uma vez que TortoiseSVN é um aplicativo cliente do Subversion, também gostaríamos de mostrar a você algumas das funcionalidades do Subversion:
- Controle de diretório
CVS somente mantém o histórico de alterações de arquivos individuais, mas Subversion usa um controle “virtual” de sistema de arquivos que mantém o histórico de toda a estrutura de diretório ao longo do tempo. Arquivos e diretórios são controlados. E como resultado, temos verdadeiros comandos para mover e copiar arquivos e diretórios.
- Submissão atômica
Cada submissão é enviada completamente para o repositório, ou não é enviado nada. Isto permite aos desenvolvedores construir e submeter as alterações em partes coesas.
- Metadados controlados
Cada arquivo e diretório possue um conjunto de “propriedades” invisíveis. Você pode inventar e gravar qualquer conjunto de chave/valor que desejar. Propriedades são controladas ao longo do tempo, exatamente como o conteúdo dos arquivos.
- Escolha das camadas da rede
Subversion tem uma noção abstrata de acesso ao repositório, tornando fácil para as pessoas desenvolverem novos mecanismos de rede. O servidor de rede avançado do Subversion é um módulo para o servidor web Apache, do qual expõe uma variante do HTTP chamada WebDAV/DeltaV. Isto dá ao Subversion uma grande vantagem em estabilidade e interoperabilidade, e provê várias funcionalidades chave de graça: autenticação, autorização, compressão, e navegação no repositório, por exemplo. Uma característica menor, um processo servidor autônomo do Subversion também está disponível. Este servidor exterioriza um protocolo específico que pode ser facilmente encapsulado sobre o protocolo ssh.
- Manipulação consiste de dados
Subversion apresenta as diferenças de arquivos usando um algoritmo de comparação binária, que funciona igualmente para arquivos texto (compreensíveis) and binários (ilegíveis). Ambos os tipos de arquivos são gravados compactados da mesma forma no repositório, e as diferenças são trasmitidas em ambas as direções através da rede.
- Ramificação e Rotulação eficiente
Os recursos necessários para ramificar e rotular não é propocional ao tamanho do projeto. Subversion cria ramos e rótulos simplesmente copiando o projeto, usando um mecanismo parecido ao hard-link. Deste modo estas operações são realizadas rapidamente sem variação de tempo, e consomem muito pouco espaço no repositório.
TortoiseSVN é um projeto Open Source desenvolvido sob a licença GNU General Public License (GPL). É gratuito para baixar e de uso gratuito, pessoalmente ou comercialmente, em qualquer número de computadores.
Although most people just download the installer, you also have full read access to the source code of this program. You can browse it on this link https://osdn.net/projects/tortoisesvn/scm/svn/. The current development line is located under /trunk/, and the released versions are located under /tags/.
TortoiseSVN e Subversion são desenvolvidos por uma comunidade de pessoas que estão trabalhando nestes projetos. Eles vêm de diferentes países pelo mundo, trabalhando juntos para criar um ótimo software.
Em 2002, Tim Kemp achou que o Subversion era um sistema de controle de versão muito bom mas que faltava uma boa interface gráfica GUI. A idéia para um programa cliente do Subversion integrado ao shell do Windows foi inpirado num programa similar para CVS de nome TortoiseCVS. Tim estudou o código fonte do TortoiseCVS e o usou como base para o TortoiseSVN. Ele então começou o projeto, registrando o domínio tortoisesvn.org e colocando o código fonte online.
Por volta daquela época, Stefan Küng estava procurando por um bom e gratuito sistema de controle de versão, encontrando assim o Subversion e o código do TortoiseSVN. Como o TortoiseSVN ainda não estava pronto para o uso, ele se juntou ao projeto e começou a programar. Ele, em pouco tempo, reescreveu grande parte do código existente e começou a adicionar comandos e features, até o ponto em que nada do código original restou.
À medida que o Subversion se tornou mais estável, mais e mais usuários foram atraídos, os quais também começaram a usar o TortoiseSVN como seu programa cliente Subversion. A base de usuários cresceu rapidamente (e ainda está crescendo todos os dias). Foi então que Lübbe Onken ofereceu ajuda com alguns belos ícones e a logomarca para o TortoiseSVN. Ele agora toma conta do website e administra muitas traduções.
Com o tempo, outros sistemas de controle de versão ganharam seus próprios clientes do Tortoise, o que passou a causar um problema com a sobreposição de ícones (icon overlays) no Windows Explorer: o número de sobreposições é limitado e mesmo um único cliente do Tortoise pode facilmente exceder esse limite. É quando Stefan Küng implementou o componente TortoiseOverlays, que permite a todos os clientes Tortoise usarem as mesmas sobreposições de ícones. Agora, todos os clientes open-source do Tortoise e mesmo alguns não-Tortoise usam esse componente compartilhado.
- Tim Kemp
por iniciar o projeto TortoiseSVN
- Stefan Küng
pelo trabalho manual para tornar o TortoiseSVN o que é agora, e sua liderança no projeto
- Lübbe Onken
pelos belos ícones, logomarca, encontrar erros, traduções e gerenciar as traduções
- Simon Large
por atualizar a documentação
- Stefan Fuhrmann
pelo cache de log e o gráfico de revisões
- O livro Subversion
por ensinar sobre o Subversion e pelo capítulo 2 de onde copiamos
- O estilo de projeto Tigris
pelos estilos da documentação de onde copiamos
- Nossos Colaboradores
pelos patches, relatório de erros e novas idéias, e por ajudar outros, respondendo perguntas na nossa lista de discussão
- Nossos Contribuidores
por muitas horas de diversão com as músicas que nos enviaram
Este livro é escrito para o pessoal letrado em computação que querem usar o Subversion para administrar seus dados, mas preferem usar uma cliente GUI do que usar um cliente por linhas de comando. TortoiseSVN é uma extensão do shell do windows e se supõe que o usuário esteja familiarizado com o windows explorer e saiba usá-lo.
Este Prefácio explica o que TortoiseSVN é, um pouco sobre o projeto TortoiseSVN, a comunidade de pessoas que trabalham nele, as condições de licenciamento para seu uso e sua distribuição.
O Capítulo 1, Começandoexplica como instalar TortoiseSVN no seu computador, e como começar a usá-lo de imediato.
Em Capítulo 2, Conceitos básicos do Controle de Versão damos uma introdução sobre o controle de revisão Subversion que é a base do TortoiseSVN. Isto é uma cópia da documentação do projeto Subversion e explica as diferentes formas de controlar versão, e como Subversion funciona.
O capítulo Capítulo 3, O Repositório explica como configurar um repositório local, útil para testar o Subversion e o TortoiseSVN usando um único PC. Ele também explica um pouco sobre administração de repositório, assunto relevante também para repositórios localizados em um servidor.
O Capítulo 4, Guia do Uso Diário é a parte mais importante pois explica todas as principais características do TortoiseSVN e como usá-las. Com o formato de tutorial, inicia explicando a função de obter uma cópia de trabalho, depois como modificar a cópia de trabalho, então submeter as modificações, etc. E então continua com os tópicos avançados.
O Capítulo 5, Project Monitor explica como você pode monitorar seus projetos Subversion para não perder submissões importantes dos outros membros da sua equipe.
Capítulo 6, SubWCRev é um outro aplicativo que acompanha TortoiseSVN que permite extrair informações da cópia de trabalho e escrever isto em arquivos.. Isto é útil para incluir informações sobre a construção dos seus projetos.
A seção Apêndice B, Como eu faço... responde as dúvidas comuns sobre a execução das tarefas que não estão explicitamente descritas em outras seções.
A parte Apêndice D, Automatizando o TortoiseSVN mostra como a as janelas do TortoiseSVN podem ser chamadas através da linha de comando. Isso pode ser útil em scripts que precisam da interação do usuário.
O Apêndice E, Command Line Interface Cross Reference mostra a relação entre os comandos do TortoiseSVN e seus equivalentes na linha de comando do aplicativo Subversion svn.exe.
Para facilitar a leitura do documento, o nome de todas as telas e Menus do TortoiseSVN estão em destaque. A Janela de Log por exemplo.
As opções de menu estão indicadas com uma seta. → significa: selecionar Mostrar Log no menu TortoiseSVN.
Quando referenciar um menu específico dentro de uma das janelas do TortoiseSVN, será usado algo como: →
Os Botões da Interface do Usuário são indicados como: Clique em para continuar.
Ações de Usuários são indicados por uma fonte em negrito. Alt+A: pressione a tecla Alt no seu teclado e enquanto a aperta, pressione também a tecla A. Right drag: aperte o botão direito do mouse e enquanto segura, arraste os itens para o novo local.
Saídas de vídeo e entradas de dados são indicadas com uma fonte different.
Importante
Detalhes importantes são indicados com um ícone.
Dica
Dicas tornam sua vida mais fácil.
Cuidado
Lugares onde você deve tomar cuidado com o que faz.
Atenção
Onde é preciso cuidado extremo. Corrupção de dados e outras coisas desagradáveis podem ocorrer se estes avisos forem ignorados.
 |
Índice
Esta seção é voltada às pessoas que gostariam de saber do que se trata o TortoiseSVN e fazer um teste. Ela explica como instalar o TortoiseSVN e configurar um repositório local, e dá o passo-a-passo para a maioria das operações mais comuns.
O TortoiseSVN está disponível para Windows Vista ou superior, nas versões 32 e 64 bits. O instalador da versão 64-bit para Windows também inclui os arquivos necessários para a versão 32 bits. Isso significa que não é preciso instalar esta versão separadamente para poder utilizá-la nas aplicações de 32 bits.
O suporte para Windows 98, Windows ME e Windows NT4 foi descontinuado na versão 1.2.0, ao passo que o suporte para Windows 2000 e XP até o SP2 acabou na versão 1.7.0. O suporte para Windows XP com o SP3 terminou na versão 1.9.0. Entretanto, você ainda pode baixar e instalar essas versões mais antigas caso necessite delas.
TortoiseSVN vem com um instalador fácil de usar. Clique duas vezes no arquivo de instalação e siga as instruções. O instalador cuidará de todo o resto. Não se esqueça de reiniciar após a instalação.
Importante
Você necessita de privilégios de Administrador para instalar o TortoiseSVN. O arquivo de instalação pedirá as credenciais de Administrador se necessário.
Pacotes de linguagens estão disponíveis, podendo traduzir a interface do TortoiseSVN para muitas diferentes línguas. Por favor, dê uma olhada em Apêndice G, Pacotes de Idiomas e Corretores Ortográficos para mais informações em como as instalar.
Se você tiver qualquer problema durante ou após a instalação do TortoiseSVN, por favor acesse nosso FAQ disponível em http://tortoisesvn.net/faq.html.
Antes de nos ocuparmos em trabalhar com arquivos reais, é importante uma visão geral de como o Subversion trabalha e os termos em que ele é usado.
- O Repositório
Subversion usa um banco de dados central que contem todos os arquivos versionados com seu histórico completo. Esse banco de dados é referenciado como repositório. O repositório normalmente está alocado num servidor de arquivos rodando o servidor Subversion, abastecendo clientes do Subversion (como o TortoiseSVN) quando requisitado. Se você faz backup de apenas uma coisa, faça o backup do seu repositório pois é a cópia mestre definitiva de todos os seus dados.
- Cópia de Trabalho
Aqui é onde você faz o trabalho de verdade. Todo desenvolvedor tem sua própria cópia de trabalho, algumas vezes conhecido como sandbox, no seu PC local. Você pode baixar a última versão do repositório, trabalhar nele localmente sem afetar os outros e então, quando estiver feliz com as mudanças que fez, enviá-las de volta ao repositório.
Uma cópia de trabalho do Subversion não possui todo o histórico do projeto, mas mantem uma cópia dos arquivos como estavam no repositório antes de você começar a fazer modificações. Isto quer dizer que é fácil fazer a checagem das modificações que você realizou.
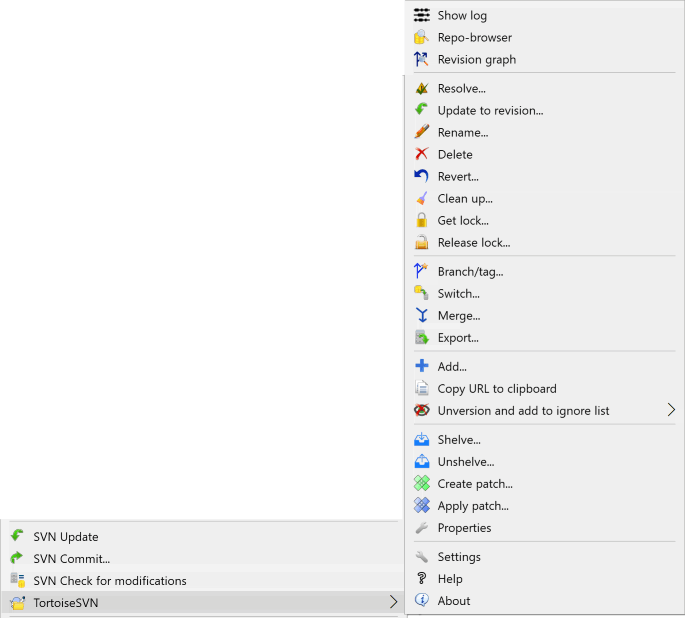
Você também tem que saber onde encontrar o TortoiseSVN, pois não há muito do que se ver no Menu Inicial. Isso é porque o TortoiseSVN é uma extensão Shell, portanto, primeiro de tudo, inicie o Windows Explorer. Clique com o botão direito numa pasta no Explorer e você deverá ver umas entradas novas no menu de contexto como este:
Esta seção mostra como experimetar as features mais usadas em um repositório pequeno. Naturalmente, não se explica tudo - este é apenas um Guia Rápido apesar de tudo. Uma vez que você estiver com tudo rodando, deverá pegar um tempinho e ler o resto deste guia, que o leva a coisas com muito mais detalhes. Também é explicado mais sobre como configurar um servidor Subversion.
Para um projeto real você terá um repositório configurado em algum lugar seguro e um servidor do Subversion para ser controlado. Para os propósitos deste tutorial nós usaremos um repositório local do Subversion que tem como característica o acesso direto ao repositório criado no seu disco sem a necessidade de um servidor.
Primeiro, crie um diretório novo vazio no seu computador. Pode ser em qualquer lugar e ter qualquer nome, mas neste tutorial nós o chamaremos C:\svn_repos. Agora, clique com o botão direito na pasta criada e, no menu de contexto, escolha → . O repositório é então criado dentro da pasta, pronto para ser usado. Também criaremos a estrutura interna padrão de pastas clicando no botão
Importante
A característica do repositório local é muito útil para testes e avaliações mas exceto se você é um desenvolver individual em um único computador você deverá sempre utilizar um servidor do Subversion devidamente configurado. É tentador para uma pequena empresa evitar o trabalho de configurar um servidor e simplesmente acessar seu repositório em uma rede compartilhada. Nunca faça isso. Você perderá dados. Leia “Acessando um Repositório em uma Rede Compartilhada” para descobrir porque fazer isso é uma má idéia, e como configurar um servidor.
Agora temos um repositório, mas está completamente vazio no momento. Suponhamos que há alguns arquivos em C:\Projects\Widget1 que eu gostaria de adicionar. Navegue para a pasta Widget1 pelo Explorer e clique com o botão direto sobre ela. Agora seleiona → que vai mostrar uma janela
Um repositório do Subversion é reconhecido pela URL, que nos permite especificar um repositório em qualquer lugar na Internet. Neste caso, precisamos apontar para nosso próprio repositório local que tem a URL file:///c:/svn_repos/trunk, ao qual adicionamos nosso próximo nome para o projeto Widget1. Note que há 3 barras depois de file: e que eles são mesmo usados.
Outra importante característica desta janela é a caixa Mensagem Importante a qual lhe permite digitar uma mensagem descrevendo o que você está fazendo. Quando você visualizar o histórico do seu projeto, essas mensagens serão um valioso guia para entender as alterações feitas e porque. Neste caso nós podemos dizer algo simples como “Importar o Projeto Componente1”. Clicar no e o diretório será adicionado ao seu repositório.
Agora que há um projeto em nosso repositório, precisamos criar uma cópia de trabalho para usar nas tarefas do dia-a-dia. Note que o ato de importar uma pasta não a transforma automaticamente em uma cópia de trabalho. O termo do Subversion para criar uma nova cópia de trabalho é Checkout. Vamos fazer o checkout da pasta Widget1 do nosso repositório para uma pasta de desenvolvimento chamada C:\Projects\Widget1-Dev. Crie essa pasta, depois clique com o botão direito do mouse sobre ela e selecione TortoiseSVN
Importante
Na configuração padrão, o item Obter do menu não está localizado no submenu do TortoiseSVN, contudo, é mostrado no menu superior do explorador. Os comandos do TortoiseSVN que não estão no submenu têm o SVN agregado em:
Você notará que a aparência deste diretório será diferente do diretório original. Cada arquivo terá uma marca verde no canto inferior esquerdo. Esses ícones de situação do TortoiseSVN estarão presentes apenas na cópia de trabalho. A situação verde indica que o arquivo não foi alterado em relação à versão do repositório.
Hora de trabalhar. Digamos que os arquivos 2Componente1.c2 e 3ReadMe.txt3da pasta Componente1-Dev foram editados. Note que a sobreposição de ícones nestes arquivos estão agora em cor vermelha, indicando que há alterações locais nos mesmos.
Mas o que nós fizemos? Clique com o botão direito em um dos arquivos alterados e selecione → . A ferramenta de comparação do TortoiseSVN será aberta, mostrando exatamente quais linhas foram modificadas.
Bom, então nós estamos felizes com as alterações, vamos atualizar o repositório. Esta ação é referenciada como Submissão das alterações. Clique com o botão direito sobre o diretório Componente1-Dev e selecione → . A janela de submissão mostrará os arquivos alterados, cada um com uma caixa de seleção. Você pode querer escolher apenas alguns dos arquivos, mas neste caso nõs vamos submeter as alterações em ambos os arquivos. Digite uma mensagem para descrever sobre o que são as alterações e clique em . A janela de progresso mostrará os arquivos sendo enviados para o repositório e então está feito.
Como os desenvolvedores precisarão adicionar novos arquivos - vamos dizer que você adicionou alguma nova funcionalidade em Extras.c e adicionou um referência no arquivo que já existia Makefile. Clique com o botão direito sobre o diretório e selecione → . A janela de Adição gora mostra para você todos os arquivos não controlados e você poderá selecionar cada um que você quer adicionar. Outra forma de adicionar arquivos poderá ser um clique com o botão direito sobre o próprio arquivo e então selecionar → .
Agora quando você for submeter o diretório, o novo arquivo aparecerá como Adicionado e o arquivo já existente como Modificado. Note que você pode dar um duplo clique sobre o arquivo modificado e verificar exatamente as alterações feitas.
Uma das características mais úteis do TortoiseSVN é a janela de Auditoria. A janela mostra a você a lista de todos os commits feitos para um arquivo ou diretório, e mostra detalhadamente as mensagens que você digitou (você digitou uma mensagem para o commit como sugerido? Se não, agora você vê porque isso é importante).
Bem, então eu manipulei um pouco aqui e usei uma imagem do repositório do TortoiseSVN.
O painel superior mostra a lista das revisões submetidas e o início da mensagem relacionada. Se você selecionar uma dessas revisões, o painel do meio mostrará a mensagem completa para a revisão e o painel de baixo mostrará a lista dos arquivos e diretórios modificados.
Cada um dos painéis possui um menu de contexto que provê a você várias maneiras de usar a informação. No painel inferior você pode dar um duplo clique em um arquivo e ver exatamente as alterações feitas naquela revisão. Leia “Janela de Revisão de Registro” para ver o texto completo.
Umas das características de todo sistema de controle de revisão é que eles permitem a você desfazer alterações feitas anteriormente. Como você pode esperar, TortoiseSVN faz isso de forma simples.
Se você quer controlar as mudanças que você fez e ainda não submeteu e desfazer essas mudanças voltando para a versão original, →
Se você quer desfazer as alterações de uma revisão em particular, abra a janela de Auditoria e encontre a revisão em questão. Selecione → e então as alterações da revisão serão desfeitas.
Este guia tem mostrado a você uma breve descrição das coisas mais importantes do TortoiseSVN e funcionalidades úteis, mas é claro que há mais que isso que nós não abordamos. Nós fortemente recomendamos que você gaste um tempo para ler todo o manual, especialmente Capítulo 4, Guia do Uso Diário que lhe dará mais detalhes sobre o que se faz no do dia-a-dia.
Nós encontramos muitas dificuldades para ter certeza de que este manual é tanto informativo quanto fácil de ler, mas nós reconhecemos que é há muito disso! Fique tranquilo e não tenha medo de tentar as coisas em um repositório de testes a medida que vai lendo. A melhor maneira de aprender é usando.
Índice
Este capítulo é uma versão levemente modificada do mesmo capítulo do livro do Subversion. Há uma versão disponível do livro do Subversion aqui: http://svnbook.red-bean.com/.
Este capítulo é uma pequena, simplória introdução ao Subversion. Se você é novato em controle de versões, este capítulo com certeza é para você. Nós começamos com uma abordagem geral dos conceitos do controle de versão, seguindo nossas idéias sobre o Subversion, e mostrando alguns exemplos simples de uso do Subversion.
Embora os exemplos desse capítulo mostre pessoas compartilhando uma porção de código de fonte, tenha em mente que Subversion pode controlar qualquer conjunto de arquivos - não está limitado a ajudar programadores.
Subversion é um sistema centralizador de compartilhamento de informação. A essência é um repositório, que é um arquivo central de dados. O repositório grava informação no formato de diretório de arquivo de sistemas - uma típica hierarquia de arquivos e diretórios. Quantos clientes quiser se conectam no repositório, e então leem e escrevem nesses arquivos. Escrevendo dados, um usuário torna a informação disponível para outros; lendo os dados, um usuário recebe a informação de outros.
Então porque isto é interessante? Até agora, isso se parece com a definição de um típico servidor de arquivos. E de verdade, o repositório é um tipo de servidor de arquivos, mas não é sua função normal. O que o repositório do Subversion faz de especial é que ele guarda cada modificação feita: cada modificação para cada arquivo e mesmo as modificações na prória estrutura de diretórios, como adição, exclusão e reorganização de arquivos e diretórios.
When a client reads data from the repository, it normally sees only the latest version of the filesystem tree. But the client also has the ability to view previous states of the filesystem. For example, a client can ask historical questions like, “ what did this directory contain last Wednesday? ”, or “ who was the last person to change this file, and what changes did they make? ” These are the sorts of questions that are at the heart of any version control system: systems that are designed to record and track changes to data over time.
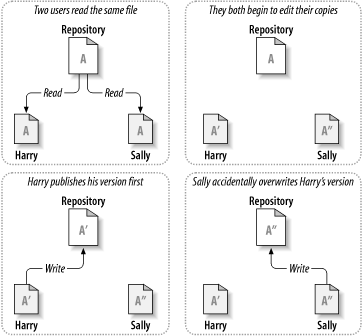
Todo sistema de controle de versão precisa resolver algumas problemas fundamentais: como o sistema vai permitir aos usuários compartilhar a informação, mas prevenindo que um não atrapalhe o outro? É muito fácil para os usuários acidentalmente sobreescrever as modificações de outros no repositório.
Considere o cenário: suponha que nós temos dois usuários, Harry e Sally. Cada um deles decide editar o mesmo arquivo no mesmo repositório ao mesmo tempo. Se Harry salvar suas alterações no repositório primeiro, é possível que (alguns tempo depois) Sally poderia acidentalmente sobreescrever as alterações com sua versão do arquivo. Enquanto a versão do arquivo do Harry se perderia para sempre (porque o sistema guarda cada modificação), qualquer alteração que Harry fez não estariam presentes na nova versão do arquivo de Sally, porque ela nunca viu as modificações do Harry. O trabalho do Harry foi perdido - ou no mínimo estaria na versão mais recente - e provavelmente por acidente. Esta é definitivamente um situação que nós queremos evitar!
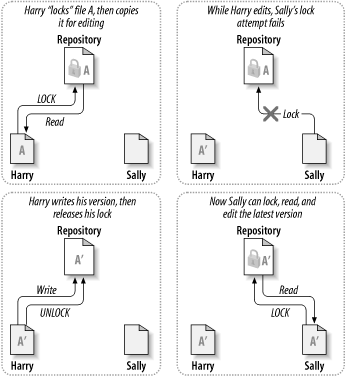
Muitos sistemas de controle de versão usam o modelo alocar-modificar-desalocar para resolver este problema, o qual é uma solução simples. Em cada sistema, o repositório permite somente uma pessoa por vez modificar o arquivo. Primeiro Harry deve alocar o arquivo antes que possa fazer as alterações. Alocar um arquivo é como um controle de biblioteca/ se Harry alocou o arquivo, então Sally não pode fazer qualquer alteração nele. Se ela tentar alocar o arquivo, o repositório vai negar essa solicitação. Tudo que ela pode fazer é ler o arquivo, e esperar até que Harry acabe as suas alterações e libere o arquivo. Depois que Harry desalocar o arquivo, sua vez acaba, e então é a vez de Sally alocar o arquivo e fazer suas alterações.
O problema com o modelo alocar-modificar-desalocar é que é muito restritivo, e muitas vezes é um empecilho para os usuários:
Alocação pode causar problemas administrativos. Algumas vezes Harry vai alocar o arquivo e então esquecer dele. Entretanto, porque Sally continua esperando para para editar o arquivo, suas mãos estão atadas. E então Harry sai de férias. Agora Sally precisa pedir a um administrador para liberar o arquivo alocado por Harry. A situação acaba causando atrasos e uma porção de tempo perdido desnecessário.
Alocação pode causa uma serialização desnecessária. O que fazer se Harry estava editando o início de um arquivo texto, e Sally quer editar apenas o fim do arquivo? Estas alterações não se sobrepoem. Eles poderiam facilmente editar o arquivo ao mesmo tempo, e nenhum grande problema ocorreria, assumindo que as modificações seriam corretamente unificadas. Não é necessário travar o arquivo neste caso.
Alocar pode criar uma falta noção de segurança. Suponhamos que Harry aloque e altere o arquivo A, enquanto ao mesmo tempo Sally aloca e edita o arquivo B. Supondo que A e B dependem um do outro, e que as modificações feitas em cada um são semanticamente incompatíveis. Imprevisivelmente A e B não funcionam mais juntos. O sistema de alocação não tem como prever este problema - ainda que esse sistema passe uma falta sensação de segurança. É fácil para Harry e Sally imaginar que alocando arquivos, cada um está seguro, numa tarefa isola, e deste modo evitando discussões precosss sobre as modificações.
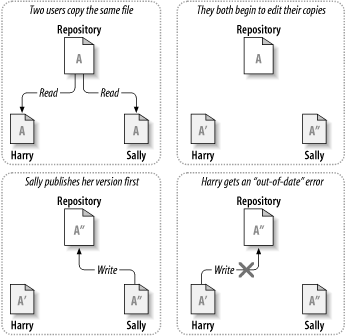
Subversion, CVS, and other version control systems use a copy-modify-merge model as an alternative to locking. In this model, each user's client reads the repository and creates a personal working copy of the file or project. Users then work in parallel, modifying their private copies. Finally, the private copies are merged together into a new, final version. The version control system often assists with the merging, but ultimately a human being is responsible for making it happen correctly.
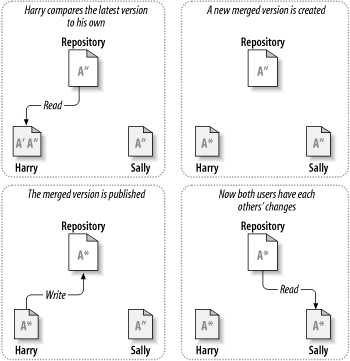
Aqui vai um exemplo. Digamos que Harry e Sally criam cada um uma cópia de trabalho de um mesmo projeto, copiado do repositório. Eles trabalham ao mesmo tempo, e fazem modificações em um mesmo arquivo A em suas cópias. Sally salva suas alterações no repositório primeiro. Quando Harry tenta salvar suas modificações após Sally, o repositório informa a ele que o arquivo A está desatualizado. Em outras palavras, o arquivo A do repositório tem alguma alteração desde a última vez que ele foi copiado. Então Harry é questionado sobre a unificação das modificações no repositório serem inseridas em sua cópia do arquivo A. Oportunamente as modicações de Sally não foram sobreescritas pelas dele; uma vez que ele unificou ambas as alterações, ele salva a sua cópia no repositório.
Mas o que acontece se as alterações de Sally se sobrepoem sobre as alterações de Harry? O que então deve ser feito? Esta situação é chamada de conflito, e em geral isto não é um problema. Quando Harry for questionado sobre a unificação das últimas alterações no repositório em sua cópia de trabalho, sua cópia do arquivo A de qualquer maneira é marcada como conflitante: ele verá todas as modificações em conflito, e manualmente resolverá. Entenda que o software não pode resolver automaticamente os conflitos; somente humanos são capazes de entender quais são as escolhas lógicas a serem tomadas. Uma vez que Harry manualmente resolveu o que estava se sobreponde (talvez precise discutir o conflito com Sally!), ele pode seguramente salvar o arquivo unificado de volta no repositório.
O modelo copiar-modificar-unificar pode parecer bagunçado, mas na prática, isto funciona grandemente. Usuários podem trabalhar paralelamente, sem esperar por outros. Quando eles trabalham num mesmo arquivo, a maioria das alterações não se sobrepoem; conflitos são pouco frequentes. E na maioria das vezes o tempo que leva para resolver os conflitos é muito menor que o tempo perdido em um sistema de alocação.
No final das contas, tudo isso acaba em um ponto crítico: comunicação entre os usuários. Quando os usuários não se comunicam direito, aumenta-se os conflitos sintáticos e semênticos. Nenhum sistema pode forçar uma perfeita comunicação, nenhum sistema pode detectar conflitos de semântica. Então não há porque se entusiasmar com falsas promessas de que um sistema de alocação evitará conflitos; na prática, alocações parecem restringir a produtividade mais que qualquer outra cosa.
Existe uma situação em comum onde o modelo alocar-modificar-desalocar se torna melhor, e é com arquivos que não são unificáveis. Por exemplo, se seu repositório contém alguns arquivos de imagens, e duas pessoas mudam a imagem ao mesmo tempo, não há nenhuma maneira de combinar as alterações. Ou Harry ou Sally perderá sua alteração.
Subversion usa a solução copiar-modificar-unificar como padrão, e na maioria dos casos é o suficiente. Contudo, a partir da versão 1.2, Subversion também permite alocar um arquivo, e se existem arquivos que não são unificáveis, você pode adotar uma política de alocação, que o Subversion está preparado para o que você precisa.
Você está pronto para ler sobre cópias de trabalho; agora vamos demonstrar como o aplicativo do Subversion cria e usa as cópias.
Uma cópia de trabalho do Subversion é uma estrutura de diretórios como outra qualquer em seu sistema local, contendo um conjunto de arquivos. Vocë pode editar esses arquivos como desejar, e se os arquivos são códigos fonte, você pode compilar seu programa a partir desta cópia como sempre fez. Sua cópia de trabalho é sua própria área pessoal. Subversion nunca vai incorporar alterações de outras pessoas, nem disponibilizar suas alterações para outros, até que você mesmo o faça.
Depois que você fez algumas modificações nos seus arquivos em sua cópia de trabalho e verificou que estão funcionando corretamente, Subversion provê a você comandos para publicar suas alterações para outras pessoas que trabalham com você em seu projeto (através da escrita no repositório). Se outras pessoas publicarem suas próprias modificações, Subversion provê comandos para unificar estas modificações na sua cópia de trabalho (através da leitura do repositório).
A working copy also contains some extra files, created and maintained by Subversion, to help it carry out these commands. In particular, your working copy contains a subdirectory named .svn, also known as the working copy administrative directory . The files in this administrative directory help Subversion recognize which files contain unpublished changes, and which files are out-of-date with respect to others' work. Prior to 1.7 Subversion maintained .svn administrative subdirectories in every versioned directory of your working copy. Subversion 1.7 takes a completely different approach and each working copy now has only one administrative subdirectory which is an immediate child of the root of that working copy.
Um repositório típico do Subversion geralmente guarda os arquivos (ou código fonte) para diversos projetos; normalmente, cada projeto é um subdiretório na estrutura de arquivos do repositório. Desta forma, uma cópia de trabalho de um usuário normalmente corresponde a uma específica subestrutura do repositório.
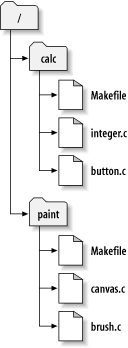
Por exemplo, suponha que você tenha um repositório que contem dois projetos de software.
Em outras palavras, o diretório principal do repositório tem dois subdiretórios: paint e calc.
To get a working copy, you must check out some subtree of the repository. (The term check out may sound like it has something to do with locking or reserving resources, but it doesn't; it simply creates a private copy of the project for you.)
Suppose you make changes to button.c. Since the .svn directory remembers the file's modification date and original contents, Subversion can tell that you've changed the file. However, Subversion does not make your changes public until you explicitly tell it to. The act of publishing your changes is more commonly known as committing (or checking in ) changes to the repository.
Para publicar suas modificações para outras pessoas, você pode usar o commando submeter do Subversion.
Agora suas modificações para button.c foram enviadas para o repositório; se outro usuário obter uma cópia de /calc, eles verão suas modificações na última versão do arquivo.
Suponha que vocë tenha uma colaboradora, Sally, que obteve uma cópia de /calc no mesmo momento que você. Quando você submeter suas modificações de button.c, a cópia de trabalho de Sally não será modificada; Subversion somente modificará as cópias dos usuários que solicitarem a atualização.
Para atualizar seu projeto, Sally deve pedir ao Subversion para atualizar sua cópia de trabalho, através do comando atualizar do Subversion. Isto incorporará sua modificação na cópia de trabalho dela, assim como qualquer outra modificação que tenha sido submetido desde que ela obteve sua cópia de trabalho.
Note que Sally não precisou especificar quais arquivos atualizar; Subversion usa a informação do diretório .svn, e além disso informações do repositório, para decidir quais arquivos precisam ser atualizados.
Repositórios do Subversion podem ser acessados através de vários métodos direfentes - como disco local, ou através de vários protocolos de rede. Um local de repositório, contudo, é sempre uma URL. O esquema de URL indica o método de acesso:
Tabela 2.1. URLs de Acesso ao Repositório
| Esquema | Método de Acesso |
|---|---|
file://
| Acesso direto ao repositório em um local ou dispositivo de rede. |
http://
| Acesso através do protocolo WebDAV para o módulo Subversion do servidor Apache. |
https://
| O mesmo que http://, mas com criptografia SSL |
svn://
| Acesso TCP/IP não autenticado através do protocolo customizado para um servidor svnserve. |
svn:ssh://
| acesso TCP/IP autenticado e criptografado através de um protocolo customizado para um servidor svnserve |
Para a maioria, URLs do Subversion usam a sintaxe padrão, permitido nomes de servidores e números de porta em uma parte específica da URL. O método de acesso file:// é normalmente usado para acesso local, apesar de que isto pode ser usado com caminhos UNC em uma máquina da rede. A URL portanto usa o formato file://hostname/path/to/repos. Para a máquina local, a parte do hostname da URL deve ser suprimida ou deve ser localhost. Por esta razão, caminhos locais normalmente aparecem com três barras, file:///path/to/repos.
Também, usuários do esquema file:// em plataformas Windows vão precisar usar uma sintaxe “padrão” não oficial para acessar repositórios que estão na mesmo máquina, mas em um dispositivo diferente que o atual dispositivo de trabalho da máquina. Qualquer uma das duas seguintes sintaxes funcionarão onde X é o dispositivo no qual o repositório está:
file:///X:/path/to/repos
...
file:///X|/path/to/repos
...
Note que a URL usa barras normais embora a forma nativa (não URL) de um caminho no Windows seja barra invertida.
Você pode acessar um repositorio FSFS via uma rede compartilhada, mas isso não é recomendado por várias razões:
Você está concedendo permissão de escrita para todos os usuários, assim, eles podem acidentalmente excluir arquivos ou corromper o sistema de arquivos do repositório.
Not all network file sharing protocols support the locking that Subversion requires. One day you will find your repository has been subtly corrupted.
Você precisa definir as permissões de acesso da maneira correta. SAMBA é particularmente difícil neste quesito.
Se uma pessoa instala uma versão mais recente do cliente que atualiza o formato do repositório, todos os demais serão impossibilitados de acessar o repositório até que também tenham atualizado para a nova versão do cliente.
Um comando svn submeter pode publicar modificações de qualquer quantidade de arquivos e diretórios como uma única transação atômica. Em sua cópia de trabalho, você pode mudar o conteudo de um arquivo, criar, excluir, renomear e copiar arquivos e diretórios, e depois enviar todas as modificações como uma única e completa alteração.
Em um repositório, cada submissão é tratada como uma transação atômica: ou todas as mudanças são enviadas, ou nenhuma delas. Subversion mantém essa atomicidade por causa de falhas de programas, falhas de sistema, falhas de rede, e ações de outros usuários.
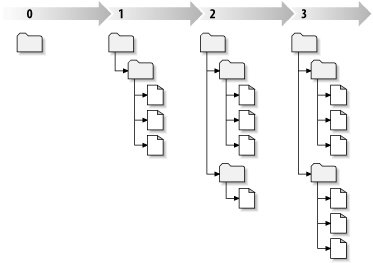
Cada vez que o repositório aceita uma submissão, ele cria um novo estado da estrutura de arquivos, chamada de revisão. Cada revisão é associada a um número natural, maior que o número da revisão anterior. A revisão inicial de um repositório recém criado é zero, e não contém nada mais que um diretório principal vazio.
Uma maneira interessante de enxergar o repositório é como uma série de estruturas. Imagine uma matriz de números de revisões, começando em 0, e se estendendo da esquerda para a direita. Cada número de revisão com uma estrutura de arquivos abaixo, e cada divisão já em seguida da maneira como o repositório realizou cada submissão.
É importante notar que cópias de trabalho nem sempre correspondem a uma única revisão qualquer no repositório; eles podem conter arquivos de diferentes revisões. Por exemplo, suponha que você obteve uma cópia de trabalho de um repositório do qual a revisão mais recente é a 4:
calc/Makefile:4
integer.c:4
button.c:4
Neste momento, esta cópia de trabalho corresponde exatamente à revisão 4 no repositório. Entretanto, suponha que você fez modificações em button.c, e submeteu essas alterações. Assumindo que não houve nenhuma outra submissão, o envio vai criar a revisão 5 no repositório, e sua cópia de trabalho vai se parecer com isto:
calc/Makefile:4
integer.c:4
button.c:5
Suponha que, neste momento, Sally envia uma alteração do integer.c, criando a revisão 6. Se você usar o svn atualizar para atualizar sua cópia de trabalho, então você terá algo como isto:
calc/Makefile:6
integer.c:6
button.c:6
As modificações de Sally para integer.c vão aparecer em sua cópia de trabalho, e sua alteração vai continuar presente em button.c. Neste exemplo, o texto de Makefile é identifico nas revisões 4, 5 e 6, mas Subversion vai marcar sua cópia de trabalho do Makefile com a revisão 6 indicando que ainda é a versão atual. Então, depois que você completou todas as atualizações na sua cópia de trabalho, isto geralmente corresponderá a uma exata revisão do repositório.
Para cada arquivo do diretório de trabalho, Subversion grava duas partes essenciais da informação na área administrativa .svn/:
what revision your working file is based on (this is called the file's working revision ), and
a informação de data/hora de quando foi a última atualização da cópia do repositório.
Com estas informação, através de troca de informações com o repositório, Subversion pode identificar qual dos quatro estados seguintes é o estado de um arquivo:
- Não modificado, e atualizado
O arquivo não foi modificado na cópia de trabalho, e nenhuma nova modificação foi submetida no repostório considerando a revisão de trabalho. Um submetero> do arquivo natualizar do arquivo tamb
- Localmente alterado, e atualizado
O arquivo possui modificações no diretório de trabalho, e nenhuma modificação para o arquivo foi enviada para o repositório considerando a revisão atual. Existem alterações que não foram submetidas para o repositório, deste modo um submeter do arquivo vai obter sucesso ao publicar suas alterações, e um atualizar do arquivo não fará nada.
- Não modificado, e desatualizado
O arquivo não possui alterações no diretório de trabalho, mas há modificações no repositório. O arquivo deverá eventualmente ser atualizado, para sincronizar com a revisão publica. Um submeter do arquivo não fará nada, e um atualizar do arquivo trará as últimas alterações para a cópia local.
- Localmente modificado, e desatualizado
O arquivo possui modificações tanto no diretório de trabalho, como no repositório. Um submeter do arquivo vai falhar com o erro desatualizado. O arquivo deverá ser atualizado primeiro; o comando atualizar vai tentar unificar as alterações do repositório com as alterações locais. Se o Subversion não conseguir completar a unificação de forma plausível automaticamente, ele deixará para o usuário resolver o conflito.
Nós apresentamos vários conceitos fundamentais do Subversion neste capítulo:
Nós introduzimos as noções de um repositório central, a cópia de trabalho do usuário, e uma porção da estrutura de revisões do repositório.
Nós mostramos alguns exemplos simples de como dois colaboradores podem usar o Subversion para publicar e receber alterações um do outro, usando o modelo 'copiar-modificar-unificar'.
Nós falamos um pouco sobre a forma como o Subversion acompanha e controla as informações em uma cópia de trabalho.
Índice
Não importa qual protocolo você use para acessar seus repositórios, você sempre precisará criar pelo menos um repositório. Isto pode ser feito igualmente com a linha de comando do Subversion ou com o TortoiseSVN.
Se você não criou ainda um repositório do Subversion, a hora é agora.
Cria um diretório vazio com o nome SVN (ex:
D:\SVN\), o qual é usado como diretório principal para todos os seus repositórios.Cria outro diretório
MyNewRepositorydentro deD:\SVN\Open the command prompt (or DOS-Box), change into
D:\SVN\and typesvnadmin create --fs-type fsfs MyNewRepository
Agora você tem uma novo repositório localizado em D:\SVN\MyNewRepository.
Abra o windows explorer
Crie um novo diretório e chame de, por exemplo
SVNRepositoryclique direito sobre o novo diretório criado e selecione → .
Um repositório é então criado dentro do novo diretório. Não edite esses arquivos você mesmo!!!. Se apresentar algum erro tenha certeza que o diretório está vazio e sem proteção de escrita.
Você será também questionado se você quer criar uma estrutura de diretórios dentro do repositório. Saiba sobre as opções de leiaute em “Leiaute do Repositório”.
TortoiseSVN irá configurar um ícone de pasta personalizado quando criar um repositório. Assim você poderá identificar os repositórios locais mais facilmente. Se você criar um repositório usando a linha de comando do cliente oficial o ícone para o diretório não será associado.
Dica
Também recomendamos que você não use file:// por qualquer razão que não sejam apenas testes locais. Usar um servidor é mais seguro e mais confiável para todos, a não ser para o uso de um único desenvolvedor.
Para acessar seu repositório local você precisa do caminho para a pasta. Apenas lembre-se que Subversion esperar todos os caminhos dos repositórios no formato file:///C:/SVNRepository/. Note o uso de barras em todo o caminho.
Para acessar o repositório localizado em uma rede compartilhada você pode também usar uma unidade mapeada, ou você pode usar um caminho UNC. Para caminhos UNC, o formato é file://NomeServidor/caminho/para/repos/. No que há apenas 2 barras aqui.
Antes do SVN 1.2, caminhos UNC tinham que ser informados num formato mais complicado file:///\NomeServidor/caminho/para/repos. Este formato ainda é suportado, mas não é recomendado.
Although in theory it is possible to put a FSFS repository on a network share and have multiple users access it using file:// protocol, this is most definitely not recommended. In fact we would strongly discourage it, and do not support such use for various reasons:
Primeiramente você está dando para todos os usuários dreito de escrita no repositório, então qualquer usuário pode acidentalmente apagar o repositório inteiro ou corrompe-lo de alguma maneira.
Em segundo lugar nem todo protocolo de compartilhamento de arquivo suporta as travas necessárias para o Subversion, então você pode encontrar seu repositório corrompido. Isto pode não acontecer logo, mas um dia dois usuários vão tentar acessar o repositório ao mesmo tempo.
Em terceiro lugar as permissões do arquivo precisam ser bem definidas. Você pode achar fácil num compartilhamento Windows, mas SAMBA é relativamente difícil.
Se uma pessoa instala uma versão mais recente do cliente que atualiza o formato do repositório, todos os demais serão impossibilitados de acessar o repositório até que também tenham atualizado para a nova versão do cliente.
O acesso através de file:// é destinado para local, um único usuário, e particularmente para testes e depurações. Quando você quer compartilhar o repositório você realmente deve configurar um servidor, e isto não é tão difícil como você deve estar pensando. Leia “Acessando o Repositório” para orientações sobre escolhas e configurações de um servidor.
Antes de você importar seus dados para o repositório você deve primeiro pensar sobre como você quer organizar os dados. Se você usar um dos formatos recomendados depois você o terá muito mais organizado.
Existem alguns padrões e recomendadas maneiras de organizar um repositório. Muitas pessoas criam um diretório trunk para guardar a “linha principal” de desenvolvimento, um diretório branches para guardar as ramificações, e um diretório tags para guardar as versões concluidas. Se o repositório guarda somente um único projeto, então frequentemente as pessoas criam estes diretórios no nível mais alto:
/trunk
/branches
/tags
Porque este formato é tão comumente usado, quando você criar um novo repositório usando o TortoiseSVN, ele também oferecerá a criação da estrutura de diretórios para você.
Se o repositório contém vários projetos, as pessoas normalmente organizam sua estrutura por ramificação:
/trunk/paint
/trunk/calc
/branches/paint
/branches/calc
/tags/paint
/tags/calc
... ou por projeto:
/paint/trunk
/paint/branches
/paint/tags
/calc/trunk
/calc/branches
/calc/tags
Organizar por projeto faz sentido se os projetos não são fortemente relacionados e cada um deles é controlado individualmente. Para projetos relacionados onde você pode querer controlar todos os projeto de uma vez, ou onde os projetos são todos amarrados uns aos outros em um único pacote de distribuição, é então mais comum organizar por ramificação. Desta maneira você tem somente um trunk para controlar, e os relacionamentos entre os subprojetos são vislumbrados mais facilmente.
Se você adotar como nível mais alto algo como/trunk /tags /branches, não há nada para dizer que você tenha que copiar o trunk inteiro para cada ramificação e liberação, e de alguma forma esta estrutura oferece mais flexibilidade.
Para projetos não relacionados você deve dar preferência para repositórios separados. Quando você submeter alterações, o novo número de revisão será do repositório inteiro, não o apenas a revisão do projeto. Tendo 2 projetos não relacionados compartilhando um mesmo repositório pode significar grandes lacunas no número da revisão. Os projetos Subversion e o TortoiseSVN aparecem no mesmo endereço principal, mas são repositórios completamente separados permitindo o desenvolvimento independente, e sem confusões no número da liberação.
Claro, você é livre para ignorar estes leiautes padrões. Você pode criar qualquer tipo de variação, seja o que funcionar melhor para você e sua equipe. Lembre-se que qualquer que seja a sua escolha, isto não é uma decisão permanente. Você pode reorganizar seu repositório a qualquer momento. Pelos diretórios branches e tags serem diretórios comuns, TortoiseSVN pode mover ou renomeá-los do jeito que você quiser.
Mudar de um leiaute para outro é apenas questão de mover uns diretórios no servidor; se você não gosta da maneira que as coisas estão organizadas no repositório, basta manipular os diretórios no repositório.
Então se você ainda não tem criada uma estrutura base de diretórios dentro do seu repositório você deverá fazer agora. Existem duas maneiras de fazer isso. Se você simplesmente quer criar uma estrutura /trunk /tags /branches, você pode usar o navegador de repositórios para criar as três pastas (em três separadas submissões). Se você quer criar um hierarquia mais estruturada então crie a estrutura primeiro no disco local e importe-a em uma única submissão, como isto:
criar uma nova pasta vazia em seu disco rígido
criar seu diretório da estrutura principal dentro da pasta - não coloque nenhum arquivo dentro ainda!
importar esta estrutura em um repositório pelo clique direito em uma pasta que contem esta estrutura de diretório e selecionando → . Na janela de importação digite a URL para o repositório e clique em OK. Isto irá importar seu diretório temporário dentro da raiz do repositório para criar o leiaute básico do repositório.
Note that the name of the folder you are importing does not appear in the repository, only its contents. For example, create the following folder structure:
C:\Temp\New\trunk
C:\Temp\New\branches
C:\Temp\New\tags
Import C:\Temp\New into the repository root, which will then look like this:
/trunk
/branches
/tags
Não importante o tipo de repositório que você usa, é vitalmente importante que você mantenha cópias de segurança regulares, e que você verifique a cópia de segurança. Se o servidor falhar, você terá condições de acessar uma versão recente de seus arquivos, mas sem o repositório todo o histórico estará perdido para sempre.
The simplest (but not recommended) way is just to copy the repository folder onto the backup medium. However, you have to be absolutely sure that no process is accessing the data. In this context, access means any access at all. If your repository is accessed at all during the copy, (web browser left open, WebSVN, etc.) the backup will be worthless.
The recommended method is to run
svnadmin hotcopy path/to/repository path/to/backup
to create a copy of your repository in a safe manner. Then backup the copy.
The svnadmin tool is installed automatically when you install the Subversion command line client. The easiest way to get this is to check the option to include the command line tools when installing TortoiseSVN, but if you prefer you can download the latest version of command line tools directly from the Subversion website.
A hook script is a program triggered by some repository event, such as the creation of a new revision or the modification of an unversioned property. Each hook is handed enough information to tell what that event is, what target(s) it's operating on, and the username of the person who triggered the event. Depending on the hook's output or return status, the hook program may continue the action, stop it, or suspend it in some way. Please refer to the chapter on Hook Scripts in the Subversion Book for full details about the hooks which are implemented.
Estas rotinas para eventos são executadas pelo servidor que hospeda o repositório. TortoiseSVN também permite que você configura no cliente rotinas para eventos que são executando localmente em consequência de certos acontecimentos. Veja “Client Side Hook Scripts” para mais informações.
Sample hook scripts can be found in the hooks directory of the repository. These sample scripts are suitable for Unix/Linux servers but need to be modified if your server is Windows based. The hook can be a batch file or an executable. The sample below shows a batch file which might be used to implement a pre-revprop-change hook.
rem Only allow log messages to be changed.
if "%4" == "svn:log" exit 0
echo Property '%4' cannot be changed >&2
exit 1
Note that anything sent to stdout is discarded. If you want a message to appear in the Commit Reject dialog you must send it to stderr. In a batch file this is achieved using >&2.
Sobreescrevendo ganchos
Se uma rotina para evento rejeitar sua submissão, então sua decisão é final. Mas você pode construir um mecanismo de desvio na própria rotina usando a técnica de Palavra Mágica. Se a rotina quiser rejeitar a operação ela primeiro vasculha a mensagem de log por uma senha específica, frase fixa ou talvez o nome do arquivos com um prefixo. Se ela encontrar a palavra mágica, então ela permite que a submissão continue. Se a frase não for encontrada, então ela bloqueia a submissão com uma mensagem como “Você não disse a palavra mágica”. :-)
Se você quer disponibilizar seu repositório Subversion para outras pessoas você pode incluir um vínculo no seu website. Uma forma de tornar isso mais fácil é incluir um vínculo externo para outros usuários do TortoiseSVN.
Quando você instala o TortoiseSVN, ele registra um novo protocolo tsvn:. Quando um usuário do TortoiseSVN clica num vínculo como este, a janela de obtenção será aberta automaticamente com a URL do repositório já preenchida.
Para incluir tal vínculo em sua própria página HTML, você precisa adicionar um código parecido com este:
<a href="tsvn:http://project.domain.org/svn/trunk">
</a>
Of course it would look even better if you included a suitable picture. You can use the TortoiseSVN logo or you can provide your own image.
<a href="tsvn:http://project.domain.org/svn/trunk">
<img src=TortoiseCheckout.png></a>
Você pode também fazer o vínculo apontar para uma revisão específica, por exemplo
<a href="tsvn:http://project.domain.org/svn/trunk?100">
</a>
Para usar o TortoiseSVN (ou qualquer outro cliente do Subversion), você precisa de um lugar para guardar seus repositórios. Você pode também guardar seus repositórios e acessá-los usando o protocolo file:// ou você pode colocá-los em um servidor e acessá-los usando os protocolos http:// ou svn://. Os dois protocolos podem também ser criptografados. Você pode usar https:// ou svn+ssh://, ou você pode usar svn:// com SASL.
If you are using a public hosting service such as SourceForge or your server has already been setup by someone else then there is nothing else you need to do. Move along to Capítulo 4, Guia do Uso Diário.
Se você não tem um servidor e vai trabalhar sozinho, ou se você está apenas avaliando o Subversion e o TortoiseSVN isoladamente, então repositórios locais são provavelmente a melhor opção. Apenas crie um repositório em seu próprio computador como descrito anteriormente em Capítulo 3, O Repositório. Você pode pular o resto deste capítulo e ir diretamente para Capítulo 4, Guia do Uso Diário para saber como começar a usá-los.
Se você está pensando em configurar um repositório para vários usuários em uma pasta compartilhada, pense novamente. Leia “Acessando um Repositório em uma Rede Compartilhada” para descobrir porque isto é uma má idéia. Configurando um servidor não é tão difícil quanto parece, e isto vai ter mais segurança e provavelmente mais velocidade.
More detailed information on the Subversion server options, and how to choose the best architecture for your situation, can be found in the Subversion book under Server Configuration.
In the early days of Subversion, setting up a server required a good understanding of server configuration and in previous versions of this manual we included detailed descriptions of how to set up a server. Since then things have become easier as there are now several pre-packaged server installers available which guide you through the setup and configuration process. These links are for some of the installers we know about:
You can always find the latest links on the Subversion website.
You can find further How To guides on the TortoiseSVN website.
Índice
- Características Gerais
- Importando Dados Para Um Repositório
- Obtendo Uma Cópia de Trabalho
- Submetendo Suas Alterações Para o Repositório
- Atualizar sua Cópia de Trabalho com mudanças feitas por outros
- Resolvendo Conflitos
- Obtendo Informações de Estado
- Lista de Alterações
- Shelving
- Janela de Revisão de Registro
- Invocando a Janela de Histórico de Revisão
- Histórico de Ações de Revisão
- Recuperando Informações Adicionais
- Obtendo mais mensagens de log
- Revisão da Cópia de Trabalho Atual
- Combinar Recursos Monitorados
- Alterando a Mensagem de Auditoria e o Autor
- Filtrando Mensagens de Log
- Informação Estatística
- Modo desconectado
- Atualizando a Visualização
- Visualizando as Diferenças
- Adicionando Novos Arquivos e Diretórios
- Copiando/Movendo/Renomeando Arquivos e Diretórios
- Ignorando Arquivos e Diretórios
- Apagando, Movendo e Renomeando
- Desfazendo Alterações
- Limpar
- Configurações do Projeto
- Itens Externos
- Ramificando / Rotulando
- Unificando
- Bloqueando
- Criando e Aplicando Correções
- Quem Mudou Qual Linha?
- O Navegador de Repositório
- Gráfico de Revisões
- Exportando um Cópia de Trabalho do Subversion
- Realocando uma cópia de trabalho
- Integração com Sistemas de Rastreamento de Erros / Rastreadores de Reportes
- Integração com visualizadores de repositórios locados na web
- Configurações do TortoiseSVN
- Configurações Gerais
- Configurações do Gráfico de Revisões
- Configurações de Sobreposição dos Ícones
- Configurações de rede
- Configuração de Programa Externo
- Dados de configuração salvos
- Cache de Log
- Client Side Hook Scripts
- Configurações TortoiseBlame
- TortoiseUDiff Settings
- Exportando preferências TSVN
- Configurações Avançadas
- Passo Final
Este documento descreve o uso diário do cliente TortoiseSVN. Este capítulo não é uma introdução aos sistemas de controle de versão, e não é uma introdução ao Subversion (SVN). Este capítulo é como um documento auxiliar para olhar quando você sabe mais ou menos o que quer fazer, mas não está absolutamente certo de como fazer.
Se você precisa aprender sobre o controle de versão usando Subversion, então nós recomendamos que você leia o fantástico livro: Controle de Versão com Subversion.
Este documento é também um trabalho em progresso, assim como TortoiseSVN e Subversion também são. Se você encontrar qualquer erro, por favor reporte para a lista de discussão para que possamos atualizar a documentação. Algumas imagens do Guia do Uso Diário (GUD) pode não refletir a última versão do aplicativo. Por favor, perdoe-nos. Nós trabalhamos no TortoiseSVN no nosso tempo livre.
A fim de obter o máximo do Guia de Uso Diário:
Você já deverá ter instalado o TortoiseSVN.
Você deverá estar familiarizado com um sistema de controle de versões.
Você deverá ter conhecimentos básicos do Subversion.
Você deve ter configurado um servidor e/ou ter acesso a um repositório Subversion.
Esta secção descreve algumas das funcionalidades do TortoiseSVN que se aplicam a praticamente tudo neste manual. Ter em atenção que muitas dessas funiconalidades apenas aparecerão no interior de uma cópia de trabalho Subversion.
Um dos recursos mais visíveis do TortoiseSVN é o de sobreposição de ícones que aparece em arquivos em sua cópia de trabalho. Eles te mostram em um instante quais de seus arquivos foram modificados. Consulte “Sobreposição dos Ícones” para descobrir o que as diferentes sobreposições representam.
Todos os comandos do TortoiseSVN são acessados através do menu de contexto do Windows Explorer. A maioria são diretamente visíveis quando se clica com o botão direito em um arquivo ou diretório. Os comandos estarão disponíveis se o arquivo ou o diretório que o contém está no controle de versão. Você também pode acessar o menu do TortoiseSVN como parte do menu Arquivo, no Windows Explorer.
Dica
Alguns comandos que são raramente usados estão disponíveis apenas em no menu de contexto extendido. Para ver o menu de contexto extendido, segure a tecla Shift quando você clicar com o botão direito.
Em alguns casos você poderá ver várias entradas do TortoiseSVN. Isto não é um bug!
Este exemplo é de um atalho não-versionado dentro de um diretório versionado, e no menu Arquivo do Windows Explorer há três entradas para o TortoiseSVN. Uma para o diretório, uma para o atalho, e uma terceira para o objeto para o qual o atalho aponta. Para ajudar a distinguir entre elas, os ícones um indicador no canto inferior direito para mostrar se a entrada se refere a um arquivo, um diretório, um atalho ou para múltiplos ítens selecionados.
Figura 4.4. Menu de quando se clica com o botão direito e se arrasta um diretório que está sob o controle de versão.
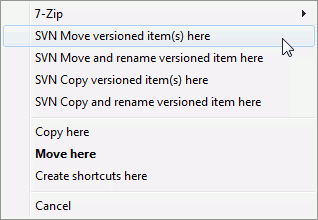
Outros comandos estão disponíveis ao se clicar e arrastar, quando você clica com o botão direito e arrasta arquivos ou diretórios para um novo endereço dentro da cópia de trabalho ou quando você clica com o botão direito e arrasta um arquivo ou diretório não versionado para um diretório sob o controle de versão.
Algumas operações comuns do Windows tem atalhos bem conhecidos, mas não aparecem em botões e menus. Se você não sabe como fazer algo óbvio como atualizar uma visualização, cheque aqui.
- F1
Ajuda, claro.
- F5
Atualiza a visualização atual. Este talvez seja o mais útil comando de uma única tecla. Por exemplo... No Explorer ele irá atualizar os ícones sobrepostos na sua cópia de trabalho. Na janela de Commit irá reexplorar a Cópia de Trabalho para ver o que precisa ser enviado. Na janela Revision Log irá verificar o repositório novamente a procura de novas modificações recentes.
- Ctrl-A
Seleciona tudo. Pode ser usado se você tiver uma mensagem de erro e precisar copiar e colar em um email. Use Ctrl-A para selecionar a mensagem e então...
- Ctrl-C
Copy the selected text. In case no text is selected but e.g. a list entry or a message box, then the content of that list entry or the message box is copied to the clipboard.
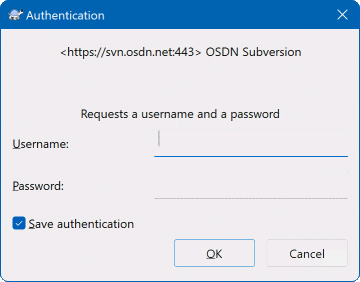
Se o repositório que você está tentando acessar é protegido por senha, uma janela de autenticação aparecerá.
Entre seu nome de usuário e senha. A caixa de seleção (checkbox) fará com que o TortoiseSVN guarde suas credenciais no diretório padrão do Subversion. %APPDATA%\Subversion\auth na árvore de subdiretórios:
svn.simplecontém as credenciais básicas de autenticação (nome do usuário/senha). Observe que as senhas são armazenadas e encriptadas com o uso do WinCrypt API, não são armazenadas no formato "texto".svn.ssl.servercontém os certificados do servidor para SSL.svn.usernamecontém credenciais para autenticações que necessitem apenas do nome de usuário (não é necessário senha).
If you want to clear the authentication cache, you can do so from the Saved Data page of TortoiseSVN's settings dialog. The button will clear the cached authentication data for all repositories. The button however will show a dialog where you can chose which cached authentication data should be deleted. Refer to “Dados de configuração salvos”.
Some people like to have the authentication data deleted when they log off Windows, or on shutdown. The way to do that is to use a shutdown script to delete the %APPDATA%\Subversion\auth directory, e.g.
@echo off
rmdir /s /q "%APPDATA%\Subversion\auth"
You can find a description of how to install such scripts at http://www.windows-help-central.com/windows-shutdown-script.html.
Para mais informações sobre como configurr seu servidor para autenticação e controle de acesso, verifique “Acessando o Repositório”.
Muitas das janelas do TortoiseSVN contém muita informação para mostrar, mas é frequentemente útil maximizar apenas a altura ou apenas a largura da janela, ao invés de maximizar na tela toda. Por conveniência, há atalhos para isto no botão Maximizar. Use o botão do meio do mouse para maximizar verticalmente, e o botão direito do mouse para maximizar horizontalmente.
Se você está importando dados para um repositório existente que já contém algum projeto, a estrutura desse repositório já deverá estar definida. Se você está importando dados para um novo repositório, recomenda-se que dispense algum tempo para definir como esse repositório será organizado. Leia “Leiaute do Repositório” para recomendações adicionais.
Esta secção descreve o comando importar do Subversion, que foi desenhado para importar uma hierarquia de pastas para o repositório de uma só vez. Apesar de efectuar o trabalho, tem algumas deficiências:
Não há qualquer maneira de selecionar os arquivos e pastas que deverão ser incluídos, em compensação poderá utilizar as configurações globais para ignorar alguns arquivos e pastas.
A pasta importada não se torna uma cópia de trabalho. Você tem que fazer um checkout para copiar os arquivos desde o servidor.
É fácil importar para uma pasta equivocada no repositório.
Por essas razões recomendamos que não uses de modo algum o comando importar mas em alternativa segue o metodo de dois-passos descrito em “Importando na Pasta”,a não ser que estejas a executar o único passo de criar uma estrutura inicial /trunk /tags /branches no teu repositório. Uma vez que aqui estás, é assim como funciona o importar básico...
Antes de importar seu projeto para um repositório, você deveria:
Remova todos os arquivos que não são necessários para construir o projeto (arquivos temporários, arquivos que são gerados por um compilador como por exemplo *. obj, binários compilados, ...)
Organize os arquivos em pastas e sub-pastas. Embora posteriormente seja possível renomear/mover arquivos, é altamente recomendado que obtenha a estrutura correta do seu projeto antes de realizar a importação!
Agora selecione a pasta de nível superior da sua estrutura de diretório do projeto no Windows Explorer e com o botão direito clique para abrir o menu de contexto. Selecione o comando →
In this dialog you have to enter the URL of the repository location where you want to import your project. It is very important to realise that the local folder you are importing does not itself appear in the repository, only its content. For example if you have a structure:
C:\Projects\Widget\source
C:\Projects\Widget\doc
C:\Projects\Widget\images
and you import C:\Projects\Widget into http://mydomain.com/svn/trunk then you may be surprised to find that your subdirectories go straight into trunk rather than being in a Widget subdirectory. You need to specify the subdirectory as part of the URL, http://mydomain.com/svn/trunk/Widget-X. Note that the import command will automatically create subdirectories within the repository if they do not exist.
A mensagem de importação é usada como uma mensagem para o histórico.
Por padrão, arquivos e pastas que correspondem aos padrões globais de pastas/arquivos ignorados, não são importados. Para contornar esse comportamento você pode utilizar o recurso Incluir arquivos ignorados. Consulte “Configurações Gerais” para obter mais informações sobre como definir um padrão global para ignorar pastas/arquivos.
Assim que clicar em TortoiseSVN inicia a importação da "árvore" de diretórios, incluindo todos os arquivos. O projeto estará armazenado no repositório sob controle de versão. Por favor note que a pasta que você importou NÃO está sob controle de versão! Para obter uma cópia de trabalho com versão controlada, você deverá fazer um Checkout da versão que você acabou de importar. Ou continue lendo sobre como proceder em "Importando na Pasta".
Assumindo que você já possui um repositório e que deseja adicionar uma nova pasta na estrutura desse repositório, apenas siga estes passos:
Usa o repositório do navegador para criar uma nova pasta de projecto directamente no repositório. Se estiveres a usar um dos layouts padrão, provavelmente vais querer criar este como uma sub-pasta do trunk em vez de na raiz do repositório. O repositório do navegador mostra a estrutura do repositório assim como o explorador do Windows, assim podes ver como as coisas são organizadas.
Efectua checkout da nova pasta sobre a pasta que queres importar. Receberás um aviso que a pasta local não está vazia, ignora-o. Terás agora uma pasta de topo versionada com conteudo não-versionado.
Use → na pasta sob controle de versão para adicionar algum ou todo conteúdo. Você pode adicionar e remover arquivos, defina as configurações em
svn:ignorepara as pastas e faça outras alterações que você necessita.Ao submeter a pasta de nível superior, você terá uma nova "árvore" sob controle de versão e uma cópia local de trabalho, criada a partir de sua pasta existente.
Às vezes, você precisa ter um arquivo sob controle de versão que contém dados específicos de usuário. Isso significa que você terá um arquivo que todo desenvolvedor/usuário precisará modificar para adequá-lo a sua configuração local. Portanto, é difícil manter um arquivo sob controle de versão porque cada usuário poderá submeter alterações no repositório constantemente.
Nesses casos, sugere-se a utilização de um arquivo modelo. Crie um arquivo que contém todos os dados que seus desenvolvedores necessitam, adicione e mantenha esse arquivo sob controle de versão e permita que os desenvolvedores façam o Checkout desse arquivo. Em seguida, cada desenvolvedor deverá fazer uma cópiaemphasis> desse arquivo e renomear essa c
As an example, you can have a look at TortoiseSVN's build script. It calls a file named default.build.user which doesn't exist in the repository. Only the file default.build.user.tmpl. default.build.user.tmpl is the template file which every developer has to create a copy from and rename that file to default.build.user. Inside that file, we added comments so that the users will see which lines they have to edit and change according to their local setup to get it working.
So as not to disturb the users, we also added the file default.build.user to the ignore list of its parent folder, i.e. we've set the Subversion property svn:ignore to include that filename. That way it won't show up as unversioned on every commit.
Para obter uma cópia de trabalho você precisa realizar um obter do repositório.
Selecione um diretório no windows explorer onde você quer deixar sua cópia de trabalho. Clique direito para abrir o menu de contexto e então selecione o comando → , o qual abrir a seguinte janela:
. Se você digitar o nome de um diretório que não existe ainda, então um diretório com este nome será criado.
Importante
Na configuração padrão, o item Obter do menu não está localizado no submenu do TortoiseSVN, contudo, é mostrado no menu superior do explorador. Os comandos do TortoiseSVN que não estão no submenu têm o SVN agregado em:
Você pode escolher a profundidade que você quer obter, o qual permitirá a você especificar a profundidade da recursão nos sub diretórios. Se você quer apenas algumas seções de uma grande hierarquia, você pode obter o nível mais alto apenas, e depois atualizar pastas específicas recursivamente.
- Totalmente recursiva
Obter estrutura completa, incluindo todos os níveis de sub diretórios.
- Filhos imediatos, incluindo pastas
Obter o diretório especificado, incluindo todos os arquivos e sub diretórios, mas não carregar os sub diretórios.
- Somente os arquivos filhos
Ober o diretório especificado, incluindo todos os arquivos mas não obter qualquer sub diretório.
- Somente este item
Obter apenas o diretório. Não carregar com arquivos ou sub diretórios.
- Cópia de trabalho
Retêm a profundidade especificada na cópia de trabalho. Esta opção não é usada na janela de obtenção, mas é o padrão em todas as outras janelas que tem a configuração de profundidade.
- Excluir
Usado para reduzir a profundidade da cópia de trabalho depois de uma pasta já ter sido carregada. Esta opção está somente disponível na janela Atualizar para a revisão.
Para facilmente seleccionar apenas os itens que pretendes para o checkout e forçar a cópia de trabalho a manter apenas esses itens, clica no botão . Isto abre uma nova caixa de diálogo onde podes verificar todos os itens que pretendes da tua cópia de trabalho e desseleccionar todos os itens que não pretendes. A cópia de trabalho resultante é conhecida como um checkout disperso. Uma actualização a tal cópia de trabalho não irá obter os ficheiros e pastas em falta, mas apernas actualizar o que já tens actualmente na tua cópia de trabalho.
If you check out a sparse working copy (i.e., by choosing something other than fully recursive for the checkout depth), you can easily add or remove sub-folders later using one of the following methods.
Right click on the checked out folder, then use → and select . This opens the same dialog that was available in the original checkout and allows you to select or deselect items to include in the checkout. This method is very flexible but can be slow as every item in the folder is updated individually.
Right click on the checked out folder, then use → to bring up the repository browser. Find the sub-folder you would like to add to your working copy, then use → .
In the check for modifications dialog, first shift click on the button . The dialog will show all the files and folders which are in the repository but which you have not checked out as remotely added. Right click on the folder(s) you would like to add to your working copy, then use → .
Esta funcionalidade é muito útil quando você apenas quer obter partes de uma grande estrutura, mas você quer a conveniência de atualizar uma só cópia de trabalho. Supondo que você tenha uma grande estrutura a qual possui sub diretórios Projeto01 até Projeto99, e você quer apenas obter o Projeto03, Projeto25 e Projeto76. Use esses passos:
Obter o diretório pai com profundidade “Somente este item”. Você agora tem um diretório do nível mais alto.
Selectionar um novo diretório e usar → para mostrar o conteúdo do repositório.
Clique direito sobre
Projeto03e → . Deixe as configurações padrões e clique em . Você agora terá um diretório carregado.Repetir o mesmo processo para
Projeto25.Navegu para
Projeto76e faça a mesma coisa. Agora note que o diretórioProjeto76não tem nada exceto oSubProj, o qual ele mesmo está carregado. Subversion criou os diretórios intermediários para você sem carregá-los.
Mudando a profundidade da cópia de trabalho
Uma vez que você obteve uma cópia de trabalho para uma profundidade particular você pode mudar a profundidade posteriormente para obter mais ou menos arquivos usando → . Nesta janela, tenha certeza que a opção Deixar a profundidade colada marcada.
Usando um servidor antigo
Servidores pré-1.5 não entendem a requisição de profundidade de uma cópia de trabalho, então eles nem sempre responderão esse pedido de forma eficiente. O comando continuará funcionando, mas servidores mais antigos poderão enviar todos os dados, deixando o cliente para filtrar o que não é requerido, o que significa mais tráfego de rede. Se possível você deverá atualizar seu servidor para uma versão mais nova que 1.5.
Se o projeto contém referências para projetos externos os quais você não quer obter no mesmo momento, use a caixa de seleção Omitir externos.
Importante
Se Omitir externos está mrcado, ou se você quer incrementar a profundidade, você precisa executar a atualização da sua cópia de trabalho usando → ao invés de → . A atualização padrão incluirá todos os externos e manterá a profundidade configurada.
É recomendado que você obtenha apenas uma parte da estrutura de diretório do trunk, ou mais abaixo. Se você especificar o diretório principal da estrutura de diretório da URL você deverá acabar com o disco cheio já que uma vez que você obterá uma cópia da estrutura do repositório inteiro incluindo cada ramo e rótulo do seu projeto.
Exportando
Algumas vezes você vai querer criar uma cópia local sem nenhum dos diretórios .svn, ex. criar um arquivo compactado do código fonte. Leia “Exportando um Cópia de Trabalho do Subversion” para saber como fazer isto.
Enviar as alterações que você fez em sua cópia de trabalho é conhecido como Submeter as alterações. Mas antes de você submeter você deve ter certeza que sua cópia de trabalho está atualizada. Você pode usar tanto → diretamente. Ou você pode usar → primeiro, para ver quais arquivos foram alterados localmente ou no servidor.
Se sua cópia de trabalho estiver atualizada e não houver conflitos, você está pronto para submeter suas alterações. Selecione qualquer arquivo e/ou pastas que você quiser submeter, então → .
A janela de submissão irá exibir todos os arquivos modificados, incluindo arquivos adicionados, deletados e não versionados. Se você não quiser que um arquivo alterado seja submetido, apenas desmarque o arquivo. Se você quiser incluir um arquivo não versionado, apenas marque o arquivo para adiciona-lo a submissão
To quickly check or uncheck types of files like all versioned files or all modified files, click the link items just above the list of shown items.
Para informação sobre as colorações das sobreposições de itens de acordo com o seu estado, por favor consulta “Estado Local e Remoto”.
Items que foram movidos para um caminho de repositório diferente são também indicados usando o marcador (s). Você pode ter movido algo enquanto trabalhava em uma ramificação (branch) e se esqueceu de mover de volta para a versão principal (trunk). Esté é seu sinal de aviso!
Submeter arquivos ou diretórios?
Quando você submete arquivos, a janela de submissão exibe apenas os arquivos que você selecionou. Quando você submete uma pasta, a janela de submissão irá exibir selecionado os arquivos modificados automaticamente. Se você se esqueceu de um novo arquivo que criou, submeter a pasta irá encontra-lo de qualquer forma. Submeter uma pasta não significa que todos os arquivos serão marcados como modificados; Isso apenas fará sua vida mais fácil.
Muitos arquivos não versionados na janela de submissão
Se você acha que a janela de submissão exibe muitos arquivos não versionados (arquivos gerados pelo compilador ou backups), existem muitas formas de lidar com isso. Você pode
adicionar o arquivo (ou um caracter especial) para listar os arquivos para excluir nas configurações da página. Isto afetará toda a cópia de trabalho que você tem.
adicionar o arquivo para a lista
svn:ignoreusando → . Isto somente afetará o diretório no qual você configurou a propriedadesvn:ignore. Usando a janela Propriedade do SVN, você pode alterar a propriedadessvn:ignorepara um diretório.add the file to the
svn:global-ignoreslist using → This will affect the directory on which you set thesvn:global-ignoresproperty and all subfolders as well.
Read “Ignorando Arquivos e Diretórios” para mais informações
Click duplo em qualquer arquivo modificado na janela de submissão irá abrir um programa de diff exibindo suas modificações. O menu de contexto irá dar mais opções, como exibido na screenshot. Você também arrastar arquivos da janela de submissão para outros aplicativos como editores de textos ou IDEs.
Você pode selecionar ou deselecionar items clicando na caixa de seleção a esquerda do item. Para diretórios você pode usar Shift-select para fazer a ação recursiva.
As colunas mostradas no painel inferior são personalizadas. Se você clicar com o botão direito em qualquer cabeçalho de coluna você virá um menu de contexto que permitirá a você selecionar quais colunas você quer ver. Você pode também mudar o tamanho da coluna usando a opção de arrasto que aparece quando você mantém o ponteiro do mouse sobre a borda da coluna. Estas personalizações são gravadas, etnão você verá a tela do mesmo jeito quando voltar.
Por padrão quando você submete alterações, qualquer travamento que você determinou em arquivos serão liberados automaticamente após a confirmação da submissão. Se você quer manter as alocações, tenha certeza que a opção Manter bloqueios está selecionada. O padrão desta caixa de seleção é obtido da opção no_unlock do arquivo de configuração do Subversion. Leia “Configurações Gerais” para mais informações sobre como editar o arquivo de configuração do Subversion.
Advertência ao submeter a tag
Usually, commits are done to the trunk or a branch, but not to tags. After all, a tag is considered fixed and should not change.
If a commit is attempted to a tag URL, TortoiseSVN shows a confirmation dialog first to ensure whether this is really what is intended. Because most of the time such a commit is done by accident.
However, this check only works if the repository layout is one of the recommended ones, meaning it uses the names trunk, branches and tags to mark the three main areas. In case the setup is different, the detection of what is a tag/branch/trunk (also known as classification patterns), can be configured in the settings dialog: “Configurações do Gráfico de Revisões”
Arrastar e Soltar
Você pode arrastar arquivos para dentro da janela de submissão de qualquer lugar, desde que as cópias de trabalho tenham sido obtidas do mesmo repositório. Por exemplo, você pode ter uma grande cópia de trabalho com inúmeras janelas do windows explorer abertas para olhar em pastas em diferentes lugares. Se você quiser evitar submeter do nível mais alto da estrutura de pastas (com uma longa lista de modificações) você pode abrir a janela de submissão para uma pasta e então arrastar os itens de outras janelas para incluir na mesma submissão atômica.
Você pode arrastar arquivos não versionados que residem em uma cópia de trabalho para uma janela de submissão e eles irão ser adicionados ao SVN automaticamente.
Arrastando arquivos da lista na parte de baixo da janela de submissão para o campo para edição da mensagem de log irá inserir os caminhos como texto dentro da caixa de edição. Isto é muito útil se você quer escrever mensagens de log da submissão que incluem os caminhos que foram afetados pela submissão.
Reparando Referência Externas Renomeadas
Algumas vezes arquivos são renomeados fora do Subversion, e eles aparecem na lista de arquivos como arquivos perdidos e como arquivos não versionados. Para evitar a perca do histório você precisa notificar o Subversion sobre a conexão entre os arquivos. Simplesmente selecione o arquivo antigo (perdido) e o arquivo nome (não versionado) e use a opção → para identificar os dois arquivos como uma renomeação.
Reparando Cópias de Referências Externas
Se você fez uma cópia de um arquivo e esqueceu de usar o comando do SVN na cópia, você pode reparar a cópia e assim o novo arquivo não perderá seu histórico. Simplesmente selecione o arquivo antigo (normal ou modificado) e o nome arquivo (não versionado) e use → para identificar os dois arquivos como um cópia.
A janela de submissão suporta a funcionalidade lista de alterações do Subversion para ajudar a agrupar arquivos com modificações relacionadas. Saiba mais sobre essa funcionalidade em “Lista de Alterações”.
Às vezes, poderás querer efectuar a submissão de apenas uma parte das alterações que efectuaste num ficheiro. Essa situação acontece com frequência quando estás a trabalhar em algo, e surge uma correcção urgente para ser submetida, e essa correcção calha estar no mesmo ficheiro em que estás a trabalhar.
right click on the file and use → . This will create a copy of the file as it is. Then you can edit the file, e.g. in a text editor and undo all the changes you don't want to commit. After saving those changes you can commit the file.
Usando TortoiseMerge
If you use TortoiseMerge to edit the file, you can either edit the changes as you're used to, or mark all the changes that you want to include. right click on a modified block and use → to include that change. Finally right click and use → which will change the right view to only include the changes you've marked before and undo the changes you have not marked.
Após submeter, a cópia do ficheiro é automaticamente restaurada e terás o ficheiro com todas as tuas modificações que não foram ainda submetidas.
Agumas vezes você tem arquivos versionados que são alterados frequentemente mas que você de verdade não quer controlar. Algumas vezes isto indica uma falha no seu processo de desenvolvimento - por que esses arquivos são controlados? deveriam ser arquivos modelos? Mas ocasionalmente isto é inevitável. Uma razão clássica é que seu IDE muda a data/hora do arquivo em seu projeto cada vez que você compila. O arquivo do projeto tem que ser controlado já que ele inclui todas as configurações de compilação, mas você não precisa submeter apenas porque mudou a data/hora do arquivo.
Para ajudar nessas situações incomuns, nós temos uma lista de alterações específica chamada ignore-on-commit. Qualquer arquivo adicionado neste lista de alterações ficará automaticamente desmarcado na janela de submissão. Você pode ainda submeter as alterações, mas você terá que selecionar manualmente na janela de submissão.
Tenha a certeza de digitar uma mensagem de log que descreva as aterações que você está submetendo. Isto ajudará você a ver o que aconteceu e quando, ao navegador pelas mensagens de auditoria do projeto dias mais tarde. A mensagem pode ser tanto longa quanto curta; muitos projetos tem diretivas para o que será incluido, o idioma a ser usado, e algumas vezes até a formatação exigida.
Você pode formatar de forma simples sua mensagem de log usando a convenção similar ao que é usado nos e-mails. Para aplicar estilos para texto, use *texto* para negrito, _texto_ para sublinhado, e ^texto^ para itálico.
TortoiseSVN inclui um corretor ortográfico para lhe ajudar a escrever a sua mensagem de log corretamente. Ele irá descatar palavras erradas. Use o menu de contexto para acessar as sugestões de correção. É claro, ele não conhece todos os termos técnicos que você conhece, então palavras digitadas corretamente irão algumas vezes aparecer como erro. Mas você não deve se preocupar. Você pode simplesmente adicionar a palavra ao seu dicionário pessoal usando o menu de contexto.
The log message window also includes a filename and function auto-completion facility. This uses regular expressions to extract class and function names from the (text) files you are committing, as well as the filenames themselves. If a word you are typing matches anything in the list (after you have typed at least 3 characters, or pressed Ctrl+Space), a drop-down appears allowing you to select the full name. The regular expressions supplied with TortoiseSVN are held in the TortoiseSVN installation bin folder. You can also define your own regexes and store them in %APPDATA%\TortoiseSVN\autolist.txt. Of course your private autolist will not be overwritten when you update your installation of TortoiseSVN. If you are unfamiliar with regular expressions, take a look at the introduction at https://en.wikipedia.org/wiki/Regular_expression, and the online documentation and tutorial at http://www.regular-expressions.info/.
Conseguir a regex certa pode ser confuso, mas para ajudar você a criar uma expressão que funcione, há uma janela de testes que permite que você entre uma expressão e então digite nomes de arquivo para testar. Inicie ela da janela de comando usando o comando TortoiseProc.exe /command:autotexttest.
The log message window also includes a commit message snippet facility. These snippets are shown in the autocomplete dropdown once you type a snippet shortcut, and selecting the snippet in the autocomplete dropdown then inserts the full text of the snippet. The snippets supplied with TortoiseSVN are held in the TortoiseSVN installation bin folder. You can also define your own snippets and store them in %APPDATA%\TortoiseSVN\snippet.txt. # is the comment character. Newlines can be inserted by escaping them like this: \n and \r. To insert a backslash, escape it like this: \\.
Voce pode reutilizar mensagens já digitados. Apenas clique sobre para ver a lista das últimas mensagens digitas para a cópia de trabalho. O número de mensagens gravadas pode ser configurado na janela de configurações do TortoiseSVN.
Você pode apagar as mensagens de submissão gravadas usando a tela Dados salvos das configurações do TortoiseSVN, ou você pode apagar as mensagens uma a uma usnado a janela Mensagens recentes usando a tecla Delete.
Se você quer incluir os caminhos verificados em sua mensagem de log, você pode usar o comando → no campo da mensagem.
Outra forma de inserir caminhos em uma mensagem de auditoria é simplesmente arrastas os arquivos da lista de arquivos para dentro do campo da mensagem.
Propriedades de Pastas Especiais
Existem muitas propriedades especiais nos diretórios que podem ser usados para dar mais controle sobre a formatação das mensagens de log na submissão e o idioma usado pelo módulo de correção ortográfica. Leia “Configurações do Projeto” para mais informações.
Integração com Ferramentas de Rastreamento de Erros
se você ativou o sistema de rastreamento de erros, você pode configurar um ou mais Controles no campo do texto Bug-ID / Issue-Nr:. Multiplos controles devem ser separados com virgula. Uma alternativa, se você está usando um controle de rastreamento de erros baseado em expressões regulares, você pode adicionar a referência ao seu controle como parte da mensagem de log. Aprenda mais sobre isso em “Integração com Sistemas de Rastreamento de Erros / Rastreadores de Reportes”.
Depois de pressionar , a janela aparece mostrando o progresso da submissão.
A janela de progresso usa cores por código para destacar diferentes ações de submissão
- Azul
Submetendo uma modificação.
- Roxo
Submetendo uma nova adição.
- Vermelho escuro
Submetendo um exclusão ou substituição.
- Preto
Todos os outros itens.
Este é o esquema padrão de cores, mas você pode personalizar as cores usando a janela de configurações. Acesse “Configurações de Cores do TortoiseSVN” para mais informações.
Periodicamente, você deve garantir que mudanças feitas por outros sejam incorporadas na sua cópia de trabalho. O processo de pegar as mudanças do servidor para sua cópia local é conhecido como atualização. A atualização pode ser feita em arquivos, uma seleção de arquivos, ou recursivamente na herarquia inteira de diretórios. Para atualizar, selecione os arquivos e/ou diretórios que quiser, clique com o botão direito e selecione → no menu de contexto do explorer. Uma janela aparecerá mostrando o progresso da atualização em tempo real. As mudanças feitas por outros serão consolidadas com seus arquivos, mantendo quaisquer mudanças que você possa ter feito nos mesmos arquivos. O repositório não é afetado por uma atualização.
A janela de progresso faz uso de código de cores para sublinhar diferentes ações de atualização
- Roxo
Novo item adicionado à CT.
- Vermelho escuro
Item redundante apagado da sua CT, ou item substituído na sua CT.
- Verde
Mudanças no repositório consolidadas com suas mudanças locais com sucesso
- Vermelho vivo
Mudanças no repositório consolidadas com mudanças locais, resultando em conflitos que você precisa resolver.
- Preto
Item inalterado em sua CT atualizado com nova versão do repositório.
Este é o esquema padrão de cores, mas você pode personalizar as cores usando a janela de configurações. Acesse “Configurações de Cores do TortoiseSVN” para mais informações.
Se você receber quaisquer conflitos durante uma atualização (isso pode acontecer se outras pessoas alteraram as mesmas linhas no mesmo arquivo que você e essas mudanças não são compatíveis) então a janela mostra esses conflitos em vermelho. Você pode efetuar um clique duplo nessas linhas para começar a ferramenta consolidação externa para resolver esses conflitos.
Quando a atualização estiver completa, a janela de progresso mostrará um sumário do número de itens atualizados, adicionados, removidos, em conflito, etc. abaixo da lista de arquivos. Esta informação pode ser copiada para a área de transferência usando Ctrl+C.
O comando padrão Actualizar não tem opções e actualiza apenas a tua cópia de trabalho par a revisão HEAD do repositório, que é o caso mais comum. Se quiseres mais controlo sobre o processo de actualização, deverás então utilizar → . Este permite-te actualizar a tua cópia de trabalho para uma revisão específica, não apenas para a mais recente. Supõem que a tua cópia de trabalho está na revisão 100, mas queres reflectir o estado quer tinha na revisão 50 - então actualiza simplesmente para a revisão 50.
Na mesma caixa de diálogo podes também escolher a nível para a qual actualizas a pasta corrente. Os termos usados são descritos em “Profundidade da Obtenção”. O nível por defeito é Cópia de trabalho, que preserva a definição de nível existente. Podes também fixar o nível persistente o que significa que actualizações subsequentes irão usar essa novo nível, i.e. esse nível será então usado como a nível por defeito.
Para tornar mais fácil incluir ou excluir itens específicos no checkout, clica no botão . Isto abre uma nova caixa de diálogo onde podes seleccionar todos os itens que quiseres na tua cópia de trabalho, e desseleccionar is itens que não quiseres.
Poderás escolher se queres ignorar qualquer projecto externo na actualização (i.e projectos referenciados com svn:externals).
Cuidado
Se você atualizar um arquivo ou pasta para uma versõa específica, você não deve fazer mudanças nesses arquivos. Você receberá mensagens de erro do tipo “desatualizados” quando tentar submetê-las! Se você quiser desfazer mudanças feitas em um arquivo e começar novamente de uma versão anterior, você pode reverter para uma versão anterior a partir da janela de log de revisões. Dê uma olhada em “Reverter (Desfazer) revisões no repositório” para mais instruções, e métodos alternativos.
pode ser ocasionalmente útil para ver como seu projeto parecia em um momento anterior de sua história. Mas de modo geral, atualizar arquivos individualmente para uma versão anterior não é uma boa idéia porque deixa sua cópia de trabalho em estado inconsistente. Se o arquivo que você está atualizando mudou de nome, você pode até descobrir que o arquivo simplesmente desaparece da sua cópia de trabalho porque não havia arquivo com aquele nome na revisão anterior. Você também deve notar que o item terá umrevestimento verde normal, para que seja indistinguível dos arquivos que estão atualizados com a última versão.
Se você simplesmente quer uma cópia local de uma versão anterior de um arquivo é melhor usar o comando → a partir da janela de log daquele arquivo.
Múltiplos Arquivos/Diretórios
Se você selecionar múltiplos arquivos e pastas no explorer e depois selecionar , todos estes arquivos/pastas serão atualizados um a um. O TortoiseSVN garantirá que todos arquivos/pastas que são do mesmo repositório serão atualizados para a mesma revisão! Mesmo se entre estas atualizações uma outra submissão tenha ocorrido.
Em algum momento você poderá se deparar com um conflito quando for atualizar/unificar seus arquivos desde o repositório ou quando você for modificar sua cópia local para uma URL diferente. Existem dois tipos de conflitos:
- conflitos de arquivo
Um conflito de arquivo ocorre se dois (ou mais) desenvolvedores modificam as mesmas linhas de um arquivo.
- conflitos de estrutura
Um conflito de estrutura ocorre quando um desenvolvedor move/renomeia/elimina um arquivo ou uma pasta que outro desenvolvedor tenha também movido/renomeado/eliminado ou ainda apenas modificado.
A file conflict occurs when two or more developers have changed the same few lines of a file. As Subversion knows nothing of your project, it leaves resolving the conflicts to the developers. The conflicting area in a text file is marked like this:
<<<<<<< filename
your changes
=======
code merged from repository
>>>>>>> revision
Also, for every conflicted file Subversion places three additional files in your directory:
- filename.ext.mine
Este é seu arquivo tal como existia em sua cópia local antes de tê-la atualizado - ou seja, sem indicações de conflito. Este arquivo contém as modificações mais recentes e nada mais.
- filename.ext.rREVANT
Este é o arquivo que serviu de revisão BASE antes de atualizar sua cópia local. Ou seja, é o arquivo que você assinalou para controlar antes de efetuar as modificações.
- filename.ext.rNOVAREV
Este é o arquivo que o cliente Subversion acabou de receber do servidor quando você atualizou sua cópia local. Este arquivo corresponde à revisão HEAD do repositório.
Podes lançar uma ferramenta externa de integração/ editor de conflitos com → ou poderás utilizar um qualquer editor de texto para resolver o conflito manualmente. Deverás decidir como é que irá ficar o código, efectua as alterações necessárias e guarda o ficheiro. Usando uma ferramenta de integração como o TortoiseMerge ou uma das outras ferramentas populares, é na generalidade a opção mais fácil já que apresentam na generalidade os ficheiros envolvidos numa painel de 3 vistas e não têm de se preocupar com os marcadores de conflitos. Se usares um editor de ficheiro terás então de pesquisar por linhas começadas pela string <<<<<<<.
Em seguida execute o comando → e submeta suas modificações no repositório. Por favor, note que o comando Resolver não resolve o conflito. Ele apenas remove os arquivos filename.ext.mine e filename.ext.r*, para permitir que você submeta suas modificações.
Se tiver conflitos com arquivos binários, Subversion não irá incluir esses arquivos (propriamente dito). A cópia local permanece inalterada (exatamente como a modificação mais recente) e você terá arquivos filename.ext.r*. Se desejar descartar as modificações e manter a versão do repositório, apenas utilize o comando Reverter. Se desejar manter sua versão e sobreescrever o repositório, utilize o comando Resolvido e submeta sua versão.
Você pode utilizar o comando Resolvido para múltiplos arquivos se clicar com o botão direito do mouse na pasta que contém os arquivos e selecionar → Isto fará aparecer uma caixa de diálogo de todos os arquivos em conflito naquela pasta e então poderá selecionar quais deverão ser assinalados como resolvido.
Um conflito de propriedade acontece quando dois ou mais desenvolvedores mudaram a mesma propriedade. Assim como para o conteúdo, resolver conflitos pode ser feito apenas pelos desenvolvedores.
Se uma das alterações deve sobreescrever outra então escolha a opção Resolver usando a propriedade local ou a opção Resolver usando a propriedade remota. Se as alterações devem ser combinadas então selecione Editar a propriedade manualmente, altere o valor da propridade como ela deve ser e marque como resolvido.
Um conflito de estrutura ocorre quando um desenvolvedor move/renomeia/elimina um arquivo ou uma pasta que outro desenvolvedor tenha também movido/renomeado/eliminado ou ainda apenas modificado. Existem diversas situações que podem resultar num conflito de estrutura e cada situação exigirá uma ação diferente para a solução do conflito.
Quando um arquivo é eliminado localmente na Subversão, o arquivo também é eliminado do sistema local de arquivos ou seja, mesmo que seja parte do conflito de estrutura isso não comprova ser uma sobreposição de conflito e você não poderá clicar nele com o botão direito do mouse, para resolver o conflito. Utilize a caixa de diálogo Verificar por Modificações ao invés de acessar a opção Editar conflitos.
TortoiseSVN pode auxiliar para encontrar o lugar correto para aplicar modificações mas poderão existir tarefas adicionais e requeridas para a solução de conflitos. Lembre-se que após uma atualização, a BASE de trabalho sempre conterá a revisão de cada item tal como era no repositório no momento da atualização. Se você reverter uma modificação após uma atualização, o repositório não retornará ao estado original, tal como era antes das modificações que você iniciou localmente.
Desenvolvedor A modifica
Foo.ce o submete para o repositório.Desenvolvedor B simultaneamente moveu
Foo.cparaBar.cem sua cópia local ou simplesmente eliminouFoo.cou a pasta que o continha.
Uma atualização da cópia de trabalho do desenvolvedor B resulta num conflito de estrutura:
Foo.cfoi eliminado da cópia de trabalho mas está marcado com um conflito de estrutura.Se o conflito resulta por ter renomeado ao invés de ter eliminado então
Bar.cestará marcado como adicionado mas não irá conter as modificações do desenvolvedor A.
Desenvolvedor B agora deverá escolher se mantém ou não as modificações do desenvolvedor A. No caso de um arquivo ter sido renomeado, ele poderá submeter as modificações de Foo.c para o arquivo renomeado Bar.c. No caso de simples arquivo ou pasta deletada, ele poderá escolher entre manter o item com as modificações do desenvolvedor A e descartar o arquivo eliminado. Ou então, poderá marcar o conflito como resolvido sem tomar qualquer atitude e efeticamente irá descartar as modificações do desenvolvedor A.
The conflict edit dialog offers to merge changes if it can find the original file of the renamed Bar.c. If there are multiple files that are possible move sources, then a button for each of these files is shown which allow you to chose the correct file.
Desenvolvedor A move
Foo.cparaBar.ce submete para o repositório.Desenvolvedor B modifica
Foo.cna sua cópia de trabalho.
Ou no caso de um diretório movido ...
Desenvolvedor A move a pasta que o continha de
FooFolderparaBarFoldere submete para o repositório.Desenvolvedor B modifica
Foo.cna sua cópia de trabalho.
Uma atualização na cópia de trabalho do desenvolvedor B resulta num conflito de estrutura. Para um simples conflito de arquivo:
Bar.cé adicionado na cópia de trabalho como um arquivo normal.Foo.cé assinalado como adicionado (com histórico) e indica um conflito de estrutura.
Para um conflito de pasta:
BarFolderé adicionada para a cópia de trabalho como uma pasta normal.FooFolderé assinalada como adicionada (com histórico) e indica um conflito de estrutura.Foo.cé assinalado como modificado.
Desenvolvedor B agora terá que decidir o que fazer com a reorganização do desenvolvedor A e submeter suas modificações para o arquivo correspondente na nova estrutura ou simplesmente reverter as modificações do desenvolvedor A e manter o arquivo local.
To merge her local changes with the reshuffle, Developer B must first find out to what filename the conflicted file Foo.c was renamed/moved in the repository. This can be done by using the log dialog. Then use the button which shows the correct source file to resolve the conflict.
If Developer B decides that A's changes were wrong then she must choose the Mark as resolved button in the conflict editor dialog. This marks the conflicted file/folder as resolved, but Developer A's changes need to be removed by hand. Again the log dialog helps to track down what was moved.
Desenvolvedor A move
Foo.cparaBar.ce submete para o repositório.Desenvolvedor B move o arquivo
Foo.cparaBix.c.
Uma atualização da cópia de trabalho do desenvolvedor B resulta num conflito de estrutura:
Bix.cé marcado como adicionado com histórico.Bar.cé adicionado na cópia local com status "normal".Foo.cé marcado como eliminado e possui um conflito de estrutura.
Para resolver este conflito, Desenvolvedor B terá que descobrir para qual nome o arquivo em conflito Foo.c foi renomeado/movido no repositório. Isto pode ser feito usando a caixa de diálogo do log.
Em seguida, o Desenvolvedor B terá que decidir se o novo nome do arquivo Foo.c será mantido - se aquele dado pelo Desenvolvedor A ou se aquele renomeado por ele mesmo.
Depois que o Desenvolvedor B tenha manualmente solucionado o conflito, o conflito de estrutura deve ser marcado como "resolvido", usando o botão apropriado na caixa de diálogo do Editor de Conflitos.
Desenvolvedor A trabalhando no trunk, modifica o arquivo
Foo.ce submete o arquivo para o repositórioDesenvolvedor B trabalhando com o branch, move e renomeia o arquivo
Foo.cparaBar.ce submete a alteração para o repositório
A atualização do Desenvolvedor A no trunk e a do Desenvolvedor B no branch, resulta num conflito de estrutura:
Bar.cjá está na cópia de trabalho com status "norma"'.Foo.cestá assinalado como "desaparecido" e com um conflito de estrutura.
Para solucionar este conflito, o Desenvolvedor B terá que marcar esse arquivo como "resolvido" na caixa de diálogo do Editor de Conflitos - o qual irá removê-lo da lista de conflitos. O Desenvolvedor B terá então que decidir se deve copiar o arquivo Foo.c "desaparecido" do repositório para a cópia de trabalho ou então se deve atualizar as modificações do Desenvolvedor A no arquivo Foo.c para o arquivo renomeado como Bar.c ou então se deve ignorar as modificações marcando o conflito como resolvido e fazer nada mais.
Note que se você copiar o arquivo "desaparecido" do repositório e então marcá-lo como resolvido, esse arquivo copiado será removido novamente. Você deve primeiro, resolver o conflito.
Desenvolvedor A trabalhando em trunk move
Foo.cparaBar.ce o submete para o repositório.Desenvolvedor B trabalhando no branch modifica o arquivo
Foo.ce o submete para o repositório.
Desenvolvedor A trabalhando no trunk move a pasta
FooFolderparaBarFoldere submete a alteração para o repositório.Desenvolvedor B trabalhando no branch modifica o arquivo
Foo.cem sua cópia de trabalho.
A atualização do Desenvolvedor A no trunk e a do Desenvolvedor B no branch, resulta num conflito de estrutura:
Bar.cé marcado como adicionado.Foo.cé marcado como modificado com um conflito de estrutura.
Desenvolvedor B agora terá que decidir o que fazer com a reorganização do desenvolvedor A e submeter suas modificações para o arquivo correspondente na nova estrutura ou simplesmente reverter as modificações do desenvolvedor A e manter o arquivo local.
To merge her local changes with the reshuffle, Developer B must first find out to what filename the conflicted file Foo.c was renamed/moved in the repository. This can be done by using the log dialog for the merge source. The conflict editor only shows the log for the working copy as it does not know which path was used in the merge, so you will have to find that yourself. The changes must then be merged by hand as there is currently no way to automate or even simplify this process. Once the changes have been ported across, the conflicted path is redundant and can be deleted.
If Developer B decides that A's changes were wrong then she must choose the Mark as resolved button in the conflict editor dialog. This marks the conflicted file/folder as resolved, but Developer A's changes need to be removed by hand. Again the log dialog for the merge source helps to track down what was moved.
Desenvolvedor A trabalhando em trunk move
Foo.cparaBar.ce o submete para o repositório.Desenvolvedor B trabalhando em um ramo, move e renomeia o arquivo
Foo.cparaBix.ce submete a alteração para o repositório.
A atualização do Desenvolvedor A no trunk e a do Desenvolvedor B no branch, resulta num conflito de estrutura:
Bix.cé marcado com Status de normal (não modificado).Bar.cé marcado como adicionado com histórico.Foo.cé marcado como inexistente e como tendo um conflito de estrutura.
To resolve this conflict, Developer B has to find out to what filename the conflicted file Foo.c was renamed/moved in the repository. This can be done by using the log dialog for the merge source.
Em seguida, o Desenvolvedor B terá que decidir se o novo nome do arquivo Foo.c será mantido - se aquele dado pelo Desenvolvedor A ou se aquele renomeado por ele mesmo.
Depois que o Desenvolvedor B tenha manualmente solucionado o conflito, o conflito de estrutura deve ser marcado como "resolvido", usando o botão apropriado na caixa de diálogo do Editor de Conflitos.
Há outros casos em que são identificados como conflitos de estrutura simplesmente porque o conflito envolve um diretório ao invés de um arquivo. Por exemplo, se você adicionar um diretório com o mesmo nome no tronco e no ramo e então tentar combiná-los você terá um conflito de estrutura.
Enquanto você estiver trabalhando na sua cópia de trabalho você frequentemente precisa saber quais arquivos foram alterados/adicionados/removidos ou renomeados, ou ainda quais arquivos foram alterados por outros.
Agora que você obteve uma cópia de trabalho do repositório Subversion você pode ver seus arquivos no windows explorer com ícones modificados. Esta é uma das razões para que o TortoiseSVN seja tão popular. O TortoiseSVN adiciona um ícone de revestimento sobre o ícone de cada arquivo. Dependendo do status do arquivo no Subversion o revestimento é diferente.
Uma cópia de trabalho recém obtida possui uma camada contendo uma marca verde. Isto significa que o estado é normal.
Assim que você começar a editar um arquivo, o estado muda para modificado e a camada de revestimento então muda para um ponto de exclamação vermelho. Dessa maneira você pode facilmente ver quais arquivos foram alterados desde que você atualizou sua cópia de trabalho e que precisam ser submetidos.
Se durante uma atualização ocorrer um conflito então o ícone muda para um ponto de exclamação amarelo.
Se você marcou a propriedade svn:needs-lock em um arquivo, o Subversion faz com que aquele arquivo se torne somente-leitura até que você obtenha uma trava naquele arquivo. Tais arquivos tem este revestimento para indicar que você precisa obter uma trava antes que você possa editar aquele arquivo.
Se você mantém uma trava em um arquivo, e o estado do Subversion é normal, o revestimento do ícone lembra você de que você deve liberar a trava se não estiver usando-o para permitir que outros possam submeter suas mudanças para quele arquivo.
Este ícone mostra a você que alguns arquivos ou pastas dentro da pasta atual foram agendados para serem deletados do controle de versionamento ou um arquivo dentro do controle de versionamento está faltando em uma pasta.
O sinal de mais significa que um arquivo ou pasta foi agendado para ser addicionado ao controle de versões.
O sinal de barra lhe diz que um arquivo ou pasta é ignorado do controle de versões. Esse revestimento é opcional.
Este ícone mostra arquivos e pastas que não estão sob o controle de versionamento, mas não foram ignorados. Este revestimento é opcional.
De fato, você pode descobrir que nem todos estes ícones são usados em seu sistema. Isto é porque o número de camadas permitidas pelo Windows é bem limitado e se você também estiver usando uma versão antiga do TortoiseCVS, então não haverá espaço suficiente. O TortoiseSVN tenta ser um “Good Citizen (TM) - Bom Cidadão” e limita seu uso de camadas para dar outros aplicativos uma chance também.
Agora que existem vários clientes Tortoise (TortoiseCVS, TortoiseHg, ...) a limitação do ícone torna-se um problema real. Para contornar isso, o projecto TortoiseSVN introduziu um conjunto de ícones comuns e partilhados, carregados como uma DLL, que podem ser usados por todos os clientes Tortoise. Verifique com o seu provedor de cliente para ver se isso já foi integrado :-)
Para uma descrição de como as camadas de ícones correspondem ao estado do Subversion e outros detalhes técnicos, leia “Sobreposição dos Ícones”.
Algumas vezes você quer ter informações mais detalhadas sobre um arquivo/diretório do que a sobreposição de ícones. Você pode obter toda a informação que Subversion provê na janela de propriedades no explorer. Apenas selecione o arquivo ou diretório e selecione → no menu de contexto (nota: esta é a entrada de menu de propriedades do explorer, não o submenu do TortoiseSVN!). No caixa de propriedades da janela, o TortoiseSVN adicionou uma nova página de propriedades para arquivos/pastas sobre o controle do Subersion, onde você pode ver todas as informações relevantes sobre os arquivos/diretórios selecionados.
É frequentemente muito útil saber quais arquivos você alterou e também quais arquivos foram alterados e submetidos por outros. É aí que o comando → se torna útil. Esta janela lhe mostrará cada arquivo que foi alterado de qualquer maneira dentro da sua cópia de tabalho, assim como quaisquer arquivos não-versionados que você possa possuir.
Se você clicar no botão então você também pode olhar as mudanças no repositório. Dessa maneira você pode checar antes de uma atualização se pode haver um possível conflito. Você também pode atualizar arquivos selecionados do repositório sem atualizar toda a pasta. Por padrão, o botão somente busca o estado remoto com a profundidade de obtenção da sua cópia de trabalho. Se você deseja ver todos os arquivos e pastas no repositório, mesmo aquelas que você não obteve, então você deve manter pressionada a tecla Shift quando clicar no botão .
A janela usa codificação de cores para demarcar o estado.
- Azul
Itens modificados localmente.
if unchanged files are inside a directory that's been moved, the status will show a
+sign in the status column, and it will be colored in blue as well.- Roxo
Itens adicionados. Itens que foram adicionados com histórico tem um sinal
+na coluna de Estado de Texto, e uma janela mostra de onde o item foi copiado.- Vermelho escuro
Itens excluídos ou perdidos.
- Verde
Itens modificados localmente e no repositório. As mudanças serão juntadas ao atualizar. Isto pode produzir conflitos ao atualizar.
- Vermelho vivo
Itens modificados localmente e apagados no repositório, ou modificados no repositório e apagados localmente. Isto irá produzir conflitos durante a atualização.
- Preto
Itens não modificados ou não controlados.
Este é o esquema padrão de cores, mas você pode personalizar as cores usando a janela de configurações. Acesse “Configurações de Cores do TortoiseSVN” para mais informações.
Ícones de sobreposição são usados para indicar também outros estados. A captura de ecrã abaixo mostra todas as sobreposições possíveis que poderão ser mostradas se necessário.
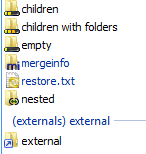
São mostradas sobreposições para os seguintes estados:
Nível de checkout
vazia, siginfica apenas o item.Nivel de checkout
ficheiros, significa só o próprio item e todos os ficheiros sem pastas filho.Nivel de checkout
imediatos, significa só próprio item, todos os ficheiros e pastas filho, mas sem os filhos das pastas filho.Itens aninhados, i.e., cópias de trabalho dentro da cópia de trabalho.
Itens externos, i.e., todos os itens que são adicionados via a propriedade
svn:externals.Itens que são restaurados após uma submissão. Consulta “Enviar somente partes dos arquivos” para detalhes.
Itens que têm modificações de propriedade, mas apenas na propriedade
svn:mergeinfo. Se qualquer outra propriedade estiver modificada, não será usada a sobreposição.
Itens que foram trocados para um caminho diferente no repositório são também sinalizados com um marcador (s). Podes ter trocado algo enquanto trabalhavas num ramo e te esqueceste de trocar de novo para o trunk. Isto é o teu sinal de aviso! O menu de contexto permite-te trocar de volta para o caminho normal mas uma vez.
Do menu de contexto da janela você pode ver um diff de mudanças. Marque as mudanças localis que você fez usando → . Marque as mudanças no repositório feitas por outros usando → .
Você também pode reverter as mudanças em arquivos individuais. Se você apagou um arquivo acidentalmente, ele aparecerá como Faltando e você pode usar Reverter para recuperá-lo.
Arquivos não-versionados e ignorados podem ser enviados para a lixeira daqui usando → . Se você deseja apagar arquivos permanentemente (ignorando a lixeira) matenha pressionada a tecla Shift enquanto cliclar em Apagar.
Se tu quiseres examinar um ficheiro em detalhe, podes arrastá-lo daqui para outro aplicativo, como um editor de texto ou IDE, ou podes salvar uma cópia simplesmente arrastando-o para uma pasta do navegador.
As colunas são personalizáveis. Se você clicar com o botão direito em qualquer cabeçalho de coluna você verá um menu de contexto permitindo-o selecionar quais colunas serão exibidas. Você pode também alterar a largura das colunas usando o ícone de arrastar que aparece quando você passa o mouse em cima de uma borda de coluna. Essas personalizações são preservadas, então você verá os mesmos cabeçalhos da próxima vez.
Se você está trabalhando em diversas tarefas independentes ao mesmo tempo, você pode também agrupar arquivos em changelists. Leia “Lista de Alterações” para maiores informações.
Na parte inferior da janela você pode ver um sumário da variação das revisões do repositório em uso na sua cópia de trabalho. Essas são as revisões submetidas, não as revisões atualizadas; elas representam a variação das revisões onde estes arquivos foram submetidos pela última vez, não as revisões nas quais foram atualizados. Note que a variação de revisões mostrada aplica-se somente aos itens exibidos, não à cópia de trabalho inteira. Se você deseja ver informações sobre a cópia de trabalho inteira você deve marcar a caixa Mostrar arquivos não modificados.
Dica
Se você deseja uma exibição simples da sua cópia de tabalho, p. ex. mostrando todos os arquivos e pastas em cada nível da hierarquia de pastas, então a janela Verificar por Modificações é a maneira mais fácil de conseguir isso. Simplesmente marque a caixa Mostrar arquivos não modificados para mostrar todos os arquivos na sua cópia de trabalho.
Reparando Referência Externas Renomeadas
Algumas vezes arquivos são renomeados fora do Subversion, e eles aparecem na lista de arquivos como arquivos perdidos e como arquivos não versionados. Para evitar a perca do histório você precisa notificar o Subversion sobre a conexão entre os arquivos. Simplesmente selecione o arquivo antigo (perdido) e o arquivo nome (não versionado) e use a opção → para identificar os dois arquivos como uma renomeação.
Reparando Cópias de Referências Externas
Se você fez uma cópia de um arquivo e esqueceu de usar o comando do SVN na cópia, você pode reparar a cópia e assim o novo arquivo não perderá seu histórico. Simplesmente selecione o arquivo antigo (normal ou modificado) e o nome arquivo (não versionado) e use → para identificar os dois arquivos como um cópia.
Frequentemente você deseja olhar dentro de seus arquivos, para observar o que foi alterado. Você pode fazê-lo selecionando o arquivo que foi alterado, e selecionando do menu de contexto do TortoiseSVN. Isto inicia o visualizador-diff externo, que irá então comparar o arquivo atual com a cópia pristina ( revisão BASE), que foi armazenada após a última submissão ou atualização.
Dica
Mesmo quando não não se está dentro de uma cópia de trabalho ou quando você tiver múltiplas versões do arquivo em disco, você ainda pode visualizar diffs:
Selecione os dois arquivos que você deseja comparar no explorer ( p. ex. usando Ctrl e o mouse) e escolha do menu de contexto do TortoiseSVN. O arquivo clicado por último ( o que possui foco, ou seja, um retângulo pontilhado) será compreendido como o último.
Em um mundo ideal, você sempre estará tabalhando em uma coisa de cada vez, e sua cópia de trabalho contém apenas um conjunto de alterações lógicas. OK, devolta a realidade. Frequentemente acontece que você precisa trabalhar em diversas tarefas não relacionadas ao mesmo tempo, e quando você olhar na janela de submissão, todas as mudanças estão misturadas. A funcionalidade das changelists ajuda-o a agrupar os arquivos, tornando mais fácil de ver o que você está fazendo. É claro que isto só pode acontecer se as mudanças não se sobrepuserem. Se duas tarefas diferentes afetarem o mesmo arquivo, não há outra maneira de separar as mudanças.
Você pode ver listas de alterações em diversos lugares, mas os mais importantes são na janela de submissão e na janela de verificação-de-modificações. Vamos começar na janela de verificação-de-modificações após você tiver trabalhado em diversas funcionalidades e muitos arquivos. Quando você abrir esta janela pela primeira vez, todos os arquivos alterados estarão listados juntos. Suponha que agora você queira organizar as coisas e agrupar os arquivos de acordo com a funcionalidade.
Selecione um ou mais arquivos e use → para adicionar um item à lista de alterações. Inicialmente não haverão listas de alterações, então a primeira vez que você fizer isto você criará uma nova changelist. Dê o nome que melhor descreve para que à está usando, e clique . A janela irá agora mudar para mostrar os grupos de itens.
Uma vez que você tiver criado a lista de alterações você pode arrastar e soltar itens nela, tanto de outra lista de alterações, como do Windows Explorer. Arrastar do Explorer pode ser útil já que permite-o adicionar itens para a lista de modificações antes que o arquivo seja modificado. Você pode fazê-lo da janela de verificar-por-modificações, mas somente através da exibição de todos os arquivos não modificados.
Na janela de submissão você pode ver os mesmos arquivos, agrupados pela lista de alterações. Além de visualizar de forma imediata a indicação visual dos agrupamentos, você também pode usar os grupos para selecionar quais arquivos submeter.
O TortoiseSVN reserva um nome de lista de alterações para uso pessoal, chamado de ignore-on-commit. Isto é usado para marcar arquivos versionados que você geralmente não deseja submeter mesmo que tenham mudanças locais. Esta funcionalidade está desrita em “Excluindo Itens de uma Lista de Submissões”.
Quando você submete arquivos pertencendo à uma lista de mudanças então normalmente você espera que a pertinência da lista de mudanças não seja mais necessária. Então por padrão, arquivos são removidos das listas automaticamente na submissão. Se você deseja reter o arquivo em sua lista, marque a caixa Guardar changelists na parte inferior da janela de submissão.
Dica
Listas de Alterações são puramente uma funcionalidade local do cliente. Criar e remover Listas de Alterações não afetará o repositório, nem a cópia de tabalho de mais ninguém. Elas são simplesmente uma maneira conveniente para vocÇê organizar seus arquivos.
Atenção
Note that if you use changelists, externals will no longer show up in their own groups anymore. Once there are changelists, files and folders are grouped by changelist, not by external anymore.
More often than wanted, it's necessary to stop what you were working on and work on something else. For example a serious problem needs immediate dealing with and you have to stop working on the new feature. If possible, you should commit the changes you have done so far and then start working on the urgent issue, but often those changes would break the build or are just not ready for committing yet.
So if you can't commit your local changes yet, you have to put them aside while you're working on the urgent issue. The shelving feature helps you do exactly that: you can store your local changes on a shelve, get your working copy in a clean state again and work on the issue. After you're finished with the urgent issue and you've committed those changes, you can unshelve your shelved work and continue working on your previous task again.
Two new commands are implemented for this. One for shelving and one for unshelving.
To shelve your local changes, select your working copy and use → The following dialog allows you to select the files you want to shelve and give a name under which you want to store them.
If you select an existing shelf, then a new version is created for that shelf. If you provide a new name, a new shelf is created for the selected files.
If you click the button, the shelf is created and your working copy files are reset to a clean state. If you click the button, the shelf is created but your local modifications are kept.
To unshelve your changes, use → to get the unshelve dialog. This dialog shows you a list of all shelved items. Select the shelved item you want and the version to apply back to your working copy and click .
Dica
Shelves are purely a local client feature. Creating and removing Shelves will not affect the repository, nor anyone else's working copy.
Experimental
The shelving feature is still marked as experimental.
That means that while shelving works as advertised, it is still in a stage where it's heavily improved and worked on. That also means that there's no guarantee that the shelves you create are upwards compatible and future versions might not be able to use them. And of course the UI might change as well in future versions to accommodate new features and behaviors.
Para cada mudança feita e submetida, você deverá prover uma mensagem de auditoria para cada mudança. Desta maneira você pode mais tarde encontrar o que foi feito e porque, e você terá um log detalhado para cada processo de desenvolvimento.
A Janela de Auditoria da Revisão recupera todas as mensagens de log e as mostra para você. A visualização é dividida em 3 painéis.
O painel superior mostra uma lista de revisões onde alterações para o arquivo/diretório foi submetido. Este resumo inclui a data e a hora, a pessoa que submeteu a revisão e os primeiros caracteres da mensagem de auditoria.
Linhas mostradas em azul indicam que alguma coisa foi copiada para esta linha de desenvolvimento (talvez de um ramo).
O painel do meio mostra a mensagem de auditoria completa da revisão selecionada.
O painel inferior mostra a lista de todos os arquivos e diretórios que foram modificados para a revisão selecionada.
Mas isto é muito mais que isso - a janela provê um menu de contexto com comandos que podem ser usados para obter ainda mais informações sobre o histórico do projeto.
There are several places from where you can show the Log dialog:
Do TortoiseSVN contexto do submenu
Da página de propriedades
Da janela de Progresso depois que uma atualização foi encerrada. Então a janela de Auditoria somente mostra tas revisões que foram alteradas desde a sua última atualização.
A partir do navegador do repositório
Se o repositório está indisponível você verá a janela Deseja continuar desconectado?, descrito em “Modo desconectado”.
o painel superior tem uma coluna Ações contendo ícones que resumem o que foi feito na revisão. Existem quatro diferentes ícones, cada um apresentado na sua própria coluna.
Se uma revisão modificou algum arquivo ou diretório, o ícone modificado é apresentado na primeira coluna.
Se uma revisão adicionou algum arquivo ou diretório, o ícone adicionado é apresentado na segunda coluna.
Se uma revisão apagou algum arquivo ou diretório, o ícone apagado é apresentado na terceira coluna.
Se uma revisão sobrepôs algum arquivo ou diretório, o ícone substituído é apresentado na quarta coluna.
If a revision moved or renamed a file or directory, the moved icon is shown in the fourth column.
If a revision replaced a file or directory by moving/renaming it, the move replaced icon is shown in the fourth column.
If a revision merged a file or directory, the merged icon is shown in the fourth column.
If a revision reverse merged a file or directory, the reverse merged icon is shown in the fourth column.
The top pane of the Log dialog has a context menu that allows you to access much more information. Some of these menu entries appear only when the log is shown for a file, and some only when the log is shown for a folder.
- Comparar com a cópia de trabalho
Compara a revisão selecionada com a cópia de trabalho. A ferramenta padrão Diff é o TortoiseMerge o qual é um suplemento do TortoiseSVN. Se a janela de auditoria é para um diretório, ela mostrará a você a lista dos arquivos alterados, e permitirá a você rever as alterações feitas em cada arquivo individualmente.
- Comparar e ver autoria em relação à BASE de trabalho
Veja a autori da revisão selecionada, e o arquivo BASE na sua cópia de trabalho e compare o relatório de autoria usando a ferramenta visual diff. Leia “Diferenças de Autoria” para mais detalhes. (somente arquivos)
- Mostrar alterações com as diferenças unificadas
Visualizar as alterações feitas em uma revisão selecionada como um arquivo Unificado-Diff (formato de correção GNU). Isto mostrará somente as diferenças com algumas linhas do contexto. É algo mais complicado de ler que o arquivo de comparação visual, mas mostrará todas as alterações juntas em um formato compactado.
Se mantiveres permida a tecla Shift enquanto clicas no item do menu, aparecerá primeiro uma caixa de diálogo onde podes configurar as opções para a comparação unificada. Essas opções incluem a possibilidade de ignorar alterações em fins-de-linha e espaços-em-branco.
- Comparar com a revisão anterior
Compara a revisão selecionada com a revisão anterior. Isto funciona de maneira similar à comparação com sua cópia de trabalho. Para diretórios esta opção mostrará primeiro os arquivos alterados permitindo a você selecionar os arquivos para comparar.
- Comparar e ver autoria em relação à revisão anterior
Mostra uma janela com os arquivos alterados permitindo a você selecionar os arquivos. Mostra a autoria da revisão selecionada, e a revisão anterior, e compara os resultados usando uma ferramenta visual diff. (somente diretórios)
- Save revisão para...
Salva a revisão selecionada para um arquivo e então você terá uma versão antiga do arquivo. (somente arquivos)
- Abrir / Abrir com...
Abre o arquivo selecionado, tanto com o visualizador padrão para aquele tipo de arquivo, como com o programa que você escolheu. (somente arquivos)
- Autoria...
Autorias do arquivo até a revisão selecionada (apenas arquivos).
- Navegar no repositório
Abre o navegador de repositório para examinar o arquivo selecionado ou diretório dentro do repositório como ele estava na revisão selecionada.
- Criar ramificação/tórulo de uma revisão
Criar um ramo ou um rótulo de uma revisão selecionada. Isto é muito útil, por exemplo, se você esqueceu de criar um rótulo e já submeteu outras alterações que supostamente não deveriam fazer parte da liberação.
- Atualizar item para a revisão
Atualize sua cópia de trabalho para a revisão selecionada. Prático se você quer que sua cópia de trabalho reflita algum momento no passado, ou se você tem submissões adicionais no repositório e você quer atualizar sua cópia um passo por vez. É melhor atualizar o diretório inteiro da sua cópia de trabalho, não apenas um arquivo, senão sua cópia de trabalho poderá ficar inconsistente.
Se você quer desfazer uma alteração mais recente permanentemente, use alternativamente a opção Reverter para esta revisão.
- Reverter para esta revisão
Reverter para uma revisão mais recente. Se você fez várias alterações, e então decidiu que você quer voltar atrás para como as coisas eram na revisão N, este é comando que você precisa. As alterações serão desfeitas em sua cópia de trabalho, assim esta operação não afetará seu repositório até que você submeta as alterações. Note que isto irá desfazer todas as alterações feitas depois da revisão selecionada, substituindo o arquivo/diretório com a revisão mais recente.
Se sua cópia de trabalho está em um estado de não modificada, depois que você realizou a operação sua cópia de trabalho aparecerá como modificada. Se você já tem alterações locais, este comando combinará o desfazimento das alterações na sua cópia de trabalho.
O que está acontecendo internamente é que o Subversion realiza uma combinação reversa das alterações feitas depois da revisão selecionada, desfazendo o que foi feito dessas submissões anteriores.
Se depois de executar esta ação você decidir que você quer desfazer o desfazimento e voltar sua cópia de trabalho de volta para o estado anterior de não modificado, você deve usar → de dentro do Windows Explorr, e isto descartará as modificações locais feitas pela ação da combinação reversa.
Se você simplesmente quer ver como um arquivo ou diretório era em uma revisão anterior, use Atualizar para a revisão ou então Salvar revisão como....
- Reverter alterações de uma revisão
Desfazer alterações das quais foram feitas em uma revisão selecionada. As alterações são desfeitas em sua cópia de trabalho, assim, esta operação não afeta o repositório de jeito algum! Note que isto irá desfazer somes as alterações feitas na revisão; a ação não substituirá sua cópia de trabalho com o arquivo inteiro da revisão anterior. Ela é muito útil por desfazer uma alteração anterior quando outras alterações não relacionadas já foram feitas.
Se sua cópia de trabalho está em um estado de não modificada, depois que você realizou a operação sua cópia de trabalho aparecerá como modificada. Se você já tem alterações locais, este comando combinará o desfazimento das alterações na sua cópia de trabalho.
O que está acontecendo internamente é que o Subversion executa uma combinação reversa de uma revisão, desfazendo seu efeito desde a submissão anterior.
Você pode desfazer o desfazimento como descrito acima em Reverter para esta revisão
- Unificar revisão para...
Combinas as revisões selecionadas em uma cópia de trabalho diferente. Uma janela de seleção de pastas permite que você escolha as cópias de trabalho para combinar, mas após isto, não há uma janela de confirmação, nem qualquer oportunidade de tentar uma combinação de teste. É uma boa idéia combinar em uma cópia de trabalho não modificada, assim você pode reverter as mudanças se não funcionar! Isto é um recurso útil se você quer combinar revisões selecionadas de um ramo para outro.
- Obter...
Obtenha uma cópia atualização de um diretório selecionado em uma revisão selecionada. Isto abrirá uma janela para você confirmar a URL e a revisão, e selecionar o local para gravar os arquivos.
- Exportar...
Exporta o arquivo/diretório selecionado na revisão selecionada. Isto abrirá uma janela para você confirmar a URL e a revisão, e selecionar o local para exportar.
- Editar autor / mensagem de log
Editar a mensagem de auditoria ou o autor associado à submissão anterior. Leia “Alterando a Mensagem de Auditoria e o Autor” para saber como isto funciona.
- Mostrar propriedades da revisão
Visualizar e editar qualquer propriedade, não apenas a mensagem de auditoria e o autor. Veja em “Alterando a Mensagem de Auditoria e o Autor”.
- Copiar para área de transferência
Copiar os detalhes do log das revisões selecionadas para a área de transferência. Isto copiará o número da revisão, o autor, a data, a mensagem de auditoria e a lista dos itens alterados para cada revisão.
- Procurar mensagens de log...
Procura mensagens de auditoria pelo texto que você digitou. Isto procura nas mensagens de log o que você digitou e também a ação resumida criada pelo Subversion (mostrado no painel inferior). A procura não diferencia maiúscula/minúscula.
- Criar análise do código colaborativo
This menu is shown only if the SmartBear code collaborator tool is installed. When invoked for the first time, a dialog is shown prompting the user to enter user credentials for both code collaborator and SVN. Once the settings are stored, the settings dialog is no longer shown when the menu is invoked, unless the user holds Ctrl while executing the menu item. The configuration and the chosen revision(s) are used to invoke the code collaborator graphical user interface client, which creates a new review with the selected revisions.
Se você selecionar duas revisões de uma vez (usando o comum Ctrl-modificador), o menu de contexto mudará e mostrará algumas opções adicionais:
Se você selecionar duas ou mais revisões (usando os modificadores Ctrl ou Shift), o menu de contexto irá incluir uma entrada para Reverter todas as mudanças que foram reitas pelas revisões selecionadas. Esta é a maneira mais fácil de restaurar um grupo de revisões de uma vez.
Você pode também escolher combinar as revisões selecionadas para outra cópia de trabalho, como descrito acima.
Se todas as revisões selecionadas são do mesmo autor, você pode editar o autor de todas as revisões de uma vez só.
The bottom pane of the Log dialog also has a context menu that allows you to
- Mostrar alterações
Mostra as alterações feitas na revisão selecionada para o arquivo selecionado.
- Autoria das alterações
Auditar a revisão selecionada e a revisão anterior para um arquivo selecionado, e comparar o relatório de autoria usando uma ferramenta visual de comparação. Leia “Diferenças de Autoria” para mais detalhes.
- Mostra como arquivo de diferenças unificado
Mostra as alterações do arquivo em um formato unificado diff. Este menu de contexto está disponível apenas para arquivos apresentados como modificado.
- Abrir / Abrir com...
Abre o arquivo selecionado, tanto com o visualizar padrão para o tipo de arquivo, ou com o programa que você escolheu.
- Autoria...
Abre a janela de Autoria, permitindo a você verificar a autoria até a revisão selecionada.
- Reverter alterações de uma revisão
Reverter as alterações feitas para o arquivo selecionado na revisão.
- Mostrar propriedades
Visualizar as propriedades do Subversion para o item selecionado.
- Mostrar log
Mostrar o log de revisões para um único arquivo selecionado.
- Recuperar log das unificações
Mostrar o log da revisão para um único arquivo selecionado, incluindo as alterações de combinação. Descubra mais em “Combinar Recursos Monitorados”.
- Save revisão para...
Salvar a revisão selecionada para um arquivo e então você terá uma versão mais antiga deste arquivo.
- Exportar...
Exporta os itens seleccionados nesta revisão para uma pasta, preservando a hierarquia de ficheiros.
When multiple files are selected in the bottom pane of the Log dialog, the context menu changes to the following:
- Save revisão para...
Salvar a revisão selecionada para um arquivo e então você terá uma versão mais antiga deste arquivo.
- Exibir múltiplas mudanças...
Show changes made in the selected revision for the selected files. Note that the show changes functionality is invoked multiple times, which may bring up multiple copies of your selected diff tool, or just add a new comparison tab in your diff tool. If you have selected more than 15 files, you will be prompted to confirm the action.
- Abrir múltiplos locais
This will open local working copy files that correspond to your selected files using the application that is registered for the extension. [The behavior is the one you would get double-clicking the working-copy file(s) in Windows explorer]. Depending on how your file extension is associated to an application and the capabilities of the application, this may be a slow operation. In the worst case, new instances of the application may be launched by Windows for each file that was selected.
If you hold Ctrl while invoking this command, the working copy files are always loaded into Visual Studio. This only works when the following conditions are met: Visual Studio must be running in the same user context while having the same process integrity level [running as admin or not] as TortoiseProc.exe. It may be desirable to have the solution containing the changed files loaded, although this is not strictly necessary. Only files that exist on disk with extensions [.cpp, .h, .cs, .rc, .resx, .xaml, .js, .html, .htm, .asp, .aspx, .php, .css and .xml] will be loaded. A maximum of 100 files can be loaded into Visual Studio at one time, and the files are always loaded as new tabs into the currently open instance of Visual Studio. The benefit of reviewing code changes in Visual Studio lies in the fact that you can then use the built-in code navigation, reference finding, static code analysis and other tools built into Visual Studio.
- Exportar...
Export the selected files/folder at the selected revision. This brings up a dialog for you to confirm the URL and revision, and select a location for the export.
Dica
Você deve notar que algumas vezes nós nos referimos às mudanças e outras vezes às diferenças. Qual é a diferença?
Subversion usa números de revisão para demonstrar 2 coisas diferentes. Uma revisão geralmente representa um estado do repositório em algum momento no tempo, mas também pode ser usado para representar uma conjunto de mudanças em uma revisão, por exemplo, “Feito em r1234” significa que as alterações submetidas em r1234 implementam a funcionalidade X. Para deixar mais claro a maneira que isto está sendo usando, nós usamos dois termos diferentes.
Se você selecionar duas revisões N e M, o menu de contexto oferecerá mostrar a diferença entre essas duas revisões. Nos termos do Subversion isto é diff -r M:N.
Se você selecionar uma única revisão N, o menu de contexto oferecerá mostrar as alterações feitas nesta revisão. Nos termos do Subversion é diff -r N-1:N ou diff -c N.
O painel inferior mostra os arquivos alterados em todas as revisões selecionadas, então o menu de contexto sempre oferecerá mostrar as diferenças
A caixa de diálogo Log nem sempre motra todas as alterações já feitas por uma série de motivos:
Para um grande repositório talvez haja centenas ou milhares de alterações e recuperar todas eles pode levar um bom tempo. Normalmente você está interessado apenas nas alterações mais recentes. Por padrão, o número de mesagens recuperadas do log é limitado a 100, mas você pode alterar este valor em → (“Janela 1 de Configurações do TortoiseSVN”),
Quando a caixa Parar para copiar/renomear é marcada, Mostrar Log irá parar no ponto de onde o arquivo selecionado ou a pasta foram copiados de outro lugar no repositório. Isto pode ser útil quando observando ramos (ou etiquetas) porque ele pára na raiz do ramo, e dá uma indicação rápida das mudanças que foram feitas apenas naquele ramo.
Normalmente você vai querer deixar esta opção desmarcada. TortoiseSVN lembrará o estado da caixa de opção, então ele respeitará sua preferência.
Quando a janela Mostrar Log é chamada da janela de Combinação, a caixa é sempre marcada por padrão. Isto é porque uma combinação está sempre procurando mudanças nos ramos, e voltar além da raiz de um ramo não faz sentido neste caso.
Note que o Subversion implementa atualmente a ação de renomear como um par cópia/deleção, portanto renomear um arquivo ou pasta irá fazer com que o display de log pare se esta opção tiver marcada.
Se você quer ver mais mensagens de log, clique no para recuperar as próximas 100 mensagens de log. Você pode repetir isso quantas vezes for preciso.
Próximo a este botão existe um botão multi-funcional que lembra a última opção que você usou. Clique na seta para ver as outras opções fornecidas.
Use se você quiser ver uma faixa de revisões específica. Uma janela irá pedir que você entre as revisões inicial e final.
Use se você quiser ver todas as mensagens de log de HEAD até a revisão 1.
Para atualizar as últimas revisões no caso de terem havido outros commits enquanto a caixa de diálogo de log esteve aberta, pressione a tecla F5.
Para atualizar o chache de log, pressione as teclas Ctrl-F5.
Como a janela de log mostra o log de HEAD, não da revisão da cópia de trabalho atual, é comum que haja mensagens de log para conteúdo que ainda não foi atualizado na cópia de trabalho. Para ajudar a deixar isto mais claro, a mensagem de submissão que corresponde à revisão que você têm na sua cópia de trabalho é mostrada em negrito.
Quando você exibe o log para uma pasta, a revisão destacada é a maior revisão encontrada dentro daquela pasta, o que requer uma pesquisa da cópia de trabalho. A pesquisa é realizada em um processo separado para não demorar para mostrar o log, mas com isso, o destaque de pastas pode não aparecer imediatamente.
Subversion 1.5 e posteriores mantém um registro das combinações usando propriedades. Isto permite que nós tenhamos um histórico mais detalhado das mudanças combinadas. Por exemplo, se você deselvolve um novo recurso em um ramo e então combina este ramo de volta com o tronco, o desenvolvimento do recurso será mostrado no log do tronco como uma única submissão para a combinação, mesmo que possa haver 1000 submissões durante o desenvolvimento no ramo.
Se você quiser ver os detalhes de quais revisões foram combinadas como parte da submissão, use a caixa de marcar Incluir revisões combinadas. Isto irá obter as mensagens de log novamente, mas também irá intercalar as mensagens de log das revisões que foram combinadas. revisões combinadas são mostradas em cinza porquê representam mudanças feiras em partes diferentes da árvore.
É claro que combinar nunca é simples! Durante o desenvolvimento de um recurso no ramo, provavelmente irão ocorrer combinações com o tronco para manter o ramo sincronizado com a linha de código principal. Então o histórico de combinações do ramo também irá mostrar outra camada de histórico de combinações. Estas camadas diferentes são mostradas na janela de log usando níveis de indentação.
Propriedades de revisão são completamente diferentes das propriedades da Subversion de cada item. Propriedades de revisão são itens descritivos que são associados com um número de revisão específico no repositório, como uma mensagem de log, data de submissão e nome do autor.
Algumas vezes você pode querer mudar uma mensagem de log que você entrou, talvez porque há erros ou porque você quer melhorar a mensagem ou mudá-la por outras razões. Ou você quer mudar o autor da submissão porque você esqueceu de configurar a autenticação ou...
Subversion lets you change revision properties any time you want. But since such changes can't be undone (those changes are not versioned) this feature is disabled by default. To make this work, you must set up a pre-revprop-change hook. Please refer to the chapter on Hook Scripts in the Subversion Book for details about how to do that. Read “Rotinas de eventos no servidor” to find some further notes on implementing hooks on a Windows machine.
Uma vêz que você já configurou seu servidor com os hooks necessários, você pode mudar o autor e a mensagem de log (ou qualquer outra propriedade de revisão) de qulquer revisão, usando o menu de contexto do painel superior da janela de Log. Você também pode editar uma mensagem de log usando o menu de contexto do painel do meio.
Atenção
Como as propriedades de revisão da Subversion não são versionadas, fazer modificações em tais propriedades (por exemplo, a propriedade mensagem de submissão svn:log) irá sobrescrever os valores anteriores da propriedade para sempre.
Importante
Since TortoiseSVN keeps a cache of all the log information, edits made for author and log messages will only show up on your local installation. Other users using TortoiseSVN will still see the cached (old) authors and log messages until they refresh the log cache. Refer to “Atualizando a Visualização”
Se você quiser restringir as mensagen de log para mostrar apenas às que você está interessado ao invés de rolar por toda a lista de milhares, você pode usar os controles de filtro no topo da Janela de Log. Os controles de datas inicial e final permitem que você restrinja a saída à uma faixa de datas conhecida. A caixa de busca permite que você mostre apenas as mensagens que contenham uma frase particular.
Clique no ícone de busca para selecionar a informação na qual você quer pesquisar e escolha o modo regex. Normalmente você irá precisar apenas de uma busca simples de palavras, mas se você precisar de termos de busca mais flexíveis, você pode usar expressões regulares. Se você colocar o curosor sobre a caixa, uma dica de tela irá dar dicas de como usar funções de expressões regulares. O filtro funciona checando quando o texto do filtro combina com as entradas de log, e então apenas estas entradas que combinam com o filtro são exibidas.
Simple sub-string search works in a manner similar to a search engine. Strings to search for are separated by spaces, and all strings must match. You can use a leading - to specify that a particular sub-string is not found (invert matching for that term), and you can use ! at the start of the expression to invert matching for the entire expression. You can use a leading + to specify that a sub-string should be included, even if previously excluded with a -. Note that the order of inclusion/exclusion is significant here. You can use quote marks to surround a string which must contain spaces, and if you want to search for a literal quotation mark you can use two quotation marks together as a self-escaping sequence. Note that the backslash character is not used as an escape character and has no special significance in simple sub-string searches. Examples will make this easier:
Alice Bob -Eve
searches for strings containing both Alice and Bob but not Eve
Alice -Bob +Eve
searches for strings containing both Alice but not Bob, or strings which contain Eve.
-Case +SpecialCase
searches for strings which do not contain Case, but still include strings which contain SpecialCase.
!Alice Bob
searches for strings which do not contain both Alice and Bob
!-Alice -Bob
do you remember De Morgan's theorem? NOT(NOT Alice AND NOT Bob) reduces to (Alice OR Bob).
"Alice and Bob"
searches for the literal expression “Alice and Bob”
""
searches for a double-quote anywhere in the text
"Alice says ""hi"" to Bob"
searches for the literal expression “Alice says "hi" to Bob”.
Descrever o uso de expressões regulares está além do escopo deste manual, mas você pode encontrar documentações online e um tutorial em http://www.regular-expressions.info/.
Note que estes filtros atuam nas mensagens já recuperadas. Eles não controlam a recuperação das mensagens do repositório.
Você também pode filtrar os nomes de caminho no painel de baixo usando a caixa Mostrar apenas caminhos afetados. Caminhos afetados são os que contém o caminho usado para mostrar o log. Se você obter o log para uma pasta, isto significa qualquer coisa na pasta ou abaixo dela. Para um arquivo, isto significa apenas aquele arquivo. Normalmente a lista de caminhos mostra quaisquer outros caminhos que são afetados pela mesma submissão, mas em cinza. Se a caixa é marcada, estes caminhos são ocultos.
Algumas vezes suas práticas de trabalho irão precisar que as mensagens de log sigam um formato particular, o que significa que o texto descrevendo as mudanças não é visível no resumo abreviado que é exibido no painel superior. A propriedade tsvn:logsummary pode ser usada para extrair uma parte da mensagem de log para ser exibida no painel superior. Leia “Propriedades do Projeto TortoiseSVN” para saber como usar esta propriedade.
Nenhuma Formatação de Auditoria do Navegador do Repositório
Because the formatting depends upon accessing Subversion properties, you will only see the results when using a checked out working copy. Fetching properties remotely is a slow operation, so you will not see this feature in action from the repo browser.
O botão tráz uma caixa exibindo algumas informações interessantes sobre as revisões mostradas na janela de Log. Isto mostra quantos autores trabalharam, quantas submissões eles fizeram, progresso por semana, e muito mais. Agora você pode ter um relance de quem tem trabalhado duro e quem está enrolando ;-)
Esta página dará a você todos os números que você pode imaginar sobre, em um período específico e em uma faixa de revisões, e alguns valores mín/máx/médios.
Este gráfico mostra a você quais autores têm estado ativos no projeto com um histograma simples, histograma de barras ou gráfico de pizza.
Quando houver poucos autores principais e muitos contribuintes menores, o número de segmentos pequenos pode fazer o gráfico mais difícil de ler. O controle deslizante abaixo permite que você ajuste um limite (como uma porcentagem do total de submissões) abaixo do qual qualquer atividade é agrupada na categoria Outros.
Esta página dá a você uma representação gráfica da atividade do projeto em termos de número de submissões e autor. Isso dá alguma ideia de quando um projeto está sendo trabalhado e quem estava trabalhando em que tempo.
Quando existem vários autores, você verá muitas linhas no gráfico. Existem duas visões disponíveis aqui: normal, onde a atividade de cada autor é relativa à linha de base, e compactado, onde a atividade de cada autor é relativa à linha de baixo. A última opção evita linhas cruzadas, a qual permite uma gráfico mais fácil de ser lido, porém mais difícil de visualizar as informações de um único autor.
Por padrão a analise é case-sensitive, portanto usuários como PeterEgan e PeteRegan são considerados autores diferentes. Entretanto, em muitos casos os nomes de usuários não são case-sensitive, e às vezes são inseridos de forma inconsistente, então você pode querer que DavidMorgan e davidmorgan sejam considerados a mesma pessoa. Use a seleção Authors case insensitive para escolher como lidar com isso.
Observe que as estatísticas cobrem o mesmo período que o diálogo de Log. Se este está mostrando apenas uma revisão então as estatísticas não irão informar muito.
Se o servidor não está acessível, e você tem o habilitar o cache de log, você pode usar a caixa de diálogo e gráfico de revisão no modo offline. Este usa dados do cache, o que lhe permite continuar a trabalhar, embora a informação não possa ser atualizada ou mesmo completada.
Aqui você tem três opções:
- Desconectado agora
Complete a operação corrente em modo offline, mas obtenha o repositório da próxima vez que os dados de log forem solicitados.
- Permanentemente desconectado
Permaneça em modo offline até que uma verificação de repositório for especificamente requisitada. Veja “Atualizando a Visualização”.
- Cancelar
Se você não quiser continuar a operação com dados possivelmente obsoletos, basta cancelar.
A caixa de opção Torne isto o padrão previne que este diálogo reapareça e sempre seleciona a próxima opção que você escolher. Você ainda pode mudar (ou remover) o padrão depois de fazer isso em → .
Se você quiser verificar novamente o servidor por novas mensagens de auditoria, você pode simplesmente atualizar a visualização usando F5. Se você estiver usando o cache de auditoria (habilitado por padrão), isto irá verificar o repositório por mensagens mais novas e buscar apenas as novas. Se o cache de auditoria estiver em modo desativado, isto também tentará colocá-lo em modo disponível.
Se você estiver usando o cache de auditoria e achar que o conteúdo ou o autor da mensagem mudou, você pode usar Shift-F5 ou Ctrl-F5 para buscar novamente do servidor as mensagens apresentadas e atualizar o cache de auditoria. Note que isto afeta apenas as mensagens atualmente mostradas e não invalida inteiramente o cache deste repositório.
Um dos requisitos mais comuns no desenvolvimento de projetos é ver o que foi modificado. Você pode querer ver as diferenças entre duas revisões de um mesmo arquivo, ou as diferenças entre dois arquivos separados. TortoiseSVN fornece uma ferramenta interna chamada TortoiseMerge para visualizar diferenças em arquivos de texto. Para visualizar diferenças em arquivos de imagem, TortoiseSVN também possui uma ferramenta chamada TortoiseIDiff. Claro, você pode usar seu programa favorito de diferenciação se quiser.
- Alterações Locais
Se você quiser ver as modificações que você fez na sua cópia de trabalho, apenas use o menu de contexto do explorer e selecione → .
- Diferença para outro ramo/destino
Se você quiser ver o que foi modificado no tronco (se você estiver trabalhando em um ramo) ou em um ramo específico (se você estiver trabalhando no tronco), você pode usar o menu de contexto do explorer. Apenas mantenha pressionado a tecla Shift enquanto clica com o botão direito no arquivo. Então selecione → . No diálogo seguinte, especifique a URL do repositório com o qual você quer comparar com seu arquivo local.
Você também pode usar o navegador de repositório e selecionar duas árvores para diferenciar, talvez duas etiquetas, ou um ramo/etiqueta e o tronco. O menu de contexto apresentado possibilita a você compará-los usando . Leia mais em “Comparando Diretórios”.
- Diferenças da revisão anterior
Se você quer ver a diferença entre uma revisão particular e sua cópia de trabalho, utilize o diálogo Revisão de Log, selecione a revisão do seu interesse, então selecione do menu de contexto.
Se você quiser ver a diferença entre a última revisão submetida e sua cópia de trabalho, assumindo que a cópia de trabalho não foi modificada, apenas clique com o botão direito no arquivo. Então selecione → . Isto irá realizar a diferenciação entre a revisão anterior à data da última submissão (como gravada na sua cópia de trabalho) e a base de trabalho. Isto mostra a você a última modificação feita naquele arquivo para trazê-lo ao estado que você agora vê em sua cópia de trabalho. Não serão mostradas modificações mais recentes que sua cópia de trabalho.
- Diferença entre as duas últimas revisões
Se você quiser ver a diferença entre duas revisões que já foram submetidas, use o diálogo de Auditoria de Revisões e selecione as duas revisões que você quer comparar (usando o habitual modificador Ctrl). Então selecione no menu de contexto.
Se você fez isso da auditoria de revisão para um diretório, uma janela de Comparação de Revisões aparecerá, mostrando a lista de arquivos alterados no diretório. Leia mais em “Comparando Diretórios”.
- Todas as alterações feitas em uma submissão
Se você quiser ver as mudanças feitas a todos os arquivos de uma revisão particular em uma visão, você pode usar a saída Comparação-Unificada (formato de correção GNU). Isso mostra apenas as diferenças com poucas linhas de contexto. É mais difícil de ler do que em uma comparação de arquivo visual, mas irá mostrar todas as mudanças juntas. A partir da janela de Auditoria de Revisão selecione a revisão de interesse, então selecione no menu de contexto.
- Diferença entre arquivos
Se você quiser ver as diferenças entre dois arquivos diferentes, você pode fazer isso diretamente no Explorer selecionando ambos os arquivos (usando o modificador usual Ctrl). Então, a partir do menu de contexto do Explorer, selecionar
If the files to compare are not located in the same folder, use the command → to mark the first file for diffing, then browse to the second file and use → . To remove the marked file, use the command → again, but hold down the Ctrl-modifier while clicking on it.
- Diferença entre o arquivo/diretório CT e uma URL
Se você quiser ver as diferenças entre um arquivo na sua cópia de trabalho e um arquivo em um repositório Subversion, você pode fazer isso diretamente no Explorer selecionando o arquivo e então mantendo pressionada a tecla Shift enquanto clica com o botão direito do mouse para obter o menu de contexto. Selecione → . Você pode fazer o mesmo para uma pasta na cópia de trabalho. TortoiseMerge mostra estas diferenças da mesma maneira que ele mostra um arquivo de correção - uma lista de arquivos modificados que você pode ver um de cada vez.
- Diferença com a informação de autoria
Se você quiser ver não apenas as diferenças mas também o autor, a revisão e a data em que as mudanças foram feitas, você pode combinar os relatórios de diferenças e de responsabilizações a partir da janela de auditoria de revisões. Leia “Diferenças de Autoria” para mais detalhes.
- Diferença entre diretórios
The built-in tools supplied with TortoiseSVN do not support viewing differences between directory hierarchies. But if you have an external tool which does support that feature, you can use that instead. In “Ferramentas de Diferenciação/Combinação Externas” we tell you about some tools which we have used.
If you have configured a third party diff tool, you can use Shift when selecting the Diff command to use the alternate tool. Read “Configuração de Programa Externo” to find out about configuring other diff tools.
Sometimes in the life of a project you might change the line endings from CRLF to LF, or you may change the indentation of a section. Unfortunately this will mark a large number of lines as changed, even though there is no change to the meaning of the code. The options here will help to manage these changes when it comes to comparing and applying differences. You will see these settings in the Merge and Blame dialogs, as well as in the settings for TortoiseMerge.
Ignorar fim de linha exclui alterações que são exclusivamente ara diferenciar o identificador de fim de linha.
Comparar espaços em branco inlcui todas as alterações de indentação e espaços em branco como linhas adicionadas/removidas.
Ignore whitespace changes excludes changes which are due solely to a change in the amount or type of whitespace, e.g. changing the indentation or changing tabs to spaces. Adding whitespace where there was none before, or removing a whitespace completely is still shown as a change.
Ignorar todos os espaços em branco exclui todas as mudanças que são apenas espaços em branco.
Naturalmente, qualquer linha com conteúdo alterado é sempre incluída na diferenciação.
When you select two trees within the repository browser, or when you select two revisions of a folder in the log dialog, you can → .
Esta janela mostra a lista de todos os arquivos que sofreram alteração e permite a você comparar ou identificar seu autor individualmente usando o menu de contexto.
You can export a change tree, which is useful if you need to send someone else your project tree structure, but containing only the files which have changed. This operation works on the selected files only, so you need to select the files of interest - usually that means all of them - and then → . You will be prompted for a location to save the change tree.
Você pode também exportar a lista de arquivos alterados para um arquivo texto usando → .
Se você quer exportar a lista de arquivos e também as ações (modificado, adicionado, apagado), você pode fazê-lo usando → .
O botão no topo permite a você mudar a direção da comparação. Você pode mostrar as alterações realizadas de A para B, ou se você preferir, de B para A.
Os botões contendo os números de revisão podem ser usados para mudar para uma faixa de revisão diferente. Quando você mudar a faixa, a lista de itens os quais diferem em duas revisões serão automaticamente atualizados.
Se a lista de arquivos é muito extensa, você pode usar a caixa de busca para reduzir a lista de nomes de arquivos para apenas os que contém o texto específico. Note que uma busca por texto simples é usada, então se você quer restringir a lista de arquivos para código em C você deve digitar .c ao invés de *.c.
Existem muitas ferramentas disponíveis para comparar arquivos texto, incluindo nosso próprio TortoiseMerge, porém nós frequentemente nos pegamos querendo ver as modificações em uma imagem além de somente textos. Por isso nós criamos o TortoiseIDiff.
→ for any of the common image file formats will start TortoiseIDiff to show image differences. By default the images are displayed side-by-side but you can use the View menu or toolbar to switch to a top-bottom view instead, or if you prefer, you can overlay the images and pretend you are using a lightbox.
Naturally you can also zoom in and out and pan around the image. You can also pan the image simply by left-dragging it. If you select the Link images together option, then the pan controls (scrollbars, mousewheel) on both images are linked.
Uma caixa de informação de imagem mostra os detalhes sobre a mesma, como o tamanho em píxeis, resolução e nível de cor. Se esta caixa está a atrapalhar usa → para a esconder. Podes obter a mesma informação numa etiqueta, se mantiveres o rato sobre a barra de título da imagem.
When the images are overlaid, the relative intensity of the images (alpha blend) is controlled by a slider control at the left side. You can click anywhere in the slider to set the blend directly, or you can drag the slider to change the blend interactively. Ctrl+Shift-Wheel to change the blend.
The button above the slider toggles between 0% and 100% blends, and if you double click the button, the blend toggles automatically every second until you click the button again. This can be useful when looking for multiple small changes.
Sometimes you want to see a difference rather than a blend. You might have the image files for two revisions of a printed circuit board and want to see which tracks have changed. If you disable alpha blend mode, the difference will be shown as an XOR of the pixel colour values. Unchanged areas will be plain white and changes will be coloured.
Quando queres comparar documentos não-textuais normalmente terás de utilizar o software usado para criar o documento, já que ele entende o formato do ficheiro.Para as suites do Microsoft Office e Open Office, normalmente usadas, existe realmente algum suporte para a visualização das diferenças e o TortoiseSVN inclui scripts para os invocar com as definições correctas ao comparar ficheiros com essas extensões bem conhecidas. Podes verificar que extensões de ficheiros são suportadas e adicionar a tua própria indo à secção → e clicar em Programas Externos
Problemas com o Office 2010
Se instalaste a versão do Office 2010 Click-to-Run e tentares compara documentos, poderás obter uma mensagem de erro do Windows Script Host como esta: “ActiveX component can't create object: word.Application”. Parece que terás de usar a versão do Office baseada em MSI para obteres a funcionalidade de comparação.
Se as ferramentas providas por nós não faz o que você precisa, tente uma das muitas disponíveis de código aberto ou comerciais. Todo mundo tem suas favoritas, e esta lista não tem o propósito de estar completa, mas aqui estão algumas que nós devemos consideramos:
- WinMerge
WinMerge is a great open-source diff tool which can also handle directories.
- Forçar Unificação
Perforce is a commercial RCS, but you can download the diff/merge tool for free. Get more information from Perforce.
- KDiff3
KDiff3 é uma ferramenta livre que também suporta diretórios. Você pode baixá-la aqui.
- SourceGear DiffMerge
SourceGear Vault is a commercial RCS, but you can download the diff/merge tool for free. Get more information from SourceGear.
- ExaminarDiferenças
ExamDiff Standard is freeware. It can handle files but not directories. ExamDiff Pro is shareware and adds a number of goodies including directory diff and editing capability. In both flavours, version 3.2 and above can handle unicode. You can download them from PrestoSoft.
- Beyond Compare
Similar to ExamDiff Pro, this is an excellent shareware diff tool which can handle directory diffs and unicode. Download it from Scooter Software.
- Araxis Merge
Araxis Merge is a useful commercial tool for diff and merging both files and folders. It does three-way comparison in merges and has synchronization links to use if you've changed the order of functions. Download it from Araxis.
Leia “Configuração de Programa Externo” para mais informações sobre como configurar o TortoiseSVN para usar essas ferramentas.
If you created new files and/or directories during your development process then you need to add them to source control too. Select the file(s) and/or directory and use → .
After you added the files/directories to source control the file appears with a added icon overlay which means you first have to commit your working copy to make those files/directories available to other developers. Adding a file/directory does not affect the repository!
Muitas Adições
Você pode usar também o comando Adicionar em diretório já versionados. Neste caso a janela de adição mostrar a você todos os arquivos não versionados contido no diretório já controlado. Esta função ajuda se você tem muitos novos arquivos e precisa adicioná-los todos de uma vez.
Para adicionar arquivos de fora da sua cópia de trabalho você pode usar o controle de arrastar-e-soltar:
selecione os arquivos que você quer adicionar
arrasto direito neles para a nova localização dentro da cópia de trabalho
solte o botão direito do mouse
selecione → . Os arquivos serão então copiados para a cópia de trabalho e adicionados ao controle de versão.
Você pode também adicionar arquivos dentro da sua cópia de trabalho apenas arrastando com o botão esquerdo e soltando eles na janela de submissão.
Se você adicionar um arquivo ou diretório por engano, você pode desfazer a adição antes de submeter usando → .
It often happens that you already have the files you need in another project in your repository, and you simply want to copy them across. You could simply copy the files and add them, but that would not give you any history. And if you subsequently fix a bug in the original files, you can only merge the fix automatically if the new copy is related to the original in Subversion.
The easiest way to copy files and folders from within a working copy is to use the right drag menu. When you right drag a file or folder from one working copy to another, or even within the same folder, a context menu appears when you release the mouse.
Figura 4.31. Menu de quando se clica com o botão direito e se arrasta um diretório que está sob o controle de versão.

Now you can copy existing versioned content to a new location, possibly renaming it at the same time.
You can also copy or move versioned files within a working copy, or between two working copies, using the familiar cut-and-paste method. Use the standard Windows Copy or Cut to copy one or more versioned items to the clipboard. If the clipboard contains such versioned items, you can then use → (note: not the standard Windows Paste) to copy or move those items to the new working copy location.
You can copy files and folders from your working copy to another location in the repository using → . Refer to “Criando um Ramo ou Rótulo” to find out more.
You can locate an older version of a file or folder in the log dialog and copy it to a new location in the repository directly from the log dialog using → . Refer to “Recuperando Informações Adicionais” to find out more.
Você também pode usar o navegador de repositório para localizar o conteúdo que procura e copiá-lo para a sua cópia de trabalho diretamente do repositório, ou copiar para outro local dentro do próprio repositório. Veja mais em “O Navegador de Repositório”.
Não pode copiar entre repositórios
Whilst you can copy or move files and folders within a repository, you cannot copy or move from one repository to another while preserving history using TortoiseSVN. Not even if the repositories live on the same server. All you can do is copy the content in its current state and add it as new content to the second repository.
If you are uncertain whether two URLs on the same server refer to the same or different repositories, use the repo browser to open one URL and find out where the repository root is. If you can see both locations in one repo browser window then they are in the same repository.
Na maioria dos projetos você terá arquivos e diretórios que não deverão ser controlados. Entre eles estão arquivos criados pelo compilador, <nome_do_arquivo>*.obj, *.lst</nome_do_arquivo>, talvez um diretório de saída usado para gravar o executável. Não importa que você submeta alterações, TortoiseSVN mostrará seus arquivos não controlados, os quais serão apresentados na lista da janela de submissão. Claro, você pode optar por não mostrá-los, mas então você poderá esquecer de adicionar alguma novo arquivo de código.
A melhor maneira de se livrar desses problemas é adicionar esses arquivos na lista de arquivos ignorados do projeto. Dessa forma eles nunca serão mostrados na lista da janela de submissão, mas arquivos genuinos de código não controlados aparecerão para serem adicionados.
If you right click on a single unversioned file, and select the command → from the context menu, a submenu appears allowing you to select just that file, or all files with the same extension. Both submenus also have a (recursively) equivalent. If you select multiple files, there is no submenu and you can only add those specific files/folders.
If you choose the (recursively) version of the ignore context menu, the item will be ignored not just for the selected folder but all subfolders as well. However this requires SVN clients version 1.8 or higher.
Se você quer remover um ou mais itens da lista de arquivos ignorados, clique com o botão direito sobre os itens e selecione → . Você pode também acessar a propriedade svn:ignore do diretório diretamente. Isto lhe permite especificar regras gerais usando o nome dos arquivos globais, descrito na próxima seção. Leia “Configurações do Projeto” para mais informações sobre como definir as propriedades diretamente. Por favor tenha o cuidado de colocar cada regra em uma linha separada. Separá-las por espaço não funciona.
A Lista Global de Arquivos Ignorados
Outra forma de ignorar arquivos é adicionar eles para a lista global de arquivo. A grande diferença é que a lista global de arquivos ignorados é uma propriedade no cliente. Isto é aplicado parar todos projetos no Subversion, but somente no PC cliente. Em geral o melhor é usar a propriedade svn:ignore onde possível, porque pode ser aplicado para áreas específicas do projeto, e isto funciona para todos que obterem o projeto. Leia “Configurações Gerais” para mais informações.
Ignorando Arquivos Controlados
Arquivos e diretórios controlados nunca devem ser ignorados - esta é uma característica do Subversion. Se você está controlando um arquivo mas não deveria, leia “Ignorar arquivos que já estão versionados” para instruções de como “não controlar” o arquivo.
Os padrões para ingorar arquivos do Subversion fazem uso do nome de arquivo global, uma técnica originalmente usada no Unix para especificar arquivos usando meta-caracteres como coringas. Os caracteres a seguir tem um significado especial:
- *
Filtra por qualquer texto de caracteres, incluindo um texto vazio (nenhum caracter).
- ?
Filtra por qualquer caracter simples.
- [...]
Filtra por qualquer um dos caracteres dentro dos colchetes. Dentro de colchetes, um par de caracteres separados por “-” filtra qualquer caracter léxico entre os dois. Por exemplo
[AGm-p]flitra por qualquer um dos caracteresA,G,m,n,oorp.
Pattern matching is case sensitive, which can cause problems on Windows. You can force case insensitivity the hard way by pairing characters, e.g. to ignore *.tmp regardless of case, you could use a pattern like *.[Tt][Mm][Pp].
Se você quer uma definição oficial para nomes de arquivos globais, você pode encontrar nas especificações IEEE para linguagem de comando de integração Pattern Matching Notation.
Nenhum Caminho na Lista Global de Arquivos Ignorados
Você não deverá incluir caminhos no seu padrão. O padrão de filtro tem a intensão de ser usado apenas para nomes de arquivos e diretórios. Se você quer ignorar todos os diretórios CVS, apenas adicione o diretório CVS na lista de arquivos ignorados. Não é necessário especificar CVS */CVS como você faria em versões anteriores. Se você quer ignorar todos os diretórios tmp quando existirem dentro de um diretório prog mas não quer quando estiverem dentro de um diretório
O Subversion permite renomear e mover ficheiro e pastas. Portanto, existem entradas para apagar e renomear no sub-menu do TortoiseSVN.
Para remover ficheiros ou pastas do Subversion usa → .
Quando
Se você quer apagar um item do repositório, mas manter uma versão local não versionada do arquivo/diretório, use → . Você deve manter a tecla Shift pressionada enquando clica com o botão direito no item desejado no painel direito do "explorer" para ver este menu de contexto estendido.
If an item is deleted via the explorer instead of using the TortoiseSVN context menu, the commit dialog shows those items as missing and lets you remove them from version control too before the commit. However, if you update your working copy, Subversion will spot the missing item and replace it with the latest version from the repository. If you need to delete a version-controlled file, always use → so that Subversion doesn't have to guess what you really want to do.
Recuperando arquivos e diretórios excluidos
If you have deleted a file or a folder and already committed that delete operation to the repository, then a normal → can't bring it back anymore. But the file or folder is not lost at all. If you know the revision the file or folder got deleted (if you don't, use the log dialog to find out) open the repository browser and switch to that revision. Then select the file or folder you deleted, right click and select → as the target for that copy operation select the path to your working copy.
Se você quer fazer uma simples renomeação de arquivo ou diretório, use → e entre com o novo nome para o item e estará feito.
If you want to move files around inside your working copy, perhaps to a different sub-folder, use the right mouse drag-and-drop handler:
selecione os arquivos ou diretórios que você quer mover
arrasto direito neles para a nova localização dentro da cópia de trabalho
solte o botão direito do mouse
no menu que se abre escolha →
Submetendo o diretório pai
Já que renomear e mover arquivos está feito assim como a exclusão como complemento você deve submeter o diretório pai dos arquivos renomeados/movidos assim como os excluídos/movidos que aparecerão na janela de submissão. Se você não submeteu a parte removida da ação de renomear/mover, ela continuará no repositório e quando algum outro participante do projeto atualizar sua cópia, os velhos arquivos não serão removidos. Por exemplo eles ambas as cópias, velhas e novas.
Você deve submeter um diretório renomeado antes de alterar qualquer arquivo dentro dele, caso contrário sua cópia de trabalho pode realmente se corromper.
Another way of moving or copying files is to use the Windows copy/cut commands. Select the files you want to copy, right click and choose → from the explorer context menu. Then browse to the target folder, right click and choose → . For moving files, choose → instead of → .
Você pode também usar o navegador de repositório para mover itens. Leia “O Navegador de Repositório” para descobrir mais.
Não Mova Arquivos Externos
Você não deverá usar os comandos do TortoiseSVN Mover ou Renomear em um diretório que tenha sido criado usando svn:externals. Esta ação poderá causar a exclusão de um item externo em seu repositório, provavelmente chateando muitas outras pessoas. Se você precisa mover um diretório externo você deverá usar uma outra ferramenta para mover, e então ajustar as propriedades svn:externals do diretório de origem e de destino.
Se o repositório atualmente já contém dois arquivos com o mesmo nome diferenciados apenas pela caixa (exemplo: TEST.TXT e test.txt, você não poderá atualizar ou obter o diretório em um cliente Windows.Embora o Subversion suporte diferenciação na caixa no nome dos arquivos, o Windows não suporta.
Isto algumas vezes acontece quando duas pessoas submetem, de diferentes cópias de trabalho, arquivos salvos com o mesmo nome, mas com caixa diferente. Isto pode também acontecer quando os arquivos forem submetidos de um sistema de arquivos que trata a caixa do nome dos arquivos, como Linux.
Nestes casos, você precisa decidir qual dos arquivos você quer manter e então apagar (ou renomear) o outro arquivo no repositório.
Prevenindo dois arquivos com o mesmo nome
There is a server hook script available at: https://svn.apache.org/repos/asf/subversion/trunk/contrib/hook-scripts/ that will prevent checkins which result in case conflicts.
Algumas vezes seu amigável IDE vai renomear arquivos para você como parte de uma refatoração, e é claro isto não é o Subversion. Se você tentar submeter suas alterações, Subversion verá que há velhos arquivos perdidos e que há novos arquivos não controlados. Você poderá apenas verificar o novo nome para adicioná-lo, mas você então perderá o histórico, já que o Subversion não conhece a relação dos arquivos.
Uma maneira melhor de notificar o Subversion é identificar a alteração como uma renomeação, e você pode fazer isso usando as janelas de Submeter e Verificar alterações. Apenas selecione ambos os arquivos (perdido e não controlado) e use → para identificar os dois arquivos como uma renomeação.
Normalmente você define sua lista de arquivos ignorados para que todos os arquivos criados sejam ignorados pelo Subversion. Mas e se você quer remover todos os arquivos ignorados para produzir uma compilação limpa? Normalmente você definie isso no arquivo makefile, mas e se você está depurando o arquivo makefile, ou alterando o sistema de compilação é útil ter uma forma de limpar tudo.
TortoiseSVN provê justamente uma opção usando →
Quando tais arquivos são removidos, a lixeira é usada, então se você cometeu algum erro ao excluir um arquivo que não estava sendo controlado, você ainda poderá restaurar o arquivo.
Se você quer desfazer todas as alterações feitas em um arquivo desde a última atualização você precisa selecionar o arquivo, clique com o botão direito para abrir o menu de contexto e então selecione a opção → . Uma janela será apresentada com os arquivos que você alterou e que podem ser revertidos. Selecione os arquivos que você reverter e clique em .
If you also want to clear all the changelists that are set, check the box at the bottom of the dialog.
If you want to undo a deletion or a rename, you need to use Revert on the parent folder as the deleted item does not exist for you to right click on.
Se você quer desfazer a adição de um item, ele aparece no menu de contexto como →
As colunas nesta janela podem ser personalizadas da mesma forma como as colunas da janela Verificar alterações. Leia “Estado Local e Remoto” para mais detalhes.
Já que algumas vezes a opção reverter é usada para limpar uma cópia de trabalho, existe uma botão extra o qual também permite a você excluir arquivos não controlados. Quando você clicar neste botão outra janela será mostrada listando todos os arquivos não controlados, os quais você poderá selecionar para exclusão.
Desfazendo Alterações que já foram Submetidas
irá somente desfazer alterações locais. A opção reverter não desfará alterações que já foram submetidas. Se você quer desfazer todas as alterações que foram submetidas em uma revisão em particular, leia “Janela de Revisão de Registro” para informações adicionais.
Reversão está Lenta
Quando você reverter alteracões você pode achar que a operação levou mais tempo que o esperado. Isto acontece porque a versão da modificação do arquivo foi enviado para a lixeira, então você pode recuperar suas alterações se você reverter algo por engano. Entretanto, se sua lixeira estiver cheia, Windows vai levar um longo tempo para encontrar um lugar para colocar o seu arquivo. A solução é simples: mantenha a lixeira vazia ou desative a opção Usar lixeira para fazer reversão nas configurações do TortoiseSVN.
If a Subversion command cannot complete successfully, perhaps due to server problems, your working copy can be left in an inconsistent state. In that case you need to use → on the folder. It is a good idea to do this at the top level of the working copy.
Na caixa de diálogo de limpeza, também existem outras opções úteis para obter uma cópia a funcionar no estado clean.
- Limpar situação da cópia de trabalho
Como constatado acima, esta opção tenta colocar uma cópia de trabalho inconsistente num estado funcional e usável. Isto não afecta quaisquer dados que tenhas, mas apenas os estados internos da base de dados da cópia de trabalho. Este é actualmente o comando
Limparque conheces de antigos clientes TortoiseSVN ou de outros clientes SVN.- Break write locks
If checked, all write locks are removed from the working copy database. For most situations, this is required for the cleanup to work!
Only uncheck this option if the working copy is used by other users/clients at the time. But if the cleanup then fails, you have to check this option for the cleanup to succeed.
- Fix time stamps
Adjusts the recorded time stamps of all files, speeding up future status checks. This can speed up all dialogs that show working copy file lists, for example the Commit dialog.
- Vacuum pristine copies
Removes unused pristine copies and compresses all remaining pristine copies of working copy files.
- Refrescar sobreposições de shell
Às vezes, as sobreposições "shell", especialmente na visualização da árvore no lado esquerdo do explorador não mostram o estado actual, ou o estado da cache falhada para re-organizar as alterações. Nesta situação, podes usar este comando para forçar uma atualização.
- Incluir externos
Se esta opção estiver assinalada, então todas as acções serão feitas para todos os arquivos e pastas incluídos com a propriedade
svn:externalstambém.- Apagar arquivos e diretórios não versionados, Apagar arquivos e diretórios ignorados
Esta é uma maneira rápida e fácil de remover todos os ficheiros gerados na tua cópia em funcionamento. Todos os ficheiros e pastas que não são versionados, são movidos para a reciclagem.
Nota: tu também podes fazer o mesmo a partir do do diálogo no → . Lá também terás uma lista de todos os ficheiros e pastas não versionadas para selecionar para a sua eliminação.
- Reverter todas as modificações recursivamente
Este comando reverte todas as suas modificações que não foram comitadas ainda.
Nota: é melhor usar o → comando em vez disto, porque lá podes primeiro ver e selecionar os ficheiros que você desejas reverter.
You can read and set the Subversion properties from the Windows properties dialog, but also from → and within TortoiseSVN's status lists, from → .
You can add your own properties, or some properties with a special meaning in Subversion. These begin with svn:. svn:externals is such a property; see how to handle externals in “Itens Externos”.
Subversion supports CVS-like keyword expansion which can be used to embed filename and revision information within the file itself. Keywords currently supported are:
- $Date$
Date of last known commit. This is based on information obtained when you update your working copy. It does not check the repository to find more recent changes.
- $Revision$
Revisão da última submissão conhecida
- $Author$
Autor que fez a última submissão conhecida.
- $HeadURL$
A URL completa deste arquivo no repositório
- $Id$
A combinação comprimida das quatro palavras-chave anteriores.
To find out how to use these keywords, look at the svn:keywords section in the Subversion book, which gives a full description of these keywords and how to enable and use them.
For more information about properties in Subversion see the Special Properties.
To add a new property, first click on New.... Select the required property name from the menu, and then fill in the required information in the specific property dialog. These specific property dialogs are described in more detail in “Editores de Propriedades”.
To add a property that doesn't have its own dialog, choose from the New... menu. Then either select an existing property in the combo box or enter a custom property name.
If you want to apply a property to many items at once, select the files/folders in explorer, then select → .
Se deseja aplicar a propriedade para todos os arquivos e diretórios na hierarquia abaixo do diretório atual, marque a opção Recursivo .
Se deseja editar uma propriedade existente, selecione a propriedade da lista de propriedades existentes e então clique em .
Se deseja editar uma propriedade existente, selecione a propriedade da lista de propriedades existentes e então clique em .
A propriedade svn:externals pode ser usada para enviar outros projetos para o mesmo repositório ou para um repositório completamente diferente. Para maiores informações, leia “Itens Externos”.
Editar propriedades na revisão atual
Pelo fato das propriedades serem versionadas, não é possível editar as revisões anteriores. Se verificar as propriedades pela caixa de dialogo do log, ou por uma revisão no navegador do repositório que não seja a ultima, poderá visualizar a lista de propriedades e valores, porem não terá nenhum controle de edição disponível.
Often you will find yourself applying the same set of properties many times, for example bugtraq:logregex. To simplify the process of copying properties from one project to another, you can use the Export/Import feature.
From the file or folder where the properties are already set, use → , select the properties you wish to export and click on . You will be prompted for a filename where the property names and values will be saved.
From the folder(s) where you wish to apply these properties, use → and click on . You will be prompted for a filename to import from, so navigate to the place you saved the export file previously and select it. The properties will be added to the folders non-recursively.
If you want to add properties to a tree recursively, follow the steps above, then in the property dialog select each property in turn, click on , check the Apply property recursively box and click on .
The Import file format is binary and proprietary to TortoiseSVN. Its only purpose is to transfer properties using Import and Export, so there is no need to edit these files.
TortoiseSVN can handle binary property values using files. To read a binary property value, to a file. To set a binary value, use a hex editor or other appropriate tool to create a file with the content you require, then from that file.
Although binary properties are not often used, they can be useful in some applications. For example if you are storing huge graphics files, or if the application used to load the file is huge, you might want to store a thumbnail as a property so you can obtain a preview quickly.
You can configure Subversion and TortoiseSVN to set properties automatically on files and folders when they are added to the repository. There are two ways of doing this.
You can edit the Subversion configuration file to enable this feature on your client. The General page of TortoiseSVN's settings dialog has an edit button to take you there directly. The config file is a simple text file which controls some of Subversion's workings. You need to change two things: firstly in the section headed miscellany uncomment the line enable-auto-props = yes. Secondly you need to edit the section below to define which properties you want added to which file types. This method is a standard Subversion feature and works with any Subversion client. However it has to be defined on each client individually - there is no way to propagate these settings from the repository.
An alternative method is to set the tsvn:autoprops property on folders, as described in the next section. This method only works for TortoiseSVN clients, but it does get propagated to all working copies on update.
As of Subversion 1.8, you can also set the property svn:auto-props on the root folder. The property value is automatically inherited by all child items.
Whichever method you choose, you should note that auto-props are only applied to files at the time they are added to the working copy. Auto-props will never change the properties of files which are already versioned.
If you want to be absolutely sure that new files have the correct properties applied, you should set up a repository pre-commit hook to reject commits where the required properties are not set.
Submeter propriedades
Propriedades do Subversion são versionadas. Depois que você mudar ou adicionar uma propriedade você precisa submeter suas alterações.
Conflitos em propriedades
Se existe um conflito ao submeter as alterações, porque outro usuário alterou a mesma propriedade, o Subversion gerará um arquivo .prej. Apague este arquivo depois que você resolver o conflito.
TortoiseSVN tem algumas propriedades especiais próprias, que começam com tsvn:.
tsvn:logminsizesets the minimum length of a log message for a commit. If you enter a shorter message than specified here, the commit is disabled. This feature is very useful for reminding you to supply a proper descriptive message for every commit. If this property is not set, or the value is zero, empty log messages are allowed.tsvn:lockmsgminsizesets the minimum length of a lock message. If you enter a shorter message than specified here, the lock is disabled. This feature is very useful for reminding you to supply a proper descriptive message for every lock you get. If this property is not set, or the value is zero, empty lock messages are allowed.tsvn:logwidthmarkeris used with projects which require log messages to be formatted with some maximum width (typically 80 characters) before a line break. Setting this property to a non-zero will do 2 things in the log message entry dialog: it places a marker to indicate the maximum width, and it disables word wrap in the display, so that you can see whether the text you entered is too long. Note: this feature will only work correctly if you have a fixed-width font selected for log messages.tsvn:logtemplateis used with projects which have rules about log message formatting. The property holds a multi-line text string which will be inserted in the commit message box when you start a commit. You can then edit it to include the required information. Note: if you are also usingtsvn:logminsize, be sure to set the length longer than the template or you will lose the protection mechanism.There are also action specific templates which you can use instead of
tsvn:logtemplate. The action specific templates are used if set, buttsvn:logtemplatewill be used if no action specific template is set.Os modelos específicos de ação são:
tsvn:logtemplatecommité usado para para todas as submissões da cópia de trabalho.tsvn:logtemplatebranché usado quando você cria um ramo/marca, ou quando você copia arquivos ou diretórios dentro do navegador de repositório.tsvn:logtemplateimporté usado para importação.tsvn:logtemplatedeleteé usado quando itens são apagados dentro do navegador de repositório.tsvn:logtemplatemoveé usado quando arquivos são renomeados ou movidos dentro do navegador de repositório.tsvn:logtemplatemkdiré usado quando diretórios são criados dentro do navegador de repositório.tsvn:logtemplatepropseté usado quando propriedades são modificadas dentro do navegador de repositório.tsvn:logtemplatelocké usado quando é obtido um bloqueio.
Subversion allows you to set “autoprops” which will be applied to newly added or imported files, based on the file extension. This depends on every client having set appropriate autoprops in their Subversion configuration file.
tsvn:autopropscan be set on folders and these will be merged with the user's local autoprops when importing or adding files. The format is the same as for Subversion autoprops, e.g.*.sh = svn:eol-style=native;svn:executablesets two properties on files with the.shextension.Se existe um conflito para a propriedade
tsvn:autopropsentre a versão remota e local, as configurações do projeto são precedentes porque elas são específicas do projeto.As of Subversion 1.8, you should use the property
svn:auto-propsinstead oftsvn:autopropssince this has the very same functionality but works with all svn clients and is not specific to TortoiseSVN.Na janela de Submissão você tem a opção de colar a lista de arquivos modificados, incluindo a situação de cada arquivo (adicionado, modificado, etc).
tsvn:logfilelistenglishdefine se a situação do arquivo é inserida em Inglês ou no idioma configurado. Se a propriedade não está configurada, o padrão étrue.TortoiseSVN can use a spell checker. On Windows 10, the spell checker of the OS is used. On earlier Windows versions, it can use spell checker modules which are also used by OpenOffice and Mozilla. If you have those installed this property will determine which spell checker to use, i.e. in which language the log messages for your project should be written.
tsvn:projectlanguagesets the language module the spell checking engine should use when you enter a log message. You can find the values for your language on this page: MSDN: Language Identifiers.Você pode tanto digitar o valor em decimal, ou em hexadecimal se iniciado com
0x. Por exemplo Inglês (US) pode ser informado como0x0409ou1033.A propriedade
tsvn:logsummaryé usada para extrair uma porção da mensagem de auditoria que é mostrada na janela de auditoria como o resumo da mensagem.The value of the
tsvn:logsummaryproperty must be set to a one line regex string which contains one regex group. Whatever matches that group is used as the summary.Por exemplo:
\[RESUMO\]:\s+(.*)Vai pegar tudo depois de “[RESUMO]” na mensagem de auditoria e usar como resumo.The property
tsvn:logrevregexdefines a regular expression which matches references to revisions in a log message. This is used in the log dialog to turn such references into links which when clicked will either scroll to that revision (if the revision is already shown in the log dialog, or if it's available from the log cache) or open a new log dialog showing that revision.A expressão regular deve ser bater com a referência completa, não apenas com o número da revisão. O número da revisão é extraído do texto de referência compatível automaticamente.
Se esta propriedade não estiver definida, uma expressão regular padrão é usada para relacionar as referências para as revisões.
Existe disponíveis várias propriedades para configurar scripts de gancho de cliente. Cada propriedade corresponde a um tipo específico de script de gancho.
As propriedades/scripts-gancho disponíveis são
- tsvn:startcommithook
- tsvn:precommithook
- tsvn:postcommithook
- tsvn:startupdatehook
- tsvn:preupdatehook
- tsvn:postupdatehook
- tsvn:prelockhook
- tsvn:postlockhook
Os parâmetros são os mesmos tal com se tu configurasses os scripts-gancho na caixa de diálogo preferências. Ver “Client Side Hook Scripts” para mais detalhes.
Visto que nem todos os utilizadores têm a sua cópia de trabalho colocada na mesma localização, nem com o mesmo nome, podes então configurar um script/ferramenta a executar que resida na tua cópia de trabalho especificando o URL do repositório em alternativa , usando
%REPOROOT%como a parte do URL referente à raiz do repositório. Por exemplo, se o script de gancho está na tua cópia de trabalho sobcontrib/hook-scripts/client-side/checkyear.js, irás especificar o caminho para o script como%REPOROOT%/trunk/contrib/hook-scripts/client-side/checkyear.js. Deste modo mesmo que movas o teu repositório para outro servidor, não terás de ajustar as propriedades dos scripts de gancho.Instead of
%REPOROOT%you can also specify%REPOROOT+%. The+is used to insert any number of folder paths necessary to find the script. This is useful if you want to specify your script so that if you create a branch the script is still found even though the url of the working copy is now different. Using the example above, you would specify the path to the script as%REPOROOT+%/contrib/hook-scripts/client-side/checkyear.js.A próxima captura de ecrã mostra como é configurado o script para verificar os anos de copyright nos cabeçalhos dos ficheiros fonte no TortoiseSVN.
When you want to add a new property, you can either pick one from the list in the combo box, or you can enter any property name you like. If your project uses some custom properties, and you want those properties to appear in the list in the combo box (to avoid typos when you enter a property name), you can create a list of your custom properties using
tsvn:userfilepropertiesandtsvn:userdirproperties. Apply these properties to a folder. When you go to edit the properties of any child item, your custom properties will appear in the list of pre-defined property names.You can also specify whether a custom dialog is used to add/edit your property. TortoiseSVN offers four different dialog, depending on the type of your property.
- bool
Se a tua propriedade só pode ter dois estados, e.g., true ou false, podes então configurar a tua propriedade como do tipo
bool.
. Especifica a tua propriedade deste modo:propertyname=bool;labeltext(YESVALUE;NOVALUE;Checkboxtext)Na <oliteral>labeltext eststateSe a tua propriedade representar um de muitos estados, e.g., sim,n, podes entstate Caixa de di do seguinte modo:propertyname=state;labeltext(DEFVAL;VAL1;TEXT1;VAL2;TEXT2;VAL3;TEXT3;...)Os parbool, com DEFVAL como parPara atsinglelinePara propriedades que consistem de uma linha de texto, use a o tipo de propriedade linha simples:/>nomepropriedade=linhasimples;identiftexto(exreg)O regex indica a expressmultiline propriedades que consistem em mmulti-linha: Caixa dinomepropriedade=multilinha;identiftexto(exreg)O regex indica a express The screenshots above were made with the following tsvn:userdirproperties: my:boolprop=bool;This is a bool type property. Either check or uncheck it.(true;false;my bool prop) my:stateprop1=state;This is a state property. Select one of the two states.(true;true;true value;false;false value) my:stateprop2=state;This is a state property. Select one of the three states.(maybe;true;answer is correct;false;answer is wrong;maybe;not answered) my:stateprop3=state;Specify the day to set this property.(1;1;Monday;2;Tuesday;3;Wednesday;4;Thursday;5;Friday;6;Saturday;7;Sunday) my:singlelineprop=singleline;enter a small comment(.*) my:multilineprop=multiline;copy and paste a full chapter here(.*) </oliteral>
TortoiseSVN can integrate with some bug tracking tools. This uses project properties that start with bugtraq:. Read “Integração com Sistemas de Rastreamento de Erros / Rastreadores de Reportes” for further information.
It can also integrate with some web-based repository browsers, using project properties that start with webviewer:. Read “Integração com visualizadores de repositórios locados na web” for further information.
Define as propriedades do projeto em diretórios
Essas propriedades especiais de projecto devem ser fixadas em pastas, para o sistema funcionar. Quando executas um comando do TortoiseSVn que usa essas propriedades, elas são lidas a partir da pasta em que clicaste. Se as propriedades não são encontradas aí, o TortoiseSVN irá procurar em direcção ascendente, através da árvore de ficheiros de modo ás encontrar até encontrar uma pasta não versionada ou a raiz da árvore (e.g. C:\).Se tens a certeza que cada utilizador só efectua checkout só a partir do, e.g. trunk/ e não de alguma subpasta, então é suficiente fixar as propriedades no trunk/. Se não tens a certeza, deverás fixar as propriedades recursivamente em cada subpasta. Se colocares a mesma propriedade, mas usares diferentes valores em diferentes niveis da hierarquia do projecto, irás então obter resultados diferentes dependendo do sítio na estrutura de pastas em que clicas.
For project properties only, i.e. tsvn:, bugtraq: and webviewer: you can use the Recursive checkbox to set the property to all sub-folders in the hierarchy, without also setting it on all files.
When you add new sub-folders to a working copy using TortoiseSVN, any project properties present in the parent folder will automatically be added to the new child folder too.
Limitações Usando o Navegador de Repositório
Fetching properties remotely is a slow operation, so some of the features described above will not work in the repository browser as they do in a working copy.
When you add a property using the repo browser, only the standard
svn:properties are offered in the pre-defined list. Any other property name must be entered manually.Propriedades não podem ser definidas ou apagadas recursivamente usando o navegador de repositório.
As propriedade do projeto não serão propagadas automaticamente quando um sub diretório é adicionado pelo navegador de repositório.
tsvn:autopropsnão definirá as propriedades em arquivos que são adicionados pelo navegador de repositório.
Cuidado
Although TortoiseSVN's project properties are extremely useful, they only work with TortoiseSVN, and some will only work in newer versions of TortoiseSVN. If people working on your project use a variety of Subversion clients, or possibly have old versions of TortoiseSVN, you may want to use repository hooks to enforce project policies. project properties can only help to implement a policy, they cannot enforce it.
Some properties have to use specific values, or be formatted in a specific way in order to be used for automation. To help get the formatting correct, TortoiseSVN presents edit dialogs for some particular properties which show the possible values or break the property into its individual components.
The svn:externals property can be used to pull in other projects from the same repository or a completely different repository as described in “Itens Externos”.
You need to define the name of the sub-folder that the external folder is checked out as, and the Subversion URL of the external item. You can check out an external at its HEAD revision, so when the external item changes in the repository, your working copy will receive those changes on update. However, if you want the external to reference a particular stable point then you can specify the specific revision to use. IN this case you may also want to specify the same revision as a peg revision. If the external item is renamed at some point in the future then Subversion will not be able to update this item in your working copy. By specifying a peg revision you tell Subversion to look for an item that had that name at the peg revision rather than at HEAD.
The button fetches the HEAD revision of every external URL and shows that HEAD revision in the rightmost column. After the HEAD revision is known, a simple right click on an external gives you the command to peg the selected externals to their explicit HEAD revision. In case the HEAD revision is not known yet, the right click command will fetch the HEAD revision first.
Seleciona as palavras-chave que você gostaria que fosse expandida em seu arquivo.
Seleciona o estilo de fim de linha que você deseja usar e o TortoiseSVN usará o valor da propriedade correto.
These 3 properties control the formatting of log messages. The first 2 disable the in the commit or lock dialogs until the message meets the minimum length. The border position shows a marker at the given column width as a guide for projects which have width limits on their log messages. Setting a value to zero will delete the property.
Escolhe a linguagem a usar para verificar ortografia nas mensagens de registona caixa de diálogo submeter. A caixa de verificação de lista de ficheiros têm utilidade quando clicas à direita no painel de mensagem e seleccionas Colar lista de ficheiros. Por defeito o estado do Subversion será mostrado na lingua local. Quando esta caixa está sinalizada o estado é sempre dado em Inglês, para projectos que requerem mensagens de registo apenas em Inglês.
This property simply controls whether a file will be checked out as read-only if there is no lock held for it in the working copy.
This property controls whether a file will be given executable status when checked out on a Unix/Linux system. It has no effect on a Windows checkout.
Quando são integradas as revisões na cópia de trabalho, o TortoiseSVN gera uma mensagem de registo para todas as revisões integradas. Essas ficam então disponíveis a partir do botão na janela de diálogo submeter.
Você pode customizar esta mensagem gerada com as seguintes propriedades:
- tsvn:mergelogtemplatetitle, tsvn:mergelogtemplatereversetitle
Esta propriedade especifica a primeira parte da mensagem de auditoria gerada. As seguintes palavras-chave podem ser usadas:
- {revisions}
Uma lista de revisões combinadas separadas por vírgula, p.ex.,
3, 5, 6, 7- {revisionsr}
Como
{revisions},mas com cada revisão precedida com umr, e.g.,r3, r5, r6, r7- {revrange}
Uma lista de revisões combinadas separadas por vírgula, se possível agrupadas em intervalos, p.ex.,
3, 5-7- {mergeurl}
O URL fonte da integração, i.e., de onde são integradas as revisões.
O valor por defeito para esta string é
Merged revision(s) {revrange} from {mergeurl}:com uma linha nova no fim.- tsvn:mergelogtemplatemsg
Esta propriedade especifica como o texto para cada revisão combinada deve se parecer. As seguintes palavras-chaves podem ser usadas:
- {msg}
A mensagem de auditoria da revisão combinada, como ela foi entrada.
- {msgoneline}
Como o
{msg}, mas todas as linhas novas são substituídas por um espaço, para que toda a mensagem de registo apareça numa única linha.- {author}
O autor da revisão mesclada
- {rev}
A própria revisão combinada.
- {bugids}
Os IDs dos erros da revisão combinada, se existirem.
- tsvn:mergelogtemplatemsgtitlebottom
This property specifies the position of the title string specified with the
tsvn:mergelogtemplatetitleortsvn:mergelogtemplatereversetitle. If the property is set toyesortrue, then the title string is appended at the bottom instead of the top.
Importante
Isto só funciona se as revisões combinadas já estiverem no cache de auditoria. Se você tiver desabilitado o cache de auditoria ou não tiver mostrado a auditoria logo antes da combinação, a mensagem gerada não conterá quaisquer informações sobre as revisões combinadas.
Por vezes é útil construir uma cópia de trabalho feita a partir de diferentes checkouts. Por exemplo, você poderá querer diferentes arquivos ou sub-diretórios de diferentes locais de um repositório ou talvez, de diferentes repositórios. Se você quiser que todo usuário tenha o mesmo layout, você pode definir as propriedades svn:externals para incluir o recurso especificado nos locais onde são necessários.
Let's say you check out a working copy of /project1 to D:\dev\project1. Select the folder D:\dev\project1, right click and choose → from the context menu. The Properties Dialog comes up. Then go to the Subversion tab. There, you can set properties. Click . In the properties dialog, either double click on the svn:externals if it already exists, or click on the button and select externals from the menu. To add a new external, click the and then fill in the required information in the shown dialog.
Cuidado
URLs must be properly escaped or they will not work, e.g. you must replace each space with %20.
Se você quiser que o caminho local inclua "espaços" ou outro caracter especial, terá que incluí-lo entre aspas ou usar o caracter \ (barra invertida) como um caracter de escape, ao estilo da linha de comandos do Linux, precedendo cada caracter especial. É claro que isto também significa que terá que necessariamente usar / (barra inclinada) como delimitador de caminho. Note que este comportamento é inusitado no Subversion 1.6 e não funcionará em versões mais antigas.
Usar números explícitos de revisão
You should strongly consider using explicit revision numbers in all of your externals definitions, as described above. Doing so means that you get to decide when to pull down a different snapshot of external information, and exactly which snapshot to pull. Besides the common sense aspect of not being surprised by changes to third-party repositories that you might not have any control over, using explicit revision numbers also means that as you backdate your working copy to a previous revision, your externals definitions will also revert to the way they looked in that previous revision, which in turn means that the external working copies will be updated to match the way they looked back when your repository was at that previous revision. For software projects, this could be the difference between a successful and a failed build of an older snapshot of your complex code base.
A caixa de diálogo de edição para propriedades svn:externals permite-te seleccionar as externas e coloca-las explicitamente na revisão HEAD.
Se o projeto externo está no mesmo repositório, quaisquer alterações feitas serão incluídas na lista de submissão quando submeter seu projeto principal.
If the external project is in a different repository, any changes you make to the external project will be shown or indicated when you commit the main project, but you have to commit those external changes separately.
Se usar URLs absolutas nas definições svn:externals e tiver que realocar sua cópia de trabalho (ou seja, a URL do seu repositório é alterada), então seus "externos" não serão alterados e poderão deixar de funcionar.
Para evitar tais problemas, a versão 1.5 ou superior do cliente Subversion, suporta URLs externas relativas. Quatro diferentes métodos de especificar uma URL relativa são suportados. Nos exemplos seguintes assume-se que temos dois repositórios: um em http://example.com/svn/repos-1 e outro em http://example.com/svn/repos-2. Temos um SVN exportado do http://example.com/svn/repos-1/project/trunk em C:\Working e a propriedade svn:externals está configurada no trunk.
- Relativo ao diretório pai
These URLs always begin with the string
../for example:../../widgets/foo common/foo-widgetThis will extract
http://example.com/svn/repos-1/widgets/foointoC:\Working\common\foo-widget.Note que a URL é relativa a URL do diretório com a propriedade
svn:externalse não a URL do diretório onde o arquivo externo está armazenado.- Relativo ao diretório principal do repositório
These URLs always begin with the string
^/for example:^/widgets/foo common/foo-widgetThis will extract
http://example.com/svn/repos-1/widgets/foointoC:\Working\common\foo-widget.You can easily refer to other repositories with the same
SVNParentPath(a common directory holding several repositories). For example:^/../repos-2/hammers/claw common/claw-hammerThis will extract
http://example.com/svn/repos-2/hammers/clawintoC:\Working\common\claw-hammer.- Relativo ao esquema
URLs beginning with the string
//copy only the scheme part of the URL. This is useful when the same hostname must the accessed with different schemes depending upon network location; e.g. clients in the intranet usehttp://while external clients usesvn+ssh://. For example://example.com/svn/repos-1/widgets/foo common/foo-widgetThis will extract
http://example.com/svn/repos-1/widgets/fooorsvn+ssh://example.com/svn/repos-1/widgets/foodepending on which method was used to checkoutC:\Working.- Relativo ao nome do servidor
URLs beginning with the string
/copy the scheme and the hostname part of the URL, for example:/svn/repos-1/widgets/foo common/foo-widgetThis will extract
http://example.com/svn/repos-1/widgets/foointoC:\Working\common\foo-widget. But if you checkout your working copy from another server atsvn+ssh://another.mirror.net/svn/repos-1/project1/trunkthen the external reference will extractsvn+ssh://another.mirror.net/svn/repos-1/widgets/foo.
You can also specify a peg and operative revision for the URL if required. To learn more about peg and operative revisions, please read the corresponding chapter in the Subversion book.
Importante
If you specify the target folder for the external as a subfolder like in the examples above, make sure that all folders in between are versioned as well. So for the examples above, the folder common should be versioned!
While the external will work in most situations properly if folders in between are not versioned, there are some operations that won't work as you expect. And the status overlay icons in explorer will also not show the correct status.
Caso necessite mais informações sobre como TortoiseSVN lida com "Propriedades", consulte “Configurações do Projeto”.
Para saber mais sobre diferentes métodos de acesso a subprojetos comuns, consulte “Inclua um subprojeto em comum”.
Desde a versão 1.6 do Subversion você pode incluir um único arquivo externo em sua cópia de trabalho usando a mesma sintaxe que usaria para diretórios. Entretanto existem algumas restrições.
The path to the file external must be a direct child of the folder where you set the
svn:externalsproperty.A URL para um arquivo externo deverá estar no mesmo repositório que a URL na qual o arquivo externo será incluído; arquivos externos inter-repositórios não são suportados.
Em vários aspectos um arquivo externo comporta-se como qualquer outro arquivo versionado, mas eles não podem ser movidos ou eliminados usando os comandos normais; é obrigatório que a propriedade svn:externals seja modificada.
If you already have a working copy of the files or folders you want to include as externals in another working copy, you can simply add those via drag and drop from the windows explorer.
Simply right drag the file or folder from one working copy to where you want those to be included as externals. A context menu appears when you release the mouse button: if you click on that context menu entry, the svn:externals property is automatically added. All you have to do after that is commit the property changes and update to get those externals properly included in your working copy.
One of the features of version control systems is the ability to isolate changes onto a separate line of development. This line is known as a branch. Branches are often used to try out new features without disturbing the main line of development with compiler errors and bugs. As soon as the new feature is stable enough then the development branch is merged back into the main branch (trunk).
Another feature of version control systems is the ability to mark particular revisions (e.g. a release version), so you can at any time recreate a certain build or environment. This process is known as tagging.
Subversion does not have special commands for branching or tagging, but uses so-called “cheap copies” instead. Cheap copies are similar to hard links in Unix, which means that instead of making a complete copy in the repository, an internal link is created, pointing to a specific tree/revision. As a result branches and tags are very quick to create, and take up almost no extra space in the repository.
If you have imported your project with the recommended directory structure, creating a branch or tag version is very simple:
Select the folder in your working copy which you want to copy to a branch or tag, then select the command → .
The default destination URL for the new branch will be the source URL on which your working copy is based. You will need to edit that URL to the new path for your branch/tag. So instead of
http://svn.collab.net/repos/ProjectName/trunk
you might now use something like
http://svn.collab.net/repos/ProjectName/tags/Release_1.10
If you can't remember the naming convention you used last time, click the button on the right to open the repository browser so you can view the existing repository structure.
Pastas intermediárias
When you specify the target URL, all the folders up to the last one must already exist or you will get an error message. In the above example, the URL http://svn.collab.net/repos/ProjectName/tags/ must exist to create the Release_1.10 tag.
However if you want to create a branch/tag to an URL that has intermediate folders that don't exist yet you can check the option Create intermediate folders at the bottom of the dialog. If that option is activated, all intermediate folders are automatically created.
Note that this option is disabled by default to avoid typos. For example, if you typed the target URL as http://svn.collab.net/repos/ProjectName/Tags/Release_1.10 instead of http://svn.collab.net/repos/ProjectName/tags/Release_1.10, you would get an error with the option disabled, but with the option enabled a folder Tags would be automatically created, and you would end up with a folder Tags and a folder tags.
Agora você tem que selecionar a fonte da cópia. Aqui você tem três opções:
- Última revisão no repositório
The new branch is copied directly in the repository from the HEAD revision. No data needs to be transferred from your working copy, and the branch is created very quickly.
- Revisão específica no repositório
The new branch is copied directly in the repository but you can choose an older revision. This is useful if you forgot to make a tag when you released your project last week. If you can't remember the revision number, click the button on the right to show the revision log, and select the revision number from there. Again no data is transferred from your working copy, and the branch is created very quickly.
- Cópia de trabalho
The new branch is an identical copy of your local working copy. If you have updated some files to an older revision in your WC, or if you have made local changes, that is exactly what goes into the copy. Naturally this sort of complex tag may involve transferring data from your WC back to the repository if it does not exist there already.
If you want your working copy to be switched to the newly created branch automatically, use the Switch working copy to new branch/tag checkbox. But if you do that, first make sure that your working copy does not contain modifications. If it does, those changes will be merged into the branch WC when you switch.
If your working copy has other projects included with svn:externals properties, those externals will be listed at the bottom of the branch/tag dialog. For each external, the target path and the source URL is shown.
If you want to make sure that the new tag always is in a consistent state, check all the externals to have their revisions pinned. If you don't check the externals and those externals point to a HEAD revision which might change in the future, checking out the new tag will check out that HEAD revision of the external and your tag might not compile anymore. So it's always a good idea to set the externals to an explicit revision when creating a tag.
The externals are automatically pinned to either the current HEAD revision or the working copy BASE revision, depending on the source of the branch/tag:
Tabela 4.1. Revisãio Pinado
| Copiar Fonte | Revisãio Pinado |
|---|---|
| Última revisão no repositório | external's repos HEAD revision |
| especexternal's repos HEAD revisionCexternal's WC BASE revision |
externals within externals
If a project that is included as an external has itself included externals, then those will not be tagged! Only externals that are direct children can be tagged.
Press to commit the new copy to the repository. Don't forget to supply a log message. Note that the copy is created inside the repository.
Note that unless you opted to switch your working copy to the newly created branch, creating a Branch or Tag does not affect your working copy. Even if you create the branch from your WC, those changes are committed to the new branch, not to the trunk, so your WC may still be marked as modified with respect to the trunk.
You can also create a branch or tag without having a working copy. To do that, open the repository browser. You can there drag folders to a new location. You have to hold down the Ctrl key while you drag to create a copy, otherwise the folder gets moved, not copied.
You can also drag a folder with the right mouse button. Once you release the mouse button you can choose from the context menu whether you want the folder to be moved or copied. Of course to create a branch or tag you must copy the folder, not move it.
Yet another way is from the log dialog. You can show the log dialog for e.g. trunk, select a revision (either the HEAD revision at the very top or an earlier revision), right click and choose .
...that is (not really) the question. While a checkout downloads everything from the desired branch in the repository to your working directory, → only transfers the changed data to your working copy. Good for the network load, good for your patience. :-)
To be able to work with your freshly generated branch or tag you have several ways to handle it. You can:
→ to make a fresh checkout in an empty folder. You can check out to any location on your local disk and you can create as many working copies from your repository as you like.
Switch your current working copy to the newly created copy in the repository. Again select the top level folder of your project and use → from the context menu.
In the next dialog enter the URL of the branch you just created. Select the Head Revision radio button and click on . Your working copy is switched to the new branch/tag.
Switch works just like Update in that it never discards your local changes. Any changes you have made to your working copy which have not yet been committed will be merged when you do the Switch. If you do not want this to happen then you must either commit the changes before switching, or revert your working copy to an already-committed revision (typically HEAD).
If you want to work on trunk and branch, but don't want the expense of a fresh checkout, you can use Windows Explorer to make a copy of your trunk checkout in another folder, then → that copy to your new branch.
Although Subversion itself makes no distinction between tags and branches, the way they are typically used differs a bit.
Tags are typically used to create a static snapshot of the project at a particular stage. As such they are not normally used for development - that's what branches are for, which is the reason we recommended the
/trunk /branches /tagsrepository structure in the first place. Working on a tag revision is not a good idea, but because your local files are not write protected there is nothing to stop you doing this by mistake. However, if you try to commit to a path in the repository which contains/tags/, TortoiseSVN will warn you.It may be that you need to make further changes to a release which you have already tagged. The correct way to handle this is to create a new branch from the tag first and commit the branch. Do your Changes on this branch and then create a new tag from this new branch, e.g.
Version_1.0.1.If you modify a working copy created from a branch and commit, then all changes go to the new branch and not the trunk. Only the modifications are stored. The rest remains a cheap copy.
Where branches are used to maintain separate lines of development, at some stage you will want to merge the changes made on one branch back into the trunk, or vice versa.
It is important to understand how branching and merging works in Subversion before you start using it, as it can become quite complex. It is highly recommended that you read the chapter Branching and Merging in the Subversion book, which gives a full description and many examples of how it is used.
The next point to note is that merging always takes place within a working copy. If you want to merge changes into a branch, you have to have a working copy for that branch checked out, and invoke the merge wizard from that working copy using → .
In general it is a good idea to perform a merge into an unmodified working copy. If you have made other changes in your WC, commit those first. If the merge does not go as you expect, you may want to revert the changes, and the Revert command will discard all changes including any you made before the merge.
There are three common use cases for merging which are handled in slightly different ways, as described below. The first page of the merge wizard asks you to select the method you need.
- Combinar uma faixa de revisões
Esse método cobre o caso em que foi feita uma ou mais revisões em um ramo (ou ao tronco) e se deseja transportar essas mudanças para um ramo diferente.
What you are asking Subversion to do is this: “ Calculate the changes necessary to get [FROM] revision 1 of branch A [TO] revision 7 of branch A, and apply those changes to my working copy (of trunk or branch B). ”
If you leave the revision range empty, Subversion uses the merge-tracking features to calculate the correct revision range to use. This is known as a reintegrate or automatic merge.
- Unificar duas árvores diferentes
This is a more general case of the reintegrate method. What you are asking Subversion to do is: “ Calculate the changes necessary to get [FROM] the head revision of the trunk [TO] the head revision of the branch, and apply those changes to my working copy (of the trunk). ” The net result is that trunk now looks exactly like the branch.
If your server/repository does not support merge-tracking then this is the only way to merge a branch back to trunk. Another use case occurs when you are using vendor branches and you need to merge the changes following a new vendor drop into your trunk code. For more information read the chapter on vendor branches in the Subversion Book.
In the From: field enter the full folder URL of the branch or tag containing the changes you want to port into your working copy. You may also click to browse the repository and find the desired branch. If you have merged from this branch before, then just use the drop down list which shows a history of previously used URLs.
If you are merging from a renamed or deleted branch then you will have to go back to a revision where that branch still existed. In this case you will also need to specify that revision as a peg revision in the range of revisions being merged (see below), otherwise the merge will fail when it can't find that path at HEAD.
In the Revision range to merge field enter the list of revisions you want to merge. This can be a single revision, a list of specific revisions separated by commas, or a range of revisions separated by a dash, or any combination of these.
Se precisas de especificar uma revisão cavilha para a integração, adiciona a revisão cavilha no fim das revisões, e.g. 5-7,10@3. No exemplo acima, as revisões 5,6,7 e 10 seriam integradas, sendo a 3 a revisão cavilha.
Importante
There is an important difference in the way a revision range is specified with TortoiseSVN compared to the command line client. The easiest way to visualise it is to think of a fence with posts and fence panels.
With the command line client you specify the changes to merge using two “fence post” revisions which specify the before and after points.
With TortoiseSVN you specify the changeset to merge using “fence panels”. The reason for this becomes clear when you use the log dialog to specify revisions to merge, where each revision appears as a changeset.
Se estiveres a integrar revisões em bloco, o método mostrado no livro do Subversion integra-te a 100-200 desta vez e 200-300 da próxima. Com o TortoiseSVN integra-te a 100-200 desta vez e 201-300 da próxima.
This difference has generated a lot of heat on the mailing lists. We acknowledge that there is a difference from the command line client, but we believe that for the majority of GUI users it is easier to understand the method we have implemented.
The easiest way to select the range of revisions you need is to click on , as this will list recent changes with their log comments. If you want to merge the changes from a single revision, just select that revision. If you want to merge changes from several revisions, then select that range (using the usual Shift-modifier). Click on and the list of revision numbers to merge will be filled in for you.
If you want to merge changes back out of your working copy, to revert a change which has already been committed, select the revisions to revert and make sure the Reverse merge box is checked.
If you have already merged some changes from this branch, hopefully you will have made a note of the last revision merged in the log message when you committed the change. In that case, you can use for the Working Copy to trace that log message. Remembering that we are thinking of revisions as changesets, you should Use the revision after the end point of the last merge as the start point for this merge. For example, if you have merged revisions 37 to 39 last time, then the start point for this merge should be revision 40.
If you are using the merge tracking features of Subversion, you do not need to remember which revisions have already been merged - Subversion will record that for you. If you leave the revision range blank, all revisions which have not yet been merged will be included. Read “Histórico de combinações” to find out more.
Quando o seguimento de integração é usado, a caixa de diálogo de registo irá mostrar as revisões previamente integradas e as revisões antecedentes ao ponto do antecessor comum, i.e. antes do ramo ser copiado, a cinzento. A caixa de verificação Ocultar revisões não.integráveis permite-te filtrar completamente essas revisões, para que vejas apenas as revisões que podem ser integradas.
If other people may be committing changes then be careful about using the HEAD revision. It may not refer to the revision you think it does if someone else made a commit after your last update.
If you leave the range of revisions empty or have the radio button all revisions checked, then Subversion merges all not-yet merged revisions. This is known as a reintegrate or automatic merge.
Existem algumas condições que se aplicam a uma integração de reintegração. Primeiramente, o servidor deverá suportar o rastreamento de integração. A cópia de trabalho deverá ser de nível infinito (sem checkouts dispersos), e não deverá ter nenhumas alterações, itens trocados ou itens que foram actualizadas para revisões diferentes da HEAD. Todas as alterações para o trunk feitas durante o desenvolvimento do ramo, deverão ter sido já integradas transversalmente para o ramo (ou marcadas como tendo sido feitas). O intervalo de revisões a integrar será então calculado automaticamente.
Click and go to “Opções de Combinação”.
If you are using this method to merge a feature branch back to trunk, you need to start the merge wizard from within a working copy of trunk.
In the From: field enter the full folder URL of the trunk. This may sound wrong, but remember that the trunk is the start point to which you want to add the branch changes. You may also click to browse the repository.
In the To: field enter the full folder URL of the feature branch.
In both the From Revision field and the To Revision field, enter the last revision number at which the two trees were synchronized. If you are sure no-one else is making commits you can use the HEAD revision in both cases. If there is a chance that someone else may have made a commit since that synchronization, use the specific revision number to avoid losing more recent commits.
Você também pode utilizar o para selecionar a revisão.
This page of the wizard lets you specify advanced options, before starting the merge process. Most of the time you can just use the default settings.
Tu podes especificar o nível a usar na integração, i.e. até que ponto deverá a integração penetrar na tua cópia de trabalho. Os termos do nível usados estão descritos em “Profundidade da Obtenção”. O nível por defeito é a Cópia de trabalho, e é quase sempre o que precisas.
Most of the time you want merge to take account of the file's history, so that changes relative to a common ancestor are merged. Sometimes you may need to merge files which are perhaps related, but not in your repository. For example you may have imported versions 1 and 2 of a third party library into two separate directories. Although they are logically related, Subversion has no knowledge of this because it only sees the tarballs you imported. If you attempt to merge the difference between these two trees you would see a complete removal followed by a complete add. To make Subversion use only path-based differences rather than history-based differences, check the Ignore ancestry box. Read more about this topic in the Subversion book, Noticing or Ignoring Ancestry.
You can specify the way that line ending and whitespace changes are handled. These options are described in “Opções de Quebra de Linha e Espaços em Branco”. The default behaviour is to treat all whitespace and line-end differences as real changes to be merged.
The checkbox marked Force the merge is used to avoid a tree conflict where an incoming delete affects a file that is either modified locally or not versioned at all. If the file is deleted then there is no way to recover it, which is why that option is not checked by default.
If you are using merge tracking and you want to mark a revision as having been merged, without actually doing the merge here, check the Only record the merge checkbox. There are two possible reasons you might want to do this. It may be that the merge is too complicated for the merge algorithms, so you code the changes by hand, then mark the change as merged so that the merge tracking algorithm is aware of it. Or you might want to prevent a particular revision from being merged. Marking it as already merged will prevent the merge occurring with merge-tracking-aware clients.
Now everything is set up, all you have to do is click on the button. If you want to preview the results simulates the merge operation, but does not modify the working copy at all. It shows you a list of the files that will be changed by a real merge, and notes files where conflicts may occur. Because merge tracking makes the merge process a lot more complicated, there is no guaranteed way to find out in advance whether the merge will complete without conflicts, so files marked as conflicted in a test merge may in fact merge without any problem.
The merge progress dialog shows each stage of the merge, with the revision ranges involved. This may indicate one more revision than you were expecting. For example if you asked to merge revision 123 the progress dialog will report “ Merging revisions 122 through 123 ”. To understand this you need to remember that Merge is closely related to Diff. The merge process works by generating a list of differences between two points in the repository, and applying those differences to your working copy. The progress dialog is simply showing the start and end points for the diff.
The merge is now complete. It's a good idea to have a look at the merge and see if it's as expected. Merging is usually quite complicated. Conflicts often arise if the branch has drifted far from the trunk.
Dica
Quando são integradas as revisões na cópia de trabalho, o TortoiseSVN gera uma mensagem de registo para todas as revisões integradas. Essas ficam então disponíveis a partir do botão na janela de diálogo submeter.
Para customizar a mensagem gerada, determine as propriedades correspondentes do projeto na sua cópia de trabalho. Veja “Templates de mensagens de registo”
For Subversion clients and servers prior to 1.5, no merge information is stored and merged revisions have to be tracked manually. When you have tested the changes and come to commit this revision, your commit log message should always include the revision numbers which have been ported in the merge. If you want to apply another merge at a later time you will need to know what you have already merged, as you do not want to port a change more than once. For more information about this, refer to Best Practices for Merging in the Subversion book.
If your server and all clients are running Subversion 1.5 or higher, the merge tracking facility will record the revisions merged and avoid a revision being merged more than once. This makes your life much simpler as you can simply merge the entire revision range each time and know that only new revisions will actually be merged.
Branch management is important. If you want to keep this branch up to date with the trunk, you should be sure to merge often so that the branch and trunk do not drift too far apart. Of course, you should still avoid repeated merging of changes, as explained above.
Dica
If you have just merged a feature branch back into the trunk, the trunk now contains all the new feature code, and the branch is obsolete. You can now delete it from the repository if required.
Importante
Subversion can't merge a file with a folder and vice versa - only folders to folders and files to files. If you click on a file and open up the merge dialog, then you have to give a path to a file in that dialog. If you select a folder and bring up the dialog, then you must specify a folder URL for the merge.
Subversion 1.5 introduced facilities for merge tracking. When you merge changes from one tree into another, the revision numbers merged are stored and this information can be used for several different purposes.
You can avoid the danger of merging the same revision twice (repeated merge problem). Once a revision is marked as having been merged, future merges which include that revision in the range will skip over it.
When you merge a branch back into trunk, the log dialog can show you the branch commits as part of the trunk log, giving better traceability of changes.
Quando você mostra a janela de auditoria a partir de uma janela de combinação, revisões já combinadas são apresentadas em cinza.
Quando você está mostrando a informação de autoria para um arquivo você pode escolher mostrar o autor original das revisões combinadas, ao invés da pessoa que fez a combinação.
Você pode marcar revisões como não combinadas incluindo as revisões na lista de revisões combinadas sem realmente fazer a combinação.
Merge tracking information is stored in the svn:mergeinfo property by the client when it performs a merge. When the merge is committed the server stores that information in a database, and when you request merge, log or blame information, the server can respond appropriately. For the system to work properly you must ensure that the server, the repository and all clients are upgraded. Earlier clients will not store the svn:mergeinfo property and earlier servers will not provide the information requested by new clients.
Mais informações sobre o controlo de integração do Subversion em; Merge tracking documentation.
Importante
The text in the conflict resolver dialogs are provided by the SVN library and might therefore not (yet) be translated as the TortoiseSVN dialogs are. Sorry for that.
Merging does not always go smoothly. Sometimes there is a conflict. TortoiseSVN helps you through this process by showing the merge conflict dialog.
It is likely that some of the changes will have merged smoothly, while other local changes conflict with changes already committed to the repository. All changes which can be merged are merged. The Merge Conflict dialog gives you different ways of handling the lines which are in conflict.
For normal conflicts that happen due to changes in the file content or its properties, the dialog shows buttons which allow you to chose which of the conflicting parts to keep or reject.
- Postpone
Don't deal with the conflict now. Let the merge continue and resolve the conflicts after the merge is done.
- Accept base
This leaves the file as it was, without neither the changes coming from the merge nor the changes you've made in your working copy.
- Accept incoming
This discards all your local changes and uses the file as it arrives from the merge source.
- Reject incoming
This discards all the changes from the merge source and leaves the file with your local edits.
- Accept incoming for conflicts
This discards your local changes where they conflict with the changes from the merge source. But it leaves all your local changes which don't conflict.
- Reject conflicts
This discards changes from the merge source which conflict with your local changes. But it keeps all changes that don't conflict with your local changes.
- Mark as resolved
Marks the conflicts as resolved. This button is disabled until you use the button to edit the conflict manually and save those changes back to the file. Once the changes are saved, the button becomes enabled.
- Editar
Starts the merge editor so you can resolve the conflicts manually. Don't forget to save the file so the button becomes enabled.
If there's a tree conflict, please first see “Conflitos de Estrutura” about the various types of tree conflicts and how and why they can happen.
To resolve tree conflicts after a merge, a dialog is shown with various options on how to resolve the conflict:
Since there are various possible tree conflict situations, the dialog will show buttons to resolve those depending on the specific conflict. The button texts and labels explain what the option to resolve the conflict does. If you're not sure, either cancel the dialog or use the button to resolve the conflict later.
When you develop a new feature on a separate branch it is a good idea to work out a policy for re-integration when the feature is complete. If other work is going on in trunk at the same time you may find that the differences become significant over time, and merging back becomes a nightmare.
If the feature is relatively simple and development will not take long then you can adopt a simple approach, which is to keep the branch entirely separate until the feature is complete, then merge the branch changes back into trunk. In the merge wizard this would be a simple Merge a range of revisions, with the revision range being the revision span of the branch.
If the feature is going to take longer and you need to account for changes in trunk, then you need to keep the branch synchronised. This simply means that periodically you merge trunk changes into the branch, so that the branch contains all the trunk changes plus the new feature. The synchronisation process uses Merge a range of revisions. When the feature is complete then you can merge it back to trunk using either Reintegrate a branch or Merge two different trees.
Another (fast) way to merge all changes from trunk to the feature branch is to use the → from the extended context menu (hold down the Shift key while you right click on the file).
This dialog is very easy. All you have to do is set the options for the merge, as described in “Opções de Combinação”. The rest is done by TortoiseSVN automatically using merge tracking.
Subversion generally works best without locking, using the “Copy-Modify-Merge” methods described earlier in “A solução Copiar-Modificar-Unificar”. However there are a few instances when you may need to implement some form of locking policy.
Você está usando arquivos “não combináveis”, por exemplo, arquivos de imagens. Se duas pessoas mudarem o mesmo arquivo, a combinação não será possível, assim as alterações de alguém serão perdidas.
Sua empresa desde sempre usou um sistema de controle de versão por bloqueio no passado e decidiu que “bloquear é o melhor”.
Firstly you need to ensure that your Subversion server is upgraded to at least version 1.2. Earlier versions do not support locking at all. If you are using file:// access, then of course only your client needs to be updated.
Os três significados de “Bloquear”
Nesta secção, e em particamente em qulaquer parte deste livro, as palavras “bloqueio” e “bloquear” descreverm um mecanismo de mutua exclusão entre utilizadores para evitar colisões ao submeter. Infelizmente, existem outros tipos de “bloqueio”s com que o Subversion, e por consequência este livro, deve ter em conta.
The second is working copy locks, used internally by Subversion to prevent clashes between multiple Subversion clients operating on the same working copy. Usually you get these locks whenever a command like update/commit/... is interrupted due to an error. These locks can be removed by running the cleanup command on the working copy, as described in “Limpar”.
E por terceiro, ficheiros e pastas podem ficar bloqueadas se estiverem a ser usadas por outro processo, por exemplo, se tiveres um documento word aberto no Word, esse ficheiro está bloqueado e não pode ser acedido pelo TortoiseSVN.
Por norma podes descartar esses outros tipos de bloqueios, até acontecer algo errado que requeira o teu apoio
Por padrão, nada é bloqueado e qualquer um que tenha acesso para submissão pode alterar qualquer arquivo a qualquer momento. Outros atualizarão suas cópias de trabalho periodicamente e as mudanças no repositório serão combinadas com as alterações locais.
If you Get a Lock on a file, then only you can commit that file. Commits by all other users will be blocked until you release the lock. A locked file cannot be modified in any way in the repository, so it cannot be deleted or renamed either, except by the lock owner.
Importante
Um bloquei não está associado a um usuário específico, mas para um usuário específico e sua cópia de trabalho. Existindo um bloqueio em uma cópia de trabalho também prevê que o mesmo usuário submete o arquivo bloqueado de outra cópia de trabalho.
As an example, imagine that user Jon has a working copy on his office PC. There he starts working on an image, and therefore acquires a lock on that file. When he leaves his office he's not finished yet with that file, so he doesn't release that lock. Back at home Jon also has a working copy and decides to work a little more on the project. But he can't modify or commit that same image file, because the lock for that file resides in his working copy in the office.
However, other users will not necessarily know that you have taken out a lock. Unless they check the lock status regularly, the first they will know about it is when their commit fails, which in most cases is not very useful. To make it easier to manage locks, there is a new Subversion property svn:needs-lock. When this property is set (to any value) on a file, whenever the file is checked out or updated, the local copy is made read-only unless that working copy holds a lock for the file. This acts as a warning that you should not edit that file unless you have first acquired a lock. Files which are versioned and read-only are marked with a special overlay in TortoiseSVN to indicate that you need to acquire a lock before editing.
Locks are recorded by working copy location as well as by owner. If you have several working copies (at home, at work) then you can only hold a lock in one of those working copies.
If one of your co-workers acquires a lock and then goes on holiday without releasing it, what do you do? Subversion provides a means to force locks. Releasing a lock held by someone else is referred to as Breaking the lock, and forcibly acquiring a lock which someone else already holds is referred to as Stealing the lock. Naturally these are not things you should do lightly if you want to remain friends with your co-workers.
Locks are recorded in the repository, and a lock token is created in your local working copy. If there is a discrepancy, for example if someone else has broken the lock, the local lock token becomes invalid. The repository is always the definitive reference.
Select the file(s) in your working copy for which you want to acquire a lock, then select the command → .
A dialog appears, allowing you to enter a comment, so others can see why you have locked the file. The comment is optional and currently only used with Svnserve based repositories. If (and only if) you need to steal the lock from someone else, check the Steal lock box, then click on .
You can set the project property tsvn:logtemplatelock to provide a message template for users to fill in as the lock message. Refer to “Configurações do Projeto” for instructions on how to set properties.
If you select a folder and then use → the lock dialog will open with every file in every sub-folder selected for locking. If you really want to lock an entire hierarchy, that is the way to do it, but you could become very unpopular with your co-workers if you lock them out of the whole project. Use with care ...
To make sure you don't forget to release a lock you don't need any more, locked files are shown in the commit dialog and selected by default. If you continue with the commit, locks you hold on the selected files are removed, even if the files haven't been modified. If you don't want to release a lock on certain files, you can uncheck them (if they're not modified). If you want to keep a lock on a file you've modified, you have to enable the Keep locks checkbox before you commit your changes.
To release a lock manually, select the file(s) in your working copy for which you want to release the lock, then select the command → There is nothing further to enter so TortoiseSVN will contact the repository and release the locks. You can also use this command on a folder to release all locks recursively.
To see what locks you and others hold, you can use → . Locally held lock tokens show up immediately. To check for locks held by others (and to see if any of your locks are broken or stolen) you need to click on .
A partir deste menu de contexto você pode também obter ou liberar bloqueios, assim como quebrar e roubar os bloqueios mantidos por outros.
Evite a quebra e Roubos de Bloqueios
If you break or steal someone else's lock without telling them, you could potentially cause loss of work. If you are working with unmergeable file types and you steal someone else's lock, once you release the lock they are free to check in their changes and overwrite yours. Subversion doesn't lose data, but you have lost the team-working protection that locking gave you.
As mentioned above, the most effective way to use locking is to set the svn:needs-lock property on files. Refer to “Configurações do Projeto” for instructions on how to set properties. Files with this property set will always be checked out and updated with the read-only flag set unless your working copy holds a lock.
As a reminder, TortoiseSVN uses a special overlay to indicate this.
If you operate a policy where every file has to be locked then you may find it easier to use Subversion's auto-props feature to set the property automatically every time you add new files. Read “Definição automática de propriedade” for further information.
Quando você criar um novo repositório com o Subversion 1.2 ou superior, quatro modelos de gancho são criados no diretório hooks no repositório. Eles são chamados antes e depois de efetuar um bloqueio, e antes e depois de liberar um bloqueio.
It is a good idea to install a post-lock and post-unlock hook script on the server which sends out an email indicating the file which has been locked. With such a script in place, all your users can be notified if someone locks/unlocks a file. You can find an example hook script hooks/post-lock.tmpl in your repository folder.
Você também pode usar ganchos para proibir a quebra ou o roubo de travas, ou talvez limitá-lo a um administrador nomeado. Ou talvez você queira enviar um e-mail para o proprietário quando um de seus bloqueios é quebrado ou roubado.
Leia “Rotinas de eventos no servidor” para saber mais.
For open source projects (like this one) everyone has read access to the repository, and anyone can make a contribution to the project. So how are those contributions controlled? If just anyone could commit changes, the project would be permanently unstable and probably permanently broken. In this situation the change is managed by submitting a patch file to the development team, who do have write access. They can review the patch first, and then either submit it to the repository or reject it back to the author.
Patch files are simply Unified-Diff files showing the differences between your working copy and the base revision.
First you need to make and test your changes. Then instead of using → on the parent folder, you select →
you can now select the files you want included in the patch, just as you would with a full commit. This will produce a single file containing a summary of all the changes you have made to the selected files since the last update from the repository.
As colunas nesta janela podem ser personalizadas da mesma forma como as colunas da janela Verificar alterações. Leia “Estado Local e Remoto” para mais detalhes.
Ao clicar no botão de Opções, podes especificar como o caminho é criado. Por exemplo, podes especificar que as mudanças no final da linha ou espaços em branco não são incluídas no arquivo do caminho final.
You can produce separate patches containing changes to different sets of files. Of course, if you create a patch file, make some more changes to the same files and then create another patch, the second patch file will include both sets of changes.
Just save the file using a filename of your choice. Patch files can have any extension you like, but by convention they should use the .patch or .diff extension. You are now ready to submit your patch file.
Dica
Do not save the patch file with a.txt extension if you intend to send it via email to someone else. Plain text files are often mangled with by the email software and it often happens that whitespaces and newline chars are automatically converted and compressed. If that happens, the patch won't apply smoothly. So use .patch or .diff as the extension when you save the patch file.You can also save the patch to the clipboard instead of to a file. You might want to do this so that you can paste it into an email for review by others. Or if you have two working copies on one machine and you want to transfer changes from one to the other, a patch on the clipboard is a convenient way of doing this.
Se preferires podes criar um ficheiro correcção a partir das caixas de diálogo Submeter ou Verificar alterações. Selecciona apenas os ficheiros e usa o item do menu de contexto para criar a correcção a partir desses ficheiros. Se quiseres ver a caixa de diálogo Opções terás de manter premida a tecla shift quando clicares à direita.
Patch files are applied to your working copy. This should be done from the same folder level as was used to create the patch. If you are not sure what this is, just look at the first line of the patch file. For example, if the first file being worked on was doc/source/english/chapter1.xml and the first line in the patch file is Index: english/chapter1.xml then you need to apply the patch to the doc/source/ folder. However, provided you are in the correct working copy, if you pick the wrong folder level, TortoiseSVN will notice and suggest the correct level.
In order to apply a patch file to your working copy, you need to have at least read access to the repository. The reason for this is that the merge program must reference the changes back to the revision against which they were made by the remote developer.
From the context menu for that folder, click on → This will bring up a file open dialog allowing you to select the patch file to apply. By default only .patch or .diff files are shown, but you can opt for “All files”. If you previously saved a patch to the clipboard, you can use in the file open dialog. Note that this option only appears if you saved the patch to the clipboard using → . Copying a patch to the clipboard from another app will not make the button appear.
Alternatively, if the patch file has a .patch or .diff extension, you can right click on it directly and select → . In this case you will be prompted to enter a working copy location.
These two methods just offer different ways of doing the same thing. With the first method you select the WC and browse to the patch file. With the second you select the patch file and browse to the WC.
Once you have selected the patch file and working copy location, TortoiseMerge runs to merge the changes from the patch file with your working copy. A small window lists the files which have been changed. Double click on each one in turn, review the changes and save the merged files.
The remote developer's patch has now been applied to your working copy, so you need to commit to allow everyone else to access the changes from the repository.
Sometimes you need to know not only what lines have changed, but also who exactly changed specific lines in a file. That's when the → command, sometimes also referred to as annotate command comes in handy.
Estas listas de comandos, para cada linha no arquivo, o autor e a revisão da alteração da linha.
If you're not interested in changes from earlier revisions you can set the revision from which the blame should start. Set this to 1, if you want the blame for every revision.
By default the blame file is viewed using TortoiseBlame, which highlights the different revisions to make it easier to read. If you wish to print or edit the blame file, select Use Text viewer to view blames.
You can specify the way that line ending and whitespace changes are handled. These options are described in “Opções de Quebra de Linha e Espaços em Branco”. The default behaviour is to treat all whitespace and line-end differences as real changes, but if you want to ignore an indentation change and find the original author, you can choose an appropriate option here.
Ter em atenção que se uma etiqueta é usada como origem para uma cópia, talvez um novo ramo baseado numa etiqueta, então essa etiqueta será mostrada como um nó separado em vez de dobrada.
Once you press TortoiseSVN starts retrieving the data to create the blame file. Once the blame process has finished the result is written into a temporary file and you can view the results.
TortoiseBlame, which is included with TortoiseSVN, makes the blame file easier to read. When you hover the mouse over a line in the blame info column, all lines with the same revision are shown with a darker background. Lines from other revisions which were changed by the same author are shown with a light background. The colouring may not work as clearly if you have your display set to 256 colour mode.
If you left click on a line, all lines with the same revision are highlighted, and lines from other revisions by the same author are highlighted in a lighter colour. This highlighting is sticky, allowing you to move the mouse without losing the highlights. Click on that revision again to turn off highlighting.
The revision comments (log message) are shown in a hint box whenever the mouse hovers over the blame info column. If you want to copy the log message for that revision, use the context menu which appears when you right click on the blame info column.
You can search within the Blame report using → . This allows you to search for revision numbers, authors and the content of the file itself. Log messages are not included in the search - you should use the Log Dialog to search those.
You can also jump to a specific line number using → .
When the mouse is over the blame info columns, a context menu is available which helps with comparing revisions and examining history, using the revision number of the line under the mouse as a reference. → generates a blame report for the same file, but using the previous revision as the upper limit. This gives you the blame report for the state of the file just before the line you are looking at was last changed. → starts your diff viewer, showing you what changed in the referenced revision. → displays the revision log dialog starting with the referenced revision.
If you need a better visual indicator of where the oldest and newest changes are, select → . This will use a colour gradient to show newer lines in red and older lines in blue. The default colouring is quite light, but you can change it using the TortoiseBlame settings.
Se estás a usar o rastreamento de integração e pediste info. de integração ao iniciar a responsabilização, então as linhas integradas são mostradas de um modo ligeiramente diferente. Onde foi alterada uma linha como resultado de uma integração de outro ramo, o TortoiseBlame irá mostrar a revisão e o autor da última alteração no ficheiro original em vez da revisão onde foi efectuada a integração. Essas linhas são identificadas ao mostrar a revisão e o autor em itálico. A revisão onde foi efectuada a integração é mostrada em separado na tooltip quando passas o rato sobre as colunas de info. de responsabilidade. Se não pretenderes que as linhas integradas sejam mostradas desta maneira, desselecciona a caixa Incluir info de integração ao iniciar a responsabilização.
Se quiseres ver os caminhos envolvidos na mesclagem, selecciona → . Isso irá mostrar o caminho onde a linha foi modificada pela última vez, excluindo as variações resultantes de uma fusão.
A revisão mostrada na informação de responsabilidade representa a última revisão onde o conteúdo dessa linha foi alterado. Se o ficherio foi criado ao copiar outro ficheiro, então até alterares a linha, a sua revisão de responsabilidade irá mostrar a última alteração no ficheiro fonte original, e não a revisão onde a cópia foi efectuada. Isto também se aplica aos caminhos mostrados com a informação de integração. O caminho mostra a localização do repositório onde a última alteração foi efectuada a essa linha.
The settings for TortoiseBlame can be accessed using → on the TortoiseBlame tab. Refer to “Configurações TortoiseBlame”.
Limpa o estado da cópia de trabalho
A janela de auditoria de revisão inclui diversas opções que lhe permitem fazer isto.
- Revisões de Autoria
In the top pane, select 2 revisions, then select → . This will fetch the blame data for the 2 revisions, then use the diff viewer to compare the two blame files.
- Alterações de Autoria
Select one revision in the top pane, then pick one file in the bottom pane and select → . This will fetch the blame data for the selected revision and the previous revision, then use the diff viewer to compare the two blame files.
- Comparar e Responsabilizar com a Referência BASE
Show the log for a single file, and in the top pane, select a single revision, then select → . This will fetch the blame data for the selected revision, and for the file in the working BASE, then use the diff viewer to compare the two blame files.
Sometimes you need to work directly on the repository, without having a working copy. That's what the Repository Browser is for. Just as the explorer and the icon overlays allow you to view your working copy, so the Repository Browser allows you to view the structure and status of the repository.
With the Repository Browser you can execute commands like copy, move, rename, ... directly on the repository.
The repository browser looks very similar to the Windows explorer, except that it is showing the content of the repository at a particular revision rather than files on your computer. In the left pane you can see a directory tree, and in the right pane are the contents of the selected directory. At the top of the Repository Browser Window you can enter the URL of the repository and the revision you want to browse.
Folders included with the svn:externals property are also shown in the repository browser. Those folders are shown with a small arrow on them to indicate that they are not part of the repository structure, just links.
Just like Windows explorer, you can click on the column headings in the right pane if you want to set the sort order. And as in explorer there are context menus available in both panes.
O menu de contexto para um arquivo lhe permite:
Abre o arquivo selecionado, tanto com o visualizar padrão para o tipo de arquivo, ou com o programa que você escolheu.
Editar o ficheiro seleccionado. Este irá efectuar checkout numa cópia de trabalho temporário e arrancar o editor por defeito para esse tipo de ficheiro. Quando fechares o programa de edição, se foram guardadas alterações irá aparecer uma caixa de diálogo submeter, permitindo que introduzas um comentário e submetas a alteração.
Mostrar o registo de revisão para esse ficheiro, ou mostra o grafo de todas as revisões, para que possas ver de onde o ficheiro veio.
Responsabilizar o arquivo, para ver quem mudou cada linha e quando.
Checkout de um único ficheiro. Isso cria uma cópia de trabalho “dispersa” que contém apenas este ficheiro.
Apagar ou renomear o arquivo.
Salvar uma cópia não versionada do arquivo para o seu disco.
Copie o URL mostrado na barra de endereços para a área de transferência.
Fazer uma cópia do arquivo, tanto para uma parte diferente do repositório quanto para uma cópia de trabalho roteado no mesmo repositório.
Visualizar/Editar as propriedades do arquivo.
Cria um atalho para que possas rapidamente arrancar de novo o navegador de repositório, a abrir directamente nesta localização.
O menu de contexto lhe permite:
Mostrar a auditoria de revisão para o diretório, ou mostrar o gráfico de todas as revisões para que você possa ver a origem do diretório.
Exportar o diretório para uma cópia local não versionada em seu disco.
Obter o diretório para produzir uma cópia de trabalho local em seu disco.
Criar um novo diretório no repositório.
Adicionar ficheiros e pastas não versionadas directamente para o repositório. Isto é efectivamente a operação importar do Subversion.
Apagar ou renomear o diretório.
Fazer uma cópia do diretório, tanto para uma parte diferente do repositório, ou para uma cópia de trabalho roteada no mesmo diretório. Isto pode também ser usado para criar um ramo/versão sem que seja necessário obter uma cópia de trabalho.
Visualizar/Editar as propriedades do diretório.
Marcar o diretório para comparação. O diretório marcado é mostrado em negrito.
Compare the folder with a previously marked folder, either as a unified diff, or as a list of changed files which can then be visually diffed using the default diff tool. This can be particularly useful for comparing two tags, or trunk and branch to see what changed.
Se você selecionar dois diretório no painel direito, você poderá ver as diferenças tanto como um arquivo unificado de diferenças, ou também como uma lista de arquivos a qual pode ser visualmente comparados usando a ferramenta padrão de diferenciação.
Se você selecionar vários diretórios no painel direito, você poderá obter todos eles de uma vez em um diretório acima em comum.
If you select 2 tags which are copied from the same root (typically /trunk/), you can use → to view the list of revisions between the two tag points.
Reverter recursivamente todas as alterações
You can use F5 to refresh the view as usual. This will refresh everything which is currently displayed. If you want to pre-fetch or refresh the information for nodes which have not been opened yet, use Ctrl-F5. After that, expanding any node will happen instantly without a network delay while the information is fetched.
Você também pode usar o navegador de repositório para operações de arrastar-e-soltar. Se você arrastar um diretório do Windows Explorer para dentro do navegador de repositório, ele será importado para o repositório. Note que se você arrastar múltiplos itens, eles serão importados em submissões individuais.
If you want to move an item within the repository, just left drag it to the new location. If you want to create a copy rather than moving the item, Ctrl-left drag instead. When copying, the cursor has a “plus” symbol on it, just as it does in Explorer.
If you want to copy/move a file or folder to another location and also give it a new name at the same time, you can right drag or Ctrl-right drag the item instead of using left drag. In that case, a rename dialog is shown where you can enter a new name for the file or folder.
Whenever you make changes in the repository using one of these methods, you will be presented with a log message entry dialog. If you dragged something by mistake, this is also your chance to cancel the action.
Sometimes when you try to open a path you will get an error message in place of the item details. This might happen if you specified an invalid URL, or if you don't have access permission, or if there is some other server problem. If you need to copy this message to include it in an email, just right click on it and use → , or simply use Ctrl+C.
Bookmarked urls/repositories are shown below the current repository folders in the left tree view. You can add entries there by right clicking on any file or folder and select → . Clicking on a bookmark will browse to that repository and file/folder.
Necessitas, por vezes, de saber de onde os ramos e etiquetas foram retirados do trunk, e a forma ideal para visualizar este tipo de informação é um grafo ou uma estrutura em árvore. É quando necessitas de usar →
This command analyses the revision history and attempts to create a tree showing the points at which copies were taken, and when branches/tags were deleted.
Importante
De modo a gerar o grafo, o TortoiseSVN precisa de carregar da raiz do repositório todas as mensagens de registo. Não será necessário dizer que isto irá levar vários minutos, mesmo com um repositório com alguns milhares de revisões, dependendo da rapidez do servidor, largura de banda da rede, etc. Se tentares isto com algo como o projecto Apache, que actualmente tem acima de 500.000 revisões, poderás ter de esperar por algum tempo.
The good news is that if you are using log caching, you only have to suffer this delay once. After that, log data is held locally. Log caching is enabled in TortoiseSVN's settings.
Cada nó do grafo de revisões representa uma revisão no repositório onde algo foi alterado, na árvore que estás a observar. Diferentes tipos de nós podem ser distinguidos através da forma e cor. As formas são fixas, mas as cores podem ser alteradas usando →
- Itens adicionados ou copiados
Items which have been added, or created by copying another file/folder are shown using a rounded rectangle. The default colour is green. Tags and trunks are treated as a special case and use a different shade, depending on the → .
- Itens excluídos
Deleted items e.g. a branch which is no longer required, are shown using an octagon (rectangle with corners cut off). The default colour is red.
- Itens renomeados
Renamed items are also shown using an octagon, but the default colour is blue.
- Dica da revisão do ramo
O grafo está normalmente restringido a mostrar pontos de ramo, mas é também útil e comum, ter a possibilidade de ver a respectiva revisão HEAD para cada ramo. Se seleccionares Mostrar revisões HEAD, cada nó de revisão HEAD será mostrado como uma elipse. De notar que a HEAD aqui refere-se à última revisão submetida nesse caminho e não a revisão HEAD do repositório
- Revisão da cópia de trabalho
Se invocaste o gráfico de revisões a partir da cópia de trabalho poderás optar por mostrar a revisão BASE no grafo usando Show WC revision, que marca o nó BASE com uma moldura a negrito.
- Cópia de trabalho modificada
Se invocaste o grafo de revisões a partir de uma cópia de trabalho podes optar por mostrar um nó adicional, que representa a cópia de trabalho modificada usando Mostrar modificações do WC. Este será um nó elíptico com uma moldura a negrito, em vermelho por defeito.
- Item normal
Todos os outros itens são apresentados usando um retângulo plano.
De notar que por defeito, o grafo só mostra os pontos onde itens foram adicionados, copiados ou removidos. Mostrando cada revisão do projecto irá gerar um grafo muito extenso para casos não triviais. Se queres realmente ver todas as revisões onde foram feitas alterações, existe uma opção para o fazer no menu Ver e na barra de ferramentas.
A vista por defeito (sem agrupamento) coloca os nós de modo que a sua posição vertical fique na ordem estrita de revisões, para que tenhas uma dica visual da ordem em que as coisas foram feitas. Quando estão na mesma coluna dois nós, a ordem é muito óbvia. Quando estão em colunas adjacentes dois nós, o deslocamento é muito menor porque não há necessidade de evitar que os nós se sobreponham, e como resultado a ordem é um pouco menos óbvia. Tais optimizações são necessárias de modo a manter a complexidade dos grafos numa dimensão aceitável. Ter em atenção que esta ordenação usa o canto do nó no lado mais antigo como referência, i.e. o canto inferior do nó, quando o grafo é mostrado com os nós mais antigos no fundo. O canto de referência é significativo porque todas as formas de nós não são da mesma altura.
Because a revision graph is often quite complex, there are a number of features which can be used to tailor the view the way you want it. These are available in the View menu and from the toolbar.
- Agrupar ramos
O comportamento por defeito (sem agrupamento) é ter todas as linhas ordenadas estrictamente por revisão. Como resultado, ramos com vida longa e submissões dispersas, ocupam uma coluna inteira para apenas poucas alterações tornando o grafo muito amplo.
Este modo agrupa alterações por ramo, pelo que não existe uma ordenação global por revisão: Revisões consecutivas num ramo serão (usualmente) mostradas em linhas consecutivas. No entanto, sub-ramos serão ordenados de tal maneira que ramos posteriores serão mostrados na mesma coluna, acima de ramos anteriores, de modo a manter o grafo estreito. Como resultado, uma dada linha poderá conter alterações de diferentes revisões.
- Mais antigo primeiro
Normalmente o grafo mostra a revisão mais antiga no fundo e a árvore cresce para cima. Usa esta opção para em alternativa crescer para baixo a partir do topo
- Alinhar árvores pelo topo
Quando um grafo está partido em várias árvores pequenas, as árvores podem aparecer na ordem natural de revisão ou alinhadas no fundo da janela, dependendo se estás a usar a opção Agrupar ramos. Usa esta opção para todas as árvores em alternativa crescerem a partir do topo.
- Reduzir linhas cruzadas
Esta opção está normalmente activada e evita o mostrar do grafo com muitas e confusas linhas cruzadas. No entanto isso poderá fazer com que as colunas do layout apareçam em sítios menos lógicos, por exemplo numa linha diagonal em vez de em coluna, e o grafo poderá requerer uma área maior para ser desenhado. Se isso for um problema poderás desactivar a opção a partir do menu Vista.
- Diferença em nome dos path
Long path names can take a lot of space and make the node boxes very large. Use this option to show only the changed part of a path, replacing the common part with dots. E.g. if you create a branch
/branches/1.2.x/doc/htmlfrom/trunk/doc/htmlthe branch could be shown in compact form as/branches/1.2.x/..because the last two levels,docandhtml, did not change.- Mostrar todas as revisões
Isto faz apenas aquilo que estás á espera, e mostra cada revisão em que algo (na árvore em que estás a construir o grafo) foi alterado. Para históricos longos isto pode produzir um grafo realmente gigante.
- Mostrar revisões ATUAIS
Isto assegura que a última revisão de cada ramo é sempre mostrada no grafo.
- Cópia exata dos códigos
When a branch/tag is made, the default behaviour is to show the branch as taken from the last node where a change was made. Strictly speaking this is inaccurate since the branches are often made from the current HEAD rather than a specific revision. So it is possible to show the more correct (but less useful) revision that was used to create the copy. Note that this revision may be younger than the HEAD revision of the source branch.
- Rótulo duplicado
Quando um projecto tem muitas etiquetas, o mostrar cada etiqueta como um nó separado no grafo ocupará muito espaço e obscurecerá, a mais interessante, estrutura de de ramos de desenvolvimento. Ao mesmo tempo deverás ter a possibilidade de aceder facilmente ao conteúdo da etiqueta, para que possas comparar revisões. Esta opção esconde os nós das etiquetas, e mostra-as em alternativa na tooltip do nó de onde foram copiadas. O ícone de etiqueta no lado direito do nó fonte indica que foram feitas etiquetas. Isto simplifica bastante a vista.
Nota que, se uma etiqueta for utilizada em si como uma fonte para obter uma cópia, talvez um novo ramo baseado numa etiqueta, então essa etiqueta será mostrada como um nó separado em vez de dobrado.
- Ocultar caminhos apagados
Hides paths which are no longer present at the HEAD revision of the repository, e.g. deleted branches.
Se seleccionaste a opção Dobrar etiquetas, então será mostrado um ramo removido, a partir do qual foram criadas as etiquetas, de outro modo as etiquetas também desapareceriam. A última revisão que foi etiquetada será mostrada na cor usada para os nós removidos, em vez de mostra uma revisão removida à parte.
Se seleccionares a opção Ocultar etiquetas, em seguida, esses ramos vão desaparecer, visto que não são necessários para mostrar as etiquetas.
- Esconder ramos não utilizados
Hides branches where no changes were committed to the respective file or sub-folder. This does not necessarily indicate that the branch was not used, just that no changes were made to this part of it.
- Mostrar revisão da CT
Marca no grafo a revisão que corresponde à revisão actualizada do item, para o qual obtiveste o grafo. Se acabaste de actualizar, esta será a revisão HEAD, mas se outros submeteram alterações desde a tua última actualização, a tua CT poderá estar algumas revisões abaixo da HEAD. O nó é marcado com uma moldura a negrito.
- Mostrar modificações da CT
Se a tua CT contém alterações locais, esta opção desenha-as como um nó elíptico separado e ligado ao nó a que a tua CT foi pela última vez actualizada. A cor de contorno por defeito é o vermelho. Para capturar as alterações mais recentes, poderás necessitar de refrescar o grafo usando F5.
- Filtro
Por vezes o grafo de revisões contém mais revisões do que aquelas que queres ver. Esta opção abre a caixa de diálogo que permite restringir o intervalo de revisões mostradas e esconder caminhos particulares pelo nome.
Se esconderes um caminho em particular e esse nó tiver nós filho, os filhos serão mostrados como uma árvore separada. Se quiseres também esconder todos os filhos usa a caixa de verificação Remover as sub-árvore(s) completas.
- Tree stripes
Quando o grafo contém várias árvores, é por vezes útil usar cores de fundo alternadas para ajudar à distinção entre elas.
- Exibir visão geral
Mostra uma pequena figura do grafo inteiro com a janela da vista corrente como um rectângulo que podes arrastar. Isto permite-te navegar pelo grafo de forma mais fácil. De notar que para grafos muito grandes a visão global pode-se tornar inutil, devido ao factor de ampliação (zoom) extremo, e por isso não ser mostrado nesses casos.
To make it easier to navigate a large graph, use the overview window. This shows the entire graph in a small window, with the currently displayed portion highlighted. You can drag the highlighted area to change the displayed region.
The revision date, author and comments are shown in a hint box whenever the mouse hovers over a revision box.
If you select two revisions (Use Ctrl-left click), you can use the context menu to show the differences between these revisions. You can choose to show differences as at the branch creation points, but usually you will want to show the differences at the branch end points, i.e. at the HEAD revision.
You can view the differences as a Unified-Diff file, which shows all differences in a single file with minimal context. If you opt to → you will be presented with a list of changed files. Double click on a file name to fetch both revisions of the file and compare them using the visual difference tool.
If you right click on a revision you can use → to view the history.
You can also merge changes in the selected revision(s) into a different working copy. A folder selection dialog allows you to choose the working copy to merge into, but after that there is no confirmation dialog, nor any opportunity to try a test merge. It is a good idea to merge into an unmodified working copy so that you can revert the changes if it doesn't work out! This is a useful feature if you want to merge selected revisions from one branch to another.
Aprenda a Ler o Gráfico de Revisões
First-time users may be surprised by the fact that the revision graph shows something that does not match the user's mental model. If a revision changes multiple copies or branches of a file or folder, for instance, then there will be multiple nodes for that single revision. It is a good practice to start with the leftmost options in the toolbar and customize the graph step-by-step until it comes close to your mental model.
All filter options try lose as little information as possible. That may cause some nodes to change their color, for instance. Whenever the result is unexpected, undo the last filter operation and try to understand what is special about that particular revision or branch. In most cases, the initially expected outcome of the filter operation would either be inaccurate or misleading.
If you want to check the server again for newer information, you can simply refresh the view using F5. If you are using the log cache (enabled by default), this will check the repository for newer commits and fetch only the new ones. If the log cache was in offline mode, this will also attempt to go back online.
If you are using the log cache and you think the message content or author may have changed, you should use the log dialog to refresh the messages you need. Since the revision graph works from the repository root, we would have to invalidate the entire log cache, and refilling it could take a very long time.
A large tree can be difficult to navigate and sometimes you will want to hide parts of it, or break it down into a forest of smaller trees. If you hover the mouse over the point where a node link enters or leaves the node you will see one or more popup buttons which allow you to do this.

Click on the minus button to collapse the attached sub-tree.

Click on the plus button to expand a collapsed tree. When a tree has been collapsed, this button remains visible to indicate the hidden sub-tree.

Click on the cross button to split the attached sub-tree and show it as a separate tree on the graph.

Click on the circle button to reattach a split tree. When a tree has been split away, this button remains visible to indicate that there is a separate sub-tree.
Click on the graph background for the main context menu, which offers options to Expand all and Join all. If no branch has been collapsed or split, the context menu will not be shown.
Sometimes you may want a clean copy of your working tree without the .svn directory, e.g. to create a zipped tarball of your source, or to export to a web server. Instead of making a copy and then deleting the .svn directory manually, TortoiseSVN offers the command → . Exporting from a URL and exporting from a working copy are treated slightly differently.
If you execute this command on an unversioned folder, TortoiseSVN will assume that the selected folder is the target, and open a dialog for you to enter the URL and revision to export from. This dialog has options to export only the top level folder, to omit external references, and to override the line end style for files which have the svn:eol-style property set.
Of course you can export directly from the repository too. Use the Repository Browser to navigate to the relevant subtree in your repository, then use → . You will get the Export from URL dialog described above.
If you execute this command on your working copy you'll be asked for a place to save the clean working copy without the .svn folder. By default, only the versioned files are exported, but you can use the Export unversioned files too checkbox to include any other unversioned files which exist in your WC and not in the repository. External references using svn:externals can be omitted if required.
Another way to export from a working copy is to right drag the working copy folder to another location and choose → or → or → . The second option includes the unversioned files as well. The third option exports only modified items, but maintains the folder structure.
When exporting from a working copy, if the target folder already contains a folder of the same name as the one you are exporting, you will be given the option to overwrite the existing content, or to create a new folder with an automatically generated name, e.g. Target (1).
Exportando um arquivo apenas
The export dialog does not allow exporting single files, even though Subversion can.
To export single files with TortoiseSVN, you have to use the repository browser (“O Navegador de Repositório”). Simply drag the file(s) you want to export from the repository browser to where you want them in the explorer, or use the context menu in the repository browser to export the files.
Exportando um Conjunto de Alterações
If you want to export a copy of your project tree structure but containing only the files which have changed in a particular revision, or between any two revisions, use the compare revisions feature described in “Comparando Diretórios”.
If you want to export your working copy tree structure but containing only the files which are locally modified, refer to SVN Export changed items here above.
Por vezes terás uma cópia de trabalho que pretendes converter de volta para uma pasta normal, ou seja, sem a pasta .svn. Tudo o que precisarás de fazer é apagar a pasta .svn da raiz da tua cópia de trabalho.
Alternatively you can export the folder to itself. In Windows Explorer right drag the working copy root folder from the file pane onto itself in the folder pane. TortoiseSVN detects this special case and asks if you want to make the working copy unversioned. If you answer yes the control directory will be removed and you will have a plain, unversioned directory tree.
Se o teu repositório, por alguma razão, mudou a sua localização (IP/URL). Talvez estejas mesmo preso e não possas aprovar e não queres verificar a tua cópia funcional novamente a partir do novo local e para mover todos os teus dados alterados de volta para a nova cópia funcional, → é o comando que estás á procura. Ele basicamente faz muito pouco: ele reescreve todos os URLs que estão associados com cada arquivo e pasta com a nova URL.
Nota
This operation only works on working copy roots. So the context menu entry is only shown for working copy roots.
You may be surprised to find that TortoiseSVN contacts the repository as part of this operation. All it is doing is performing some simple checks to make sure that the new URL really does refer to the same repository as the existing working copy.
Atenção
This is a very infrequently used operation. The relocate command is only used if the URL of the repository root has changed. Possible reasons are:
O endereço IP do servidor foi modificado.
O protocolo foi modificado (e.g. http:// to https://).
O diretório raiz do repositório no servidor configurado foi modificado.
Put another way, you need to relocate when your working copy is referring to the same location in the same repository, but the repository itself has moved.
Isto não se aplica se:
You want to move to a different Subversion repository. In that case you should perform a clean checkout from the new repository location.
You want to switch to a different branch or directory within the same repository. To do that you should use → . Read “Para Obter ou Alternar” for more information.
If you use relocate in either of the cases above, it will corrupt your working copy and you will get many unexplainable error messages while updating, committing, etc. Once that has happened, the only fix is a fresh checkout.
It is very common in Software Development for changes to be related to a specific bug or issue ID. Users of bug tracking systems (issue trackers) would like to associate the changes they make in Subversion with a specific ID in their issue tracker. Most issue trackers therefore provide a pre-commit hook script which parses the log message to find the bug ID with which the commit is associated. This is somewhat error prone since it relies on the user to write the log message properly so that the pre-commit hook script can parse it correctly.
TortoiseSVN pode ajudar o usuário de duas maneiras:
When the user enters a log message, a well defined line including the issue number associated with the commit can be added automatically. This reduces the risk that the user enters the issue number in a way the bug tracking tools can't parse correctly.
Or TortoiseSVN can highlight the part of the entered log message which is recognized by the issue tracker. That way the user knows that the log message can be parsed correctly.
When the user browses the log messages, TortoiseSVN creates a link out of each bug ID in the log message which fires up the browser to the issue mentioned.
You can integrate a bug tracking tool of your choice in TortoiseSVN. To do this, you have to define some properties, which start with bugtraq:. They must be set on Folders: (“Configurações do Projeto”)
Quando editas qualquer uma das propriedades do bugtraq, um editor de propriedade especial será usado para tornar mais fácil definir os valores adequados.
There are two ways to integrate TortoiseSVN with issue trackers. One is based on simple strings, the other is based on regular expressions. The properties used by both approaches are:
- bugtraq:url
Set this property to the URL of your bug tracking tool. It must be properly URI encoded and it has to contain
%BUGID%.%BUGID%is replaced with the Issue number you entered. This allows TortoiseSVN to display a link in the log dialog, so when you are looking at the revision log you can jump directly to your bug tracking tool. You do not have to provide this property, but then TortoiseSVN shows only the issue number and not the link to it. e.g the TortoiseSVN project is usinghttp://issues.tortoisesvn.net/?do=details&id=%BUGID%.You can also use relative URLs instead of absolute ones. This is useful when your issue tracker is on the same domain/server as your source repository. In case the domain name ever changes, you don't have to adjust the
bugtraq:urlproperty. There are two ways to specify a relative URL:If it begins with the string
^/it is assumed to be relative to the repository root. For example,^/../?do=details&id=%BUGID%will resolve tohttps://tortoisesvn.net/?do=details&id=%BUGID%if your repository is located onhttps://tortoisesvn.net/svn/trunk/.A URL beginning with the string
/is assumed to be relative to the server's hostname. For example/?do=details&id=%BUGID%will resolve tohttps://tortoisesvn.net/?do=details&id=%BUGID%if your repository is located anywhere onhttps://tortoisesvn.net.- bugtraq:warnifnoissue
Set this to
true, if you want TortoiseSVN to warn you because of an empty issue-number text field. Valid values aretrue/false. If not defined,falseis assumed.
In the simple approach, TortoiseSVN shows the user a separate input field where a bug ID can be entered. Then a separate line is appended/prepended to the log message the user entered.
- bugtraq:message
This property activates the bug tracking system in Input field mode. If this property is set, then TortoiseSVN will prompt you to enter an issue number when you commit your changes. It's used to add a line at the end of the log message. It must contain
%BUGID%, which is replaced with the issue number on commit. This ensures that your commit log contains a reference to the issue number which is always in a consistent format and can be parsed by your bug tracking tool to associate the issue number with a particular commit. As an example you might useIssue : %BUGID%, but this depends on your Tool.- bugtraq:label
This text is shown by TortoiseSVN on the commit dialog to label the edit box where you enter the issue number. If it's not set,
Bug-ID / Issue-Nr:will be displayed. Keep in mind though that the window will not be resized to fit this label, so keep the size of the label below 20-25 characters.- bugtraq:number
If set to
trueonly numbers are allowed in the issue-number text field. An exception is the comma, so you can comma separate several numbers. Valid values aretrue/false. If not defined,trueis assumed.- bugtraq:append
This property defines if the bug-ID is appended (true) to the end of the log message or inserted (false) at the start of the log message. Valid values are
true/false. If not defined,trueis assumed, so that existing projects don't break.
In the approach with regular expressions, TortoiseSVN doesn't show a separate input field but marks the part of the log message the user enters which is recognized by the issue tracker. This is done while the user writes the log message. This also means that the bug ID can be anywhere inside a log message! This method is much more flexible, and is the one used by the TortoiseSVN project itself.
- bugtraq:logregex
This property activates the bug tracking system in Regex mode. It contains either a single regular expressions, or two regular expressions separated by a newline.
If two expressions are set, then the first expression is used as a pre-filter to find expressions which contain bug IDs. The second expression then extracts the bare bug IDs from the result of the first regex. This allows you to use a list of bug IDs and natural language expressions if you wish. e.g. you might fix several bugs and include a string something like this: “This change resolves issues #23, #24 and #25”.
If you want to catch bug IDs as used in the expression above inside a log message, you could use the following regex strings, which are the ones used by the TortoiseSVN project:
[Ii]ssues?:?(\s*(,|and)?\s*#\d+)+and(\d+).The first expression picks out “issues #23, #24 and #25” from the surrounding log message. The second regex extracts plain decimal numbers from the output of the first regex, so it will return “23”, “24” and “25” to use as bug IDs.
Breaking the first regex down a little, it must start with the word “issue”, possibly capitalised. This is optionally followed by an “s” (more than one issue) and optionally a colon. This is followed by one or more groups each having zero or more leading whitespace, an optional comma or “and” and more optional space. Finally there is a mandatory “#” and a mandatory decimal number.
If only one expression is set, then the bare bug IDs must be matched in the groups of the regex string. Example:
[Ii]ssue(?:s)? #?(\d+)This method is required by a few issue trackers, e.g. trac, but it is harder to construct the regex. We recommend that you only use this method if your issue tracker documentation tells you to.If you are unfamiliar with regular expressions, take a look at the introduction at https://en.wikipedia.org/wiki/Regular_expression, and the online documentation and tutorial at http://www.regular-expressions.info/.
Não é sempre fácil obter a regex correcta, pelo que para dar ajudar, existe uma caixa de diálogo de teste embebida na caixa de diálogo de propriedades do bugtraq. Clica no botão à direita das caixas de edição para o mostrar. Aqui podes introduzir algum texto, e alterar cada regex para veres os resultados. Se a regex for inválida o fundo da caixa de edição muda para vermelho.
If both the bugtraq:message and bugtraq:logregex properties are set, logregex takes precedence.
Dica
Even if you don't have an issue tracker with a pre-commit hook parsing your log messages, you still can use this to turn the issues mentioned in your log messages into links!
And even if you don't need the links, the issue numbers show up as a separate column in the log dialog, making it easier to find the changes which relate to a particular issue.
Some tsvn: properties require a true/false value. TortoiseSVN also understands yes as a synonym for true and no as a synonym for false.
Definir as Propriedades em um Diretório
These properties must be set on folders for the system to work. When you commit a file or folder the properties are read from that folder. If the properties are not found there, TortoiseSVN will search upwards through the folder tree to find them until it comes to an unversioned folder, or the tree root (e.g. C:\) is found. If you can be sure that each user checks out only from e.g trunk/ and not some sub-folder, then it's enough if you set the properties on trunk/. If you can't be sure, you should set the properties recursively on each sub-folder. A property setting deeper in the project hierarchy overrides settings on higher levels (closer to trunk/).
As of version 1.8, TortoiseSVN and Subversion use so called inherited properties, which means a property that is set on a folder is automatically also implicitly set on all subfolders. So there's no need to set the properties on all folders anymore but only on the root folder.
For project properties only, i.e. tsvn:, bugtraq: and webviewer: you can use the Recursive checkbox to set the property to all sub-folders in the hierarchy, without also setting it on all files.
When you add new sub-folders to a working copy using TortoiseSVN, any project properties present in the parent folder will automatically be added to the new child folder too.
Nenhuma Informação do Rastreador de Reportes no Navegador de Repositório
Because the issue tracker integration depends upon accessing Subversion properties, you will only see the results when using a checked out working copy. Fetching properties remotely is a slow operation, so you will not see this feature in action from the repo browser unless you started the repo browser from your working copy. If you started the repo browser by entering the URL of the repository you won't see this feature.
Pela mesma razão, as propriedades do projeto não se propagarão automaticamente quando são adicionadas pastas filhas através do navegador da repo
This issue tracker integration is not restricted to TortoiseSVN; it can be used with any Subversion client. For more information, read the full Issue Tracker Integration Specification in the TortoiseSVN source repository. (“Licença” explains how to access the repository.)
The previous section deals with adding issue information to the log messages. But what if you need to get information from the issue tracker? The commit dialog has a COM interface which allows integration an external program that can talk to your tracker. Typically you might want to query the tracker to get a list of open issues assigned to you, so that you can pick the issues that are being addressed in this commit.
Any such interface is of course highly specific to your issue tracker system, so we cannot provide this part, and describing how to create such a program is beyond the scope of this manual. The interface definition and sample plugins in C# and C++/ATL can be obtained from the contrib folder in the TortoiseSVN repository. (“Licença” explains how to access the repository.) A summary of the API is also given in Capítulo 7, IBugtraqProvider interface. Another (working) example plugin in C# is Gurtle which implements the required COM interface to interact with the Google Code issue tracker.
For illustration purposes, let's suppose that your system administrator has provided you with an issue tracker plugin which you have installed, and that you have set up some of your working copies to use the plugin in TortoiseSVN's settings dialog. When you open the commit dialog from a working copy to which the plugin has been assigned, you will see a new button at the top of the dialog.
In this example you can select one or more open issues. The plugin can then generate specially formatted text which it adds to your log message.
There are several web-based repository viewers available for use with Subversion such as ViewVC and WebSVN. TortoiseSVN provides a means to link with these viewers.
You can integrate a repo viewer of your choice in TortoiseSVN. To do this, you have to define some properties which define the linkage. They must be set on Folders: (“Configurações do Projeto”)
- webviewer:revision
Set this property to the URL of your repo viewer to view all changes in a specific revision. It must be properly URI encoded and it has to contain
%REVISION%.%REVISION%is replaced with the revision number in question. This allows TortoiseSVN to display a context menu entry in the log dialog → .- webviewer:pathrevision
Set this property to the URL of your repo viewer to view changes to a specific file in a specific revision. It must be properly URI encoded and it has to contain
%REVISION%and%PATH%.%PATH%is replaced with the path relative to the repository root. This allows TortoiseSVN to display a context menu entry in the log dialog → For example, if you right click in the log dialog bottom pane on a file entry/trunk/src/filethen the%PATH%in the URL will be replaced with/trunk/src/file.
You can also use relative URLs instead of absolute ones. This is useful in case your web viewer is on the same domain/server as your source repository. In case the domain name ever changes, you don't have to adjust the webviewer:revision and webviewer:pathrevision property. The format is the same as for the bugtraq:url property. See “Integração com Sistemas de Rastreamento de Erros / Rastreadores de Reportes”.
Definir as Propriedades em um Diretório
These properties must be set on folders for the system to work. When you commit a file or folder the properties are read from that folder. If the properties are not found there, TortoiseSVN will search upwards through the folder tree to find them until it comes to an unversioned folder, or the tree root (e.g. C:\) is found. If you can be sure that each user checks out only from e.g trunk/ and not some sub-folder, then it's enough if you set the properties on trunk/. If you can't be sure, you should set the properties recursively on each sub-folder. A property setting deeper in the project hierarchy overrides settings on higher levels (closer to trunk/).
For project properties only, i.e. tsvn:, bugtraq: and webviewer: you can use the Recursive checkbox to set the property to all sub-folders in the hierarchy, without also setting it on all files.
When you add new sub-folders to a working copy using TortoiseSVN, any project properties present in the parent folder will automatically be added to the new child folder too.
Limitações Usando o Navegador de Repositório
Because the repo viewer integration depends upon accessing Subversion properties, you will only see the results when using a checked out working copy. Fetching properties remotely is a slow operation, so you will not see this feature in action from the repo browser unless you started the repo browser from your working copy. If you started the repo browser by entering the URL of the repository you won't see this feature.
Pela mesma razão, as propriedades do projeto não se propagarão automaticamente quando são adicionadas pastas filhas através do navegador da repo
To find out what the different settings are for, just leave your mouse pointer a second on the editbox/checkbox... and a helpful tooltip will popup.
This dialog allows you to specify your preferred language, and the Subversion-specific settings.
- Idioma
Selects your user interface language. Of course, you have to install the corresponding language pack first to get another UI language than the default English one.
- Verificar atualizações
TortoiseSVN will contact its download site periodically to see if there is a newer version of the program available. If there is it will show a notification link in the commit dialog. Use if you want an answer right away. The new version will not be downloaded; you simply receive an information dialog telling you that the new version is available.
- Sons do sistema
TortoiseSVN has three custom sounds which are installed by default.
Error
Notificação
Aviso
You can select different sounds (or turn these sounds off completely) using the Windows Control Panel. is a shortcut to the Control Panel.
- Usar caixas de diálogo Aero
No Windows Vista e sistemas posteriores, isto controla se as caixas de diálogo usam o estilo Aero.
- Criar Biblioteca
No Windows 7 podes criar uma biblioteca na qual agrupas cópias de trabalho que estão espalhadas por vários locais do teu sistema.
- Padrão global para ignorar
Global ignore patterns are used to prevent unversioned files from showing up e.g. in the commit dialog. Files matching the patterns are also ignored by an import. Ignore files or directories by typing in the names or extensions. Patterns are separated by spaces e.g.
bin obj *.bak *.~?? *.jar *.[Tt]mp. These patterns should not include any path separators. Note also that there is no way to differentiate between files and directories. Read “Padrões de Filtro na Lista de Arquivos Ignorados” for more information on the pattern-matching syntax.Note that the ignore patterns you specify here will also affect other Subversion clients running on your PC, including the command line client.
Cuidado
If you use the Subversion configuration file to set a
global-ignorespattern, it will override the settings you make here. The Subversion configuration file is accessed using the as described below.This ignore pattern will affect all your projects. It is not versioned, so it will not affect other users. By contrast you can also use the versioned
svn:ignoreorsvn:global-ignoresproperty to exclude files or directories from version control. Read “Ignorando Arquivos e Diretórios” for more information.- Altera as datas dos arquivos para “hora da última submissão”
This option tells TortoiseSVN to set the file dates to the last commit time when doing a checkout or an update. Otherwise TortoiseSVN will use the current date. If you are developing software it is generally best to use the current date because build systems normally look at the date stamps to decide which files need compiling. If you use “last commit time” and revert to an older file revision, your project may not compile as you expect it to.
- Arquivo de configuração do Subversion
Use to edit the Subversion configuration file directly. Some settings cannot be modified directly by TortoiseSVN, and need to be set here instead. For more information about the Subversion
configfile see the Runtime Configuration Area. The section on Automatic Property Setting is of particular interest, and that is configured here. Note that Subversion can read configuration information from several places, and you need to know which one takes priority. Refer to Configuration and the Windows Registry to find out more.- Ao actualizar aplica alterações locais ao svn:externals
Esta opção diz ao TortoiseSVN para aplicar sempre alterações locais à propriedade
svn:externalsao actualizar a cópia de trabalho.
This page allows you to specify which of the TortoiseSVN context menu entries will show up in the main context menu, and which will appear in the TortoiseSVN submenu. By default most items are unchecked and appear in the submenu.
There is a special case for Get Lock. You can of course promote it to the top level using the list above, but as most files don't need locking this just adds clutter. However, a file with the svn:needs-lock property needs this action every time it is edited, so in that case it is very useful to have at the top level. Checking the box here means that when a file is selected which has the svn:needs-lock property set, Get Lock will always appear at the top level.
Most of the time, you won't need the TortoiseSVN context menu, apart for folders that are under version control by Subversion. For non- versioned folders, you only really need the context menu when you want to do a checkout. If you check the option Hide menus for unversioned paths , TortoiseSVN will not add its entries to the context menu for unversioned folders. But the entries are added for all items and paths in a versioned folder. And you can get the entries back for unversioned folders by holding the Shift key down while showing the context menu.
If there are some paths on your computer where you just don't want TortoiseSVN's context menu to appear at all, you can list them in the box at the bottom.
This dialog allows you to configure some of TortoiseSVN's dialogs the way you like them.
- Número padrão de mensagens de log
Limits the number of log messages that TortoiseSVN fetches when you first select → Useful for slow server connections. You can always use or to get more messages.
- Fonte para mensagens de log
Selects the font face and size used to display the log message itself in the middle pane of the Revision Log dialog, and when composing log messages in the Commit dialog.
- Formato curto de data / hora no histórico
If the standard long messages use up too much space on your screen use the short format.
- Duplo-clique na lista de comentários para comparar com a revisão anterior
If you frequently find yourself comparing revisions in the top pane of the log dialog, you can use this option to allow that action on double click. It is not enabled by default because fetching the diff is often a long process, and many people prefer to avoid the wait after an accidental double click, which is why this option is not enabled by default.
- Fechamento Automático
TortoiseSVN can automatically close all progress dialogs when the action is finished without error. This setting allows you to select the conditions for closing the dialogs. The default (recommended) setting is Close manually which allows you to review all messages and check what has happened. However, you may decide that you want to ignore some types of message and have the dialog close automatically if there are no critical changes.
Auto-close if no merges, adds or deletes means that the progress dialog will close if there were simple updates, but if changes from the repository were merged with yours, or if any files were added or deleted, the dialog will remain open. It will also stay open if there were any conflicts or errors during the operation.
Auto-close if no conflicts relaxes the criteria further and will close the dialog even if there were merges, adds or deletes. However, if there were any conflicts or errors, the dialog remains open.
Auto-close if no errors always closes the dialog even if there were conflicts. The only condition that keeps the dialog open is an error condition, which occurs when Subversion is unable to complete the task. For example, an update fails because the server is inaccessible, or a commit fails because the working copy is out-of-date.
- Sempre fechar as janelas para operações locais
Local operations like adding files or reverting changes do not need to contact the repository and complete quickly, so the progress dialog is often of little interest. Select this option if you want the progress dialog to close automatically after these operations, unless there are errors.
- Usar lixeira para fazer reversão
When you revert local modifications, your changes are discarded. TortoiseSVN gives you an extra safety net by sending the modified file to the recycle bin before bringing back the pristine copy. If you prefer to skip the recycle bin, uncheck this option.
- Use URL of WC as the default “From:” URL
In the merge dialog, the default behaviour is for the From: URL to be remembered between merges. However, some people like to perform merges from many different points in their hierarchy, and find it easier to start out with the URL of the current working copy. This can then be edited to refer to a parallel path on another branch.
- Caminho padrão de envio:
You can specify the default path for checkouts. If you keep all your checkouts in one place, it is useful to have the drive and folder pre-filled so you only have to add the new folder name to the end.
- Default checkout URL
You can also specify the default URL for checkouts. If you often checkout sub-projects of some very large project, it can be useful to have the URL pre-filled so you only have to add the sub-project name to the end.
- Usar recursividade nas pastas não versionadas
If this box is checked (default state), then whenever the status of an unversioned folder is shown in the Add, Commit or Check for Modifications dialog, every child file and folder is also shown. If you uncheck this box, only the unversioned parent is shown. Unchecking reduces clutter in these dialogs. In that case if you select an unversioned folder for Add, it is added recursively.
In the Check for Modifications dialog you can opt to see ignored items. If this box is checked then whenever an ignored folder is found, all child items will be shown as well.
- Usar autocompletar para caminhos de arquivo e palavras-chave
The commit dialog includes a facility to parse the list of filenames being committed. When you type the first 3 letters of an item in the list, the auto-completion box pops up, and you can press Enter to complete the filename. Check the box to enable this feature.
- Tempo limite, em segundos, para parar a interpretação do autocompletar
The auto-completion parser can be quite slow if there are a lot of large files to check. This timeout stops the commit dialog being held up for too long. If you are missing important auto-completion information, you can extend the timeout.
- Only use spellchecker when
tsvn:projectlanguageis set If you don't wish to use the spellchecker for all commits, check this box. The spellchecker will still be enabled where the project properties require it.
- Máximo de itens no histórico de mensagens de log
When you type in a log message in the commit dialog, TortoiseSVN stores it for possible re-use later. By default it will keep the last 25 log messages for each repository, but you can customize that number here. If you have many different repositories, you may wish to reduce this to avoid filling your registry.
Note that this setting applies only to messages that you type in on this computer. It has nothing to do with the log cache.
- Selecionar itens automaticamente
The normal behaviour in the commit dialog is for all modified (versioned) items to be selected for commit automatically. If you prefer to start with nothing selected and pick the items for commit manually, uncheck this box.
- Abrir novamente a janela depois de submeter se houver itens não submetidos
This reopens the commit dialog automatically at the same directory after a successful commit. The dialog is reopened only if there still are items left to commit.
- Conectar ao repositório ao inicializar
The Check for Modifications dialog checks the working copy by default, and only contacts the repository when you click . If you always want to check the repository, you can use this setting to make that action happen automatically.
- Mostrar janela de Bloqueio antes de bloquear arquivos
When you select one or more files and then use → to take out a lock on those files, on some projects it is customary to write a lock message explaining why you have locked the files. If you do not use lock messages, you can uncheck this box to skip that dialog and lock the files immediately.
If you use the lock command on a folder, you are always presented with the lock dialog as that also gives you the option to select files for locking.
If your project is using the
tsvn:lockmsgminsizeproperty, you will see the lock dialog regardless of this setting because the project requires lock messages.
Settings for the repository browser:
- Pré-carga dos diretórios por uma navegação mais rápida
Se esta caixa estiver verificada (estado por defeito), o navegador de repositório recolherá informação sobre as pastas visualizadas no plano de fundo. Deste modo, assim que navegares numa dessas pastas, a informação já estará assim disponível.
No entanto, alguns servidores não conseguem lidar com pedidos múltiplos que isto provoca, ou quando não configurado correctamente trata tantos pedidos como algo nefasto e começa a bloqueá-los. Neste caso poderás desactivar a pré-colecta aqui.
- Mostrar externos
Se esta caixa estiver verificada (estado por defeito), o navegador de repositório mostra os ficheiros
Tal como a funcionalidade da pré-colecta exposta acima, esta também pode colocar muito esforço em servidores fracos. Neste caso pode desactivar esta funcionalidade aqui.
There are two versions of shelfing implemented in SVN. Here you can select which version you want to use. Note that changing this setting might require an OS restart to take effect.
- V2
this version is much faster than
V3and is the recommended version to use.However, the speed comes at a prize:
V2does not handle directory changes, and can't handle copies and moves of files.- V3
this is the latest version of the shelfing feature. It can handle changes to directories as well as file moves/copies.
However,
V3is much slower thanV2and can be unusably slow for big repositories or if you have a slow connection to the repository.
Esta janela permite configurar as cores do texto nas janelas do TortoiseSVN de acordo com a sua preferência.
- Possível ou real conflito / obstrução
A conflict has occurred during update, or may occur during merge. Update is obstructed by an existing unversioned file/folder of the same name as a versioned one.
Esta cor é também usada para mensagens de erro em janelas de progresso.
- Arquivos adicionados
Itens adicionados ao repositório.
- Perdido / apagada / substituído
Items deleted from the repository, missing from the working copy, or deleted from the working copy and replaced with another file of the same name.
- Combinado
Changes from the repository successfully merged into the WC without creating any conflicts.
- Modificado / copiado
Add with history, or paths copied in the repository. Also used in the log dialog for entries which include copied items.
- Nó excluído
Um item que foi apagado do repositório.
- Nó adicionado
Um item que foi adicionado ao repositório, por ação de adição, cópia ou movimentação.
- Nó renomeado
Um item que foi renomeado dentro do repositório.
- Nó substituido
O item original foi apagado e um novo item com o mesmo nome o substituiu.
- Correspondência de filtro
Quando houver um filtro em uso na janela de auditoria, os termos de busca são destacados nos resultados usando esta cor.
other settings:
- Tema escuro
The dialogs in TortoiseSVN can be shown in a dark mode on Windows 10 1809 and later. This feature also requires that dark mode for applications is enabled in the Windows 10 settings.
Importante
Note that not all controls in all dialogs are shown in a dark theme.
- Padrões de Classificação
The revision graph attempts to show a clearer picture of your repository structure by distinguishing between trunk, branches and tags. As there is no such classification built into Subversion, this information is extracted from the path names. The default settings assume that you use the conventional English names as suggested in the Subversion documentation, but of course your usage may vary.
Specify the patterns used to recognise these paths in the three boxes provided. The patterns will be matched case-insensitively, but you must specify them in lower case. Wild cards
*and?will work as usual, and you can use;to separate multiple patterns. Do not include any extra white space as it will be included in the matching specification.Commit tag detection
Please note that these patterns are also used to detect commits to a tag, not just for the revision graph.
- Cores Modificadas
Colors are used in the revision graph to indicate the node type, i.e. whether a node is added, deleted, renamed. In order to help pick out node classifications, you can allow the revision graph to blend colors to give an indication of both node type and classification. If the box is checked, blending is used. If the box is unchecked, color is used to indicate node type only. Use the color selection dialog to allocate the specific colors used.
This page allows you to configure the colors used. Note that the color specified here is the solid color. Most nodes are colored using a blend of the node type color, the background color and optionally the classification color.
- Nó Excluído
Items which have been deleted and not copied anywhere else in the same revision.
- Nó Adicionado
Itens recém-adicionado, ou copiados (adicionar com histórico).
- Nó Renomeado
Itens excluídos de um local e acrescentou em outro na mesma revisão.
- Nó Modificado
Modificações simples, sem qualquer adição ou exclusão.
- Nó não alterado
May be used to show the revision used as the source of a copy, even when no change (to the item being graphed) took place in that revision.
- Nó Principal
Atual última revisão no repositório
- Nó CT
If you opt to show an extra node for your modified working copy, attached to its last-commit revision on the graph, use this color.
- Limite do nó CT
If you opt to show whether the working copy is modified, use this color border on the WC node when modifications are found.
- Nós de rótulos
Nós classificados como etiquetas podem ser misturados com essa cor
- Nós do tronco
Nodes classificados como tronco podem ser misturados com esta cor.
- Marcador dobrado
If you use tag folding to save space, tags are marked on the copy source using a block in this color.
- Marcadores de Nós Selecionados
When you left click on a node to select it, the marker used to indicate selection is a block in this color.
- Faixas
These colors are used when the graph is split into sub-trees and the background is colored in alternating stripes to help pick out the separate trees.
This page allows you to choose the items for which TortoiseSVN will display icon overlays.
Since it takes quite a while to fetch the status of a working copy, TortoiseSVN uses a cache to store the status so the explorer doesn't get hogged too much when showing the overlays. You can choose which type of cache TortoiseSVN should use according to your system and working copy size here:
- Padrão
Caches all status information in a separate process (
TSVNCache.exe). That process watches all drives for changes and fetches the status again if files inside a working copy get modified. The process runs with the least possible priority so other programs don't get hogged because of it. That also means that the status information is not real time but it can take a few seconds for the overlays to change.Advantage: the overlays show the status recursively, i.e. if a file deep inside a working copy is modified, all folders up to the working copy root will also show the modified overlay. And since the process can send notifications to the shell, the overlays on the left tree view usually change too.
Disadvantage: the process runs constantly, even if you're not working on your projects. It also uses around 10-50 MB of RAM depending on number and size of your working copies.
- Shell
Caching is done directly inside the shell extension dll, but only for the currently visible folder. Each time you navigate to another folder, the status information is fetched again.
Advantage: needs only very little memory (around 1 MB of RAM) and can show the status in real time.
Disadvantage: Since only one folder is cached, the overlays don't show the status recursively. For big working copies, it can take more time to show a folder in explorer than with the default cache. Also the mime-type column is not available.
- Nenhum
With this setting, the TortoiseSVN does not fetch the status at all in Explorer. Because of that, files don't get an overlay and folders only get a 'normal' overlay if they're versioned. No other overlays are shown, and no extra columns are available either.
Advantage: uses absolutely no additional memory and does not slow down the Explorer at all while browsing.
Disadvantage: Status information of files and folders is not shown in Explorer. To see if your working copies are modified, you have to use the “Check for modifications” dialog.
By default, overlay icons and context menus will appear in all open/save dialogs as well as in Windows Explorer. If you want them to appear only in Windows Explorer, check the Show overlays and context menu only in explorer box.
You can force the status cache to None for elevated processes by checking the Disable status cache for elevated processes box. This is useful if you want to prevent another TSVNCache.exe process getting created with elevated privileges.
You can also choose to mark folders as modified if they contain unversioned items. This could be useful for reminding you that you have created new files which are not yet versioned. This option is only available when you use the default status cache option (see below).
If you have files in the ignore-on-commit changelist, you can chose to make those files not propagate their status to the parent folder. That way if only files in that changelist are modified, the parent folder still shows the unmodified overlay icon.
The next group allows you to select which classes of storage should show overlays. By default, only hard drives are selected. You can even disable all icon overlays, but where's the fun in that?
Network drives can be very slow, so by default icons are not shown for working copies located on network shares.
USB Flash drives appear to be a special case in that the drive type is identified by the device itself. Some appear as fixed drives, and some as removable drives.
The Exclude Paths are used to tell TortoiseSVN those paths for which it should not show icon overlays and status columns. This is useful if you have some very big working copies containing only libraries which you won't change at all and therefore don't need the overlays, or if you only want TortoiseSVN to look in specific folders.
Any path you specify here is assumed to apply recursively, so none of the child folders will show overlays either. If you want to exclude only the named folder, append ? after the path.
The same applies to the Include Paths. Except that for those paths the overlays are shown even if the overlays are disabled for that specific drive type, or by an exclude path specified above.
Users sometimes ask how these three settings interact. For any given path check the include and exclude lists, seeking upwards through the directory structure until a match is found. When the first match is found, obey that include or exclude rule. If there is a conflict, a single directory spec takes precedence over a recursive spec, then inclusion takes precedence over exclusion.
An example will help here:
Exclude:
C:
C:\develop\?
C:\develop\tsvn\obj
C:\develop\tsvn\bin

Include:
C:\develop
These settings disable icon overlays for the C: drive, except for c:\develop. All projects below that directory will show overlays, except the c:\develop folder itself, which is specifically ignored. The high-churn binary folders are also excluded.
TSVNCache.exe also uses these paths to restrict its scanning. If you want it to look only in particular folders, disable all drive types and include only the folders you specifically want to be scanned.
Exclude SUBST Drives
It is often convenient to use a SUBST drive to access your working copies, e.g. using the command
subst T: C:\TortoiseSVN\trunk\doc
However this can cause the overlays not to update, as TSVNCache will only receive one notification when a file changes, and that is normally for the original path. This means that your overlays on the subst path may never be updated.
An easy way to work around this is to exclude the original path from showing overlays, so that the overlays show up on the subst path instead.
Por vezes poderás excluir áreas que contêm cópias de trabalho, o que poupa o TSVNCache de efectuar a pesquisa e monitorização de alterações, mantendo a indicação visual de que a pasta contém uma cópia de trabalho. A caixa de verificação Mostrar pastas raiz excluídas como 'normal' permite-te fazer isso. Com esta opção, as pastas raiz de cópias de trabalho, em qualquer área excluída (tipo de navegação não verificado, ou especificamente excluido) serão mostradas como normais e actualizadas, com a marca verde de verificação. Isto lembrar-te-á que estás a olhar para uma cópia de trabalho, mesmo que os ícones de sobreposição das pastas não estejam correctos. Os ficheiros não terão nenhuns ícones de sobreposição. Ter em atenção que os menus de contexto funcionaram na mesma, mesmo que não sejam mostrados os ícones de sobreposição.
As a special exception to this, drives A: and B: are never considered for the Show excluded folders as 'normal' option. This is because Windows is forced to look on the drive, which can result in a delay of several seconds when starting Explorer, even if your PC does have a floppy drive.
You can change the overlay icon set to the one you like best. Note that if you change overlay set, you may have to restart your computer for the changes to take effect.
Porque o número de sobreposições disponíveis é severamente restrito, podes optar por desactivar alguns manipuladores para garantir que o que tu quiseres será carregado. O TortoiseSVN porque usa o componente TortoiseOverlays comum que é compartilhado com os outros clientes do Tortoise (por exemplo o TortoiseCVS e o TortoiseHg), esta configuração também irá afectar os clientes.
Here you can configure your proxy server, if you need one to get through your company's firewall.
If you need to set up per-repository proxy settings, you will need to use the Subversion servers file to configure this. Use to get there directly. Consult the Runtime Configuration Area for details on how to use this file.
You can also specify which program TortoiseSVN should use to establish a secure connection to a svn+ssh repository. We recommend that you use TortoisePlink.exe. This is a version of the popular Plink program, and is included with TortoiseSVN, but it is compiled as a Windowless app, so you don't get a DOS box popping up every time you authenticate.
You must specify the full path to the executable. For TortoisePlink.exe this is the standard TortoiseSVN bin directory. Use the button to help locate it. Note that if the path contains spaces, you must enclose it in quotes, e.g.
"C:\Program Files\TortoiseSVN\bin\TortoisePlink.exe"
One side-effect of not having a window is that there is nowhere for any error messages to go, so if authentication fails you will simply get a message saying something like “Unable to write to standard output”. For this reason we recommend that you first set up using standard Plink. When everything is working, you can use TortoisePlink with exactly the same parameters.
TortoisePlink does not have any documentation of its own because it is just a minor variant of Plink. Find out about command line parameters from the PuTTY website.
To avoid being prompted for a password repeatedly, you might also consider using a password caching tool such as Pageant. This is also available for download from the PuTTY website.
Finally, setting up SSH on server and clients is a non-trivial process which is beyond the scope of this help file. However, you can find a guide in the TortoiseSVN FAQ listed under Subversion/TortoiseSVN SSH How-To.
Here you can define your own diff/merge programs that TortoiseSVN should use. The default setting is to use TortoiseMerge which is installed alongside TortoiseSVN.
Read “Ferramentas de Diferenciação/Combinação Externas” for a list of some of the external diff/merge programs that people are using with TortoiseSVN.
An external diff program may be used for comparing different revisions of files. The external program will need to obtain the filenames from the command line, along with any other command line options. TortoiseSVN uses substitution parameters prefixed with %. When it encounters one of these it will substitute the appropriate value. The order of the parameters will depend on the Diff program you use.
- %base
O arquivo original sem alterações.
- %bname
O título da janela para o arquivo de base
- %nqbname
The window title for the base file, without quotes
- %mine
Seu próprio arquivo com suas mudanças
- %yname
O título da janela para o seu arquivo
- %nqyname
The window title for your file, without quotes
- %burl
A URL do arquivo original, se disponível
- %nqburl
A URL do arquivo original, se disponível, sem citações
- %yurl
A URL do segundo arquivo, se disponível
- %nqyurl
The URL of the second file, if available, without quotes
- %brev
A revisão do arquivo original, se disponível
- %nqbrev
A revisão do arquivo original, se diponivel, sem citações
- %yrev
A revisão do segundo arquivo, se disponível
- %nqyrev
A revisão do segundo arquivo, se disponivel, sem citações
- %peg
A revisão marcada, se disponível
- %nqpeg
The peg revision, if available, without quotes
- %fname
O nome do arquivo. Esta é uma string vazia se dois diferentes arquivos são diffed ao invés de dois estados do mesmo arquivo.
- %nqfname
O nome do arquivo, sem citação.
The window titles are not pure filenames. TortoiseSVN treats that as a name to display and creates the names accordingly. So e.g. if you're doing a diff from a file in revision 123 with a file in your working copy, the names will be filename : revision 123 and filename : working copy.
For example, with ExamDiff Pro:
C:\Path-To\ExamDiff.exe %base %mine --left_display_name:%bname
                                    --right_display_name:%yname
or with KDiff3:
C:\Path-To\kdiff3.exe %base %mine --L1 %bname --L2 %yname
or with WinMerge:
C:\Path-To\WinMerge.exe -e -ub -dl %bname -dr %yname %base %mine
or with Araxis:
C:\Path-To\compare.exe /max /wait /title1:%bname /title2:%yname
                       %base %mine
or with UltraCompare:
C:\Path-To\uc.exe %base %mine -title1 %bname -title2 %yname
or with DiffMerge:
C:\Path-To\DiffMerge.exe -nosplash -t1=%bname -t2=%yname %base %mine
If you use the svn:keywords property to expand keywords, and in particular the revision of a file, then there may be a difference between files which is purely due to the current value of the keyword. Also if you use svn:eol-style = native the BASE file will have pure LF line endings whereas your file will have CR-LF line endings. TortoiseSVN will normally hide these differences automatically by first parsing the BASE file to expand keywords and line endings before doing the diff operation. However, this can take a long time with large files. If Convert files when diffing against BASE is unchecked then TortoiseSVN will skip pre-processing the files.
You can also specify a different diff tool to use on Subversion properties. Since these tend to be short simple text strings, you may want to use a simpler more compact viewer.
If you have configured an alternate diff tool, you can access TortoiseMerge and the third party tool from the context menus. → uses the primary diff tool, and Shift+ → uses the secondary diff tool.
No fundo da caixa de diálogo podes configurar um programa para visualizar os ficheiros comp-unificada (ficheiros correcção). Não são requeridos parâmetros. A preferência omissão dá indicação para usar o TortoiseUDiff, que é instalado com o TrotoiseSVN, e os códigos de cores para as linhas adicionadas e removidas.
Visto que o Unified Diff é apenas um formato de texto, poderás usar o teu editor de texto preferido se preferires.
Um programa externo de mesclagem usado para resolver arquivos conflitantes. É utilizado substituição de parâmetro do mesmo modo como seria com um problema comparador.
- %base
o arquivo original sem as suas ou quaisquer mudanças
- %bname
O título da janela para o arquivo de base
- %nqbname
The window title for the base file, without quotes
- %mine
Seu próprio arquivo com suas mudanças.
- %yname
O título da janela para o seu arquivo
- %nqyname
The window title for your file, without quotes
- %theirs
o arquivo como ele é no repositório
- %tname
O título da janela para o arquivo no repositório
- %nqtname
O título da janela para o arquivo dentro do repositório, sem citações
- %merged
O arquivo conflitante, o resultado da operação de mesclagem.
- %mname
O título da janela para o arquivo mesclado
- %nqmname
A janela do título do arquivo fundido, sem citações
- %fname
O nome dos arquivos conflitantes.
- %nqfname
O nome dos arquivos conflitantes, sem citação.
For example, with Perforce Merge:
C:\Path-To\P4Merge.exe %base %theirs %mine %merged
or with KDiff3:
C:\Path-To\kdiff3.exe %base %mine %theirs -o %merged
                      --L1 %bname --L2 %yname --L3 %tname
or with Araxis:
C:\Path-To\compare.exe /max /wait /3 /title1:%tname /title2:%bname
                       /title3:%yname %theirs %base %mine %merged /a2
or with WinMerge (2.8 or later):
C:\Path-To\WinMerge.exe %merged
or with DiffMerge:
C:\Path-To\DiffMerge.exe -caption=%mname -result=%merged -merge
      -nosplash -t1=%yname -t2=%bname -t3=%tname %mine %base %theirs
Nas configurações avançadas, é possível definir um comparador e um mesclador diferente para cada extensão de arquivo. Para cada instancia pode-se associar o Photoshop como o programa “Comparador” para arquivos .jpg :-) É possível também associar a propriedade svn:mime-type como programa comparador ou de mesclagem.
To associate using a file extension, you need to specify the extension. Use .bmp to describe Windows bitmap files. To associate using the svn:mime-type property, specify the mime type, including a slash, for example text/xml.
Para sua comodidade, TortoiseSVN salva muitas das configurações que você utiliza, e lembra onde você esteve anteriormente. Se você desejar limpar os dados de cache, pode ser feito aqui.
- Histórico de URLs
Whenever you checkout a working copy, merge changes or use the repository browser, TortoiseSVN keeps a record of recently used URLs and offers them in a combo box. Sometimes that list gets cluttered with outdated URLs so it is useful to flush it out periodically.
If you want to remove a single item from one of the combo boxes you can do that in-place. Just click on the arrow to drop the combo box down, move the mouse over the item you want to remove and type Shift+Del.
- Mensagens de log (Janela de entrada)
TortoiseSVN stores recent commit log messages that you enter. These are stored per repository, so if you access many repositories this list can grow quite large.
- Mensagens de log (Mostra janela de log)
TortoiseSVN caches log messages fetched by the Show Log dialog to save time when you next show the log. If someone else edits a log message and you already have that message cached, you will not see the change until you clear the cache. Log message caching is enabled on the Log Cache tab.
- Dimensões e posições das janelas
Muitos diálogos lembrar o tamanho e tela de posição que você usado pela última vez.
- Dados de autenticação
When you authenticate with a Subversion server, the username and password are cached locally so you don't have to keep entering them. You may want to clear this for security reasons, or because you want to access the repository under a different username ... does John know you are using his PC?
If you want to clear authentication data for one particular server only, use the instead of the button.
- Registro de ações
TortoiseSVN keeps a log of everything written to its progress dialogs. This can be useful when, for example, you want to check what happened in a recent update command.
The log file is limited in length and when it grows too big the oldest content is discarded. By default 4000 lines are kept, but you can customize that number.
From here you can view the log file content, and also clear it.
This dialog allows you to configure the log caching feature of TortoiseSVN, which retains a local copy of log messages and changed paths to avoid time-consuming downloads from the server. Using the log cache can dramatically speed up the log dialog and the revision graph. Another useful feature is that the log messages can still be accessed when offline.
- Habilitar cache de log
Enables log caching whenever log data is requested. If checked, data will be retrieved from the cache when available, and any messages not in the cache will be retrieved from the server and added to the cache.
If caching is disabled, data will always be retrieved directly from the server and not stored locally.
- Permitir URLs ambíguas
Occasionally you may have to connect to a server which uses the same URL for all repositories. Older versions of
svnbridgewould do this. If you need to access such repositories you will have to check this option. If you don't, unchecked it to improve performance.- Permitir UUIDs ambíguos
Some hosting services give all their repositories the same UUID. You may even have done this yourself by copying a repository folder to create a new one. For all sorts of reasons this is a bad idea - a UUID should be unique. However, the log cache will still work in this situation if you check this box. If you don't need it, unchecked it to improve performance.
- Se o repositório não pode ser acessado
If you are working offline, or if the repository server is down, the log cache can still be used to supply log messages already held in the cache. Of course the cache may not be up-to-date, so there are options to allow you to select whether this feature should be used.
When log data is being taken from the cache without contacting the server, the dialog using those message will show the offline state in its title bar.
- Tempo limite antes de atualizar a última revisão
When you invoke the log dialog you will normally want to contact the server to check for any newer log messages. If the timeout set here is non-zero then the server will only be contacted when the timeout has elapsed since the last time contact. This can reduce server round-trips if you open the log dialog frequently and the server is slow, but the data shown may not be completely up-to-date. If you want to use this feature we suggest using a value of 300 (5 minutes) as a compromise.
- Dias de inatividade até que pequenos caches sejam removidos
If you browse around a lot of repositories you will accumulate a lot of log caches. If you're not actively using them, the cache will not grow very big, so TortoiseSVN purges them after a set time by default. Use this item to control cache purging.
- Tamanho máximo de um cache inativo removido
Larger caches are more expensive to reacquire, so TortoiseSVN only purges small caches. Fine tune the threshold with this value.
- Número máximo de falhas da ferramenta antes da remoção do cache
Occasionally something goes wrong with the caching and causes a crash. If this happens the cache is normally deleted automatically to prevent a recurrence of the problem. If you use the less stable nightly build you may opt to keep the cache anyway.
On this page you can see a list of the repositories that are cached locally, and the space used for the cache. If you select one of the repositories you can then use the buttons underneath.
Click on the to completely refresh the cache and fill in any holes. For a large repository this could be very time consuming, but useful if you are about to go offline and want the best available cache.
Click on the button to export the entire cache as a set of CSV files. This could be useful if you want to process the log data using an external program, although it is mainly useful to the developers.
Click on to remove all cached data for the selected repositories. This does not disable caching for the repository so the next time you request log data, a new cache will be created.
clique no botão para ver statisticas detalhadas de um cache em particular. Muitos dos campos mostrados aqui são de interesse de desenvolvedores do TortoiseSVN, por esse motivo não são exibidos todos os seus detalhes.
- RAM
Quantidade de memória necessária para carregar o cache
- Disco
Quantidade de espaço em disco usado para o cache, Dados são comprimidos, então o uso do disco é geralmente bastante modesto.
- Conexão
Mostra se o repositório estava disponível última vez que o cache foi usado.
- Última atualização
A última vez que o conteúdo do cache foi alterado.
- Última atualização principal
A Última vez que foi requisitada a última revisão do servidor.
- Autores
O número de autores diferentes com mensagens registradas no cache.
- Caminhos
O número de caminhos listados, como você veria usando
svn log -v.- INtervalos omitidos
The number of revision ranges which we have not fetched, simply because they haven't been requested. This is a measure of the number of holes in the cache.
- Revisão máxima
O maior número de revisão armazenada em cache
- Número de revisões
O número de revisões armazenadas no cache. Esta é outra medida de cache complementar.
This dialog allows you to set up hook scripts which will be executed automatically when certain Subversion actions are performed. As opposed to the hook scripts explained in “Rotinas de eventos no servidor”, these scripts are executed locally on the client.
One application for such hooks might be to call a program like SubWCRev.exe to update version numbers after a commit, and perhaps to trigger a rebuild.
Note that you can also specify such hook scripts using special properties on your working copy. See the section “Propriedades do Projeto TortoiseSVN” for details.
To add a new hook script, simply click and fill in the details.
There are currently these types of hook script available
- Start-commit
Called before the commit dialog is shown. You might want to use this if the hook modifies a versioned file and affects the list of files that need to be committed and/or commit message. However you should note that because the hook is called at an early stage, the full list of objects selected for commit is not available.
- Manual Pre-commit
If this is specified, the commit dialog shows a button which when clicked runs the specified hook script. The hook script receives a list of all checked files and folders and the commit message if there was one entered.
- Check-commit
Called after the user clicks in the commit dialog, and before the commit dialog closes. This hook gets a list of all the checked files. If the hook returns an error, the commit dialog stays open.
If the returned error message contains paths on newline separated lines, those paths will get selected in the commit dialog after the error message is shown.
- Pre-commit
Called after the user clicks in the commit dialog, and before the actual commit begins. This hook has a list of exactly what will be committed.
- Post-commit
Called after the commit finishes successfully.
- Start-update
Chamado antes que a notificação de uptate-to-revision seja exibida.
- Pre-update
Called before the actual Subversion update or switch begins.
- Post-update
Called after the update, switch or checkout finishes (whether successful or not).
- Pré-conexão
Called before an attempt to contact the repository. Called at most once in five minutes.
- Pre-lock
Called before an attempt to lock a file.
- Post-lock
Called after a file has been locked.
A hook is defined for a particular working copy path. You only need to specify the top level path; if you perform an operation in a sub-folder, TortoiseSVN will automatically search upwards for a matching path.
Next you must specify the command line to execute, starting with the path to the hook script or executable. This could be a batch file, an executable file or any other file which has a valid windows file association, e.g. a perl script. Note that the script must not be specified using a UNC path as Windows shell execute will not allow such scripts to run due to security restrictions.
The command line includes several parameters which get filled in by TortoiseSVN. The parameters passed depend upon which hook is called. Each hook has its own parameters which are passed in the following order:
- Start-commit
PATHMESSAGEFILECWD- Manual Pre-commit
PATHMESSAGEFILECWD- Check-commit
PATHMESSAGEFILECWD- Pre-commit
PATHDEPTHMESSAGEFILECWD- Post-commit
PATHDEPTHMESSAGEFILEREVISIONERRORCWD- Start-update
PATHCWD- Pre-update
PATHDEPTHREVISIONCWD- Post-update
PATHDEPTHREVISIONERRORCWDRESULTPATH- Pré-conexão
no parameters are passed to this script. You can pass a custom parameter by appending it to the script path.
- Pre-lock
PATHLOCKFORCEMESSAGEFILECWD- Post-lock
PATHLOCKFORCEMESSAGEFILEERRORCWD
The meaning of each of these parameters is described here:
- PATH
A path to a temporary file which contains all the paths for which the operation was started in UTF-8 encoding. Each path is on a separate line in the temp file.
Note that for operations done remotely, e.g. in the repository browser, those paths are not local paths but the urls of the affected items.
- DEPTH
Nível com que a submissão/actualização é executada.
Os valores possíveis são:
- -2
svn_depth_unknown- -1
svn_depth_exclude- 0
svn_depth_empty- 1
svn_depth_files- 2
svn_depth_immediates- 3
svn_depth_infinity
- MESSAGEFILE
Path to a file containing the log message for the commit. The file contains the text in UTF-8 encoding. After successful execution of the start-commit hook, the log message is read back, giving the hook a chance to modify it.
- REVISION
The repository revision to which the update should be done or after a commit completes.
- LOCK
Either
truewhen locking, orfalsewhen unlocking.- FORCE
Either
trueorfalse, depending on whether the operation was forced or not.- ERROR
Path to a file containing the error message. If there was no error, the file will be empty.
- CWD
The current working directory with which the script is run. This is set to the common root directory of all affected paths.
- RESULTPATH
A path to a temporary file which contains all the paths in UTF-8 encoding which were somehow touched by the operation. Each path is on a separate line in the temp file.
Note that although we have given these parameters names for convenience, you do not have to refer to those names in the hook settings. All parameters listed for a particular hook are always passed, whether you want them or not ;-)
If you want the Subversion operation to hold off until the hook has completed, check Wait for the script to finish.
Normally you will want to hide ugly DOS boxes when the script runs, so Hide the script while running is checked by default. Also you need to check this if your hook script might return an error that should stop the operation.
Theforce flag can be set if the user must not proceed with the operation without running the script, i.e. the script must always run. If the force flag is not checked, then the user is shown a button to retry the operation without running the hook script. Sample client hook scripts can be found in the contrib folder in the TortoiseSVN repository. (“Licença” explains how to access the repository.)
When debugging hook scripts you may want to echo progress lines to the DOS console, or insert a pause to stop the console window disappearing when the script completes. Because I/O is redirected this will not normally work. However you can redirect input and output explicitly to CON to overcome this. e.g.
echo Checking Status > con
pause < con > con
A small tool is included in the TortoiseSVN installation folder named ConnectVPN.exe. You can use this tool configured as a pre-connect hook to connect automatically to your VPN before TortoiseSVN tries to connect to a repository. Just pass the name of the VPN connection as the first parameter to the tool.
TortoiseSVN can use a COM plugin to query issue trackers when in the commit dialog. The use of such plugins is described in “Obtendo Informações do Rastreador de Reportes”. If your system administrator has provided you with a plugin, which you have already installed and registered, this is the place to specify how it integrates with your working copy.
Click on to use the plugin with a particular working copy. Here you can specify the working copy path, choose which plugin to use from a drop down list of all registered issue tracker plugins, and any parameters to pass. The parameters will be specific to the plugin, but might include your user name on the issue tracker so that the plugin can query for issues which are assigned to you.
If you want all users to use the same COM plugin for your project, you can specify the plugin also with the properties bugtraq:provideruuid, bugtraq:provideruuid64 and bugtraq:providerparams.
- bugtraq:provideruuid
This property specifies the COM UUID of the IBugtraqProvider, for example
{91974081-2DC7-4FB1-B3BE-0DE1C8D6CE4E}. (This example is the UUID of the Gurtle bugtraq provider, which is a provider for the Google Code issue tracker.)- bugtraq:provideruuid64
This is the same as
bugtraq:provideruuid, but for the 64-bit version of the IBugtraqProvider.- bugtraq:providerparams
This property specifies the parameters passed to the IBugtraqProvider.
Please check the documentation of your IBugtraqProvider plugin to find out what to specify in these two properties.
The settings used by TortoiseBlame are controlled from the main context menu, not directly with TortoiseBlame itself.
- Cores
TortoiseBlame can use the background colour to indicate the age of lines in a file. You set the endpoints by specifying the colours for the newest and oldest revisions, and TortoiseBlame uses a linear interpolation between these colours according to the repository revision indicated for each line.
Poderás especificar diferentes cores a usar na barra de localização. Por defeito é usado um grande contraste na barra de localização enquanto é mantido claro o fundo da janela principal, para que possas ainda ler o texto.
- Fonte
You can select the font used to display the text, and the point size to use. This applies both to the file content, and to the author and revision information shown in the left pane.
- Abas
Defines how many spaces to use for expansion when a tab character is found in the file content.
The settings used by TortoiseUDiff are controlled from the main context menu, not directly with TortoiseUDiff itself.
- Cores
The default colors used by TortoiseUDiff are usually ok, but you can configure them here.
- Fonte
You can select the font used to display the text, and the point size to use.
- Abas
Defines how many spaces to use for expansion when a tab character is found in the file diff.
You can sync all TortoiseSVN settings to and from an encrypted file. The file is encrypted with the password you enter so you don't have to worry if you store that file on a cloud folder like OneDrive, GDrive, DropBox, ...
When a path and password is specified, TortoiseSVN will sync all settings automatically and keep them in sync.
You can also export/import an encrypted files with all the settings manually. When you do that, you're asked for the path of the file and the password to encrypt/decrypt the settings file.
When exporting the settings manually, you can also optionally include all local settings which are not included in a normal export or in a sync. Local settings are settings which include local paths which usually vary between computers. These local settings include the configured diff and merge tools and hook scripts.
A few infrequently used settings are available only in the advanced page of the settings dialog. These settings modify the registry directly and you have to know what each of these settings is used for and what it does. Do not modify these settings unless you are sure you need to change them.
- AllowAuthSave
Sometimes multiple users use the same account on the same computer. In such situations it's not really wanted to save the authentication data. Setting this value to
falsedisables thesave authenticationbutton in the authentication dialog.- AllowUnversionedObstruction
If an update adds a new file from the repository which already exists in the local working copy as an unversioned file, the default action is to keep the local file, showing it as a (possibly) modified version of the new file from the repository. If you would prefer TortoiseSVN to create a conflict in such situations, set this value to
false.- AlwaysExtendedMenu
As with the explorer, TortoiseSVN shows additional commands if the Shift key is pressed while the context menu is opened. To force TortoiseSVN to always show those extended commands, set this value to
true.- AutoCompleteMinChars
The minimum amount of chars from which the editor shows an auto-completion popup. The default value is
3.- AutocompleteRemovesExtensions
The auto-completion list shown in the commit message editor displays the names of files listed for commit. To also include these names with extensions removed, set this value to
true.- BlockPeggedExternals
File externals that are pegged to a specific revision are blocked by default from being selected for a commit. This is because a subsequent update would revert those changes again unless the pegged revision of the external is adjusted.
Set this value to
falsein case you still want to commit changes to such external files.- BlockStatus
If you don't want the explorer to update the status overlays while another TortoiseSVN command is running (e.g. Update, Commit, ...) then set this value to
true.- CacheTrayIcon
To add a cache tray icon for the TSVNCache program, set this value to
true. This is really only useful for developers as it allows you to terminate the program gracefully.- ColumnsEveryWhere
The extra columns the TortoiseSVN adds to the details view in Windows Explorer are normally only active in a working copy. If you want those to be accessible everywhere, not just in working copies, set this value to
true. Note that the extra columns are only available in XP. Vista and later doesn't support that feature any more. However some third-party explorer replacements do support those even on Windows versions later than XP.- ConfigDir
You can specify a different location for the Subversion configuration file here. This will affect all TortoiseSVN operations.
- CtrlEnter
In most dialogs in TortoiseSVN, you can use Ctrl+Enter to dismiss the dialog as if you clicked on the OK button. If you don't want this, set this value to
false.- Debug
Set this to
trueif you want a dialog to pop up for every command showing the command line used to start TortoiseProc.exe.- DebugOutputString
Coloca esta opção como
verdadeiraliteral> se quiseres que o TortoiseSVN imprima mensagens de compila- DialogTitles
O formato padrão (valor 0) dos títulos do diálogo é
url/caminho - nome do diálogo - TortoiseSVN. Se definires esse valor para 1, o formato é alterado paranome do diálogo - url/caminho - TortoiseSVN.- DiffBlamesWithTortoiseMerge
TortoiseSVN allows you to assign an external diff viewer. Most such viewers, however, are not suited for change blaming (“Diferenças de Autoria”), so you might wish to fall back to TortoiseMerge in this case. To do so, set this value to
true.- DlgStickySize
This value specifies the number of pixels a dialog has to be near a border before the dialog sticks to it. The default value is 3. To disable this value set the value to zero.
- FixCaseRenames
Algumas aplicações alteram a altura da letra dos nomes de ficheiros sem aviso, mas essas alterações não são desejadas nem necessárias. Por exemplo uma mudança de
file.txtparaFILE.TXTnão afectaria aplicações normais de Windows, mas o Subversion é sensivel à altura da letra nessas situações. Pelo que, o TortoiseSVN repara automaticamente essas situações.Se não pretenderes que o TortoiseSVN corrija automaticamente por ti essas alterações de altura de letra, podes colocar este valor a
false.- FullRowSelect
The status list control which is used in various dialogs (e.g., commit, check-for-modifications, add, revert, ...) uses full row selection (i.e., if you select an entry, the full row is selected, not just the first column). This is fine, but the selected row then also covers the background image on the bottom right, which can look ugly. To disable full row select, set this value to
false.- GroupTaskbarIconsPerRepo
This option determines how the Win7 taskbar icons of the various TortoiseSVN dialogs and windows are grouped together. This option has no effect on Vista!
O valor padrão é 0. Com esta definição, os ícones são agrupados por tipo de aplicação. Todas as caixas de diálogo do TortoiseSVN são agrupadas, todas as janelas do TortoiseMerge são agrupadas, ...
Se definido como 1, então em vez de todos os diálogos em um único grupo por aplicação, eles são agrupados por repositório. Por exemplo, se você tem um diálogo aberto e um log de diálogo de confirmação para repositório
A, E uma caixa de diálogo de check-para-modificações e uma caixa de diálogo registo para o repositórioB, Então existem dois grupos de aplicativos ícone mostrado na barra de tarefas Win7, um grupo para cada repositório. Mas as janelas TortoiseMerge não são agrupados com diálogos TortoiseSVN.Se definir para 2, então o agrupamento funciona como a configuração definiada para 1, exceto que a janela do TortoiseSVN, TortoiseMerge, TortoiseBlame, TortoiseIDiff e do TortoiseUDiff serão agrupadas juntas. Por exemplo, se você tem a janela de submissão aberta e então dá um duplo clique em um arquivo modificado, a janela aberta de diferenças do TortoiseMerge será colocada junto no mesmo ícone do grupo na barra de tarefas como o ícone da janela de submissão.
Se estiver definido para 3, então o grupo funciona como se a configuração estivesse definida para 1, mas o agrupamento não é feito de acordo com o repositório, mas de acordo com a cópia de trabalho. Isso é útil se você tiver todos os seus projetos no mesmo repositório, mas diferentes cópias de trabalho para cada projeto.
Se definido para 4, então o grupo funciona como se tivesse a configuração definida para 2, mas o agrupamento não é feito de acordo com o repositório, mas de acordo com a cópia de trabalho.
- GroupTaskbarIconsPerRepoOverlay
Isto não tem efeito se a opção
GroupTaskbarIconsPerRepoestá definida para 0 (veja acima).Se esta opção estiver definida para
true, Então cada ícone na barra de tarefas do Win7 mostra uma sobreposição de cor no pequeno rectângulo, indicando o repositório os diálogos/janelas são usados.- HideExternalInfo
Se for posto a
false, então é mostrado em separado cadasvn:externalsdurante uma actualização.Se for colocado
true(por defeito), então a actualização de informação para os externos só é mostrada se os externos forem afectados pela actualização, i.e. alteradas de algum modo. De outro modo nada é mostrado, tal como com os ficheiros e pastas normais.- HookCancelError
If this is set to
true, then cancelling the dialog to approve a hook script to run will show an error dialog indicating the user cancelled.- IncludeExternals
By default, TortoiseSVN always runs an update with externals included. This avoids problems with inconsistent working copies. If you have however a lot of externals set, an update can take quite a while. Set this value to
falseto run the default update with externals excluded. To update with externals included, either run theUpdate to revision...dialog or set this value totrueagain.- LogFindCopyFrom
Quando é arrancada a caixa de diálogo de registo a partir do wizard de integração, são mostradas a cinzento as revisões já integradas, mas revisões para além do ponto de criação do ramo também são mostradas. Essas revisões são mostradas a preto porque não podem ser integradas.
SE está opção está configurada a
true, então o TortoiseSVN tenta encontrar a revisão onde foi criado o ramo e esconder todas as revisões que estão além dessa revisão. Visto que isto pode demorar algum tempo, esta opção está desactivada por defeito. Esta opçao também não funciona com alguns servidores SVN (e.g., Google Code Hosting, ver issue #5471).- LogMultiRevFormat
A format string for the log messages when multiple revisions are selected in the log dialog.
You can use the following placeholders in your format string:
- %1!ld!
- é substituído com o número da revisão
- %2!s!
- é substituído com a mensagem de log curta da revisão
- LogStatusCheck
The log dialog shows the revision the working copy path is at in bold. But this requires that the log dialog fetches the status of that path. Since for very big working copies this can take a while, you can set this value to
falseto deactivate this feature.- MaxHistoryComboItems
Comboboxes for URLs and paths show a history of previously used URLs/paths if possible. This settings controls how many previous items are saved and shown. The default is 25 items.
- MergeLogSeparator
When you merge revisions from another branch, and merge tracking information is available, the log messages from the revisions you merge will be collected to make up a commit log message. A pre-defined string is used to separate the individual log messages of the merged revisions. If you prefer, you can set this to a value containing a separator string of your choice.
- NumDiffWarning
If you want to show the diff at once for more items than specified with this settings, a warning dialog is shown first. The default is 10.
- OldVersionCheck
TortoiseSVN checks whether there's a new version available about once a week. If an updated version is found, the commit dialog shows a link control with that info. If you prefer the old behavior back where a dialog pops up notifying you about the update, set this value to
true.- RepoBrowserTrySVNParentPath
The repository browser tries to fetch the web page that's generated by an SVN server configured with the SVNParentPath directive to get a list of all repositories. To disable that behavior, set this value to
false.- ScintillaBidirectional
This option enables the bidirectional mode for the commit message edit box. If enabled, right-to-left language text editing is done properly. Since this feature is expensive, it is disabled by default. You can enable this by setting this value to
true.- ScintillaDirect2D
Esta opção activa o uso de aceleração Direct2D em desenho no controlo Scintilla, que é usado como caixa de edição como por exemplo na janela Submeter, e também para o visualizador de comparação unificada. Com algumas placas gráficas esta funcionalidade por vezes não funciona correctamente, pelo que o cursor para introdução de texto não está sempre visível. Se isso acontecer, podes desligar esta funcionalidade colocando este valor a
false.- OutOfDateRetry
This parameter specifies how TortoiseSVN behaves if a commit fails due to an out-of-date error:
- 0
The user is asked whether to update the working copy or not, and the commit dialog is not reopened after the update.
- 1
This is the default. The user is asked whether to update the working copy or not, and the commit dialog is reopened after the update so the user can proceed with the commit right away.
- 2
Similar to
1, but instead of updating only the paths selected for a commit, the update is done on the working copy root. This helps to avoid inconsistent working copies.- 3
The user is not asked to update the working copy. The commit simply fails with the out-of-date error message.
- PlaySound
If set to
true, TortoiseSVN will play a system sound when an error or warning occurs, or another situation which is important and requires your attention. Set this tofalseif you want to keep TortoiseSVN quiet. Note that the project monitor has its own setting for playing sounds, which you can configure in its settings dialog.- ShellMenuAccelerators
TortoiseSVN uses accelerators for its explorer context menu entries. Since this can lead to doubled accelerators (e.g. the
SVN Commithas the Alt-C accelerator, but so does theCopyentry of explorer). If you don't want or need the accelerators of the TortoiseSVN entries, set this value tofalse.- ShowContextMenuIcons
This can be useful if you use something other than the windows explorer or if you get problems with the context menu displaying incorrectly. Set this value to
falseif you don't want TortoiseSVN to show icons for the shell context menu items. Set this value totrueto show the icons again.- ShowAppContextMenuIcons
If you don't want TortoiseSVN to show icons for the context menus in its own dialogs, set this value to
false.- ShowNotifications
Set this value to
falseif you don't want the project monitor to show notification popups when new commits are detected.- StyleCommitMessages
The commit and log dialog use styling (e.g. bold, italic) in commit messages (see “Registro de Mensagens de Submissão” for details). If you don't want to do this, set the value to
false.- UpdateCheckURL
This value contains the URL from which TortoiseSVN tries to download a text file to find out if there are updates available. This might be useful for company admins who don't want their users to update TortoiseSVN until they approve it.
- UseCustomWordBreak
The standard edit controls do not stop on forward slashes like they're found in paths and urls. TortoiseSVN uses a custom word break procedure for the edit controls. If you don't want that and use the default instead, set this value to 0. If you only want the default for edit controls in combo boxes, set this value to 1.
- VersionCheck
TortoiseSVN checks whether there's a new version available about once a week. If you don't want TortoiseSVN to do this check, set this value to
false.
The project monitor is a helpful tool that monitors repositories and notifies you in case there are new commits.
The projects can be monitored via a working copy path or directly via their repository URLs.
The project monitor scans each project in a configurable interval, and every time new commits are detected a notification popup is shown. Also the icon that is added to the system tray changes to indicate that there are new commits.
Snarl
If Snarl is installed and active, then the project monitor automatically uses Snarl to show the notifications about newly detected commits.
If you first start the project monitor, the tree view on the left side is empty. To add projects, click on the button at the top of the dialog named .
To add a project for monitoring, fill in the required information. The name of the project is not optional and must be filled in, all other information is optional.
If the box for Path or Url is left empty, then a folder is added. This is useful to group monitored projects.
If you want to monitor all repositories served via the SVNParentPath directive, enter the root Url for your repositories and check the box Url points to SVNParentPath list.
The fields Username and Password should only be filled in if the repository does not provide anonymous read access, and only if the authentication is not stored by Subversion itself. If you're accessing the monitored repository with TortoiseSVN or other svn clients and you've stored the authentication already, you should leave this empty: you won't have to edit those projects manually if the password changes.
The Monitor interval in minutes specifies the minutes to wait in between checks. The smallest interval is one minute.
check interval
If there are a lot of users monitoring the same repository and the bandwidth on the server is limited, a repository admin can set the minimum for check intervals using an svnrobots.txt file. A detailed explanation on how this works can be found on the project monitor website:
The project monitor shows all monitored projects on the left in a tree view. The projects can be moved around, for example one project can be moved below another project, making it a child/subproject.
A click on a project shows all the log messages of that project on the right.
Projects that have updates are shown in bold, with the number of new commits in brackets at the right. A click on a project marks it automatically as read.
The toolbar at the top of the dialog allows to configure and operate the project monitor.
- Checar agora
While each monitored project is checked according to the interval that's set up, clicking this button will force a check of all projects immediately. Note that if there are updates, the notification won't show up until all projects have been checked.
- Adicionar projeto
Opens a new dialog to set up a new project for monitoring.
- Editar
Opens the configuration dialog for the selected project.
- Remover
Removes the selected project after a confirmation dialog is shown.
- Mark all as read
Marks all revisions in all projects as read. Note that if you select a project with unread revisions, those revisions are automatically marked as read when you select another project.
If you hold down the Shift key when clicking the button, all error states are also cleared if there are any.
- Update all
Runs an Update on all monitored working copies. Projects that are monitored via an url are not updated, only those that are set up with a working copy path.
- Opções
Shows a dialog to configure the behavior of the project monitor.
SubWCRev is Windows console program which can be used to read the status of a Subversion working copy and optionally perform keyword substitution in a template file. This is often used as part of the build process as a means of incorporating working copy information into the object you are building. Typically it might be used to include the revision number in an “About” box.
SubWCRev reads the Subversion status of all files in a working copy, excluding externals by default. It records the highest commit revision number found, and the commit timestamp of that revision, it also records whether there are local modifications in the working copy, or mixed update revisions. The revision number, update revision range and modification status are displayed on stdout.
SubWCRev.exe is called from the command line or a script, and is controlled using the command line parameters.
SubWCRev WorkingCopyPath [SrcVersionFile DstVersionFile] [-nmdfe]
WorkingCopyPath is the path to the working copy being checked. You can only use SubWCRev on working copies, not directly on the repository. The path may be absolute or relative to the current working directory.
If you want SubWCRev to perform keyword substitution, so that fields like repository revision and URL are saved to a text file, you need to supply a template file SrcVersionFile and an output file DstVersionFile which contains the substituted version of the template.
You can specify ignore patterns for SubWCRev to prevent specific files and paths from being considered. The patterns are read from a file named .subwcrevignore. The file is read from the specified path, and also from the working copy root. If the file does not exist, no files or paths are ignored. The .subwcrevignore file can contain multiple patterns, separated by newlines. The patterns are matched against the paths relative to the repository root and paths relative to the path of the .subwcrevignore file. For example, to ignore all files in the doc folder of the TortoiseSVN working copy, the .subwcrevignore would contain the following lines:
/trunk/doc
/trunk/doc/*
Or, assuming the .subwcrevignore file is in the working copy root which is checked out from trunk, using the patterns
doc
doc/*
is the same as the example above.
To ignore all images, the ignore patterns could be set like this:
*.png
*.jpg
*.ico
*.bmp
Importante
The ignore patterns are case-sensitive, just like Subversion is.
Dica
To create a file with a starting dot in the Windows explorer, enter .subwcrevignore.. Note the trailing dot.
There are a number of optional switches which affect the way SubWCRev works. If you use more than one, they must be specified as a single group, e.g. -nm, not -n -m.
Tabela 6.1. List of available command line switches
| Alternar | Descrição |
|---|---|
| -n | If this switch is given, SubWCRev will exit with ERRORLEVEL 7 if the working copy contains local modifications. This may be used to prevent building with uncommitted changes present. |
| -N | If this switch is given, SubWCRev will exit with NÍVEL de ERRO 11 if the working copy contains unversioned items that are not ignored. |
| -m | If this switch is given, SubWCRev will exit with ERRORLEVEL 8 if the working copy contains mixed revisions. This may be used to prevent building with a partially updated working copy. |
| -d | If this switch is given, SubWCRev will exit with ERRORLEVEL 9 if the destination file already exists. |
| -f | If this switch is given, SubWCRev will include the last-changed revision of folders. The default behaviour is to use only files when getting the revision numbers. |
| -e | If this switch is given, SubWCRev will examine directories which are included with svn:externals, but only if they are from the same repository. The default behaviour is to ignore externals. |
| -E | If this switch is given, same as -e, but it ignores the externals with explicit revisions, when the revision range inside of them is only the given explicit revision in the properties. So it doesn't lead to mixed revisions. |
| -x | If this switch is given, SubWCRev will output the revision numbers in HEX. |
| -X | If this switch is given, SubWCRev will output the revision numbers in HEX, with '0X' prepended. |
| -F | If this switch is given, SubWCRev will ignore any .subwcrevignore files and include all files. |
| -q | If this switch is given, SubWCRev will perform the keyword substitution without showing working copy status on stdout. |
If there is no error, SubWCRev returns zero. But in case an error occurs, the error message is written to stderr and shown in the console. And the returned error codes are:
Tabela 6.2. List of SubWCRev error codes
| Código de Erro | Descrição |
|---|---|
| 1 | Erro de sintaxe. Um ou mais parâmetros de linha de comando são inválidos. |
| 2 | O arquivo ou pasta especificada na linha de comando não foi encontrado. |
| 3 | O arquivo de entrada não pôde ser aberto, ou o arquivo de destino não pode ser criado. |
| 4 | Could not allocate memory. This could happen if e.g. the source file is too big. |
| 5 | O arquivo fonte não pode ser escaneado apropriadamente. |
| 6 | SVN error: Subversion returned with an error when SubWCRev tried to find the information from the working copy. |
| 7 | The working copy has local modifications. This requires the -n switch. |
| 8 | The working copy has mixed revisions. This requires the -m switch. |
| 9 | The output file already exists. This requires the -d switch. |
| 10 | O caminho especificado não é uma cópia de trabalho ou parte de uma. |
| 11 | The working copy has unversioned files or folders in it. This requires the -N switch. |
If a source and destination files are supplied, SubWCRev copies source to destination, performing keyword substitution as follows:
Tabela 6.3. Lista de palavras-chave disponíveis
| Palavra-chave | Descrição |
|---|---|
| $WCREV$ | Replaced with the highest commit revision in the working copy. |
| $WCREV&$ | Substituída com a revisão de submissão mais elevada da cópia de trabalho, AND com o valor após o caracter &. Por exemplo: $WCREV&0xFFFF$ |
| $WCREV-$, $WCREV+$ | Substituída com a revisão de submissão mais elevada da cópia de trabalho, com o valor adicionado ou subtraído após o caracter + ou -. Por exemplo: $WCREV-1000$ |
| $WCDATE$, $WCDATEUTC$ | Remover ficheiros e pastas ignorados e não-versionados |
| $WCNOW$, $WCNOWUTC$ | Replaced with the current system date/time. This can be used to indicate the build time. Time formatting can be used as described for $WCDATE$. |
| $WCRANGE$ | Replaced with the update revision range in the working copy. If the working copy is in a consistent state, this will be a single revision. If the working copy contains mixed revisions, either due to being out of date, or due to a deliberate update-to-revision, then the range will be shown in the form 100:200. |
| $WCMIXED$ | $WCMIXED?TText:FText$ is replaced with TText if there are mixed update revisions, or FText if not. |
| $WCMODS$ | $WCMODS?TText:FText$ is replaced with TText if there are local modifications, or FText if not. |
| $WCUNVER$ | $WCUNVER?TText:FText$ is replaced with TText if there are unversioned items in the working copy, or FText if not. |
| $WCEXTALLFIXED$ | $WCEXTALLFIXED?TText:FText$ is replaced with TText if all externals are fixed to an explicit revision, or FText if not. |
| $WCISTAGGED$ | $WCISTAGGED?TText:FText$ is replaced with TText if the repository URL contains the tags classification pattern, or FText if not. |
| $WCURL$ | Replaced with the repository URL of the working copy path passed to SubWCRev. |
| $WCINSVN$ | $WCINSVN?TText:FText$ is replaced with TText if the entry is versioned, or FText if not. |
| $WCNEEDSLOCK$ | $WCNEEDSLOCK?TText:FText$ is replaced with TText if the entry has the svn:needs-lock property set, or FText if not. |
| $WCISLOCKED$ | $WCISLOCKED?TText:FText$ is replaced with TText if the entry is locked, or FText if not. |
| $WCLOCKDATE$, $WCLOCKDATEUTC$ | Replaced with the lock date. Time formatting can be used as described for $WCDATE$. |
| $WCLOCKOWNER$ | Substituído com o nome do dono do bloqueio |
| $WCLOCKCOMMENT$ | Substituído com o comentário do bloqueio |
| $WCUNVER$ | $WCUNVER?TText:FText$ is replaced with TText if there are unversioned files or folders in the working copy, or FText if not. |
SubWCRev does not directly support nesting of expressions, so for example you cannot use an expression like:
#define SVN_REVISION "$WCMIXED?$WCRANGE$:$WCREV$$"
But you can usually work around it by other means, for example:
#define SVN_RANGE       $WCRANGE$
#define SVN_REV         $WCREV$
#define SVN_REVISION    "$WCMIXED?SVN_RANGE:SVN_REV$"
Dica
Some of these keywords apply to single files rather than to an entire working copy, so it only makes sense to use these when SubWCRev is called to scan a single file. This applies to $WCINSVN$, $WCNEEDSLOCK$, $WCISLOCKED$, $WCLOCKDATE$, $WCLOCKOWNER$ and $WCLOCKCOMMENT$.
The example below shows how keywords in a template file are substituted in the output file.
// Test file for SubWCRev

char *Revision      = "$WCREV$";
char *Revision16    = "$WCREV&0xFF$";
char *Revisionp100  = "$WCREV+100$";
char *Revisionm100  = "$WCREV-100$";
char *Modified      = "$WCMODS?Modified:Not modified$";
char *Unversioned   = "$WCUNVER?Unversioned items found:no unversioned items$";
char *Date          = "$WCDATE$";
char *CustDate      = "$WCDATE=%a, %d %B %Y$";
char *DateUTC       = "$WCDATEUTC$";
char *CustDateUTC   = "$WCDATEUTC=%a, %d %B %Y$";
char *TimeNow       = "$WCNOW$";
char *TimeNowUTC    = "$WCNOWUTC$";
char *RevRange      = "$WCRANGE$";
char *Mixed         = "$WCMIXED?Mixed revision WC:Not mixed$";
char *ExtAllFixed   = "$WCEXTALLFIXED?All externals fixed:Not all externals fixed$";
char *IsTagged      = "$WCISTAGGED?Tagged:Not tagged$";
char *URL           = "$WCURL$";
char *isInSVN       = "$WCINSVN?versioned:not versioned$";
char *needslck      = "$WCNEEDSLOCK?TRUE:FALSE$";
char *islocked      = "$WCISLOCKED?locked:not locked$";
char *lockdateutc   = "$WCLOCKDATEUTC$";
char *lockdate      = "$WCLOCKDATE$";
char *lockcustutc   = "$WCLOCKDATEUTC=%a, %d %B %Y$";
char *lockcust      = "$WCLOCKDATE=%a, %d %B %Y$";
char *lockown       = "$WCLOCKOWNER$";
char *lockcmt       = "$WCLOCKCOMMENT$";

#if $WCMODS?1:0$
#error Source is modified
#endif

// End of file
After running SubWCRev.exe path\to\workingcopy testfile.tmpl testfile.txt, the output file testfile.txt would looks like this:
// Test file for SubWCRev

char *Revision      = "22837";
char *Revision16    = "53";
char *Revisionp100  = "22937";
char *Revisionm100  = "22737";
char *Modified      = "Modified";
char *Unversioned   = "no unversioned items";
char *Date          = "2012/04/26 18:47:57";
char *CustDate      = "Thu, 26 April 2012";
char *DateUTC       = "2012/04/26 16:47:57";
char *CustDateUTC   = "Thu, 26 April 2012";
char *TimeNow       = "2012/04/26 20:51:17";
char *TimeNowUTC    = "2012/04/26 18:51:17";
char *RevRange      = "22836:22837";
char *Mixed         = "Mixed revision WC";
char *ExtAllFixed   = "All externals fixed";
char *IsTagged      = "Not tagged";
char *URL           = "https://svn.code.sf.net/p/tortoisesvn/code/trunk";
char *isInSVN       = "versioned";
char *needslck      = "FALSE";
char *islocked      = "not locked";
char *lockdateutc   = "1970/01/01 00:00:00";
char *lockdate      = "1970/01/01 01:00:00";
char *lockcustutc   = "Thu, 01 January 1970";
char *lockcust      = "Thu, 01 January 1970";
char *lockown       = "";
char *lockcmt       = "";

#if 1
#error Source is modified
#endif

// End of file
Dica
A file like this will be included in the build so you would expect it to be versioned. Be sure to version the template file, not the generated file, otherwise each time you regenerate the version file you need to commit the change, which in turn means the version file needs to be updated.
If you need to access Subversion revision information from other programs, you can use the COM interface of SubWCRev. The object to create is SubWCRev.object, and the following methods are supported:
Tabela 6.4. COM/automation methods supported
| Método | Descrição |
|---|---|
| .GetWCInfo | This method traverses the working copy gathering the revision information. Naturally you must call this before you can access the information using the remaining methods. The first parameter is the path. The second parameter should be true if you want to include folder revisions. Equivalent to the -f command line switch. The third parameter should be true if you want to include svn:externals. Equivalent to the -e command line switch. |
| .GetWCInfo2 | O mesmo que GetWCInfo() mas com um quarto parâmetro que fixa o equivalente ao switch de linha de comando -E. |
| .Revision | The highest commit revision in the working copy. Equivalent to $WCREV$. |
| .Date | The commit date/time of the highest commit revision. Equivalent to $WCDATE$. |
| .Author | The author of the highest commit revision, that is, the last person to commit changes to the working copy. |
| .MinRev | The minimum update revision, as shown in $WCRANGE$ |
| .MaxRev | The maximum update revision, as shown in $WCRANGE$ |
| .HasModifications | Verdadeiro se houver modificações locais |
| .HasUnversioned | Verdadeiro se existirem itens não versionados. |
| .Url | Replaced with the repository URL of the working copy path used in GetWCInfo. Equivalent to $WCURL$. |
| .IsSvnItem | Verdadeiro se o item estiver versionado. |
| .NeedsLocking | True if the item has the svn:needs-lock property set. |
| .IsLocked | Verdadeiro se o item estiver bloqueado |
| .LockCreationDate | String representing the date when the lock was created, or an empty string if the item is not locked. |
| .LockOwner | String representing the lock owner, or an empty string if the item is not locked. |
| .LockComment | The message entered when the lock was created. |
The following example shows how the interface might be used.
// testCOM.js - ficheiro javascript
// script de teste para o SubWCRev COM/Automation-object

filesystem = new ActiveXObject("Scripting.FileSystemObject");

revObject1 = new ActiveXObject("SubWCRev.object");
revObject2 = new ActiveXObject("SubWCRev.object");
revObject3 = new ActiveXObject("SubWCRev.object");
revObject4 = new ActiveXObject("SubWCRev.object");

revObject1.GetWCInfo(
    filesystem.GetAbsolutePathName("."), 1, 1);
revObject2.GetWCInfo(
    filesystem.GetAbsolutePathName(".."), 1, 1);
revObject3.GetWCInfo(
    filesystem.GetAbsolutePathName("SubWCRev.cpp"), 1, 1);
revObject4.GetWCInfo2(
    filesystem.GetAbsolutePathName("..\\.."), 1, 1, 1);

wcInfoString1 = "Revision = " + revObject1.Revision +
                "\nMin Revision = " + revObject1.MinRev +
                "\nMax Revision = " + revObject1.MaxRev +
                "\nDate = " + revObject1.Date +
                "\nURL = " + revObject1.Url + "\nAuthor = " +
                revObject1.Author + "\nHasMods = " +
                revObject1.HasModifications + "\nIsSvnItem = " +
                revObject1.IsSvnItem + "\nNeedsLocking = " +
                revObject1.NeedsLocking + "\nIsLocked = " +
                revObject1.IsLocked + "\nLockCreationDate = " +
                revObject1.LockCreationDate + "\nLockOwner = " +
                revObject1.LockOwner + "\nLockComment = " +
                revObject1.LockComment;
wcInfoString2 = "Revision = " + revObject2.Revision +
                "\nMin Revision = " + revObject2.MinRev +
                "\nMax Revision = " + revObject2.MaxRev +
                "\nDate = " + revObject2.Date +
                "\nURL = " + revObject2.Url + "\nAuthor = " +
                revObject2.Author + "\nHasMods = " +
                revObject2.HasModifications + "\nIsSvnItem = " +
                revObject2.IsSvnItem + "\nNeedsLocking = " +
                revObject2.NeedsLocking + "\nIsLocked = " +
                revObject2.IsLocked + "\nLockCreationDate = " +
                revObject2.LockCreationDate + "\nLockOwner = " +
                revObject2.LockOwner + "\nLockComment = " +
                revObject2.LockComment;
wcInfoString3 = "Revision = " + revObject3.Revision +
                "\nMin Revision = " + revObject3.MinRev +
                "\nMax Revision = " + revObject3.MaxRev +
                "\nDate = " + revObject3.Date +
                "\nURL = " + revObject3.Url + "\nAuthor = " +
                revObject3.Author + "\nHasMods = " +
                revObject3.HasModifications + "\nIsSvnItem = " +
                revObject3.IsSvnItem + "\nNeedsLocking = " +
                revObject3.NeedsLocking + "\nIsLocked = " +
                revObject3.IsLocked + "\nLockCreationDate = " +
                revObject3.LockCreationDate + "\nLockOwner = " +
                revObject3.LockOwner + "\nLockComment = " +
                revObject3.LockComment;
wcInfoString4 = "Revision = " + revObject4.Revision +
                "\nMin Revision = " + revObject4.MinRev +
                "\nMax Revision = " + revObject4.MaxRev +
                "\nDate = " + revObject4.Date +
                "\nURL = " + revObject4.Url + "\nAuthor = " +
                revObject4.Author + "\nHasMods = " +
                revObject4.HasModifications + "\nIsSvnItem = " +
                revObject4.IsSvnItem + "\nNeedsLocking = " +
                revObject4.NeedsLocking + "\nIsLocked = " +
                revObject4.IsLocked + "\nLockCreationDate = " +
                revObject4.LockCreationDate + "\nLockOwner = " +
                revObject4.LockOwner + "\nLockComment = " +
                revObject4.LockComment;

WScript.Echo(wcInfoString1);
WScript.Echo(wcInfoString2);
WScript.Echo(wcInfoString3);
WScript.Echo(wcInfoString4);
The following listing is an example on how to use the SubWCRev COM object from C#:
using LibSubWCRev;
SubWCRev sub = new SubWCRev();
sub.GetWCInfo("C:\\PathToMyFile\\MyFile.cc", true, true);
if (sub.IsSvnItem == true)
{
    MessageBox.Show("versioned");
}
else
{
    MessageBox.Show("not versioned");
}
To get a tighter integration with issue trackers than by simply using the bugtraq: properties, TortoiseSVN can make use of COM plugins. With such plugins it is possible to fetch information directly from the issue tracker, interact with the user and provide information back to TortoiseSVN about open issues, verify log messages entered by the user and even run actions after a successful commit to e.g, close an issue.
We can't provide information and tutorials on how you have to implement a COM object in your preferred programming language, but we have example plugins in C++/ATL and C# in our repository in the contrib/issue-tracker-plugins folder. In that folder you can also find the required include files you need to build your plugin. (“Licença” explains how to access the repository.)
Importante
You should provide both a 32-bit and 64-bit version of your plugin. Because the x64-Version of TortoiseSVN can not use a 32-bit plugin and vice-versa.
Se publicares um plugin de rastreador de problemas para o TortoiseSVN, por favor não lhe dês o nome de Tortoise<QualquerCoisa>. Gostariamos de reservar o perfixo Tortoise para um cliente de controlo de versões integrado na shell do Windows. Por exemplo: TortoiseCVS, TortoiseSVN, TortoiseHg, TortoiseGit e o TortoiseBzr são todos clientes de controlo de versões.
Dá, por favor, um nome ao teu plugin de cliente Tortoise Tartaruga <something> , onde <something> será referente ao controlador de problemas ao qual estás ligado. Em alternativa, escolhe um nome que soe como Tartaruga mas tenha uma primeira letra diferente. Bons exemplos são:
Gurtle - Um plugin de rastreador de reportes para Google code
TurtleMine - Um plugin de rastreador de reportes para Redmine
VurtleOne - Um plugin de rastreador de reportes para VersionOne
TortoiseSVN 1.5 and later can use plugins which implement the IBugtraqProvider interface. The interface provides a few methods which plugins can use to interact with the issue tracker.
HRESULT ValidateParameters (
  // Parent window for any UI that needs to be
  // displayed during validation.
  [in] HWND hParentWnd,

  // The parameter string that needs to be validated.
  [in] BSTR parameters,

  // Is the string valid?
  [out, retval] VARIANT_BOOL *valid
);
This method is called from the settings dialog where the user can add and configure the plugin. The parameters string can be used by a plugin to get additional required information, e.g., the URL to the issue tracker, login information, etc. The plugin should verify the parameters string and show an error dialog if the string is not valid. The hParentWnd parameter should be used for any dialog the plugin shows as the parent window. The plugin must return TRUE if the validation of the parameters string is successful. If the plugin returns FALSE, the settings dialog won't allow the user to add the plugin to a working copy path.
HRESULT GetLinkText (
  // Parent window for any (error) UI that needs to be displayed.
  [in] HWND hParentWnd,

  // The parameter string, just in case you need to talk to your
  // web service (e.g.) to find out what the correct text is.
  [in] BSTR parameters,

  // What text do you want to display?
  // Use the current thread locale.
  [out, retval] BSTR *linkText
);
The plugin can provide a string here which is used in the TortoiseSVN commit dialog for the button which invokes the plugin, e.g., "Choose issue" or "Select ticket". Make sure the string is not too long, otherwise it might not fit into the button. If the method returns an error (e.g., E_NOTIMPL), a default text is used for the button.
HRESULT GetCommitMessage (
  // Parent window for your provider's UI.
  [in] HWND hParentWnd,

  // Parameters for your provider.
  [in] BSTR parameters,
  [in] BSTR commonRoot,
  [in] SAFEARRAY(BSTR) pathList,

  // The text already present in the commit message.
  // Your provider should include this text in the new message,
  // where appropriate.
  [in] BSTR originalMessage,

  // The new text for the commit message.
  // This replaces the original message.
  [out, retval] BSTR *newMessage
);
This is the main method of the plugin. This method is called from the TortoiseSVN commit dialog when the user clicks on the plugin button.
The parameters string is the string the user has to enter in the settings dialog when he configures the plugin. Usually a plugin would use this to find the URL of the issue tracker and/or login information or more.
The commonRoot string contains the parent path of all items selected to bring up the commit dialog. Note that this is not the root path of all items which the user has selected in the commit dialog. For the branch/tag dialog, this is the path which is to be copied.
The pathList parameter contains an array of paths (as strings) which the user has selected for the commit.
The originalMessage parameter contains the text entered in the log message box in the commit dialog. If the user has not yet entered any text, this string will be empty.
The newMessage return string is copied into the log message edit box in the commit dialog, replacing whatever is already there. If a plugin does not modify the originalMessage string, it must return the same string again here, otherwise any text the user has entered will be lost.
In TortoiseSVN 1.6 a new interface was added which provides more functionality for plugins. This IBugtraqProvider2 interface inherits from IBugtraqProvider.
HRESULT GetCommitMessage2 (
  // Parent window for your provider's UI.
  [in] HWND hParentWnd,

  // Parameters for your provider.
  [in] BSTR parameters,
  // The common URL of the commit
  [in] BSTR commonURL,
  [in] BSTR commonRoot,
  [in] SAFEARRAY(BSTR) pathList,

  // The text already present in the commit message.
  // Your provider should include this text in the new message,
  // where appropriate.
  [in] BSTR originalMessage,

  // You can assign custom revision properties to a commit
  // by setting the next two params.
  // note: Both safearrays must be of the same length.
  //       For every property name there must be a property value!

  // The content of the bugID field (if shown)
  [in] BSTR bugID,

  // Modified content of the bugID field
  [out] BSTR * bugIDOut,

  // The list of revision property names.
  [out] SAFEARRAY(BSTR) * revPropNames,

  // The list of revision property values.
  [out] SAFEARRAY(BSTR) * revPropValues,

  // The new text for the commit message.
  // This replaces the original message
  [out, retval] BSTR * newMessage
);
This method is called from the TortoiseSVN commit dialog when the user clicks on the plugin button. This method is called instead of GetCommitMessage(). Please refer to the documentation for GetCommitMessage for the parameters that are also used there.
The parameter commonURL is the parent URL of all items selected to bring up the commit dialog. This is basically the URL of the commonRoot path.
The parameter bugID contains the content of the bug-ID field (if it is shown, configured with the property bugtraq:message).
The return parameter bugIDOut is used to fill the bug-ID field when the method returns.
The revPropNames and revPropValues return parameters can contain name/value pairs for revision properties that the commit should set. A plugin must make sure that both arrays have the same size on return! Each property name in revPropNames must also have a corresponding value in revPropValues. If no revision properties are to be set, the plugin must return empty arrays.
HRESULT CheckCommit (
  [in] HWND hParentWnd,
  [in] BSTR parameters,
  [in] BSTR commonURL,
  [in] BSTR commonRoot,
  [in] SAFEARRAY(BSTR) pathList,
  [in] BSTR commitMessage,
  [out, retval] BSTR * errorMessage
);
This method is called right before the commit dialog is closed and the commit begins. A plugin can use this method to validate the selected files/folders for the commit and/or the commit message entered by the user. The parameters are the same as for GetCommitMessage2(), with the difference that commonURL is now the common URL of all checked items, and commonRoot the root path of all checked items.
For the branch/tag dialog, the commonURL is the source URL of the copy, and commonRoot is set to the target URL of the copy.
The return parameter errorMessage must either contain an error message which TortoiseSVN shows to the user or be empty for the commit to start. If an error message is returned, TortoiseSVN shows the error string in a dialog and keeps the commit dialog open so the user can correct whatever is wrong. A plugin should therefore return an error string which informs the user what is wrong and how to correct it.
HRESULT  OnCommitFinished (
  // Parent window for any (error) UI that needs to be displayed.
  [in] HWND hParentWnd,

  // The common root of all paths that got committed.
  [in] BSTR commonRoot,

  // All the paths that got committed.
  [in] SAFEARRAY(BSTR) pathList,


  // The text already present in the commit message.
  [in] BSTR logMessage,

  // The revision of the commit.
  [in] ULONG revision,


  // An error to show to the user if this function
  // returns something else than S_OK
  [out, retval] BSTR * error
);
This method is called after a successful commit. A plugin can use this method to e.g., close the selected issue or add information about the commit to the issue. The parameters are the same as for GetCommitMessage2.
HRESULT HasOptions(
  // Whether the provider provides options
  [out, retval] VARIANT_BOOL *ret
);
This method is called from the settings dialog where the user can configure the plugins. If a plugin provides its own configuration dialog with ShowOptionsDialog, it must return TRUE here, otherwise it must return FALSE.
HRESULT ShowOptionsDialog(
  // Parent window for the options dialog
  [in] HWND hParentWnd,

  // Parameters for your provider.
  [in] BSTR parameters,

  // The parameters string
  [out, retval] BSTR * newparameters
);
This method is called from the settings dialog when the user clicks on the "Options" button that is shown if HasOptions returns TRUE. A plugin can show an options dialog to make it easier for the user to configure the plugin.
The parameters string contains the plugin parameters string that is already set/entered.
The newparameters return parameter must contain the parameters string which the plugin constructed from the info it gathered in its options dialog. That paramameters string is passed to all other IBugtraqProvider and IBugtraqProvider2 methods.
Because TortoiseSVN is being developed all the time it is sometimes hard to keep the documentation completely up to date. We maintain an online FAQ which contains a selection of the questions we are asked the most on the TortoiseSVN mailing lists https://groups.google.com/forum/#!forum/tortoisesvn and https://groups.google.com/forum/#!forum/tortoisesvn-dev
If you have a question which is not answered anywhere else, the best place to ask it is on one of the mailing lists:
https://groups.google.com/forum/#!forum/tortoisesvn is the one to use if you have questions about using TortoiseSVN.
If you want to help out with the development of TortoiseSVN, then you should take part in discussions on https://groups.google.com/forum/#!forum/tortoisesvn-dev
Índice
- Mover/copiar vários arquivos de uma só vez
- Usuario forçando para entrar uma messagem de log
- Atualizar os arquivos selecionados a partir do repositório
- Reverter (Desfazer) revisões no repositório
- Compare duas revisões de um arquivo ou pasta
- Inclua um subprojeto em comum
- Criar atalho para um repositório
- Ignorar arquivos que já estão versionados
- Unversion a working copy
- Remover uma cópia de trabalho
Esse appendix contem solução para o seu problema/questão, você pode ter quando está usando o TortoiseSVN
Moving/Copying single files can be done by using → . But if you want to move/copy a lot of files, this way is just too slow and too much work.
The recommended way is by right dragging the files to the new location. Simply right click on the files you want to move/copy without releasing the mouse button. Then drag the files to the new location and release the mouse button. A context menu will appear where you can either choose → . or → .
There are two ways to prevent users from committing with an empty log message. One is specific to TortoiseSVN, the other works for all Subversion clients, but requires access to the server directly.
If you have direct access to the repository server, you can install a pre-commit hook script which rejects all commits with an empty or too short log message.
In the repository folder on the server, there's a sub-folder hooks which contains some example hook scripts you can use. The file pre-commit.tmpl contains a sample script which will reject commits if no log message is supplied, or the message is too short. The file also contains comments on how to install/use this script. Just follow the instructions in that file.
This method is the recommended way if your users also use other Subversion clients than TortoiseSVN. The drawback is that the commit is rejected by the server and therefore users will get an error message. The client can't know before the commit that it will be rejected. If you want to make TortoiseSVN have the button disabled until the log message is long enough then please use the method described below.
TortoiseSVN uses properties to control some of its features. One of those properties is the tsvn:logminsize property.
If you set that property on a folder, then TortoiseSVN will disable the button in all commit dialogs until the user has entered a log message with at least the length specified in the property.
For detailed information on those project properties, please refer to “Configurações do Projeto”.
Normally you update your working copy using → . But if you only want to pick up some new files that a colleague has added without merging in any changes to other files at the same time, you need a different approach.
Use → . and click on to see what has changed in the repository. Select the files you want to update locally, then use the context menu to update just those files.
De longe a maneira mais fácil para reverter alterações de uma ou mais revisões, é usar a caixa de diálogo registo de revisões.
Selecione o arquivo ou pasta onde deseja reverter as modificações. Se você quiser reverter todas as modificações, isto precisa ser a pasta de nível superior.
Select → to display a list of revisions. You may need to use or to show the revision(s) you are interested in.
Select the revision you wish to revert. If you want to undo a range of revisions, select the first one and hold the Shift key while selecting the last one. If you want to pick out individual revisions and ranges, use the Ctrl key while selecting revisions. Right click on the selected revision(s), then select → .
Or if you want to make an earlier revision the new HEAD revision, right click on the selected revision, then select → . This will discard all changes after the selected revision.
You have reverted the changes within your working copy. Check the results, then commit the changes.
Se desejas inserir numeros de revisões como uma lista, podes usar a caixa de diálogo Integrar. O método anterior usa integração nos bastidores; este método usa-a explicitamente.
In your working copy select → .
Na caixa de diálogo Tipo Integração selecciona Integra um intervalo de revisões.
In the From: field enter the full repository URL of your working copy folder. This should come up as the default URL.
In the Revision range to merge field enter the list of revisions to roll back (or use the log dialog to select them as described above).
Tem a certeza que a caixa Integração inversa está verificada.
Na caixa de diálogo Opções de integração aceita os valores por defeito.
Clique para completar a mesclagem.
Você reverteu as mudanças dentro de sua cópia de trabalho. Verifique se ocorreu conforme o esperado, em seguida, confirmar as alterações.
Since TortoiseSVN never loses data, your “rolled back” revisions still exist as intermediate revisions in the repository. Only the HEAD revision was changed to a previous state. If you want to make revisions disappear completely from your repository, erasing all trace that they ever existed, you have to use more extreme measures. Unless there is a really good reason to do this, it is not recommended. One possible reason would be that someone committed a confidential document to a public repository.
The only way to remove data from the repository is to use the Subversion command line tool svnadmin. You can find a description of how this works in the Repository Maintenance.
If you want to compare two revisions in an item's history, for example revisions 100 and 200 of the same file, just use → to list the revision history for that file. Pick the two revisions you want to compare then use → .
If you want to compare the same item in two different trees, for example the trunk and a branch, you can use the repository browser to open up both trees, select the file in both places, then use → .
If you want to compare two trees to see what has changed, for example the trunk and a tagged release, you can use → Select the two nodes to compare, then use → . This will show a list of changed files, and you can then select individual files to view the changes in detail. You can also export a tree structure containing all the changed files, or simply a list of all changed files. Read “Comparando Diretórios” for more information. Alternatively use → to see a summary of all differences, with minimal context.
Às vezes você vai querer incluir outro projeto dentro de sua cópia de trabalho, talvez alguma biblioteca de código . Há pelo menos 4 maneiras de lidar com isso.
Set the svn:externals property for a folder in your project. This property consists of one or more lines; each line has the name of a sub-folder which you want to use as the checkout folder for common code, and the repository URL that you want to be checked out there. For full details refer to “Itens Externos”.
Commit the new folder. Now when you update, Subversion will pull a copy of that project from its repository into your working copy. The sub-folders will be created automatically if required. Each time you update your main working copy, you will also receive the latest version of all external projects.
Se o projeto externo está no mesmo repositório, quaisquer alterações feitas serão incluídas na lista de submissão quando submeter seu projeto principal.
If the external project is in a different repository, any changes you make to the external project will be shown or indicated when you commit the main project, but you have to commit those external changes separately.
Of the three methods described, this is the only one which needs no setup on the client side. Once externals are specified in the folder properties, all clients will get populated folders when they update.
Create a new folder within your project to contain the common code, but do not add it to Subversion.
Select → for the new folder and checkout a copy of the common code into it. You now have a separate working copy nested within your main working copy.
The two working copies are independent. When you commit changes to the parent, changes to the nested WC are ignored. Likewise when you update the parent, the nested WC is not updated.
If you use the same common core code in several projects, and you do not want to keep multiple working copies of it for every project that uses it, you can just check it out to a separate location which is related to all the other projects which use it. For example:
C:\Projects\Proj1
C:\Projects\Proj2
C:\Projects\Proj3
C:\Projects\Common
and refer to the common code using a relative path, e.g. ..\..\Common\DSPcore.
If your projects are scattered in unrelated locations you can use a variant of this, which is to put the common code in one location and use drive letter substitution to map that location to something you can hard code in your projects, e.g. Checkout the common code to D:\Documents\Framework or C:\Documents and Settings\{login}\My Documents\framework then use
SUBST X: "D:\Documents\framework"
to create the drive mapping used in your source code. Your code can then use absolute locations.
#include "X:\superio\superio.h"
This method will only work in an all-PC environment, and you will need to document the required drive mappings so your team know where these mysterious files are. This method is strictly for use in closed development environments, and not recommended for general use.
The maybe easiest way is to simply add the project in a subfolder to your own project working copy. However this has the disadvantage that you have to update and upgrade this external project manually.
To help with the upgrade, TortoiseSVN provides a command in the explorer right-drag context menu. Simply right-drag the folder where you unzipped the new version of the external library to the folder in your working copy, and then select → . This will then copy the new files over to the target folder while automatically adding new files and removing files that aren't in the new version anymore.
If you frequently need to open the repository browser at a particular location, you can create a desktop shortcut using the automation interface to TortoiseProc. Just create a new shortcut and set the target to:
TortoiseProc.exe /command:repobrowser /path:"url/to/repository"
Of course you need to include the real repository URL.
If you accidentally added some files which should have been ignored, how do you get them out of version control without losing them? Maybe you have your own IDE configuration file which is not part of the project, but which took you a long time to set up just the way you like it.
If you have not yet committed the add, then all you have to do is use → to undo the add. You should then add the file(s) to the ignore list so they don't get added again later by mistake.
If the files are already in the repository, they have to be deleted from the repository and added to the ignore list. Fortunately TortoiseSVN has a convenient shortcut for doing this. → will first mark the file/folder for deletion from the repository, keeping the local copy. It also adds this item to the ignore list so that it will not be added back into Subversion again by mistake. Once this is done you just need to commit the parent folder.
If you have a working copy which you want to convert back to a plain folder tree without the .svn directory, you can simply export it to itself. Read “Removendo uma cópia de trabalho do controle de versão” to find out how.
If you have a working copy which you no longer need, how do you get rid of it cleanly? Easy - just delete it in Windows Explorer! Working copies are private local entities, and they are self-contained. Deleting a working copy in Windows Explorer does not affect the data in the repository at all.
Índice
This appendix contains solutions to problems/questions you might have when you are responsible for deploying TortoiseSVN to multiple client computers.
The TortoiseSVN installer comes as an MSI file, which means you should have no problems adding that MSI file to the group policies of your domain controller.
A good walk-through on how to do that can be found in the knowledge base article 314934 from Microsoft: http://support.microsoft.com/?kbid=314934.
TortoiseSVN must be installed under Computer Configuration and not under User Configuration. This is because TortoiseSVN needs the CRT and MFC DLLs, which can only be deployed per computer and not per user. If you really must install TortoiseSVN on a per user basis, then you must first install the MFC and CRT package version 12 from Microsoft on each computer you want to install TortoiseSVN as per user.
You can customize the MSI file if you wish so that all your users end up with the same settings. TSVN settings are stored in the registry under HKEY_CURRENT_USER\Software\TortoiseSVN and general Subversion settings (which affect all Subversion clients) are stored in config files under %APPDATA%\Subversion. If you need help with MSI customization, try one of the MSI transform forums or search the web for “MSI transform”.
TortoiseSVN checks if there's a new version available every few days. If there is a newer version available, a notification is shown in the commit dialog.
If you're responsible for a lot of users in your domain, you might want your users to use only versions you have approved and not have them install always the latest version. You probably don't want that upgrade notification to show up so your users don't go and upgrade immediately.
Versions 1.4.0 and later of TortoiseSVN allow you to redirect that upgrade check to your intranet server. You can set the registry key HKCU\Software\TortoiseSVN\UpdateCheckURL (string value) to an URL pointing to a text file in your intranet. That text file must have the following format:
1.9.1.6000
A new version of TortoiseSVN is available for you to download!
http://192.168.2.1/downloads/TortoiseSVN-1.9.1.6000-svn-1.9.1.msi
The first line in that file is the version string. You must make sure that it matches the exact version string of the TortoiseSVN installation package. The second line is a custom text, shown in the commit dialog. You can write there whatever you want. Just note that the space in the commit dialog is limited. Too long messages will get truncated! The third line is the URL to the new installation package. This URL is opened when the user clicks on the custom message label in the commit dialog. You can also just point the user to a web page instead of the MSI file directly. The URL is opened with the default web browser, so if you specify a web page, that page is opened and shown to the user. If you specify the MSI package, the browser will ask the user to save the MSI file locally.
As of version 1.4.0 and later, the TortoiseSVN installer doesn't provide the user with the option to set the SVN_ASP_DOT_NET_HACK environment variable anymore, since that caused many problems and confusion for users who always install everything no matter whether they know what it is for.
But the feature is still available in TortoiseSVN and other svn clients. To enable it you have to set the Windows environment variable named ASPDOTNETHACK to 1. Actually, the value of that environment variable doesn't matter: if the variable exists the feature is active.
Importante
Toma nota que este hack só é necessário se estiveres ainda a utilizar o VS.NET2002. Todas as versões posteriores do Visual Studio não requerem que este hack esteja activo! Pelo que a não ser que estejas a usar uma ferramenta antiga, NÂO USES ISTO!
As of version 1.5.0 and later, TortoiseSVN allows you to disable (actually, hide) context menu entries. Since this is a feature which should not be used lightly but only if there is a compelling reason, there is no GUI for this and it has to be done directly in the registry. This can be used to disable certain commands for users who should not use them. But please note that only the context menu entries in the explorer are hidden, and the commands are still available through other means, e.g. the command line or even other dialogs in TortoiseSVN itself!
The registry keys which hold the information on which context menus to show are HKEY_CURRENT_USER\Software\TortoiseSVN\ContextMenuEntriesMaskLow and HKEY_CURRENT_USER\Software\TortoiseSVN\ContextMenuEntriesMaskHigh.
Each of these registry entries is a DWORD value, with each bit corresponding to a specific menu entry. A set bit means the corresponding menu entry is deactivated.
Tabela C.1. Entradas do menu e seus valores
| Valor | Opção do Menu |
|---|---|
| 0x0000000000000001 | Obter |
| 0x0000000000000002 | Atualizar |
| 0x0000000000000004 | Submeter |
| 0x0000000000000008 | Adicionar |
| 0x0000000000000010 | Reverter |
| 0x0000000000000020 | Limpar |
| 0x0000000000000040 | Resolver |
| 0x0000000000000080 | Alternar |
| 0x0000000000000100 | Importar |
| 0x0000000000000200 | Exportar |
| 0x0000000000000400 | Criar Repositório aqui |
| 0x0000000000000800 | Ramificar/Rotular... |
| 0x0000000000001000 | Combinar |
| 0x0000000000002000 | Apagar |
| 0x0000000000004000 | Renomear |
| 0x0000000000008000 | Atualizar para Revisão |
| 0x0000000000010000 | Diff |
| 0x0000000000020000 | Log |
| 0x0000000000040000 | Conflitos |
| 0x0000000000080000 | Reposicionar |
| 0x0000000000100000 | Verificar alterações |
| 0x0000000000200000 | Ignorar |
| 0x0000000000400000 | Navegador do Repositório |
| 0x0000000000800000 | Autoria |
| 0x0000000001000000 | Criar Correção |
| 0x0000000002000000 | Aplicar correção |
| 0x0000000004000000 | Gráfico de revisões |
| 0x0000000008000000 | Bloquear |
| 0x0000000010000000 | Remover bloqueio |
| 0x0000000020000000 | Propriedades |
| 0x0000000040000000 | Comparar com URL |
| 0x0000000080000000 | Excluir não versionados |
| 0x0000000100000000 | Mesclar tudo |
| 0x0000000200000000 | Diferença com a revisão anterior |
| 0x0000000400000000 | Colar |
| 0x0000000800000000 | Atualiza a cópia de trabalho |
| 0x0000001000000000 | Diferenças mais tarde |
| 0x0000002000000000 | Comparar com 'filename' |
| 0x0000004000000000 | Unified diff |
| 0x2000000000000000 | Configurações |
| 0x4000000000000000 | Ajuda |
| 0x8000000000000000 | Sobre |
Example: to disable the “Relocate” the “Delete unversioned items” and the “Settings” menu entries, add the values assigned to the entries like this:
0x0000000000080000
+ 0x0000000080000000
+ 0x2000000000000000
= 0x2000000080080000
The lower DWORD value (0x80080000) must then be stored in HKEY_CURRENT_USER\Software\TortoiseSVN\ContextMenuEntriesMaskLow, the higher DWORD value (0x20000000) in HKEY_CURRENT_USER\Software\TortoiseSVN\ContextMenuEntriesMaskHigh.
To enable the menu entries again, simply delete the two registry keys.
Índice
Since all commands for TortoiseSVN are controlled through command line parameters, you can automate it with batch scripts or start specific commands and dialogs from other programs (e.g. your favourite text editor).
Importante
Remember that TortoiseSVN is a GUI client, and this automation guide shows you how to make the TortoiseSVN dialogs appear to collect user input. If you want to write a script which requires no input, you should use the official Subversion command line client instead.
The TortoiseSVN GUI program is called TortoiseProc.exe. All commands are specified with the parameter /command:abcd where abcd is the required command name. Most of these commands need at least one path argument, which is given with /path:"some\path". In the following table the command refers to the /command:abcd parameter and the path refers to the /path:"some\path" parameter.
There's a special command that does not require the parameter /command:abcd but, if nothing is specified on the command line, starts the project monitor instead. If /tray is specified, the project monitor starts hidden and only adds its icon to the system tray.
Since some of the commands can take a list of target paths (e.g. committing several specific files) the /path parameter can take several paths, separated by a * character.
You can also specify a file which contains a list of paths, separated by newlines. The file must be in UTF-16 format, without a BOM. If you pass such a file, use /pathfile instead of /path. To have TortoiseProc delete that file after the command is finished, you can pass the parameter /deletepathfile. If you don't pass /deletepathfile, you have to delete the file yourself or the file gets left behind.
The progress dialog which is used for commits, updates and many more commands usually stays open after the command has finished until the user presses the button. This can be changed by checking the corresponding option in the settings dialog. But using that setting will close the progress dialog, no matter if you start the command from your batch file or from the TortoiseSVN context menu.
To specify a different location of the configuration file, use the parameter /configdir:"path\to\config\directory". This will override the default path, including any registry setting.
To close the progress dialog at the end of a command automatically without using the permanent setting you can pass the /closeonend parameter.
/closeonend:0não fechar o diálogo automaticamente/closeonend:1fechar automaticamente se não houver erros/closeonend:2fechar automaticamente se não houver erros e conflitos/closeonend:3fechar automaticamente se não houver erros, conflitos e combinações
To close the progress dialog for local operations if there were no errors or conflicts, pass the /closeforlocal parameter.
The table below lists all the commands which can be accessed using the TortoiseProc.exe command line. As described above, these should be used in the form /command:abcd. In the table, the /command prefix is omitted to save space.
Tabela D.1. Lista de comandos e opções disponíveis
| Comando | Descrição |
|---|---|
| :about | Shows the about dialog. This is also shown if no command is given. |
| :log |
Opens the log dialog. The
An svn date revision can be in one of the following formats:
|
| :checkout |
Opens the checkout dialog. The If you specify |
| :import | Opens the import dialog. The /path specifies the directory with the data to import. You can also specify the /logmsg switch to pass a predefined log message to the import dialog. Or, if you don't want to pass the log message on the command line, use /logmsgfile:caminho, where caminho points to a file containing the log message. |
| :update | Updates the working copy in /path to HEAD. If the option /rev is given then a dialog is shown to ask the user to which revision the update should go. To avoid the dialog specify a revision number /rev:1234. Other options are /nonrecursive, /ignoreexternals and /includeexternals. The /stickydepth indicates that the specified depth should be sticky, creating a sparse checkout. The /skipprechecks can be set to skip all checks that are done before an update. If this is specified, then the Mostrar log button is disabled, and the context menu to show diffs is also disabled after the update. |
| :commit | Opens the commit dialog. The /path specifies the target directory or the list of files to commit. You can also specify the /logmsg switch to pass a predefined log message to the commit dialog. Or, if you don't want to pass the log message on the command line, use /logmsgfile:caminho, where caminho points to a file containing the log message. To pre-fill the bug ID box (in case you've set up integration with bug trackers properly), you can use the /bugid:"o código do erro aqui" to do that. |
| :add | Adds the files in /path to version control. |
| :revert | Reverts local modifications of a working copy. The /path tells which items to revert. |
| :cleanup | Cleans up interrupted or aborted operations and unlocks the working copy in /path. You also have to pass the /cleanup to actually do the cleanup. Use /noui to prevent the result dialog from popping up (either telling about the cleanup being finished or showing an error message). /noprogressui also disables the progress dialog. /nodlg disables showing the cleanup dialog where the user can choose what exactly should be done in the cleanup. The available actions can be specified with the options /cleanup for status cleanup, /breaklocks to break all locks, /revert to revert uncommitted changes, /delunversioned, /delignored, /refreshshell, /externals, /fixtimestamps and /vacuum. |
| :resolve | Marks a conflicted file specified in /path as resolved. If /noquestion is given, then resolving is done without asking the user first if it really should be done. |
| :repocreate | Cria um repositório em /path |
| :switch | Abre a caixa de diálogo trocar. O /path especifica a pasta de destino e o /url o URL de destino da troca. |
| :export | Exports the working copy in /path to another directory. If the /path points to an unversioned directory, a dialog will ask for an URL to export to the directory in /path. If you specify the key /blockpathadjustments, the automatic export path adjustments are blocked. |
| :dropexport | Exporta a cópia de trabalho em /path para a pasta especificada em /droptarget. Esta exportação não usa a caixa de diálogo exportar, mas executa-a directamente. A opção /overwrite indica que os ficheiros existentes são sobrepostos sem informação ao utilizador, e a opção /autorename indica que se os ficheiros já existirem, os ficheiros exportados serão automaticamente renomeados para evitar sobreposições. A opção /extended pode indicar alterações locais para só exportar ficheiros que foram alterados localmente, ou Não versionado exportar também todos os itens não versionados. |
| :dropvendor | Copies the folder in /path recursively to the directory specified in /droptarget. New files are added automatically, and missing files get removed in the target working copy, basically ensuring that source and destination are exactly the same. Specify /noui to skip the confirmation dialog, and /noprogressui to also disable showing the progress dialog. |
| :merge | Opens the merge dialog. The /path specifies the target directory. For merging a revision range, the following options are available: /fromurl:URL, /revrange:texto. For merging two repository trees, the following options are available: /fromurl:URL, /tourl:URL, /fromrev:xxx and /torev:xxx. |
| :mergeall | Opens the merge all dialog. The /path specifies the target directory. |
| :copy | Brings up the branch/tag dialog. The /path is the working copy to branch/tag from. And the /url is the target URL. If the urls starts with a ^ it is assumed to be relative to the repository root. To already check the option Troca a cópia de trabalho para o novo ramo/etiqueta you can pass the /switchaftercopy switch. To check the option Criar pastas intermediárias pass the /makeparents switch. You can also specify the /logmsg switch to pass a predefined log message to the branch/tag dialog. Or, if you don't want to pass the log message on the command line, use /logmsgfile:caminho, where caminho points to a file containing the log message. |
| :settings | Abre a janela de configurações. |
| :remove | Removes the file(s) in /path from version control. |
| :rename | Renames the file in /path. The new name for the file is asked with a dialog. To avoid the question about renaming similar files in one step, pass /noquestion. |
| :diff | Starts the external diff program specified in the TortoiseSVN settings. The /path specifies the first file. If the option /path2 is set, then the diff program is started with those two files. If /path2 is omitted, then the diff is done between the file in /path and its BASE. If the specified file also has property modifications, the external diff tool is also started for each modified property. To prevent that, pass the option /ignoreprops. To explicitly set the revision numbers use /startrev:xxx and /endrev:xxx, and for the optional peg revision use /pegrevision:xxx. If /blame is set and /path2 is not set, then the diff is done by first blaming the files with the given revisions. The parameter /line:xxx specifies the line to jump to when the diff is shown. |
| :shelve | Shelves the specified paths in a new shelf. The option /shelfname:name specifies the name of the shelf. An optional log message can be specified with /logmsg:message. If option /checkpoint is passed, the modifications of the files are kept. |
| :unshelve | Applies the shelf with the name /shelfname:name to the working copy path. By default the last version of the shelf is applied, but you can specify a version with /version:X. |
| :showcompare |
Depending on the URLs and revisions to compare, this either shows a unified diff (if the option The options If the specified url also has property modifications, the external diff tool is also started for each modified property. To prevent that, pass the option If a unified diff is requested, an optional |
| :conflicteditor | Starts the conflict editor specified in the TortoiseSVN settings with the correct files for the conflicted file in /path. |
| :relocate | Opens the relocate dialog. The /path specifies the working copy path to relocate. |
| :help | Abre o arquivo de ajuda. |
| :repostatus | Opens the check-for-modifications dialog. The /path specifies the working copy directory. If /remote is specified, the dialog contacts the repository immediately on startup, as if the user clicked on the Verificar o repositório button. |
| :repobrowser |
Arranca a caixa de diálogo do navegador de repositório, apontando para o URL da cópia de trabalho dada pelo Uma opção adicional Se Se for especificada a |
| :ignore | Adds all targets in /path to the ignore list, i.e. adds the svn:ignore property to those files. |
| :blame |
Opens the blame dialog for the file specified in If the options If the option The options |
| :cat | Saves a file from an URL or working copy path given in /path to the location given in /savepath:caminho. The revision is given in /revision:xxx. This can be used to get a file with a specific revision. |
| :createpatch | Creates a patch file for the path given in /path. To skip the file Save-As dialog you can pass /savepath:caminho to specify the path where to save the patch file to directly. To prevent the unified diff viewer from being started showing the patch file, pass /noview. If a unified diff is requested, an optional prettyprint option can be specified which will show the merge-info properties in a more user readable format. |
| :revisiongraph |
Mostra o gráfico de revisões para o caminho informado em Para criar um ficheiro de imagem do gráfico de revisão para um caminho específico, mas sem mostrar a janela do gráfico, Visto o gráfico de revisões ter muitas opções que afectam o modo como é visualizado, podes também activar opções para usares ao criar o ficheiro de imagem de saída. Passa essas opções com |
| :lock | Locks a file or all files in a directory given in /path. The 'lock' dialog is shown so the user can enter a comment for the lock. |
| :unlock | destrava um ou todos os arquivos em dado diretório /path. |
| :rebuildiconcache | Rebuilds the windows icon cache. Only use this in case the windows icons are corrupted. A side effect of this (which can't be avoided) is that the icons on the desktop get rearranged. To suppress the message box, pass /noquestion. |
| :properties |
Mosta a caixa de diálogo propriedades para o caminho especificado por Para este comando lidar com propreidades versionadas é necessário uma cópia de trabalho. As propriedades da revisão podem ser vistas/alteradas se Para abrir directamente a caixa de diálogo de propriedades para uma propriedade específica, passa o seu nome como |
| :sync |
Exports/imports settings, either depending on whether the current settings or the exported settings are newer, or as specified. If a path is passed with The parameter If neither If If The parameter |
Examples (which should be entered on one line):
TortoiseProc.exe /command:commit
                 /path:"c:\svn_wc\file1.txt*c:\svn_wc\file2.txt"
                 /logmsg:"test log message" /closeonend:0

TortoiseProc.exe /command:update /path:"c:\svn_wc\" /closeonend:0

TortoiseProc.exe /command:log /path:"c:\svn_wc\file1.txt"
                 /startrev:50 /endrev:60 /closeonend:0
Using special URLs, it is also possible to call TortoiseProc from a web page.
TortoiseSVN registers a new protocol tsvncmd: which can be used to create hyperlinks that execute TortoiseSVN commands. The commands and parameters are the same as when automating TortoiseSVN from the command line.
The format of the tsvncmd: URL is like this:
tsvncmd:command:cmd?parameter:paramvalue?parameter:paramvalue
com cmd a ser um dos comandos permitidos, parameter a ser o nome de um parâmetro como path ou revision, e paramvalue a ser o valor a usar para esse parâmetro. A lista de parãmetros permitidos depende do comando usado.
The following commands are allowed with tsvncmd: URLs:
:update:commit:diff:repobrowser:checkout:export:blame:repostatus:revisiongraph:showcompare:log:properties
Um simples URL de exemplo poderá se assemelhar a isto:
<a href="tsvncmd:command:update?path:c:\svn_wc?rev:1234">Update</a>
, ou num caso mais complexo:
<a href="tsvncmd:command:showcompare?
url1:https://svn.code.sf.net/p/stefanstools/code/trunk/StExBar/src/setup/Setup.wxs?
url2:https://svn.code.sf.net/p/stefanstools/code/trunk/StExBar/src/setup/Setup.wxs?
revision1:188?revision2:189">compare</a>
The image diff tool has a few command line options which you can use to control how the tool is started. The program is called TortoiseIDiff.exe.
The table below lists all the options which can be passed to the image diff tool on the command line.
Tabela D.2. Lista de opções disponíveis
| Opção | Descrição |
|---|---|
| :left | Caminho para o arquivo mostrado a esquerda. |
| :lefttitle | A title string. This string is used in the image view title instead of the full path to the image file. |
| :right | Path to the file shown on the right. |
| :righttitle | A title string. This string is used in the image view title instead of the full path to the image file. |
| :overlay | If specified, the image diff tool switches to the overlay mode (alpha blend). |
| :fit | If specified, the image diff tool fits both images together. |
| :showinfo | Shows the image info box. |
Example (which should be entered on one line):
TortoiseIDiff.exe /left:"c:\images\img1.jpg" /lefttitle:"image 1"
                  /right:"c:\images\img2.jpg" /righttitle:"image 2"
                  /fit /overlay
The unified diff viewer has only two command line options:
Tabela D.3. Lista de opções disponíveis
| Opção | Descrição |
|---|---|
| :patchfile | Path to the unified diff file. |
| :p | Activates pipe mode. The unified diff is read from the console input. |
Examples (which should be entered on one line):
TortoiseUDiff.exe /patchfile:"c:\diff.patch"
If you create the diff from another command, you can use TortoiseUDiff to show that diff directly:
svn diff | TortoiseUDiff.exe /u
this also works if you omit the /p parameter:
svn diff | TortoiseUDiff.exe
Índice
- Convenções e regras básicas
- Comandos do TortoiseSVN
- Obter
- Atualizar
- Atualizar para Revisão
- Submeter
- Diff
- Log
- Procurar por Modificações
- Gráfico de Revisões
- Navegador de
- Conflitos
- Resolvido
- Renomear
- Apagar
- Reverter
- Limpar
- Obter bloqueio
- Liberar bloqueio
- Ramificar/Rotular...
- Alternar
- Combinar
- Exportar
- Reposicionar
- Criar repositó aqui
- Adicionar
- Importar
- Autoria
- Adicionar à lista de ignorados
- Criar Correção
- Aplicar correção
Sometimes this manual refers you to the main Subversion documentation, which describes Subversion in terms of the Command Line Interface (CLI). To help you understand what TortoiseSVN is doing behind the scenes, we have compiled a list showing the equivalent CLI commands for each of TortoiseSVN's GUI operations.
Nota
Even though there are CLI equivalents to what TortoiseSVN does, remember that TortoiseSVN does not call the CLI but uses the Subversion library directly.
If you think you have found a bug in TortoiseSVN, we may ask you to try to reproduce it using the CLI, so that we can distinguish TortoiseSVN issues from Subversion issues. This reference tells you which command to try.
In the descriptions which follow, the URL for a repository location is shown simply as URL, and an example might be https://svn.code.sf.net/p/tortoisesvn/code/trunk/. The working copy path is shown simply as PATH, and an example might be C:\TortoiseSVN\trunk.
Importante
Because TortoiseSVN is a Windows Shell Extension, it is not able to use the notion of a current working directory. All working copy paths must be given using the absolute path, not a relative path.
Certain items are optional, and these are often controlled by checkboxes or radio buttons in TortoiseSVN. These options are shown in [square brackets] in the command line definitions.
svn checkout [-depth ARG] [--ignore-externals] [-r rev] URL PATH
Os itens de nível da caixa combo estão relacionados com o parâmetro -depth.
If Omit externals is checked, use the --ignore-externals switch.
If you are checking out a specific revision, specify that after the URL using -r switch.
svn info URL_of_WC
svn update [-r rev] PATH
Updating multiple items is currently not an atomic operation in Subversion. So TortoiseSVN first finds the HEAD revision of the repository, and then updates all items to that particular revision number to avoid creating a mixed revision working copy.
If only one item is selected for updating or the selected items are not all from the same repository, TortoiseSVN just updates to HEAD.
No command line options are used here. Update to revision also implements the update command, but offers more options.
svn info URL_of_WC
svn update [-r rev] [-depth ARG] [--ignore-externals] PATH
Os itens de nível da caixa combo estão relacionados com o parâmetro -depth.
If Omit externals is checked, use the --ignore-externals switch.
In TortoiseSVN, the commit dialog uses several Subversion commands. The first stage is a status check which determines the items in your working copy which can potentially be committed. You can review the list, diff files against BASE and select the items you want to be included in the commit.
svn status -v PATH
If Show unversioned files is checked, TortoiseSVN will also show all unversioned files and folders in the working copy hierarchy, taking account of the ignore rules. This particular feature has no direct equivalent in Subversion, as the svn status command does not descend into unversioned folders.
If you check any unversioned files and folders, those items will first be added to your working copy.
svn add PATH...
When you click on OK, the Subversion commit takes place. If you have left all the file selection checkboxes in their default state, TortoiseSVN uses a single recursive commit of the working copy. If you deselect some files, then a non-recursive commit (-N) must be used, and every path must be specified individually on the commit command line.
svn commit -m "LogMessage" [-depth ARG] [--no-unlock] PATH...
LogMessage here represents the contents of the log message edit box. This can be empty.
If Keep locks is checked, use the --no-unlock switch.
svn diff PATH
If you use Diff from the main context menu, you are diffing a modified file against its BASE revision. The output from the CLI command above also does this and produces output in unified-diff format. However, this is not what TortoiseSVN is using. TortoiseSVN uses TortoiseMerge (or a diff program of your choosing) to display differences visually between full-text files, so there is no direct CLI equivalent.
You can also diff any 2 files using TortoiseSVN, whether or not they are version controlled. TortoiseSVN just feeds the two files into the chosen diff program and lets it work out where the differences lie.
svn log -v -r 0:N --limit 100 [--stop-on-copy] PATH
or
svn log -v -r M:N [--stop-on-copy] PATH
By default, TortoiseSVN tries to fetch 100 log messages using the --limit method. If the settings instruct it to use old APIs, then the second form is used to fetch the log messages for 100 repository revisions.
If Stop on copy/rename is checked, use the --stop-on-copy switch.
svn status -v PATH
or
svn status -u -v PATH
The initial status check looks only at your working copy. If you click on then the repository is also checked to see which files would be changed by an update, which requires the -u switch.
If Show unversioned files is checked, TortoiseSVN will also show all unversioned files and folders in the working copy hierarchy, taking account of the ignore rules. This particular feature has no direct equivalent in Subversion, as the svn status command does not descend into unversioned folders.
O gráfico de revisões é uma característica apenas do TortoiseSVN. Não existe comando equivalente para a linha de comando.
What TortoiseSVN does is an
svn info URL_of_WC
svn log -v URL
where URL is the repository root and then analyzes the data returned.
svn info URL_of_WC
svn list [-r rev] -v URL
You can use svn info to determine the repository root, which is the top level shown in the repository browser. You cannot navigate Up above this level. Also, this command returns all the locking information shown in the repository browser.
The svn list call will list the contents of a directory, given a URL and revision.
This command has no CLI equivalent. It invokes TortoiseMerge or an external 3-way diff/merge tool to look at the files involved in the conflict and sort out which lines to use.
svn status -v PATH
The first stage is a status check which determines the items in your working copy which can potentially be reverted. You can review the list, diff files against BASE and select the items you want to be included in the revert.
When you click on OK, the Subversion revert takes place. If you have left all the file selection checkboxes in their default state, TortoiseSVN uses a single recursive (-R) revert of the working copy. If you deselect some files, then every path must be specified individually on the revert command line.
svn revert [-R] PATH...
svn status -v PATH
The first stage is a status check which determines the files in your working copy which can potentially be locked. You can select the items you want to be locked.
svn lock -m "Mensagem de bloqueio" [--force] PATH...
LockMessage here represents the contents of the lock message edit box. This can be empty.
If Steal the locks is checked, use the --force switch.
svn copy -m "LogMessage" URL URL
or
svn copy -m "LogMessage" URL@rev URL@rev
or
svn copy -m "LogMessage" PATH URL
The Branch/Tag dialog performs a copy to the repository. There are 3 radio button options:
- Última revisão no repositório
- especC which correspond to the 3 command line variants above.
LogMessage here represents the contents of the log message edit box. This can be empty.
svn merge [--dry-run] --force From_URL@revN To_URL@revM PATH
The performs the same merge with the --dry-run switch.
svn diff From_URL@revN To_URL@revM
The shows the diff operation which will be used to do the merge.
svn export [-r rev] [--ignore-externals] URL Export_PATH
This form is used when accessed from an unversioned folder, and the folder is used as the destination.
Exporting a working copy to a different location is done without using the Subversion library, so there's no matching command line equivalent.
What TortoiseSVN does is to copy all files to the new location while showing you the progress of the operation. Unversioned files/folders can optionally be exported too.
In both cases, if Omit externals is checked, use the --ignore-externals switch.
svn add PATH...
Se você selecionou uma pasta, o TortoiseSVN inicia fazendo uma busca recursiva nela por ítens que podem ser adicionados.
svn import -m LogMessage PATH URL
LogMessage here represents the contents of the log message edit box. This can be empty.
svn blame -r N:M -v PATH
svn log -r N:M PATH
If you use TortoiseBlame to view the blame info, the file log is also required to show log messages in a tooltip. If you view blame as a text file, this information is not required.
svn propget svn:ignore PATH > tempfile
{edit new ignore item into tempfile}
svn propset svn:ignore -F tempfile PATH
Because the svn:ignore property is often a multi-line value, it is shown here as being changed via a text file rather than directly on the command line.
svn diff PATH > patch-file
TortoiseSVN creates a patch file in unified diff format by comparing the working copy with its BASE version.
Índice
This appendix contains a more detailed discussion of the implementation of some of TortoiseSVN's features.
Every file and folder has a Subversion status value as reported by the Subversion library. In the command line client, these are represented by single letter codes, but in TortoiseSVN they are shown graphically using the icon overlays. Because the number of overlays is very limited, each overlay may represent one of several status values.
The Conflicted overlay is used to represent the conflicted state, where an update or switch results in conflicts between local changes and changes downloaded from the repository. It is also used to indicate the obstructed state, which can occur when an operation is unable to complete.
The Modified overlay represents the modified state, where you have made local modifications, the merged state, where changes from the repository have been merged with local changes, and the replaced state, where a file has been deleted and replaced by another different file with the same name.
The Deleted overlay represents the deleted state, where an item is scheduled for deletion, or the missing state, where an item is not present. Naturally an item which is missing cannot have an overlay itself, but the parent folder can be marked if one of its child items is missing.
The Added overlay is simply used to represent the added status when an item has been added to version control.
The In Subversion overlay is used to represent an item which is in the normal state, or a versioned item whose state is not yet known. Because TortoiseSVN uses a background caching process to gather status, it may take a few seconds before the overlay updates.
The Needs Lock overlay is used to indicate when a file has the svn:needs-lock property set.
The Locked overlay is used when the local working copy holds a lock for that file.
The Ignored overlay is used to represent an item which is in the ignored state, either due to a global ignore pattern, or the svn:ignore property of the parent folder. This overlay is optional.
The Unversioned overlay is used to represent an item which is in the unversioned state. This is an item in a versioned folder, but which is not under version control itself. This overlay is optional.
If an item has Subversion status none (the item is not within a working copy) then no overlay is shown. If you have chosen to disable the Ignored and Unversioned overlays then no overlay will be shown for those files either.
An item can only have one Subversion status value. For example a file could be locally modified and it could be marked for deletion at the same time. Subversion returns a single status value - in this case deleted. Those priorities are defined within Subversion itself.
When TortoiseSVN displays the status recursively (the default setting), each folder displays an overlay reflecting its own status and the status of all its children. In order to display a single summary overlay, we use the priority order shown above to determine which overlay to use, with the Conflicted overlay taking highest priority.
De facto, poderás descobrir que nem todos esses ícones são usados no teu sistema. Isto é porque o número de sobreposições permitida pelo Windows está limitada a 15. O Windows usa 4, e os restantes 11 podem ser usados por outras aplicações. Se não existir um número de slots de sobreposições disponíveis, o TortoiseSVN tenta ser um Bom Cidadão (TM) e limita o seu uso de sobreposições, para dar oportunidade a outras aplicações.
Visto estarem disponíveis clientes Tortoise para outros sistemas de controlo de versões, criámos um componente partilhado responsável pela visualização das sobreposições de ícones. Os pormenores técnicos não são aqui importantes, tudo o que necessitas de saber é que este componente partilhado permite a todos os clientes Tortoise usar as mesmas sobreposições, e por isso o limite das 11 vagas disponíveis não é afectado pela instalação de mais um cliente Tortoise. É claro que existe um senão; todos os clientes Tortoise usam as mesmas sobreposições de ícones, pelo que não consegues distinguir pelas sobreposições, que sistema de controlo de versões está a ser usado pela cópia de trabalho.
Normal, Modified and Conflicted are always loaded and visible.
Deleted is loaded if possible, but falls back to Modified if there are not enough slots.
Read-Only is loaded if possible, but falls back to Normal if there are not enough slots.
Locked is loaded if possible, but falls back to Normal if there are not enough slots.
Added is loaded if possible, but falls back to Modified if there are not enough slots.
O instalador padrão tem suporte apenas para o Inglês, porém você pode fazer o download de pacotes de idiomas e corretores ortográficos separadamente após a instalação.
The TortoiseSVN user interface has been translated into many different languages, so you may be able to download a language pack to suit your needs. You can find the language packs on our translation status page. And if there is no language pack available, why not join the team and submit your own translation ;-)
Each language pack is packaged as a .msi installer. Just run the install program and follow the instructions. After the installation finishes, the translation will be available.
The documentation has also been translated into several different languages. You can download translated manuals from the support page on our website.
TortoiseSVN uses the Windows spell checker if it's available (Windows 8 or later). Which means that if you want the spell checker to work in a different language than the default OS language, you have to install the spell checker module in the Windows settings (Settings > Time & Language > Region & Language).
TortoiseSVN will use that spell checker if properly configured with the tsvn:projectlanguage project property.
In case the Windows spell checker is not available, TortoiseSVN can also use spell checker dictionaries from OpenOffice and Mozilla.
The installer automatically adds the US and UK English dictionaries. If you want other languages, the easiest option is simply to install one of TortoiseSVN's language packs. This will install the appropriate dictionary files as well as the TortoiseSVN local user interface. After the installation finishes, the dictionary will be available too.
Or you can install the dictionaries yourself. If you have OpenOffice or Mozilla installed, you can copy those dictionaries, which are located in the installation folders for those applications. Otherwise, you need to download the required dictionary files from http://wiki.services.openoffice.org/wiki/Dictionaries.
Once you have got the dictionary files, you probably need to rename them so that the filenames only have the locale chars in it. Example:
en_US.affen_US.dic
Then just copy them into the %APPDATA%\TortoiseSVN\dic folder. If that folder isn't there, you have to create it first. TortoiseSVN will also search the Languages sub-folder of the TortoiseSVN installation folder (normally this will be C:\Program Files\TortoiseSVN\Languages); this is the place where the language packs put their files. However, the %APPDATA%-folder doesn't require administrator privileges and, thus, has higher priority. The next time you start TortoiseSVN, the spell checker will be available.
Se você instalar vários dicionários, TortoiseSVN usa essas regras para selecionar uma para usar.
Verifique a configuração
tsvn:projectlanguage.Veja “Configurações do Projeto” para informações sobre a configuração.Se o idioma do projeto não estiver configurado, ou o idioma não estiver instalado, tente o idioma correspondente da configuração do Windows.
If the exact Windows locale doesn't work, try the “Base” language, e.g.
de_CH(Swiss-German) falls back tode_DE(German).Se nada disso funcionar, então o idioma padrão é o Inglês, que está incluido na instalação normal.
- Adicionar
Um comando do Subversion que é usado para adicionar um arquivo ou diretório para a sua cópia de trabalho. Os novos itens são adicionados para o repositório quando você submetê-los.
- Revisão BASE
A revisão base atual de um arquivo ou diretório na sua cópia de trabalho. Está é a revisão que o arquivo ou diretório está, quando a última obtenção, atualização ou submissão foi feita. A revisão BASE normalmente não é igual a ÚLTIMA revisão.
- Autoria
Este comando é apenas para arquivos texto, e ele apresenta para cada lista a revisão do repositório a qual pertence a última alteração, e o autor que fez a alteração. Nossa implementação de interface é chamada TortoiseBlame e também mostra a data/hora da submissão e a mensagem de log quando você passar o mouse sobre o número da revisão.
- Ramificação
Um termo frequentemente usado em sistemas de controle de versão descreve o que acontece quando o desenvolvimento se ramifica num ponto em particular e segue dois caminhos diferentes. Você pode criar uma ramificação desligada da linha principal de desenvolvimento, logo, pode desenvolver novas funcionalidades sem desestabilizar a linha principal. Ou você pode criar uma ramificação da versão estável para a qual você apenas fará correções de erros, enquanto insere novas funcionalidades em uma versão instável no tronco. No Subversion uma ramificação é criada como uma “cópia leve”.
- Obter
Um comando do Subversion que cria uma cópia local em uma diretório vazio baixando os arquivos controlados do repositório.
- Limpar
Uma citação do livro do Subversion: “Limpar recursivamente a cópia de trabalho, removendo travas e encerrando operação não finalizadas. Se você sempre recebe o erro cópia de trabalho travada, execute este comando para remove travas obsoletas e voltar a sua cópia de trabalho para o estado normal novamente. ” Note que neste contexto, trava refere-se ao travamento do sistema de arquivos, e não ao bloqueio no repositório.
- Submeter
Este comando do Subversion é usado para passar as alterações da sua cópia de trabalho de volta para o repositório, criando uma nova revisão no repositório.
- Conflito
Quando as alterações do repositório são combinadas com as alterações locais, algumas vezes estas alterações ocorrem nas mesmas linhas. Neste caso Subversion não pode decidir automaticamente qual versão usar e o arquivo é marcado como em conflito. Você precisa editar este arquivo manualmente e resolver o conflito antes que você possa submeter qualquer alteração adicional.
- Copiar
Em um repositório do Subversion você pode criar uma cópia de de um arquivo apenas ou de uma estrutura inteira. Estas cópias são feitas como “cópias levess> que funcionam mais ou menos como um atalho para o arquivo original, e que consome quase nenhum espa”
- Apagar
Quando vocë excluir um item controlado (e submeter a alteração) este item não existirá mais no repositório depois da revisão submetida. Mas é claro que continuará a existir em revisões anteriores no repositório, logo você pode continuar acessando o arquivo. Se necessário, você pode copiar um item excluído e “recuperar” o mesmo completamente com o histórico.
- Diff
Atalho para “Mostrar Diferenças”. Muito prático quando você quer ver exatamente as alterações que foram feitas.
- Exportar
Este comando produz uma cópia de uma diretório controlado, assim como uma cópia de trabalho, mas sem os diretórios locais
.svn.- FSFS
Um sistema de arquivo proprietário do Subversion para repositórios. Pode ser usado em uma rede compartilhada. O padrão para a versão do repositório 1.2 ou posterior.
- GPO
Objeto da política do grupo.
- Última Revisão
A última revisão do arquivo ou diretório no repositório.
- Importar
Comando do Subversion para importar um diretório e sua subestrutura inteira para o repositório em uma única revisão.
- Bloquear
Quando você bloqueia um item controlado, você marca o item no repositório como um arquivo não atualizável, exceto para a cópia de trabalho que bloqueiou o arquivo.
- Log
Mostra o histórico de revisão de um arquivo ou diretório. Também conhecido como “Histórico”.
- Histórico
Mostra o histórico de revisões de um arquivo ou diretório. Também conhecido como “Log”.
- Combinar
O processo pelo qual as mudanças do repositório são adicionadas na sua cópia de trabalho sem perder qualquer alteração que você tenha feita localmente. Algumas vezes essas alterações não podem ser combinar automaticamente e a cópia de trabalho indicará que há conflito.
Combinar acontece automaticamente quando você atualiza sua cópia de trabalho. Você pode também combinar mudanças específicas de outra ramificação usando o comando Combinar do TortoiseSVN.
- Correção
Se uma cópia de trabalho possui alterações apenas em arquivos texto, é possível usar o comando Diferenças do Subversion para gerar um arquivo simples de resumo dessas alterações no formato Unified Diff. Um arquivo deste tipo é oferecido como “Correção”, e ele pode ser enviado por e-mail para alguém (ou para uma lista de discussão) e ser aplicado em outra cópia de trabalho. Alguém sem acesso para submissão pode fazer alterações e enviar um arquivo de correção para alguém com permissão de escrita submeter as alterações. Ou se você não tem certeza sobre a alteração você pode enviar o arquivo de correção para outros revisarem.
- Propriedade
Como complemento para versionamento de diretórios e arquivos, Subversion permite adicionar metadados controlados - referenciado como “propriedades” para cada diretório ou arquivo controlado. Cada propriedade tem um nome e um valor, assim como uma chave de registro. Subversion tem algumas propriedades especiais que são usadas internamente, tal como
svn:eol-style. TortoiseSVN tem algumas também, tal comotsvn:logminsize. Você pode adicionar suas próprias propriedades com qualquer nome ou valor que você queira.- Reposicionar
Se seu repositório for movido, talvez porque você precisou movê-lo para um diretório diferente no servidor, ou porque o nome do domínio do servidor foi alterado, você precisa “realocar” sua cópia de trabalho para a nova URL onde o seu repositório está localizado.
Nota: você deverá somente usar este comando se sua cópia de trabalho aponta para o mesmo local no mesmo repositório, mas o repositório foi movido. Em qualquer outra circustância você provavelmente deverá usar “Alternar” ao invés deste comando.
- Repositório
Um repositório é um lugar central onde os dados são guardados e mantidos. Um repositório pode ser um lugar onde várias bases de dados ou arquivos são localizados para distribuir pela rede, ou um repositório pode ser um local que é diretamente acessado pelos usuários sem ter que atravessar uma rede.
- Resolver
Quando os arquivos na cópia de trabalho são deixados em estado de conflito logo depois de serem unificados, estes conflitos devem ser resolvidos por um ser humano usando um editor (ou talvez o TortoiseMerge). Este processo é referenciado como “Resolvendo Conflitos”. Quando tudo foi resolvido você pode marcar os arquivos conflitantes como resolvidos, e então será permtido submeter estes arquivos.
- Reverter
Subversion mantém uma cópia local “original” de cada arquivo de como ele era quando foi feita a última atualização da cópia de trabalho. Se você fez alterações e decidir que quer desfazê-las, você pode usar o comando “reverter” para voltar para a revisão original.
- Revisão
Cada vez que você submete um conjunto de alterações, você cria uma nova “revisão” no repositório. Cada revisão representa um estado da estrutura do repositório em um certo ponto de sua história. Se você quer voltar no tempo você pode examiar o repositório como ele era na revisão N.
De outro ponto de vista, uma revisão pode referenciar um conjunto de mudanças que foram feitas quando a revisão foi criada.
- Propriedade da Revisão (revprop)
Assim como os arquivo possuem propriedades, assim também é para cada revisão no repositório. Algumas revprops especiais são adicionadas automaticamente quando a revisão é criada, chamadas:
svn:date svn:author svn:logque representam a data/hora, o autor e a mensagem de log da submissão respectivamente. Estas propriedades podem ser editadas, mas elas não são controladas, então qualquer alteração é permanente e não pode ser desfeita.- SVN
Uma abreviação frequentemente usada para Subversion.
O nome do protocolo personalizado do Subversion usado pelo servidor de respotório “svnserve”.
- Alternar
Assim como “Atualizar para a revisão” altera a versão de uma cópia de trabalho apontando para um ponto diferente no histórico, assim também “Alternar” altera o espaço de uma cópia de trabalho que aponta para uma parte diferente do repositório. Isto é particularmente útil quando se está trabalhando no tronco e na ramificação e apenas poucos arquivos são diferentes. Você pode alternar sua cópia de trabalho entre os dois e somente os arquivos diferentes serão transferidos.
- Atualizar
Este comando do Subversion baixa as últimas alterações do repositório para a sua cópia de trabalho, combinando qualquer alteração feita por outros usuários com suas alterações locais na cópia de trabalho.
- Cópia de Trabalho
Está a sua estrutura local “isolada”, e é onde você vai trabalhar sobre os arquivos controlados, e isto normalmente ficará em seu disco local. Você cria uma cópia de trabalho executando um “Obter” de um repositório, e você envia suas alterações de volta para o repositório executando um “Submeter”.
Símbolos
- 'cópia de trabalho' não versionada, Exportando um Cópia de Trabalho do Subversion
- (+), Estado Local e Remoto
A
- Acesso, Acesso Local para o Repositório
- ações server-side, O Navegador de Repositório
- adicionar, Adicionando Novos Arquivos e Diretórios
- Adicionar arquivos no repositório, Importando Dados Para Um Repositório
- anotação, Quem Mudou Qual Linha?
- apagar, Apagando arquivos e diretórios
- arquivos especiais, Arquivos Especiais
- arquivos temporários, Importar
- arquivos/diretório não versionados, Ignorando Arquivos e Diretórios
- arrastar direito, Arrastar e Soltar
- arrastar-e-soltar, Arrastar e Soltar
- atalho, Criar atalho para um repositório
- atualizar, Atualizar sua Cópia de Trabalho com mudanças feitas por outros, Atualizar os arquivos selecionados a partir do repositório
- autenticação, Autenticação
- auto-props, Definição automática de propriedade
- automatizando, Comandos do TortoiseSVN, Controlador de URL do Tsvncmd, Comandos do TortoiseIDiff , Comandos TortoiseUDiff
- autoria, Quem Mudou Qual Linha?
B
- bloqueando, Bloqueando
- bugtracker, Integração com Sistemas de Rastreamento de Erros / Rastreadores de Reportes
- buscar mudanças, Atualizar sua Cópia de Trabalho com mudanças feitas por outros
C
- Cache de log, Cache de Log
- Caminhos UNC, Acesso Local para o Repositório
- checkout esparso, Obtendo Uma Cópia de Trabalho
- CLI,
- clique do botão direito, Menus do Contexto
- COM, ,
- COM SubWCRev interface, COM interface
- combinar conflitos, Handling Conflicts after Merge
- commit monitor,
- comparando revisões, Comparando Diretórios
- comparar, Visualizando as Diferenças
- Comparar arquivos, Compare duas revisões de um arquivo ou pasta
- Comparar diretórios, Compare duas revisões de um arquivo ou pasta
- configurações, Configurações do TortoiseSVN
- conflito, A solução Copiar-Modificar-Unificar, Resolvendo Conflitos
- conflito de estrutura, Resolvendo Conflitos
- Controlador de domínio, Deploy TortoiseSVN via group policies
- Controlador de URL, Controlador de URL do Tsvncmd
- controle de versão,
- cópia de segurança, Cópia de Segurança do Repositório
- cópia de trabalho, Cópias de Trabalho
- copiar, Ramificando / Rotulando, O Navegador de Repositório
- copiar arquivos, Copiando/Movendo/Renomeando Arquivos e Diretórios
- correção, Criando e Aplicando Correções
- corretor ortográfico, Corretor ortográfico
- criando o repositório, Criação do Repositório
- Criar, Criando um Repositório com a linha de comando do cliente
- TortoiseSVN, Criando um Repositório com o TortoiseSVN
- criar a cópia de trabalho, Obtendo Uma Cópia de Trabalho
D
- deploy, Deploy TortoiseSVN via group policies
- desabilitar funções, Desabilitar opções do menu de contexto
- desfazer, Desfazendo Alterações
- desfazer alteração, Reverter (Desfazer) revisões no repositório
- desfazer submissão, Reverter (Desfazer) revisões no repositório
- detach from repository, Ignorar arquivos que já estão versionados
- dicionário, Corretor ortográfico
- diferenças, Visualizando as Diferenças, Criando e Aplicando Correções
- diferenças da imagem, Comparando Imagens Utilizando o TortoiseIDiff
- diferenças unificadas, Criando e Aplicando Correções
E
- editar log/autor, Alterando a Mensagem de Auditoria e o Autor
- enviar alterações, Submetendo Suas Alterações Para o Repositório
- estatísticas, Informação Estatística
- eventos, Rotinas de eventos no servidor
- Eventos do cliente, Client Side Hook Scripts
- expandir palavras-chave, svn:keywords
- explorer, Caracterísiticas do TortoiseSVN
- exportar, Exportando um Cópia de Trabalho do Subversion
- exportar modificações, Comparando Diretórios
- extração versão,
F
- FAQ,
- ferramenta de diferenciação, Ferramentas de Diferenciação/Combinação Externas
- ferramentas de unificação, Ferramentas de Diferenciação/Combinação Externas
- filtro, Filtrando Mensagens de Log
G
- gerando diferenças, Visualizar diferenças
- globais, Padrões de Filtro na Lista de Arquivos Ignorados
- GPO, Deploy TortoiseSVN via group policies
- gráfico, Gráfico de Revisões
- gráfico de revisões, Gráfico de Revisões
- grupo de políticas, Deploy TortoiseSVN via group policies, Desabilitar opções do menu de contexto
H
- histórico, Janela de Revisão de Registro
- histórico de combinações, Histórico de combinações
- histórico de erros, Integração com Sistemas de Rastreamento de Erros / Rastreadores de Reportes
I
- IBugtraqProvider,
- ícones, Sobreposição dos Ícones
- ignorar, Ignorando Arquivos e Diretórios
- importando na pasta, Importando na Pasta
- importar, Importando Dados Para Um Repositório
- instalar, Instalação
- Interface do Windows, Caracterísiticas do TortoiseSVN
L
- limpar, Desfazendo Alterações, Limpar
- linha de comando, Comandos do TortoiseSVN, Comandos do TortoiseIDiff , Comandos TortoiseUDiff
- linha de comando do cliente,
- lista de alterações, Lista de Alterações
- Livro do Subversion,
- log, Janela de Revisão de Registro
- log de rastreamento de combinação, Combinar Recursos Monitorados
- louvor, Quem Mudou Qual Linha?
M
- manipulador de arraste, Arrastar e Soltar
- marcar liberação, Ramificando / Rotulando
- maximizar, Maximizando Janelas
- mensagem de log, Usuario forçando para entrar uma messagem de log
- mensagem de submissão, Usuario forçando para entrar uma messagem de log
- mensagem vazia, Usuario forçando para entrar uma messagem de log
- mensagens de log, Janela de Revisão de Registro
- mensagens de submissão, Janela de Revisão de Registro
- menu do contexto, Menus do Contexto
- Microsoft Word, Comparando Documentos Office
- modificações, Estado Local e Remoto
- monitoring projects,
- movendo, Mover/copiar vários arquivos de uma só vez
- mover, Movendo arquivos e diretórios
- mover arquvos, Copiando/Movendo/Renomeando Arquivos e Diretórios
- msi, Deploy TortoiseSVN via group policies
- mudanças, Compare duas revisões de um arquivo ou pasta
N
- não versionado, Removendo uma cópia de trabalho do controle de versão, Ignorar arquivos que já estão versionados
- navegador de repositório, O Navegador de Repositório
- Número de versão nos arquivos,
O
- obter, Obtendo Uma Cópia de Trabalho
- Obter parcialmente, Obtendo Uma Cópia de Trabalho
- opções do menu de contexto, Desabilitar opções do menu de contexto
P
- pacotes de idioma, Pacotes de Idioma
- padrão de exclusão, Configurações Gerais
- padrão global de arquivos ignorados, Configurações Gerais
- padrões de filtro, Padrões de Filtro na Lista de Arquivos Ignorados
- palavras-chave, svn:keywords
- plugin,
- project monitor,
- Projetos ASP, Alternado SVN_ASP_DOT_NET_HACK variável do ambiente
- Projetos comuns, Inclua um subprojeto em comum
- projetos de fornecedores, Inclua um subprojeto em comum
- propriedades da revisão, Alterando a Mensagem de Auditoria e o Autor
- propriedades do projeto, Propriedades do Projeto TortoiseSVN
- propriedades do Subversion, Propriedades do Subversion
- Propriedades do TortoiseSVN, Propriedades do Projeto TortoiseSVN
- propriedades do windows, Situação Detalhada
R
- ramificação, Copiando/Movendo/Renomeando Arquivos e Diretórios, Ramificando / Rotulando
- rastreador de reportes, Integração com Sistemas de Rastreamento de Erros / Rastreadores de Reportes,
- Rede Compartilhada, Acessando um Repositório em uma Rede Compartilhada
- referências externas, Itens Externos, Inclua um subprojeto em comum
- registro, Configurações Avançadas
- remote commits,
- remover, Apagando arquivos e diretórios
- remover versionamento, Ignorar arquivos que já estão versionados
- renomear, Movendo arquivos e diretórios, O Navegador de Repositório, Mover/copiar vários arquivos de uma só vez
- renomear arquivos, Copiando/Movendo/Renomeando Arquivos e Diretórios
- reorganizar, Mover/copiar vários arquivos de uma só vez
- reposicionar, Realocando uma cópia de trabalho
- repositório, O Repositório, Importando Dados Para Um Repositório
- repositórios externos, Itens Externos
- resolver, Resolvendo Conflitos
- retroceder, Reverter (Desfazer) revisões no repositório
- reverter, Desfazendo Alterações, Reverter (Desfazer) revisões no repositório
- revisão, Revisões, Gráfico de Revisões
- revprops, Alterando a Mensagem de Auditoria e o Autor
- Rotinas para eventos, Rotinas de eventos no servidor, Client Side Hook Scripts
- rotinas para eventos no servidor, Rotinas de eventos no servidor
- rótulo, Copiando/Movendo/Renomeando Arquivos e Diretórios, Ramificando / Rotulando
S
- servidor movido, Realocando uma cópia de trabalho
- servidor proxy, Configurações de rede
- shelve, Shelving
- situação, Obtendo Informações de Estado, Estado Local e Remoto
- situação da cópia de trabalho, Obtendo Informações de Estado
- Sobrepor prioridade, Sobreposição dos Ícones
- somente leitura, Bloqueando
- sons, Configurações Gerais
- sopreposições, Sobreposição dos Ícones, Sobreposição dos Ícones
- submetendo, Submetendo Suas Alterações Para o Repositório
- submeter, Submetendo Suas Alterações Para o Repositório
- SUBST drives, Configurações de Sobreposição dos Ícones
- SubWCRev,
- SVN_ASP_DOT_NET_HACK, Alternado SVN_ASP_DOT_NET_HACK variável do ambiente
T
- TortoiseIDiff, Comparando Imagens Utilizando o TortoiseIDiff
- traduções, Pacotes de Idioma
- trocar, Para Obter ou Alternar
U
- unificação, Unificando
- duas árvores, Combinando Duas Árvores Diferentes
- intervalo de revisão, Unificar um Intervalo de Revisões
- unshelve, Shelving
- URL alterada, Realocando uma cópia de trabalho
- URL do repositório alterada, Realocando uma cópia de trabalho
V
- verificação de atualização, Redirecionar a verificação de atualização
- verificar nova versão, Redirecionar a verificação de atualização
- versão, Redirecionar a verificação de atualização
- versionar novos arquivos, Adicionando Novos Arquivos e Diretórios
- ViewVC, Integração com visualizadores de repositórios locados na web
- vínculo, Vínculos externos
- Vínculo do TortoiseSVN, Vínculos externos
- vínculo externo, Vínculos externos
- visualizador do servidor, O Navegador de Repositório
- visualizar de repositório, Integração com visualizadores de repositórios locados na web
- visualizar modificações, Obtendo Informações de Estado
- visualizar web, Integração com visualizadores de repositórios locados na web
- VS2003, Alternado SVN_ASP_DOT_NET_HACK variável do ambiente
