在软件开发中,修改依赖于一个bug或问题编号是很常见的。bug跟踪系统的用户(问题跟踪者)喜欢在问题跟踪中将Subversion的修改与一个指定编号联系起来。因此很多问题跟踪者提供了一个预提交钩子脚本,分析日志,查找提交相关的bug编号。这稍微有些不可靠,因为它依赖于用户写完全的日志,预提交钩子才能正确分析。
TortoiseSVN可以在两个方面帮助用户:
当用户输入日志信息时,一个定义良好,包含问题编号,与此提交相关的的行,会自动增加。这样减少了用户输入的问题编号不能比bug跟踪系统正确分析的风险。
或者TortoiseSVN高亮显示日志消息中能被问题跟踪者识别的部分。这样,用户就知道日志消息能被正确解析。
当用户浏览日志信息,TortoiseSVN在日志信息中创建指向每个bug标示的链接,它可以用浏览器打开。
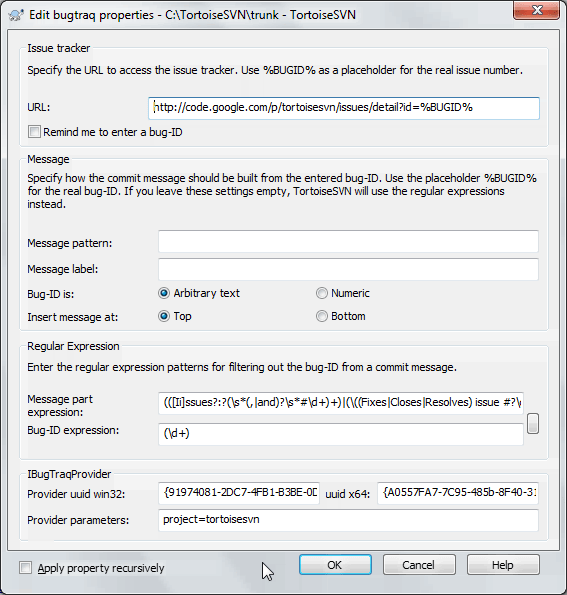
您可以在 TortoiseSVN 中为您的选择集成一个错误跟踪工具。为此,您必须定义一些属性,用 bugtraq: 开头。它们必须设置于文件夹: (“项目设置”一节)
When you edit any of the bugtraq properties a special property editor is used to make it easier to set appropriate values.
有两种方式将问题跟踪器集成于 TortoiseSVN。一种基于简单的字符串,另一种基于 正则表达式。两种方法使用的属性为:
- bugtraq:url
将这个属性设置为你的bug跟踪工具的地址。它必须编码并且包含<literal>%BUGID%</literal>。<literal>%BUGID%</literal>用你输入的问题编号替换。它允许TortoiseSVN 在日志对话框中显示链接,于是你可以在察看版本日志时直接进入bug跟踪工具。你可以不提供这个属性,但是这样TortoiseSVN就不能显示链接了,只能显示问题编号。例如TortoiseSVN 使用<literal>http://issues.tortoisesvn.net/?do=details&id=%BUGID%</literal>。
您也可以使用相对地址来代替绝对地址。当您的问题跟踪器和源版本库在同一域/服务器上时,这非常有用。即使在域名称发生更改的情况下,您也不必调整
bugtraq:url属性。有两种方式来指定相对地址:If it begins with the string
^/it is assumed to be relative to the repository root. For example,^/../?do=details&id=%BUGID%will resolve tohttps://tortoisesvn.net/?do=details&id=%BUGID%if your repository is located onhttps://tortoisesvn.net/svn/trunk/.A URL beginning with the string
/is assumed to be relative to the server's hostname. For example/?do=details&id=%BUGID%will resolve tohttps://tortoisesvn.net/?do=details&id=%BUGID%if your repository is located anywhere onhttps://tortoisesvn.net.- bugtraq:warnifnoissue
如果你想TortoiseSVN给出空问题编号的警告,就设置为 <literal>真</literal>。有效取值是 <literal>真/假</literal>。<emphasis>如果没有定义,那么假定为 <literal>假</literal></emphasis>。
在最简单的方法里,TortoiseSVN为用户显示了一个单独的bug ID输入字段,然后后面预计会追加一个用户输入日志信息的行。
- bugtraq:message
此属性以输入字段模式激活问题跟踪系统。如果设置了此属性,在提交更改时,TortoiseSVN 将提示您输入问题单编号。它通常会在日志信息后面添加一行。必须包含
%BUGID%,在提交时会被替换为问题单编号。这确保了您的提交日志包含了对总是保持一致格式并且可被问题跟踪工具解析的问题单编号的引用,从而将问题与特定提交相关联。例如,您可能使用Issue : %BUGID%,但是这取决于您的工具。- bugtraq:label
是TortoiseSVN的提交对话框中用来输入问题单号码的输入项,如果没有设置,将会显示<literal>Bug-ID / Issue-Nr:</literal>,要记住窗口不会为适应标签而改变大小,所以请保持标签的小于20-25个字符。
- bugtraq:number
如果设置为
true,在问题单编号文本字段中只允许输入数字。逗号除外,因此您可以使用逗号来分隔多个数字。有效的值为true/false。如果未定义,假定为true。- bugtraq:append
这个属性定义了bug-ID。是追加到(true)日志信息的末尾,还是插入到(false)日志信息的开始。有效的值包括
true/false,如果没有定义,默认是true,所以现存的项目不会被打破。
在含正则表达式的方法中,TortoiseSVN 不会显示一个单独的输入字段,而是标记用户所输入的日志信息的一部分,这可以被问题追踪工具所识别。这是在用户编写日志信息的时候完成的,这也意味着 bug ID 可以出现在日志信息的任何位置!这种方法更为灵活,也是 TortoiseSVN 项目本身使用的方法。
- bugtraq:logregex
此属性以正则表达式模式激活问题追踪系统。它既可包含单个正则表达式,也可包含以新行来分隔的两个正则表达式。
如果设置了两个表达式,那么第一个表达式用作为一个预过滤器来查找包含 bug ID 的表达式。然后第二个表达式从第一个正则表达式的结果中提取显现出的 bug ID。这允许您使用 bug ID 列表和自然语言表达式,如果您愿意的话。例如,您可能修复几个 bug 并包括像这样的字符串: “This change resolves issues #23, #24 and #25”。
如果您想像上述日志信息中的表达式那样捕获 bug ID,您可以使用下面的 TortoiseSVN 项目所使用的正则表达式字符串:
[Ii]ssues?:?(\s*(,|and)?\s*#\d+)+和(\d+)。第一个表达式从日志消息中筛选出 “issues #23, #24 and #25”。第二个正则表达式从第一个正则表达式的输出中提取纯粹的十进制数, 因此它将返回 “23”, “24” 和 “25” 并用作为 bug ID。
稍微分解一下第一个正则表达式,它必须以 “issue” 开头,可以大写。其后也可以跟一个 “s” (多个问题) 和一个冒号。这之后跟一个或多个组,每个都有零个或多个前导空格、可选的逗号或 “and” 以及更多的可选空格。最后强制使用 “#” 和十进制数。
如果只设置了一个表达式,则出现的 bug ID 必须按正则表达式字符串组匹配。例如:
[Ii]ssue(?:s)? #?(\d+)此方法是一些问题跟踪器所必需的,比如 trac,但它构建正则表达式会更难。我们建议您仅使用此方法,如果您的问题跟踪器文档告诉你如此。If you are unfamiliar with regular expressions, take a look at the introduction at https://en.wikipedia.org/wiki/Regular_expression, and the online documentation and tutorial at http://www.regular-expressions.info/.
It's not always easy to get the regex right so to help out there is a test dialog built into the bugtraq properties dialog. Click on the button to the right of the edit boxes to bring it up. Here you can enter some test text, and change each regex to see the results. If the regex is invalid the edit box background changes to red.
如果同时设置了bugtraq:message和bugtraq:logregex属性,日志正则表达式会优先使用。
提示
即使你的问题追踪工具没有pre-commit钩子来解析日志信息,你仍然可以使用这个功能将日志信息中的问题单转化为链接!
即使您不需要链接,问题单编号会在日志对话框中显示为一个单独的列,可更容易找到相对于某特定问题单的变动。
一些 tsvn: 属性需要 true/false 值。TortoiseSVN 也理解 yes 是 true 的同义词,no 是 false 的同义词。
设置文件夹的属性
为了系统能够工作,这个属性必须设置到文件夹上。当您提交文件或文件夹时,属性会从文件夹上读取。如果没有发现属性,TortoiseSVN 会向上级搜索整个目录树,直到一个没有版本控制的文件夹或发现根目录(例如C:\)为止。如果您能够确定每个用户只从 trunk/ 检出,而不是一些子目录,那么您只在 trunk/ 上设置属性就足够了。如果不能确定,您必须为每个子目录设置这些属性。在较深的项目层次结构中的属性设置将重写较高级别上的设置(更靠近 trunk/ 的)。
As of version 1.8, TortoiseSVN and Subversion use so called inherited properties, which means a property that is set on a folder is automatically also implicitly set on all subfolders. So there's no need to set the properties on all folders anymore but only on the root folder.
对于tsvn:属性,例如 tsvn:,bugtraq: 和 webviewer:,你只能对于所有子文件夹使用递归复选框设置属性,不用将这些属性设置在文件上。
当你使用TortoiseSVN在工作副本中新建一个子目录, 上层目录的所有项目属性都会自动的被继承。.
没有来自版本库浏览器的问题跟踪器信息
Because the issue tracker integration depends upon accessing Subversion properties, you will only see the results when using a checked out working copy. Fetching properties remotely is a slow operation, so you will not see this feature in action from the repo browser unless you started the repo browser from your working copy. If you started the repo browser by entering the URL of the repository you won't see this feature.
出于同样的原因,当使用版本库浏览器添加子文件夹时,项目属性将不会被自动传递到子文件夹。
This issue tracker integration is not restricted to TortoiseSVN; it can be used with any Subversion client. For more information, read the full Issue Tracker Integration Specification in the TortoiseSVN source repository. (“许可协议”一节 explains how to access the repository.)
前一节介绍了在日志信息中添加问题单信息,那如何从问题跟踪器中获取信息呢?提交对话框有一个 COM 接口,可允许集成一个能够跟跟踪器交互的外部程序。通常,您可能想查询跟踪器以得到分配给您的开放问题列表,以便于您能选取提交中正在解决的问题。
Any such interface is of course highly specific to your issue tracker system, so we cannot provide this part, and describing how to create such a program is beyond the scope of this manual. The interface definition and sample plugins in C# and C++/ATL can be obtained from the contrib folder in the TortoiseSVN repository. (“许可协议”一节 explains how to access the repository.) A summary of the API is also given in 第 7 章 IBugtraqProvider 接口. Another (working) example plugin in C# is Gurtle which implements the required COM interface to interact with the Google Code issue tracker.
为便于说明,假设您的系统管理员已向您提供了已安装的问题跟踪器插件,并且您已让一些工作副本使用了 TortoiseSVN 设置对话框中的插件。当您从已分配了插件的工作副本中打开提交对话框时,您会在对话框顶部看到一个新的按钮。
在此示例中,您可以选择一个或多个开放问题。然后,该插件可以生成特殊格式的文本,并将其添加到您的日志消息中。
