Kadang kala Anda perlu mengetahui tidak hanya baris apa yang berubah, tapi juga siapa sebenarnya yang mengubah baris tertentu dalam file. Itulah ketika perintah, → kadang-kadang juga dirujuk sebagai perintah anotasi dengan mudah.
Perintah ini mendaftar, untuk setiap baris dalam sebuah file, pembuat dan revisi dimana baris diubah.
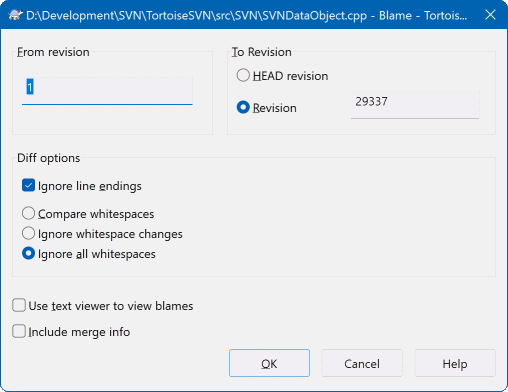
Jika Anda tidak tertarik dalam perubahan dari revisi sebelumnya Anda bisa men-set revisi dari dimana blame seharusnya dimulai. Set ini ke 1, jika Anda ingin blame untuk setiap revisi.
By default the blame file is viewed using TortoiseBlame, which highlights the different revisions to make it easier to read. If you wish to print or edit the blame file, select Use Text viewer to view blames.
You can specify the way that line ending and whitespace changes are handled. These options are described in bagian bernama “Line-end and Whitespace Options”. The default behaviour is to treat all whitespace and line-end differences as real changes, but if you want to ignore an indentation change and find the original author, you can choose an appropriate option here.
You can include merge information as well if you wish, although this option can take considerably longer to retrieve from the server. When lines are merged from another source, the blame information shows the revision the change was made in the original source as well as the revision when it was merged into this file.
Once you press TortoiseSVN starts retrieving the data to create the blame file. Once the blame process has finished the result is written into a temporary file and you can view the results.
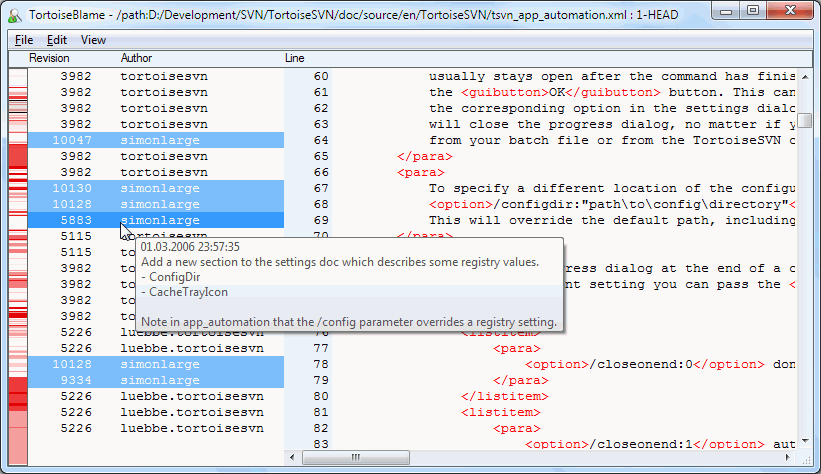
TortoiseBlame, yang disertakan dengan TortoiseSVN, membuat file blame lebih mudah dibaca. Ketika Anda membawa mouse diatas baris dalam kolom info blame, semua baris dengan revisi sama ditampilkan dengan latar belakang lebih gelap. Baris dari revisi lain yang diubah oleh pembuat yang sama ditampilkan dengan latar belakang terang. Pewarnaan mungkin tidak bekerja dengan jelas jika Anda mempunyai layar yang di-set ke mode warna 256.
Jika Anda mengklik kiri pada sebuah baris, semua baris dengan revisi sama diterangi, dan baris dari revisi lain oleh pembuat yang sama diterangi dalam warna lebih terang. Penerangan ini lengket, membolehkan Anda untuk memindahkan mouse tanpa kehilangan penerangan. Klik pada revisi itu lagi untuk mematikan penerangan.
Komentar revisi ditampilkan dalam kotak petunjuk kapan saja mouse berjalan di atas kolom info blame. Jika Anda ingin menyalin pesan log untuk revisi itu, gunakan menu konteks yang muncul jika Anda mengeklik kanan pada kolom info blame.
Anda bisa mencari di dalam laporan Blame menggunakan → . Ini membolehkan Anda untuk mencari angka revisi, pembuat dan isi dari file itu sendiri. Log pesan tidak disertakan dalam pencarian - Anda harus menggunakan Dialog Log untuk mencarinya.
Anda juga dapat lompat ke suatu baris spesifik menggunakan → .
When the mouse is over the blame info columns, a context menu is available which helps with comparing revisions and examining history, using the revision number of the line under the mouse as a reference. → generates a blame report for the same file, but using the previous revision as the upper limit. This gives you the blame report for the state of the file just before the line you are looking at was last changed. → starts your diff viewer, showing you what changed in the referenced revision. → displays the revision log dialog starting with the referenced revision.
If you need a better visual indicator of where the oldest and newest changes are, select → . This will use a colour gradient to show newer lines in red and older lines in blue. The default colouring is quite light, but you can change it using the TortoiseBlame settings.
If you are using Merge Tracking and you requested merge info when starting the blame, merged lines are shown slightly differently. Where a line has changed as a result of merging from another path, TortoiseBlame will show the revision and author of the last change in the original file rather than the revision where the merge took place. These lines are indicated by showing the revision and author in italics. The revision where the merge took place is shown separately in the tooltip when you hover the mouse over the blame info columns. If you do not want merged lines shown in this way, uncheck the Include merge info checkbox when starting the blame.
If you want to see the paths involved in the merge, select → . This shows the path where the line was last changed, excluding changes resulting from a merge.
The revision shown in the blame information represents the last revision where the content of that line changed. If the file was created by copying another file, then until you change a line, its blame revision will show the last change in the original source file, not the revision where the copy was made. This also applies to the paths shown with merge info. The path shows the repository location where the last change was made to that line.
The settings for TortoiseBlame can be accessed using → on the TortoiseBlame tab. Refer to bagian bernama “TortoiseBlame Settings”.
One of the limitations of the Blame report is that it only shows the file as it was in a particular revision, and the last person to change each line. Sometimes you want to know what change was made, as well as who made it. If you right click on a line in TortoiseBlame you have a context menu item to show the changes made in that revision. But if you want to see the changes and the blame information simultaneously then you need a combination of the diff and blame reports.
Dialog log revisi menyertakan beberapa opsi yang membolehkan Anda melakukan ini.
- Revisi Blame
Dalam pane atas, pilih 2 revisi, lalu pilih → . Ini akan mengambil data blame untuk 2 revisi, lalu gunakan peninjau diff untuk membandingkan dua file blame.
- Blame Changes
Select one revision in the top pane, then pick one file in the bottom pane and select → . This will fetch the blame data for the selected revision and the previous revision, then use the diff viewer to compare the two blame files.
- Bandingkan dan Blame dengan BASE Pekerjaan
Menampilkan log untuk file tunggal, dan dalam pane atas, pilih revisi tunggal, lalu pilih → . Ini akan mengambil data blame untuk revisi yang dipilih, dan untuk file dalam BASE pekerjaan, kemudian gunakan peninjau diff untuk membandingkan dua file blame.

