Dimana cabang digunakan untuk memelihara baris terpisah dari pengembangan pada beberapa tahap Anda akan menginginkan untuk menggabung perubahan yang dibuat pada satu cabang kembali ke dalam trunk, atau sebaliknya.
It is important to understand how branching and merging works in Subversion before you start using it, as it can become quite complex. It is highly recommended that you read the chapter Branching and Merging in the Subversion book, which gives a full description and many examples of how it is used.
The next point to note is that merging always takes place within a working copy. If you want to merge changes into a branch, you have to have a working copy for that branch checked out, and invoke the merge wizard from that working copy using → .
Secara umum adalah ide yang baik untuk melakukan penggabungan ke dalam copy pekerjaan yang tidak diubah. Jika Anda membuat perubahan lain dalam WC Anda, komit itu dulu. Jika penggabungan tidak seperti yang Anda harapkan, Anda mungkin ingin memulihkan perubahan, dan perintah Pulihkan akan mengabaikan semua perubahan termasuk setiap yang Anda buat sebelum penggabungan.
There are three common use cases for merging which are handled in slightly different ways, as described below. The first page of the merge wizard asks you to select the method you need.
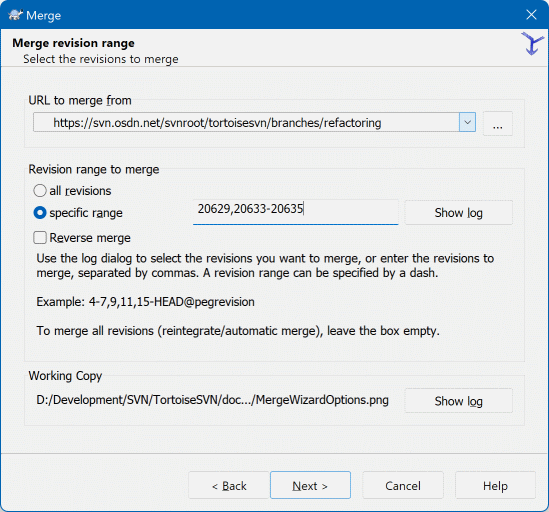
- Merge a range of revisions
Metode ini mengetengahkan kasus ketika Anda sudah membuat satu atau lebih revisi ke cabang (atau ke trunk) dan Anda ingin mengirimkan perubahan itu ke cabang yang berbeda.
What you are asking Subversion to do is this: “ Calculate the changes necessary to get [FROM] revision 1 of branch A [TO] revision 7 of branch A, and apply those changes to my working copy (of trunk or branch B). ”
If you leave the revision range empty, Subversion uses the merge-tracking features to calculate the correct revision range to use. This is known as a reintegrate or automatic merge.
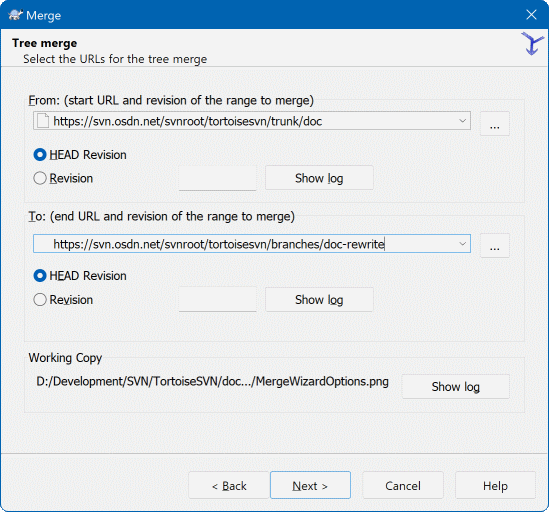
- Merge two different trees
This is a more general case of the reintegrate method. What you are asking Subversion to do is: “ Calculate the changes necessary to get [FROM] the head revision of the trunk [TO] the head revision of the branch, and apply those changes to my working copy (of the trunk). ” The net result is that trunk now looks exactly like the branch.
If your server/repository does not support merge-tracking then this is the only way to merge a branch back to trunk. Another use case occurs when you are using vendor branches and you need to merge the changes following a new vendor drop into your trunk code. For more information read the chapter on vendor branches in the Subversion Book.
In the From: field enter the full folder URL of the branch or tag containing the changes you want to port into your working copy. You may also click to browse the repository and find the desired branch. If you have merged from this branch before, then just use the drop down list which shows a history of previously used URLs.
If you are merging from a renamed or deleted branch then you will have to go back to a revision where that branch still existed. In this case you will also need to specify that revision as a peg revision in the range of revisions being merged (see below), otherwise the merge will fail when it can't find that path at HEAD.
In the Revision range to merge field enter the list of revisions you want to merge. This can be a single revision, a list of specific revisions separated by commas, or a range of revisions separated by a dash, or any combination of these.
If you need to specify a peg revision for the merge, add the peg revision at the end of the revisions, e.g. 5-7,10@3. In the above example, the revisions 5,6,7 and 10 would be merged, with 3 being the peg revision.
Penting
There is an important difference in the way a revision range is specified with TortoiseSVN compared to the command line client. The easiest way to visualise it is to think of a fence with posts and fence panels.
With the command line client you specify the changes to merge using two “fence post” revisions which specify the before and after points.
With TortoiseSVN you specify the changeset to merge using “fence panels”. The reason for this becomes clear when you use the log dialog to specify revisions to merge, where each revision appears as a changeset.
If you are merging revisions in chunks, the method shown in the Subversion book will have you merge 100-200 this time and 200-300 next time. With TortoiseSVN you would merge 100-200 this time and 201-300 next time.
This difference has generated a lot of heat on the mailing lists. We acknowledge that there is a difference from the command line client, but we believe that for the majority of GUI users it is easier to understand the method we have implemented.
The easiest way to select the range of revisions you need is to click on , as this will list recent changes with their log comments. If you want to merge the changes from a single revision, just select that revision. If you want to merge changes from several revisions, then select that range (using the usual Shift-modifier). Click on and the list of revision numbers to merge will be filled in for you.
If you want to merge changes back out of your working copy, to revert a change which has already been committed, select the revisions to revert and make sure the Reverse merge box is checked.
If you have already merged some changes from this branch, hopefully you will have made a note of the last revision merged in the log message when you committed the change. In that case, you can use for the Working Copy to trace that log message. Remembering that we are thinking of revisions as changesets, you should Use the revision after the end point of the last merge as the start point for this merge. For example, if you have merged revisions 37 to 39 last time, then the start point for this merge should be revision 40.
If you are using the merge tracking features of Subversion, you do not need to remember which revisions have already been merged - Subversion will record that for you. If you leave the revision range blank, all revisions which have not yet been merged will be included. Read bagian bernama “Merge Tracking” to find out more.
When merge tracking is used, the log dialog will show previously merged revisions, and revisions pre-dating the common ancestor point, i.e. before the branch was copied, as greyed out. The Hide non-mergeable revisions checkbox allows you to filter out these revisions completely so you see only the revisions which can be merged.
Jika orang lain boleh mengkomit perubahan maka hati-hati terhadap penggunaan revisi HEAD. Ia tidak boleh merujuk ke revisi yang Anda pikir benar jika orang lain mengkomit setetlah pemutahiran Anda yang terkahir.
If you leave the range of revisions empty or have the radio button all revisions checked, then Subversion merges all not-yet merged revisions. This is known as a reintegrate or automatic merge.
There are some conditions which apply to a reintegrate merge. Firstly, the server must support merge tracking. The working copy must be of depth infinite (no sparse checkouts), and it must not have any local modifications, switched items or items that have been updated to revisions other than HEAD. All changes to trunk made during branch development must have been merged across to the branch (or marked as having been merged). The range of revisions to merge will be calculated automatically.
Click and go to bagian bernama “Merge Options”.
If you are using this method to merge a feature branch back to trunk, you need to start the merge wizard from within a working copy of trunk.
In the From: field enter the full folder URL of the trunk. This may sound wrong, but remember that the trunk is the start point to which you want to add the branch changes. You may also click to browse the repository.
In the To: field enter the full folder URL of the feature branch.
Dalam kedua field Dari Revisi dan field Ke Revisi, masukkan angka revisi terakhir dimana dua susunan disinkronisasi. Jika Anda yakin tidak-ada yang lain melakukan komit Anda bisa menggunakan revisi HEAD dalam kedua kasus. Jika ada kesempatan dimana orang lain sudah melakukan komit sejak sinkronisasi, gunakan angka revisi tertenu untuk menghindari kehilangan komit terbaru.
You can also use to select the revision.
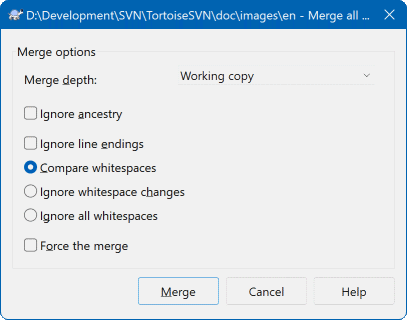
This page of the wizard lets you specify advanced options, before starting the merge process. Most of the time you can just use the default settings.
You can specify the depth to use for the merge, i.e. how far down into your working copy the merge should go. The depth terms used are described in bagian bernama “Checkout Depth”. The default depth is Working copy, which uses the existing depth setting, and is almost always what you want.
Most of the time you want merge to take account of the file's history, so that changes relative to a common ancestor are merged. Sometimes you may need to merge files which are perhaps related, but not in your repository. For example you may have imported versions 1 and 2 of a third party library into two separate directories. Although they are logically related, Subversion has no knowledge of this because it only sees the tarballs you imported. If you attempt to merge the difference between these two trees you would see a complete removal followed by a complete add. To make Subversion use only path-based differences rather than history-based differences, check the Ignore ancestry box. Read more about this topic in the Subversion book, Noticing or Ignoring Ancestry.
You can specify the way that line ending and whitespace changes are handled. These options are described in bagian bernama “Line-end and Whitespace Options”. The default behaviour is to treat all whitespace and line-end differences as real changes to be merged.
The checkbox marked Force the merge is used to avoid a tree conflict where an incoming delete affects a file that is either modified locally or not versioned at all. If the file is deleted then there is no way to recover it, which is why that option is not checked by default.
If you are using merge tracking and you want to mark a revision as having been merged, without actually doing the merge here, check the Only record the merge checkbox. There are two possible reasons you might want to do this. It may be that the merge is too complicated for the merge algorithms, so you code the changes by hand, then mark the change as merged so that the merge tracking algorithm is aware of it. Or you might want to prevent a particular revision from being merged. Marking it as already merged will prevent the merge occurring with merge-tracking-aware clients.
Now everything is set up, all you have to do is click on the button. If you want to preview the results simulates the merge operation, but does not modify the working copy at all. It shows you a list of the files that will be changed by a real merge, and notes files where conflicts may occur. Because merge tracking makes the merge process a lot more complicated, there is no guaranteed way to find out in advance whether the merge will complete without conflicts, so files marked as conflicted in a test merge may in fact merge without any problem.
The merge progress dialog shows each stage of the merge, with the revision ranges involved. This may indicate one more revision than you were expecting. For example if you asked to merge revision 123 the progress dialog will report “ Merging revisions 122 through 123 ”. To understand this you need to remember that Merge is closely related to Diff. The merge process works by generating a list of differences between two points in the repository, and applying those differences to your working copy. The progress dialog is simply showing the start and end points for the diff.
The merge is now complete. It's a good idea to have a look at the merge and see if it's as expected. Merging is usually quite complicated. Conflicts often arise if the branch has drifted far from the trunk.
Tip
Whenever revisions are merged into a working copy, TortoiseSVN generates a log message from all the merged revisions. Those are then available from the button in the commit dialog.
To customize that generated message, set the corresponding project properties on your working copy. See bagian bernama “Merge log message templates”
For Subversion clients and servers prior to 1.5, no merge information is stored and merged revisions have to be tracked manually. When you have tested the changes and come to commit this revision, your commit log message should always include the revision numbers which have been ported in the merge. If you want to apply another merge at a later time you will need to know what you have already merged, as you do not want to port a change more than once. For more information about this, refer to Best Practices for Merging in the Subversion book.
If your server and all clients are running Subversion 1.5 or higher, the merge tracking facility will record the revisions merged and avoid a revision being merged more than once. This makes your life much simpler as you can simply merge the entire revision range each time and know that only new revisions will actually be merged.
Manajemen cabang penting. Jika Anda ingin membiarkan cabang ini mutahir dengan trunk, Anda harus memastikan untuk sering menggabung agar cabang dan trunk tidak berselisih terlalu jauh. Tentu saja, Anda masih harus menghindari pengulangan penggabungan perubahan seperti dijelaskan di atas.
Tip
If you have just merged a feature branch back into the trunk, the trunk now contains all the new feature code, and the branch is obsolete. You can now delete it from the repository if required.
Penting
Subversion can't merge a file with a folder and vice versa - only folders to folders and files to files. If you click on a file and open up the merge dialog, then you have to give a path to a file in that dialog. If you select a folder and bring up the dialog, then you must specify a folder URL for the merge.
Subversion 1.5 introduced facilities for merge tracking. When you merge changes from one tree into another, the revision numbers merged are stored and this information can be used for several different purposes.
You can avoid the danger of merging the same revision twice (repeated merge problem). Once a revision is marked as having been merged, future merges which include that revision in the range will skip over it.
When you merge a branch back into trunk, the log dialog can show you the branch commits as part of the trunk log, giving better traceability of changes.
When you show the log dialog from within the merge dialog, revisions already merged are shown in grey.
When showing blame information for a file, you can choose to show the original author of merged revisions, rather than the person who did the merge.
You can mark revisions as do not merge by including them in the list of merged revisions without actually doing the merge.
Merge tracking information is stored in the svn:mergeinfo property by the client when it performs a merge. When the merge is committed the server stores that information in a database, and when you request merge, log or blame information, the server can respond appropriately. For the system to work properly you must ensure that the server, the repository and all clients are upgraded. Earlier clients will not store the svn:mergeinfo property and earlier servers will not provide the information requested by new clients.
Find out more about merge tracking from Subversion's Merge tracking documentation.
Penting
The text in the conflict resolver dialogs are provided by the SVN library and might therefore not (yet) be translated as the TortoiseSVN dialogs are. Sorry for that.
Merging does not always go smoothly. Sometimes there is a conflict. TortoiseSVN helps you through this process by showing the merge conflict dialog.
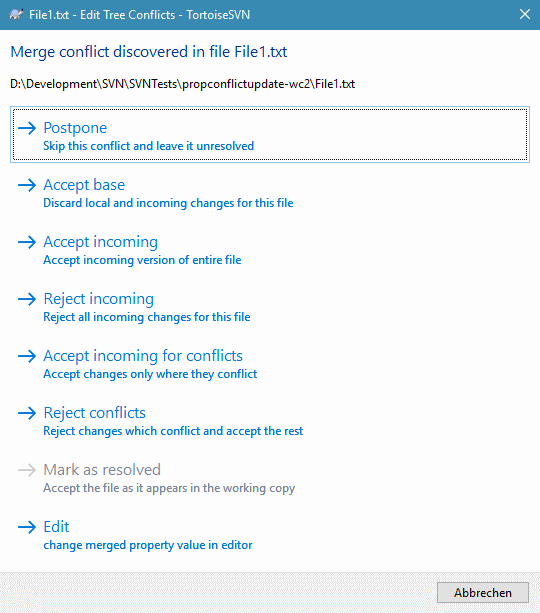
It is likely that some of the changes will have merged smoothly, while other local changes conflict with changes already committed to the repository. All changes which can be merged are merged. The Merge Conflict dialog gives you different ways of handling the lines which are in conflict.
For normal conflicts that happen due to changes in the file content or its properties, the dialog shows buttons which allow you to chose which of the conflicting parts to keep or reject.
- Postpone
Don't deal with the conflict now. Let the merge continue and resolve the conflicts after the merge is done.
- Accept base
This leaves the file as it was, without neither the changes coming from the merge nor the changes you've made in your working copy.
- Accept incoming
This discards all your local changes and uses the file as it arrives from the merge source.
- Reject incoming
This discards all the changes from the merge source and leaves the file with your local edits.
- Accept incoming for conflicts
This discards your local changes where they conflict with the changes from the merge source. But it leaves all your local changes which don't conflict.
- Reject conflicts
This discards changes from the merge source which conflict with your local changes. But it keeps all changes that don't conflict with your local changes.
- Mark as resolved
Marks the conflicts as resolved. This button is disabled until you use the button to edit the conflict manually and save those changes back to the file. Once the changes are saved, the button becomes enabled.
- Edit
Starts the merge editor so you can resolve the conflicts manually. Don't forget to save the file so the button becomes enabled.
If there's a tree conflict, please first see bagian bernama “Tree Conflicts” about the various types of tree conflicts and how and why they can happen.
To resolve tree conflicts after a merge, a dialog is shown with various options on how to resolve the conflict:
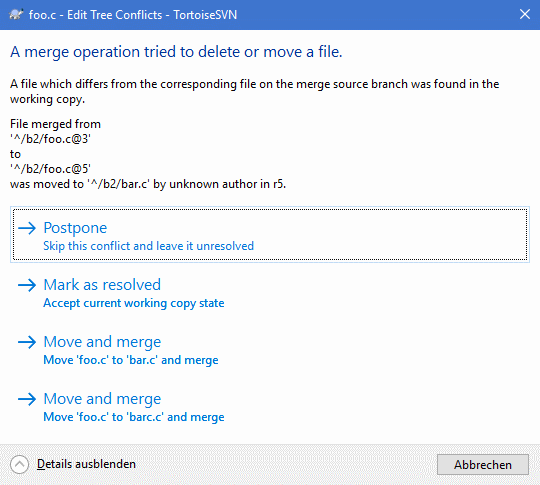
Since there are various possible tree conflict situations, the dialog will show buttons to resolve those depending on the specific conflict. The button texts and labels explain what the option to resolve the conflict does. If you're not sure, either cancel the dialog or use the button to resolve the conflict later.
When you develop a new feature on a separate branch it is a good idea to work out a policy for re-integration when the feature is complete. If other work is going on in trunk at the same time you may find that the differences become significant over time, and merging back becomes a nightmare.
If the feature is relatively simple and development will not take long then you can adopt a simple approach, which is to keep the branch entirely separate until the feature is complete, then merge the branch changes back into trunk. In the merge wizard this would be a simple Merge a range of revisions, with the revision range being the revision span of the branch.
If the feature is going to take longer and you need to account for changes in trunk, then you need to keep the branch synchronised. This simply means that periodically you merge trunk changes into the branch, so that the branch contains all the trunk changes plus the new feature. The synchronisation process uses Merge a range of revisions. When the feature is complete then you can merge it back to trunk using either Reintegrate a branch or Merge two different trees.
Another (fast) way to merge all changes from trunk to the feature branch is to use the → from the extended context menu (hold down the Shift key while you right click on the file).
This dialog is very easy. All you have to do is set the options for the merge, as described in bagian bernama “Merge Options”. The rest is done by TortoiseSVN automatically using merge tracking.