Deze sectie laten we je zien hoe je een paar van de meest gebruikte functies kunt proberen op een kleine test repository. Natuurlijk verklaart het niet alles - dit is immers slechts de snelstart gids. Als je alles geconfigureerd hebt moet je de tijd nemen om de rest van deze handleiding door te lezen. Daarin wordt ook uitgelegd hoe je een echte Subversion server installeert.
Voor een echt project zul je een repository op een veilige plaats opzetten en een Subversion server om het te controleren. In deze tutorial gebruiken we Subversion's lokale repository mogelijkheid welke directe toegang tot een repository op je hard disk mogelijk maakt, zonder een aparte server.
First create a new empty directory on your PC. It can go anywhere, but in this tutorial we are going to call it C:\svn_repos. Now right click on the new folder and from the context menu choose → . The repository is then created inside the folder, ready for you to use. We will also create the default internal folder structure by clicking the button.
Belangrijk
De lokale repository mogelijkheid is erg handig voor test en evaluatie maar tenzij je als enige ontwikkelaar op een enkele computer werkt kun je beter een echte subversion server gebruiken. Het is verleidelijk om in een klein bedrijf het extra werk om een server te installeren te vermeiden en de repository op een via het netwerk gedeelde map te benaderen. Doe dat nooit. Je zult data verliezen. Lees de paragraaf met de naam “Een archief benaderen op een Netwerk schijf” om te weten waarom dit een slecht idee is en hoe je een server moet installeren.
Now we have a repository, but it is completely empty at the moment. Let's assume I have a set of files in C:\Projects\Widget1 that I would like to add. Navigate to the Widget1 folder in Explorer and right click on it. Now select → which brings up a dialog
A Subversion repository is referred to by URL, which allows us to specify a repository anywhere on the Internet. In this case we need to point to our own local repository which has a URL of file:///c:/svn_repos/trunk, and to which we add our own project name Widget1. Note that there are 3 slashes after file: and that forward slashes are used throughout.
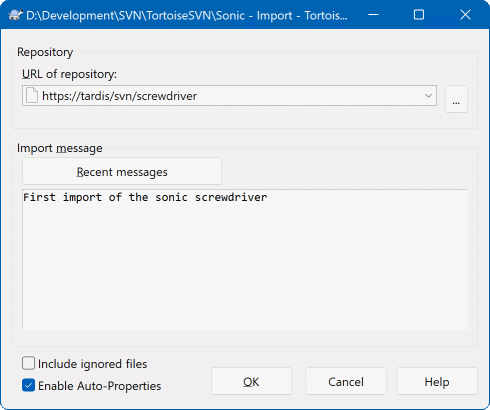
Een andere belangrijke functie van dit dialoogvenster is de Import Message box. Hierin kun je beschrijven wat je veranderd hebt. Als je later in de project geschiedenis zoekt, zijn deze berichten een waardevolle leidraad voor welke wijzigingen zijn aangebracht en waarom. In dit geval kun je bijvoorbeeld iets simpels als “Importeer het widget1 project” invullen . Klik op en de map wordt toegevoegd aan uw repository.
Now that we have a project in our repository, we need to create a working copy to use for day-to-day work. Note that the act of importing a folder does not automatically turn that folder into a working copy. The Subversion term for creating a fresh working copy is Checkout. We are going to checkout the Widget1 folder of our repository into a development folder on the PC called C:\Projects\Widget1-Dev. Create that folder, then right click on it and select → . Then enter the URL to checkout, in this case file:///c:/svn_repos/trunk/Widget1 and click on . Our development folder is then populated with files from the repository.
Belangrijk
In the default setting, the checkout menu item is not located in the TortoiseSVN submenu but is shown at the top explorer menu. TortoiseSVN commands that are not in the submenu have SVN prepended:
U zal merken dat het uitzicht van deze bestandsmap verschilt van de oorspronkelijke map. Elk bestand heeft een groen vinkje in de hoek linksonder. Deze TortoiseSVN-statusicoontjes zijn enkel zichtbaar in een map die onder versiecontrole geplaatst is. Het groene statussymbool betekent dat het bestand in de map onveranderd is van de versie in het SVN-repository.
Time to get to work. In the Widget1-Dev folder we start editing files - let's say we make changes to Widget1.c and ReadMe.txt. Notice that the icon overlays on these files have now changed to red, indicating that changes have been made locally.
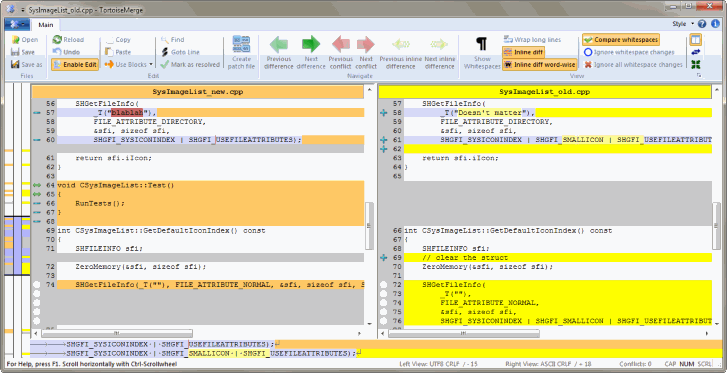
Maar wat zijn nu de veranderingen? Rechts-klik op een van de veranderde bestanden en selecteer → . Het vergelijkprogramma van TortoiseSVN wordt gestart en laat precies zien welke regels veranderd zijn.
OK, so we are happy with the changes, let's update the repository. This action is referred to as a Commit of the changes. Right click on the Widget1-Dev folder and select → . The commit dialog lists the changed files, each with a checkbox. You might want to choose only a subset of those files, but in this case we are going to commit the changes to both files. Enter up a message to describe what the change is all about and click on . The progress dialog shows the files being uploaded to the repository and you're done.
As the project develops you will need to add new files - let's say you add some new features in Extras.c and add a reference in the existing Makefile. Right click on the folder and → . The Add dialog now shows you all unversioned files and you can select which ones you want to add. Another way of adding files would be to right click on the file itself and select → .
Wanneer je vervolgens de folder wilt vastleggen wordt het nieuwe bestand getoond als Toegevoegd en het bestaande bestand als Aangepast. Bemerk dat je door te dubbelklikken op het aangepaste bestand de exacte wijzigingen aan dat bestand kan zien.
One of the most useful features of TortoiseSVN is the Log dialog. This shows you a list of all the commits you made to a file or folder, and shows those detailed commit messages that you entered (you did enter a commit message as suggested? If not, now you see why this is important).
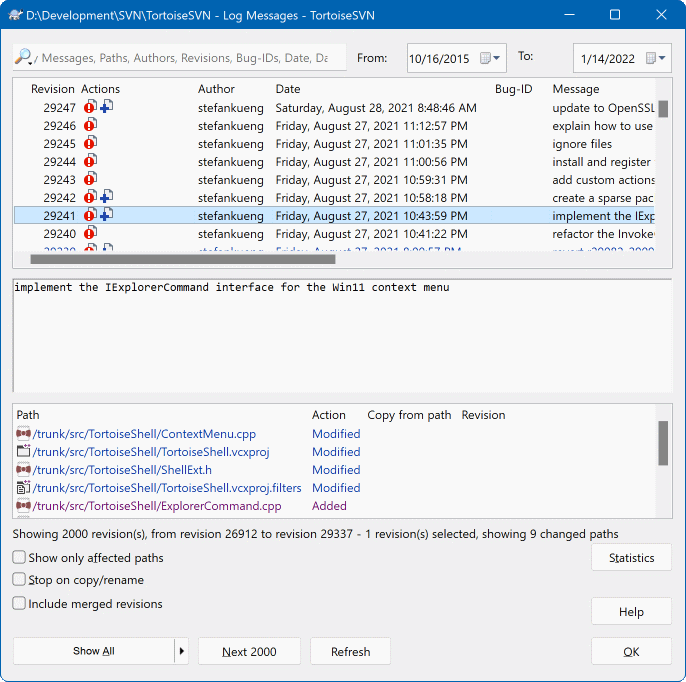
OK, so I cheated a little here and used a screenshot from the TortoiseSVN repository.
The top pane shows a list of revisions committed along with the start of the commit message. If you select one of these revisions, the middle pane will show the full log message for that revision and the bottom pane will show a list of changed files and folders.
Each of these panes has a context menu which provides you with lots more ways of using the information. In the bottom pane you can double click on a file to see exactly what changes were made in that revision. Read de paragraaf met de naam “Logboekboodschappen Venster” to get the full story.
Een feature van alle versiebeheersystemen is dat ze je toestaan om wijzigingen, die je eerder hebt gemaakt, ongedaan te maken. Zoals je wellicht al verwacht, maakt TortoiseSVN dit erg gemakkelijk voor je om te doen.
If you want to get rid of changes that you have not yet committed and reset your file to the way it was before you started editing, → is your friend. This discards your changes (to the Recycle bin, just in case) and reverts to the committed version you started with. If you want to get rid of just some of the changes, you can use TortoiseMerge to view the differences and selectively revert changed lines.
If you want to undo the effects of a particular revision, start with the Log dialog and find the offending revision. Select → and those changes will be undone.