Where branches are used to maintain separate lines of development, at some stage you will want to merge the changes made on one branch back into the trunk, or vice versa.
It is important to understand how branching and merging works in Subversion before you start using it, as it can become quite complex. It is highly recommended that you read the chapter Branching and Merging in the Subversion book, which gives a full description and many examples of how it is used.
The next point to note is that merging always takes place within a working copy. If you want to merge changes into a branch, you have to have a working copy for that branch checked out, and invoke the merge wizard from that working copy using → .
In general it is a good idea to perform a merge into an unmodified working copy. If you have made other changes in your WC, commit those first. If the merge does not go as you expect, you may want to revert the changes, and the Revert command will discard all changes including any you made before the merge.
There are three common use cases for merging which are handled in slightly different ways, as described below. The first page of the merge wizard asks you to select the method you need.
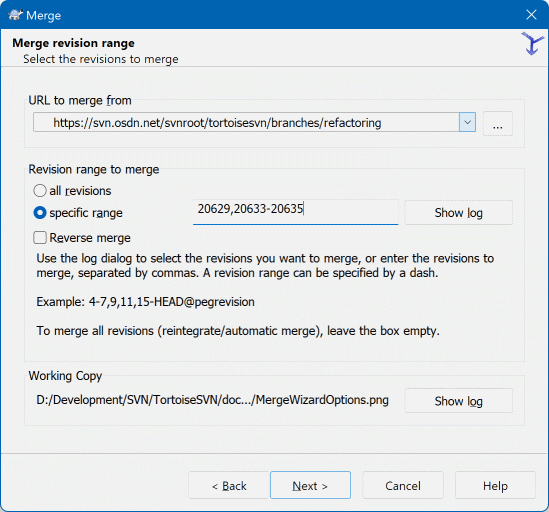
- Combinar uma faixa de revisões
Esse método cobre o caso em que foi feita uma ou mais revisões em um ramo (ou ao tronco) e se deseja transportar essas mudanças para um ramo diferente.
What you are asking Subversion to do is this: “ Calculate the changes necessary to get [FROM] revision 1 of branch A [TO] revision 7 of branch A, and apply those changes to my working copy (of trunk or branch B). ”
If you leave the revision range empty, Subversion uses the merge-tracking features to calculate the correct revision range to use. This is known as a reintegrate or automatic merge.
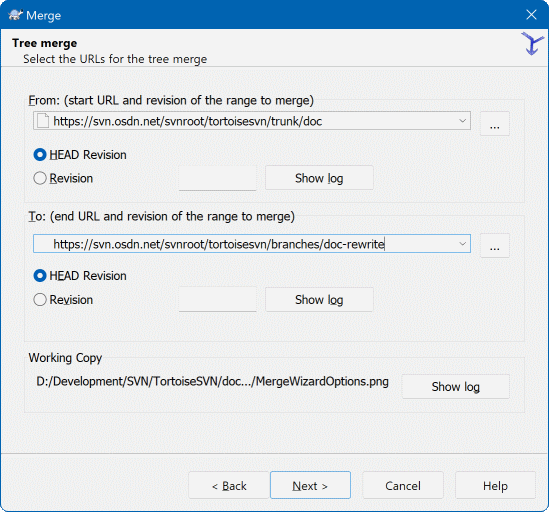
- Unificar duas árvores diferentes
This is a more general case of the reintegrate method. What you are asking Subversion to do is: “ Calculate the changes necessary to get [FROM] the head revision of the trunk [TO] the head revision of the branch, and apply those changes to my working copy (of the trunk). ” The net result is that trunk now looks exactly like the branch.
If your server/repository does not support merge-tracking then this is the only way to merge a branch back to trunk. Another use case occurs when you are using vendor branches and you need to merge the changes following a new vendor drop into your trunk code. For more information read the chapter on vendor branches in the Subversion Book.
In the From: field enter the full folder URL of the branch or tag containing the changes you want to port into your working copy. You may also click to browse the repository and find the desired branch. If you have merged from this branch before, then just use the drop down list which shows a history of previously used URLs.
If you are merging from a renamed or deleted branch then you will have to go back to a revision where that branch still existed. In this case you will also need to specify that revision as a peg revision in the range of revisions being merged (see below), otherwise the merge will fail when it can't find that path at HEAD.
In the Revision range to merge field enter the list of revisions you want to merge. This can be a single revision, a list of specific revisions separated by commas, or a range of revisions separated by a dash, or any combination of these.
Se precisas de especificar uma revisão cavilha para a integração, adiciona a revisão cavilha no fim das revisões, e.g. 5-7,10@3. No exemplo acima, as revisões 5,6,7 e 10 seriam integradas, sendo a 3 a revisão cavilha.
Importante
There is an important difference in the way a revision range is specified with TortoiseSVN compared to the command line client. The easiest way to visualise it is to think of a fence with posts and fence panels.
With the command line client you specify the changes to merge using two “fence post” revisions which specify the before and after points.
With TortoiseSVN you specify the changeset to merge using “fence panels”. The reason for this becomes clear when you use the log dialog to specify revisions to merge, where each revision appears as a changeset.
Se estiveres a integrar revisões em bloco, o método mostrado no livro do Subversion integra-te a 100-200 desta vez e 200-300 da próxima. Com o TortoiseSVN integra-te a 100-200 desta vez e 201-300 da próxima.
This difference has generated a lot of heat on the mailing lists. We acknowledge that there is a difference from the command line client, but we believe that for the majority of GUI users it is easier to understand the method we have implemented.
The easiest way to select the range of revisions you need is to click on , as this will list recent changes with their log comments. If you want to merge the changes from a single revision, just select that revision. If you want to merge changes from several revisions, then select that range (using the usual Shift-modifier). Click on and the list of revision numbers to merge will be filled in for you.
If you want to merge changes back out of your working copy, to revert a change which has already been committed, select the revisions to revert and make sure the Reverse merge box is checked.
If you have already merged some changes from this branch, hopefully you will have made a note of the last revision merged in the log message when you committed the change. In that case, you can use for the Working Copy to trace that log message. Remembering that we are thinking of revisions as changesets, you should Use the revision after the end point of the last merge as the start point for this merge. For example, if you have merged revisions 37 to 39 last time, then the start point for this merge should be revision 40.
If you are using the merge tracking features of Subversion, you do not need to remember which revisions have already been merged - Subversion will record that for you. If you leave the revision range blank, all revisions which have not yet been merged will be included. Read “Histórico de combinações” to find out more.
Quando o seguimento de integração é usado, a caixa de diálogo de registo irá mostrar as revisões previamente integradas e as revisões antecedentes ao ponto do antecessor comum, i.e. antes do ramo ser copiado, a cinzento. A caixa de verificação Ocultar revisões não.integráveis permite-te filtrar completamente essas revisões, para que vejas apenas as revisões que podem ser integradas.
If other people may be committing changes then be careful about using the HEAD revision. It may not refer to the revision you think it does if someone else made a commit after your last update.
If you leave the range of revisions empty or have the radio button all revisions checked, then Subversion merges all not-yet merged revisions. This is known as a reintegrate or automatic merge.
Existem algumas condições que se aplicam a uma integração de reintegração. Primeiramente, o servidor deverá suportar o rastreamento de integração. A cópia de trabalho deverá ser de nível infinito (sem checkouts dispersos), e não deverá ter nenhumas alterações, itens trocados ou itens que foram actualizadas para revisões diferentes da HEAD. Todas as alterações para o trunk feitas durante o desenvolvimento do ramo, deverão ter sido já integradas transversalmente para o ramo (ou marcadas como tendo sido feitas). O intervalo de revisões a integrar será então calculado automaticamente.
Click and go to “Opções de Combinação”.
If you are using this method to merge a feature branch back to trunk, you need to start the merge wizard from within a working copy of trunk.
In the From: field enter the full folder URL of the trunk. This may sound wrong, but remember that the trunk is the start point to which you want to add the branch changes. You may also click to browse the repository.
In the To: field enter the full folder URL of the feature branch.
In both the From Revision field and the To Revision field, enter the last revision number at which the two trees were synchronized. If you are sure no-one else is making commits you can use the HEAD revision in both cases. If there is a chance that someone else may have made a commit since that synchronization, use the specific revision number to avoid losing more recent commits.
Você também pode utilizar o para selecionar a revisão.
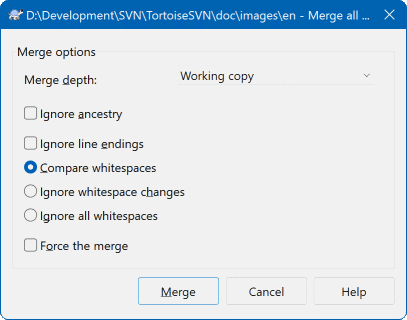
This page of the wizard lets you specify advanced options, before starting the merge process. Most of the time you can just use the default settings.
Tu podes especificar o nível a usar na integração, i.e. até que ponto deverá a integração penetrar na tua cópia de trabalho. Os termos do nível usados estão descritos em “Profundidade da Obtenção”. O nível por defeito é a Cópia de trabalho, e é quase sempre o que precisas.
Most of the time you want merge to take account of the file's history, so that changes relative to a common ancestor are merged. Sometimes you may need to merge files which are perhaps related, but not in your repository. For example you may have imported versions 1 and 2 of a third party library into two separate directories. Although they are logically related, Subversion has no knowledge of this because it only sees the tarballs you imported. If you attempt to merge the difference between these two trees you would see a complete removal followed by a complete add. To make Subversion use only path-based differences rather than history-based differences, check the Ignore ancestry box. Read more about this topic in the Subversion book, Noticing or Ignoring Ancestry.
You can specify the way that line ending and whitespace changes are handled. These options are described in “Opções de Quebra de Linha e Espaços em Branco”. The default behaviour is to treat all whitespace and line-end differences as real changes to be merged.
The checkbox marked Force the merge is used to avoid a tree conflict where an incoming delete affects a file that is either modified locally or not versioned at all. If the file is deleted then there is no way to recover it, which is why that option is not checked by default.
If you are using merge tracking and you want to mark a revision as having been merged, without actually doing the merge here, check the Only record the merge checkbox. There are two possible reasons you might want to do this. It may be that the merge is too complicated for the merge algorithms, so you code the changes by hand, then mark the change as merged so that the merge tracking algorithm is aware of it. Or you might want to prevent a particular revision from being merged. Marking it as already merged will prevent the merge occurring with merge-tracking-aware clients.
Now everything is set up, all you have to do is click on the button. If you want to preview the results simulates the merge operation, but does not modify the working copy at all. It shows you a list of the files that will be changed by a real merge, and notes files where conflicts may occur. Because merge tracking makes the merge process a lot more complicated, there is no guaranteed way to find out in advance whether the merge will complete without conflicts, so files marked as conflicted in a test merge may in fact merge without any problem.
The merge progress dialog shows each stage of the merge, with the revision ranges involved. This may indicate one more revision than you were expecting. For example if you asked to merge revision 123 the progress dialog will report “ Merging revisions 122 through 123 ”. To understand this you need to remember that Merge is closely related to Diff. The merge process works by generating a list of differences between two points in the repository, and applying those differences to your working copy. The progress dialog is simply showing the start and end points for the diff.
The merge is now complete. It's a good idea to have a look at the merge and see if it's as expected. Merging is usually quite complicated. Conflicts often arise if the branch has drifted far from the trunk.
Dica
Quando são integradas as revisões na cópia de trabalho, o TortoiseSVN gera uma mensagem de registo para todas as revisões integradas. Essas ficam então disponíveis a partir do botão na janela de diálogo submeter.
Para customizar a mensagem gerada, determine as propriedades correspondentes do projeto na sua cópia de trabalho. Veja “Templates de mensagens de registo”
For Subversion clients and servers prior to 1.5, no merge information is stored and merged revisions have to be tracked manually. When you have tested the changes and come to commit this revision, your commit log message should always include the revision numbers which have been ported in the merge. If you want to apply another merge at a later time you will need to know what you have already merged, as you do not want to port a change more than once. For more information about this, refer to Best Practices for Merging in the Subversion book.
If your server and all clients are running Subversion 1.5 or higher, the merge tracking facility will record the revisions merged and avoid a revision being merged more than once. This makes your life much simpler as you can simply merge the entire revision range each time and know that only new revisions will actually be merged.
Branch management is important. If you want to keep this branch up to date with the trunk, you should be sure to merge often so that the branch and trunk do not drift too far apart. Of course, you should still avoid repeated merging of changes, as explained above.
Dica
If you have just merged a feature branch back into the trunk, the trunk now contains all the new feature code, and the branch is obsolete. You can now delete it from the repository if required.
Importante
Subversion can't merge a file with a folder and vice versa - only folders to folders and files to files. If you click on a file and open up the merge dialog, then you have to give a path to a file in that dialog. If you select a folder and bring up the dialog, then you must specify a folder URL for the merge.
Subversion 1.5 introduced facilities for merge tracking. When you merge changes from one tree into another, the revision numbers merged are stored and this information can be used for several different purposes.
You can avoid the danger of merging the same revision twice (repeated merge problem). Once a revision is marked as having been merged, future merges which include that revision in the range will skip over it.
When you merge a branch back into trunk, the log dialog can show you the branch commits as part of the trunk log, giving better traceability of changes.
Quando você mostra a janela de auditoria a partir de uma janela de combinação, revisões já combinadas são apresentadas em cinza.
Quando você está mostrando a informação de autoria para um arquivo você pode escolher mostrar o autor original das revisões combinadas, ao invés da pessoa que fez a combinação.
Você pode marcar revisões como não combinadas incluindo as revisões na lista de revisões combinadas sem realmente fazer a combinação.
Merge tracking information is stored in the svn:mergeinfo property by the client when it performs a merge. When the merge is committed the server stores that information in a database, and when you request merge, log or blame information, the server can respond appropriately. For the system to work properly you must ensure that the server, the repository and all clients are upgraded. Earlier clients will not store the svn:mergeinfo property and earlier servers will not provide the information requested by new clients.
Mais informações sobre o controlo de integração do Subversion em; Merge tracking documentation.
Importante
The text in the conflict resolver dialogs are provided by the SVN library and might therefore not (yet) be translated as the TortoiseSVN dialogs are. Sorry for that.
Merging does not always go smoothly. Sometimes there is a conflict. TortoiseSVN helps you through this process by showing the merge conflict dialog.

It is likely that some of the changes will have merged smoothly, while other local changes conflict with changes already committed to the repository. All changes which can be merged are merged. The Merge Conflict dialog gives you different ways of handling the lines which are in conflict.
For normal conflicts that happen due to changes in the file content or its properties, the dialog shows buttons which allow you to chose which of the conflicting parts to keep or reject.
- Postpone
Don't deal with the conflict now. Let the merge continue and resolve the conflicts after the merge is done.
- Accept base
This leaves the file as it was, without neither the changes coming from the merge nor the changes you've made in your working copy.
- Accept incoming
This discards all your local changes and uses the file as it arrives from the merge source.
- Reject incoming
This discards all the changes from the merge source and leaves the file with your local edits.
- Accept incoming for conflicts
This discards your local changes where they conflict with the changes from the merge source. But it leaves all your local changes which don't conflict.
- Reject conflicts
This discards changes from the merge source which conflict with your local changes. But it keeps all changes that don't conflict with your local changes.
- Mark as resolved
Marks the conflicts as resolved. This button is disabled until you use the button to edit the conflict manually and save those changes back to the file. Once the changes are saved, the button becomes enabled.
- Editar
Starts the merge editor so you can resolve the conflicts manually. Don't forget to save the file so the button becomes enabled.
If there's a tree conflict, please first see “Conflitos de Estrutura” about the various types of tree conflicts and how and why they can happen.
To resolve tree conflicts after a merge, a dialog is shown with various options on how to resolve the conflict:
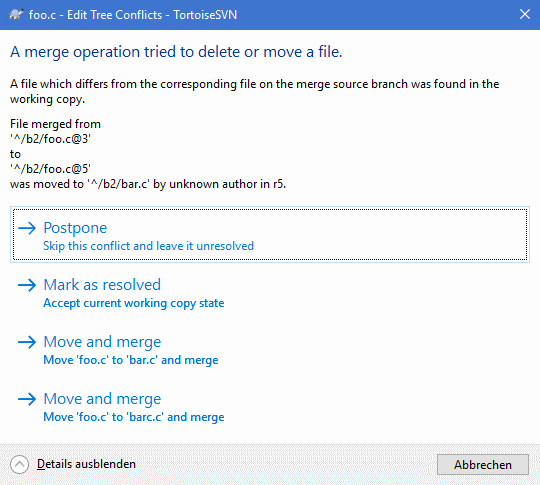
Since there are various possible tree conflict situations, the dialog will show buttons to resolve those depending on the specific conflict. The button texts and labels explain what the option to resolve the conflict does. If you're not sure, either cancel the dialog or use the button to resolve the conflict later.
When you develop a new feature on a separate branch it is a good idea to work out a policy for re-integration when the feature is complete. If other work is going on in trunk at the same time you may find that the differences become significant over time, and merging back becomes a nightmare.
If the feature is relatively simple and development will not take long then you can adopt a simple approach, which is to keep the branch entirely separate until the feature is complete, then merge the branch changes back into trunk. In the merge wizard this would be a simple Merge a range of revisions, with the revision range being the revision span of the branch.
If the feature is going to take longer and you need to account for changes in trunk, then you need to keep the branch synchronised. This simply means that periodically you merge trunk changes into the branch, so that the branch contains all the trunk changes plus the new feature. The synchronisation process uses Merge a range of revisions. When the feature is complete then you can merge it back to trunk using either Reintegrate a branch or Merge two different trees.
Another (fast) way to merge all changes from trunk to the feature branch is to use the → from the extended context menu (hold down the Shift key while you right click on the file).
This dialog is very easy. All you have to do is set the options for the merge, as described in “Opções de Combinação”. The rest is done by TortoiseSVN automatically using merge tracking.