For open source projects (like this one) everyone has read access to the repository, and anyone can make a contribution to the project. So how are those contributions controlled? If just anyone could commit changes, the project would be permanently unstable and probably permanently broken. In this situation the change is managed by submitting a patch file to the development team, who do have write access. They can review the patch first, and then either submit it to the repository or reject it back to the author.
Patch files are simply Unified-Diff files showing the differences between your working copy and the base revision.
First you need to make and test your changes. Then instead of using → on the parent folder, you select →
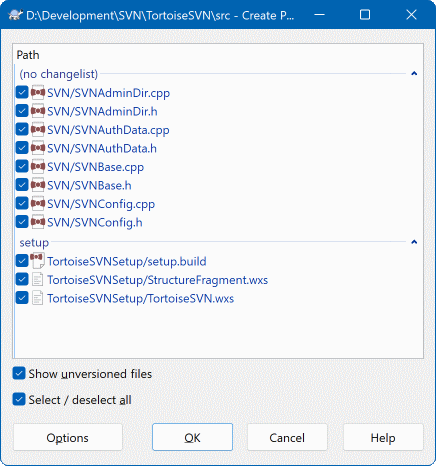
you can now select the files you want included in the patch, just as you would with a full commit. This will produce a single file containing a summary of all the changes you have made to the selected files since the last update from the repository.
As colunas nesta janela podem ser personalizadas da mesma forma como as colunas da janela Verificar alterações. Leia “Estado Local e Remoto” para mais detalhes.
Ao clicar no botão de Opções, podes especificar como o caminho é criado. Por exemplo, podes especificar que as mudanças no final da linha ou espaços em branco não são incluídas no arquivo do caminho final.
You can produce separate patches containing changes to different sets of files. Of course, if you create a patch file, make some more changes to the same files and then create another patch, the second patch file will include both sets of changes.
Just save the file using a filename of your choice. Patch files can have any extension you like, but by convention they should use the .patch or .diff extension. You are now ready to submit your patch file.
Dica
Do not save the patch file with a.txt extension if you intend to send it via email to someone else. Plain text files are often mangled with by the email software and it often happens that whitespaces and newline chars are automatically converted and compressed. If that happens, the patch won't apply smoothly. So use .patch or .diff as the extension when you save the patch file.You can also save the patch to the clipboard instead of to a file. You might want to do this so that you can paste it into an email for review by others. Or if you have two working copies on one machine and you want to transfer changes from one to the other, a patch on the clipboard is a convenient way of doing this.
Se preferires podes criar um ficheiro correcção a partir das caixas de diálogo Submeter ou Verificar alterações. Selecciona apenas os ficheiros e usa o item do menu de contexto para criar a correcção a partir desses ficheiros. Se quiseres ver a caixa de diálogo Opções terás de manter premida a tecla shift quando clicares à direita.
Patch files are applied to your working copy. This should be done from the same folder level as was used to create the patch. If you are not sure what this is, just look at the first line of the patch file. For example, if the first file being worked on was doc/source/english/chapter1.xml and the first line in the patch file is Index: english/chapter1.xml then you need to apply the patch to the doc/source/ folder. However, provided you are in the correct working copy, if you pick the wrong folder level, TortoiseSVN will notice and suggest the correct level.
In order to apply a patch file to your working copy, you need to have at least read access to the repository. The reason for this is that the merge program must reference the changes back to the revision against which they were made by the remote developer.
From the context menu for that folder, click on → This will bring up a file open dialog allowing you to select the patch file to apply. By default only .patch or .diff files are shown, but you can opt for “All files”. If you previously saved a patch to the clipboard, you can use in the file open dialog. Note that this option only appears if you saved the patch to the clipboard using → . Copying a patch to the clipboard from another app will not make the button appear.
Alternatively, if the patch file has a .patch or .diff extension, you can right click on it directly and select → . In this case you will be prompted to enter a working copy location.
These two methods just offer different ways of doing the same thing. With the first method you select the WC and browse to the patch file. With the second you select the patch file and browse to the WC.
Once you have selected the patch file and working copy location, TortoiseMerge runs to merge the changes from the patch file with your working copy. A small window lists the files which have been changed. Double click on each one in turn, review the changes and save the merged files.
The remote developer's patch has now been applied to your working copy, so you need to commit to allow everyone else to access the changes from the repository.