Včasih želite izvedeti, od kje izhajajo veje in oznake in najlažji način, da to izveste, je graf revizije ali drevesne strukture. Takrat uporabite →
Ta ukaz analizira zgodovino revizij in poskuša ustvariti drevo, ki prikazuje, kje so se zgodila kopiranja oziroma kje so bile veje/oznake izbrisane.
Pomembno
Za generiranje grafa mora TortoiseSVN iz strežnika prenesti dnevniške zapise vseh revizij. Verjetno ni potrebno poudarjati, da lahko pri skladiščih z nekaj tisoč revizijami to traja kar nekaj minut, odvisno tudi od hitrosti strežnika, pasovne širine omrežja... Če poskusite izdelati graf revizij na projektu, kot je denimo Apache, ki ima trenutno več kot pol milijona revizij, boste čakali kar lep čas.
The good news is that if you are using log caching, you only have to suffer this delay once. After that, log data is held locally. Log caching is enabled in TortoiseSVN's settings.
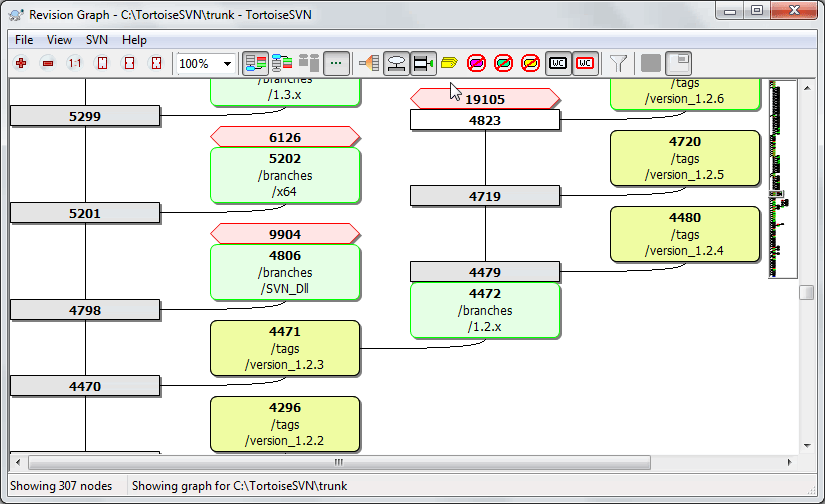
Each revision graph node represents a revision in the repository where something changed in the tree you are looking at. Different types of node can be distinguished by shape and colour. The shapes are fixed, but colours can be set using →
- Added or copied items
Items which have been added, or created by copying another file/folder are shown using a rounded rectangle. The default colour is green. Tags and trunks are treated as a special case and use a different shade, depending on the → .
- Deleted items
Deleted items e.g. a branch which is no longer required, are shown using an octagon (rectangle with corners cut off). The default colour is red.
- Renamed items
Renamed items are also shown using an octagon, but the default colour is blue.
- Revizija na vrhu veje
The graph is normally restricted to showing branch points, but it is often useful to be able to see the respective HEAD revision for each branch too. If you select Show HEAD revisions, each HEAD revision nodes will be shown as an ellipse. Note that HEAD here refers to the last revision committed on that path, not to the HEAD revision of the repository.
- Working copy revision
If you invoked the revision graph from a working copy, you can opt to show the BASE revision on the graph using Show WC revision, which marks the BASE node with a bold outline.
- Modified working copy
If you invoked the revision graph from a working copy, you can opt to show an additional node representing your modified working copy using Show WC modifications. This is an elliptical node with a bold outline in red by default.
- Normal item
Vsi drugi elementi so prikazani s pravokotnikom
Note that by default the graph only shows the points at which items were added, copied or deleted. Showing every revision of a project will generate a very large graph for non-trivial cases. If you really want to see all revisions where changes were made, there is an option to do this in the View menu and on the toolbar.
The default view (grouping off) places the nodes such that their vertical position is in strict revision order, so you have a visual cue for the order in which things were done. Where two nodes are in the same column the order is very obvious. When two nodes are in adjacent columns the offset is much smaller because there is no need to prevent the nodes from overlapping, and as a result the order is a little less obvious. Such optimisations are necessary to keep complex graphs to a reasonable size. Please note that this ordering uses the edge of the node on the older side as a reference, i.e. the bottom edge of the node when the graph is shown with oldest node at the bottom. The reference edge is significant because the node shapes are not all the same height.
Ker je graf revizij pogosto kar zapleten, imate na voljo kar nekaj možnosti, da ga priredite po svojem okusu. Te možnosti so na voljo v meniju Pogled in v orodni vrstici.
- Razdeljevanje vej v skupine
The default behavior (grouping off) has all rows sorted strictly by revision. As a result, long-living branches with sparse commits occupy a whole column for only a few changes and the graph becomes very broad.
This mode groups changes by branch, so that there is no global revision ordering: Consecutive revisions on a branch will be shown in (often) consecutive lines. Sub-branches, however, are arranged in such a way that later branches will be shown in the same column above earlier branches to keep the graph slim. As a result, a given row may contain changes from different revisions.
- Starejše na vrhu
Običajno graf prikazuje starejše revizije na dnu, drevo pa potem raste navzgor. Z vključitvijo te možnosti graf raste od vrha navzdol.
- Poravnaj drevesa na vrhu
When a graph is broken into several smaller trees, the trees may appear either in natural revision order, or aligned at the bottom of the window, depending on whether you are using the Group Branches option. Use this option to grow all trees down from the top instead.
- Zmanjšaj križanje črt
This option is normally enabled and avoids showing the graph with a lot of confused crossing lines. However this may also make the layout columns appear in less logical places, for example in a diagonal line rather than a column, and the graph may require a larger area to draw. If this is a problem you can disable the option from the View menu.
- Differential path names
Long path names can take a lot of space and make the node boxes very large. Use this option to show only the changed part of a path, replacing the common part with dots. E.g. if you create a branch
/branches/1.2.x/doc/htmlfrom/trunk/doc/htmlthe branch could be shown in compact form as/branches/1.2.x/..because the last two levels,docandhtml, did not change.- Show all revisions
This does just what you expect and shows every revision where something (in the tree that you are graphing) has changed. For long histories this can produce a truly huge graph.
- Pokaži revizijo HEAD
S to možnostjo zagotovite, da je najnovejša revizija vsake veje vedno prikazana na grafu.
- Natančni izvori kopiranja
When a branch/tag is made, the default behaviour is to show the branch as taken from the last node where a change was made. Strictly speaking this is inaccurate since the branches are often made from the current HEAD rather than a specific revision. So it is possible to show the more correct (but less useful) revision that was used to create the copy. Note that this revision may be younger than the HEAD revision of the source branch.
- Zloži oznake
When a project has many tags, showing every tag as a separate node on the graph takes a lot of space and obscures the more interesting development branch structure. At the same time you may need to be able to access the tag content easily so that you can compare revisions. This option hides the nodes for tags and shows them instead in the tooltip for the node that they were copied from. A tag icon on the right side of the source node indicates that tags were made. This greatly simplifies the view.
Note that if a tag is itself used as the source for a copy, perhaps a new branch based on a tag, then that tag will be shown as a separate node rather than folded.
- Hide deleted paths
Hides paths which are no longer present at the HEAD revision of the repository, e.g. deleted branches.
If you have selected the Fold tags option then a deleted branch from which tags were taken will still be shown, otherwise the tags would disappear too. The last revision that was tagged will be shown in the colour used for deleted nodes instead of showing a separate deletion revision.
If you select the Hide tags option then these branches will disappear again as they are not needed to show the tags.
- Hide unused branches
Hides branches where no changes were committed to the respective file or sub-folder. This does not necessarily indicate that the branch was not used, just that no changes were made to this part of it.
- Show WC revision
Marks the revision on the graph which corresponds to the update revision of the item you fetched the graph for. If you have just updated, this will be HEAD, but if others have committed changes since your last update your WC may be a few revisions lower down. The node is marked by giving it a bold outline.
- Show WC modifications
If your WC contains local changes, this option draws it as a separate elliptical node, linked back to the node that your WC was last updated to. The default outline colour is red. You may need to refresh the graph using F5 to capture recent changes.
- Filter
Včasih graf revizij prikaže več podrobnosti, kot si želite. Ta možnost odpre pogovorno okno, ki omogoča omejevanje prikazanega območja revizij in skrivanje določenih poti po imenu.
If you hide a particular path and that node has child nodes, the children will be shown as a separate tree. If you want to hide all children as well, use the Remove the whole subtree(s) checkbox.
- Tree stripes
Where the graph contains several trees, it is sometimes useful to use alternating colours on the background to help distinguish between trees.
- Show overview
Shows a small picture of the entire graph, with the current view window as a rectangle which you can drag. This allows you to navigate the graph more easily. Note that for very large graphs the overview may become useless due to the extreme zoom factor and will therefore not be shown in such cases.
Za lažjo navigacijo po grafu revizij uporabite predogledno okno. Ta prikaže celoten graf v majhnem oknu, pri tem pa je trenutno prikazan del posebej označen. Označen del lahko premikate in s tem spremenite pogled grafa.
Datum revizije, avtor in komentarji so prikazani v namigu, ko miško pridržite na polju revizije.
Če izberete dve reviziji (uporabite CTRL)-levi klik), lahko uporabite kontekstni meni, da prikažete razlike med revizijama. Prikažete lahko tudi razlike med začetnimi točkami vej, vendar običajno prikazujemo razlike med končnimi točkami vej (revizije HEAD).
Razlike lahko prikažete kot datoteko poenotene različice, ki prikaže vse razlike v eni datoteki z minimalno vsebino. Če izberete → , se vam prikaže seznam spremenjenih datotek. Dvokliknite na datoteko, da prenesete obe reviziji datoteke in ju primerjate z grafičnim orodjem za razlikovanje.
Če kliknete z desnim gumbom na revizijo, lahko uporabite → .
You can also merge changes in the selected revision(s) into a different working copy. A folder selection dialog allows you to choose the working copy to merge into, but after that there is no confirmation dialog, nor any opportunity to try a test merge. It is a good idea to merge into an unmodified working copy so that you can revert the changes if it doesn't work out! This is a useful feature if you want to merge selected revisions from one branch to another.
Learn to Read the Revision Graph
First-time users may be surprised by the fact that the revision graph shows something that does not match the user's mental model. If a revision changes multiple copies or branches of a file or folder, for instance, then there will be multiple nodes for that single revision. It is a good practice to start with the leftmost options in the toolbar and customize the graph step-by-step until it comes close to your mental model.
All filter options try lose as little information as possible. That may cause some nodes to change their color, for instance. Whenever the result is unexpected, undo the last filter operation and try to understand what is special about that particular revision or branch. In most cases, the initially expected outcome of the filter operation would either be inaccurate or misleading.
Če želite preveriti, ali obstajajo na strežniku novejše informacije, lahko pogled osvežite z uporabe tipke F5. Če uporabljate predpomnilnik dnevnika (privzeta nastavitev), s tem preverite, ali se na skladišču nahajajo nove objave, in prenesete le najnovejše zapise. Če ste pred delali v nepovezanem načinu, bo TortoiseSVN poskušal vzpostaviti povezavo.
Če uporabljate predpomnilnik dnevnika in menite, da se je sporočilo dnevniškega zapisa ali avtor spremenil, uporabite okno dnevnika za osvežitev željenih sporočil. Ker se graf revizij sestavlja iz korena skladišča, bi bilo potrebno preveriti celoten predpomnilnik. Posodabljanje bi trajalo zelo dolgo.
A large tree can be difficult to navigate and sometimes you will want to hide parts of it, or break it down into a forest of smaller trees. If you hover the mouse over the point where a node link enters or leaves the node you will see one or more popup buttons which allow you to do this.

Click on the minus button to collapse the attached sub-tree.

Click on the plus button to expand a collapsed tree. When a tree has been collapsed, this button remains visible to indicate the hidden sub-tree.

Click on the cross button to split the attached sub-tree and show it as a separate tree on the graph.

Click on the circle button to reattach a split tree. When a tree has been split away, this button remains visible to indicate that there is a separate sub-tree.
Click on the graph background for the main context menu, which offers options to Expand all and Join all. If no branch has been collapsed or split, the context menu will not be shown.