Quand vous utilisez des branches pour maintenir des lignes de développement séparées, il y aura un moment où vous voudrez fusionner les changements faits sur une branche vers le trunk, ou vice versa.
Il est important de comprendre comment les embranchements et les fusions fonctionnent dans Subversion avant de commencer à les utiliser, car ils peuvent devenir assez complexes. Il est fortement recommandé de lire le chapitre Gestion des branches dans le livre de Subversion, qui donne une description complète et de nombreux exemples sur la façon de l'utiliser.
Il faut aussi noter que fusionner se fait toujours à l'intérieur d'une copie de travail. Si vous voulez fusionner des modifications vers une branche, vous devez avoir une copie de travail extraite pour la branche, et appeler l'assistant de fusion depuis cette copie de travail en utilisant → .
En général, c'est une bonne idée d'exécuter une fusion dans une copie de travail inchangée. Si vous avez fait d'autres changements dans votre CdT, livrez-les d'abord. Si la fusion ne se déroule pas comme prévu, vous pouvez vouloir annuler les changements, et la commande Revenir en arrière supprimera tous les changements y compris ceux effectués avant la fusion.
Il y a trois cas d'utilisation de la fusion qui sont gérés de façons légèrement différentes, comme décrit ci-dessous. La première page de l'assistant de fusion vous demande de quelle méthode vous avez besoin.
- Fusionner une plage de révisions
Cette méthode couvre le cas où vous avez fait une ou plusieurs révisions sur une branche (ou sur le trunk) et vous voulez reporter ces changements vers une autre branche.
Ce que vous demandez à Subversion de faire est : « Calcule les changements nécessaires pour passer [DE] la révision 1 de la branche A [À] la révision 7 de la branche A, et applique ces changements à ma copie de travail (du trunk ou de la branche B) ».
Si vous laissez vide la plage de révisions, Subversion utilise les fonctions de suivi de fusion pour calculer la bonne plage de révisions à utiliser. Cela s'appelle une réintégration ou une fusion automatique.
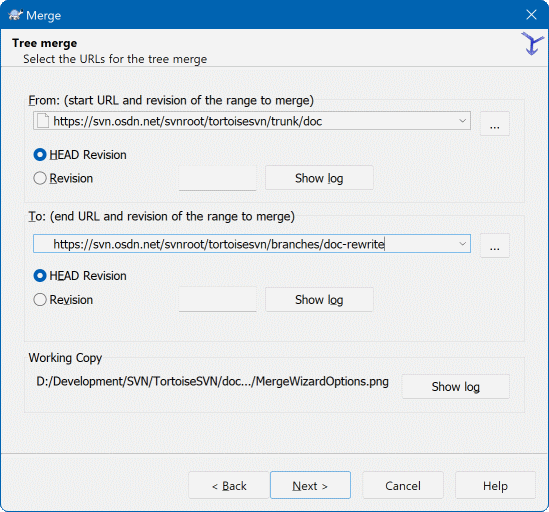
- Fusionner deux arborescences différentes
C'est une généralisation de la méthode de réintégration. Ce que vous demandez à Subversion de faire est : « Calcule les changements nécessaires pour passer [DE] la révision HEAD du trunk [À] la révision HEAD de la branche, et applique ces changements à ma copie de travail (du trunk) ». Le résultat est que le trunk a maintenant la même apparence que la branche.
Si votre serveur ou votre dépôt ne supporte pas le suivi de fusion, alors c'est la seule façon de fusionner une branche vers le trunk. Un autre cas d'utilisation se produit quand vous utilisez les branches d'un fournisseur et que vous avez besoin de fusionner les changements dans le code de votre trunk à la suite d'une nouvelle publication du fournisseur. Pour plus d'informations, lisez le chapitre sur les branches fournisseurs dans le livre de Subversion.
Dans le champ De : entrez l'URL complète du dossier de la branche ou de l'étiquette contenant les changements que vous voulez reporter dans votre copie de travail. Vous pouvez aussi cliquer sur pour parcourir le dépôt et trouver la branche désirée. Si vous avez déjà fusionné depuis cette branche, alors utilisez simplement la liste déroulante contenant l'historique des URLs déjà utilisées.
Si vous fusionnez depuis une branche renommée ou effacée, alors vous devrez retourner à une révision où cette branche existait encore. Dans ce cas, vous devez aussi spécifier cette révision comme révision pivot dans la plage des révisions fusionnées (voir ci-dessous), sinon la fusion échouera quand elle ne pourra pas trouver ce chemin à la révision HEAD.
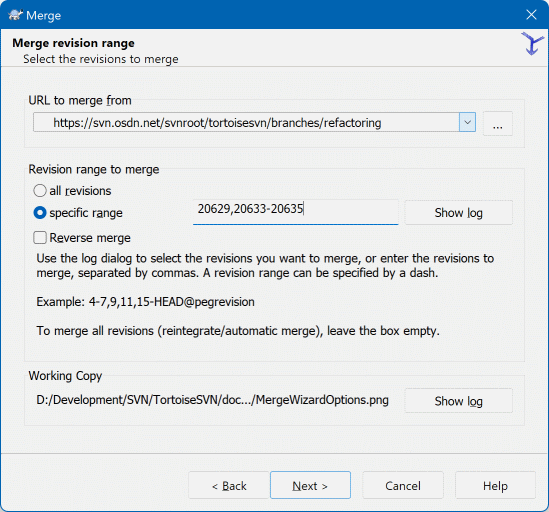
Dans le champ texte Plage de révisions à fusionner entrez la liste des révisions à fusionner. Ce peut être une seule révision, une liste de révisions spécifiques séparées par des virgules, une plage de révisions séparées par un tiret, ou une combinaison de ces différentes notations.
Si vous avez besoin de spécifier une révision pivot pour la fusion, ajoutez la révision pivot à la fin des révisions, ex. :5-7,10@3. Dans l'exemple ci-dessus, les révisions 5,6,7 et 10 seront fusionnées, avec 3 comme révision pivot.
Important
Dans TortoiseSVN, il y a une différence importante dans la manière dont est spécifiée une plage de révisions par rapport au client en ligne de commande. La façon la plus simple de visualiser cela est de penser à une clôture avec des poteaux et des panneaux.
Avec le client en ligne de commande, vous spécifiez les modifications à fusionner avec deux révisions « poteaux de clôture » qui spécifient les bornes avant et après.
Avec TortoiseSVN, vous spécifiez la liste des modifications à fusionner en utilisant des « panneaux de clôture ». La raison devient claire lorsque vous utilisez la boîte de dialogue de journal pour spécifier les révisions à fusionner, où chaque révision apparaît comme une liste de modifications.
Si vous fusionnez des révisions par lots, la méthode décrite dans le livre de Subversion vous fera fusionner 100–200 cette fois et 200–300 la prochaine. Avec TortoiseSVN, vous fusionneriez 100–200 cette fois et 201–300 la prochaine.
Cette différence a fait couler beaucoup d'encre dans les listes de diffusion. Nous reconnaissons les différences avec le client en ligne de commande, mais nous pensons que pour la majorité des utilisateurs de l'interface graphique, il est plus facile de comprendre la notation que nous avons implémentée.
La façon la plus facile de choisir la plage de révisions dont vous avez besoin est de cliquer sur , puisqu'ainsi les changements récents seront affichés avec les commentaires associés. Si vous voulez fusionner les changements d'une seule révision, sélectionnez juste cette révision. Si vous voulez fusionner les changements de plusieurs révisions, alors sélectionnez cette plage (en utilisant comme de coutume la touche Maj). Cliquez sur et les numéros de révision seront automatiquement insérés.
Si vous voulez revenir sur des modifications déjà fusionnées dans votre copie de travail, sélectionnez les révisions à annuler et vérifiez bien que la case Fusion inversée est cochée.
Si vous avez déjà fusionné des changements de cette branche, avec bon espoir vous aurez fait une note de la dernière révision fusionnée dans le commentaire quand vous avez livré la modification. Dans ce cas, vous pouvez utiliser dans la copie de travail pour retrouver ce commentaire. Dans la mesure où nous considérons les révisions comme des listes de modifications, vous devriez utiliser la révision de fin de la dernière fusion comme point de départ pour celle ci. Par exemple, si vous avez fusionné les révisions 37 à 39 la dernière fois, alors le point de départ pour cette fusion devrait être la révision 40.
Si vous vous servez de la fonctionnalité de suivi de fusion de Subversion, vous n'avez pas besoin de vous souvenir des révisions déjà fusionnées — Subversion les enregistrera pour vous. Si vous laissez le champ plage de révisions vide, toutes les révisions qui n'ont pas encore été fusionnées y seront listées. Lisez la section intitulée « Suivi de fusion » pour en savoir plus.
Quand le suivi de fusion est utilisé, la boîte de dialogue de journal montrera les révisions précédemment fusionnées, et les révisions antérieures à l'ancêtre commun, c'est-à-dire avant la copie de la branche, en grisé. La case à cocher Cacher les révisions ne pouvant être fusionnées vous permet de filtrer complètement ces révisions, afin que vous ne voyiez que les révisions qui peuvent être fusionnées.
Si d'autres personnes peuvent livrer des changements alors soyez prudents en utilisant la révision HEAD. Elle peut ne pas faire référence à la révision à laquelle vous pensez si quelqu'un d'autre a fait une livraison après votre dernière mise à jour.
Si vous laissez vide la plage de révisions ou que vous sélectionnez le bouton radio toutes les révisions, alors Subversion fusionne toutes les révisions qui ne l'ont pas encore été. On appelle cela une réintégration ou une fusion automatique.
Il y a quelques prérequis pour pouvoir faire une réintégration. Premièrement, le serveur doit supporter le suivi de fusion. La copie de travail doit contenir toute la profondeur complète de l'arborescence (pas d'extractions partielles), et elle ne doit pas avoir de modifications locales, d'éléments déplacés ou mis à jour à une révision autre que HEAD. Tous les changements faits sur le trunk pendant la phase de développement de la branche doivent avoir été intégrés à la branche (ou marqués comme ayant été fusionnés). La plage de révisions à fusionner sera calculée automatiquement.
Cliquez sur et aller à la section intitulée « Options de fusion ».
Si vous utilisez cette méthode pour fusionner une branche avec le trunk, vous devez démarrer l'assistant de fusion depuis une copie de travail du trunk.
Dans le champ De : entrez l'URL complète du dossier du trunk. Cela peut sembler erroné, mais souvenez-vous que le trunk est l'endroit auquel vous souhaitez ajouter les modifications de la branche. Vous pouvez aussi cliquer sur pour parcourir le dépôt.
Remplissez le champ À : avec l'adresse complète de la branche.
Dans les deux champs Depuis la révision et À la révision, entrez le numéro de la dernière révision à laquelle les deux arbres ont été synchronisés. Si vous êtes sûrs que personne d'autre ne fait de livraison vous pouvez utiliser la révision HEAD dans les deux cas. S'il y a une chance que quelqu'un d'autre ait fait une livraison depuis cette synchronisation, utilisez le numéro spécifique de la révision pour éviter de perdre des livraisons plus récentes.
Vous pouvez également utiliser pour sélectionner la révision.
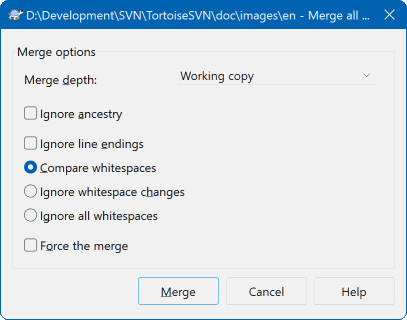
Cette page de l'assistant vous permet de spécifier des options avancées avant de commencer le processus de fusion. La plupart du temps vous pouvez vous contenter d'utiliser les options par défaut.
Vous pouvez donner la profondeur de fusion, c'est-à-dire à quelle profondeur dans la copier de travail la fusion doit aller. Les termes de profondeur utilisés sont décrits dans la section intitulée « Profondeur d'extraction ». La profondeur par défaut est Copie de travail, qui utilise le paramètre existant de profondeur, et c'est presque toujours ce dont vous avez besoin.
La plupart du temps, vous voulez que la fusion prenne en compte l'historique du fichier, afin que les changements relatifs à un ancêtre commun soient fusionnés. Parfois vous pouvez avoir besoin de fusionner des fichiers qui sont apparentés, mais pas dans votre dépôt. Par exemple, vous pouvez avoir importé les versions 1 et 2 d'une bibliothèque tierce partie dans deux répertoires différents. Bien qu'ils soient apparentés logiquement, Subversion ne le sait pas parce qu'il ne voit que les archives que vous avez importées. Si vous essayiez de fusionner les différences entre ces deux arborescences, vous verriez une suppression complète suivi d'un ajout complet. Pour dire à Subversion de n'utiliser que les différences basées sur le chemin plutôt que les différences basées sur l'historique, cochez la case Ignorer l'ascendance. Vous pouvez en lire plus sur ce sujet dans le livre de Subversion, Prise en compte ou non de l'ascendance.
Vous pouvez spécifier la gestion des changements de caractères de fin de ligne et d'espacement. Ces options sont décrites dans la section intitulée « Options de fins de ligne et d'espacement ». Le comportement par défaut est de considérer toutes les différences d'espaces et de fins de lignes comme des modifications à part entière, qu'il faut livrer.
La case à cocher Forcer la fusion est utilisée pour éviter un conflit d'arborescence lors de la suppression d'un fichier qui a été modifié localement ou qui n'est pas sous contrôle de version. Si le fichier est supprimé, il n'y a aucun moyen de le récupérer, ce qui explique que par défaut cette case ne soit pas cochée.
Si vous utilisez la fonction de suivi de fusion et que vous souhaitez marquer une révision comme ayant été fusionnée, sans vraiment avoir fait de fusion ici, cochez la case Enregistrer uniquement la fusion. Il y a deux raisons pour lesquelles vous pourriez être amenés à faire ceci. La fusion à effectuer est trop compliquée pour les algorithmes de fusion, vous faites donc la fusion à la main et marquez les modifications comme ayant été fusionnées de manière à ce que le suivi de fusion le sache. Ou vous voulez éviter qu'une révision particulière soit fusionnée. La marquer comme ayant été fusionnée empêchera les clients supportant le suivi de fusion de faire effectivement la fusion.
A présent que tout est correctement configuré, tout ce que vous avez à faire est de cliquer sur le bouton . Si vous voulez avoir un aperçu du résultat, le bouton simulera la fusion sans modifier la CdT. La liste des fichiers qui seront changés par une vraie fusion s'affichera, ainsi que les endroits où il pourrait y avoir des conflits. Comme le suivi de fusion rend le processus de fusion beaucoup plus complexe, il n'est pas possible de savoir à l'avance avec certitude si la fusion sera réalisée sans conflit, donc les fichiers marqués comme étant en conflit dans un test de fusion pourraient en fait fusionner sans aucun problème.
La boîte de dialogue de progression de la fusion vous montre chaque étape de la fusion, avec les plages de révisions concernées. Elle peut indiquer une révision de plus que ce à quoi vous vous attendiez. Par exemple, si vous avez demandé de fusionner la révision 123, la boîte de dialogue de progression affichera « Fusion des révisions 122 à 123 ». Pour le comprendre, il faut vous souvenir que la fusion est apparentée à la comparaison. Le processus de fusion génère une liste de différences entre deux points dans le dépôts, puis applique ces différences à votre copie de travail. La boîte de dialogue de progression vous montre simplement les points de départ et d'arrivée de la comparaison.
La fusion est à présent effectuée. C'est une bonne idée d'aller regarder le résultat et de vérifier que tout est conforme à vos attentes. Fusionner est normalement assez compliqué. Il y a souvent des conflits si la branche s'est beaucoup éloignée du trunk.
Astuce
Quand des révisions sont fusionnées dans une copie de travail, TortoiseSVN génère un message de log à partir de toutes les révisions fusionnées. Ces messages sont alors disponibles depuis le bouton dans la boîte de dialogue de livraison.
Pour personnaliser ce message généré, positionnez les propriétés de projet correspondantes sur votre copie de travail. Voir la section intitulée « Fusionner les modèles de message de journal »
Pour les clients et serveurs Subversion antérieurs à la version 1.5, aucune information de fusion n'est conservée et il faut aller rechercher manuellement les révisions à fusionner. Une fois que vous avez testé les changements et que vous allez livrer cette révision, le commentaire de livraison devrait toujours inclure les numéros de révision inclus dans la fusion. Si vous voulez faire une autre fusion plus tard, vous aurez besoin de savoir ce que vous avez déjà fusionné pour ne pas appliquer vos modifications plusieurs fois. Pour plus d'informations, consultez Best Practices for Merging dans le livre de Subversion [NdT : version 1.4 non traduite en français].
Pour des clients et serveurs Subversion en version 1.5 ou postérieure, la fonctionnalité de suivi de fusion enregistrera les révisions fusionnées et empêchera de fusionner une même révision plusieurs fois. Cela vous simplifie considérablement la tâche, dans la mesure où vous pouvez simplement fusionner toute la plage de révisions à chaque fois en étant sûr que seules les nouvelles révisions seront vraiment fusionnées.
La gestion de branches est importante. Si vous voulez conserver une branche synchronisée avec le tronc, vous devrez vous assurer de fusionner souvent de sorte que la branche et le tronc ne soient pas trop éloignés. Bien sûr, vous devez toujours éviter de fusionner plusieurs fois les mêmes modifications comme expliqué ci-dessus.
Astuce
Si vous venez de fusionner avec le trunk une branche créée pour le développement d'une fonctionnalité, le trunk contient à présent le code de la nouvelle fontionnalité, et la branche est obsolète. Vous pouvez donc la supprimer du dépôt si besoin est.
Important
Subversion ne peut pas fusionner un fichier avec un dossier et vice versa — dossiers entre eux et fichiers entre eux uniquement. Si vous cliquez sur un fichier et ouvrez la boîte de dialogue de fusion, vous devez alors donner un chemin vers un fichier dans cette boîte de dialogue. Si vous choisissez un dossier et affichez la boîte de dialogue, vous devez alors spécifier une URL de dossier pour la fusion.
La version 1.5 de Subversion a introduit des aides au suivi de fusion. Lorsque vous fusionnez des modifications depuis une arborescence vers une autre, les numéros de révision sont stockés et cette information peut être utilisée à plusieurs fins.
Vous pouvez éviter le danger de fusionner deux fois la même révision (problème de fusions répétées). Dès qu'une révision a été marquée comme ayant été fusionnée, les fusions futures incluant cette révision dans leur plage de révisions l'ignoreront.
Quand vous fusionnez une branche dans le tronc, la fenêtre de commentaires peut vous montrer les livraisons de la branche comme faisant partie des commentaires du tronc, donnant une meilleure traçabilité des modifications.
Lorsque vous affichez la fenêtre de commentaires depuis la fenêtre de fusion, les révisions déjà fusionnées sont grisées.
Quand l'annotation d'un fichier est affichée, vous pouvez choisir de montrer les auteurs des révisions fusionnées, au lieu de la personne ayant fait la fusion.
Vous pouvez marquer les révisions comme n'étant pas à fusionner en les incluant dans la liste des révisions fusionnées mais sans vraiment faire la fusion.
Les informations de suivi de fusion sont stockées dans la propriété svn:mergeinfo par le client lorsqu'il effectue la fusion. Au moment de la livraison de cette fusion, le serveur stocke l'information dans la base de données, et quand vous souhaitez fusionner, commenter ou annoter, le serveur peut répondre de manière appropriée. Afin que le système fonctionne correctement, vous devez vous assurer que le serveur, le dépôt et les clients sont à jour. Les clients plus anciens ne stockeront pas la propriété svn:mergeinfo et les serveurs plus anciens ne pourront pas fournir l'information demandée par les clients récents.
Apprenez-en plus sur le suivi des fusions dans la Documentation du suivi des fusions de Subversion.
Important
Le texte des boîtes de dialogue de résolution de conflit est fourni par la bibliothèque SVN, et la traduction peut donc ne pas (encore) être synchronisée avec celle des boîtes de dialogue TortoiseSVN. Nous en sommes désolés.
Une fusion ne se passe pas toujours très bien. Il y a parfois un conflit. TortoiseSVN vous aide à suivre ce processus en vous montrant la boîte de dialogue de conflit de fusion.
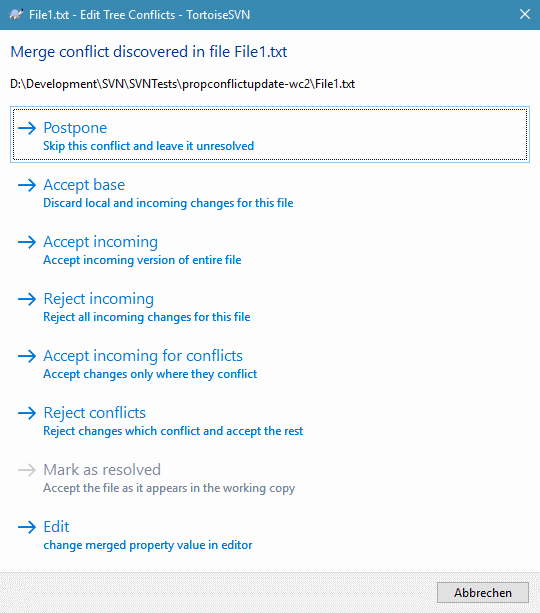
Il est probable que certains changements auront été fusionnés sans difficulté, mais que d'autres changements locaux seront en conflit avec les changements déjà livrés dans le dépôt. Tous les changements qui peuvent être fusionnés le sont. La boîte de dialogue de conflit de fusion vous donne plusieurs façons de gérer les lignes qui sont en conflit.
Pour les conflits normaux qui se produisent à cause de changements dans le contenu du fichier ou dans ses propriétés, la boîte de dialogue contient des boutons qui vous permettent de choisir ce que vous voulez garder ou rejeter parmi les parties en conflit.
S'il y a un conflit d'arborescence, veuillez d'abord consulter la section intitulée « Conflits d'arborescence » à propos des différents types de conflits d'arborescence et de comment et pourquoi ils se produisent.
Pour résoudre les conflits d'arborescence après une fusion, une boîte de dialogue est affichée avec différentes options sur comment résoudre le conflit :
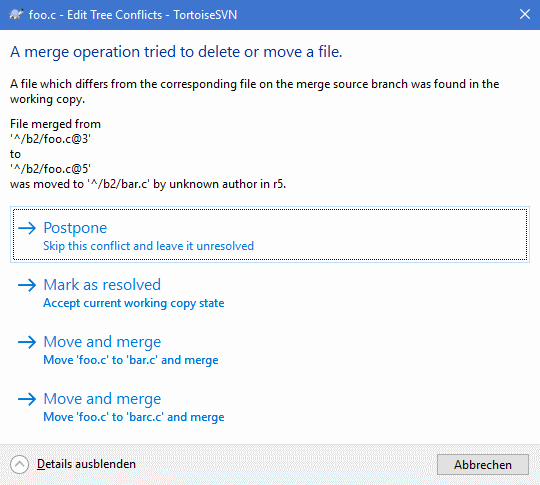
Comme il y a plusieurs situations possibles de conflit d'arborescence, les boutons affichés dans la boîte de dialogue pour résoudre ces situations dépendront du conflit concerné. Les textes et libellés des boutons expliquent ce que fait l'option pour résoudre le conflit. Si vous n'êtes pas sûr de vous, vous pouvez soit annuler la boîte de dialogue, soit utiliser le bouton pour résoudre le conflit plus tard.
Quand vous développez une nouvelle fonctionnalité dans une branche séparée, c'est une bonne pratique de prévoir une politique de réintégration de cette branche lorsque la nouvelle fonctionnalité sera prête. Si la branche principale — trunk — évolue en même temps, il est probable que les différences seront nombreuses, rendant l'intégration cauchemardesque.
Si la fonctionnalité est relativement simple et que le développement ne prend pas beaucoup de temps, vous pouvez adopter une solution simple, qui consiste à garder une branche distincte, que vous intégrerez lorsque le développement sera fini. Dans l'assistant de fusion, ce devrait n'être qu'un simple Fusionner une plage de révisions, la plage de révisions couvrant la période de développement de la branche.
Dans le cas où la fonctionnalité prend plus de temps et que vous avez besoin de prendre en compte les évolutions du trunk, alors vous devez garder votre branche synchronisée. Cela signifie simplement que vous allez fusionner de temps en temps les évolutions du trunk dans votre branche, de manière à ce que votre branche contienne toutes les modifications du trunk en plus de la nouvelle fonctionnalité. Le processus de synchronisation utilise la commande Fusionner une plage de révisions. Quand le développement de la fonctionnalité est achevé vous pouvez alors fusionner la branche dans le trunk en utilisant soit Réintégrer une branche soit Fusionner deux arborescences.
Une autre façon (rapide) de fusionner tous les changements du trunk dans la branche de la fonctionnalité est d'utiliser la commande → dans le menu contextuel étendu (gardez appuyée la touche Maj en faisant un clic droit sur le fichier).
Cette boîte de dialogue est très simple. Tout ce que vous avez à faire est de positionner les options pour la fusion, comme décrit dans la section intitulée « Options de fusion ». TortoiseSVN s'occupe automatiquement du reste avec le suivi de fusion.