Mengirimkan perubahan yang Anda buat ke copy pekerjaan Anda dikenal sebagai mengkomit perubahan. Tapi sebelum Anda mengkomit Anda harus memastikan bahwa copy pekerjaan Anda mutahir. Anda bisa menggunakan → secara langsung. Atau Anda bisa menggunakan → pertama, untuk melihat file yang mana yang telah berubah secara lokal atau pada server.
Jika copy pekerjaan Anda mutahir dan di sana tidak ada konflik, Anda siap untuk mengkomit perubahan Anda. Pilih file/folder mana saja yang ingin Anda komit, lalu → .
Dialog komit akan memperlihatkan kepada Anda setiap file yang diubah, termasuk yang ditambahkan, dihapus dan file tidak berversi. Jika Anda tidak ingin file yang diubah dikomit, cukup jangan centang file itu. Jika Anda ingin menyertakan file tidak berversi, centang file itu untuk ditambahkan ke komit.
To quickly check or uncheck types of files like all versioned files or all modified files, click the link items just above the list of shown items.
For information on the coloring and overlays of the items according to their status, please see bagian bernama “Status Lokal dan Remote”.
Item-item yang sudah ditukar ke path repositori yang berbeda juga ditunjukan menggunakan tanda (s). Anda mungkin telah menukar sesuatu sementara bekerja pada cabang dan lupa untuk menukarnya kembali ke trunk. Ini adalah tanda peringatan Anda!
Komit file atau folder?
Ketika Anda mengkomit file, dialog komit hanya menampilkan file yang telah Anda pilih. Ketika Anda mengkomit folder dialog komit akan memilih file yang diubah secara otomatis. Jika Anda lupa tentang file baru yang Anda buat, mengkomit folder akan membuat Anda menemukannya. Mengkomit folder tidak berarti bahwa setiap file ditandai sebagai diubah; ini hanya memudahkan hidup Anda dengan melakukan pekerjaan lebih bagi Anda.
Banyak file tidak berversi dalam dialog komit
If you think that the commit dialog shows you too many unversioned (e.g. compiler generated or editor backup) files, there are several ways to handle this. You can:
menambah file (atau suatu ekstensi wildcard) ke daftar file untuk dikecualikan pada halaman seting. Ini akan mempengaruhi setiap copy pekerjaan yang Anda miliki.
menambah file ke daftar
svn:ignoremenggunakan → Ini hanya akan mempengaruhi direktori di mana Anda mengeset propertisvn:ignore. Dengan menggunakan Dialog Properti SVN, Anda bisa mengubah propertisvn:ignoreuntuk direktori.add the file to the
svn:global-ignoreslist using → This will affect the directory on which you set thesvn:global-ignoresproperty and all subfolders as well.
Read bagian bernama “Mengabaikan File Dan Direktori” for more information.
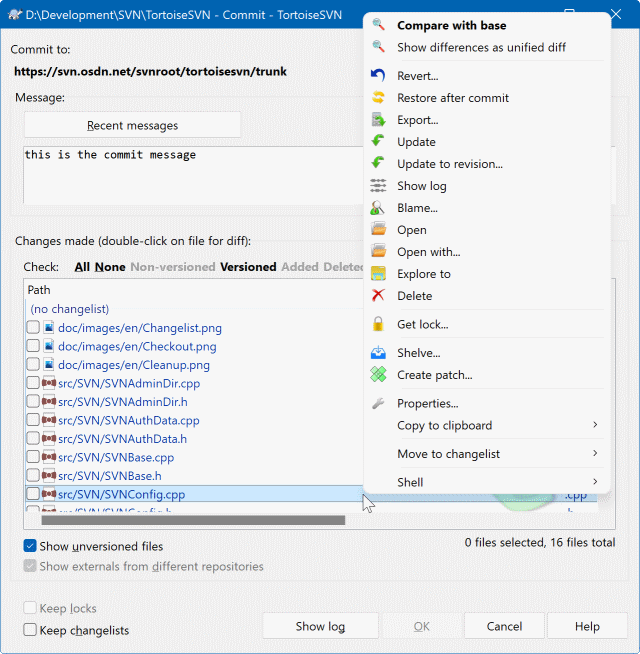
Double clicking on any modified file in the commit dialog will launch the external diff tool to show your changes. The context menu will give you more options, as shown in the screenshot. You can also drag files from here into another application such as a text editor or an IDE.
You can select or deselect items by clicking on the checkbox to the left of the item. For directories you can use Shift-select to make the action recursive.
Kolom yang ditampilkan di pane bawah bisa diatur sesuai kesukaan Anda. Jika Anda mengklik kanan pada header kolom apa saja, Anda akan melihat suatu menu konteks yang membolehkan Anda untuk memilih kolom mana yang ditampilkan. Anda juga bisa mengubah panjang kolom dengan menggunakan kendali drag yang muncul ketika Anda memindahkan mouse melalui batas kolom. Kustomisasi ini tersimpan sehingga Anda akan melihat heading yang sama nantinya.
By default when you commit changes, any locks that you hold on files are released automatically after the commit succeeds. If you want to keep those locks, make sure the Keep locks checkbox is checked. The default state of this checkbox is taken from the no_unlock option in the Subversion configuration file. Read bagian bernama “Seting Umum” for information on how to edit the Subversion configuration file.
Warning when committing to a tag
Usually, commits are done to the trunk or a branch, but not to tags. After all, a tag is considered fixed and should not change.
If a commit is attempted to a tag URL, TortoiseSVN shows a confirmation dialog first to ensure whether this is really what is intended. Because most of the time such a commit is done by accident.
However, this check only works if the repository layout is one of the recommended ones, meaning it uses the names trunk, branches and tags to mark the three main areas. In case the setup is different, the detection of what is a tag/branch/trunk (also known as classification patterns), can be configured in the settings dialog: bagian bernama “Revision Graph Settings”
Drag dan Drop
Anda bisa menggeret file ke dalam dialog komit dari mana saja, selama copy pekerjaan di-check out dari repositori yang sama. Sebagai contoh, Anda mempunyai copy pekerjaan yang besar dengan beberapa explorer windows terbuka untuk melihat jarak folder dari hirarki. Jika Anda ingin menghindari komit dari folder tingkat atas (dengan panjang folder yang sulit memeriksa perubahan) Anda bisa membuka dialog komit untuk satu folder dan menggeret item dari jendela lain untuk disertakan di dalam komit atomis yang sama.
Anda dapat menggeret file-file tidak berversi yang berada dalam suatu copy pekerjaan ke dalam dialog komit dan mereka akan ditambah-SVN-kan secara otomatis.
Dragging files from the list at the bottom of the commit dialog to the log message edit box will insert the paths as plain text into that edit box. This is useful if you want to write commit log messages that include the paths that are affected by the commit.
Terkadang file-file diubah namanya di luar Subversion, dan mereka muncul di daftar file sebagai file yang hilang dan file yang tidak terversi. Untuk menghindari kehilangan sejarah tersebut, Anda perlu untuk memberitahu Subversion tentang koneksi tersebut. Cukup pilih nama lama (hilang) dan nama baru (tidak terversi) dan gunakan → untuk memasangkan kedua file tersebut sebagai suatu perubahan nama.
Repairing External Copies
If you made a copy of a file but forgot to use the Subversion command to do so, you can repair that copy so the new file doesn't lose its history. Simply select both the old name (normal or modified) and the new name (unversioned) and use → to pair the two files as a copy.
The commit dialog supports Subversion's changelist feature to help with grouping related files together. Find out about this feature in bagian bernama “Daftar Perubahan”.
Sometimes you want to only commit parts of the changes you made to a file. Such a situation usually happens when you're working on something but then an urgent fix needs to be committed, and that fix happens to be in the same file you're working on.
right click on the file and use → . This will create a copy of the file as it is. Then you can edit the file, e.g. in a text editor and undo all the changes you don't want to commit. After saving those changes you can commit the file.
Menggunakan TortoiseMerge
If you use TortoiseMerge to edit the file, you can either edit the changes as you're used to, or mark all the changes that you want to include. right click on a modified block and use → to include that change. Finally right click and use → which will change the right view to only include the changes you've marked before and undo the changes you have not marked.
After the commit is done, the copy of the file is restored automatically, and you have the file with all your modifications that were not committed back.
Sometimes you have versioned files that change frequently but that you really don't want to commit. Sometimes this indicates a flaw in your build process - why are those files versioned? should you be using template files? But occasionally it is inevitable. A classic reason is that your IDE changes a timestamp in the project file every time you build. The project file has to be versioned as it includes all the build settings, but it doesn't need to be committed just because the timestamp changed.
To help out in awkward cases like this, we have reserved a changelist called ignore-on-commit. Any file added to this changelist will automatically be unchecked in the commit dialog. You can still commit changes, but you have to select it manually in the commit dialog.
Pastikan untuk memasukkan log pesan yang menjelaskan perubahan yang Anda komit. Ini akan membantu Anda untuk melihat apa yang terjadi dan kapan saat Anda melihat pesan log proyek pada lain waktu. Pesan bisa sepanjang atau sesingkat yang Anda inginkan; banyak proyek mempunyai petunjuk untuk apa yang seharusnya disertakan, bahasa yang digunakan, dan ada kalanya bahkan format ketat.
Anda bisa menyediakan format sederhana ke log pesan Anda menggunakan konvensi mirip ke yang digunakan di dalam email. Untuk menerapkan ke teks, gunakan *text* untuk tebal, _text_ untuk garis bawah, dan ^text^ untuk miring.
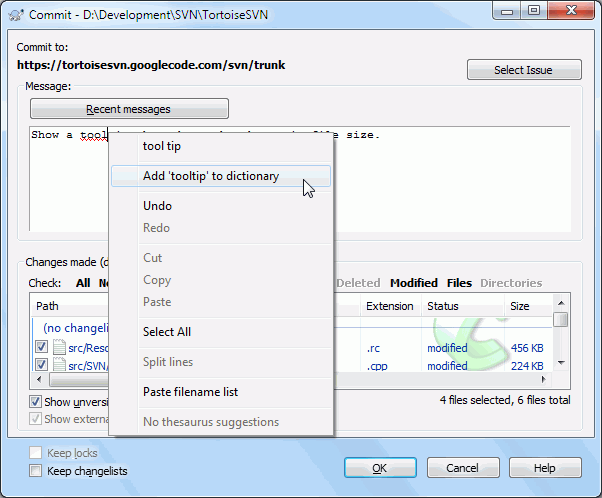
TortoiseSVN menyertakan pemeriksa ejaan untuk membantu Anda mendapatkan log pesan yang benar. Ini akan menerangi setiap kata yang salah eja. Gunakan menu konteks untuk mengakses koreksi yang disarankan. Tentu saja, ia tidak mengetahui setiap istilah teknis yang Anda ketahui sehingga ejaan kata yang benar akan tetap muncul sebagai kesalahan. Tapi jangan khawatir. Anda bisa menambahkannya ke kamus pribadi Anda menggunakan menu konteks.
The log message window also includes a filename and function auto-completion facility. This uses regular expressions to extract class and function names from the (text) files you are committing, as well as the filenames themselves. If a word you are typing matches anything in the list (after you have typed at least 3 characters, or pressed Ctrl+Space), a drop-down appears allowing you to select the full name. The regular expressions supplied with TortoiseSVN are held in the TortoiseSVN installation bin folder. You can also define your own regexes and store them in %APPDATA%\TortoiseSVN\autolist.txt. Of course your private autolist will not be overwritten when you update your installation of TortoiseSVN. If you are unfamiliar with regular expressions, take a look at the introduction at https://en.wikipedia.org/wiki/Regular_expression, and the online documentation and tutorial at http://www.regular-expressions.info/.
Getting the regex just right can be tricky, so to help you sort out a suitable expression there is a test dialog which allows you to enter an expression and then type in filenames to test it against. Start it from the command prompt using the command TortoiseProc.exe /command:autotexttest.
The log message window also includes a commit message snippet facility. These snippets are shown in the autocomplete dropdown once you type a snippet shortcut, and selecting the snippet in the autocomplete dropdown then inserts the full text of the snippet. The snippets supplied with TortoiseSVN are held in the TortoiseSVN installation bin folder. You can also define your own snippets and store them in %APPDATA%\TortoiseSVN\snippet.txt. # is the comment character. Newlines can be inserted by escaping them like this: \n and \r. To insert a backslash, escape it like this: \\.
You can re-use previously entered log messages. Just click on to view a list of the last few messages you entered for this working copy. The number of stored messages can be customized in the TortoiseSVN settings dialog.
You can clear all stored commit messages from the Saved data page of TortoiseSVN's settings, or you can clear individual messages from within the Recent messages dialog using the Delete key.
If you want to include the checked paths in your log message, you can use the command → in the edit control.
Another way to insert the paths into the log message is to simply drag the files from the file list onto the edit control.
Properti Folder Khusus
Ada beberapa properti folder khusus yang bisa digunakan untuk membantu memberikan kontrol lebih melalui format dari pesan log komit dan bahasa yang digunakan oleh modul pemeriksa ejaan. Baca bagian bernama “Seting Proyek” untuk informasi lengkap.
Integration with Bug Tracking Tools
If you have activated the bug tracking system, you can set one or more Issues in the Bug-ID / Issue-Nr: text box. Multiple issues should be comma separated. Alternatively, if you are using regex-based bug tracking support, just add your issue references as part of the log message. Learn more in bagian bernama “Integration with Bug Tracking Systems / Issue Trackers”.
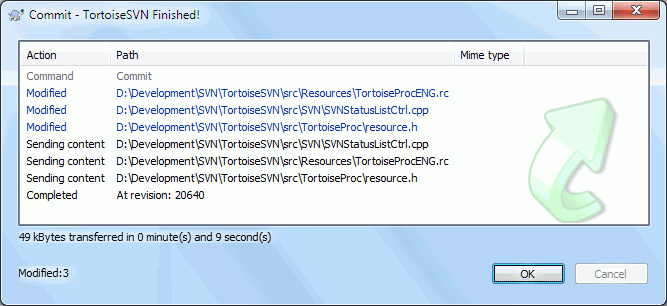
Setelah menekan , dialog muncul menampilkan progres dari komit.
Dialog progres menggunakan kode warna untuk menerangi tindakan komit yang berbeda
- Biru
Mengkomit modifikasi.
- Ungu
Mengkomit tambahan baru.
- Merah tua
Mengkomit penghapusan atau penggantian.
- Hitam
Item-item lainnya.
Ini adalah skema warna standar, tapi Anda bisa mengkustomisasi warna menggunakan dialog seting. Baca bagian bernama “Seting Warna TortoiseSVN” untuk informasi lengkap.


