If you are importing into an existing repository which already contains some projects, then the repository structure will already have been decided. If you are importing data into a new repository, then it is worth taking the time to think about how it will be organised. Read bagian bernama “Tata Letak Repositori” for further advice.
This section describes the Subversion import command, which was designed for importing a directory hierarchy into the repository in one shot. Although it does the job, it has several shortcomings:
There is no way to select files and folders to include, aside from using the global ignore settings.
The folder imported does not become a working copy. You have to do a checkout to copy the files back from the server.
It is easy to import to the wrong folder level in the repository.
For these reasons we recommend that you do not use the import command at all but rather follow the two-step method described in bagian bernama “Impor di tempat”, unless you are performing the simple step of creating an initial /trunk /tags /branches structure in your repository. Since you are here, this is how the basic import works ...
Sebelum Anda mengimpor proyek Anda ke dalam repositori Anda harus:
Menghapus semua file yang tidak diperlukan untuk membangun proyek (file temporal, file yang dibuat oleh kompilator seperti. *.obj, biner terkompilasi, ...)
Organize the files in folders and sub-folders. Although it is possible to rename/move files later it is highly recommended to get your project's structure straight before importing!
Sekarang pilih folder tingkat-atas dari struktur direktori proyek Anda dalam windows explorer dan klik kanan untuk membuka menu konteks. Pilih perintah → yang membawa kotak dialog:
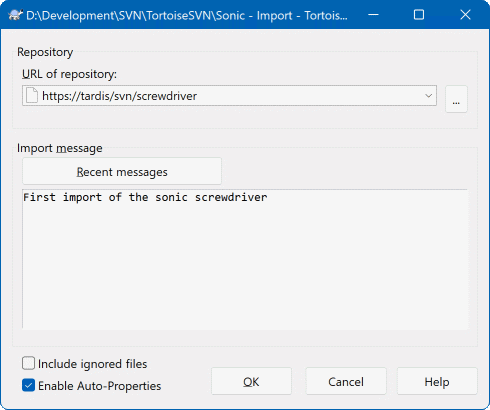
In this dialog you have to enter the URL of the repository location where you want to import your project. It is very important to realise that the local folder you are importing does not itself appear in the repository, only its content. For example if you have a structure:
C:\Projects\Widget\source
C:\Projects\Widget\doc
C:\Projects\Widget\images
and you import C:\Projects\Widget into http://mydomain.com/svn/trunk then you may be surprised to find that your subdirectories go straight into trunk rather than being in a Widget subdirectory. You need to specify the subdirectory as part of the URL, http://mydomain.com/svn/trunk/Widget-X. Note that the import command will automatically create subdirectories within the repository if they do not exist.
Pesan impor digunakan sebagai pesan log.
Secara bawaan, file dan folder yang sama dengan pola abaikan-global tidak diimpor. Untuk menimpa perlaku ini Anda bisa menggunakan kotak centang Sertakan file diabaikan. Lihat bagian bernama “Seting Umum” untuk informasi lebih jauh pada menyeting pola abaikan global.
As soon as you press TortoiseSVN imports the complete directory tree including all files into the repository. The project is now stored in the repository under version control. Please note that the folder you imported is NOT under version control! To get a version-controlled working copy you need to do a Checkout of the version you just imported. Or read on to find out how to import a folder in place.
Dengan berasumsi bahwa Anda sudah memiliki sebuah repositori, dan Anda ingin menambahkan sebuah struktur folder baru ke dalamnya, cukup ikuti langkah-langkah berikut:
Use the repository browser to create a new project folder directly in the repository. If you are using one of the standard layouts you will probably want to create this as a sub-folder of trunk rather than in the repository root. The repository browser shows the repository structure just like Windows explorer, so you can see how things are organised.
Checkout the new folder over the top of the folder you want to import. You will get a warning that the local folder is not empty. Ignore the warning. Now you have a versioned top level folder with unversioned content.
Pilih → atas folder berversi ini untuk menambahkan beberapa atau semua isi. Anda dapat menambah dan menghapus berkas-berkas, mengeset properti-properti
svn:ignoredi folder-folder dan membuat perubahan-perubahan lain yang Anda perlukan.Komit folder level puncak tersebut, dan Anda memiliki suatu pohon berversi yang baru, dan sebuah salinan perkerjaan lokal, dibuat dari folder Anda yang sudah ada.
Ada kalanya Anda perlu mempunyai file dibawah kontrol versi yang berisi data pengguna tertentu. Itu berarti Anda mempunyai file yang perlu dimodifikasi oleh setiap pengembang/pengguna untuk memenuhi setup lokalnya. Tapi memversi file demikian sulit karena setiap pengguna akan mengkomit perubahannya setiap kali ke repositori.
In such cases we suggest to use template files. You create a file which contains all the data your developers will need, add that file to version control and let the developers check this file out. Then, each developer has to make a copy of that file and rename that copy. After that, modifying the copy is not a problem anymore.
As an example, you can have a look at TortoiseSVN's build script. It calls a file named default.build.user which doesn't exist in the repository. Only the file default.build.user.tmpl. default.build.user.tmpl is the template file which every developer has to create a copy from and rename that file to default.build.user. Inside that file, we added comments so that the users will see which lines they have to edit and change according to their local setup to get it working.
So as not to disturb the users, we also added the file default.build.user to the ignore list of its parent folder, i.e. we've set the Subversion property svn:ignore to include that filename. That way it won't show up as unversioned on every commit.