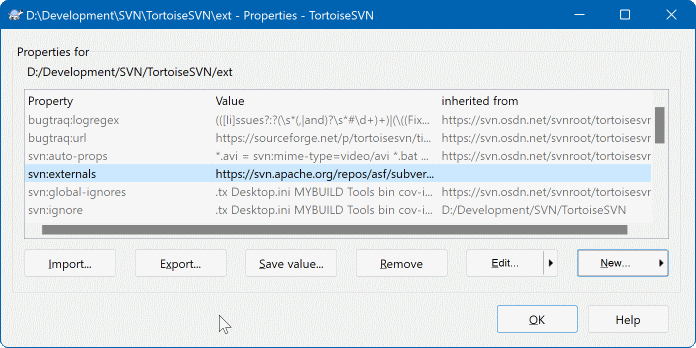
Lastnosti Subversion lahko preberete in nastavite v oknu Lastnosti, ki ga prikaže sistem Windows. Poleg tega vidite te lastnosti tudi, če uporabite ukaz → . V pogovornih oknih TortoiseSVN, kjer se izpišejo seznami datotek, lahko lastnosti prikažete z ukazom → .
You can add your own properties, or some properties with a special meaning in Subversion. These begin with svn:. svn:externals is such a property; see how to handle externals in “External Items”.
Subversion omogoča (podobno kot sistem CVS) razširitev ključnih besed, ki se lahko uporabljajo za vstavljanje imena datoteke in številke revizije v vsebino datoteke. Trenutno so podprte naslednje ključne besede:
- $Date$
Datum zadnje znane objave glede na informacije iz zadnje posodobitve delovne kopije. Ne preverja, če so v skladišču novejše spremembe.
- $Revision$
Revizija zadnje znane objave.
- $Author$
Avtor zadnje znane objave.
- $HeadURL$
Celoten naslov URL te datoteke v skladišču.
- $Id$
Stisnjena kombinacija prejšnjih štirih ključnih besed.
To find out how to use these keywords, look at the svn:keywords section in the Subversion book, which gives a full description of these keywords and how to enable and use them.
For more information about properties in Subversion see the Special Properties.
To add a new property, first click on New.... Select the required property name from the menu, and then fill in the required information in the specific property dialog. These specific property dialogs are described in more detail in “Property Editors”.
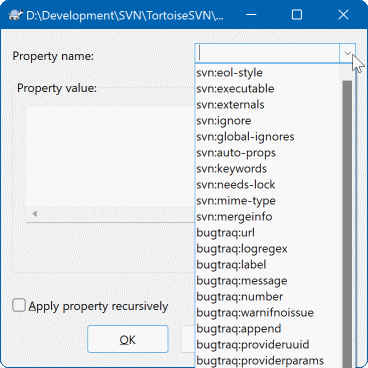
To add a property that doesn't have its own dialog, choose from the New... menu. Then either select an existing property in the combo box or enter a custom property name.
If you want to apply a property to many items at once, select the files/folders in explorer, then select → .
Če želite nastaviti lastnost vsaki datoteki in mapi v hierarhiji pod trenutno mapo, uporabite potrditveno polje Rekurzivno.
Če želite urediti obstoječo lastnost, jo izberite iz seznama obstoječih lastnosti in kliknite na gumb .
Če želite odstraniti nastavljeno lastnost, jo izberite iz seznama obstoječih lastnosti in kliknite na gumb .
The svn:externals property can be used to pull in other projects from the same repository or a completely different repository. For more information, read “External Items”.
Edit properties at HEAD revision
Because properties are versioned, you cannot edit the properties of previous revisions. If you look at properties from the log dialog, or from a non-HEAD revision in the repository browser, you will see a list of properties and values, but no edit controls.
Pogosto isti nabor lastnosti nastavite na več datotekah/mapah, naprimer bugtraq:logregex. Za enostaven prenos lastnosti iz enega projekta na drugega lahko uporabite zmožnost Izvoz/Uvoz.
Na datoteki ali mapi, ki vsebuje nastavljene lastnosti, uporabite → , izberite lastnosti, ki jih želite izvoziti in kliknite na gumb . Vpisati boste morali ime datoteke, v katero naj se lastnosti shranijo.
Na mapah, na katerih želite nastaviti lastnosti, uporabite → in kliknite na gumb . Izberite datoteko, iz katere želite uvoziti lastnosti, zato izberite datoteko, ki ste jo ustvarili pri izvažanju. Lastnosti bodo v mapo dodane nerekurzivno.
Če želite drevesu dodati lastnosti rekurzivno, naredite zgoraj opisane korake, potem pa v oknu lastnosti izberite vsako lastnost, kliknite na gumb , potrdite polje Uporabi lastnost rekurzivno in kliknite na gumb .
Izvozna datoteka je binarna in lastna sistemu TortoiseSVN. Njena edina uporaba je prenos lastnosti z uporabo ukazov Izvozi in Uvozi, tako da teh datotek ne urejamo.
TortoiseSVN lahko z uporabo datotek dodaja lastnostim dvojiške vrednosti. Če želite dvojiško lastnost prebrati, jo shranite v datoteko z gumbom . Če želite dvojiško lastnost nastaviti, uporabite urejevalnik datotek ali drugo primerno orodje, ki vam omogoča ustvariti datoteko z željeno vsebino, potem pa datoteko naložite s klikom na gumb .
Čeprav se dvojiške lastnosti ne uporabljajo prav pogosto, pa so včasih precej uporabne. Primer: če shranjujete obsežne grafične datoteke ali če je aplikacija, ki slike nalaga, obsežna, lahko pomanjšane slike shranite kot lastnosti datotek in jih tako hitreje pregledujete.
Subversion in TortoiseSVN lahko prilagodite tako, da se lastnosti samodejno nastavijo datotekam in mapam, ko se te dodajo v skladišče. To lahko storite na dva načina.
You can edit the Subversion configuration file to enable this feature on your client. The General page of TortoiseSVN's settings dialog has an edit button to take you there directly. The config file is a simple text file which controls some of Subversion's workings. You need to change two things: firstly in the section headed miscellany uncomment the line enable-auto-props = yes. Secondly you need to edit the section below to define which properties you want added to which file types. This method is a standard Subversion feature and works with any Subversion client. However it has to be defined on each client individually - there is no way to propagate these settings from the repository.
Druga možnost je nastavitev lastnosti tsvn:autoprops na mapah, kot je opisano v naslednjem odseku. Ta metoda deluje le pri odjemalcih TortoiseSVN, vendar se pri posodobitvi prenese na vse delovne kopije.
As of Subversion 1.8, you can also set the property svn:auto-props on the root folder. The property value is automatically inherited by all child items.
Whichever method you choose, you should note that auto-props are only applied to files at the time they are added to the working copy. Auto-props will never change the properties of files which are already versioned.
Če želite stoodstotno zagotoviti, da imajo datoteke ob dodajanju v skladišče nastavljene ustrezne lastnosti, namestite v skladišče akcijske skripte, ki se izvedejo pred objavo (pre-hook script).
Objavite lastnosti
Lastnosti v sistemu Subversion so pod nadzorom različic. Potem, ko spremenite ali dodate lastnosti, morate spremembe objaviti.
Spori pri lastnostih
Če pri objavi sprememb pride do spora, ker je nek drug uporabnik sprememnil isto lastnost, Subversion ustvari datoteko .prej. Ko rešite spor, to datoteko izbrišite.
TortoiseSVN ima nekaj svojih posebnih lastnosti, ki se začnejo s tsvn:.
tsvn:logminsizenastavi najmanjšo dolžino sporočila dnevniškega zapisa za objavo. Če vnesete krajši zapis, objava ni mogoča. Ta lastnost je uporabna, ker vas opozori, da morate pri vsaki objavi podati primerno opisno sporočilo. Če ta lastnost ni nastavljena ali je nastavljena na vrednost nič, sistem omogoča objavo brez sporočila.tsvn:lockmsgminsizenastavi najmanjšo dolžino sporočila pri zaklepu. Če vnesete krajši zapis, pridobitev zaklepa ni mogoča. Ta lastnost je uporabna, ker vas opozori, da morate pri pridobivanju zaklepa podati primerno opisno sporočilo. Če ta lastnost ni nastavljena ali je nastavljena na vrednost nič, sistem omogoča pridobivanje zaklepa brez vnosa sporočila.tsvn:logwidthmarkerse uporablja pri projektih, ki zahtevajo, da je sporočilo dnevniškega zapisa oblikovano tako, da imajo vrstice določeno največjo dolžino (tipično je ta dolžina 80 znakov) pred novo vrstico. Nastavitev vrednosti, različne od nič, ima dve posledici v oknu za vnos dnevniškega zapisa: nariše mejo največje dovoljene dolžine vrstice in onemogoči oblivanje besedila, tako da vidite, katere vrstice so predolge. Opomba: ta zmožnost pravilno deluje le, če je pisava, uporabljena za sporočila dnevniških zapisov, konstantne širine.tsvn:logtemplatese uporablja pri projektih, kjer je oblika sporočil dnevniških zapisov predpisana. Ta lastnosti vsebuje besedilo v več vrsticah, ki se vstavi v okno za vnos sporočila dnevniškega zapisa ob pričetku objave. Zapis nato uredite in vnesete zahtevane informacije. Opomba: če hkrati s to lastnostjo uporabljate tudi lastnosttsvn:logminsize, nastavite najmanjšo dolžino dnevniškega zapisa na vrednost, ki je večja od dolžine predloge, sicer določanje najmanjše velikosti zapisa nima več zaščitne vloge.There are also action specific templates which you can use instead of
tsvn:logtemplate. The action specific templates are used if set, buttsvn:logtemplatewill be used if no action specific template is set.The action specific templates are:
tsvn:logtemplatecommitis used for all commits from a working copy.tsvn:logtemplatebranchis used when you create a branch/tag, or when you copy files or folders directly in the repository browser.tsvn:logtemplateimportis used for imports.tsvn:logtemplatedeleteis used when deleting items directly in the repository browser.tsvn:logtemplatemoveis used when renaming or moving items in the repository browser.tsvn:logtemplatemkdiris used when creating directories in the repository browser.tsvn:logtemplatepropsetis used when modifying properties in the repository browser.tsvn:logtemplatelockis used when getting a lock.
Subversion allows you to set “autoprops” which will be applied to newly added or imported files, based on the file extension. This depends on every client having set appropriate autoprops in their Subversion configuration file.
tsvn:autopropscan be set on folders and these will be merged with the user's local autoprops when importing or adding files. The format is the same as for Subversion autoprops, e.g.*.sh = svn:eol-style=native;svn:executablesets two properties on files with the.shextension.Če pride do spora med krajevnimi samodejnimi lastnostmi in lastnostjo
tsvn:autoprops, se upoštevajo nastavitve projekta, ker so sprecifične za ta projekt.As of Subversion 1.8, you should use the property
svn:auto-propsinstead oftsvn:autopropssince this has the very same functionality but works with all svn clients and is not specific to TortoiseSVN.V oknu za objave lahko prilepite seznam spremenjenih datotek, vključno s stanjem vsake datoteke (dodano, spremenjeno...). Lastnost
tsvn:logfilelistenglishdoloča, ali se stanje vstavlja v angleškem jeziku ali v jeziku, ki ga uporabljate v programu TortoiseSVN. Če te lastnosti ne nastavite, se upošteva privzeta vrednosttrue, kar pomeni, da so podatki o stanju prilepljeni v angleškem jeziku.TortoiseSVN can use a spell checker. On Windows 10, the spell checker of the OS is used. On earlier Windows versions, it can use spell checker modules which are also used by OpenOffice and Mozilla. If you have those installed this property will determine which spell checker to use, i.e. in which language the log messages for your project should be written.
tsvn:projectlanguagesets the language module the spell checking engine should use when you enter a log message. You can find the values for your language on this page: MSDN: Language Identifiers.Vrednost lahko vnesete v desetiški obliki ali v šestnajstiški obliki - v tem primeru ji dodajte predpono
0x. Primer: za uporabo ameriške angleščine vnesite0x0409ali1033.Lastnost
tsvn:logsummaryse uporablja za izluščenje dela sporočila dnevniškega zapisa, ki se izpiše v dnevniku kot povzetek sporočila.Vrednost lastnosti
tsvn:logsummarymora biti enovrstični regularni izraz, ki vsebuje eno skupino. Rezultat te skupine se uporabi za povzetek.Primer:
\[SUMMARY\]:\s+(.*)najde vso besedilo, ki se nahaja za nizom “[SUMMARY]” in ga uporabi kot povzetek.The property
tsvn:logrevregexdefines a regular expression which matches references to revisions in a log message. This is used in the log dialog to turn such references into links which when clicked will either scroll to that revision (if the revision is already shown in the log dialog, or if it's available from the log cache) or open a new log dialog showing that revision.The regular expression must match the whole reference, not just the revision number. The revision number is extracted from the matched reference string automatically.
If this property is not set, a default regular expression is used to link revision references.
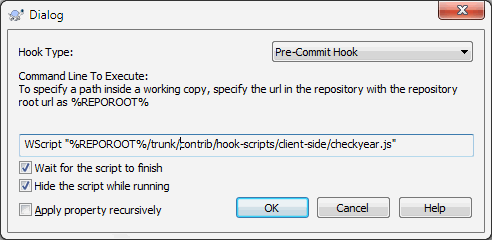
There are several properties available to configure client-side hook scripts. Each property is for one specific hook script type.
The available properties/hook-scripts are
- tsvn:startcommithook
- tsvn:precommithook
- tsvn:postcommithook
- tsvn:startupdatehook
- tsvn:preupdatehook
- tsvn:postupdatehook
- tsvn:prelockhook
- tsvn:postlockhook
The parameters are the same as if you would configure the hook scripts in the settings dialog. See “Ukazne datoteke akcij na strani odjemalca” for the details.
Since not every user has his or her working copy checked out at the same location with the same name, you can configure a script/tool to execute that resides in your working copy by specifying the URL in the repository instead, using
%REPOROOT%as the part of the URL to the repository root. For example, if your hook script is in your working copy undercontrib/hook-scripts/client-side/checkyear.js, you would specify the path to the script as%REPOROOT%/trunk/contrib/hook-scripts/client-side/checkyear.js. This way even if you move your repository to another server you do not have to adjust the hook script properties.Instead of
%REPOROOT%you can also specify%REPOROOT+%. The+is used to insert any number of folder paths necessary to find the script. This is useful if you want to specify your script so that if you create a branch the script is still found even though the url of the working copy is now different. Using the example above, you would specify the path to the script as%REPOROOT+%/contrib/hook-scripts/client-side/checkyear.js.The following screenshot shows how the script to check for current copyright years in source file headers is configured for TortoiseSVN.
Kadar želite dodati novo lastnost, jo lahko izberete iz seznama v spustnem polju ali pa vpišete poljubno ime lastnosti. Če na projektu uporabljate uporabniško določene lastnosti in želite, da se te lastnosti pojavijo v spustnem polju (v izogib tipkarskim napakam pri pisanju imena), lahko ustvarite seznam lastnih lastnosti z uporabo
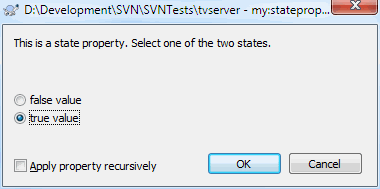
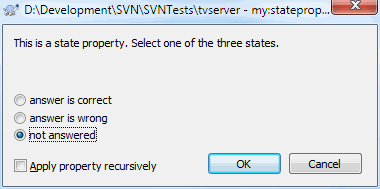
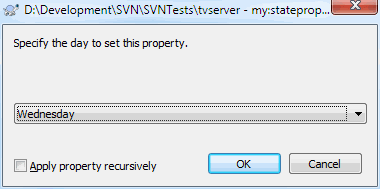
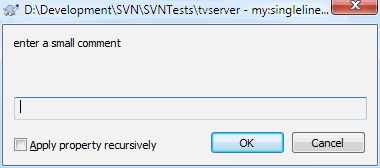
tsvn:userfilepropertiesintsvn:userdirproperties. Te lastnosti nastavite mapi. Ko boste urejali lastnosti kateregakoli elementa v tej mapi, se bodo lastne lastnosti pojavile na seznamu preddefiniranih imen.You can also specify whether a custom dialog is used to add/edit your property. TortoiseSVN offers four different dialog, depending on the type of your property.
- bool
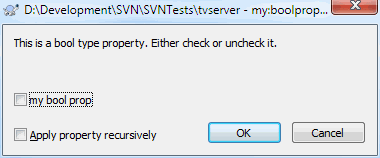
If your property can only have two states, e.g., true and false, then you can configure your property as a
booltype.
Specify your property like this:propertyname=bool;labeltext(YESVALUE;NOVALUE;Checkboxtext)the
labeltextis the text shown in the dialog above the checkbox where you can explain the purpose and use of the property. The other parameters should be self explanatory.- state
If your property represents one of many possible states, e.g.,
yes, no, maybe, then you can configure your property as astate
property like this:propertyname=state;labeltext(DEFVAL;VAL1;TEXT1;VAL2;TEXT2;VAL3;TEXT3;...)The parameters are the same as for the
boolproperty, withDEFVALbeing the default value to be used if the property isn't set yet or has a value that's not configured.For up to three different values, the dialog shows up to three radio buttons. If there are more values configured, it uses a combo box from where the user can select the required state.
- singleline
For properties that consist of one line of text, use the
singlelineproperty type:propertyname=singleline;labeltext(regex)the
regexspecifies a regular expression which is used to validate (match) the text the user entered. If the text does not match the regex, then the user is shown an error and the property isn't set.- multiline
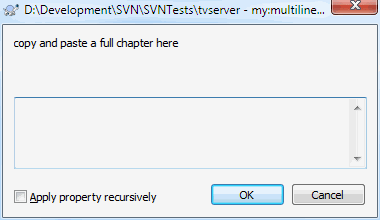
For properties that consist of multiple lines of text, use the
multilineproperty type:propertyname=multiline;labeltext(regex)the
regexspecifies a regular expression which is used to validate (match) the text the user entered. Don't forget to include the newline (\n) character in the regex!
The screenshots above were made with the following
tsvn:userdirproperties:my:boolprop=bool;This is a bool type property. Either check or uncheck it.(true;false;my bool prop) my:stateprop1=state;This is a state property. Select one of the two states.(true;true;true value;false;false value) my:stateprop2=state;This is a state property. Select one of the three states.(maybe;true;answer is correct;false;answer is wrong;maybe;not answered) my:stateprop3=state;Specify the day to set this property.(1;1;Monday;2;Tuesday;3;Wednesday;4;Thursday;5;Friday;6;Saturday;7;Sunday) my:singlelineprop=singleline;enter a small comment(.*) my:multilineprop=multiline;copy and paste a full chapter here(.*)
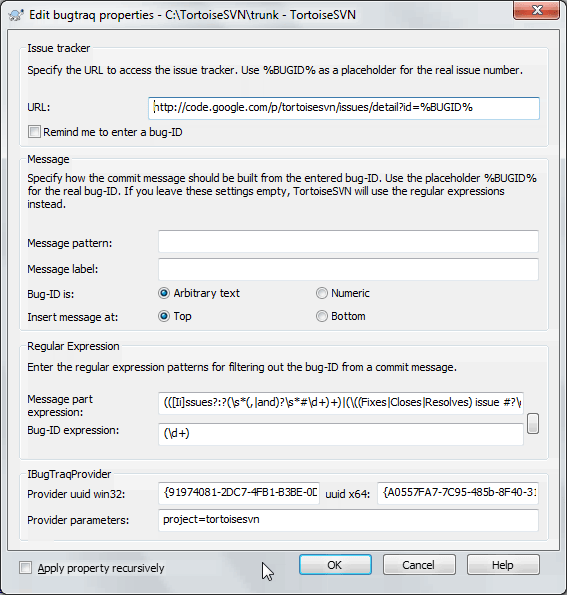
TortoiseSVN zna vključiti nekatera orodja za sledenje zadev. Za to se uporabljajo lastnosti, ki se začnejo z bugtraq:. Za več informacij preberite “Integracija s sistemi za sledenje zadev”.
Vključi lahko tudi nekatera spletna orodja za brskanje po skladiščih. Za to uporablja lastnosti, ki se začnejo z webviewer:. Za več informacij preberite “Integracija z internetno naravnanimi pregledovalniki skladišč”.
Nastavite projektne lastnosti na mapah
These special project properties must be set on folders for the system to work. When you use a TortoiseSVN command which uses these properties, the properties are read from the folder you clicked on. If the properties are not found there, TortoiseSVN will search upwards through the folder tree to find them until it comes to an unversioned folder, or the tree root (e.g. C:\) is found. If you can be sure that each user checks out only from e.g trunk/ and not some sub-folder, then it is sufficient to set the properties on trunk/. If you can't be sure, you should set the properties recursively on each sub-folder. If you set the same property but you use different values at different depths in your project hierarchy then you will get different results depending on where you click in the folder structure.
For project properties only, i.e. tsvn:, bugtraq: and webviewer: you can use the Recursive checkbox to set the property to all sub-folders in the hierarchy, without also setting it on all files.
When you add new sub-folders to a working copy using TortoiseSVN, any project properties present in the parent folder will automatically be added to the new child folder too.
Limitations Using the Repository Browser
Fetching properties remotely is a slow operation, so some of the features described above will not work in the repository browser as they do in a working copy.
When you add a property using the repo browser, only the standard
svn:properties are offered in the pre-defined list. Any other property name must be entered manually.Properties cannot be set or deleted recursively using the repo browser.
Project properties will not be propagated automatically when a child folder is added using the repo browser.
tsvn:autopropswill not set properties on files which are added using the repo browser.
Opozorilo
Čeprav so projektne lastnosti TortoiseSVN zelo uporabne, delujejo le z odjemalcem TortoiseSVN, nekatere celo samo z novejšimi različicami TortoiseSVN. Če uporabniki na vašem projektu uporabljajo različne odjemalce za Subversion ali pa starejše različice TortoiseSVN, raje uporabite skripte akcij v skladišču za zagotavljanje spoštovanja pravil. Lastnosti tsvn: vam le pomagajo nastaviti pravila, ne morejo pa jih zagotavljati.
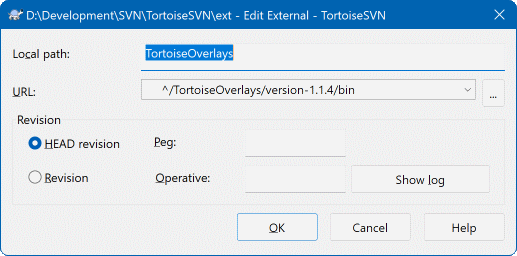
Some properties have to use specific values, or be formatted in a specific way in order to be used for automation. To help get the formatting correct, TortoiseSVN presents edit dialogs for some particular properties which show the possible values or break the property into its individual components.
The svn:externals property can be used to pull in other projects from the same repository or a completely different repository as described in “External Items”.
You need to define the name of the sub-folder that the external folder is checked out as, and the Subversion URL of the external item. You can check out an external at its HEAD revision, so when the external item changes in the repository, your working copy will receive those changes on update. However, if you want the external to reference a particular stable point then you can specify the specific revision to use. IN this case you may also want to specify the same revision as a peg revision. If the external item is renamed at some point in the future then Subversion will not be able to update this item in your working copy. By specifying a peg revision you tell Subversion to look for an item that had that name at the peg revision rather than at HEAD.
The button fetches the HEAD revision of every external URL and shows that HEAD revision in the rightmost column. After the HEAD revision is known, a simple right click on an external gives you the command to peg the selected externals to their explicit HEAD revision. In case the HEAD revision is not known yet, the right click command will fetch the HEAD revision first.
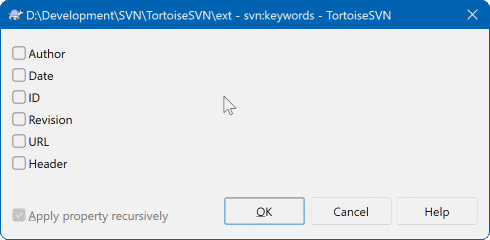
Select the keywords that you would like to be expanded in your file.
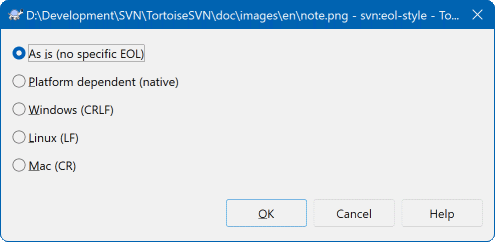
Select the end-of-line style that you wish to use and TortoiseSVN will use the correct property value.
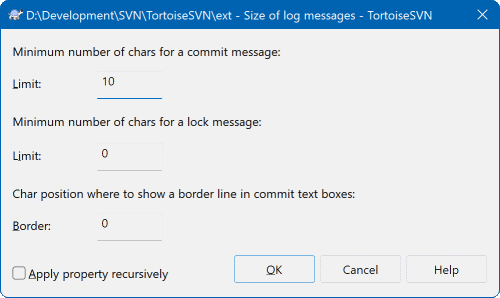
These 3 properties control the formatting of log messages. The first 2 disable the in the commit or lock dialogs until the message meets the minimum length. The border position shows a marker at the given column width as a guide for projects which have width limits on their log messages. Setting a value to zero will delete the property.
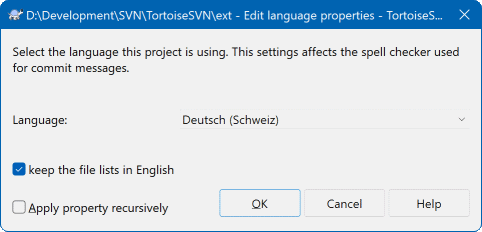
Choose the language to use for spell-checking log messages in the commit dialog. The file lists checkbox comes into effect when you right click in the log message pane and select Paste file list. By default the Subversion status will be shown in your local language. When this box is checked the status is always given in English, for projects which require English-only log messages.
This property simply controls whether a file will be checked out as read-only if there is no lock held for it in the working copy.
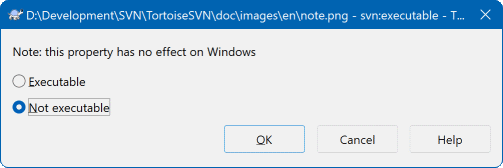
This property controls whether a file will be given executable status when checked out on a Unix/Linux system. It has no effect on a Windows checkout.
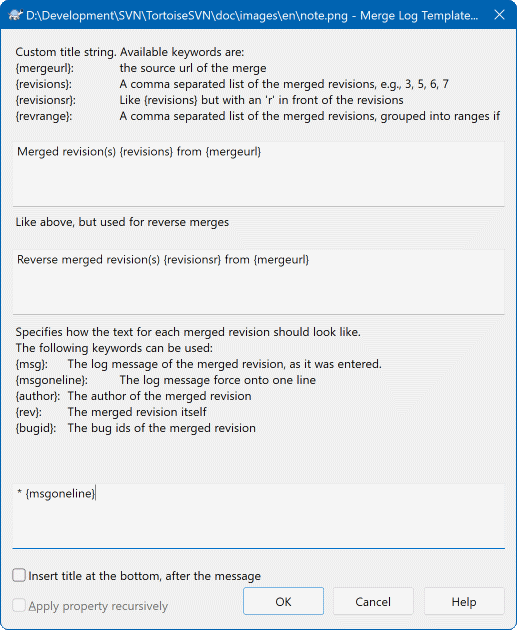
Whenever revisions are merged into a working copy, TortoiseSVN generates a log message from all the merged revisions. Those are then available from the button in the commit dialog.
You can customize that generated message with the following properties:
- tsvn:mergelogtemplatetitle, tsvn:mergelogtemplatereversetitle
This property specifies the first part of the generated log message. The following keywords can be used:
- {revisions}
A comma separated list of the merged revisions, e.g.,
3, 5, 6, 7- {revisionsr}
Like
{revisions}, but with each revision preceded with anr, e.g.,r3, r5, r6, r7- {revrange}
A comma separated list of the merged revisions, grouped into ranges if possible, e.g.,
3, 5-7- {mergeurl}
The source URL of the merge, i.e., where the revisions are merged from.
The default value for this string is
Merged revision(s) {revrange} from {mergeurl}:with a newline at the end.- tsvn:mergelogtemplatemsg
This property specifies how the text for each merged revision should look like. The following keywords can be used:
- {msg}
The log message of the merged revision, as it was entered.
- {msgoneline}
Like
{msg}, but all newlines are replaced with a space, so that the whole log message appears on one single line.- {author}
The author of the merged revision.
- {rev}
The merged revision itself.
- {bugids}
The bug IDs of the merged revision, if there are any.
- tsvn:mergelogtemplatemsgtitlebottom
This property specifies the position of the title string specified with the
tsvn:mergelogtemplatetitleortsvn:mergelogtemplatereversetitle. If the property is set toyesortrue, then the title string is appended at the bottom instead of the top.
Pomembno
This only works if the merged revisions are already in the log cache. If you have disabled the log cache or not shown the log first before the merge, the generated message won't contain any information about the merged revisions.
