Si vous importez des éléments dans un dépôt contenant déjà des projets, alors la structure du dépôt aura déjà été décidée. Si vous importez des éléments dans un nouveau dépôt alors il est temps de penser à la manière de l'organiser. Lisez la section intitulée « Disposition du dépôt » pour avoir des conseils.
Cette section décrit la commande Importer de Subversion, qui a été conçue pour importer la hiérarchie d'un dossier dans le dépôt d'un seul coup. Même si ça fait le boulot, cela a plusieurs défauts :
Il n'y a aucun moyen de sélectionner des éléments à inclure, à part en utilisant le filtre global des fichiers à ignorer.
Le répertoire importé ne devient pas une copie de travail. Vous devez faire une extraction pour en avoir une directement du serveur.
Il est aisé de se tromper de répertoire à importer dans le dépôt.
Pour ces raisons nous vous recommandons de ne pas utiliser du tout la commande Importer, mais plutôt de suivre la méthode en 2 étapes décrite dans la section intitulée « Importer en place », sauf si vous faites la simple étape de création de la structure initiale /trunk /tags /branches dans votre dépôt. Puisque vous êtes là, voici comment l'import basique fonctionne...
Avant que vous n'importiez votre projet dans un dépôt, vous devriez :
Supprimer tous les fichiers qui ne sont pas nécessaires pour générer le projet (fichiers temporaires, fichiers produits par un compilateur, par exemple *.obj, binaires compilés...)
Organiser les fichiers en dossiers et sous-dossiers. Bien qu'il soit possible de renommer/déplacer les fichiers plus tard, il est fortement recommandé de clarifier la structure de votre projet avant l'importation !
Choisissez maintenant le dossier de niveau supérieur de votre structure de répertoire de projet dans l'explorateur Windows et faites un clic droit pour ouvrir le menu contextuel. Choisissez la commande → qui fait s'afficher une boîte de dialogue :
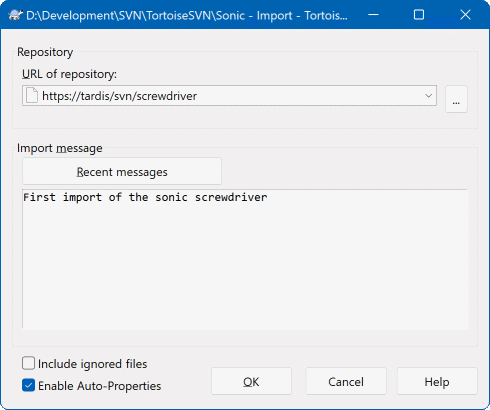
Dans cette boîte de dialogue, vous devez saisir l'URL du dépôt dans lequel vous voulez importer votre projet. Il est très important de comprendre que le répertoire local que vous importez n'apparaît pas lui-même dans le dépôt, mais juste son contenu. Par exemple, si vous avez la structure suivante :
C:\Projects\Widget\source
C:\Projects\Widget\doc
C:\Projects\Widget\images
et que vous importez C:\Projects\Widget dans http://monnomdedomaine.com/svn/trunk, alors vous pourriez être surpris de voir que vos sous-répertoires iront directement sous trunk au lieu d'être dans un sous-répertoire Widget. Vous devez spécifier le sous-répertoire comme faisant partie de l'URL, http://monnomdedomaine.com/svn/trunk/Widget-X. Remarquez que la commande Importer créera automatiquement les sous-répertoires dans le dépôt s'ils n'existent pas.
Le message d'importation est utilisé comme commentaire.
Par défaut, les fichiers et les dossiers qui correspondent au filtre d'exclusion ne sont pas importés. Pour ignorer ce comportement, vous pouvez utiliser la case à cocher Inclure les fichiers ignorés. Référez-vous à la section intitulée « Configuration générale » pour plus d'informations sur la configuration d'un filtre d'exclusion.
Dès que vous appuyez sur TortoiseSVN importe dans le dépôt l'arborescence complète des répertoires, fichiers compris. Le projet est maintenant sous contrôle de version dans le dépôt. Veuillez noter que le dossier que vous avez importé n'est PAS sous contrôle de version ! Pour obtenir une copie de travail sous contrôle de version, vous devez faire une extraction de la version que vous venez d'importer. Ou vous renseigner sur la manière d'importer un répertoire déjà en place.
Si vous disposez déjà d'un dépôt, et que vous souhaitez y ajouter une nouvelle arborescence, suivez les étapes suivantes :
Utilisez l'explorateur de dépôt pour créer un nouveau dossier de projet directement dans le dépôt. Si vous utilisez une des dispositions standard, vous voudrez probablement le créer comme un sous-dossier de trunk, plutôt qu'à la racine du dépôt. L'explorateur de dépôt montre la structure du dépôt juste comme l'explorateur Windows, afin que vous puissiez voir comment les choses sont organisées.
Extrayez le nouveau répertoire par-dessus le répertoire que vous voulez importer. Un message d'avertissement va s'afficher, indiquant que le répertoire local n'est pas vide. Ignorez l'avertissement. Vous disposez maintenant d'un répertoire de plus haut niveau versionné, dont le contenu n'est pas versionné.
Sélectionnez → sur le répertoire sous contrôle de version pour ajouter un ou des éléments. Vous pouvez ajouter ou supprimer des fichiers, activer les propriétés
svn:ignoresur les répertoires et faire toutes les modifications dont vous avez besoin.Livrez le répertoire de plus haut niveau, et vous aurez une nouvelle arborescence versionnée, et une copie de travail locale, créée depuis votre répertoire existant.
Parfois vous avez besoin d'avoir sous contrôle de version un fichier qui contient des données spécifiques aux utilisateurs. Cela signifie que vous avez un fichier que chaque développeur/utilisateur doit adapter à son paramétrage local. Mais versionner un tel fichier est difficile car chaque utilisateur livrerait son propre fichier à chaque fois.
Dans de tels cas nous suggérons d'utiliser des fichiers templates. Vous créez un fichier qui contient toutes les données dont vos développeurs auront besoin, ajoutez ce fichier au contrôle de version et laissez les développeurs extraire ce fichier. Alors, chaque développeur doit faire une copie de ce fichier et la renommer. Après cela, modifier la copie n'est plus un problème.
À titre d'exemple, vous pouvez regarder le script de build de TortoiseSVN. Il appelle un fichier nommé default.build.user qui n'existe pas dans le dépôt. Seul le fichier default.build.user.tmpl existe. default.build.user.tmpl est le fichier modèle, dont chaque développeur doit créer une copie et renommer cette copie en default.build.user. À l'intérieur de ce fichier, nous avons ajouté des commentaires pour que les utilisateurs voient quelles sont les lignes qu'ils doivent éditer et modifier selon leur paramétrage local pour qu'il fonctionne.
Afin de ne pas déranger les utilisateurs, nous avons aussi ajouté le fichier default.build.user à la liste des fichiers ignorés de son répertoire parent, c'est-à-dire que nous avons positionné la propriété Subversion svn:ignore pour inclure ce nom de fichier. De cette façon, il n'apparaîtra pas comme non versionné à chaque livraison.